9a. Group Project - Embedded Programming
Week 8 - 3/16/22
This week’s group project was to investigage different types of embedded programming systems and architectures.
What we have been using.
We first started with the electronics design of the SAMD11C14 chip in order to create our programmers.
We’ve been using the SAMD11C14 to make the programmers, but also for our own circuits. But with this, we’ve only been using the Arduino IDE for programming purposes so far.
Then we started using the Attiny412’s to create simple “blink” boards.
This system is well documented on different individual websites, but we felt it best to include since this and the ATTiny412 are the systems that we’ve used so far during the FabAcademy.
What we experimented with this week.
PIC Chips
Denny has a lot of experience working with PIC chips, and so that was one of the microprocessor architectures we looked at.
Introduction to the Microchip PIC®:
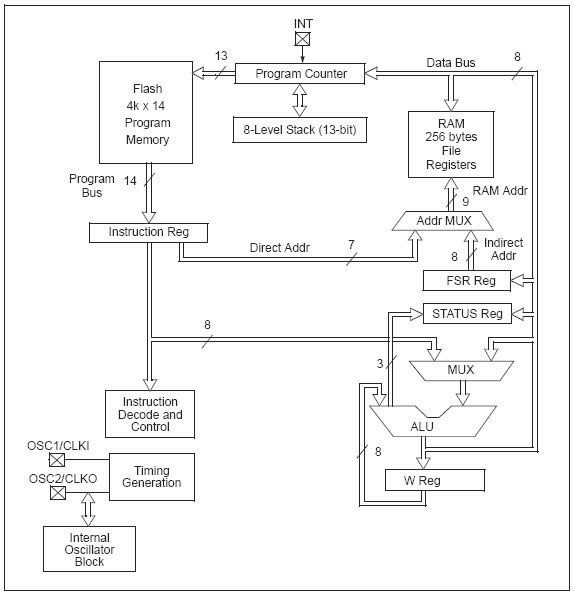
All processors have several similar components: - Arithmetic Logical Unit ( ALU) – where the calculations are made - Memory – Program and data are stored here - Registers – Short term storage of results and data - Input / Output ( I/O ) - How data is taken in and put out - Buses – The wires and logic used to transfer data around - Execution Logic - The control logic to synchronize the execution of instructions
Figure 1. Simplified PIC® Block Diagram
Processor Instruction Types:
CISC: Complex Instruction Set Computer - Microprocessor: Many instructions, like multiply, divide, floating point processor, etc.
RISC: Reduced Instruction Set Computer - Microcontroller: Small opcode, with very minimal instructions, but executed very fast.
Processor Architectures:
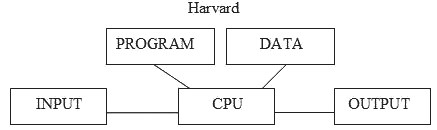
There are two types of processor architecture in general, the Harvard and the Von Neumann.
Harvard Architecture:
In a Harvard Architecture machine, the computer system’s memory is separated into two discrete parts: data and instructions. In a pure Harvard system, the two different memories occupy separate memory modules, and instructions can only be executed from the instruction memory.
Von Neumann Architecture:
John Von Neumann suggested that data and programs should be stored together in memory, it is now called Von Neumann architecture. Programs are fetched from memory for executions by a central unit that is what we call the CPU. Basically programs and data are represented on memory in the same way. The program is just data coded for special meaning.

- Which type does a Laptop use? Von Neumann
- Which does the PIC® microcontroller use? Harvard
- There is no Input or Output shown in Figure 1. Where would those blocks go in this figure? Along the 8 bit Data Bus
- What is the difference between a microprocessor and a micro-controller?
- Microprocessor: All Memory and peripheral devices are off-chip
- Microcontroller: Everything is contained on-chip, so it is basically a computer on a chip.
PIC® Data Storage
-
Program Memory: The program is stored in the Flash Program Memory. It is 14 bits wide. The technology is similar to the USB flash drives and can be read and written to by the program.
-
Data RAM: The data is stored in the RAM File Registers. It is 8 bits wide and is volatile. If power is removed that information is lost!
-
EEPROM Data: If you need to save information between power interruptions there is EEPROM data storage available. It is read and written to similar to the method for the Flash Program Memory. It must be written in 4 byte blocks.
PIC® Registers
There are several special registers used in the PIC® architecture. (Reference Figure 1) - Status Reg: Holds status results from arithmetic and Logical operations. * Z: Zero bit. Set to a 1 if the result is zero. * C: Carry/Not-borrow bit. Set to a 1 if a carry-out happened from the MSB. Inverts for subtraction. * DC: Digit Carry/ Not-borrow bit. Similar to the C bit, but from the 4th bit of the results. * Also holds information about the processor status, and includes the following: * RP1:RP0: Register Bank Select bits. (used for file register bank addressing)
-
FSR Reg: Used to address the RAM File Special Registers.
-
W Reg: Work register, holds data results from the arithmetic or logical operation.
-
Program Counter: A 13 bit register that holds the pointer to where we are currently executing in the Program Memory.
-
OPTION_REG: This option register sets up information about Pullups, interrupt edge select, Timer clock sources, and Prescalers. (we will study this register in detail in the future)
-
Reset Vector: Not an actual register but a fixed setting of the Program Counter = 0000h, when a chip reset occurs.
-
Interrupt Vector: When an interrupt occurs, the Program Counter is set to 0004h.
-
Level Stack: When an interrupt or subroutine is invoked the current Program Counter is pushed on to the stack. It is a LIFO stack, only 8 levels deep. So you must be careful when calling subroutines along with the possibility of an interrupt.
-
I/O ports: Registers sampling inputs or holding output data. Outputs in general can be several types:
- Active pull-up: Has internal transistor pulling it high, when active 1.
- Open Collector (or drain): No active or passive pullup.
- Tristate: Active High = 1, Active Low = 0, Inactive = floating, Hi-Z or off.
-
Resistor weak pull-up: An internal high resistance FET (5 to 10kohm) pullup.
-
ALU: Arithmetic Logic Unit. Not really a register, but an array of logic to perform the requested calculation, whether arithmetic or logical.
-
Instruction Decode and Control: This logic sequences all the above registers to perform the instruction that is specified in the program.
The PIC® family of processors ranges from small 6 pin devices to 80 pin monsters. The devices cover the PIC10F to PIC18F and up through the PIC24F and the PIC32F a 32 bit controller, but still uses the same 35 basic instructions. In the high end 32 bit controllers where speed is critical, pipelining is used with an instruction pre-fetch cache.
Raspberry Pi 3b and 4 and Pi Zero.
While it would be difficult to immediately classify the Raspberry Pi line as the same thing as a microcontroller, I would argue that modern microcontrollers are becoming more like computers, as Systems on a Chip, and the Raspberry Pi computer is becoming more like the arduinio style system (hardware and software, with robust community support). And this becomes even more so when you take into account the Raspberry Pi Zero (and we’re interested in the Pi Pico, but haven’t had a chance to play with one yet.)
We’ve also used these before in the FabAcademy. Garrett used them to help program his SAMD11C board programmers.
For the Raspberry Pi’s, we used a Raspberry Pi 3b and a Raspberry Pi 4.
Since the Raspberry Pi is a fully capable computer, even capable of running a stripped down version of Windows, it’s capable of running just about any software and programming languages that are supported by Linux.
We choose to use Python, as we have the most expereince with it.
Setting up Python on a Raspberry Pi.
Installing Python is a rather simple thing on Raspbian OS (or whatever it’s now called.)
Give the below command, and Python should be installed automatically. “Sudo” is giving the installation super user privileges so that it can install the software. “Apt” is the program that helps install software such as python, and of course the “install” is telling “apt” what to install. In this case Python 3. (Because Python version 2 and version 3 have some key differences and are no longer exactly backwards compatible. It’s complicated.)
sudo apt install python3
Raspberry Pi has a number of IDE’s for python installed, and there are ton of other one’s out there. But I’m old school, I’m okay with just using a text editor. I’ll be using “nano”
This program is going to deal with images. As such we need to install a library that will make it easy to work with images in python.
We’ll be using the newer version of the Python Image Library, now called Pillow.
pip install pillow
Let’s start coding. I’m going to be following a tutorial from: https://www.youtube.com/watch?v=v_raWlX7tZY
Open a new text file.
nano artsy.py
Then I’m going to add the library we’ll be using to do much of the work for us, the Python Image Library (PIL)
import PIL.image
Then we need to tell the program what it’s first going to do, it’s “main” code.
def main():
And then we start the code. Note, that whitespace, spaces and tabs, are incredibly important in Python. This isn’t a Python tutorial, but I just wanted to point it out.
and to copy the def main, and the code:
import PIL.image

def main():
   path = input("Enter a picture file:\n")  # path to image
   try:
      image = PIL.Image.open(path)   # open the image with the path we got from above
   except:
      print(path, " is not a valid pathname, file or image.")
But we also need other parts pf the program to do some work.
One will tell the computer what “pixels” to use.
##ascii characters greyscale
ASCII_CHARS - ["@", "#", "S", "%", "?", "*", "+", ";", ":", ",", "."]
One will tell the computer to resize the images for the screen.
# resize image according to new width
def resize_image(image, new_width=100):
   width, height = image.size
   rato - height / width
   new_height = int(new_width * ratio)
   resized_image = image.resize((new_width, new_height))
   return(resized_image)
One will covert each pixel to gray scale
# turn the image into greyscale
def grayify(image):
   grayscale_image = image.convert("L")
   return(grayscale_image)
and finally, the last will convert the pixels into ASCII characters.
# Convert pixels to a string of ASCII Characters
def pixels_to_ascii(image):
   pixels = image.getdata()
   characters = "".join([SCII_CHARS[pixel//25] for pixel in pixels])
   return(characters)
Then we print the file, and if you want, you can save the file.
The entire code:
import PIL
from PIL import Image

# ascii characters we'll be  using
ASCII_CHARS = ["@", "#", "S", "%", "?", "*", "+", ";", ":", ",", "."]

# resize image according to new width
def resize_image(image, new_width=80):
   width, height = image.size
   ratio = height / width
   new_height = int(new_width * ratio)
   resized_image = image.resize((new_width, new_height))
   return(resized_image)

# turn the image into greyscale
def grayify(image):
   grayscale_image = image.convert("L")
   return(grayscale_image)

# Convert pixels to a string of ASCII Characters
def pixels_to_ascii(image):
   pixels = image.getdata()
   characters = "".join([ASCII_CHARS[pixel//25] for pixel in pixels])
   return(characters)


def main(new_width=80):
   path = input("Enter a picture file:\n")  # path to image
   try:
      image = PIL.Image.open(path)  # open the image with the path we got from >
   except:
      print(path, " is not a valid pathname, file or image.")

   # Convert image to ASCII
   new_image_data = pixels_to_ascii(grayify(resize_image(image)))

   #format
   pixel_count = len(new_image_data)
   ascii_image = "\n".join(new_image_data[i:(i+new_width)] for i in range(0, pi>

   # Print
   print(ascii_image)

   # save image
   with open("ascii_image.txt","w") as f:
      f.write(ascii_image)

main()
Which if we’re using just a simple blue circle image as input, spit out this:
