12. Input Devices
This week is for inputs. I’m going with something simple first, then hopefully work up to something a bit more difficult, at least for me.
My inputs for this week are buttons. Simple, yeah, but for my project, I need to create a keyboard that corresponds with the Neopixels from Outputs week. Again, this means a 2x2 grid of buttons to create a simple keyboard. Once I get that going, the goal is to try out a proximity sensor.
First though, I need to get the colors to change with the button. I found this Button Cycler on Adafruit’s Github, so that should be a good place to start.
Button Cycle Code
// Simple demonstration on using an input device to trigger changes on your
// NeoPixels. Wire a momentary push button to connect from ground to a
// digital IO pin. When the button is pressed it will change to a new pixel
// animation. Initial state has all pixels off -- press the button once to
// start the first animation. As written, the button does not interrupt an
// animation in-progress, it works only when idle.

#include <Adafruit_NeoPixel.h>
#ifdef __AVR__
 #include <avr/power.h> // Required for 16 MHz Adafruit Trinket
#endif

// Digital IO pin connected to the button. This will be driven with a
// pull-up resistor so the switch pulls the pin to ground momentarily.
// On a high -> low transition the button press logic will execute.
#define BUTTON_PIN   2

#define PIXEL_PIN    6  // Digital IO pin connected to the NeoPixels.

#define PIXEL_COUNT 16  // Number of NeoPixels

// Declare our NeoPixel strip object:
Adafruit_NeoPixel strip(PIXEL_COUNT, PIXEL_PIN, NEO_GRB + NEO_KHZ800);
// Argument 1 = Number of pixels in NeoPixel strip
// Argument 2 = Arduino pin number (most are valid)
// Argument 3 = Pixel type flags, add together as needed:
//   NEO_KHZ800  800 KHz bitstream (most NeoPixel products w/WS2812 LEDs)
//   NEO_KHZ400  400 KHz (classic 'v1' (not v2) FLORA pixels, WS2811 drivers)
//   NEO_GRB     Pixels are wired for GRB bitstream (most NeoPixel products)
//   NEO_RGB     Pixels are wired for RGB bitstream (v1 FLORA pixels, not v2)
//   NEO_RGBW    Pixels are wired for RGBW bitstream (NeoPixel RGBW products)

boolean oldState = HIGH;
int     mode     = 0;    // Currently-active animation mode, 0-9

void setup() {
  pinMode(BUTTON_PIN, INPUT_PULLUP);
  strip.begin(); // Initialize NeoPixel strip object (REQUIRED)
  strip.show();  // Initialize all pixels to 'off'
}

void loop() {
  // Get current button state.
  boolean newState = digitalRead(BUTTON_PIN);

  // Check if state changed from high to low (button press).
  if((newState == LOW) && (oldState == HIGH)) {
    // Short delay to debounce button.
    delay(20);
    // Check if button is still low after debounce.
    newState = digitalRead(BUTTON_PIN);
    if(newState == LOW) {      // Yes, still low
      if(++mode > 8) mode = 0; // Advance to next mode, wrap around after #8
      switch(mode) {           // Start the new animation...
        case 0:
          colorWipe(strip.Color(  0,   0,   0), 50);    // Black/off
          break;
        case 1:
          colorWipe(strip.Color(255,   0,   0), 50);    // Red
          break;
        case 2:
          colorWipe(strip.Color(  0, 255,   0), 50);    // Green
          break;
        case 3:
          colorWipe(strip.Color(  0,   0, 255), 50);    // Blue
          break;
        case 4:
          theaterChase(strip.Color(127, 127, 127), 50); // White
          break;
        case 5:
          theaterChase(strip.Color(127,   0,   0), 50); // Red
          break;
        case 6:
          theaterChase(strip.Color(  0,   0, 127), 50); // Blue
          break;
        case 7:
          rainbow(10);
          break;
        case 8:
          theaterChaseRainbow(50);
          break;
      }
    }
  }

  // Set the last-read button state to the old state.
  oldState = newState;
}

// Fill strip pixels one after another with a color. Strip is NOT cleared
// first; anything there will be covered pixel by pixel. Pass in color
// (as a single 'packed' 32-bit value, which you can get by calling
// strip.Color(red, green, blue) as shown in the loop() function above),
// and a delay time (in milliseconds) between pixels.
void colorWipe(uint32_t color, int wait) {
  for(int i=0; i<strip.numPixels(); i++) { // For each pixel in strip...
    strip.setPixelColor(i, color);         //  Set pixel's color (in RAM)
    strip.show();                          //  Update strip to match
    delay(wait);                           //  Pause for a moment
  }
}

// Theater-marquee-style chasing lights. Pass in a color (32-bit value,
// a la strip.Color(r,g,b) as mentioned above), and a delay time (in ms)
// between frames.
void theaterChase(uint32_t color, int wait) {
  for(int a=0; a<10; a++) {  // Repeat 10 times...
    for(int b=0; b<3; b++) { //  'b' counts from 0 to 2...
      strip.clear();         //   Set all pixels in RAM to 0 (off)
      // 'c' counts up from 'b' to end of strip in steps of 3...
      for(int c=b; c<strip.numPixels(); c += 3) {
        strip.setPixelColor(c, color); // Set pixel 'c' to value 'color'
      }
      strip.show(); // Update strip with new contents
      delay(wait);  // Pause for a moment
    }
  }
}

// Rainbow cycle along whole strip. Pass delay time (in ms) between frames.
void rainbow(int wait) {
  // Hue of first pixel runs 3 complete loops through the color wheel.
  // Color wheel has a range of 65536 but it's OK if we roll over, so
  // just count from 0 to 3*65536. Adding 256 to firstPixelHue each time
  // means we'll make 3*65536/256 = 768 passes through this outer loop:
  for(long firstPixelHue = 0; firstPixelHue < 3*65536; firstPixelHue += 256) {
    for(int i=0; i<strip.numPixels(); i++) { // For each pixel in strip...
      // Offset pixel hue by an amount to make one full revolution of the
      // color wheel (range of 65536) along the length of the strip
      // (strip.numPixels() steps):
      int pixelHue = firstPixelHue + (i * 65536L / strip.numPixels());
      // strip.ColorHSV() can take 1 or 3 arguments: a hue (0 to 65535) or
      // optionally add saturation and value (brightness) (each 0 to 255).
      // Here we're using just the single-argument hue variant. The result
      // is passed through strip.gamma32() to provide 'truer' colors
      // before assigning to each pixel:
      strip.setPixelColor(i, strip.gamma32(strip.ColorHSV(pixelHue)));
    }
    strip.show(); // Update strip with new contents
    delay(wait);  // Pause for a moment
  }
}

// Rainbow-enhanced theater marquee. Pass delay time (in ms) between frames.
void theaterChaseRainbow(int wait) {
  int firstPixelHue = 0;     // First pixel starts at red (hue 0)
  for(int a=0; a<30; a++) {  // Repeat 30 times...
    for(int b=0; b<3; b++) { //  'b' counts from 0 to 2...
      strip.clear();         //   Set all pixels in RAM to 0 (off)
      // 'c' counts up from 'b' to end of strip in increments of 3...
      for(int c=b; c<strip.numPixels(); c += 3) {
        // hue of pixel 'c' is offset by an amount to make one full
        // revolution of the color wheel (range 65536) along the length
        // of the strip (strip.numPixels() steps):
        int      hue   = firstPixelHue + c * 65536L / strip.numPixels();
        uint32_t color = strip.gamma32(strip.ColorHSV(hue)); // hue -> RGB
        strip.setPixelColor(c, color); // Set pixel 'c' to value 'color'
      }
      strip.show();                // Update strip with new contents
      delay(wait);                 // Pause for a moment
      firstPixelHue += 65536 / 90; // One cycle of color wheel over 90 frames
    }
  }
}
So right off the bat, it’s clear that this is a way more complicated code that what I started with. This code uses 16 NeoPixels in strip which are then coded to create the multiple effects listed in the code.
I don’t need all of the fancy effects, but I do need the basic concept of pushing the button and progressing to the next color. Luckily, Adam had some rare free time, and sat down with me to figure out the best method to do exactly that.
My Frankenstein’s Monster Code
After looking at the code for all of a few minutes, Adam suggested starting from scratch with a much more simple method. We could pull elements from other programs to get the effect we wanted. Thus we ended up with the amalgamation below.
#include <tinyNeoPixel.h>
#ifdef __AVR__
#include <avr/power.h> // Required for 16 MHz Adafruit Trinket
#endif

// Digital IO pin connected to the button. This will be driven with a
// pull-up resistor so the switch pulls the pin to ground momentarily.
// On a high -> low transition the button press logic will execute.
#define BUTTON_PIN   1

#define PIXEL_PIN    4  // Digital IO pin connected to the NeoPixels.

#define PIXEL_COUNT 1  // Number of NeoPixels

// Declare our NeoPixel strip object:
tinyNeoPixel strip(PIXEL_COUNT, PIXEL_PIN, NEO_GRB + NEO_KHZ800);

boolean lastState = HIGH;
int redArray[7] = {153, 0, 102, 102, 0, 204, 255};
int greenArray[7] = {153, 102, 0, 0, 153, 102, 255};
int blueArray[7] = {255, 0, 0, 51, 153, 0, 255};
int index = 0;

#include <ezButton.h>

ezButton button(1);  // create ezButton object that attach to pin 7;

void setup() {
  pinMode(BUTTON_PIN, INPUT_PULLUP);
  strip.begin(); // Initialize NeoPixel strip object (REQUIRED)
  strip.clear();  // Initialize all pixels to 'off'
strip.setBrightness(85); // about 1/3 brightness
  strip.setPixelColor(0,strip.Color(153, 153, 255)); //starting color
  strip.show();

    button.setDebounceTime(150); // set debounce time to 100 milliseconds

}

void loop() {

  // Get current button state.
button.loop(); // MUST call the loop() function first

  int btnState = button.getState();
  // Check if state changed from high to low (button press).
  if (lastState == HIGH &&(btnState == LOW) ) {
    // Short delay to debounce button.
    delay(20);

      index++;
      if (index > 6) index = 0;

      strip.setPixelColor(0,strip.Color(redArray[index], greenArray[index], blueArray[index]));
      strip.show();


  }// end if low
 // save the the last state
  lastState = btnState;
}//end loop
So What Does it Do?
Like the title suggests, this was a mish-mash of code from various sources to create a working program.
First of all, Adam suggested that instead of setting every option, I use an array, or collection of information that would then increment the index one by one through the set. The concept seemed simple enough.
The first thing we took was the button checking portion of the button cycler, which checks for debounce.
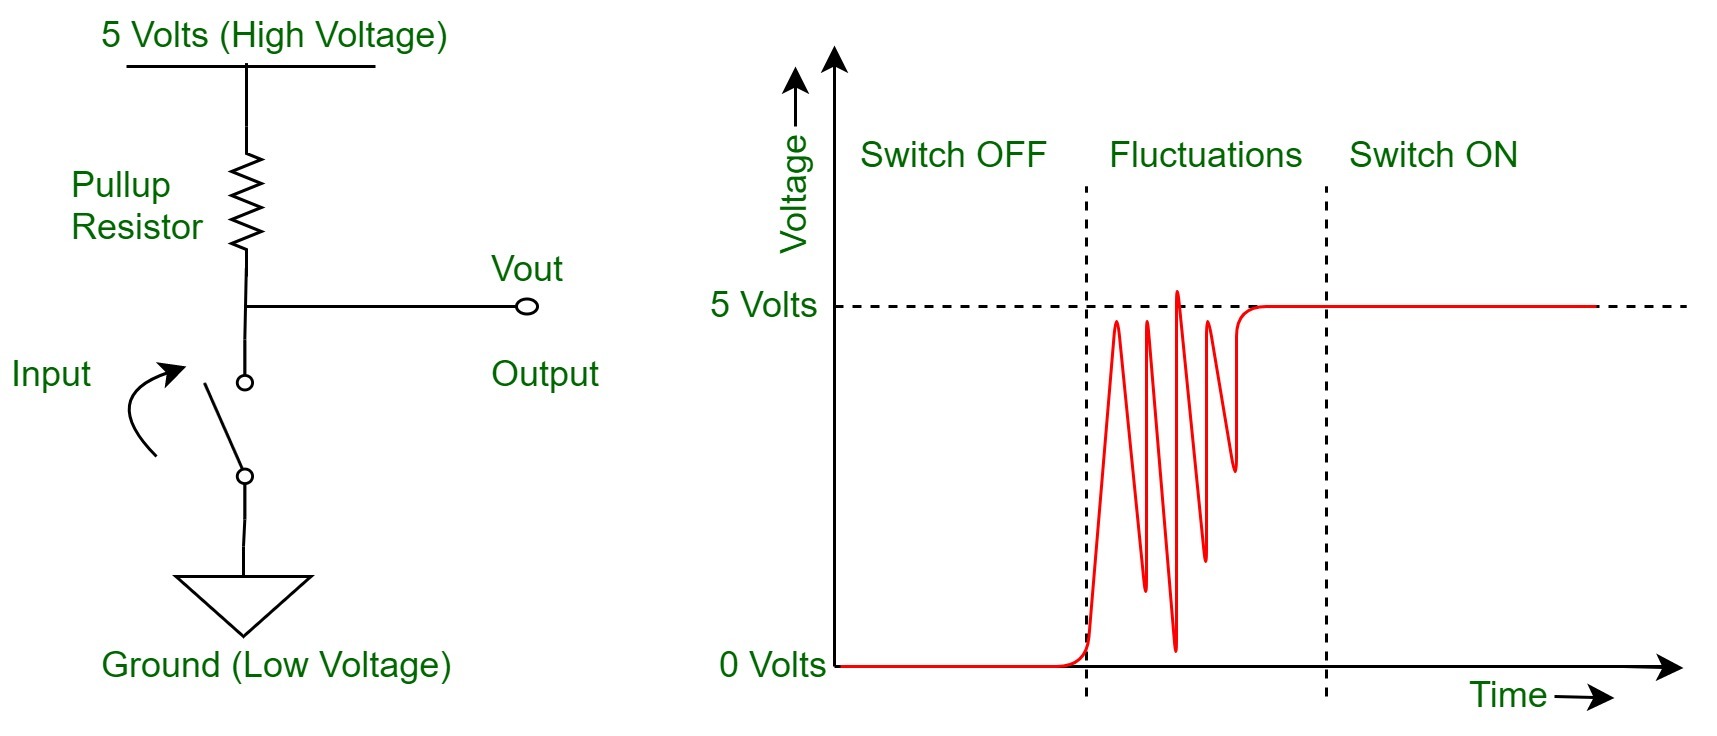
Image is from Geeks for Geeks, which has a great short write up about debounce.
Pressing a button is a mechanical action. The button itself sits on a spring, so when it’s pressed, the spring bounces multiple times until it settles again. When viewed with an oscilloscope, the signal looks like a bunch of jagged peaks. The debounce tells the program that after the initial push or signal, it will ignore any other signals within a set amount of time.
Once we had that set up, it was time to set up the array. The type of array that would work best for advancing the colors is an RGB data, where all the red values are in one array, all the green are in another, and the blue are in the last array.
The arrays are created using integers, and in this case, I needed them to be global integers, or data that is kept outside of a loop. This means the information can be used over and over again with each loop, meaning that I’ll have the same colors show up no matter how many times I press the buttons. If the integers were inside the loop, then that information would disappear at the end of the loop.
Since I had the colors already in my previous blink program, found on Week 10 - Outputs, it was simply a matter of building the database.
int redArray[7] = {##, ##, ##}
This is the basic setup for an array. First is the int, or integer, followed by the name of the integer, redArray. (Capitalization is important in coding, even if it doesn’t make sense.) The next part tells the program how many pieces of data are inside the array, in this case 7. Last is the information that will control the colors, found inside the “{}”. I made one for red, green, and blue, each named for their respective color reference.
When I typed these up the first time, I forgot to add the ; at the end of each line. It was a simple fix, but one to pay attention to when writing code.
int index = 0;
This integer is for the index, or how the program counts through the array. The index always starts with 0, so in this case, since I have seven colors, it will count 0 though 6.
We forgot this integer the first time around, so the program didn’t know what “index” was in the code.
index++;
if (index > 6) index = 0;
The index integer is referenced in this section. The first part says that the index will progress by one, or plue one. The next part says that if the index number is greater than 6, then it will start again at the first number, or 0.
At this point, we were running into issues with the code not knowing which state it was in, or states not being declared, and it was getting a bit confusing. So Adam opened a new screen and we started with the bit of code we knew worked, based on the Pixel_Blink code.
After rewriting it, we sent the code to the board and didn’t get any error messages! Except it also didn’t do anything. One of the things we doubled checked was that the pin number was correct for the button. Once verified, we then started reading back through the code and found the problem.
strip.SetPixelColor(0,strip.Color(153, 153, 255))
We were missing this line that actually told the NeoPixel to show a starting color.
It worked with the correction!! Except then it got stuck. Sort of. I pushed the button and it worked once, but then it didn’t progress forward again. Adam suggested adding back in the old state and new state, but the program still got “stuck” in the same spot.
We thought maybe it was the opposite problem, so we removed debounce all together, as well as the old and new state, which got us a different problem. This time when I pushed the button, it would cycle through all the colors very quickly, but only when I held the button down.
Back to debounce.
Adam mentioned that while the code for the debounce would work as it was written, it was long and overly complicated for what it needed to do. After a quick search, he found a library for debouncing,
Then we used the example code and plugged it into our code, making sure to change the button number to match my pin.
We tried it again, but it was still cycling too quickly. We started messing with the debounce delay, but that only seemed to effect how long I had to hold the button before it would start cycling the colors.
Then we were back to states again. The oldState and currentState are looking for the button press, whether it’s HIGH or LOW. We had added them back in, but the ezButton had changed the names, so after some quick corrections, we tried it one more time.
AND IT WORKED!
Success~
I’m so excited that it works! This is a huge part of my final project, and being able to see it working in person is amazing. The next part is the more complicated bit, but I’m sure I’ll be able to get it to work.
Files
The file for the button program is here. It’s a bit messy, so I hear.
Group Project
The link to the group project can be found here.
This is way outside my wheelhouse. I don’t completely understand exactly what’s going on with electronics and signals, but luckily we had Denny there to explain it a bit. One thing I did get out of it was about pull-up resistors, which basically do what they say. They pull-up or improve the signal, so you get a better result or output at the end.