1.0 Project Management
This week I worked on defining my final project idea and started to getting used to the documentation process.
Intro
Let me just start out with a confession: this was a bit overwhelming. I had heard of GitHub before, more in passing, without ever really making the connection as to what it actually is. I am grateful to my instructor, Adam Harris, for arranging a meeting a week early for us to go over expectations and to give a quick and dirty introduction to the site and its workings. But, there was a lot of jargon thrown around that I was not familiar with, and the more I looked into how this works, the deeper the rabbit hole got.
So in a word: overwhelming.
I’ll just have to take a page from Alice’s book.
Research: What am I Doing?
The first thing I did was research. Lots of research. During the meeting, we were introduced to our grader, David Taylor, who went through a PowerPoint that included multiple resources to get started. These included links to GitHub’s turtorial page, a site one of his students, Teddy Warner, had built, as well as Adam Harris, our instructor’s, site, but I began to notice a theme.
There are a lot of assumptions in the tutorials of setting up your GitHub page. As I said before, this process quickly becomes a rabbit hole, and the number of programs and setups necessary to do anything just built on each other until I wasn’t sure what I actually needed and what was just extra. The guide I ended up following was Elena Cardiel’s, on her Fab Academy site.
In order to keep things as neat and organized as possible, I’ll include all the links and resources at the end, as well as in context, so all additional information is in one location.
First Things First: What is an SSH and How Do I Get One?
I used the guide from GitHub Docs for this portion.
1) Download GitBash .
- Many guides immediately jumped into listing commands without telling you where to actually put them. GitBash is essentially GitHub’s command prompt, or terminal, as it’s commonly referred to, just like your computer has a command prompt.
2) When it’s finished downloading, open it up. It should look like this:
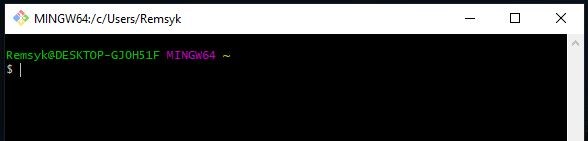
The pathway looks different because I used my laptop in place of my desktop, but the concept is the same.
Copy and paste the following line into the GitBash:
$ ssh-keygen -t ed25519 -C "your_email@example.com"
3) GitBash will generate a folder with a couple files, one public, one private, and will tell you where it’s located. Press enter to accept the default file path. Leave the passphrase options blank, just press enter to continue.
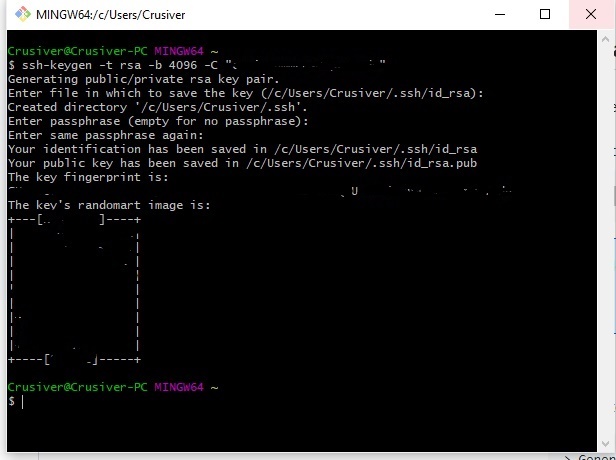
4) At this point, navigate to the folder with the generated files. The folder is called “.ssh“. Multiple guides said that the key needed to be copied and entered into GitHub, but the files aren’t recognized by the computer. My solution was to open Notepad, then open the file. When you navigate to the folder through Notepad, change the recognized file type to “All files” and they’ll appear. Select the one with the extension “.pub“. The file will look like a bunch of nonsense. Don’t panic! Keep this open in the background.
Where Do I Put the Key?
1) On your main GitLab page, in the top right corner where your profile picture is, click the dropdown menu and select “Preferences”.
2) A new menu will populate on the left side. Select “SSH Keys”.
3) Copy everything from the file you opened in Notepad. Make sure to note that the beginning text matches the information given above the entry box, “ssh-rsa…”.
4) Give it a name. I don’t believe it’s necessary, but I named mine just so it’s easy to remember.
5) Skip the expiration date and add your key!
When I was sent the link for my GitLab, I decided to mess around a bit and experiment while I waited for our initial meeting to begin. I changed my about page, just a paragraph, and hit “commit” thinking it was similar to the “Save” option. I’ll admit I had a brief moment of panic when I realized my little edit was announced on the page. I thought I had messed up the original file for future use, since it’s called the “master” file, which traditionally implies it’s the template. Luckily, I didn’t have my SSH set up, and nothing actually changed (though this confused me then).
After I set up the SSH, I decided to make some more changes and see if my original edit would be included in my first real commit, and it did!
Frustration: What Does This Error Even Mean?!
I’m a very hands on person, which is why I am a machinist. If I can pick it up, move it, rearrange it, touch it, interact with it, I can figure out what to do with it. Coding is so abstract, it jut runs me in circles. The walls of text eventually just run together, and then I’m not sure what I’m even looking at anymore. Hopefully it will get easier, but it’s hard to search for how to do things when you don’t know what to search for.
After setting up the .ssh, I did most of my updates through the online editor, but it’s quite tedious to edit your website this way. I read this exact situation over and over, and how much easier it is to edit on your local device, but it was quite a struggle to get to that point.
Due to circumstances beyond our control, while on campus, we’re not able to connect to GitHub through the ssh key, but instead need to use HTTPS. Adam created this great video on how to get everything set up to run locally, but that’s when I ran into issues. Another student in our group, Garrett, ran into an issue with the pip command, but was able to find and share a work around for the problem. Lucky for me, since I ran into the same thing.
My big problem started when I tried to push to the server. I needed to put in my Microsoft credentials, but nothing I tried worked. This issue took multiple days and Garrett’s help to resolve, but we finally figured it out.
Setting Up the HTTPS: That’s A Lot of Programs…
As I said before, our instructor Adam created a very clear video showing exactly how to perform each step. There are a couple places where my process deviates from his, but they’ll be marked accordingly.
1) Download all the programs! In a lot of tutorials, this list of programs came up frequently, but finding out WHY all of these items were required was not as clear.
- Download Python. Why? This is required in order for the terminal to understand the codes we need to enter.
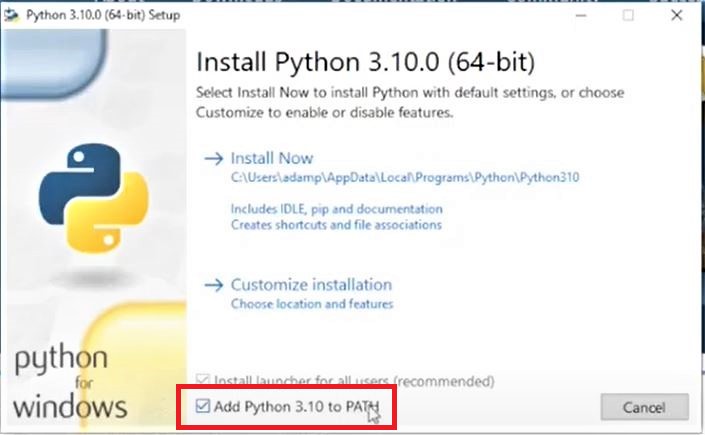
Important: When installing Python, make sure to click the box that says “Add Python 3.10 to PATH”. Without it, nothing from here on will work. It is possible to go back and add the option later, or you can uninstall and reinstall Python.
- Download Visual Studio Code or VSCode for short. This is where we’ll do all our actual editing.
This is the point in the video where we deviate slightly. The concept is the same though.
2) We need to clone, or copy, our GitLabs site. In the video, Adam explains how to create a new site through GitLab, but since we were given a site to work from, we’re going to use that instead. Then select the option for HTTPS.

3) A popup window will appear asking if you want to open the cloned file in Visual Studio. Click open, and VS Code will open. It will then ask you if you really, really want to open the file. We do, so click open.
4) Now we need to select a location to save our repository. I made a folder on my desktop for this step, but you can save the folder in whatever location makes sense for you.
5) NOW we can actually open the file. Once you hit save, VS Code will ask if you want to open it now. Since we have some things to change, click open.
6) VS Code will give you a warning asking if you trust the authors of the file. Since we’re the authors, we’re going to say that we do trust them. Now we can see all of the same files and pathways that we had on the website.
7) The next thing we need to do is install mkdocs. We can do that by entering the following code into the terminal.
pip install mkdocs-material
Then we’ll install the plugin that mkdocs needs, using the following line of code:
pip3 install mkdocs-git-revision-date-localized-plugin
This is where my first problem occured. The terminal did not recognize the “pip” command, even though I had followed all the steps correctly up to this point (I had double checked). Garrett had encountered this problem and his solution was to simply open a second terminal and run the pip commands from there. Strangely enough, this worked, even though nothing else had been changed.
At this point, we deviate again from Adam’s video. He explains how to create a new site through the terminal we just used, but as mentioned before, we already have a site in place, so we can skip this step. Again, this is an excellent reference in the even you wanted to create your own site from scratch.
8) Next, we can enter the following line of code to run a version of our site.
mkdocs serve
When this is running, we can view any changes that we make through VS Code on a webpage that is a direct reflection of how the final product will look like. After running this line of code, a IP address will appear as a link, which will bring you to an offline version of your site.
In order to view any changes you’ve made, first save the file that you’re working on in VS Code, using CTRL+S, and the site will immediately update, without the need to refresh or reopen the page. It’s a very quick way to preview exactly what’s been added, as well as a way to check if a feature, link, picture, etc. will work.
9) Once we’re satisfied with any changes we’ve made, first we need to shut down the server that we started by hitting CTRL-C. The terminal will say it’s shutting down.
Next, we have two methods to push and upload our changes. Both options do the same thing. First we can use the button controls in VS Code, and we’ll start by clicking “Source Control”, which is the icon that looks a bit like a USB icon. This will display all the changes you’ve made to the site.
Then we’ll click on the three dots that are in the top right corner of the side bar, and in the dropdown menu, come down to “Changes”, then select “Stage All Changes”. This shows all the changes you’ve made in another dropdown menu in the sidebar.
Again, we’ll go back to the three dots from earlier, come down to “Commit”, and select “Commit Staged”. A small popup will appear across the top of the screen where you can enter in any notes about the changes. It’s good practice to put in any notes about what you did so you can reference them later, just in case something happens or breaks down the line. When finished, hit enter, and the sidebar will change to display a blue bar that says “Sync Changes”.
Click on this bar, and select “Okay” for the popup. This lets you know that you’re about the push the changes onto GitHub.
This is where my second, and most frustrating problem occurred. When I hit okay, I was asked to enter my username and password in a Microsoft authenticator. Since it was my first time pushing any changes, I thought it needed my login information so it knew where to put the information, but nothing I entered worked. I was on my desktop, and after some hunting on the internet (and coming up empty), I decided to try again on my laptop, only I would go through the step very slowly and methodically to make sure I didn’t miss anything.
I also met up with Garrett to go over this problem, since he has more experience with coding in general, and again, we ran into the problem on my laptop. Finally, we found a solution on Stack Overflow that said that I needed to create an access token, which could then be added to my GitHub profile and entered into the popup when it asked for authentication. Thankfully this fixed the problem, but neither of us knows why it wouldn’t let me get onto my own site.
Success!!!
I’m so glad I have someone to talk to and help me troubleshoot.
From this point on, it was smooth sailing. I had a lot of catching up to do already in terms of updating my site, but now I can make the changes easily from my laptop.
Side Notes and Another Head Scratcher
I’ve had to make multiple corrections to my images, with various degrees of success. Thankfully, Adam was able to point out where the problem was, and now my images show up properly.
Problem: Images
- Forward Slash ( \ ) vs Back Slash ( / )
This one confused me a bit, mostly because of conflicting information. If you grew up in the 90s, then you probably were subjected to commercial after commercial promoting their new fancy websites. “Go to http://www. blah blah blah”. I heard it so often, the only “slash” I know is the back slash, and following any folder or site directory, you can see it in use. But if you use VS Code to create the path to an image, by right clicking the particular image from the side menu and selecting the pathway, it generates a path with the forward slash. If it generates code like this, then it must be correct, right? Wrong. Don’t use this method. Just write it out, double check that everything is spelled correctly, and save yourself a bit of headache.
- Pathways
Another slightly confusing problem, but easy to correct. The following is a correct pathway to display an image:
../../images/week02/Finished Top.jpg
This particular image is the last one in my Fusion 360 section of Week 2. The problem I ran into was that I did not go back far enough in the directories, so essentially, it was trying to pull the image out of the wrong folder. Each set of ( .. ) tells the path to move up one folder, or directory, so I just needed to add a second set of ( ../ ) to the beginning of the path, and problem solved.
The issue I was having, and how this went unnoticed, is because the local site, the one you can use to check any changes by typing “mkdocs serve” in the terminal, displays the images just fine without the second set. So it was especially confusing when all of the pictures showed up just fine before committing, and then were broken when pushed. The issue didn’t become obvious until Adam pointed out the actual code as it was displayed on the site, which can be found by typing “CTRL+U” when on the page. The source for the image that was broken versus the working image showed it was trying to access a different pathway than the one that worked.
This is where it was a bit confusing however, because the code that I had entered for the broken image was this:

But the code that displayed for it was this:
cori-summers/assignments/images/week01/GitBash%20First%20Opened.JPG
I’m not sure where the “Assignments” portion came in, but I think it has something to do with the first issue, using VS Code to generate the path instead of just writing it yourself.
So, moral of the story, just type it out. It may take a few extra seconds here, but it will save tons of headache down the line.