10. Molding and casting
Group assignment:
-
Review the safety data sheets for each of your molding and casting materials.
-
Make and compare test casts with each of them.
Individual assignment:
- Design a 3D mould around the stock and tooling that you’ll be using, mill it (rough cut + (at least) three-axis finish cut), and use it to cast parts.
1. GROUP ASSIGNMENT
To properly perform this assignment, we must take into account the safety measures and also the characteristics of each material, I detail each one below:
1.1 GENERAL SAFETY RECOMMENDATIONS
- Always wear eye protection to protect against spatters.
- Wear gloves and a long sleeve shirt to protect your hands and arms.
- Do not breath dust.
- Wear a mask to avoid accidental inhalation or ingestion of any material.
- Do not allow small children in your work area or permit them to handle your the materials.
1.2 MATERIALS
To perform the molding and casting there are different types of materials, but we must divide into two mainly:
- Mold materials (mainly silicone)
- Filling materials (plaster, resin, chocolate, etc).
If you live in Peru, I recommend the following companies to obtain materials:
SILICONE FOR MOLDS
There are different materials to make the mold, but the most recommended is silicone, as it can be easily removed without breaking due to its flexibility.
There are different types of silicone, for example, for wax reproduction, for resin, for food grade, etc. Each one is suitable for a specific material as they have different properties.
Below I show you the silicones I used for testing:
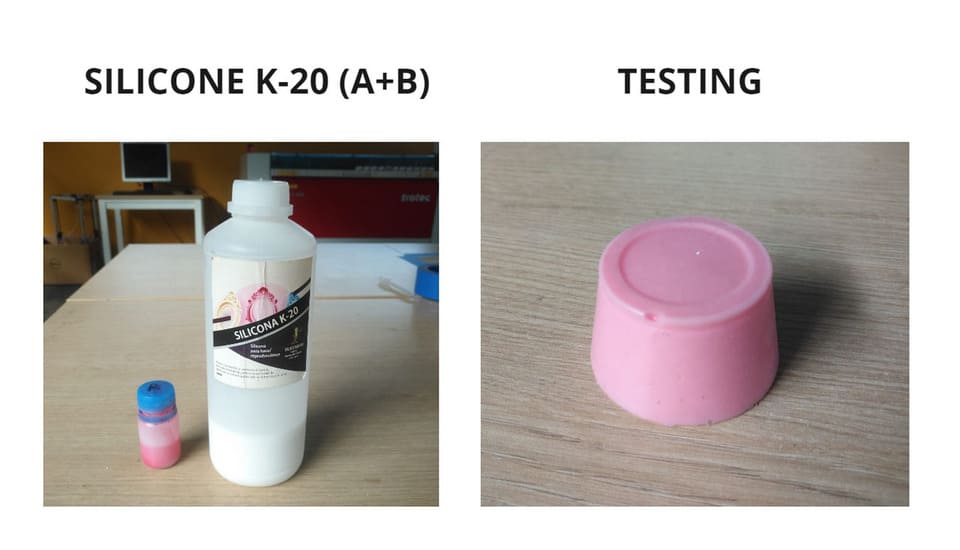
SILICONE K-20
- Rtv Silicone Rubber
- BRAND: Silicon
- COLOR: White silicone and pink catalyst
- HARDNESS: Shore A 20
- MIX RATIO: A (silicone) + B (catalyst), A: 100% and B : 2-3% , by weight or volume.
- POT LIFE: 26min
- CURING TIME: 3-5 hours
- VISCOSITY: 8000 mPa.s
- Wear gloves and mask
This silicone is for general use in industry and art for a variety of applications and is tear resistant. It can be used for both casting and brush technique.
CASTING MATERIALS
For filler material we can use different materials, from resin, cement, wax, chocolate, etc. I will use the following:
UV RESIN
- BRAND: Silicon Peru
- COLOR: Colorless
- CURING TIME: 5min with ultraviolet light or 1 hour with sun exposure.
- No catalyst needed for drying
- Wear gloves and mask.
It is recommended for fine and small pieces of jewelry or costume jewelry.

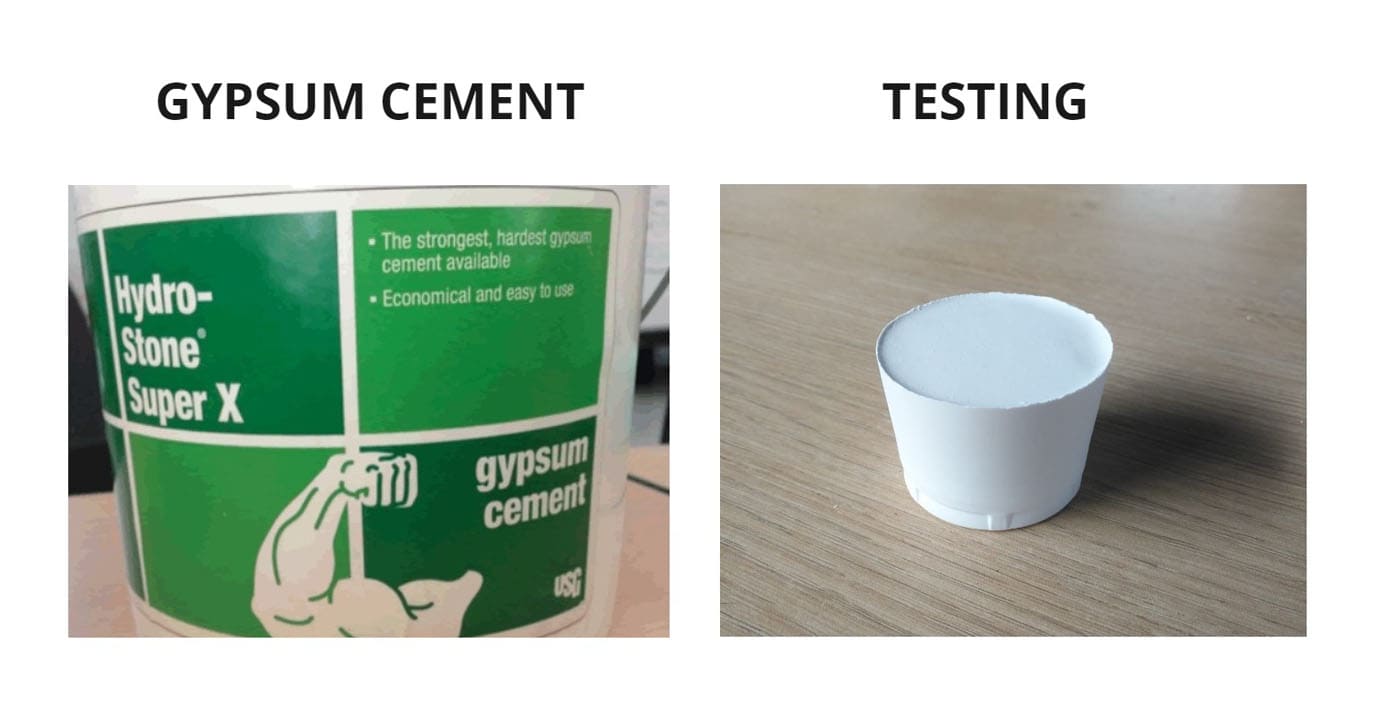
HYDRO-STONE SUPER X GYPSUM CEMENT
- FORM: Powder
- PHYSICAL STATE: Solid
- COLOR: White to off-white
- Ph: 7-8
- SOLUBILITY (water): 0.15 -0.4 / 100g (H2O)
- MIX RATIO: 50% (cement) / 50% (water)
- Do not breath dust.
- Wear gloves and mask
- Avoid exposure to moisture. When mixed with water this product can become very hot.
- In case of mold making, do not use for reproduction of any part of the body, as it may cause damage to the skin.
1.3 TESTING AND COMPARISON
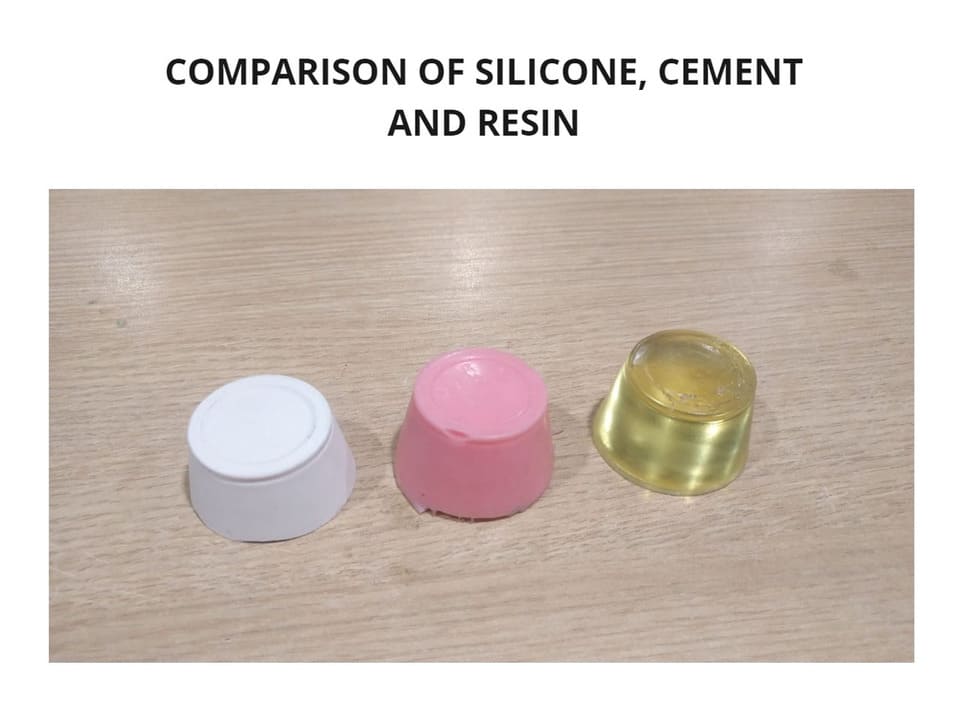
And this is the testing of the materials, in the case of silicones, of different brands but with very similar properties, although they have different drying times.
-
The K-20 silicone had a drying time of about 10 minutes, and a catalyst of 2 to 3% was used. While the Type 5 silicone had a drying time of 30min and even a little more and only 2% catalyst was used.
-
It was possible to make a more homogeneous mixture and had more time to mix component A and B when less catalyst was used, but it may take a little longer to dry. If you use less than 2% of catalyst, it will take many hours to be ready.
-
Cement and resin have different finishes, texture and color, while resin is more translucent, cement is opaque and you can’t see through it.
-
UV Resin has a faster curing time but does not need a catalyst unlike the normal curing Epoxy Cristal resin.
-
Do not pour the material directly into the wax mold because it will ruin the wax and the negative will come out but not the final piece.

2. INDIVIDUAL ASSIGNMENT
Based on traditional Korean patterns, merge shapes into a single design to make part of the accessory called Norigae. There are many designs of this accessory that are made of fabric or carved in stone, but I proposed to use different materials and make it by molding and casting.
Here is the step-by-step process:
DESIGN
To start the design you need to know the limits of the work space. One of the things to take into account was the size of the wax to be able to make both parts of the mold in one wax bar, as well as the size of the milling machine and the milling depth.
LIMITATIONS:
WAX MEASUREMENT: 114 x 190 x 41 mm
I will show you what measurements to take into account when designing the wax mold, the following design shown is only an example to indicate the limiting dimensions:

The challenge of this assignment is not only to make a 3D design, but also to use curved shapes to see the machine work and I tried to do that but without leaving out the details.
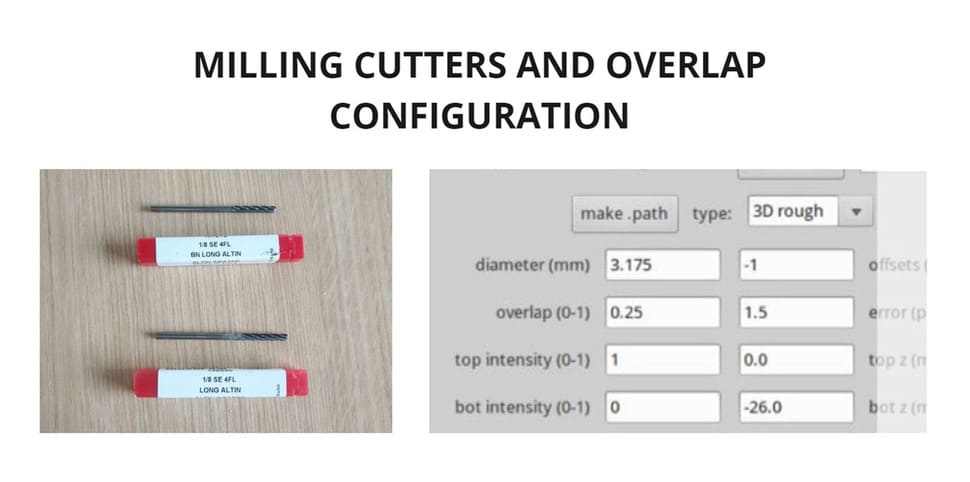
Since the tip of the milling cutter measures 1/8 inch , the shapes should not have a volume smaller than that, since it would not be able to drill and I partially took this into account, you will see why in the testing phase.
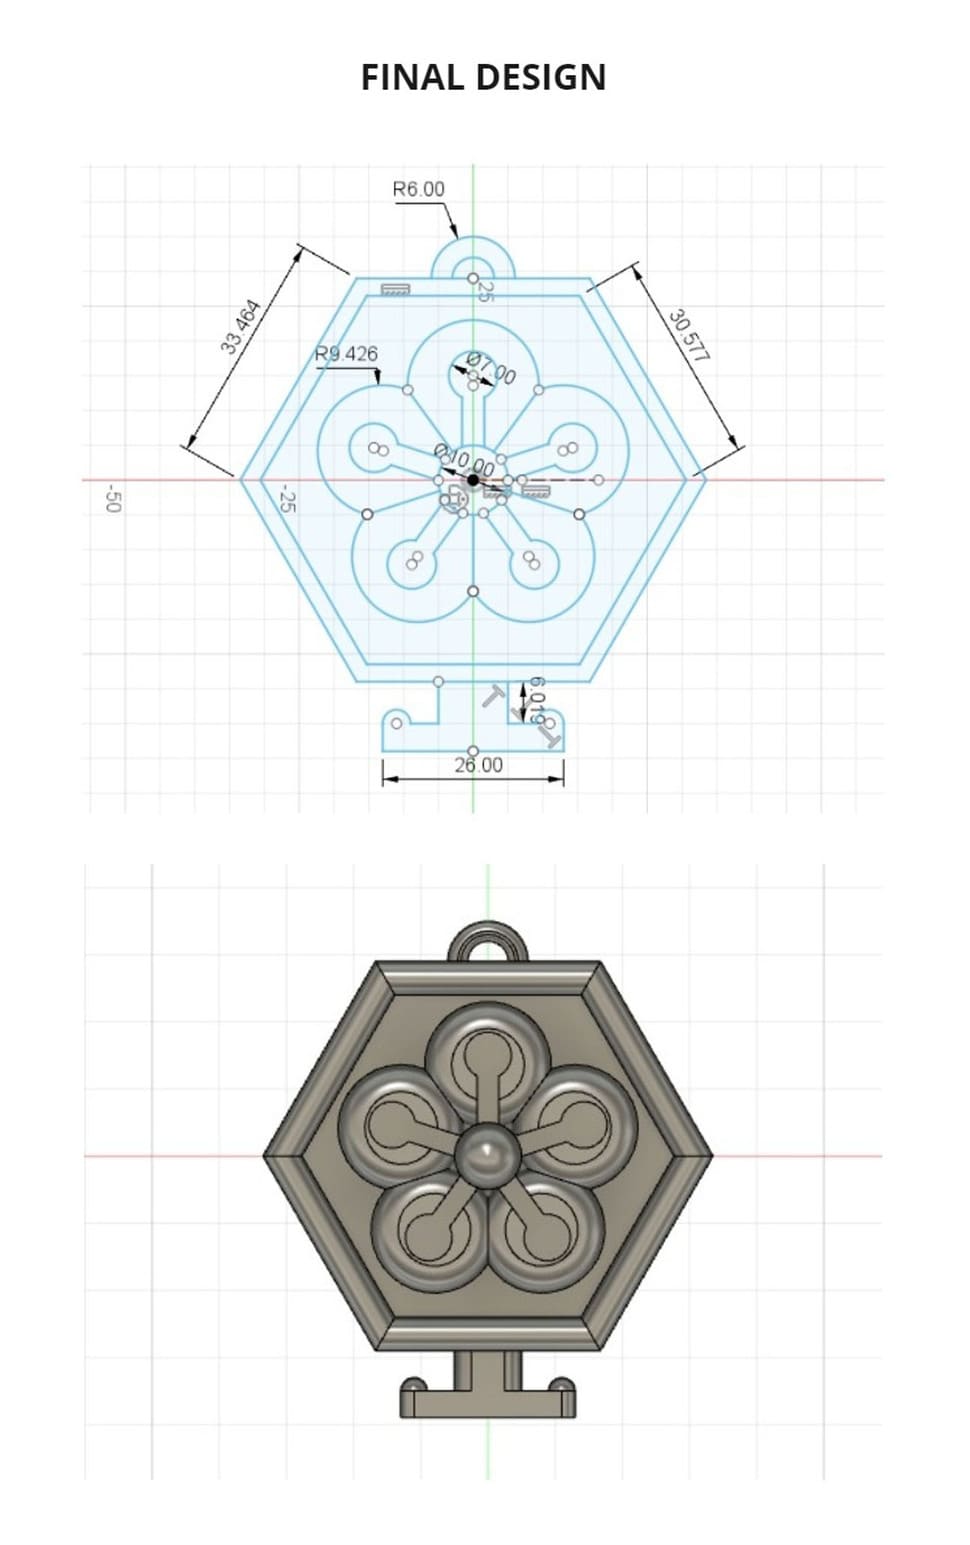
The hexagonal shape is very present in Korean patterns, as well as the flowers. I modified it slightly and fused them to create the final piece. Then I followed the following steps to realize my design:
- I started by drawing a hexagon with each side of 30.577 mm , so the design can be made without any problem and does not exceed the safety limits of the wax.
- I started extruding the shape and rounding the edges.
- I tried to give it a hollow part at the top and an opening at the bottom to help the material enter when pouring.
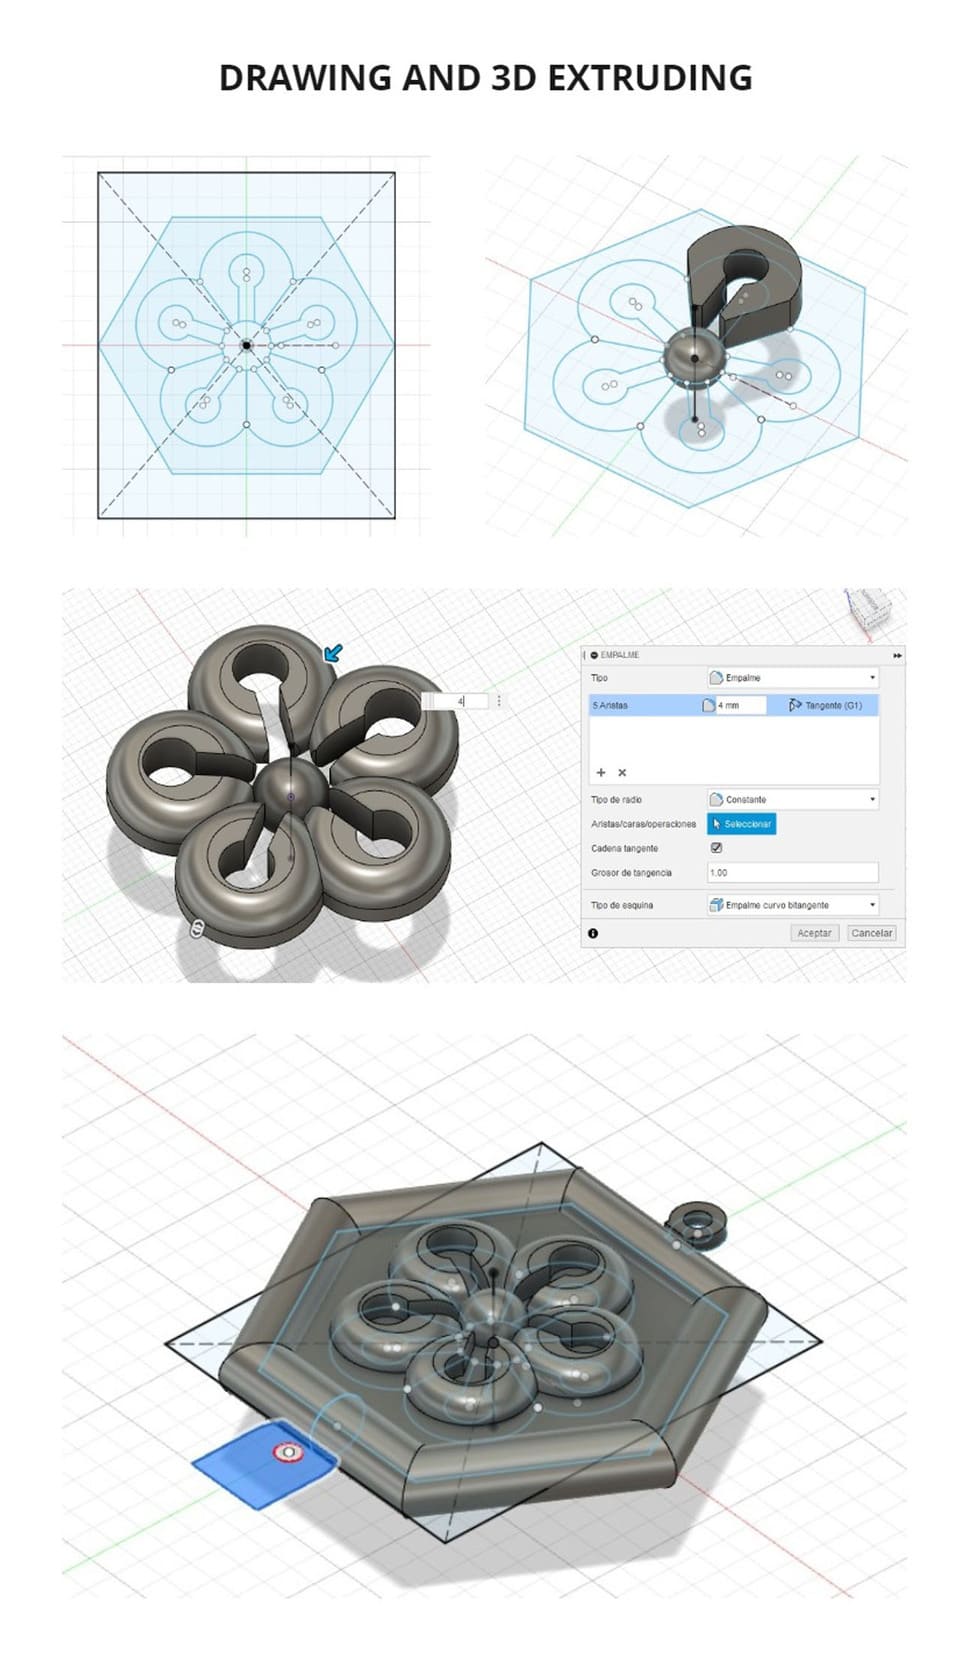
This is the final design, I made a small modification in the lower part to be able to join it with threads later (to use it as Norigae) and at the same time it serves for the casting of the material in the mold. It also retains a small opening at the top to be used as a pendant.
And to achieve the wax mold, I used only 25mm deep for the design, I left 5mm between the surface of the mold and the surface of the wax so that there are no problems when unmolding it.
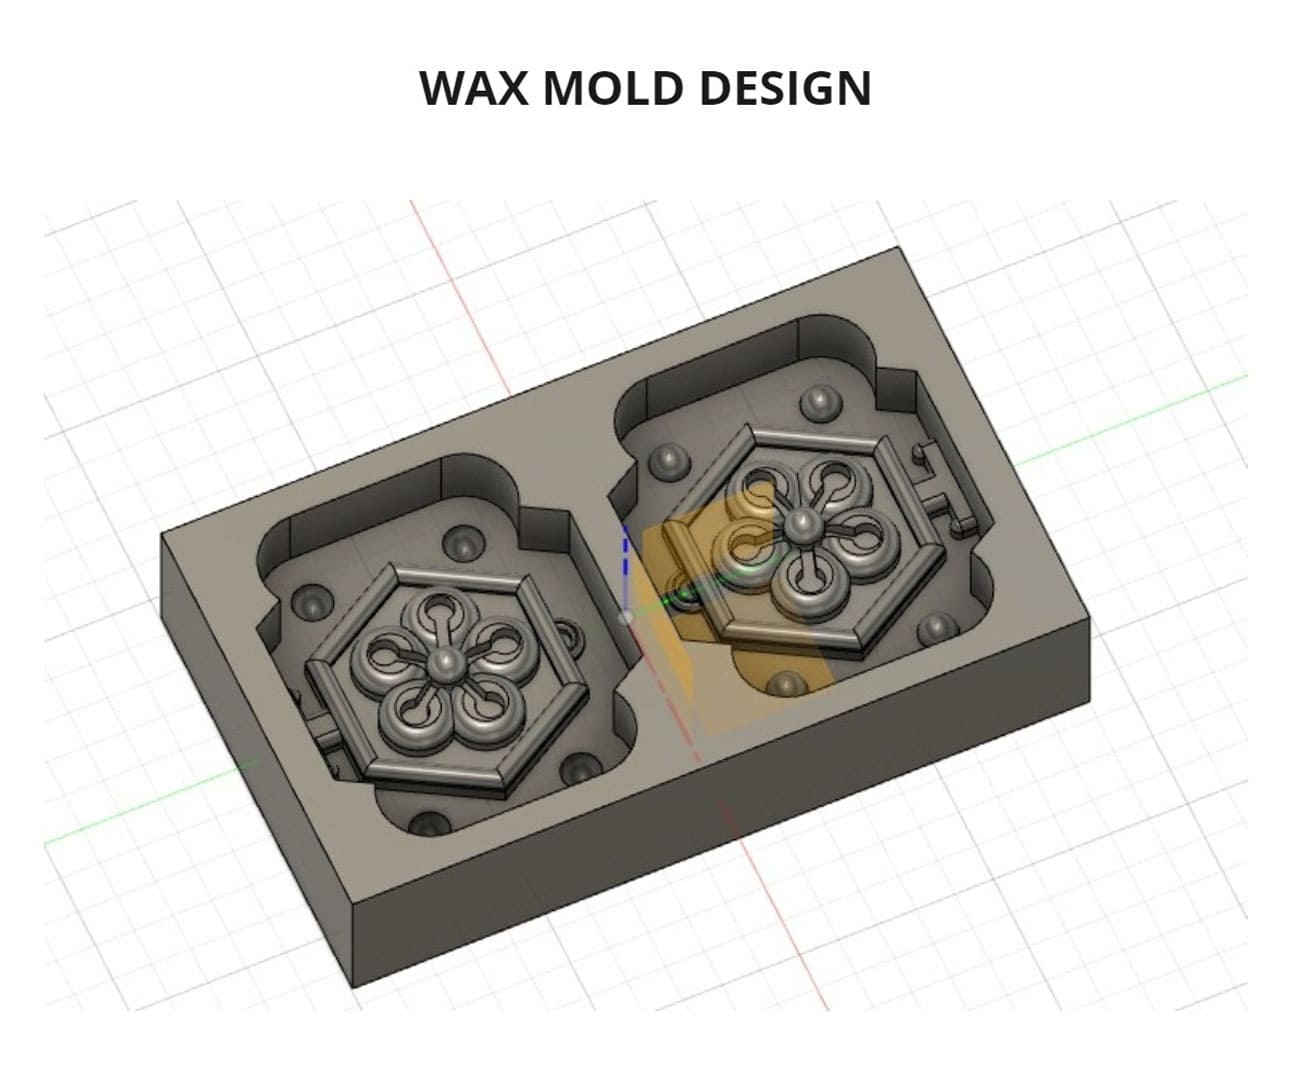
I didn’t use a totally square mold because I didn’t want to waste material, I wanted to follow the hexagon shape, but I added elements to help the grip when the molds are put together, that’s why you see hemispheres coming out of one side and the other side is caved in.
3D MILLING
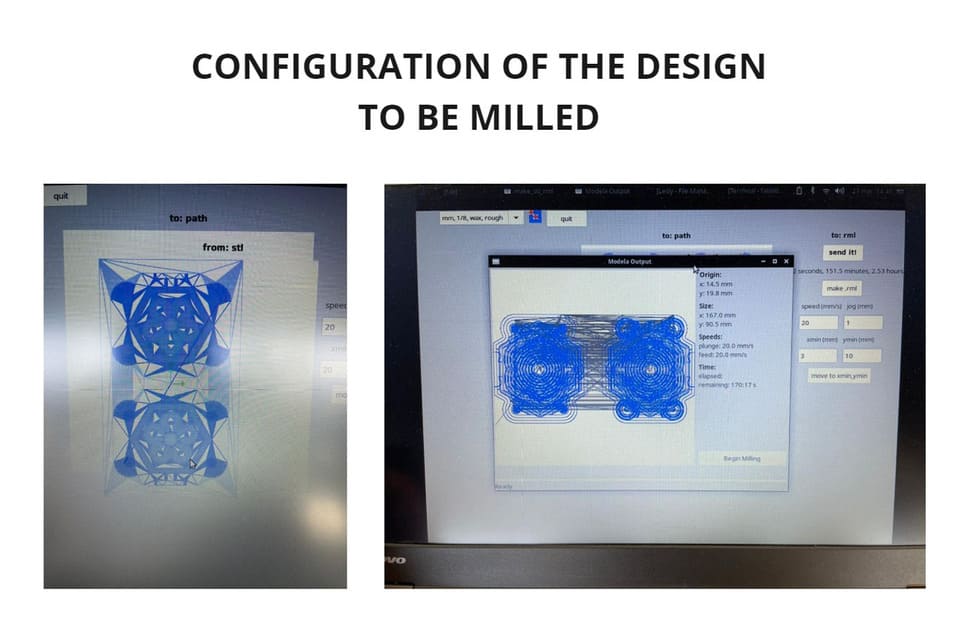
For this process I used the Roland Modela MDX-20 milling machine, the same machine that was used for milling plates, as it can also mill wax. To do so, I followed the steps below:
- The file was saved in .STL format from Fusion 360, to be able to use it later in the milling machine since it is a compatible format.
- I chose the type of milling cutter, in this case 1/8 inch, the wax material. I also choose the process to be done, first the ROUGHING is done and then the process is repeated again but with another purpose which is the FINISHING.
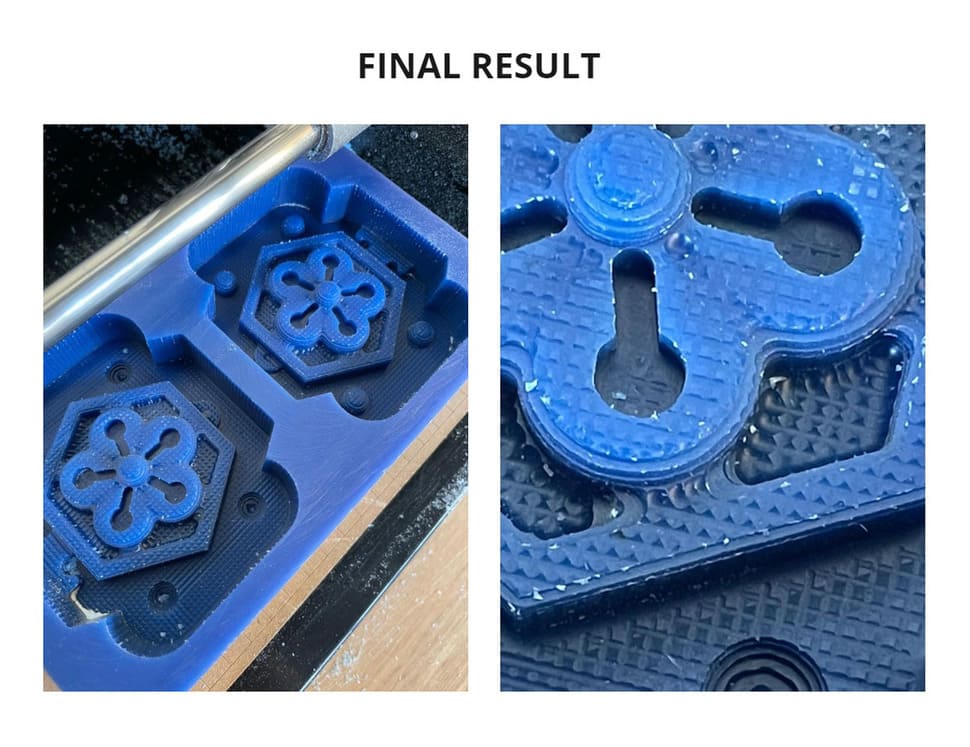
This is the final result, you may wonder why the finish is not completely smooth, it turns out that although we used 1/8 inch milling cutters with different tips for roughing and finishing, the problem was not the tips but the space in the path, this command is called OVERLAP and makes the space much narrower, helping to have a more uniform surface, it is something that we realized after having finished the piece.
So keep in mind this configuration so that you can give the desired results on surfaces that you want to be as perfect as possible and if you want to give more detail and the piece is very small, you should change the milling cutter to one of less thickness.
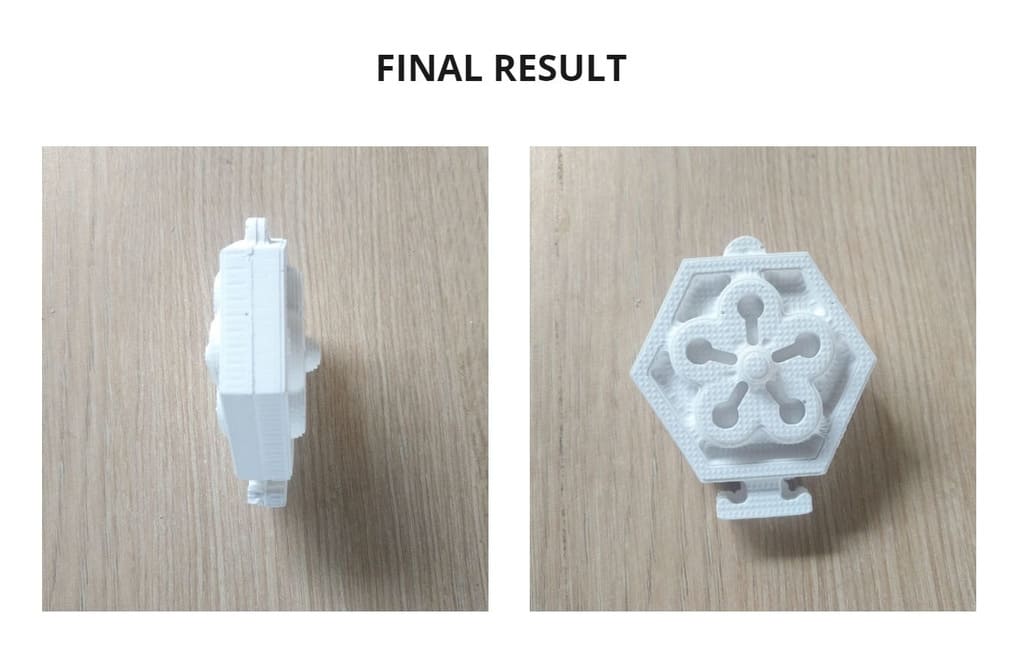
As you can see in the following images, some details could not be done well and it was because they were much smaller than the milling cutter size.
TESTING
In order to create our mold, we need silicone, in this case I am using K-20 silicone with its catalyst.
I made the casting in both parts, in one I used 3% catalyst and in the other I used 2%, the difference is noticeable because the one with more catalyst, hardened prematurely and the casting was not uniform, even bubbles came out.
While in the one I used 2% catalyst, it came out more uniform, the bubbles were minimal and the mold came out as clean as possible. So I made an extra mold to replace the one that came out with a lot of bubbles.
The drying time is 10min, very fast, but I removed it after 20min for safety.
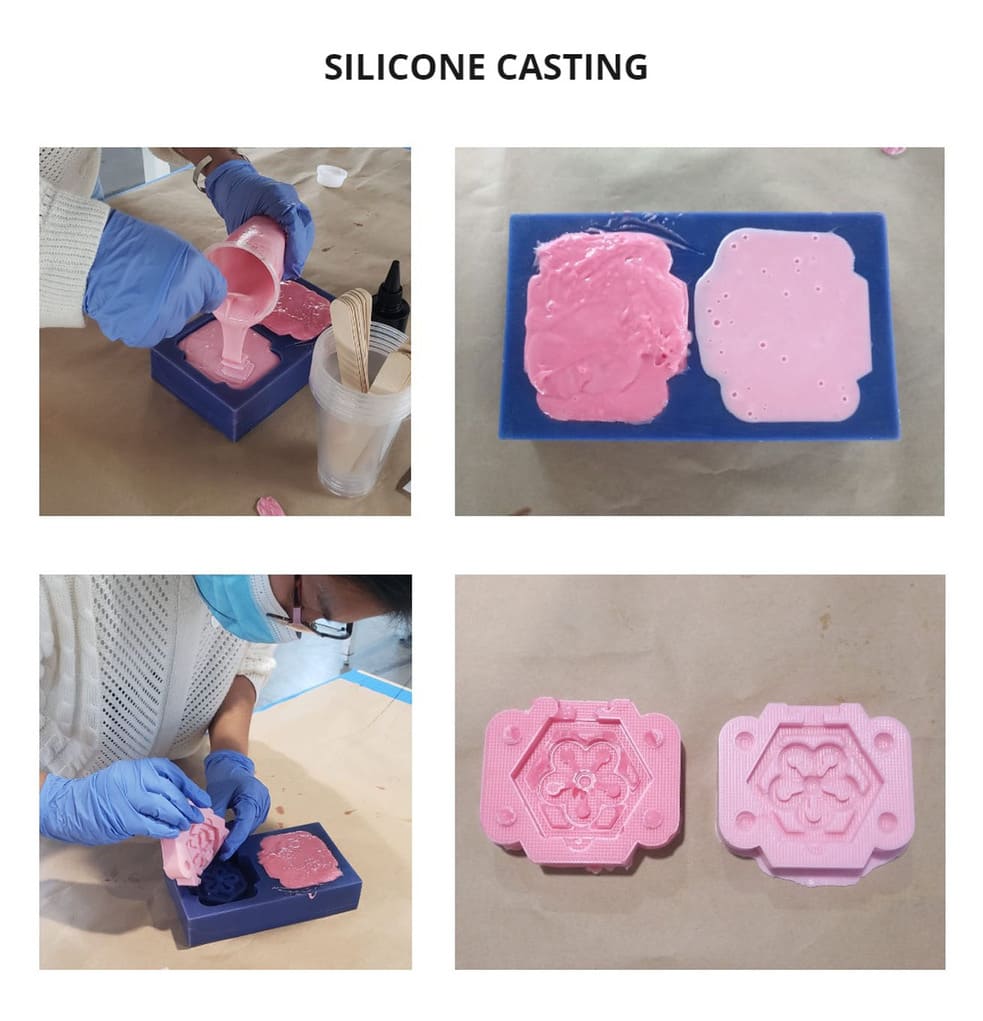
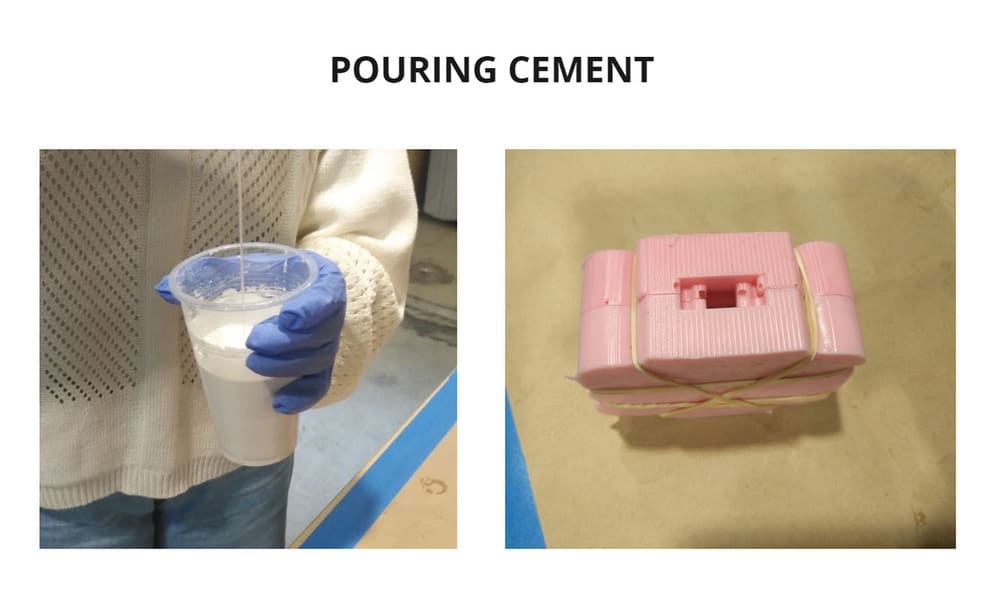
Then both parts of the mold are joined together thanks to the hemispherical volumes, but for extra safety, it was also held with rubber bands to prevent it from opening in the process.
The casting of the material that will be part of the final piece is done, in this case I used gypsum cement, it is mixed with water until it has the right consistency as it is in the technical sheet of the group assignment and it is applied to the edge.
I did the total casting on all the molds to see the difference, the result was that where bubbles came out there was excessive material and the shape is not perfect, while where the more uniform mold was used, it has a better finish.
There is some excess material on the edges that can be sanded off without any problem, you can even paint over it and make your design more personalized.

3. CONCLUSIONS
-
Never pour the material directly on the wax, because it can cause damage, so first make a silicone mold that can be removed without damaging the wax.
-
When large molds are made, it is advisable to use less catalyst to prevent the mixture from drying prematurely, as the material could dry out before being poured.
-
There are fast drying resins such as UV resin or others, that in 10 minutes the piece is ready, but it is advisable only for small pieces because in large pieces it could dry before making the whole casting, the design would look irregular and with imperfections.
-
To make a small test of the mixture will help us to have better results and to avoid mistakes in the final piece like using excessive material or excessive catalyst.
-
To avoid bubbles you can shake the mold a little after the casting or with a wooden paddle tap on the surface, this will help to eliminate the bubbles inside.
-
If a catalyst for silicone has color, it will help to know if the mixture has been well done, on the other hand if it is colorless, we will not know if it has been equally distributed.
-
Having a type of silicone with standard characteristics will help us to use it with more different types of materials. It must be taken into account that for food or medical parts another type of silicone is used, called RTV Platinum of medical and food grade, avoiding any type of problem such as intoxication or irritation.
-
Take into account the size of the wax to make the mold design. If the design is too large and the limits of the wax are less than 1 cm, it may break.
4. FILES
5. USEFUL LINKS
-
Types of silicone : In spanish