'"I won't plant for the thieves," will starve both farmer and thieves.'
African Proverbs
Project Management
Web Development.
To develop this section, I basically heeded the advise given by Neil during the first web lecture, that we should review previous students' projects. So I basically utilized the work done by Cristian Plugari of the 2018 Fab Academy session. The website is needed for documentation purposes, and as well as to track your weekly progress. Without which you could seemingly kiss your Fab Academy success 'Bye Bye'. Sorry that sounds too harsh, but I know you understood what I am saying *winks*. Another thing is that this website development stage is as a result of the first week's assignment. I am beginning to wonder how someone who does not drink coffee or Red Bull would fair in this Fab Academy journey (Pheeeeeeew! *sighs*).
Another advantage of the website is so that others, yes YOU, can learn from the previous year's efforts. So you would not have to create what you could have easily replicated. Just like I used Cristian's work *genius*.
Since most of the work done in this is a direct replica of Cristian's impeccable work. I will refrain from laying too much details into this, and simply refer you to his work. Just Click here. However, few changes were made to Cristian's template some of which includes creating an assignment link on the navigation link on the left hand side of the page. This helps with easy navigation to the assignment link, that is for those who are too busy to read the whole page.
I will detail some of the changes made during the web development phase. It is worth noting that the text editor I am using is 'Atom'. The reason for using this is not because atom is known as the smallest particle, but because I personally find it really easy to use. I downloaded Atom from this link.. After the download, just install it.

Since you are here, I assume you have either decided to use atom or are just too inquisitive to know what I did. Whatever the case may be, you are very much welcome to tag along my Fab Academy journey. To proceed, I assume that you have cloned your gitlab repository. If you have not done that, then leave whatever you are doing and get that done sofort. You can scroll up to see how to clone your repo.
To proceed, click the file section, then select 'Add Project folder', then select the folder to add to atom (this should be your repository). If this was done well, you should now see you Fab Academy folder on the left hand pane as depicted in the picture below.
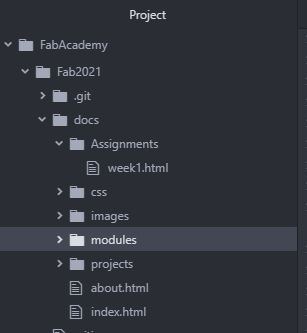
Now you can simply just select the dropdown pane to see what you have in the folder. Please note, this creates a link between between your repository and the atom editor. So if you attempt to create a new file or folder through Git Bash, for example 'touch
One of the few changes I made was to create a folder that contains the css files. This folder contains the css style, and I also created a new file that contains the fonts used. So I did not just copy and pay everything from Cristian's work. I added a little bit of originality to it. However, I foresee a major overhaul as the Fab Acdemy journey progresses.
VORSICHT!
Please also be informed that you should intensely check the name of the pictures, folders and files attached, as it is not case-sensitive. So it is very important that the names appear the way they are exactly written on the images folder. One silly mistake I made was evident by not noting the difference between .JPG and .jpg, until my Fab Instructor got back to me about some pictures not showing. Being a hot-headed person, I felt Daniele must have definitely gone GREEN and definitely smoked some high-grade stuffs. Well, I am also a sustainable-oriented person!
Some more few changes were made. Some of these changes includes the following:
I really just had to show up and express how good I am getting with 'GIT'. Here are some of the methods I used to get this done.

mkdir 'Name' (Comment - In my case I used mkdir css)
VORSICHT!
Here, you have to be very careful where you create the folder. If I am talking about it, then trust me I made the mistake. Though this was easily fixed, but why make a mistake that could be avoided. So what I did was to create the folder write in the 'Docs' folder.
touch 'Name' (Comment - In my case I used font.css)
VORSICHT!
Here, you have to ensure that you do include the format of the file you are creating. In my case at this moment, it is font.css. If you are creating an HTML file, then you have to include .html at the end of the file name.
h4 style="color: #FFFFFF; background-color:Tomato"> Enter text here
Please do not forget to put these angular brackets ( "<" and ">") at the beginning of the code above. The reason I left it out is because, Atom software still sees it as a code rather than a text.
Whatever you do, do not forget to do the following:
Run a git status, to know what is in the staged area of the repository
Run the 'add' command
commit the modifications to the repository
Pull before you push the files to your repository on Gitlab!
Then push the changes to your Gitlab repo.
A word they say is enough for the wise! Shikena! Gasikya!
If you are still happy reading my Fab Academy Blog (documentation), then meet me on Week 2, because I have to finish the CAD design for my final project. 'Life goes on'.
So help me God!
Thank you for your attention! You can follow the weekly progress of the final project, please click Main Final Project.