Week 15. Interfaces week
But first
For this week I did something very very very simple because, once again, I did my favorite thing, run out of time.
The idea is very simple, create a slider that controls the intensity of a led and send the data from the digital interface to the micro controller.
But first I would like to say that an interface is like a bridge between our physical world and the digital world. There are many types of interfaces the ones I know are, digital interfaces and physical interfaces.
- Digital interfaces
I can describe them as digital representations of physical sensors. For example buttons, sliders, text boxes, and strings inputs. -
Physical interfaces
This ones are the every life sensors like the physical buttons, and sliders
In this website we have already seen the physical interfaces, the first electronics production final product had a button, that means it basically includes a physical interface. What we haven't seen are the digital interfaces.
There are many tools for making digital interfaces, I only know App Inventor from the MIT, but I haven't tried it. And the Qt language, this is like an add on for Python. We already have a program that helps us writing python code like Visual Studio code,
so we first need to install the add on.
Go to the shell of your computer and write the next code. pip3 install pyqt5 wait for the program to install, open VS code, create a new python file and start programming.
Before that let me refresh an important point while doing this, you need to program the interface on python and the micro controller on it's language, once said that let's start
The interface code
Kind os ashamed but I have to say that chatGPT helped me making this code.
  import sys
  from PyQt5.QtWidgets import (QApplication, QWidget, QVBoxLayout, QLabel, QPushButton, QSlider)
  from PyQt5.QtCore import Qt
  import serial

  # Inicializa el puerto serial (ajusta el nombre y velocidad según tu sistema)
  try:
      ser = serial.Serial('COM3', 9600)  # Cambia 'COM3' por tu puerto (Linux: '/dev/ttyUSB0')
  except serial.SerialException as e:
      print(f"No se pudo abrir el puerto serial: {e}")
      ser = None

  class SerialSliderApp(QWidget):
      def __init__(self):
          super().__init__()

          self.setWindowTitle("Control Serial con Slider")

          self.slider = QSlider(Qt.Horizontal)
          self.slider.setMinimum(0)
          self.slider.setMaximum(255)
          self.slider.setValue(0)

          self.label = QLabel("Valor: 0")

          self.button = QPushButton("Enviar por Serial")

          layout = QVBoxLayout()
          layout.addWidget(self.label)
          layout.addWidget(self.slider)
          layout.addWidget(self.button)
          self.setLayout(layout)

          # Conexiones de señales
          self.slider.valueChanged.connect(self.actualizar_valor)
          self.button.clicked.connect(self.enviar_serial)

      def actualizar_valor(self, value):
          self.label.setText(f"Valor: {value}")

      def enviar_serial(self):
          if ser and ser.is_open:
              value = self.slider.value()
              try:
                  ser.write(bytes([value]))  # Enviamos como byte
                  print(f"Enviado: {value}")
              except serial.SerialException as e:
                  print(f"Error al enviar datos: {e}")
          else:
              print("Puerto serial no disponible.")

  if __name__ == '__main__':
    app = QApplication(sys.argv)
    window = SerialSliderApp()
    window.show()
    sys.exit(app.exec_())
Let's explain the code by parts:
import sys
from PyQt5.QtWidgets import (QApplication, QWidget, QVBoxLayout, QLabel, QPushButton, QSlider)
from PyQt5.QtCore import Qt
import serial
This code imports the system functions,this will help us creating a window on the system, editing it, minimizing it
and closing it.
It also imports the widgets we will be using like buttons, applications, widgets, boxlayouts, sliders, etc.
I also imports the serial communications libraries and some important aspects of Qt.
try:
ser = serial.Serial('COM3', 9600)  # Cambia 'COM3' por tu puerto (Linux: '/dev/ttyUSB0')
except serial.SerialException as e:
print(f"No se pudo abrir el puerto serial: {e}")
ser = None
We have aready seen this lines on the communication week, this will try to set communication trough the selected COM port. If failed, it will send an alert of "not possible".
if __name__ == '__main__':
app = QApplication(sys.argv)
window = SerialSliderApp()
window.show()
sys.exit(app.exec_())
This lines are like a poka yoke to the system to make sure you are calling the right program.
The app variable holds an application that is created with the help of the sys importation.
The variable window will contain everything we add to it, and this line is calling the main class.
Then we have to show the window on the created app.
And the last line is for the closing button of every app window
So, to summarize we create an app and the system opens it, and in that app we add the window that contains everything we want.
This will work just as another app from the computer thanks to the system library importation.
self.setWindowTitle("Control Serial con Slider")
Sets the name/tittle of the window, in this case is something like, Serial control with slider.
self.slider = QSlider(Qt.Horizontal)
self.slider.setMinimum(0)
self.slider.setMaximum(255)
self.slider.setValue(0)
Creates a horizontal slider and sets the minimum and maximum values of the slider,
as I want to control the intensity of a led I set it between 0 and 255.
The last line sets a default value, in this case as I wanted to start with
the led turned off I placed 0 on the default value.
self.label = QLabel("Valor: 0")

self.button = QPushButton("Enviar por Serial")
Creates a text label that will help us show the value of the slider.
And creates a push button that holds the message "Send by serial"
layout = QVBoxLayout()
layout.addWidget(self.label)
layout.addWidget(self.slider)
layout.addWidget(self.button)
self.setLayout(layout)
Creates an object called layout (like a box with vertical boxes that we can add as we want)
And we need to add our objects (digital representations of physical ways of interacting with the digital world)
So we use .addWidget(the name of the object we want to add), to add it on the place we want. The way wee write this lines
is the way they will be added. And as we used a vertical box every add will be added one down the other.
self.slider.valueChanged.connect(self.actualizar_valor)
self.button.clicked.connect(self.enviar_serial)
As far as I know this codes are interruptions, that means no matter when we do what it says, they will execute a specific function that we define it to call.
In this case I there is a interruption for when the value of the slider has changed, it will call the "actualizar valor" function.
And the second interruption is for when the "send button" is pressed, it will call the "enviar_serial" function.
def actualizar_valor(self, value):
self.label.setText(f"Valor: {value}")
The set value function, this is a very basic one, it will call the variable value that contains the value of the slider (the interruption sends it automatically). And sets the text and the value on the label.
def enviar_serial(self):
  if ser and ser.is_open:
    value = self.slider.value()
    try:
      ser.write(bytes([value]))  # Enviamos como byte
      print(f"Enviado: {value}")
    except serial.SerialException as e:
      print(f"Error al enviar datos: {e}")
  else:
    print("Puerto serial no disponible.")
This one is the function called when we press the send button, this will check is the serial communication is open,
and if it is it will create the local variable value, which will contain the slider value then it will try to write the value on the parameters of the
serial communication already established. It will write it as bytes.
And if the serial communication is not ready or there is a problem it will send a error message.
And that's basically it, a pretty simple but functional code.
This is what it sees like
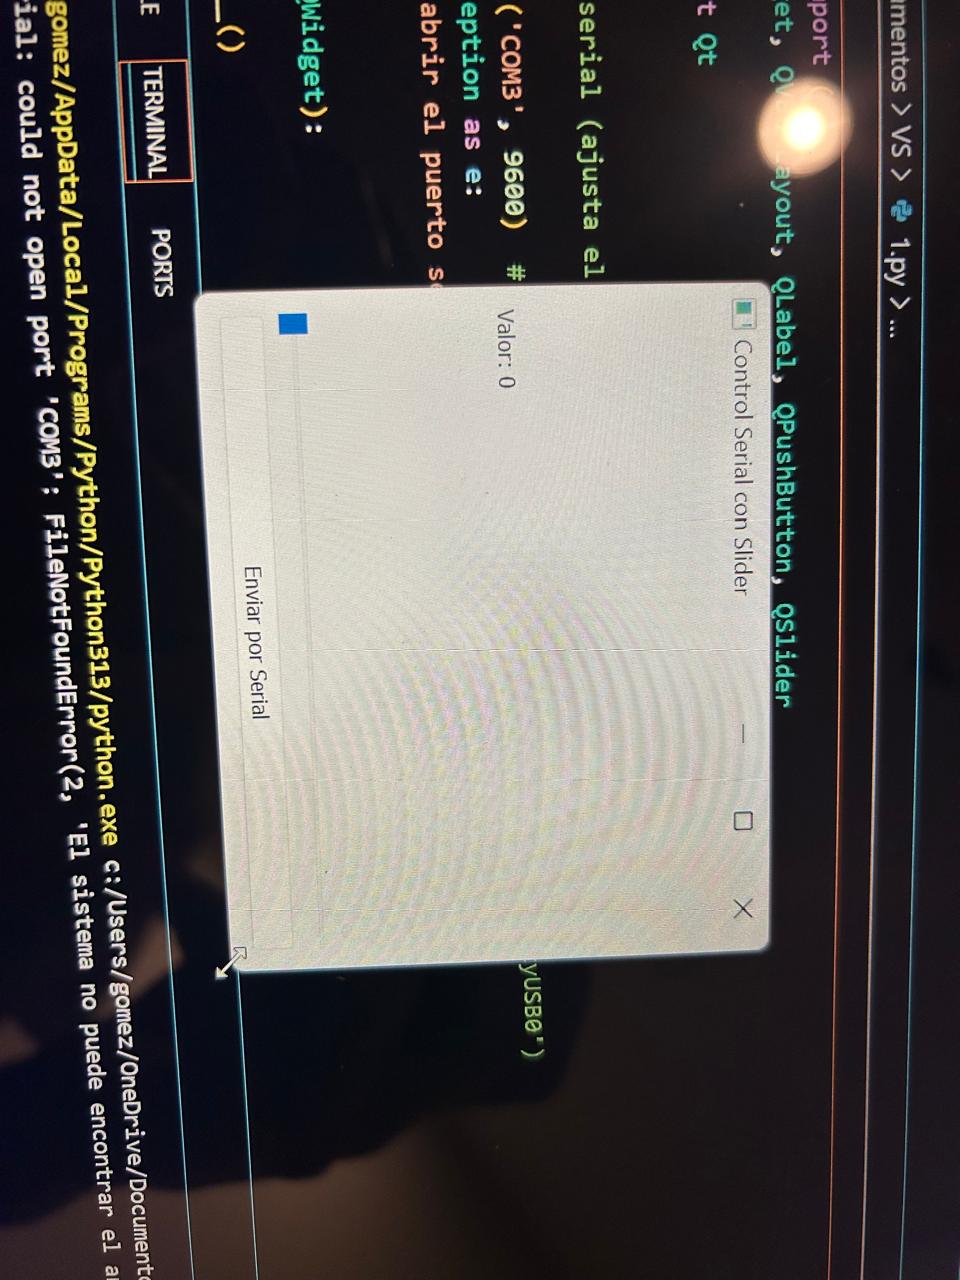
As I said, a very very simple but functional interface. We can see the Vertical box lay out because each object is on top of the other. If we wanted it one next to the other we would have to use a Horizontal Box layout.
The file
The micro controller code
This code is even easier than the first one because is just reading and setting a led intensity. Pretty easy.
#define ledPin A0 // Pin PWM para controlar el LED

void setup() {
  pinMode(ledPin, OUTPUT);
  Serial.begin(9600); // Inicializa la comunicación serial
}

void loop() {
  if (Serial.available() > 0) {
    int valor = Serial.read(); // Lee el valor (0-255)

    // Asegura que esté en el rango permitido
    valor = constrain(valor, 0, 255);

    analogWrite(ledPin, valor); // Ajusta el brillo del LED
  }
}
I think there's no need to explain this code, in this website we have already seen this commands, how ever, once again, chatGPT helped me with this one.
- There is the define section, where I tell the micro in which pin is the led
- Void set up, setting the pin mode (output) and begin the serial communication, the Bauds have to the same as the first code.
- And the void loop, make sure there is serial communication, read the messages on the serial port and save on the value variable, make sure the value is among the needed interval and write the analog value on the pin led.
Easy peasy lemon squeezy.
The final product
The file
Learning outcome
I learned two important things
- Programming on Qt is nothing like programming in just python, you use it, but is not the same logic, here you will use more interruptions and im pretty sure, many other commands that I haven't seen. but yeah is not the same.
- Using the same port for writing and reading messages on serial communication is possible "I think" but is quite messy, tried it adding a button so I can read and write on the same project but it was messy, I no to keep searching to figure it out.