Week 11. Networking and communications
But first
How does it work?
Hey there, a few weeks later but here we are making it.
Communications, this is what it is, talk from one device to another device. There two main categories, wired communications and wireless communications.
In this week I'll be trying wired communications. Now within the wired communications there are 2 main types, parallel and serial. A quick explication of what is each one.
The parallel communications are what it says, they need a pin for each beat that you want to send, and as each bit has its own pin you can send them at the same time. Take a look to the next image so you can understand it better.
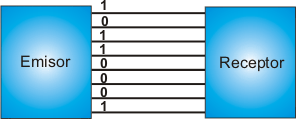
Each bite is sended on each wire, this kind of communication is very fast and efficient but there is one big problem, you need a lot of pins. Imagine, just to send a 2 digit number on binary you would need 4 pins.
A great example of this kind of communications is the always old "parallel ports".
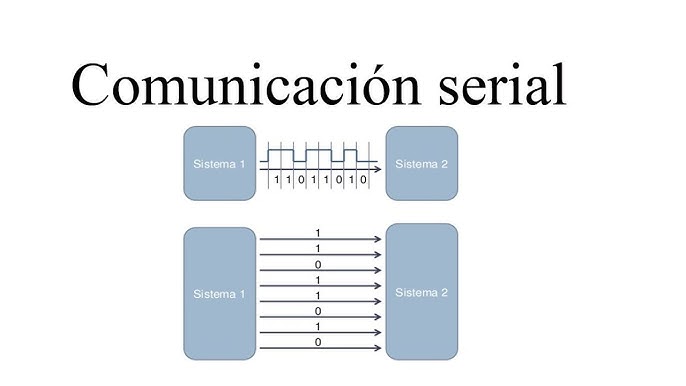
That's why the serial communication came out. As it's name says, you are sending a byte after another, this allows you to use just one wire for sending and one for receiving. So you are available to send and receive complex messages with just two wires.
Let's look a comparison:
Now, there are different types within this type of communication, for example:
-
I2C
Which is very used when connecting micro controller - micro controller, or different things like a LCD screen. This uses a "master" - "Slave" System -
UART
Which I categorized as the one that allows you to talk from a pc to a micro controller. - Among others
What did I do?
What I basically did was, give instructions from my PC to my micro controller, So I used UART communication. I had to create 2 codes on 2 different languages.
I programmed the micro controller with arduino, and I created a code with python on my computer.
Now here is something important to mention and to say. The mention is that I took the main code for the UART communication from a teammate of
the machine week
, Erwin, thanks a lot, you basically taught me this.
On this assignment is basically everything, just go the codes part and you will find everything there.
The micro controller code
  #include <)Wire.h>
  #include <)LiquidCrystal_I2C.h>

  LiquidCrystal_I2C lcd(0x27,16,2);

  String serialLine = "";

  void setup() {
    // put your setup code here, to run once:
    Serial.begin(115200);
    lcd.init();
    lcd.backlight();
    lcd.setCursor(0,0);
    lcd.print("Debería empezar a imprimir lo que mande desde mi compu");
    delay(1000);

  }

  void loop() {
    // put your main code here, to run repeatedly:
    while (Serial.available()){
      lcd.clear();
      char c = Serial.read();
      lcd.print(c);
      delay(1000);
      Serial.println("ok");
      serialLine = "";
    }
  }
Let me explain it. As I'm using a LCD screen to see what the PC is sending, I added the wire library (you will need this library every time you work with I2C), and the
library to communicate with the screen with I2C.
Then I set the direction and the size of the screen. And after this the communication parameters start, I will explain this ignoring the LCD. part
String serialLine = "";
Declare a "string" variable, which will contain the message.
Serial.begin(115200);
Start the serial communication.
while (Serial.available()){

}
Make sure to read everything on the serial communication channel.
char c = Serial.read();
Read the message on the channel.
lcd.print(c);
Print the message.
Serial.println("ok");
And then tell send an "ok" to tell the other program, the micro controller is ready to receive the next message.
The code on the computer
  import serial
  import time

  PORT = "COM4"
  BAUD_RATE = 115200
  time.sleep(2)
  a = str(0)

  try:
    ser = serial.Serial(PORT, BAUD_RATE, timeout=2)
    print(f"Conectado a {PORT} a {BAUD_RATE} baudios")
  except serial.SerialException:
    print(f"Error al conectar al puerto {PORT}")

  for i in range (0,10,1):
    print(f"Enviando {a}")
    ser.write((a + "\n").encode())

    response = ""
    while True:
      if ser.in_waiting > 0:
        response += ser.read(ser.in_waiting).decode()
        if "ok" in response.lower():
          print("Recibido: ok\n")
          break

  ser.close()
  print("Envio finslizado")
Let's explain this code, this is almost pure serial communication and the first thing we have to do is import some libraries
import serial
import time
The first library we have to install it, so just go to the terminal on your computer and paste this pip install pyserial and the second one just import it.
PORT = "COM4"
BAUD_RATE = 115200
time.sleep(2)
Define some important parameters ike the port, in which por are you connecting the micro controller, this depends on each computer.
And define the BAUD_RATE, This is how many bits per second are you sending. Important, you have to set the same ratio on both codes, other way it won't work.
Then you can give a gew seconds for the system to set the parameters.
try:
    ser = serial.Serial(PORT, BAUD_RATE, timeout=2)
    print(f"Conectado a {PORT} a {BAUD_RATE} baudios")
except serial.SerialException:
    print(f"Error al conectar al puerto {PORT}")
Here we are telling the code to try connecting the selected port. The "try" - "except" function works like and "if"-"else".
If the connection is successful it will create the variable "ser" and the program will run.
If it is not successful it won't create the "ser" variable and the program will print the error message, continue and give an error.
ser.write((a + "\n").encode())
This part will write on the previous variable that contains the information of where to send it. It will send th message we want and we have to add the "\n" because this will tell the code where the message ends. This command can be interpreted as a line jump or "enter". Now the last part encode() will turn our message into binary system so the machine can send it.
while True:
    if ser.in_waiting > 0:
    response += ser.read(ser.in_waiting).decode()
    if "ok" in response.lower():
        print("Recibido: ok\n")
        break
This block is basically the one that waits for and answer form the micro controller, and it wont change unless there is actually a response. That's why it is on a "while True" loop. Then, the "if" asks the serial port is there is something trying to get in, is there is something the sentence will we more than 1, so "response" variable will take the data waiting on the port. and will decode it. In this case as we are sending "ok" to let the program know is all ready, the second "if" will lok for a "ok" on the response. and then it will break the sentence and continue with the code and restarting the code.
ser.close()
As it says this line will close the serial communication so the program ends.
The physical circuit
This isn't even a circuit, I just connected a LCD screen with the I2C module to my micro controller and showed there the messages. The connection is the next one:
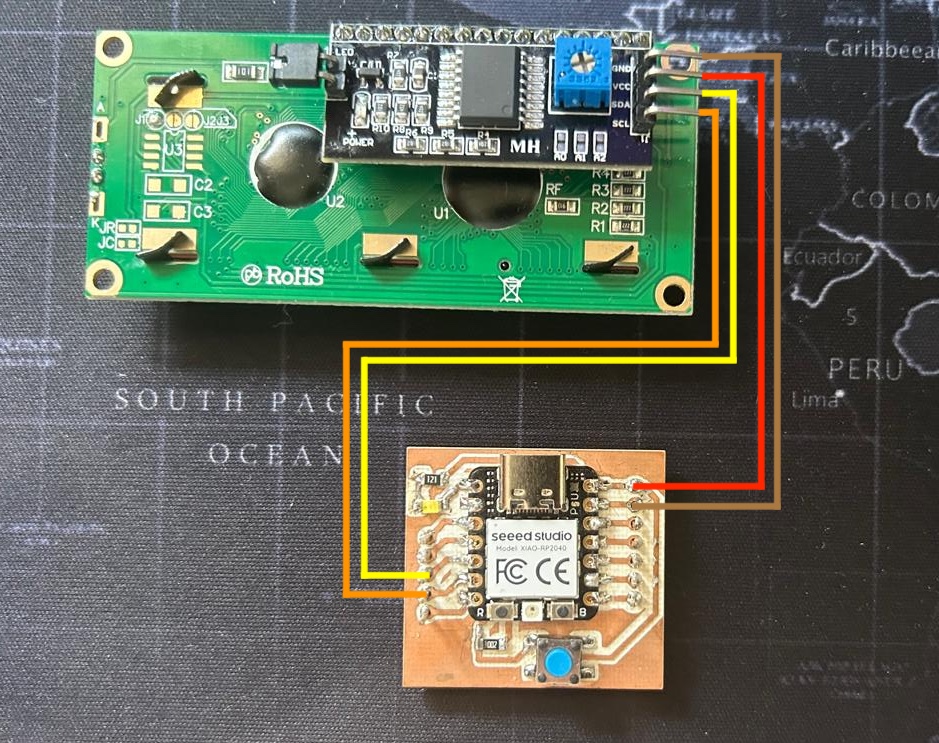
Once yu have all connected you just have to connect the micro controller to the computer by USB, send the code to the micro controller, run both codes and wait for the magic to happened.
Very important NOTE, You have to connect the USB on the same port you programed on the python code, other way th connection will fail and the code will not run.
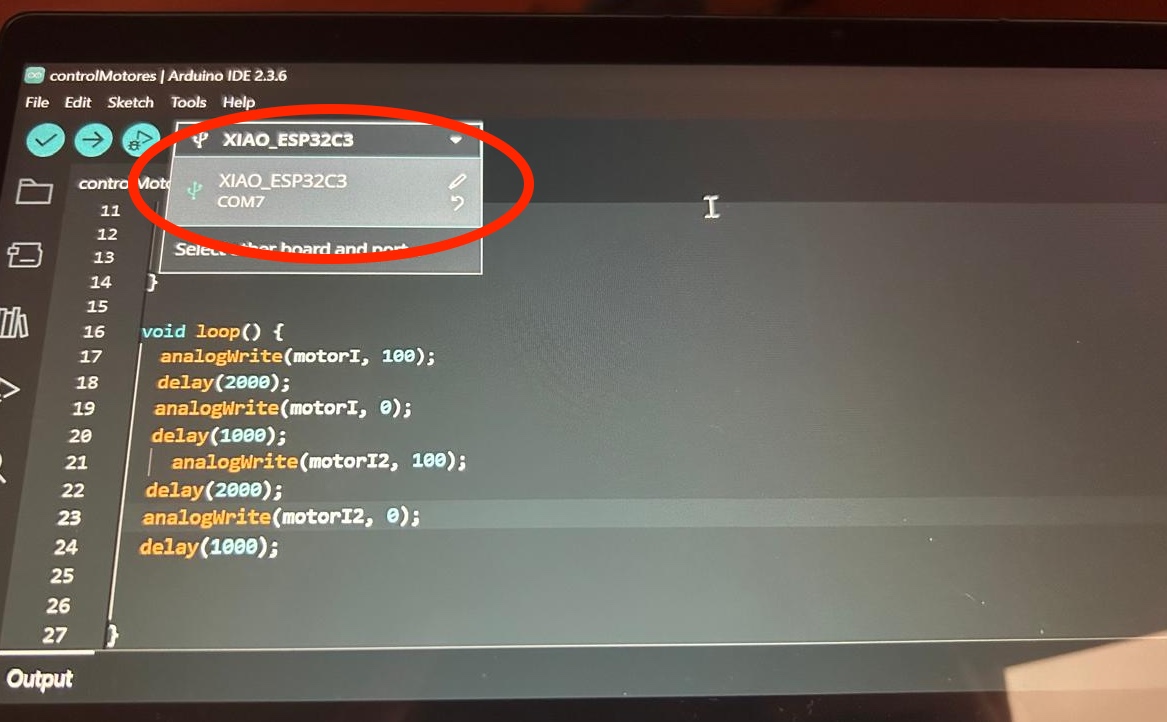
But how do I know which port is it?, There is an easy way to answer that question and is with the arduino IDE. When you are writing a code on the arduino IDE it asks you to set the micro controller you are working with the in which "COM" port do you have it connected. Right there:
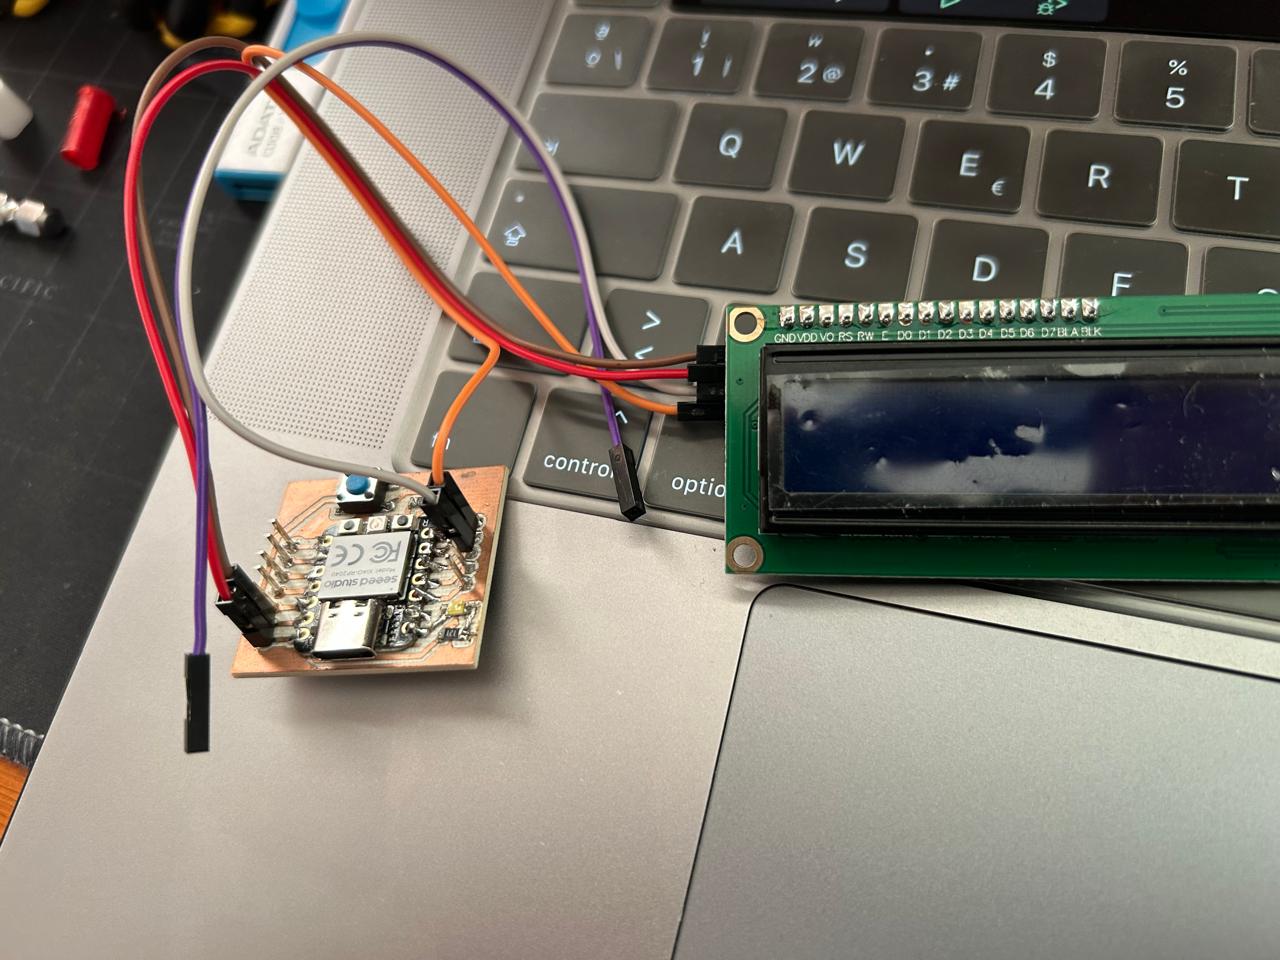
The final product
As you can see the computer is printing what it is sending, and a few seconds later you can see it on the LCD screen, how ever there are a few issues here, the first one, there is the cero, but the next character is a 3 line something.
This special character is the "\n" that we are writing on the code to tell the system where does the message ends. We need this but we don't want it to be showed. So we have to take it out of the printing message.
The second issue is that, as you can see there is a delay between the first code and the LCD screen. This is because the micro controller is reading and showing character by character of the message, and in this case we have 2 characters: "0" and "\n".
So there is the delay, we have to read the hole message at once and disappear the "\n" of the printed message.
And now that we will edit the code we can add some "waiting" message while there is nothing on the serial port.
The better final product
The code
#include <)Wire.h>
#include <)LiquidCrystal_I2C.h>

LiquidCrystal_I2C lcd(0x27,16,2);

String serialLine = "";

void setup() {
  // put your setup code here, to run once:
  Serial.begin(115200);
  lcd.init();
  lcd.backlight();
  lcd.setCursor(0,0);
  lcd.print("Debería empezar a imprimir lo que mande desde mi compu");
  delay(2000);
  lcd.clear();

}

void loop() {
  // put your main code here, to run repeatedly:
  if (Serial.available() == 0){
    lcd.setCursor(0,0);
    lcd.print("En espera");
  }
  while (Serial.available()){
    lcd.clear();
    String c = Serial.readStringUntil('\n');
    lcd.print(c);
    delay(500);
    lcd.clear();
    Serial.println("ok");

  serialLine = "";
  }
}
The code changed a little bit, but let's take a look.
The libraries are the same, the set up loop is the same, and on the void loop, there are 2 man changes:
if (Serial.available() == 0){
  lcd.setCursor(0,0);
  lcd.print("En espera");
}
This reads the serial port and if there is nothing to read, it will place the text on the (0,0) position of the LCD screen and print, "en espera" = "waiting" until there is something
String c = Serial.readStringUntil('\n');
This line solves kind of both issue, because in difference with the first command to read the message, this reads until a certain character, and in this case is the "\n" character, ths means, the variable will be a string as long as the message, and it will not include the "\n" character. And that's it.