- Week 1 : Project Management
- Week 2 : Computer-aided
- Week 3 : Computer Controlled Cutting
- Week 4 : Embedded Programming
- Week 5 :3D Scanning and Printing
- Week 6 : Electronic Design
- Week 7 : Computer Controlled Machining
- Week 8 : Electronics Production
- Week 9 : Input Devices
- Week 10 : Output Devices
- Week 11 : Networking and Communication
- Week 12 : Mechanical Design and Machine Design
- Week 14 : Molding and Casting
- Week 15 : Interface and Application Programming
- Week 16 : System Integeration
- Week 17 : Wildcard Week
- Week 18 : Applications and Implications, Project Development
- Week 19 : Invention, Intellectual property and Income
- Week 20 : FInal Project Requirements
Week 15 : Interface and Application Programming
Objectives of the Week
Group Assignment Contribution
For More about Group Assignment
Introduction to Graphical User Interfaces (GUI)
A Graphical User Interface (GUI) is a visual platform that enables users to interact with electronic systems through graphical elements such as buttons, indicators, images, text, and animations instead of command-line instructions. GUIs improve user experience by presenting information in an intuitive and interactive format.
In embedded systems, graphical interfaces play an important role in visualizing sensor data, monitoring system status, controlling hardware devices, and providing real-time feedback to users. By integrating a GUI with a microcontroller, physical inputs can be converted into meaningful visual outputs that are easier to understand and analyze.
For this assignment, I developed a Processing-based graphical application that communicates with a Seeed Studio XIAO ESP32-C3 through serial communication. The application receives real-time joystick data from the microcontroller and visualizes the movement on the screen using dynamic graphical elements. This demonstrates the interaction between embedded hardware and software applications through a user-friendly interface.
Project Overview
The objective of this project was to establish communication between a Seeed Studio XIAO ESP32-C3 and a Processing application running on a computer. A joystick module was connected to the microcontroller, which continuously measured the X-axis and Y-axis positions and transmitted the values through USB serial communication.
The Processing application received the incoming data stream and converted the joystick readings into graphical movements on the screen. A circular graphical object was used to represent the joystick position, providing real-time visual feedback whenever the joystick was moved.
This project demonstrates the complete workflow of interface and application programming, including hardware interfacing, serial communication, data processing, and graphical visualization.
Software Installation and Development Tools
Two software environments were used to complete this assignment: Arduino IDE and Processing. Arduino IDE was used to develop and upload the firmware to the Seeed Studio XIAO ESP32-C3, while Processing was used to create the graphical user interface that visualizes the joystick data in real time.
The Arduino IDE provides the necessary tools for writing, compiling, and uploading embedded programs to the microcontroller. Processing provides a simplified environment for developing interactive graphical applications with built-in support for serial communication.
| Software | Purpose | Download Link |
|---|---|---|
| Arduino IDE | Firmware development and uploading code to the XIAO ESP32-C3. | Download Arduino IDE |
| Processing | Development of the graphical user interface and serial communication. | Download Processing |
After installing both software packages, the XIAO ESP32-C3 board package was configured in Arduino IDE, and the Processing environment was prepared for serial communication and graphical application development.
Arduino IDE used for firmware development.
Processing IDE used for GUI development.
Hardware Setup
The hardware used for this assignment consists of a Seeed Studio XIAO ESP32-C3 and a two-axis joystick module. The joystick serves as the primary input device, allowing the user to generate analog position values along the X and Y axes. These values are read by the microcontroller and transmitted to the Processing application through serial communication.
The XIAO ESP32-C3 was selected because of its compact size, built-in USB communication, and support for analog input channels. The joystick module provides variable voltage outputs that change according to the movement of the joystick, making it suitable for real-time interface applications.
Components Used
| Component | Quantity |
|---|---|
| Seeed Studio XIAO ESP32-C3 | 1 |
| Joystick Module | 1 |
| USB Type-C Cable | 1 |
| Jumper Wires | 4 |
Wiring Connections
| XIAO ESP32-C3 | Joystick Module |
|---|---|
| 3.3V | VCC |
| GND | GND |
| A0 | VRX |
| A1 | VRY |
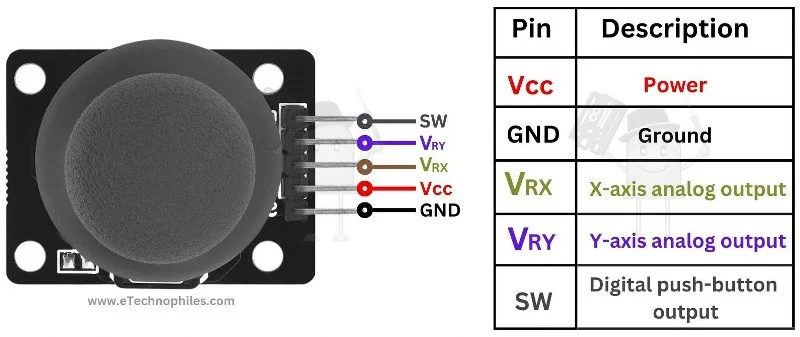
The joystick's X-axis output was connected to analog pin A0, while the Y-axis output was connected to analog pin A1. The module was powered directly from the 3.3V supply of the XIAO ESP32-C3. As the joystick moves, the analog voltage levels vary, allowing the microcontroller to continuously monitor its position.
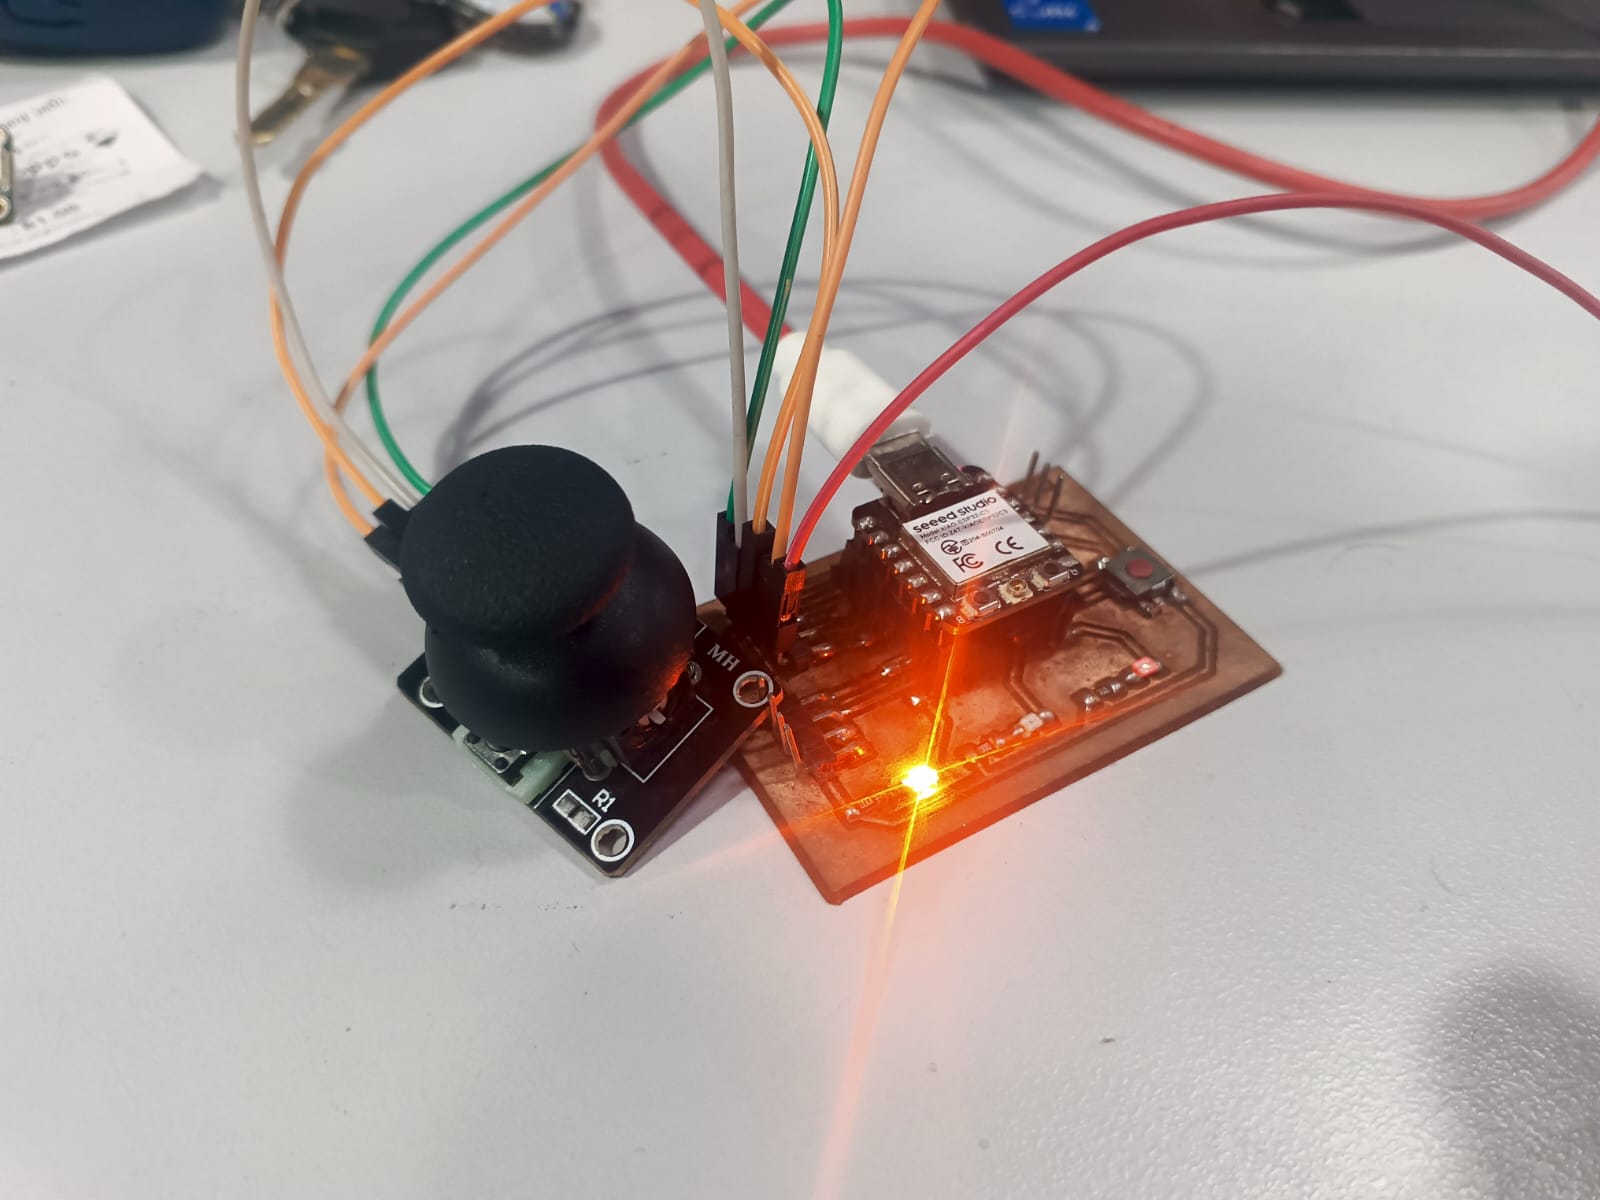
Figure: Wiring connection between the Seeed Studio XIAO ESP32-C3 and the joystick module.
XIAO ESP32-C3 Firmware
The Seeed Studio XIAO ESP32-C3 was programmed using the Arduino IDE to continuously acquire joystick position data and transmit it to the Processing application through serial communication. The microcontroller reads the analog voltages generated by the joystick and converts them into digital values using its built-in Analog-to-Digital Converter (ADC).
The acquired X-axis and Y-axis values are formatted as comma-separated data and transmitted through the USB serial interface at a baud rate of 115200 bps. This format simplifies data parsing on the Processing side and enables real-time communication between the embedded hardware and the graphical application.
Program Workflow
- Initialize serial communication at 115200 baud.
- Read joystick X-axis value from analog pin A0.
- Read joystick Y-axis value from analog pin A1.
- Format the readings into a comma-separated string.
- Transmit the values through the serial port.
- Repeat continuously to provide real-time updates.
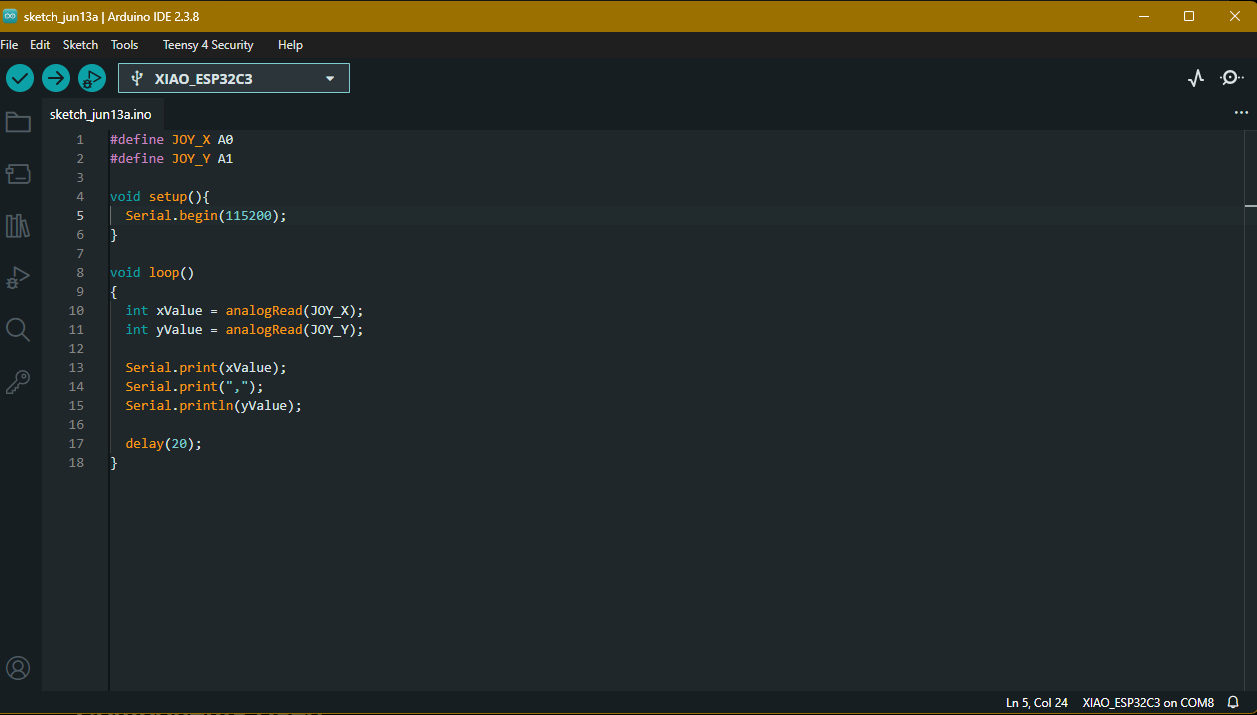
XIAO ESP32-C3 Source Code
            // =====================================================
            // XIAO ESP32-C3 Joystick Interface
            // Sends X,Y values to Processing
            // =====================================================

            #define JOY_X A0
            #define JOY_Y A1

            void setup()
            {
            Serial.begin(115200);
            }

            void loop()
            {
            int xValue = analogRead(JOY_X);
            int yValue = analogRead(JOY_Y);

            Serial.print(xValue);
            Serial.print(",");
            Serial.println(yValue);

            delay(20);
            }
The transmitted data follows the format shown below, where the first value represents the X-axis position and the second value represents the Y-axis position of the joystick.
            2048,1987
            2150,2050
            1875,2301
            1980,1900
This serial data stream is continuously monitored by the Processing application, allowing the graphical interface to respond immediately to joystick movement.
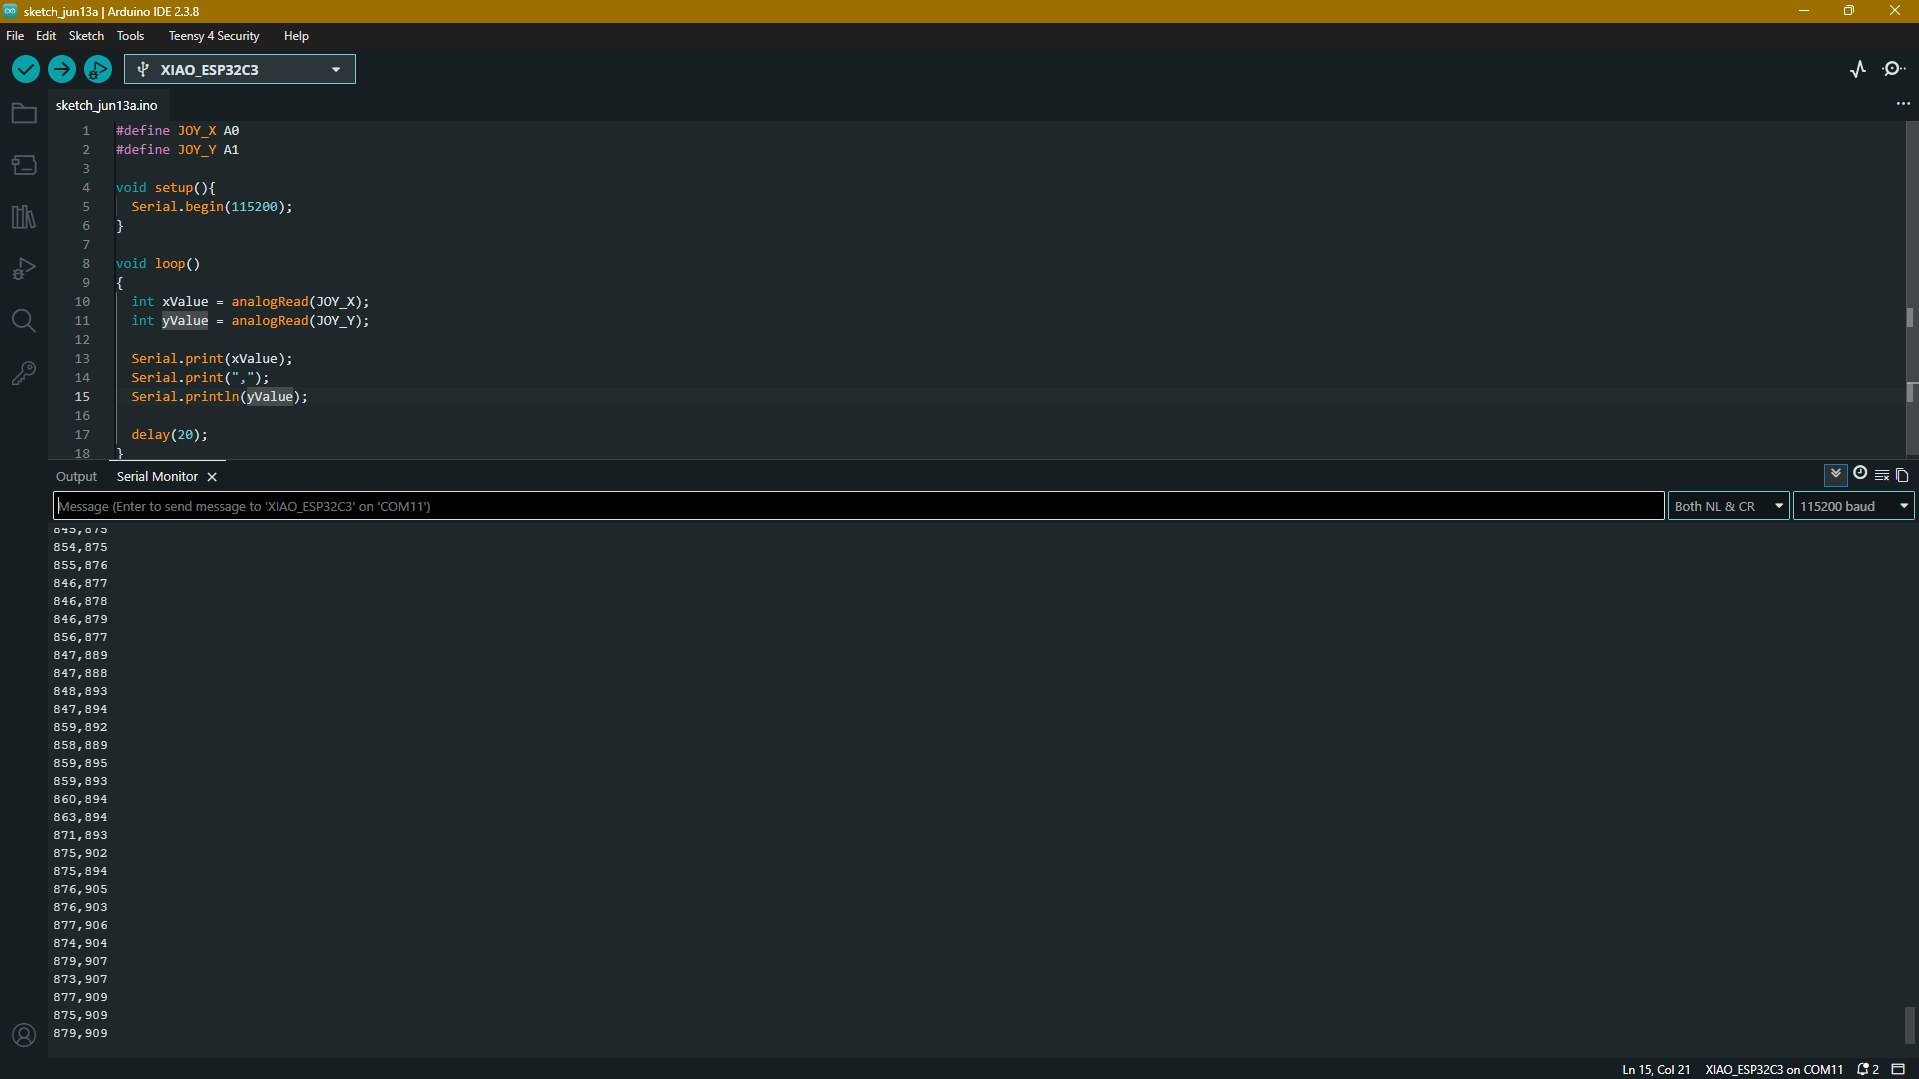
Figure: Real-time joystick values transmitted by the XIAO ESP32-C3 through serial communication.
Working with Processing
Processing is an open-source programming environment designed for creating visual and interactive applications. It provides a simplified framework for graphics rendering, animation, and serial communication, making it an excellent platform for developing interfaces that interact with embedded hardware.
In this assignment, Processing was used to create a graphical user interface that visualizes joystick movements received from the Seeed Studio XIAO ESP32-C3. The application receives real-time serial data from the microcontroller and converts the incoming values into graphical movements on the computer screen.
Unlike traditional software development environments, Processing allows rapid development of interactive applications using a simplified syntax while still providing access to advanced graphical capabilities. This makes it particularly suitable for prototyping human-machine interfaces and embedded visualization systems.
Why Processing Was Selected
- Built-in support for serial communication.
- Simple environment for creating graphical interfaces.
- Real-time rendering and animation capabilities.
- Cross-platform compatibility.
- Easy integration with Arduino and ESP32-based systems.
The Processing application acts as the software interface of the project. It continuously receives joystick data from the microcontroller and updates the visual representation without requiring manual refresh operations.
Processing Development Environment
Before developing the graphical interface, the Processing IDE was installed and configured on the host computer. The environment provides a code editor, execution console, graphics engine, and serial communication library required for developing interactive applications.
The Processing IDE was used to write, compile, and execute the graphical application responsible for receiving joystick data and visualizing it in real time.
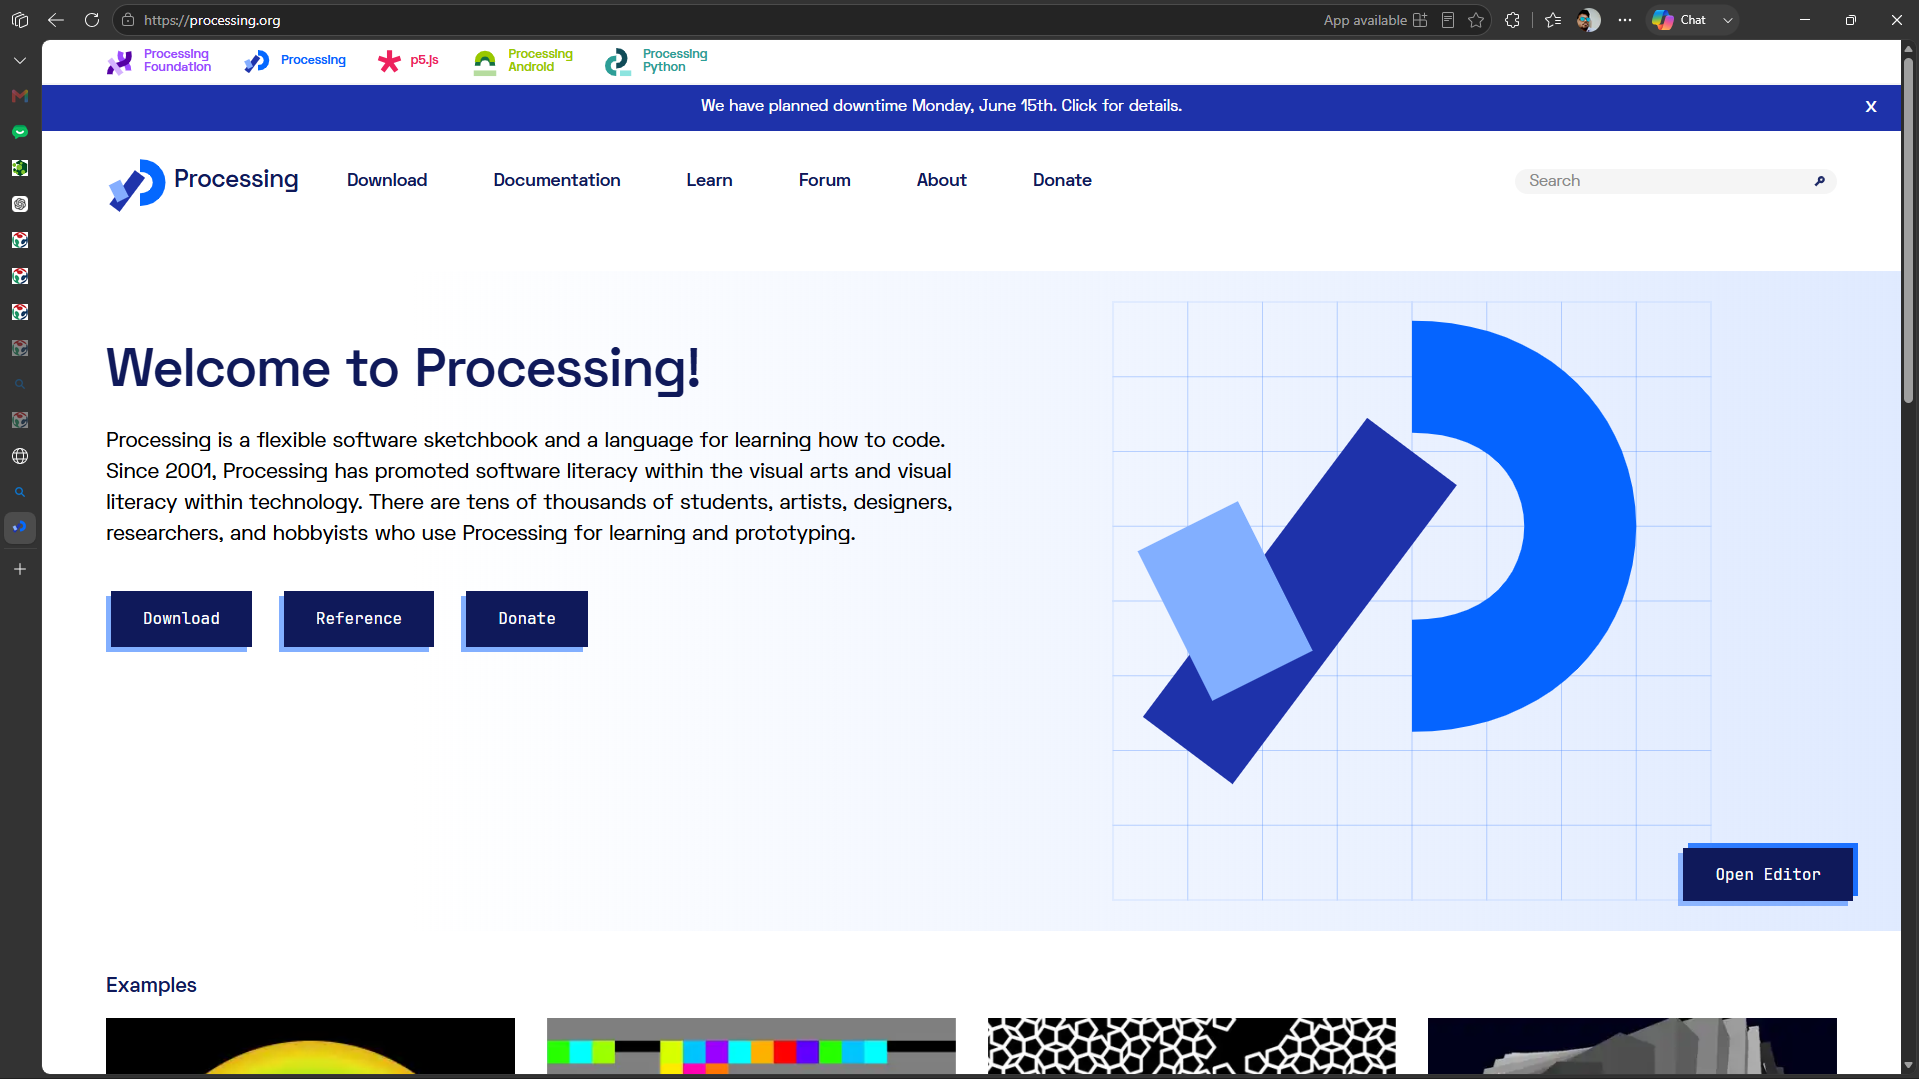
Figure: Processing development environment used for creating the graphical user interface.
Processing Application Development
The graphical user interface was developed using Processing and was designed to visualize joystick movements in real time. The application receives analog position data from the Seeed Studio XIAO ESP32-C3 through serial communication and converts the incoming values into graphical movements on the screen.
The application consists of four major functional blocks:
- Serial Communication Initialization
- Graphical User Interface Setup
- Real-Time Data Visualization
- Serial Data Processing
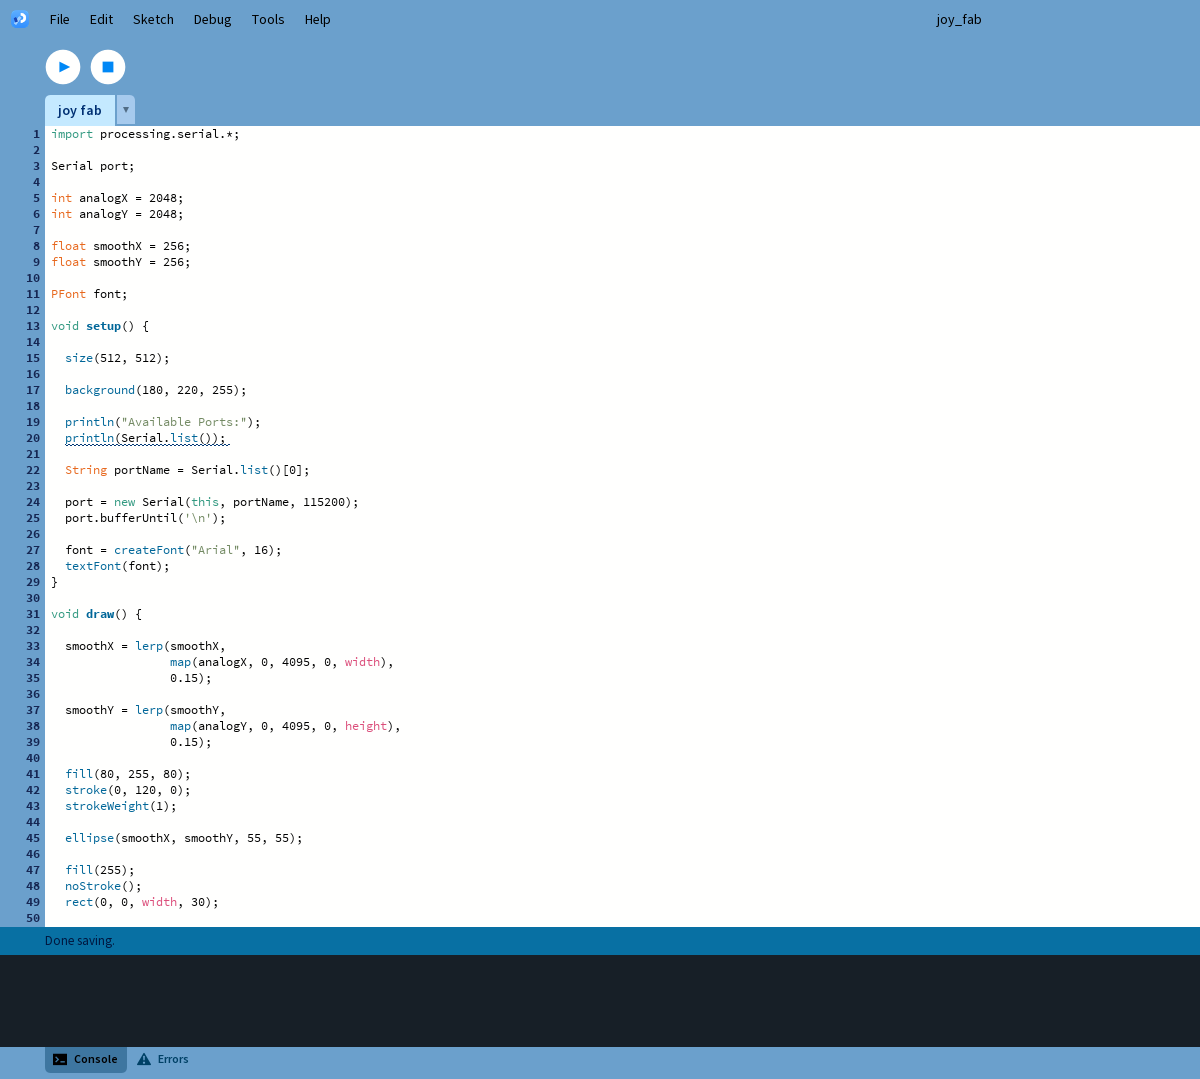
Complete Processing Source Code
                import processing.serial.*;

                Serial port;

                int analogX = 2048;
                int analogY = 2048;

                float smoothX = 256;
                float smoothY = 256;

                PFont font;

                void setup() {

                size(512, 512);

                background(180, 220, 255);

                println("Available Ports:");
                println(Serial.list());

                String portName = Serial.list()[0];

                port = new Serial(this, portName, 115200);
                port.bufferUntil('\n');

                font = createFont("Arial", 16);
                textFont(font);
                }

                void draw() {

                smoothX = lerp(smoothX,
                                map(analogX, 0, 4095, 0, width),
                                0.15);

                smoothY = lerp(smoothY,
                                map(analogY, 0, 4095, 0, height),
                                0.15);

                fill(80, 255, 80);
                stroke(0, 120, 0);
                strokeWeight(1);

                ellipse(smoothX, smoothY, 55, 55);

                fill(255);
                noStroke();
                rect(0, 0, width, 30);

                fill(0);
                text("AnalogX = " + analogX +
                    "   AnalogY = " + analogY,
                    10, 20);
                }

                void serialEvent(Serial port) {

                String data = port.readStringUntil('\n');

                if (data != null) {

                    data = trim(data);

                    String values[] = split(data, ',');

                    if (values.length >= 2) {

                    analogX = int(values[0]);
                    analogY = int(values[1]);
                    }
                }
                }

                void keyPressed() {

                if (key == 'c' || key == 'C') {

                    background(180, 220, 255);
                }
                }
Serial Communication Initialization
The first step in the application was establishing serial communication between the computer and the XIAO ESP32-C3. The Processing Serial library was imported and configured to communicate at 115200 baud, matching the baud rate used by the microcontroller.
                import processing.serial.*;

                Serial port;

                String portName = Serial.list()[0];

                port = new Serial(
                    this,
                    portName,
                    115200
                );

                port.bufferUntil('\n');
The bufferUntil('\n') function ensures that Processing waits until an entire line of data is received before attempting to process it.
Graphical User Interface Setup
The graphical interface was created using a 512 × 512 pixel canvas. A custom font was loaded for displaying joystick values, while a light blue background was selected to improve visual clarity.
                size(512,512);

                background(
                    180,
                    220,
                    255
                );

                font = createFont(
                    "Arial",
                    16
                );

                textFont(font);
This initialization stage prepares the graphical environment before any joystick data is received.
Real-Time Visualization
The joystick position is represented by a green circle that moves dynamically across the screen. The incoming analog values are mapped from the ADC range of the ESP32-C3 to the dimensions of the Processing window.
To achieve smoother movement, the lerp() function was used. This interpolation technique reduces sudden jumps and creates a more natural visual response.
                smoothX = lerp(
                    smoothX,
                    map(
                        analogX,
                        0,
                        4095,
                        0,
                        width
                    ),
                    0.15
                );

                smoothY = lerp(
                    smoothY,
                    map(
                        analogY,
                        0,
                        4095,
                        0,
                        height
                    ),
                    0.15
                );
The graphical position is continuously updated inside the draw() function, creating a real-time visual representation of joystick movement.
User Interface Design and Visualization
The graphical user interface was designed to provide a simple and intuitive visualization of joystick movement. The interface receives real-time analog values from the Seeed Studio XIAO ESP32-C3 and converts them into graphical motion on the screen.
A green circular indicator was used to represent the joystick position. As the joystick is moved, the circle moves correspondingly across the Processing window. This creates a direct visual relationship between the physical movement of the joystick and the graphical representation displayed on the computer.
The interface also displays the live analog values of the X-axis and Y-axis at the top of the window. This allows the user to monitor the actual data being received from the microcontroller while simultaneously observing the graphical response.
User Interface Features
- Real-time joystick position visualization.
- Continuous serial communication with the XIAO ESP32-C3.
- Smooth graphical movement using interpolation.
- Live display of analog X and Y values.
- Simple and responsive user interaction.
- Visual feedback without requiring additional hardware outputs.
To improve the visual experience, smoothing functions were implemented within the Processing application. This prevents sudden jumps in position and creates a more natural movement of the graphical object.
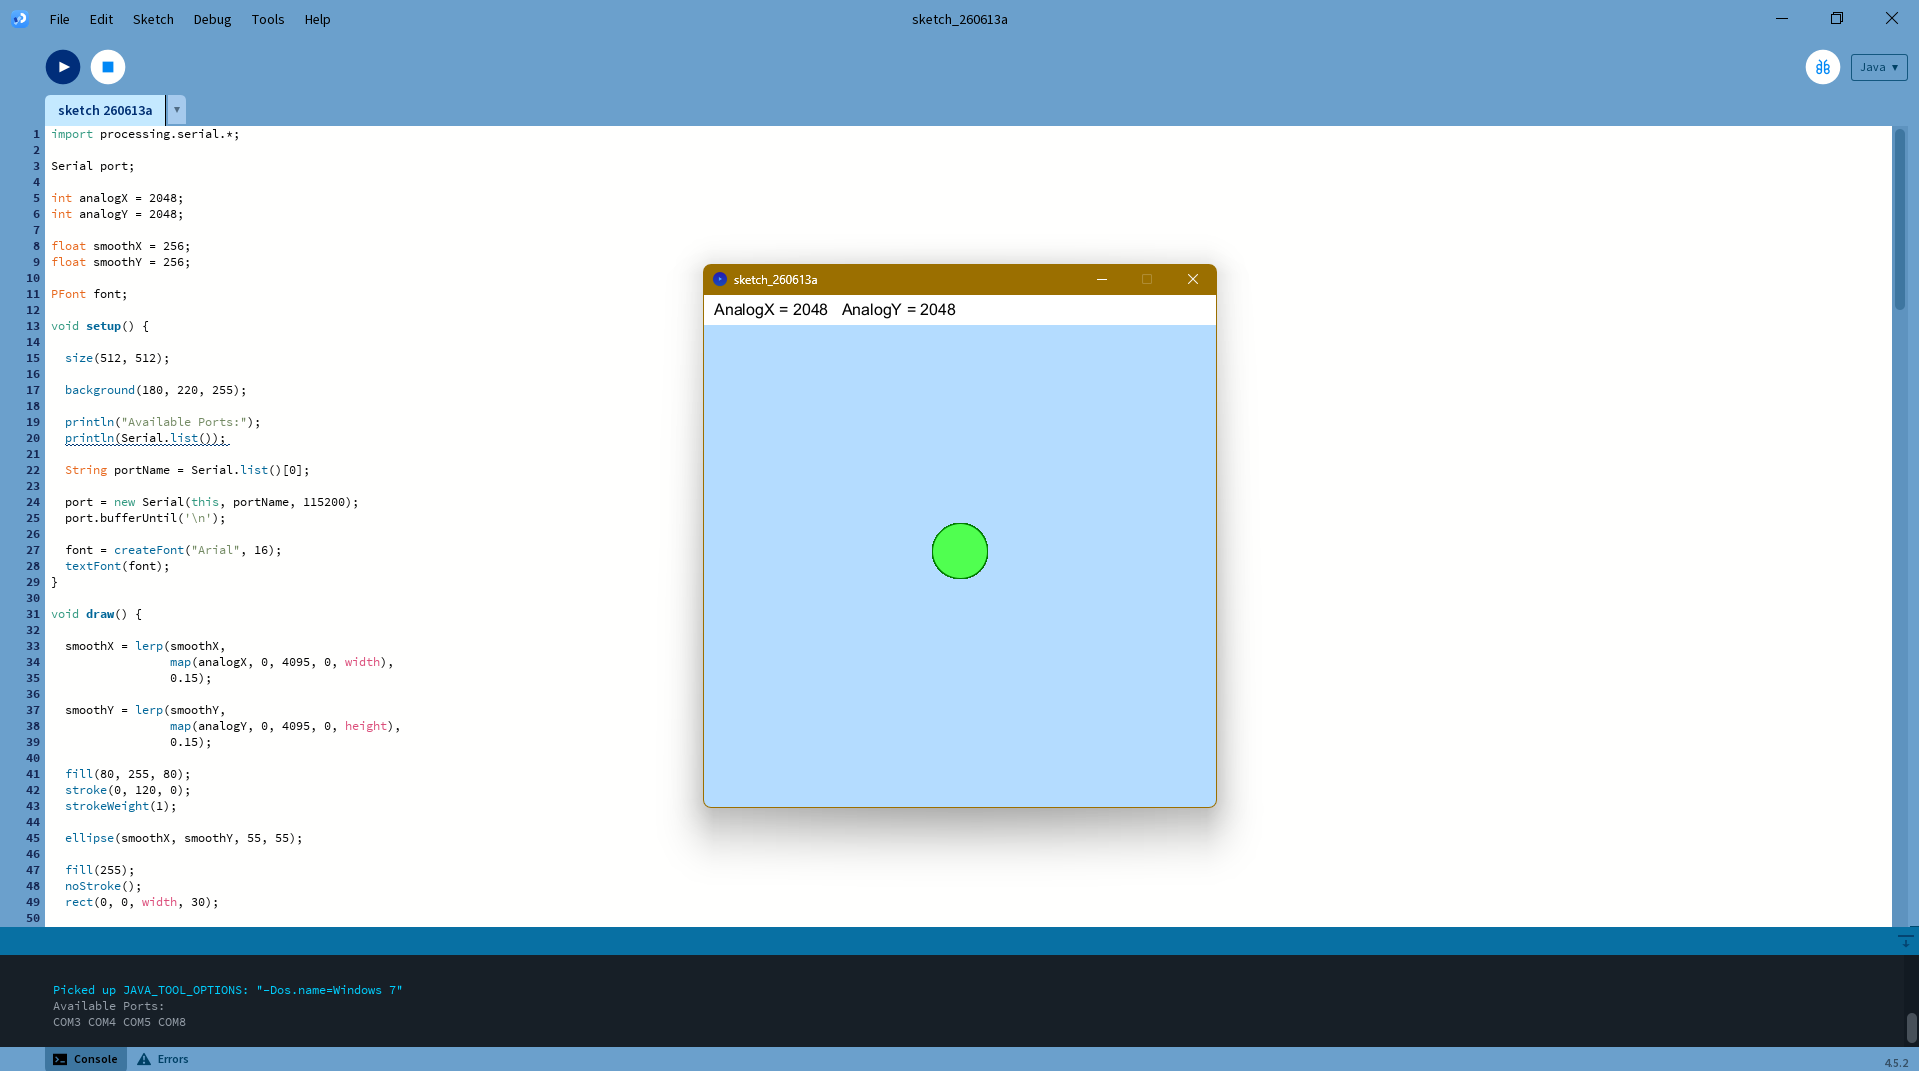
Figure: Real-time visualization of joystick movement in the Processing application.
Communication Between the Application and Microcontroller
Communication between the Seeed Studio XIAO ESP32-C3 and the Processing application was established through USB serial communication at a baud rate of 115200 bps. The microcontroller continuously reads the joystick position and transmits the X-axis and Y-axis values to the computer.
The transmitted data is formatted as a comma-separated string, allowing the Processing application to easily parse and process the incoming information.
                2048,1987
                2150,2050
                1875,2301
                1980,1900
The Processing application continuously monitors the serial port using the serialEvent() function. Whenever a complete line of data is received, the values are separated, converted into integers, and stored for graphical processing.
The received joystick values are mapped to screen coordinates and used to update the position of the graphical indicator. This creates real-time interaction between the physical joystick and the software application.
The successful transmission and visualization of joystick data confirmed reliable communication between the embedded hardware and the graphical user interface.
Problems Encountered and Solutions
During the development of this project, several challenges were encountered while establishing communication between the XIAO ESP32-C3 and the Processing application. These issues were systematically identified and resolved through testing and debugging.
Issue 1: Serial Port Detection
Initially, the Processing application was unable to receive data from the microcontroller because an incorrect serial port was selected. Since multiple COM ports were available on the computer, the application attempted to connect to the wrong device.
To solve this issue, the Serial.list() function was used to display all available serial ports in the Processing console. After identifying the correct port associated with the XIAO ESP32-C3, the application was updated to use the appropriate port for communication.
Issue 2: Baud Rate Mismatch
Reliable communication requires both the microcontroller and the Processing application to operate at the same baud rate. During initial testing, inconsistent data reception occurred due to mismatched serial communication settings.
This issue was resolved by configuring both the XIAO ESP32-C3 firmware and the Processing application to communicate at 115200 baud, ensuring stable and error-free data transfer.
Issue 3: Abrupt Graphical Movement
Directly mapping raw joystick values to screen coordinates resulted in sudden jumps and jerky movement of the graphical indicator. This reduced the visual quality of the user interface.
To improve the user experience, the lerp() interpolation function was implemented within the Processing application. This smoothing technique gradually transitions between positions, producing more natural and responsive movement.
Issue 4: Analog Input Fluctuations
Small variations in joystick readings caused minor fluctuations in the displayed position, even when the joystick was stationary. These variations are common in analog sensors and can affect visualization accuracy.
The smoothing algorithm reduced the effect of these fluctuations and provided a more stable graphical representation of joystick movement.
After resolving these issues, the application successfully established reliable communication with the XIAO ESP32-C3 and provided smooth real-time visualization of joystick inputs.
Conclusion
This offers a simple yet powerful introduction to interfacing embedded hardware with visual interfaces. By combining Seeed XIAO with Processing, beginners can learn about real-time data communication, sensor integration, and graphical interaction—all essential skills in embedded systems and human-computer interaction.
Hero Shot
The final application successfully established communication between the Seeed Studio XIAO ESP32-C3 and the Processing graphical interface. The joystick movements were continuously transmitted through serial communication and visualized in real time within the Processing application.
As the joystick was moved along the X-axis and Y-axis, the graphical indicator responded immediately by updating its position on the screen. The application also displayed the live analog values received from the microcontroller, providing clear visual feedback of the incoming data.
This demonstration validates the complete interface programming workflow, including hardware interfacing, serial communication, data processing, and graphical visualization. The successful integration of the embedded system with the Processing application fulfilled the objectives of this week's assignment.
Finally Leaving my files here
Downloads
The software and source files used during this assignment can be downloaded using the links below.
| S.No | File Name | Description | Download |
|---|---|---|---|
| 1 | Arduino_Joystick_Code.ino | Firmware used on the Seeed XIAO microcontroller for reading joystick inputs. | Download |
| 2 | Processing_GUI.pde | Processing application source code used for joystick visualization. | Download |
| 3 | Processing Software | Official Processing IDE download page. | Download |