Assignments
Group Assignment:
- Review the safety data sheets for each of your molding and casting materials.
- Make and compare test casts with each of them.
- Compare printing vs milling molds.
Individual Assignment:
- Design a mold around the process you’ll be using, produce it with a smooth surface
finish that does not show the production process, and use it to cast parts.
Week 13 Molding and Casting
Group Reflection
This was one of the most challenging assignments, as it involved processes I had never tried before — such as mold design, material preparation, and casting. Personally, I took on the full process of creating a molded flower pot as a gift for my mom, who loves plants. I designed the pot digitally, 3D printed the mold in PLA, and used ECOCRYL® A/B resin as my casting material, which was available at the lab and nearing expiration. For the release process, I applied petroleum jelly to the mold surface and added a balloon layer to facilitate demolding.
As a group, we explored different molding and casting materials and reviewed the corresponding material safety data sheets (MSDS). For molding, I used PLA filament, which is safe and easy to handle, though it requires precise printing to avoid leaks. For casting, I used ECOCRYL® A/B, a low-viscosity acrylic polymer resin. According to the MSDS provided by Novarchem, it is classified as a hazardous substance due to its irritant properties and should be used with gloves and proper ventilation. It cures at room temperature and provides good dimensional stability, but requires careful mixing and fast pouring to avoid bubbles or premature hardening.
We also made and compared test casts using the available materials. ECOCRYL A/B proved to be rigid and detailed, but it cures very quickly. In contrast, plaster is more forgiving but less durable. These tests helped us evaluate things like flow behavior, curing time, surface finish, and bonding with the mold.
As part of our analysis, we discussed the advantages of 3D printing vs CNC milling to create molds. Printed molds using PLA are faster and allow more complex shapes, but they can be porous and less durable. Milled molds — often made of wax, machinable foam, or PMMA — result in smoother surfaces and better tolerances, but require longer machine time and appropriate bit selection. In my case, 3D printing was the most accessible and efficient option for my design.
Overall, the process included multiple steps: modeling, mold fabrication, mold prep and release application, resin mixing and pouring, curing, and demolding. I learned how small design details — like surface smoothness or draft angles — greatly affect the quality and ease of demolding. While I successfully completed the process, I identified improvements for future attempts, like better sealing of the mold and adding escape channels for trapped air. Still, it was deeply satisfying to see my digital design become a physical object, made with my own hands.
1️⃣ Introduction & Concept Inspiration
For this assignment, I decided to design and fabricate a custom flower pot as a gift for my mom, who is passionate about plants. My goal was to transform a digital design into a functional object that also had emotional meaning. I wanted the result to be detailed, durable, and easy to demold—so I had to choose the right mold material, casting material, and fabrication method.
For the mold, I chose to use 3D printing with PLA filament. PLA is biodegradable, easy to print, and provides good resolution for detailed models. It’s also widely available and compatible with my printer (Creality Ender 3 V3 SE). While other materials like silicone or resin molds can offer greater flexibility, they require more preparation, time, and often introduce additional costs. In this case, PLA was the most efficient and accessible choice for my design.
As for the casting material, I opted to use ECOCRYL® A/B, a two-component acrylic-based resin available at the FabLab. Although silicone could offer higher flexibility for some use cases, it is more expensive and unnecessary for rigid parts like a planter. ECOCRYL was ideal because of its quick curing, fine detail reproduction, and excellent surface hardness, making it suitable for decorative and functional applications. Additionally, the batch I used was about to expire, so it was a sustainable decision to take advantage of an existing resource.
This project allowed me to explore a complete workflow: from digital modeling to mold design, 3D printing, preparation and casting, and finally, post-processing. It was a deeply enriching experience, combining technical learning with a personal and emotional motivation.
2️⃣ Mold Design Development
The mold design process began with a clear personal goal: to create a custom flower pot for my mom. I started by browsing Pinterest, where I found a planter model that inspired me due to its organic and flowing shape.
Looking for a tool to quickly generate this form digitally, I explored MakerWorld's Make My Vase, a parametric web app that allows users to generate custom vases by adjusting sliders for height, twist, thickness, and base shape. Using this tool, I created a model that reflected my reference but adapted it for mold fabrication.
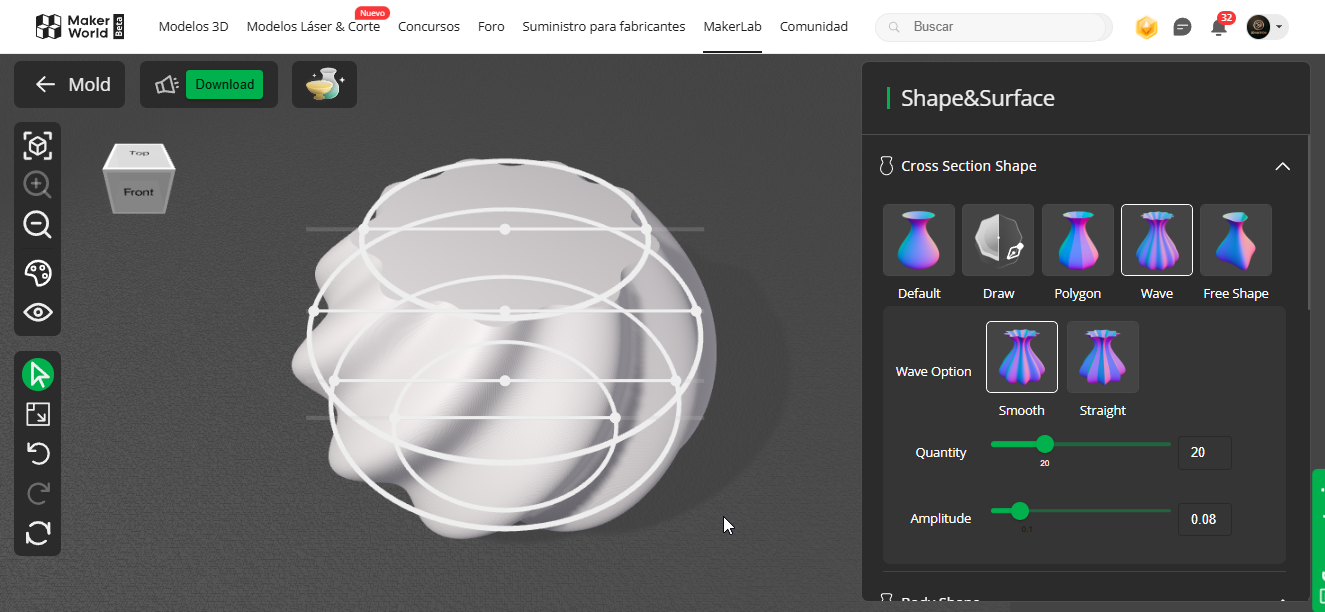
🧪 Generated planter model using MakerWorld's MakeMyVase app
🧰 With the STL file exported from MakeMyVase, I opened it in Fusion 360 to begin designing my custom mold. The first thing I did was place a cylinder inside the vase to act as the inner cavity or core of the mold. This cylinder would later help form the hollow center of the flower pot.
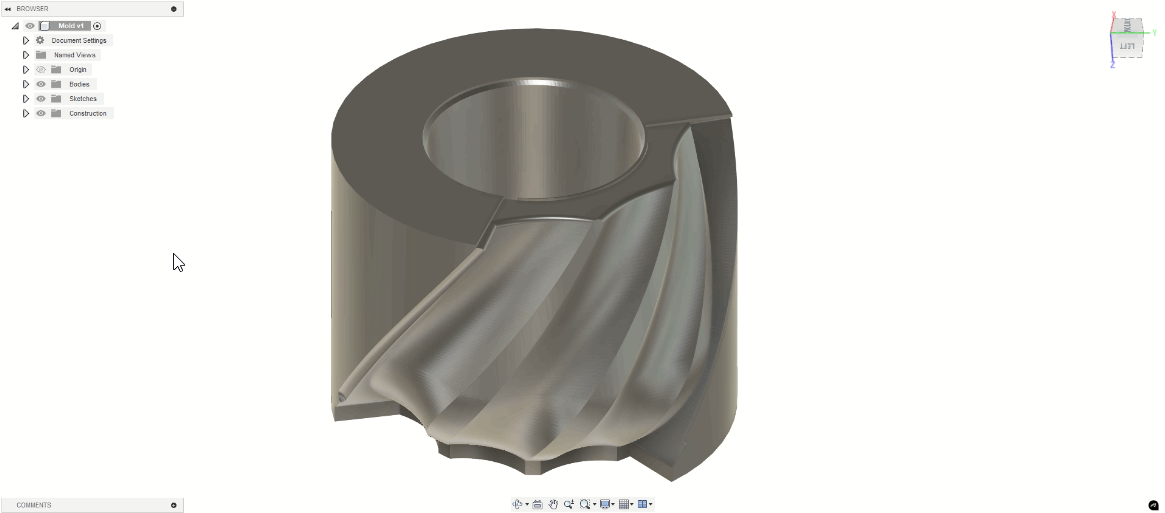
🧱 Imported vase with inserted cylinder in Fusion 360, ready to begin splitting the mold
📺 To understand how to create molds correctly and efficiently, I followed this YouTube tutorial. Thanks to the clear explanation, I was able to figure out the best way to cut my mold into multiple pieces for easy demolding.
🧩 Based on the design and symmetry of the vase, I decided to split the mold into 4 parts:
- 🌀 A central pivot (cylindrical) to create the inside hollow of the planter
- 🧩 Three identical outer panels that wrap around the central part. These were sliced diagonally in Fusion to make a smooth circular shape when assembled
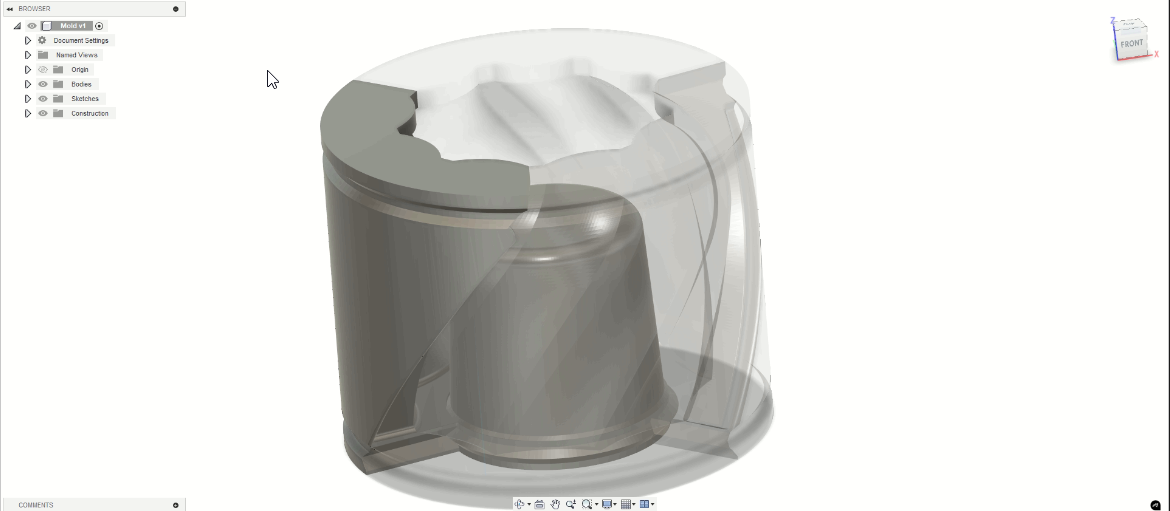
🔍 Fusion 360 view showing the 3 identical outer parts and the central pivot core
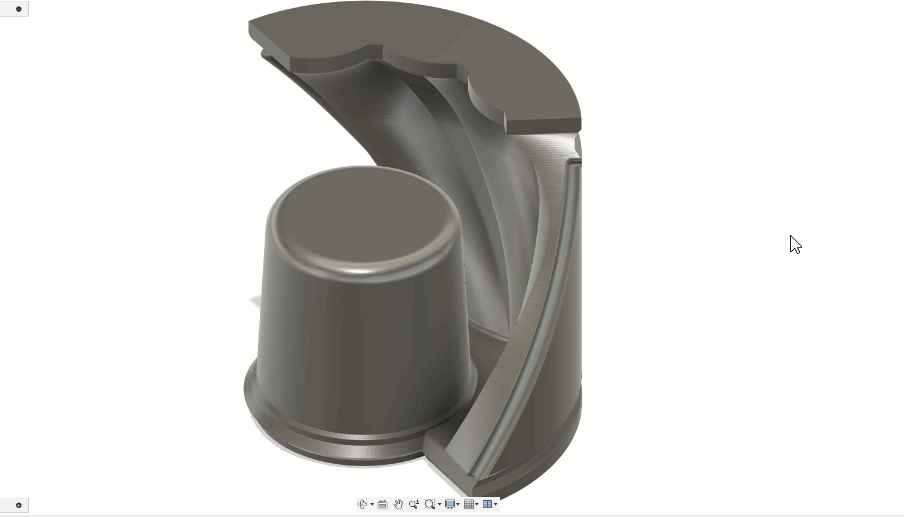
🧩 Final preparation of outer segment and central pivot, aligned and ready to export as STL files
🧾 Once I had the pieces separated in Fusion 360, I exported each one individually as an STL file. At this point, I had:
- ✅ One file for the central cylinder (pivot)
- ✅ One file for the outer segment – which I could print three times since they are identical
🧵 The next step was slicing. I imported the STLs into OrcaSlicer, my preferred slicing software, and configured the slicing parameters specifically for my Creality Ender 3 V3 SE printer. I paid special attention to strength and detail so that the mold could withstand casting pressure and be reused if needed.
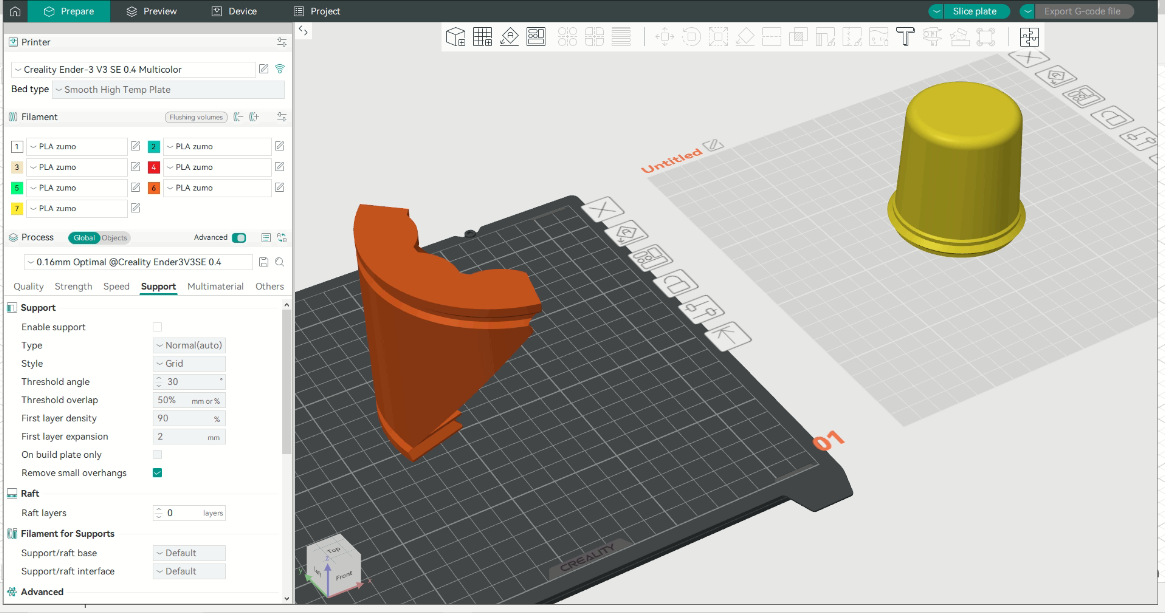
🖨️ Slicing preview in OrcaSlicer for Ender 3 V3 SE – mold section with print time and path
- Layer height: 0.16 mm for fine details
- Wall count: 3 outer walls for mold durability
- Infill pattern: Gyroid – chosen for its strength and even internal structure
- Print time: ~3 hours and 40 minutes per mold segment
- Printing method: I printed all 4 parts separately, then manually assembled the mold
🛠️ I successfully printed 3 outer panels (same file repeated) and 1 central pivot. After printing, I carefully removed the supports, sanded any imperfections, and did a test fit of all four parts to make sure they aligned perfectly. This modular mold design made it much easier to demold the final casting later.
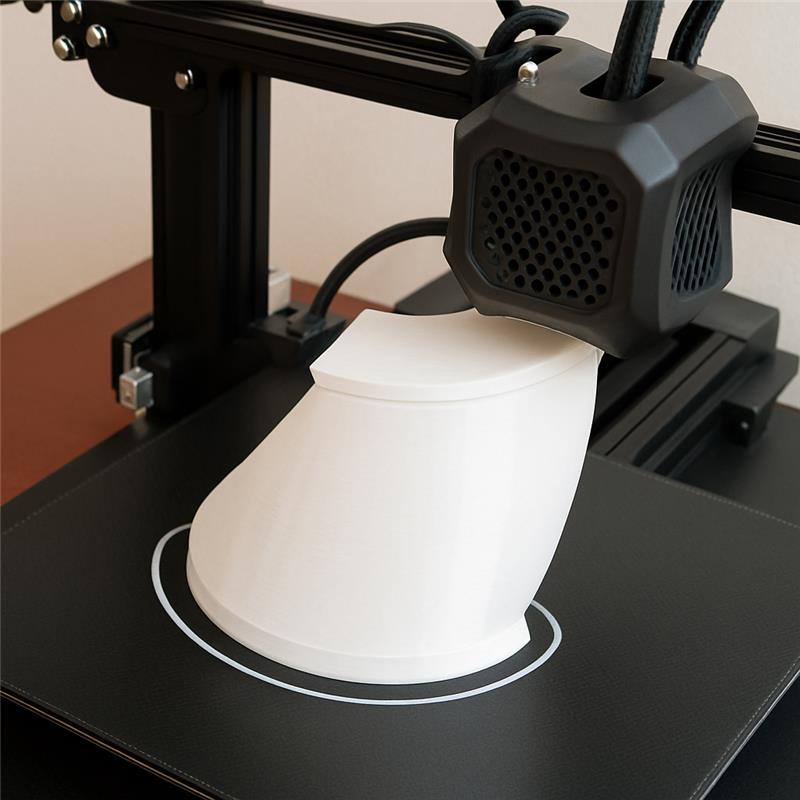
📦 Final 3D printed mold parts – three identical outer pieces and one central cylinder
🧪 This entire process allowed me to turn a digital 3D shape into a real-world mold, prepared and optimized for resin casting. By thinking ahead and designing the mold in four pieces, I made the demolding much simpler and ensured good print quality and reuse. My next step was casting the planter using ECOCRYL® A/B resin.
3️⃣ Mold Preparation
Once the four 3D printed mold pieces were ready, I carefully prepared them for the casting process. First, I applied a uniform coat of petroleum jelly to all internal PLA surfaces using a fine brush. This release agent helps prevent the resin from sticking and makes the demolding process significantly easier.
To form the inner cavity of the planter, I inserted an inflated balloon at the center of the mold before assembly. This technique — commonly used in cement planters — reduces the amount of casting material needed, makes the final object lighter, and facilitates demolding thanks to the balloon's flexibility.
After placing the balloon, I positioned the three outer shell segments around it and added the central pivot piece to define the internal volume. Once aligned, I secured all parts using rubber bands and adhesive tape to keep the geometry tight and avoid leaks during pouring.
For the casting material, I selected ECOCRYL® A/B, a two-component acrylic resin produced in Argentina. According to its technical datasheet, this resin offers fast curing, excellent surface detail reproduction, and mechanical strength suitable for both decorative and functional applications. It’s essential to mix the two parts in a 1:1 ratio and pour immediately, as the working time is short.
🔧 Mold Assembled & Secured
The mold was fully assembled and held firmly in place using tape and rubber bands. The balloon in the center shaped the planter’s internal cavity, while the outer parts provided structure and containment. All contact surfaces were treated with petroleum jelly to ensure an easy and clean demolding process.
4️⃣ Casting Process
With the mold fully assembled and secured, I moved on to one of the most critical parts of the project: casting. For this process, I selected ECOCRYL® A/B, a two-part casting material that combines the ease of use of plaster with the high-performance properties of resin. This material is widely used in Argentina for artistic, decorative, and functional purposes. It consists of Part B (a fine white powder) and Part A (a clear liquid binder). The manufacturer recommends a precise mix ratio of 2:1 by weight, meaning two parts of powder for every one part of liquid. To ensure exact proportions, I used a digital kitchen scale capable of reading small increments.
In the first image below, you can see the powder being weighed, while the second image shows the scale ready to receive both components. At this stage, preparation and timing were essential, as ECOCRYL® has a relatively short working time once both components are combined. Delays or poor mixing can lead to premature curing, poor flow, or visible bubbles in the final piece.
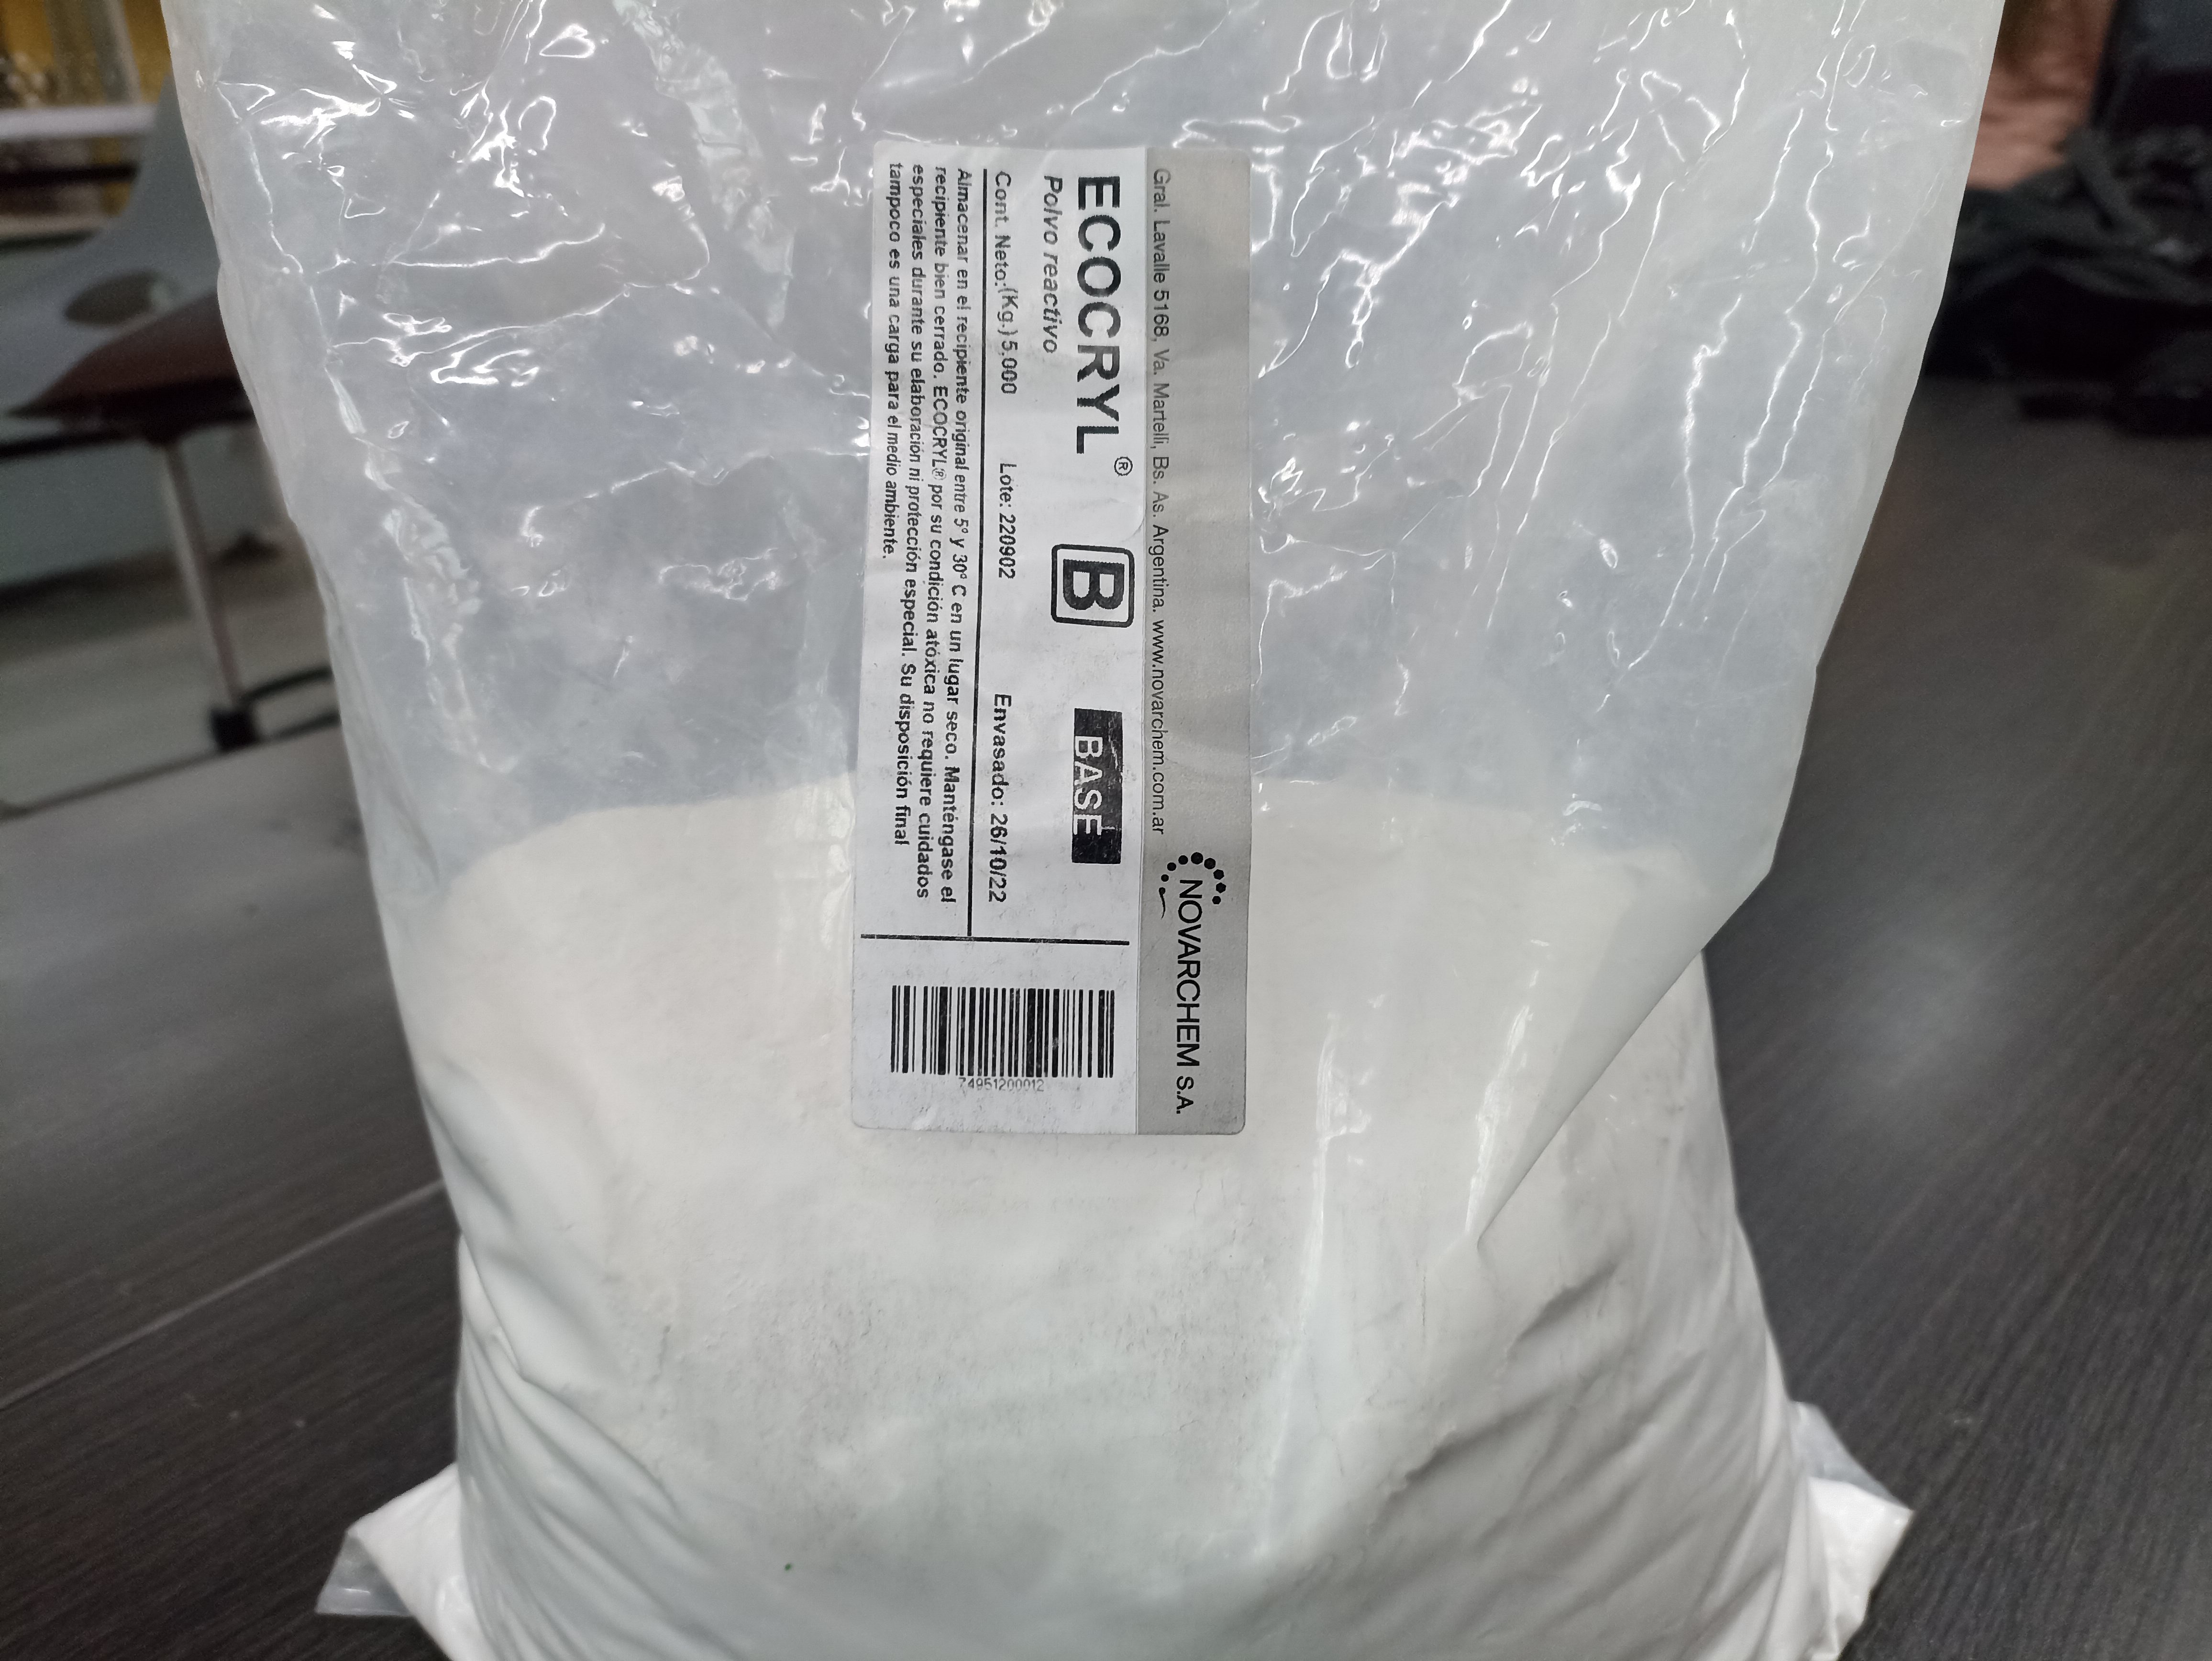
Image 1: Weighing Part B (powder) with a precision scale.
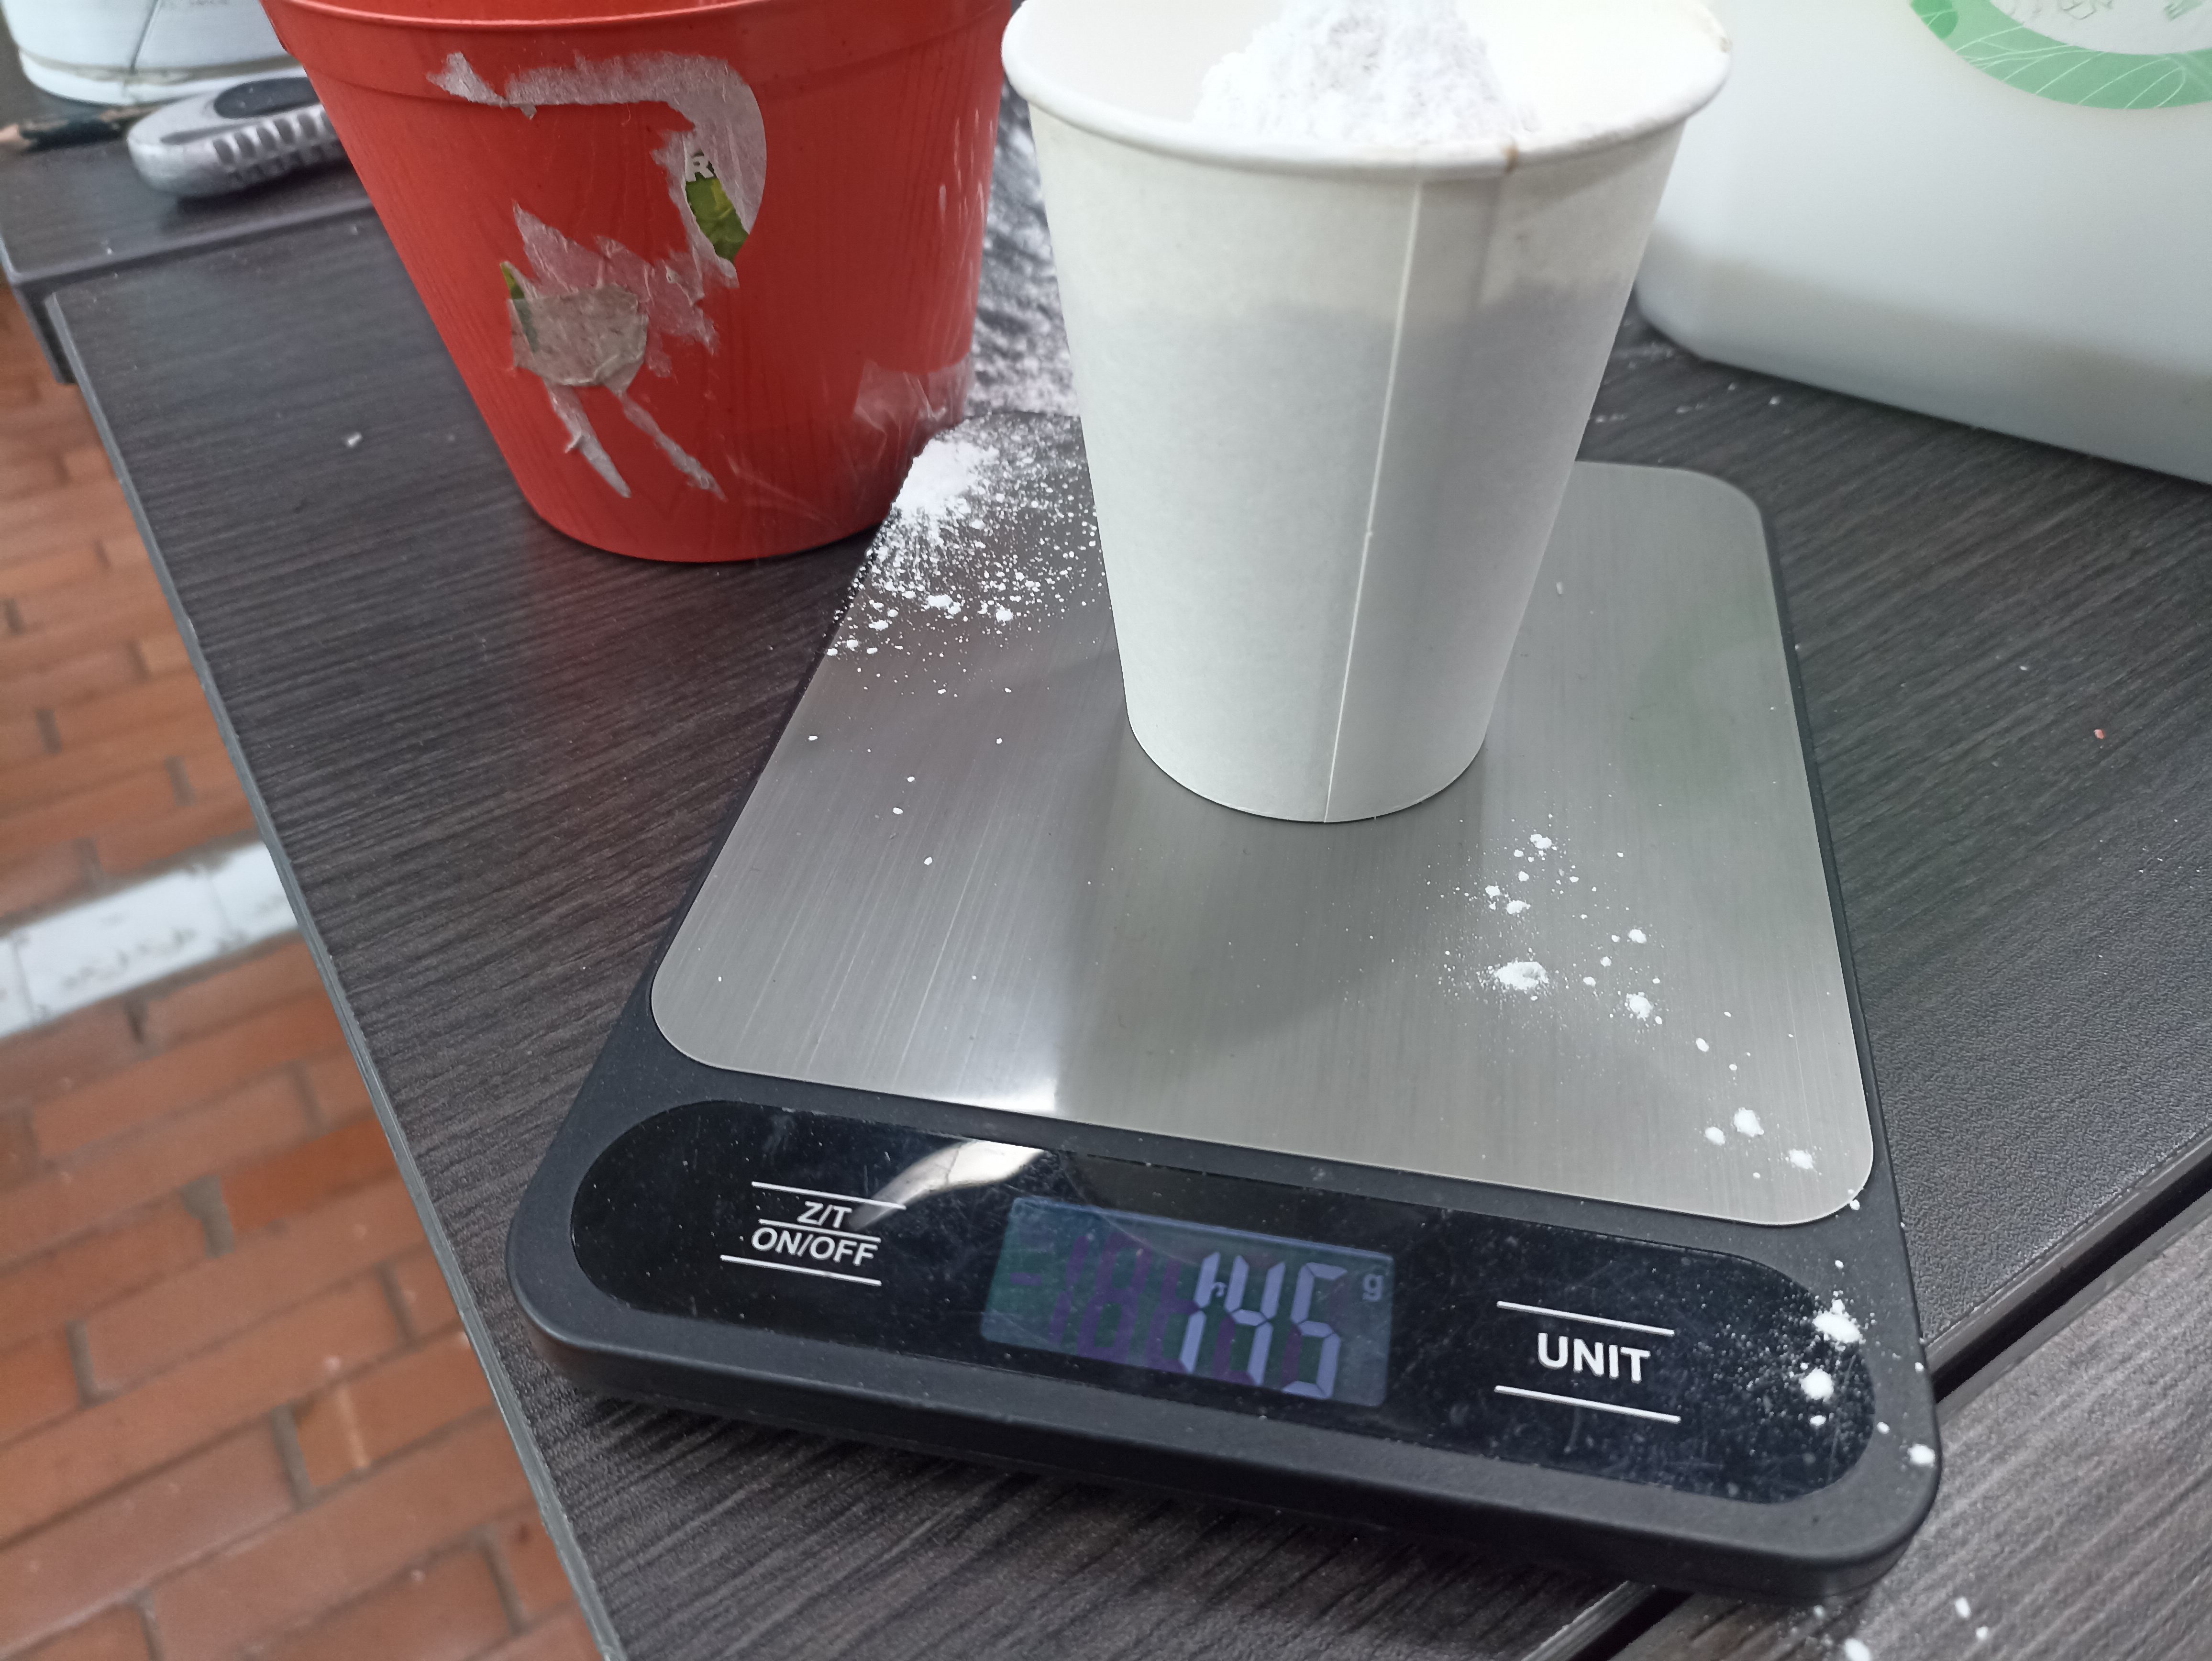
Image 2: Preparing the correct ratio for an optimal mix.
After mixing the first batch — approximately 120 grams — I poured it into the mold, only to discover it wasn’t enough to completely fill the volume. This unexpected outcome required me to quickly prepare a second batch while the first one was still workable. This highlighted the importance of estimating the mold’s internal volume beforehand and reinforced the value of planning. To enhance the quality of the mix and eliminate air pockets, I improvised a mechanical mixer by attaching a broken hand mixer blade to my electric drill. This innovation significantly improved the speed and consistency of the mixture, preventing clumps and reducing trapped bubbles compared to manual mixing.
Video: Using a drill to achieve smooth and homogeneous mixing.
Once the resin-plaster blend was properly mixed, I slowly poured it into the mold from one corner, allowing the mixture to flow naturally and expel air as it filled the cavity. To assist this, I gently tapped the mold's outer walls and base several times, helping trapped air rise to the surface. This technique is common in casting and improves the final finish by minimizing surface bubbles. In the next image, you can see the mold fully filled with ECOCRYL®, and the top of the balloon visible, indicating the inner cavity of the planter.
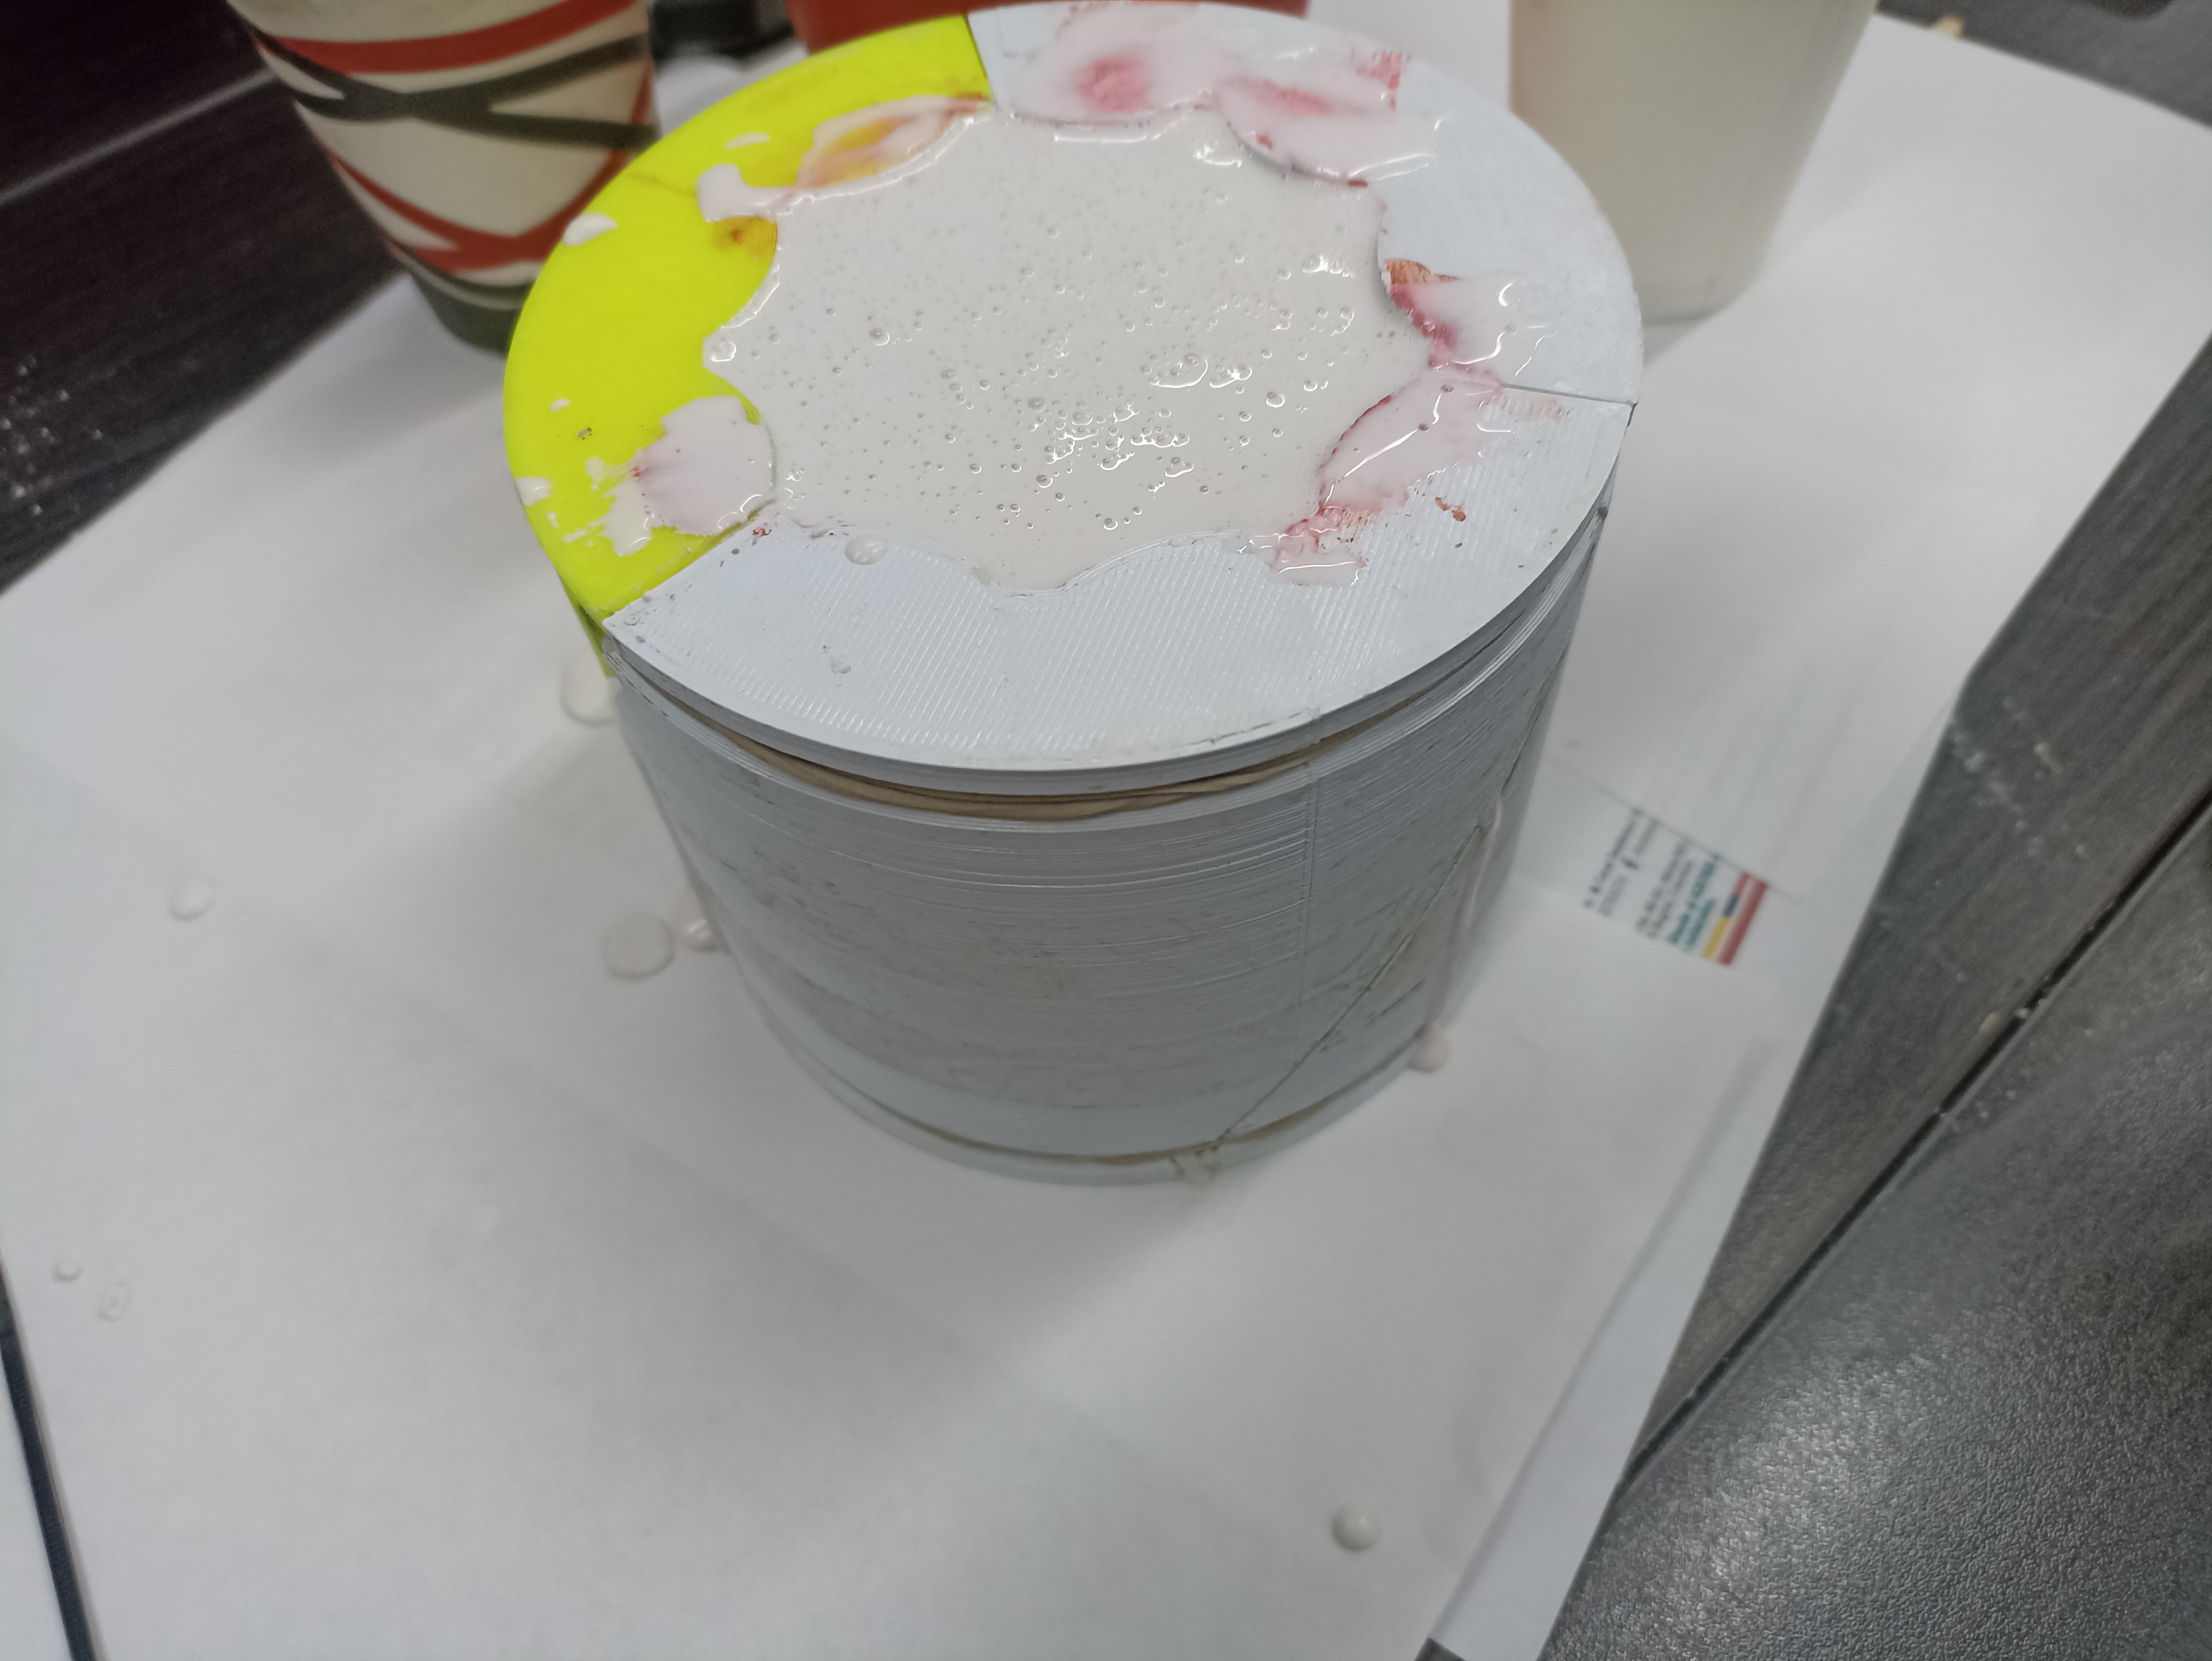
Image 3: The mold completely filled with the casting material, ready to cure.
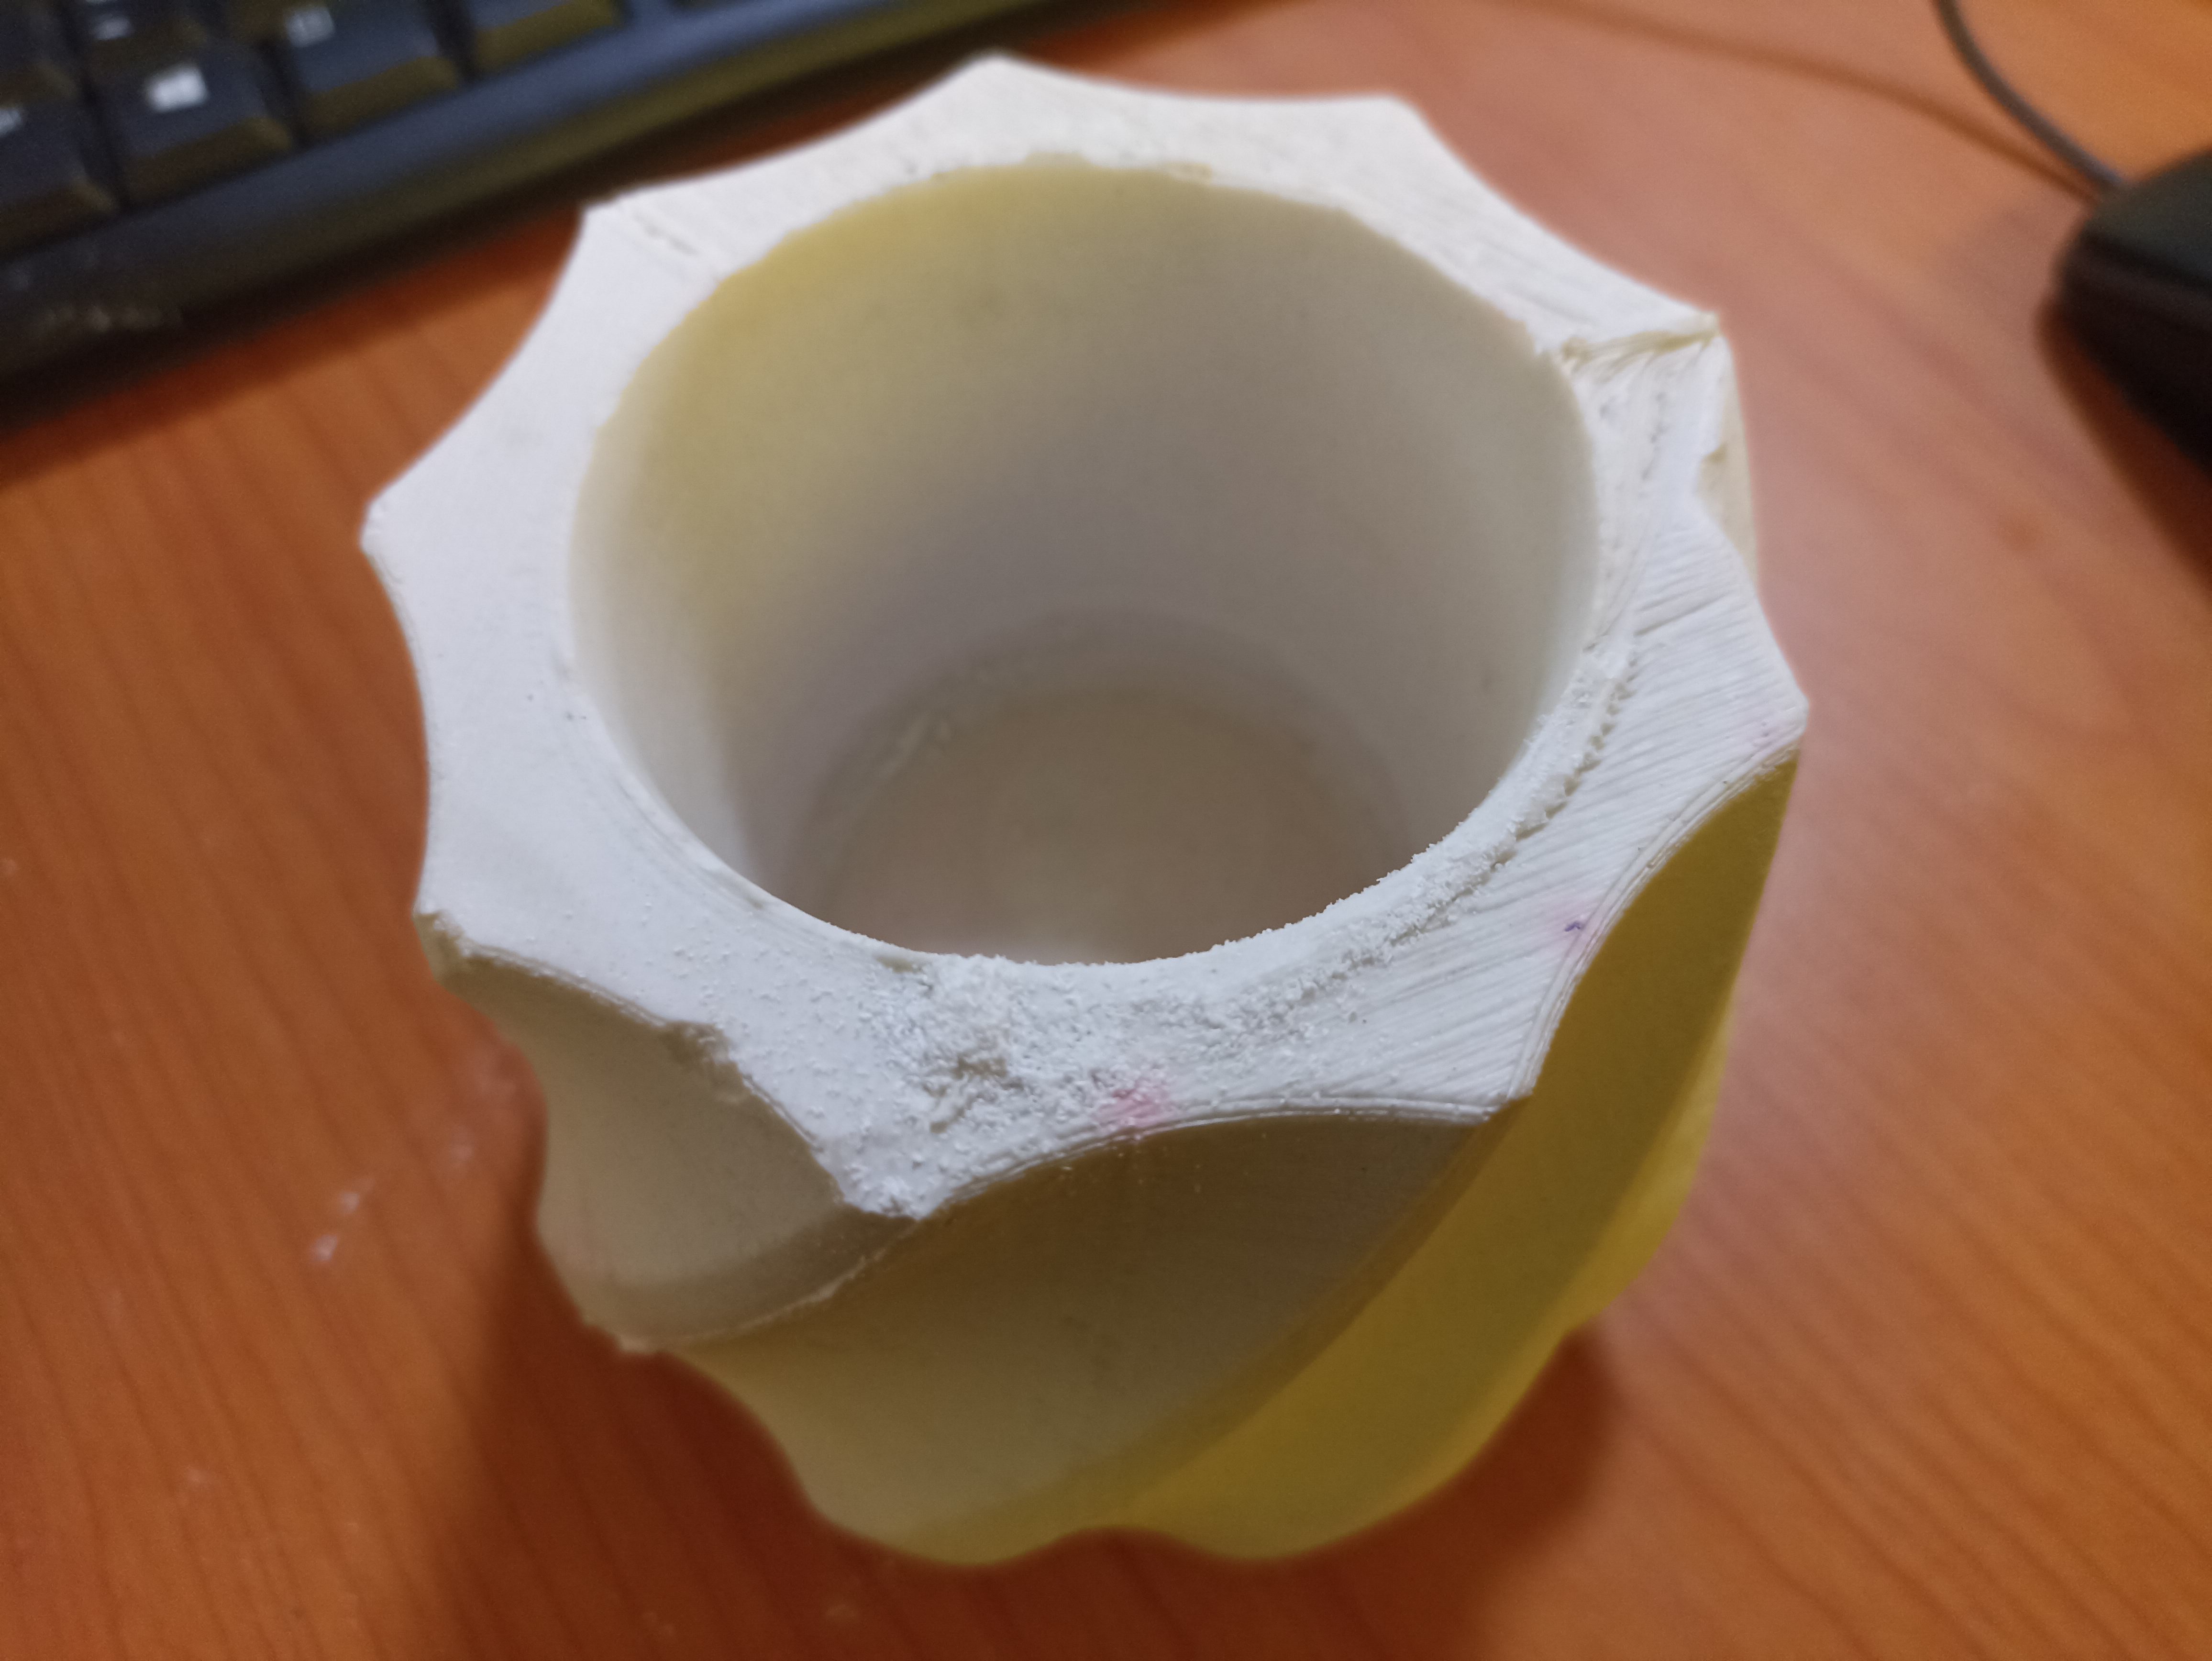
After pouring, I let the material rest undisturbed for at least 30 minutes, allowing it to settle and harden according to the manufacturer’s instructions. During this time, I avoided touching or moving the mold, which could cause deformation or irregular curing. Once partially set, I carefully removed the rubber bands and tape, then slowly detached the mold pieces to demold the object. The balloon in the center was deflated and removed, leaving a smooth inner cavity as planned. I then left the piece to cure completely for 24 hours at room temperature to ensure maximum hardness and durability before attempting any finishing.
🧪 Additional Information: ECOCRYL® A/B is a fast-curing, professional-grade resin-plaster with excellent surface fidelity and moderate flexibility. It’s ideal for use in functional parts like planters, sculptures, and tiles. You can read the full technical datasheet provided by Novarchem here: ECOCRYL® A/B Datasheet.
5️⃣ Final Result & Finishing
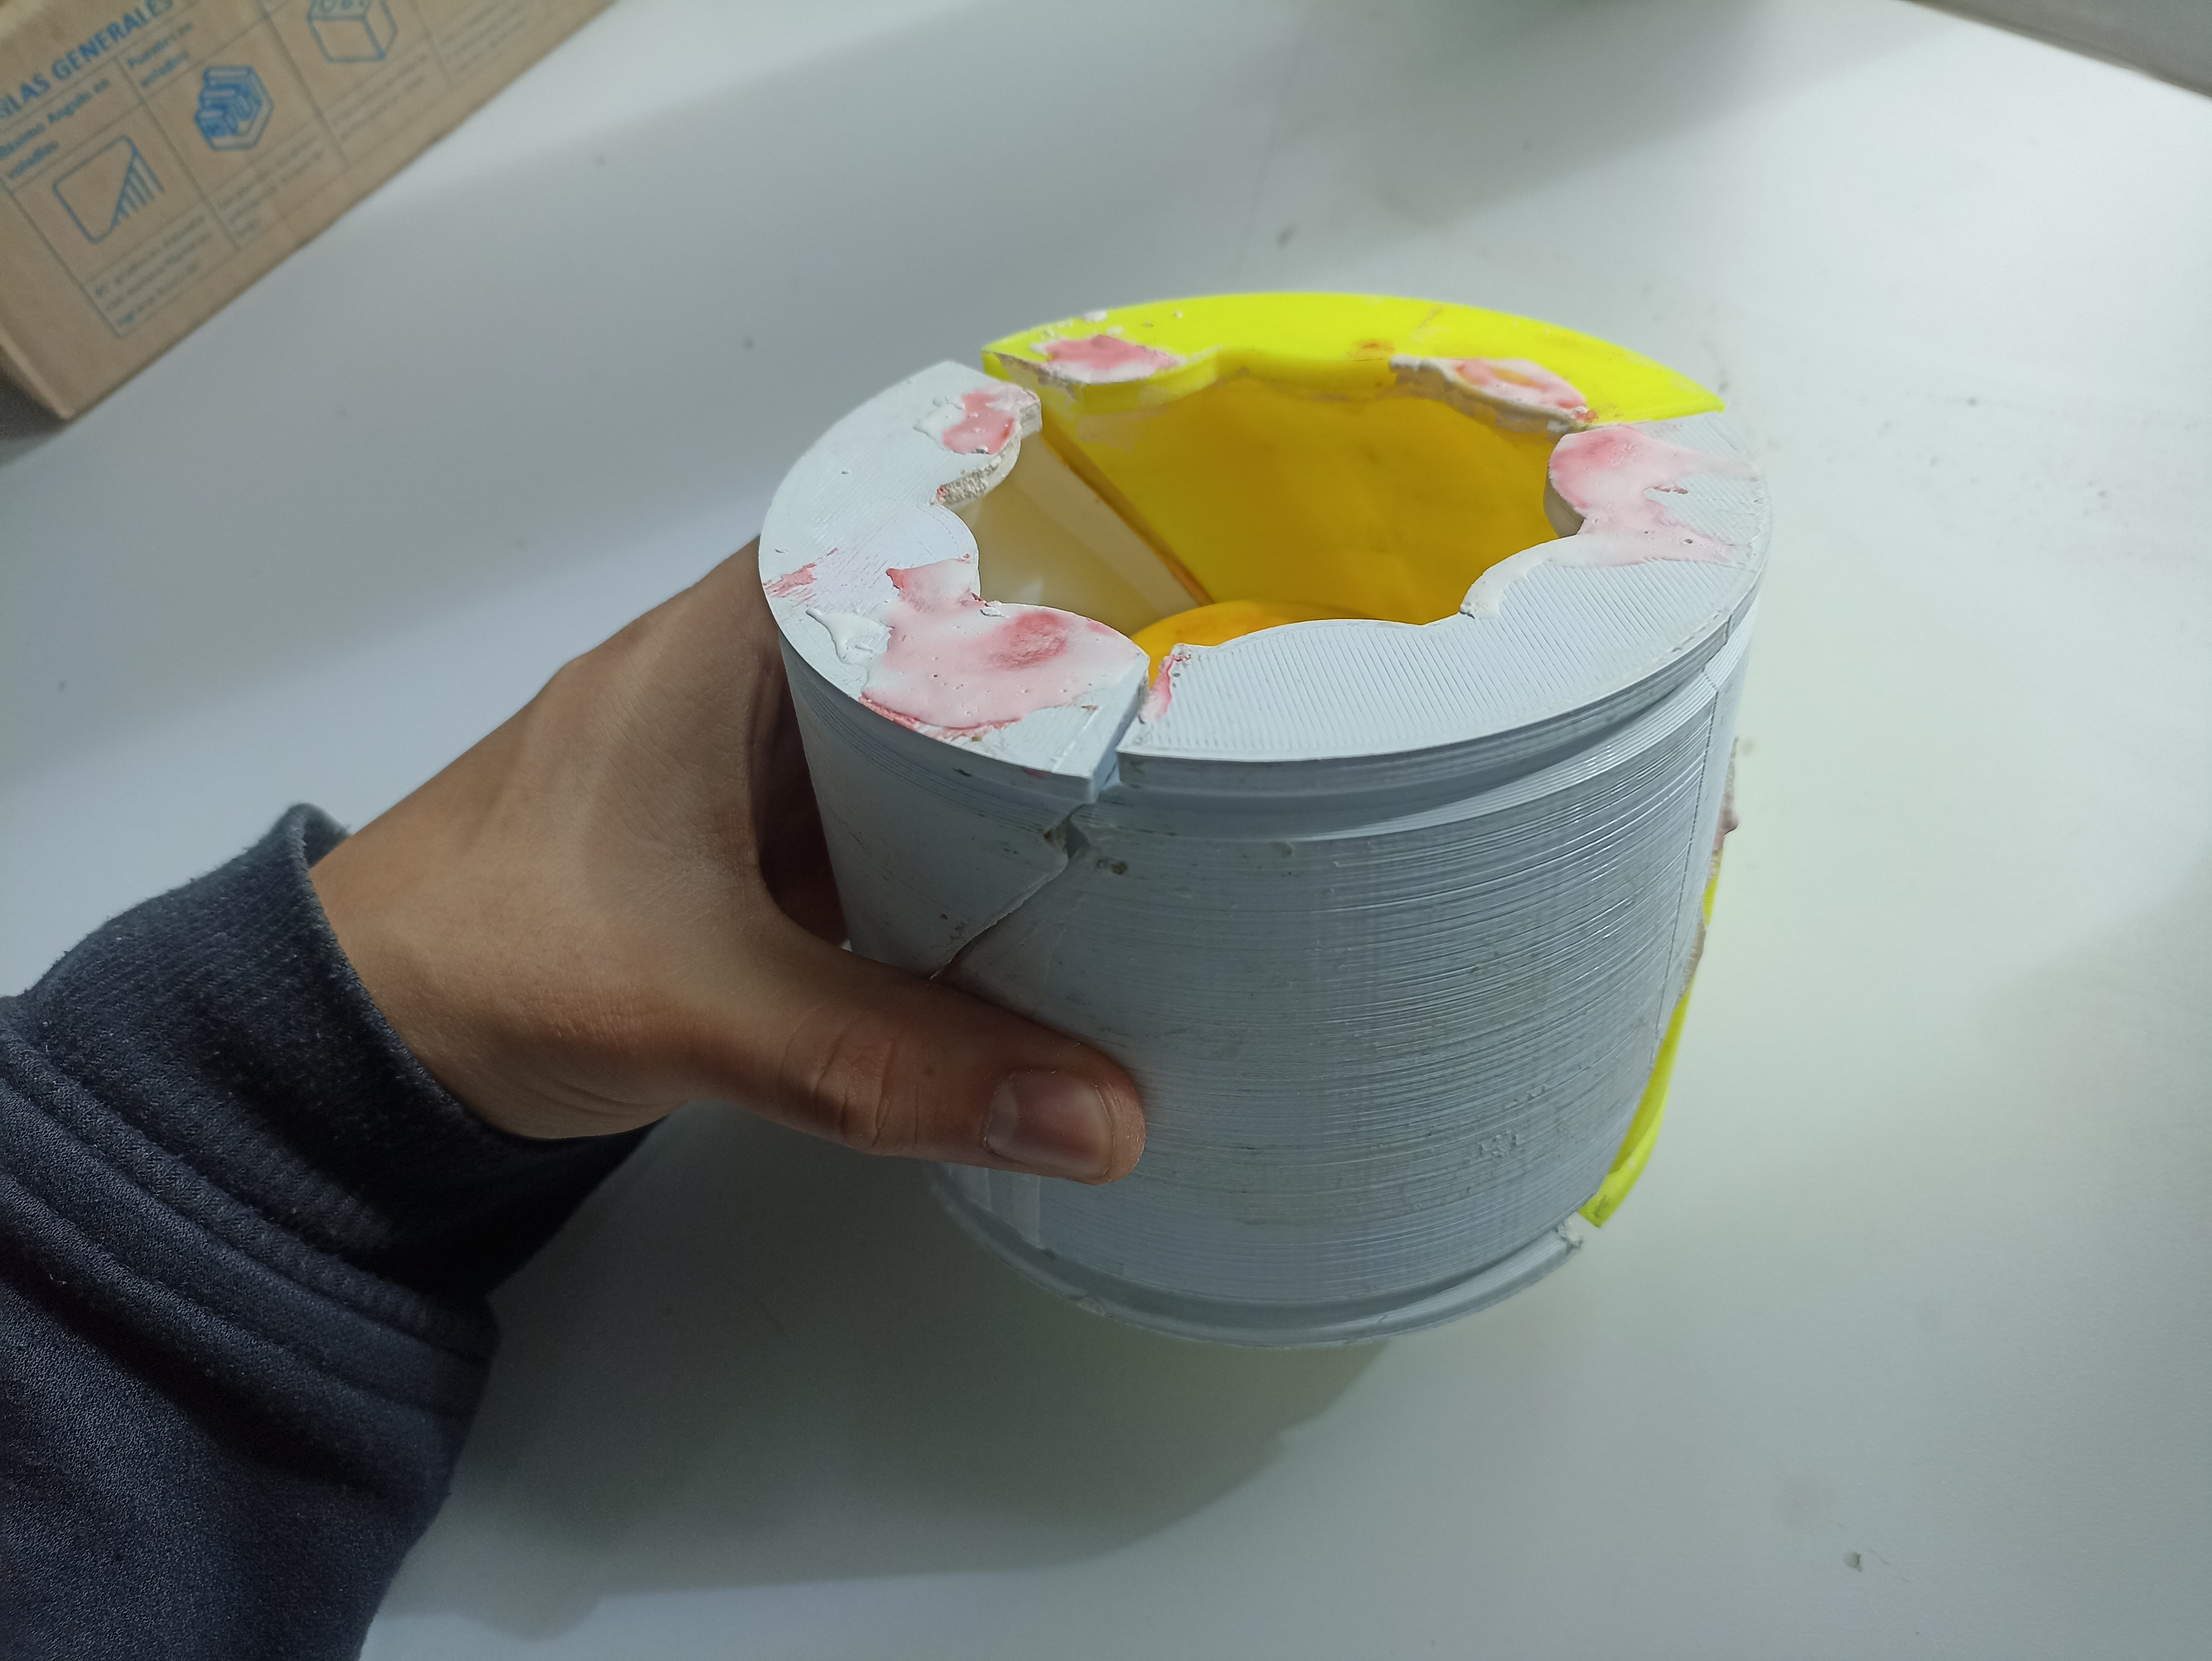
Once I poured the Ecocryl and let it cure, I waited almost 50 minutes before attempting to demold — a bit more than the 30 minutes suggested in the datasheet. Honestly, I was nervous. I didn’t want to mess up the planter after coming this far. The extra curing time made the material feel firmer, which helped during handling, but also made separating the mold parts much harder. They were practically fused together!
Video: Demolding was tricky due to the tight fit, but the flexible balloon helped a lot.
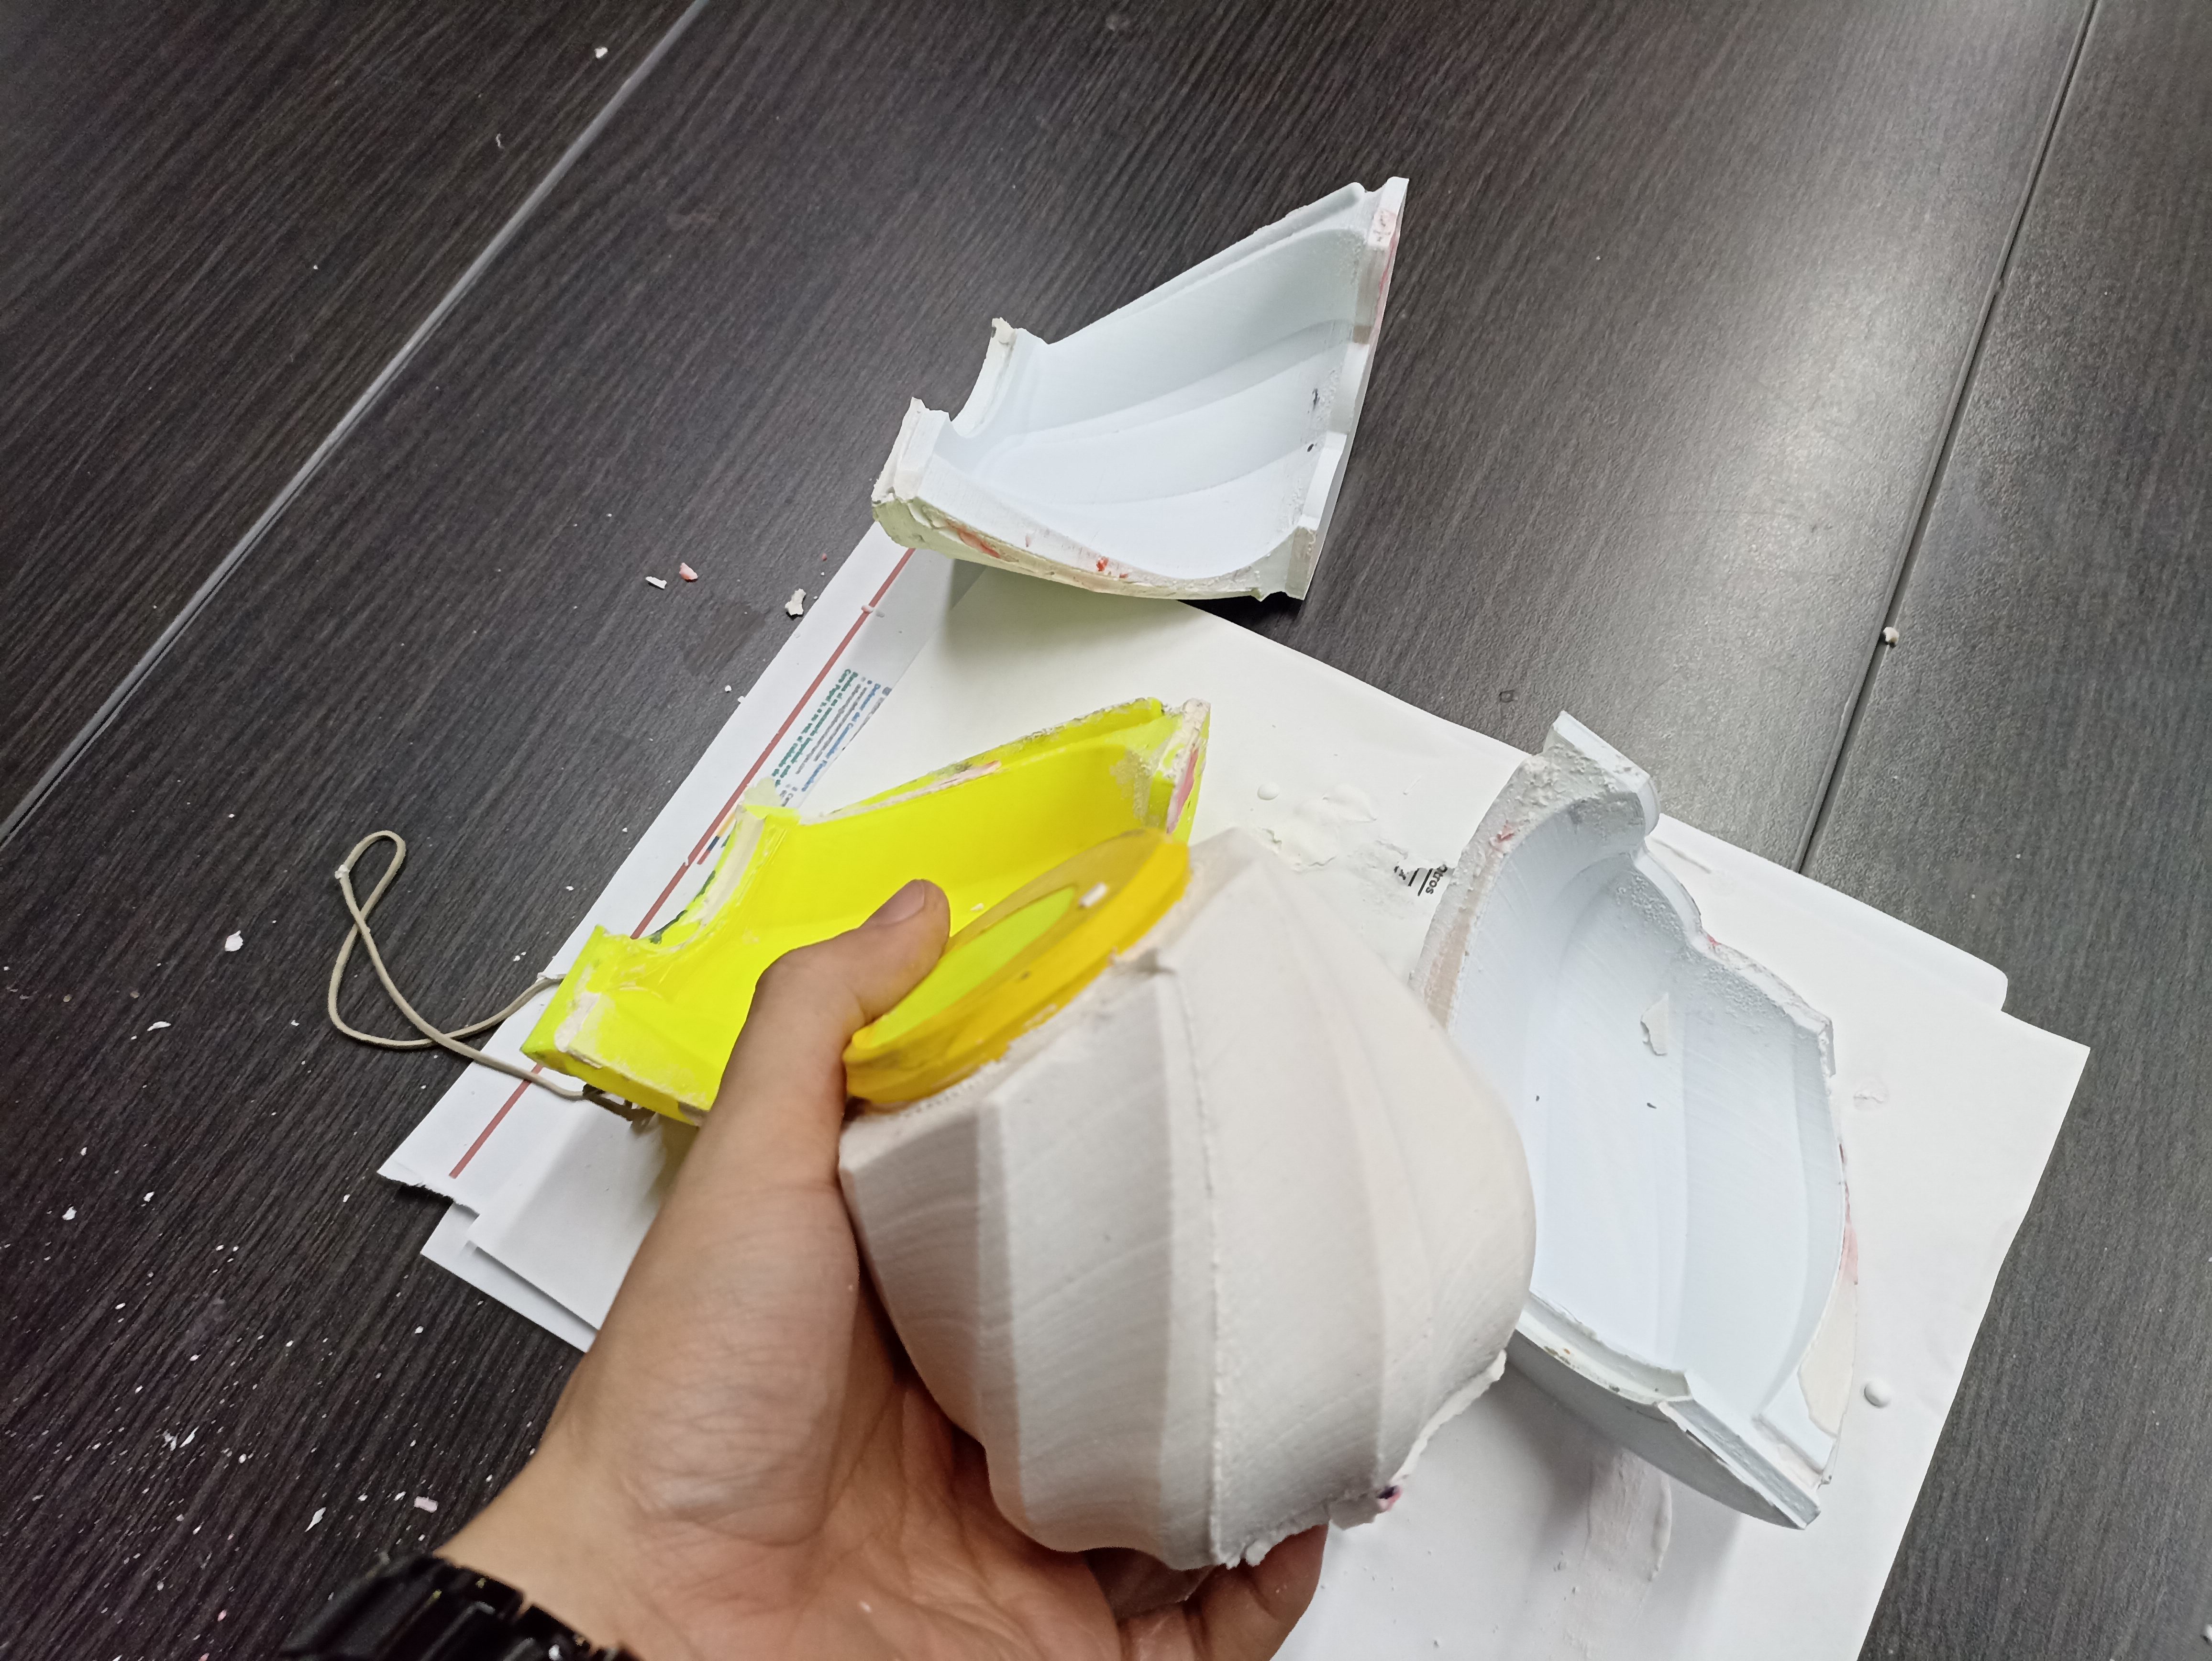
Images: Taking apart the mold required patience and careful pulling. The balloon trick worked perfectly to create the cavity.
Even though I tried to seal the mold as best as I could, a few small leaks appeared — mostly around the top edge of the planter. These imperfections were minor but visible, showing that I still need to improve how I align and tighten the mold parts. It’s a good reminder that small gaps = big problems when working with fluid materials like resin or plaster.
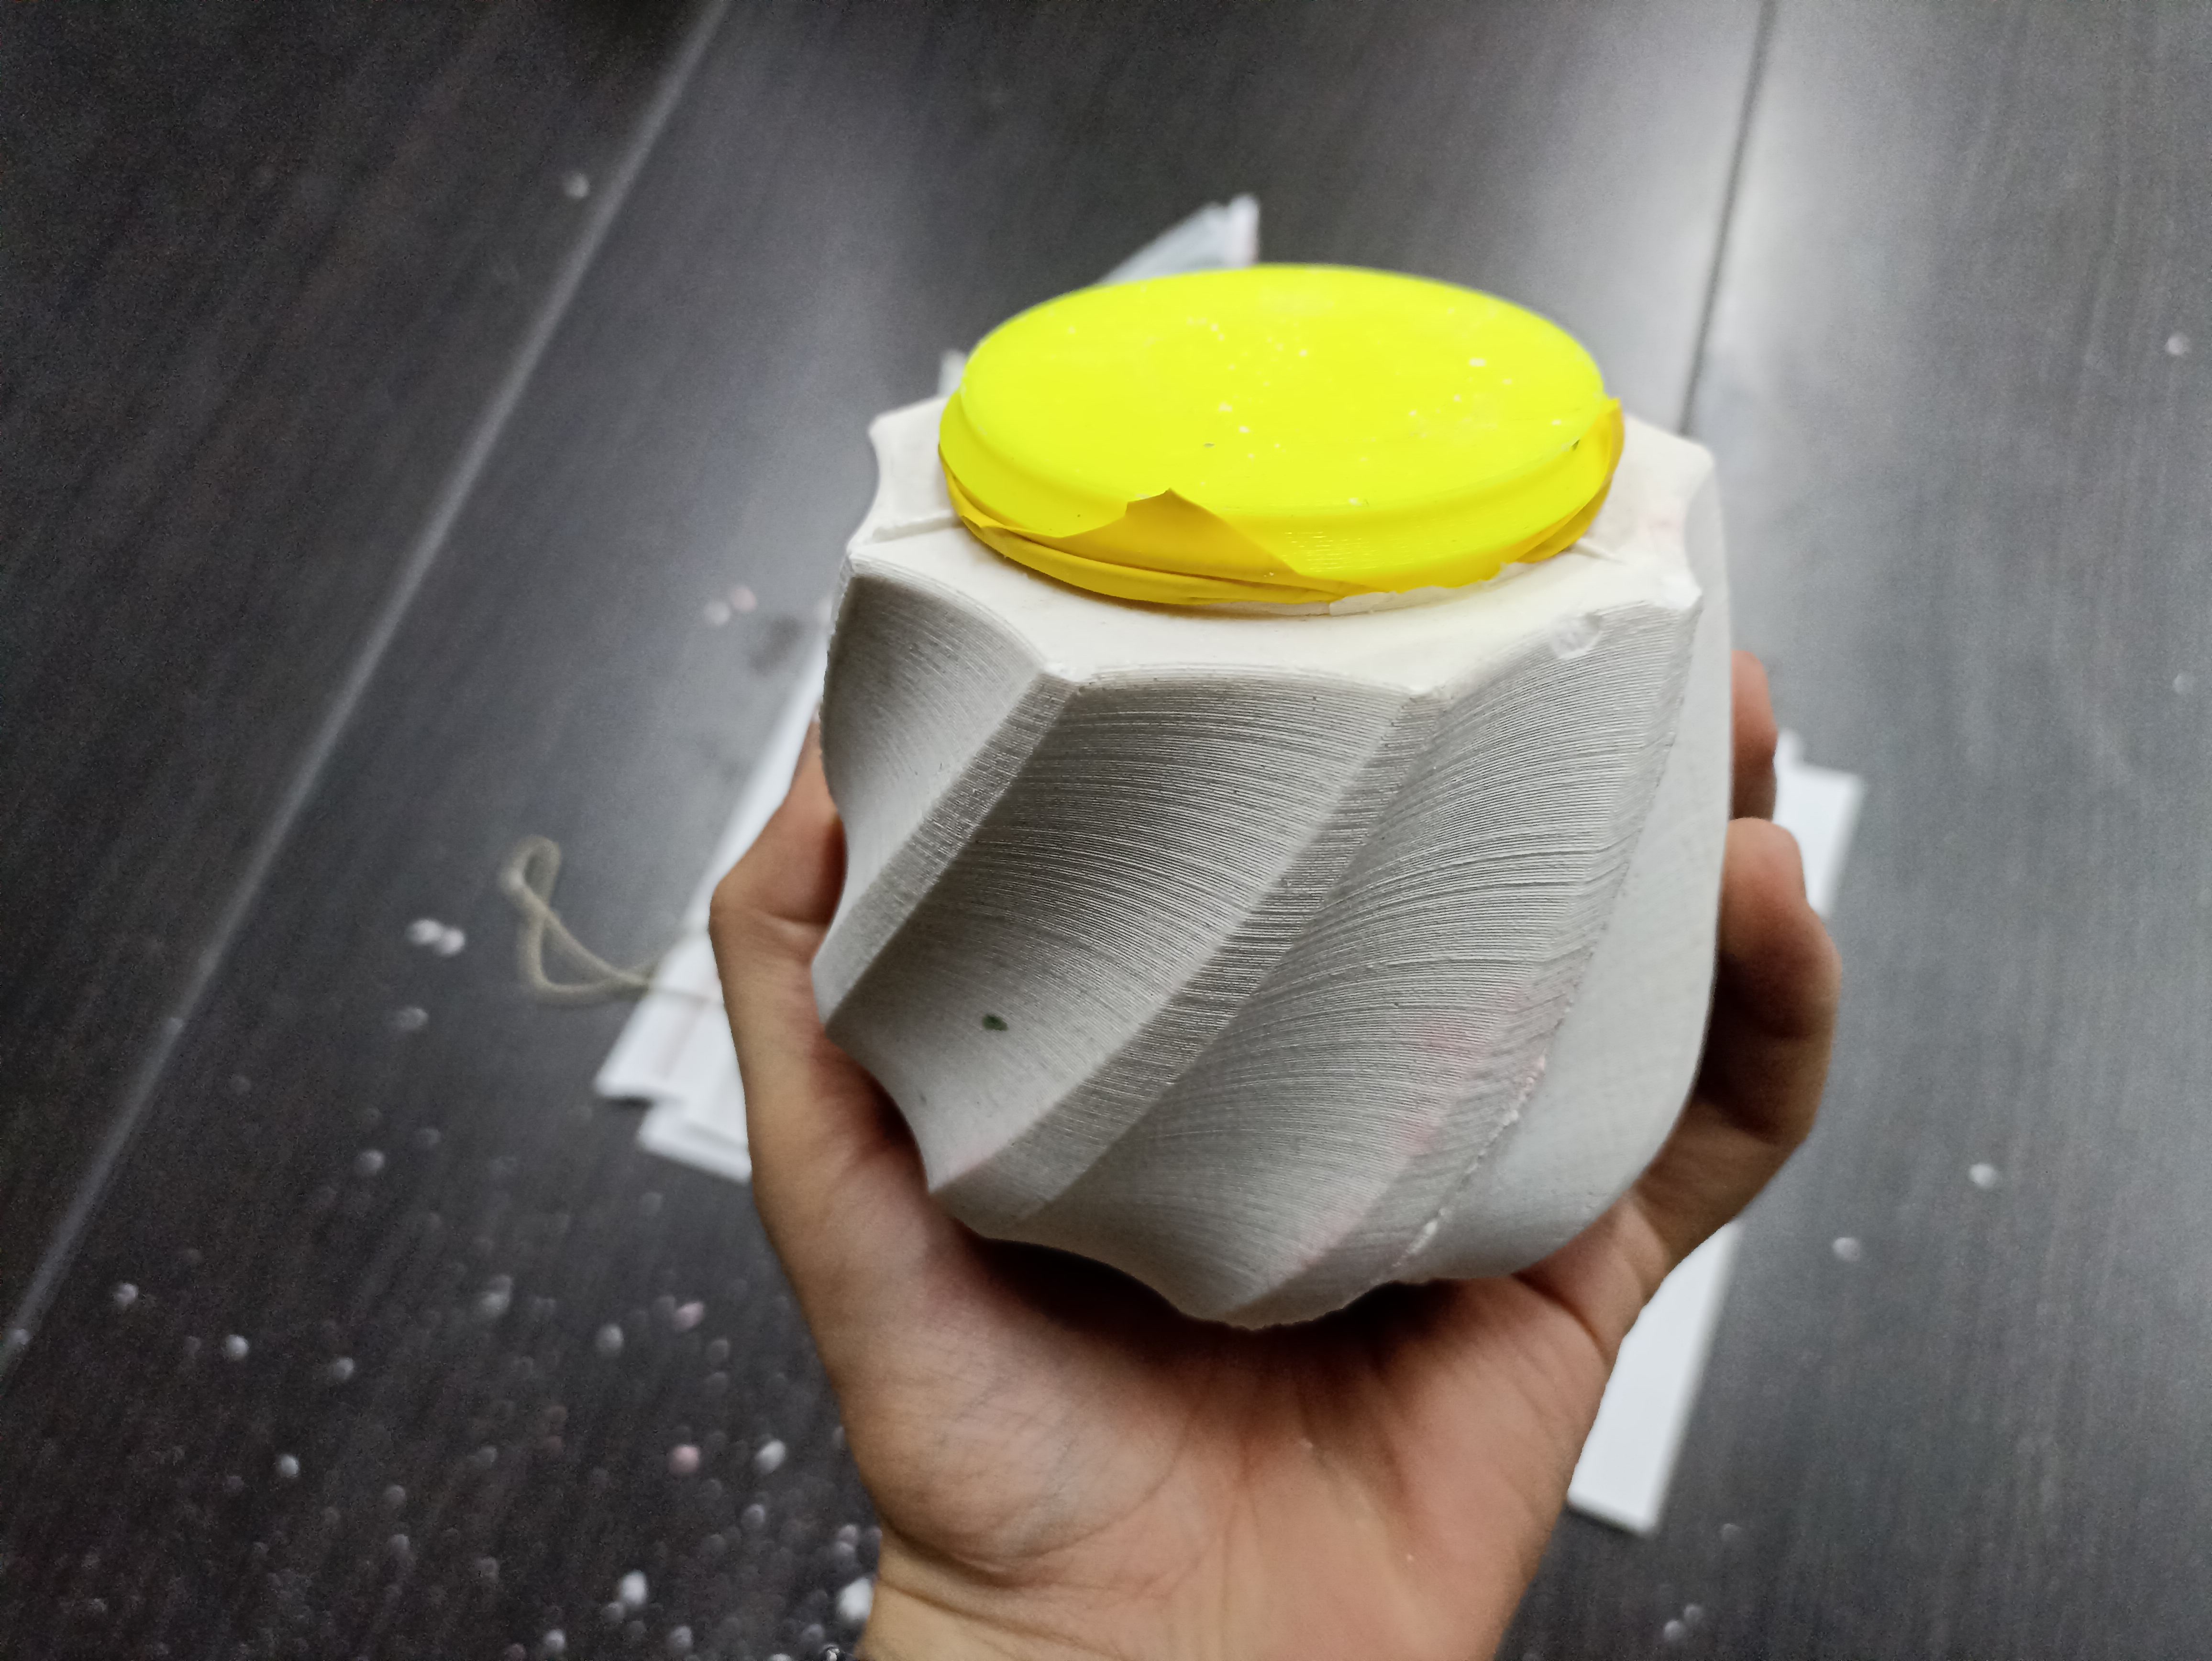
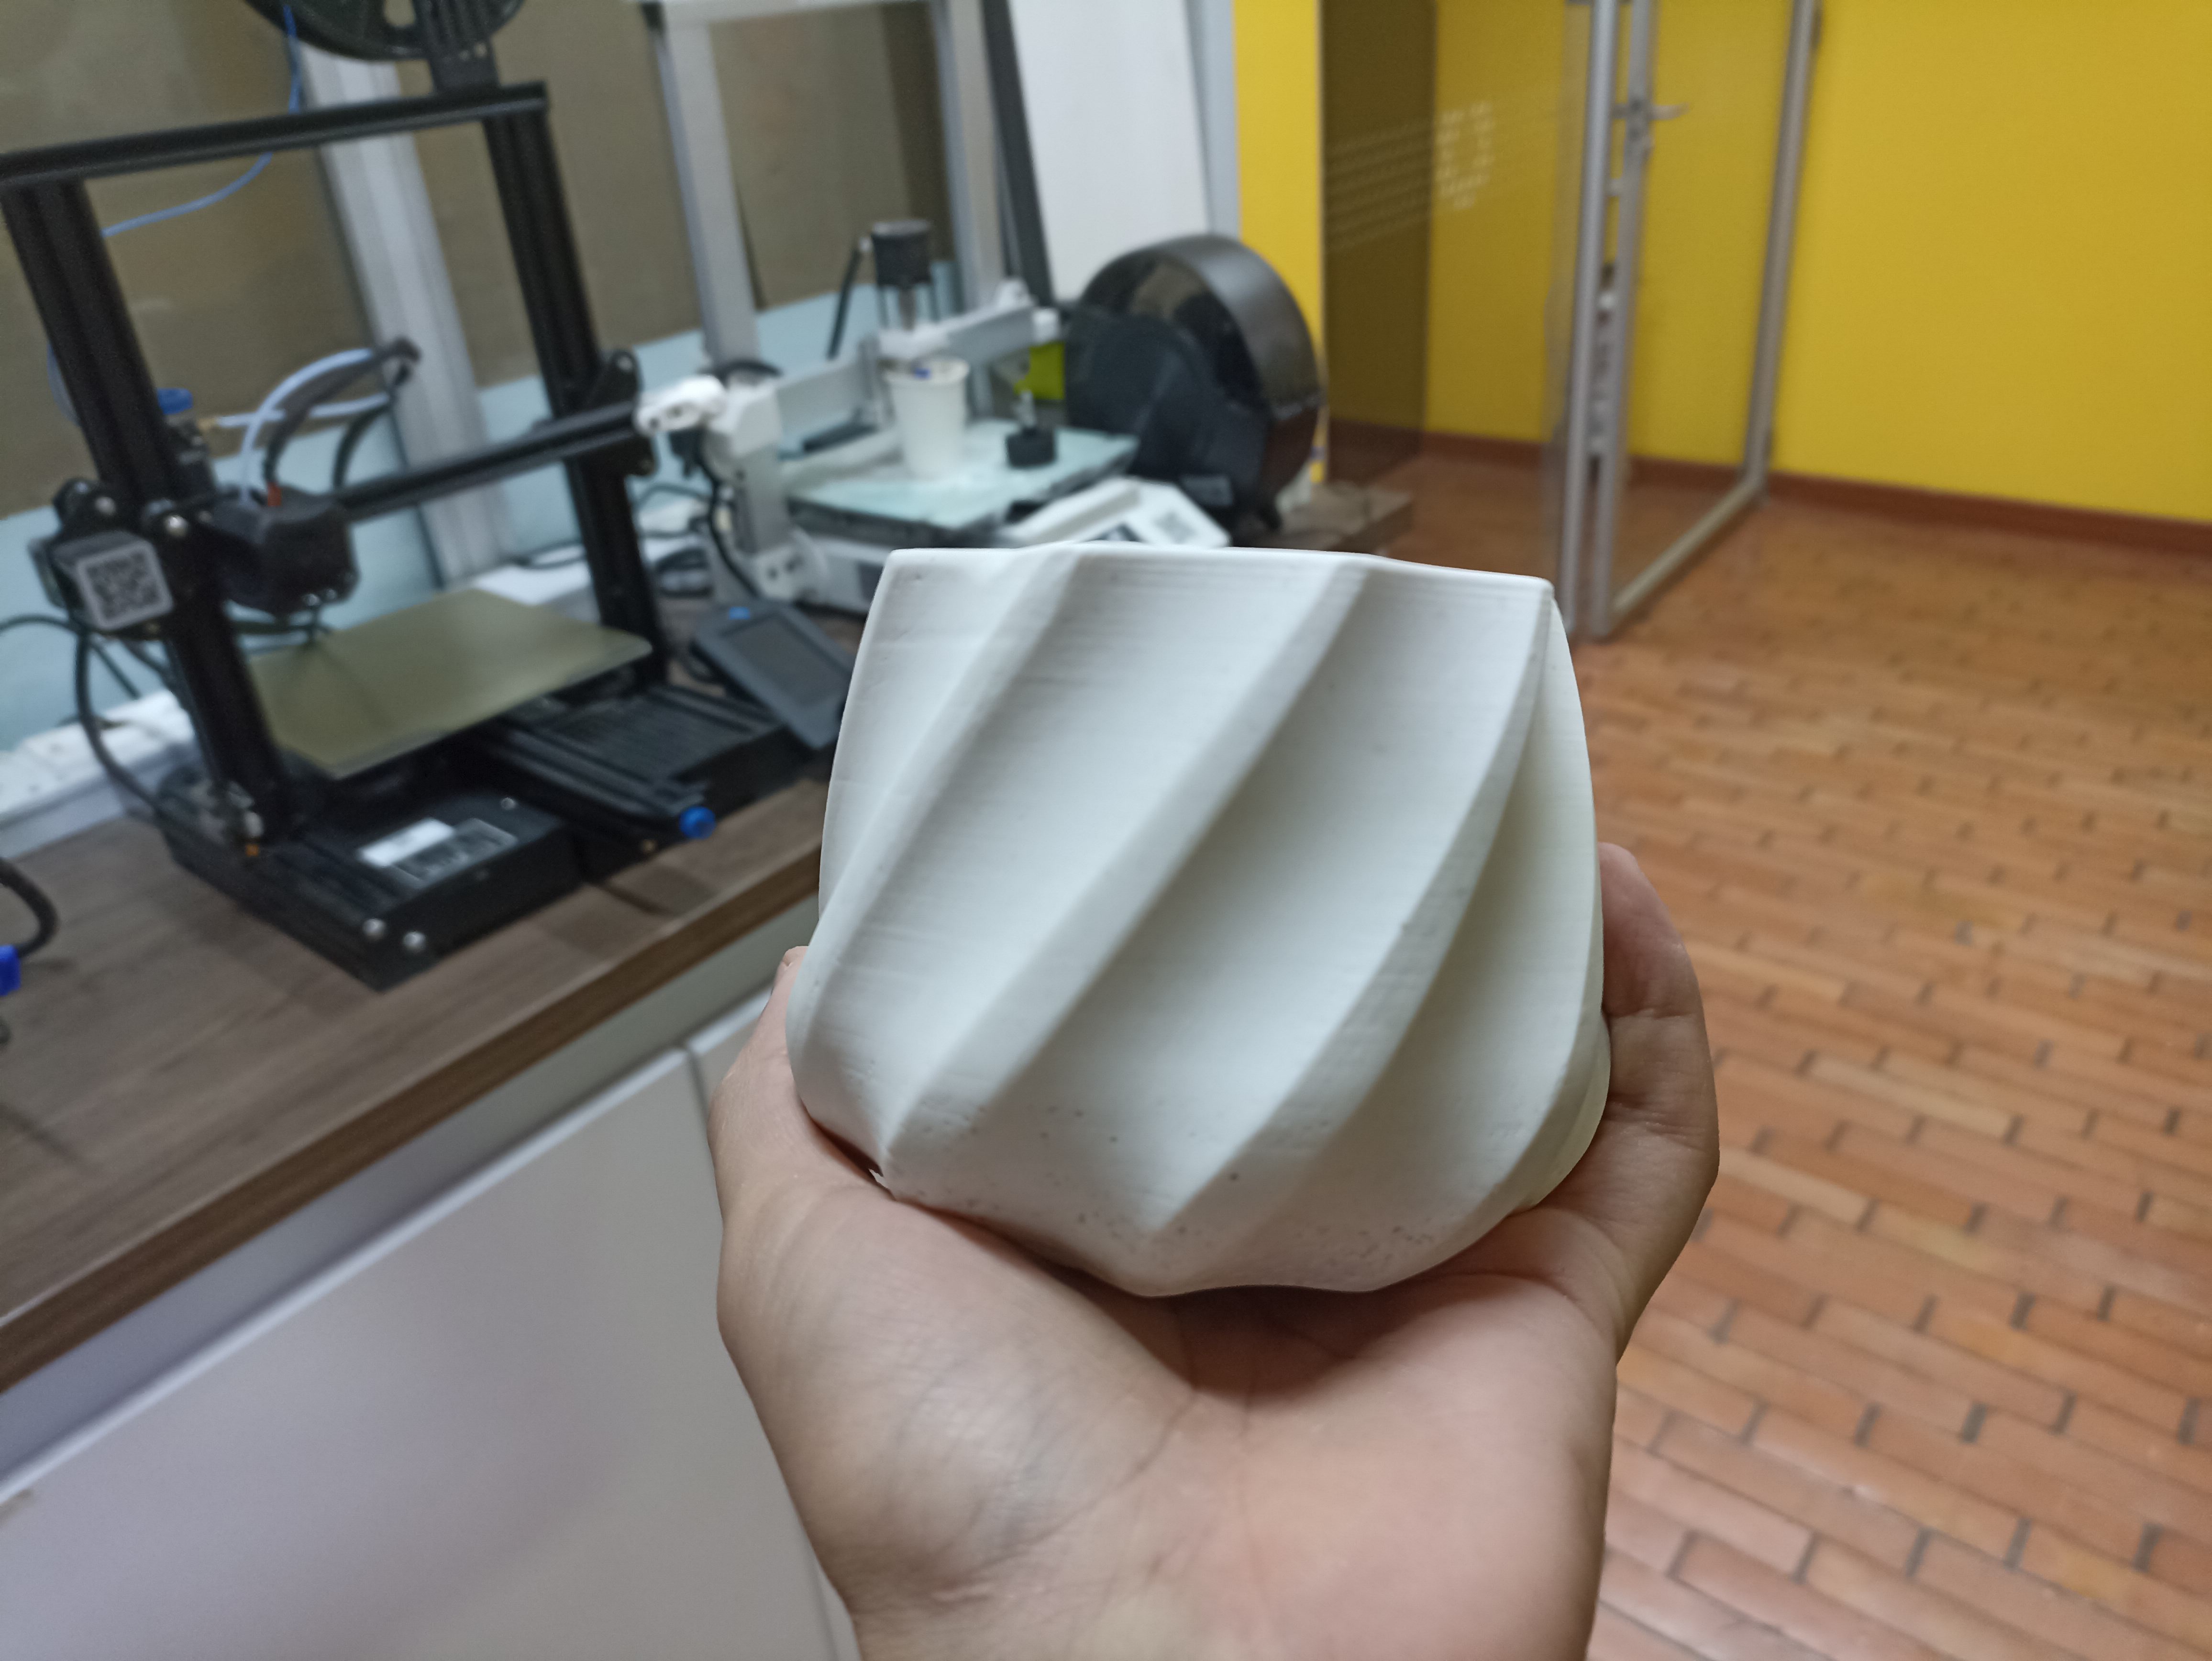
Once the planter was free from the mold and fully cured, I began post-processing. I wore a dust mask to avoid breathing any fine particles and used fine-grit sandpaper to polish the outer surface. It was slow, repetitive work — but incredibly satisfying. You could really see the transformation as the rough, matte finish turned into a smoother surface. I didn’t want to overdo it and accidentally crack the piece, so I used gentle, circular motions and checked constantly.
Video: Polishing the surface to remove imperfections and achieve a better finish.
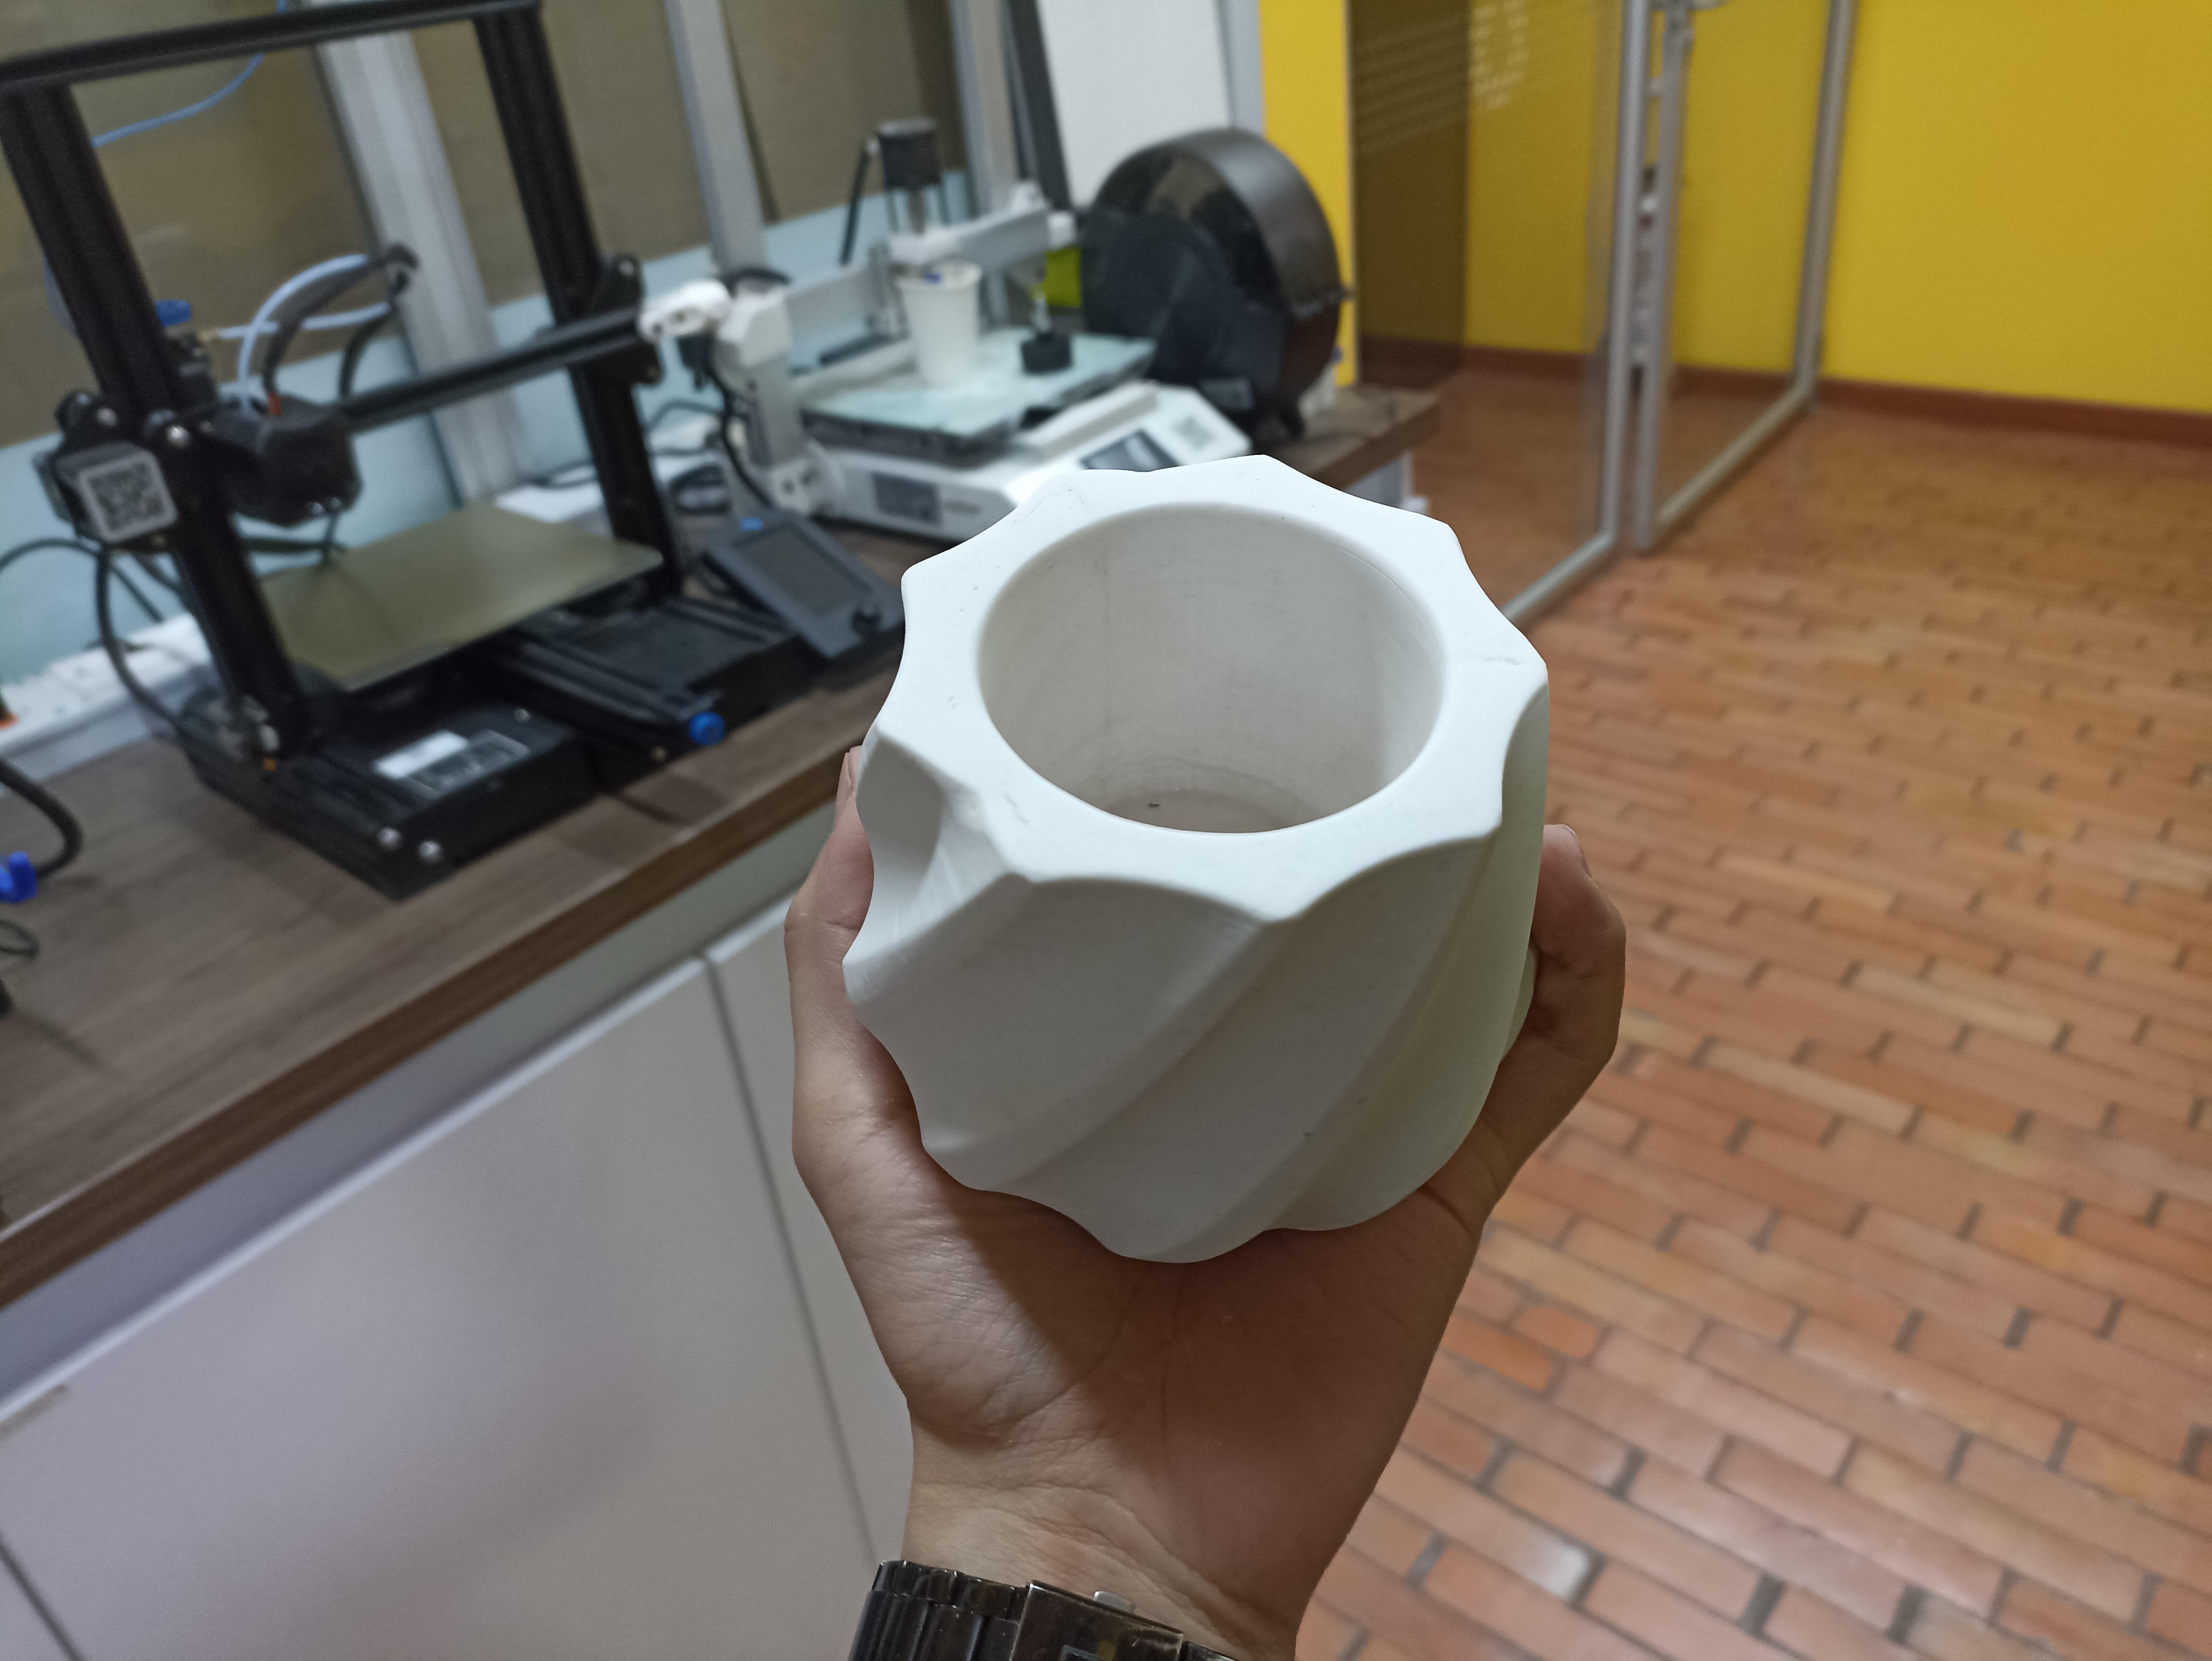
Image: The final planter after sanding — ready to be gifted.
As my very first molding and casting project, this planter was a full-on learning experience. I made some rookie mistakes: underestimating the amount of casting material, waiting too long to demold, and leaving small leaks in the mold seal. But I also learned how to solve problems on the fly, like adapting a drill for mixing or using a balloon to simplify cavity creation. Most importantly, I proved to myself that with enough care, research, and patience — I could turn a digital idea into a real, tangible, handmade object. And the best part? My mom loved it. That makes everything worth it 💚.
🧠 Reflections & Learnings
This week, I dove into the fascinating world of molding and casting—something I had never done before. Inspired by my mom’s love for plants, I designed and fabricated a planter pot from scratch using 3D printing and plaster casting. It was deeply satisfying to transform a digital design into a physical and meaningful gift.
I learned the importance of mold sealing and release strategies. For instance, I initially underestimated how much plaster I would need, and I didn’t fully tighten the mold, so some material leaked out. I also waited longer than the recommended curing time, which made demolding harder but helped with the structural integrity of the piece. These small mistakes helped me understand how crucial timing, preparation, and materials are when casting.
One trick that worked incredibly well was using a balloon inside the mold to create the inner cavity. It simplified the demolding process and prevented me from damaging the part. I also made my own mixing tool using a cut spatula mounted to a drill, which helped me mix the plaster more effectively and reduce bubbles.
After demolding, I noticed rough edges and small surface imperfections, so I wore a mask and carefully sanded the piece by hand. This post-processing phase helped me appreciate how finishing touches can elevate the final result.
Overall, this assignment taught me how to plan better, work with care and patience, and explore creative ways to solve practical problems. I’m proud of the outcome, and I look forward to experimenting with other molding materials and shapes in the future.
As part of the group assignment, I reviewed alternative casting materials with my classmates. While I personally used ECOCRYL® A/B for my final cast, we also discussed and observed results using silicone, wax, and plaster. Silicone offers excellent flexibility and detail, making it ideal for molds with undercuts. Wax is easy to melt and reuse, though fragile. Plaster is inexpensive and user-friendly, though less durable than resin. Understanding the properties of each material helped me appreciate why ECOCRYL was chosen for my project.
Comparing 3D printing vs CNC milling for mold making, I found that printing allowed more organic and complex shapes—perfect for my planter. It was also more accessible and cost-effective in my lab. However, it left visible layer lines that affected the surface finish. Milling, by contrast, produces very smooth surfaces and precise geometries, especially when using wax or machinable foam. But it takes longer and requires more preparation. For small, artistic projects like mine, 3D printing is a great option, while CNC is better for high-precision or repeated molds.
📦 Downloads & Files
- 🧱 Molde_central_x1.stl – Central core used to form the internal cavity of the planter.
- 🧱 Molde_lateralx3.stl – One of the three identical lateral pieces needed to complete the mold.
- 🧱 laterales.stl – Combined lateral segments assembled as one solid for preview.
- 🧩 Mold_1.3mf – 3MF file exported from slicer, including settings.