Assignments
Assignment:
- Model (raster, vector, 2D, 3D, render, animate, simulate, ...) a potential final
project.
Additional Instructions:
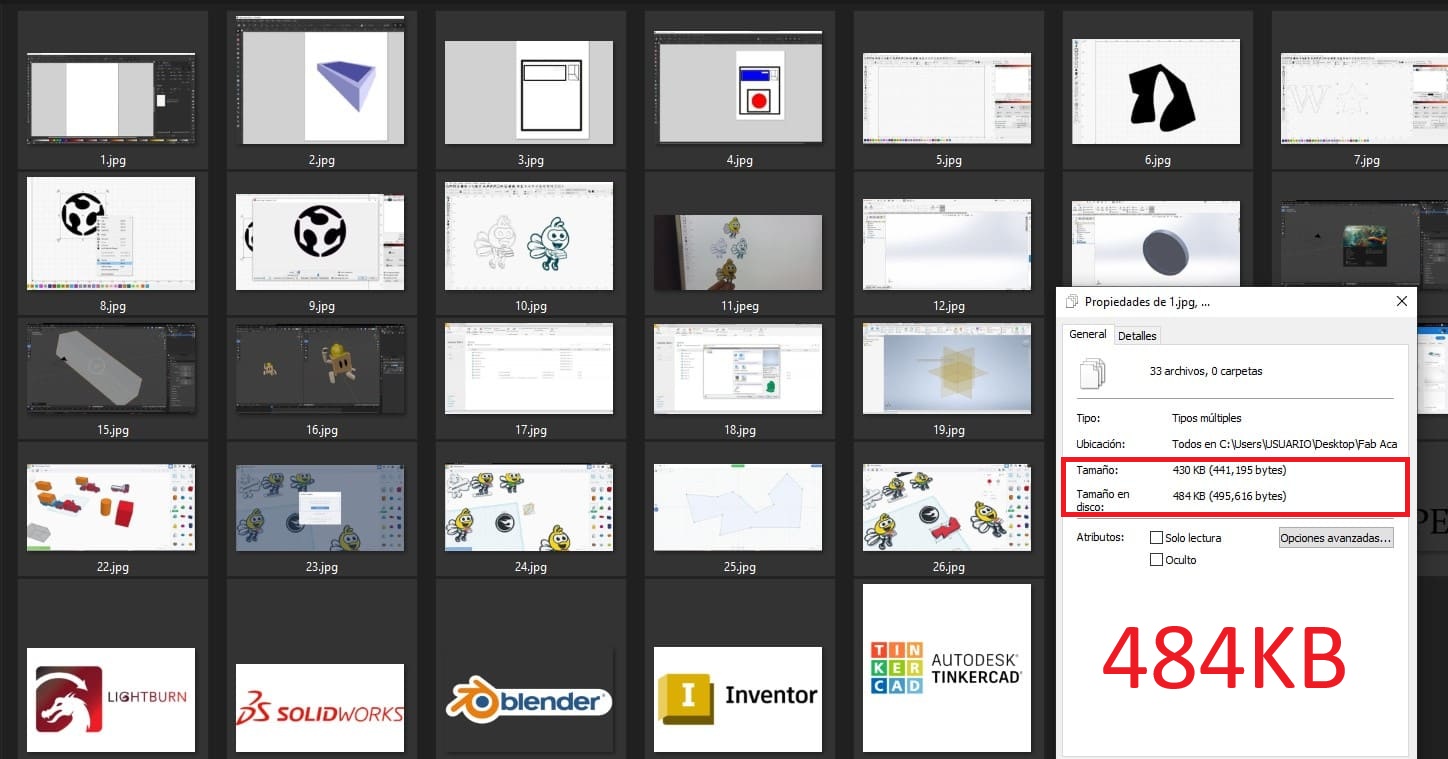
- Compress your images and videos.
- Post a description with your design files on your class page.
Week 2. Computer-Aided Design
2D Vector
Exploring Vector Design Tools: Inkscape vs LightBurn
In the world of design and digital fabrication, choosing the right tool can make the difference between a smooth workflow and one filled with complications. Today, I want to share my experience using two programs that, while different in focus, are essential in my daily work at the FabLab: Inkscape and LightBurn.
Inkscape: The Power of Vector Design

What is Inkscape?
Inkscape is an open-source, completely free vector graphic design software. It is designed to create and edit vector graphics in SVG format, making it a versatile tool for illustrations, logos, technical designs, and more.
What is it used for?
Inkscape is ideal for:
- Creating graphic designs from scratch.
- Editing and manipulating SVG files.
- Creating complex illustrations with advanced path and node editing tools.
- Preparing designs for printing, laser cutting, or CNC (though it requires additional steps).
My Experience with Inkscape
First Steps in the Inkscape Environment
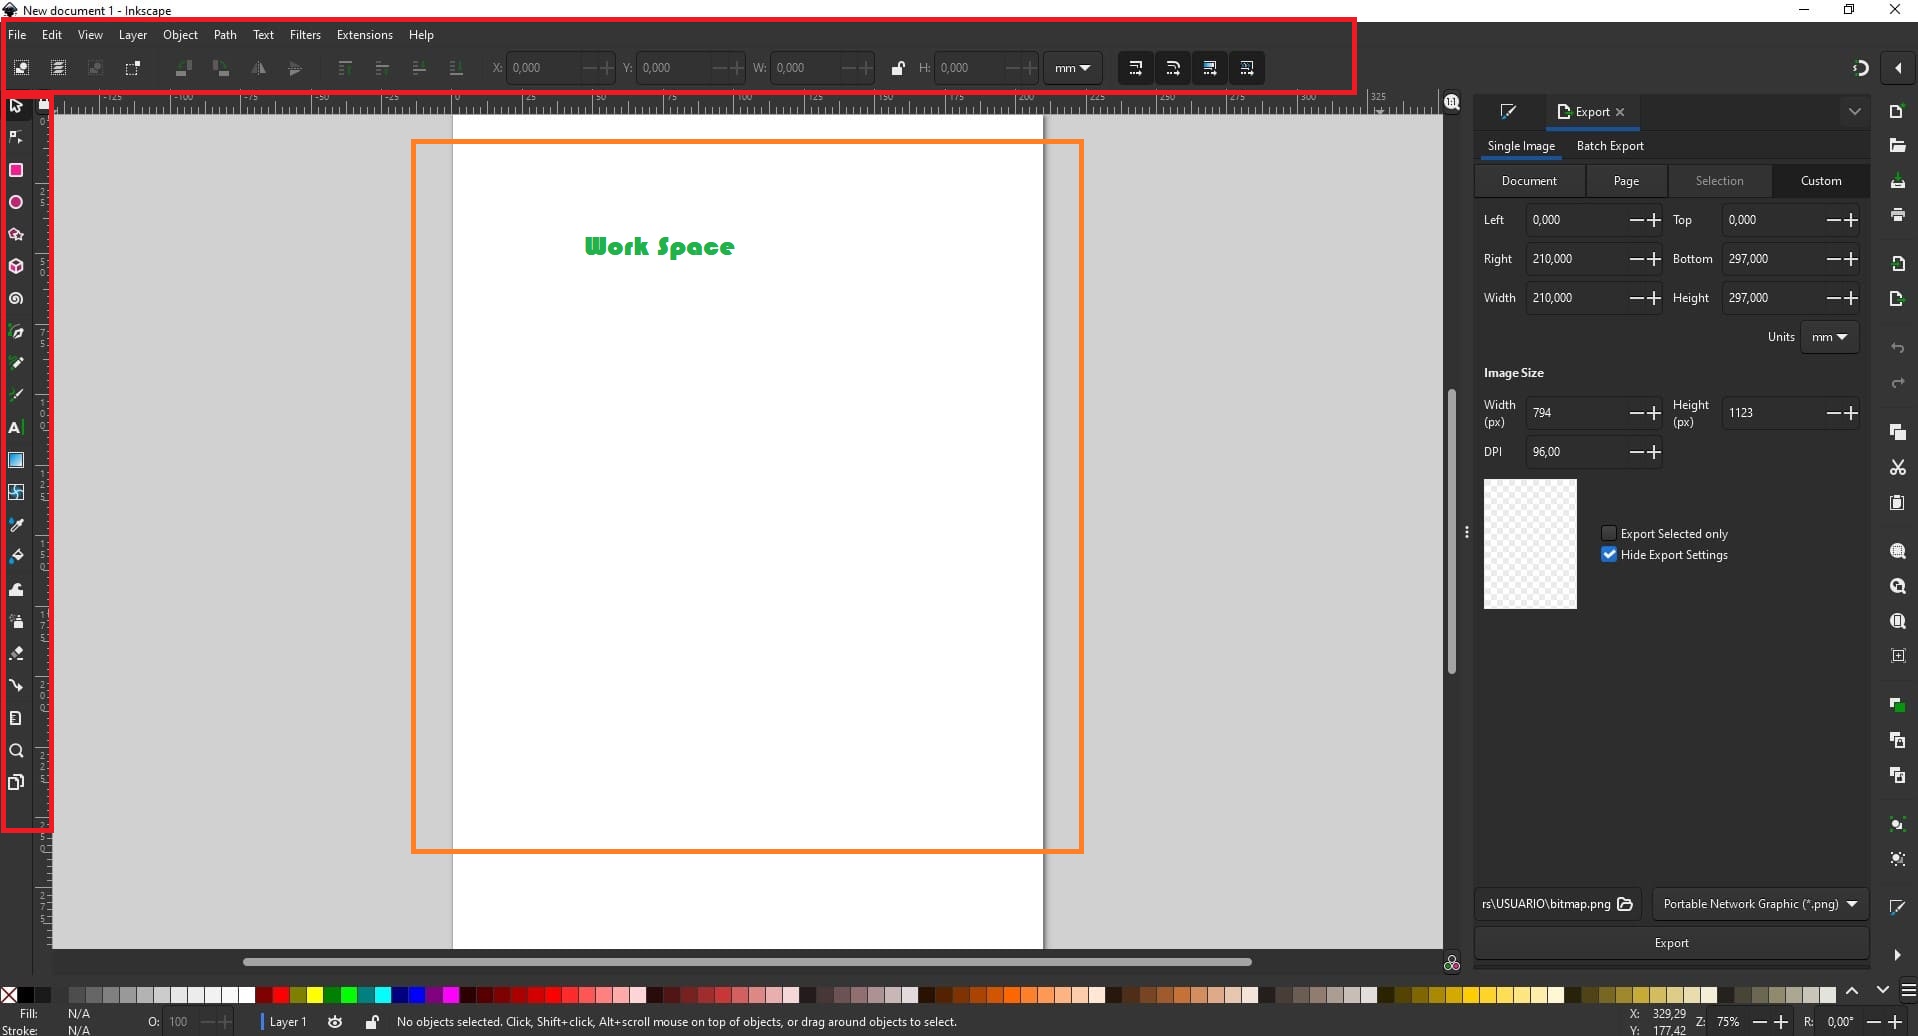
When opening Inkscape, I was greeted with a clean but feature-packed interface. In the first image, I show the workspace, where we can see how to create a new file and get familiar with the basic tools. While it may seem overwhelming at first, it becomes more intuitive with practice.
Drawing a 3D Cube
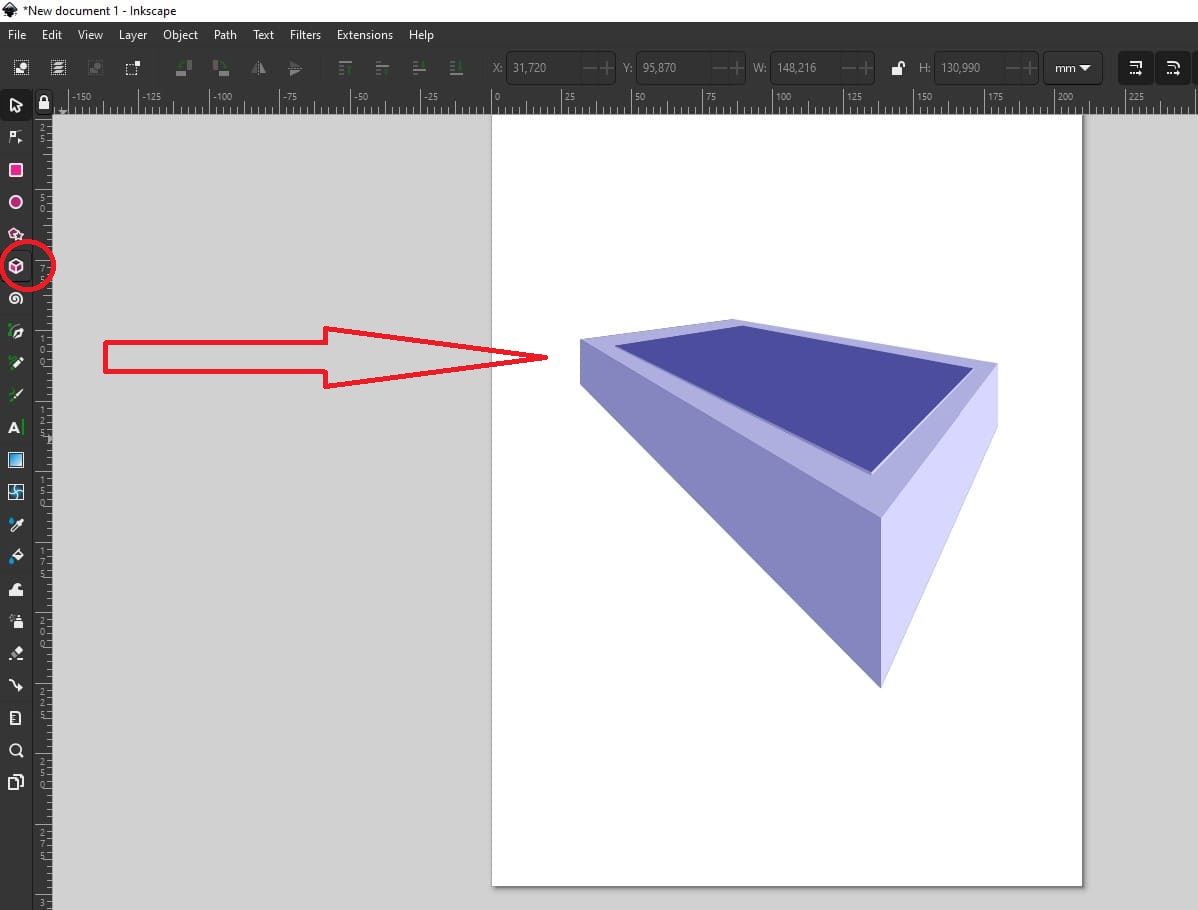
In the second image, I used basic shape and line tools to draw a 3D cube. Inkscape makes it easy to create geometric shapes, but achieving professional results requires a good grasp of its editing tools.
Sketching a Personal Project
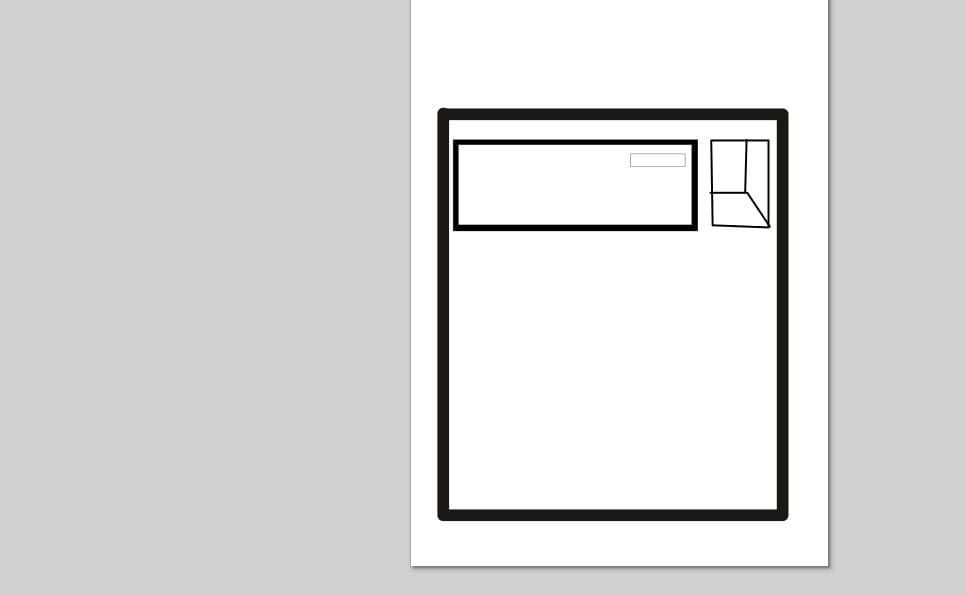
In the third image, I show a sketch of one of my projects. I used lines and colors to bring the design to life. While the result isn’t perfect, Inkscape allowed me to experiment with shapes and fills creatively.
A Not-So-Professional Design
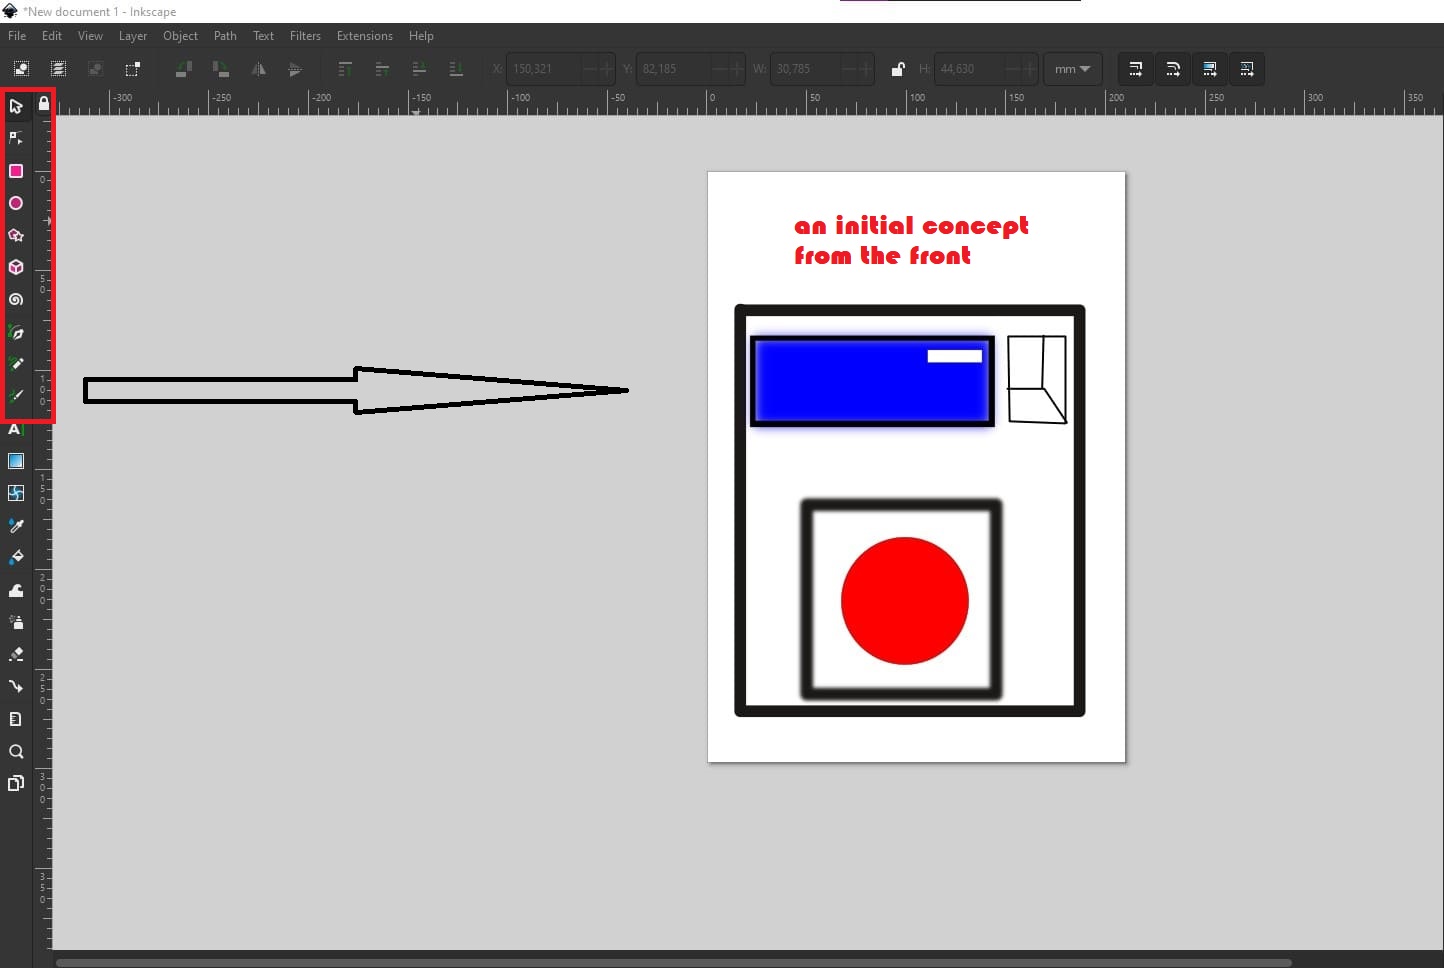
In the fourth image, I share a more elaborate design visualization. Although I haven’t fully mastered the software, Inkscape has allowed me to explore my creativity and learn step by step.
LightBurn: The Specialized Tool for Digital Fabrication
LightBurn is a design and control software for laser cutters and CNC machines. While it’s not a full graphic editor like Inkscape, it is optimized for preparing vector files (SVG, DXF) and sending them directly to machines.

What is LightBurn?
LightBurn is a design and control software for laser cutters and CNC machines. While it’s not a full graphic editor like Inkscape, it is optimized for preparing vector files (SVG, DXF) and sending them directly to machines.
Why is it a Great Option?
LightBurn is perfect for:
- Creating and editing vectors quickly and easily.
- Preparing DXF and SVG files for laser cutting, CNC, or engraving.
- Controlling and configuring machines directly from the software.
- Optimizing workflows in a FabLab.
My Experience with LightBurn
The LightBurn Environment
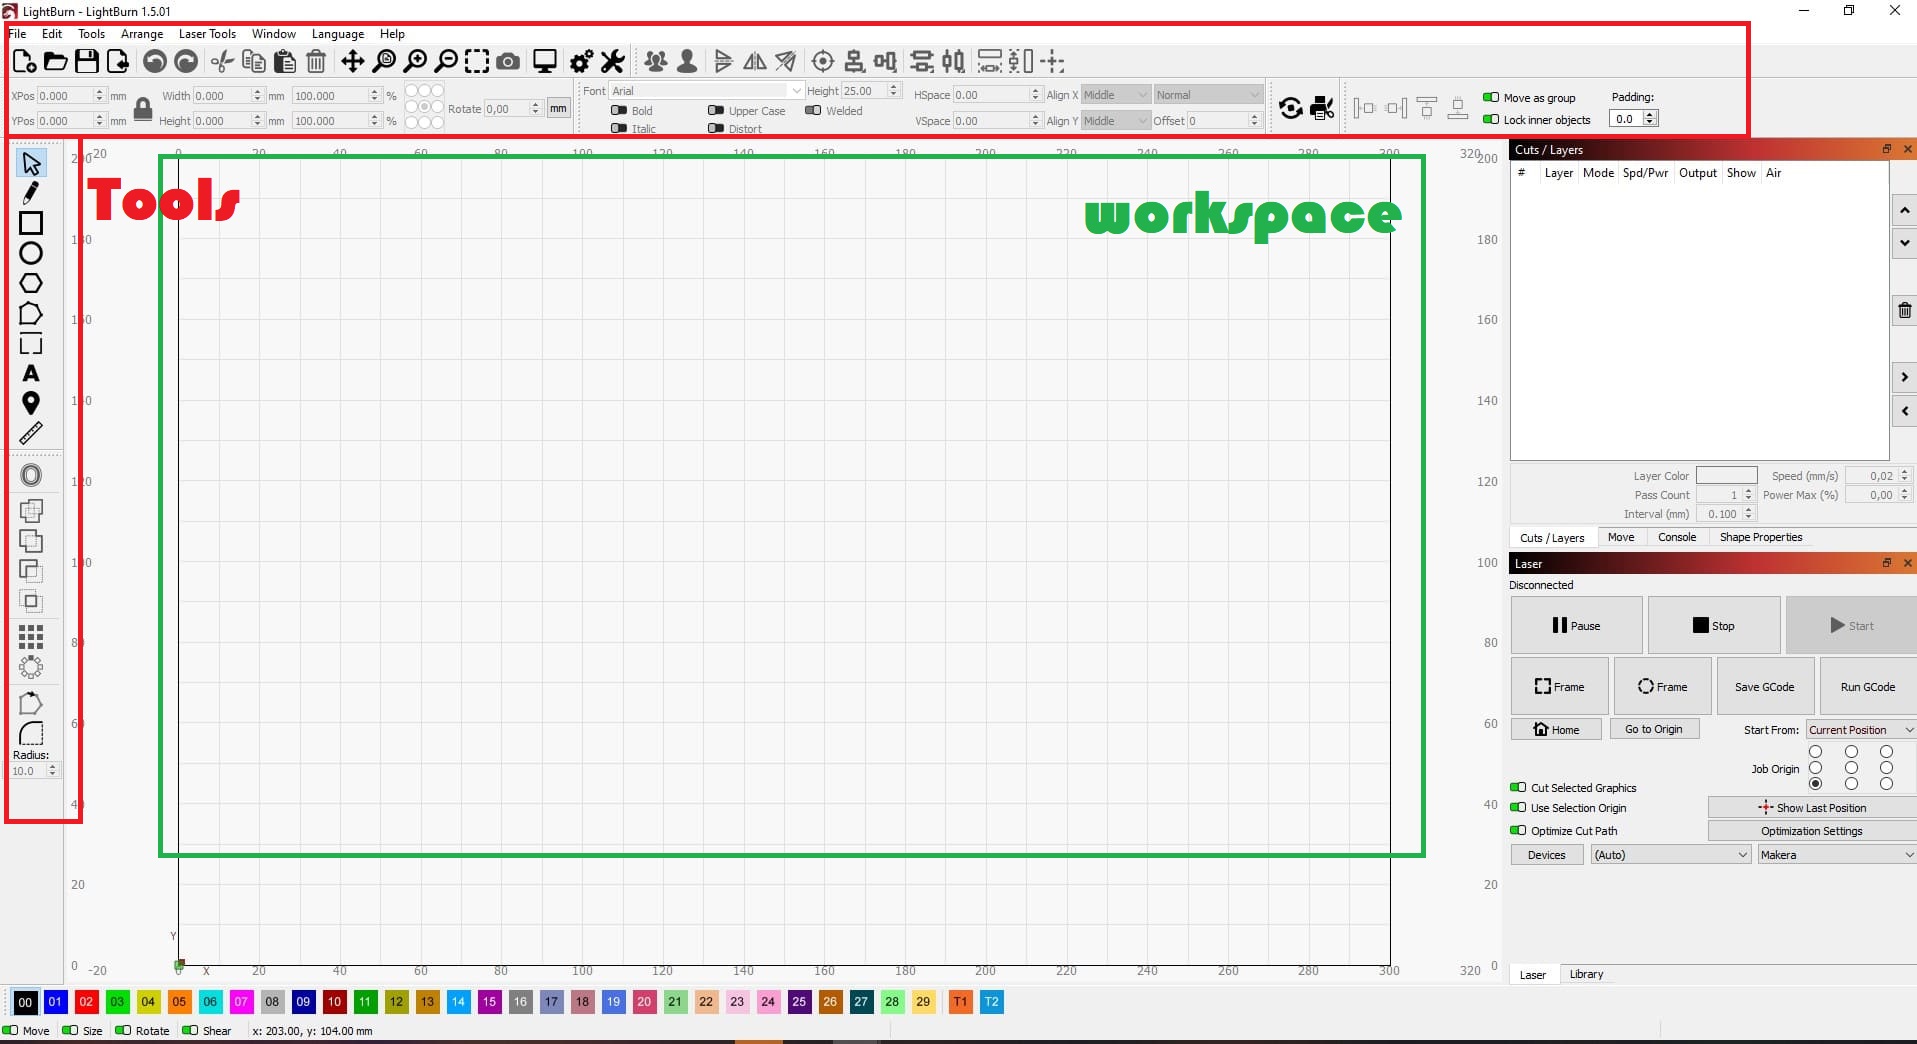
In the fifth image, I show the LightBurn interface. Its layout is simpler and more focused on digital fabrication. From the start, I noticed it’s more agile and easier to use than Inkscape for my FabLab needs.
Creating Basic Shapes
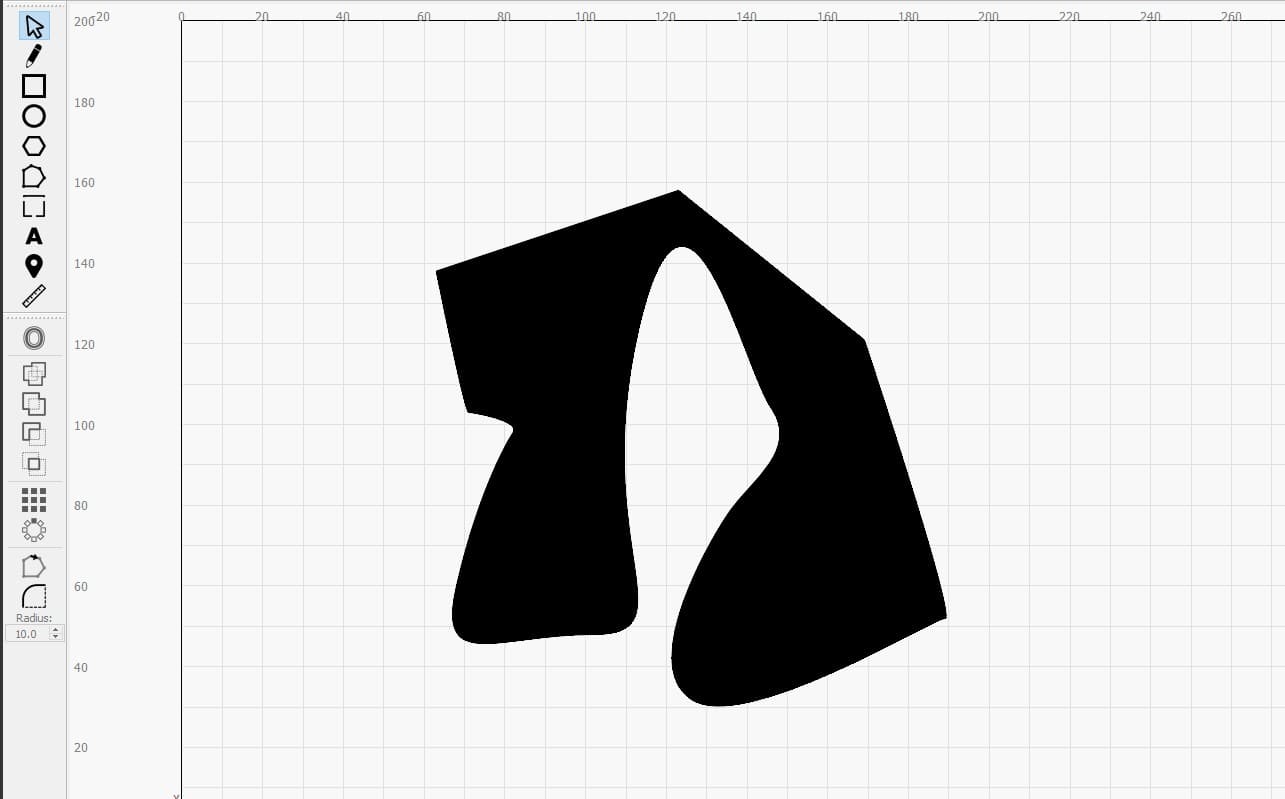
In the sixth image, I used basic line and shape tools to create a simple design. LightBurn allows for intuitive vector drawing, making it easy to create designs ready for cutting.
Shapes and Defined Text
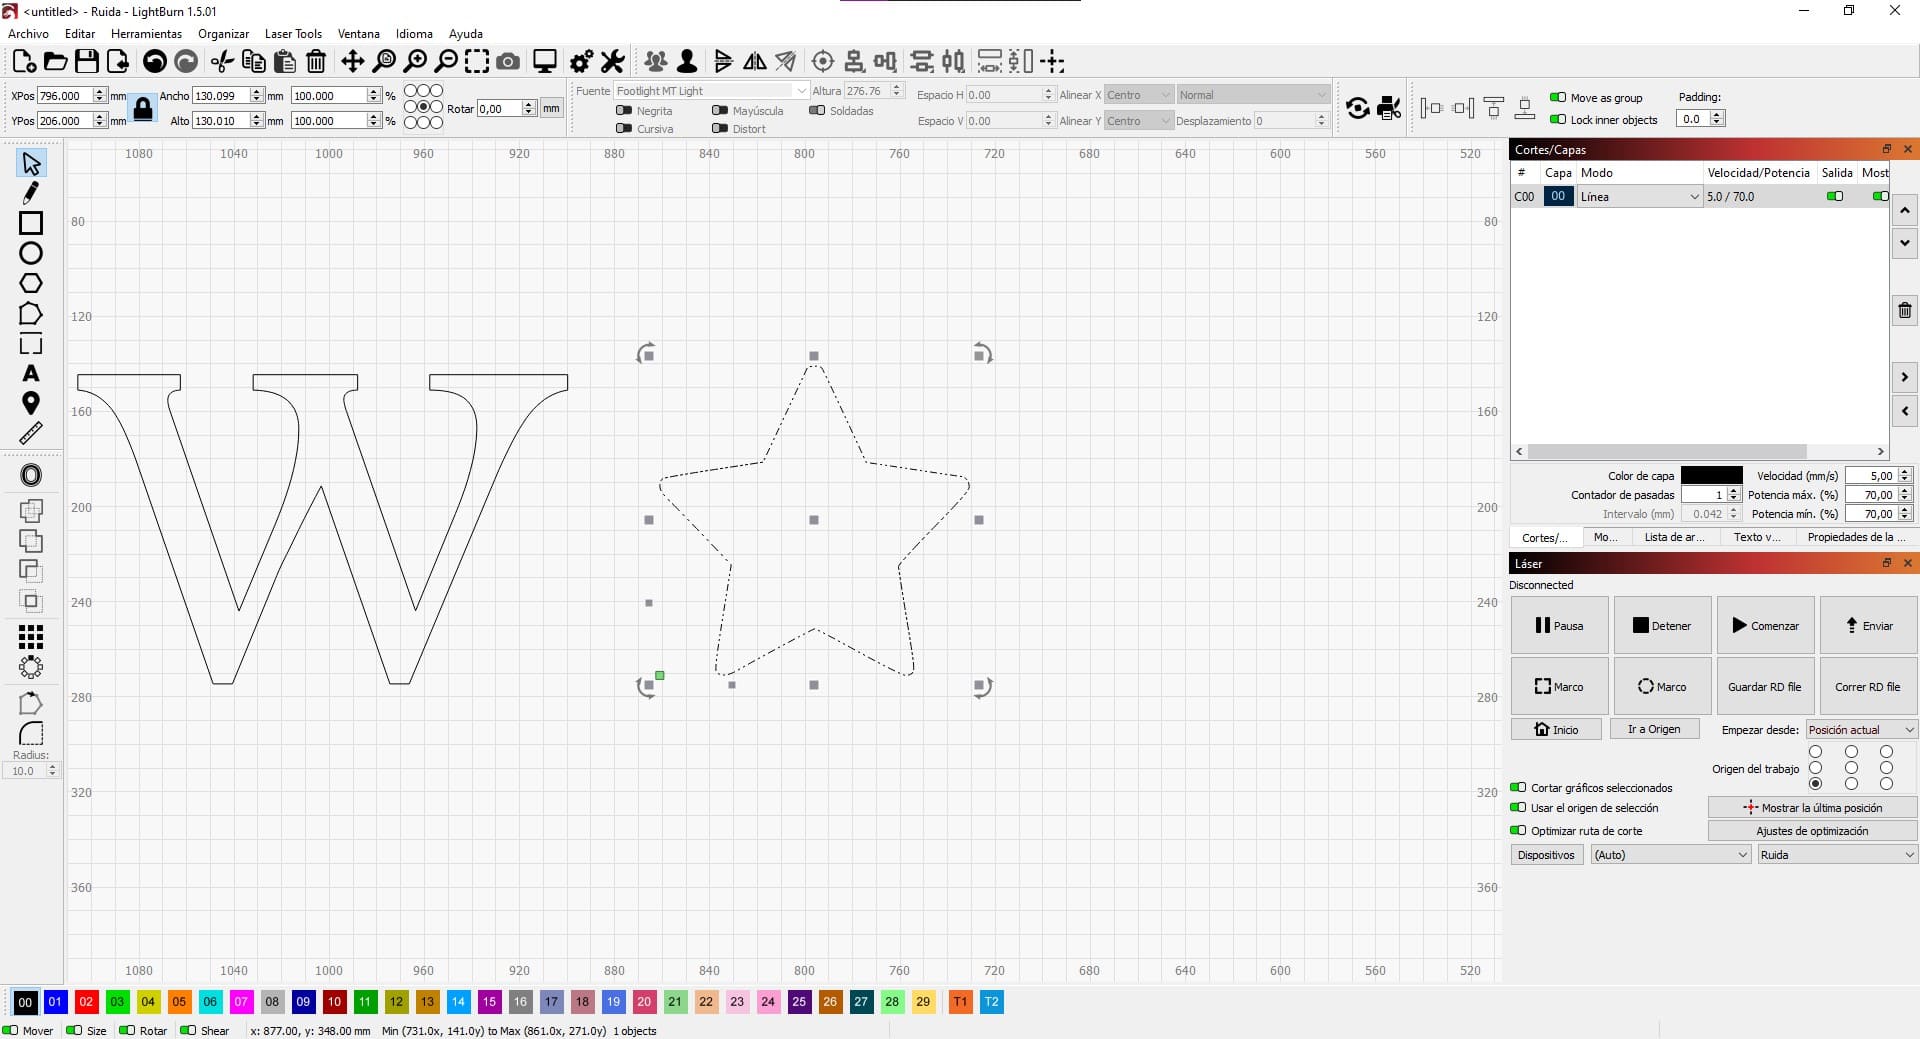
In the seventh image, I show how shapes and text can be combined to create more elaborate designs. LightBurn includes specific tools for adjusting cutting and engraving parameters, making it ideal for practical projects.
Vectorizing Images to Black and White
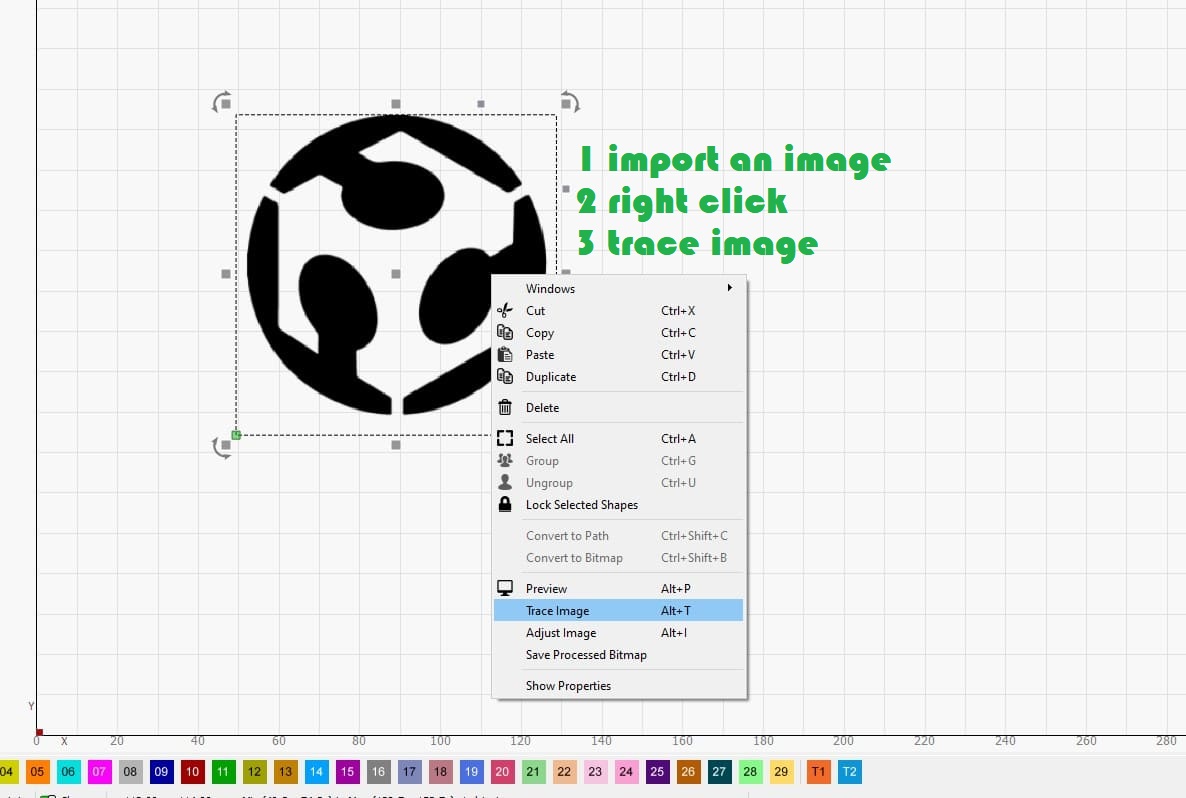
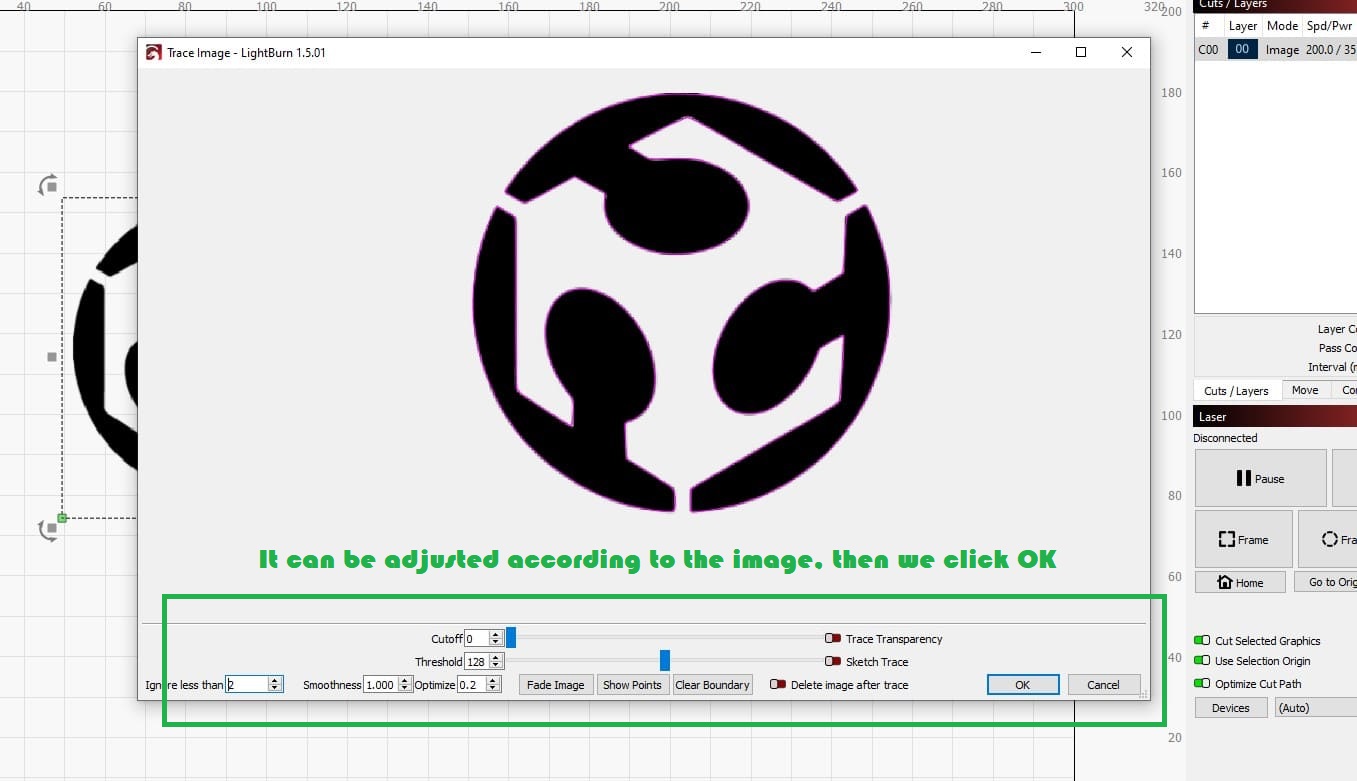
In the eighth and ninth images, I explore the ease of vectorizing black-and-white images. LightBurn has a built-in function to convert images into vectors, which is very useful for laser engraving or vinyl cutting.
A Complete Example: The MELI Mascot
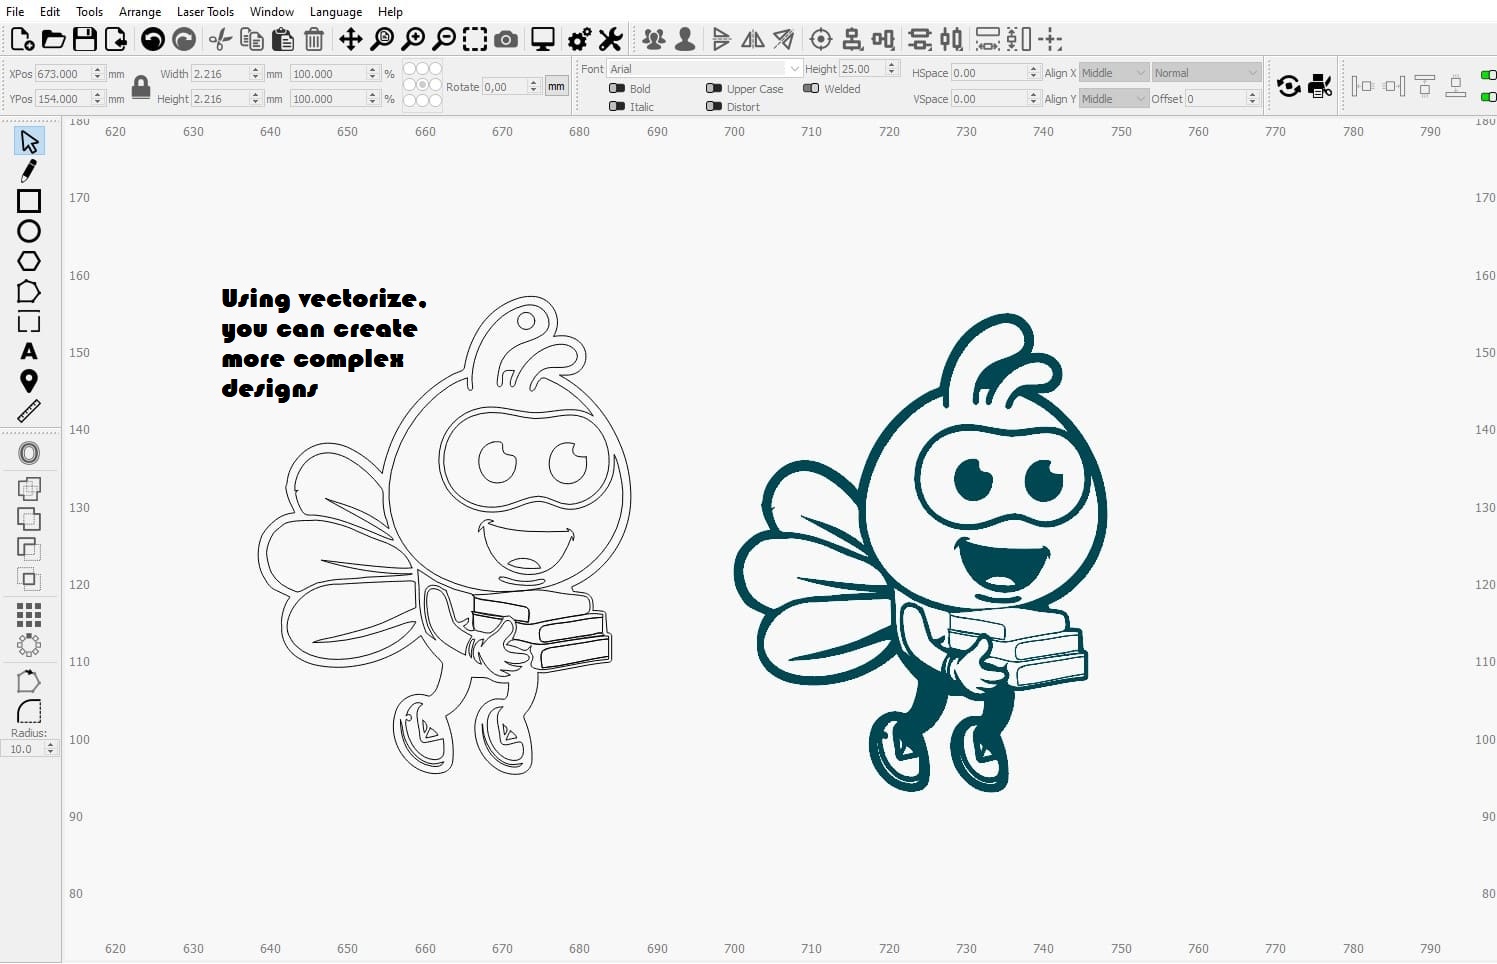
In the tenth image, I show two versions of my university’s mascot, MELI. LightBurn allowed me to create a clean and precise vector design, ready to be used in different applications.
From 2D to 3D: Adding Volume to My Designs
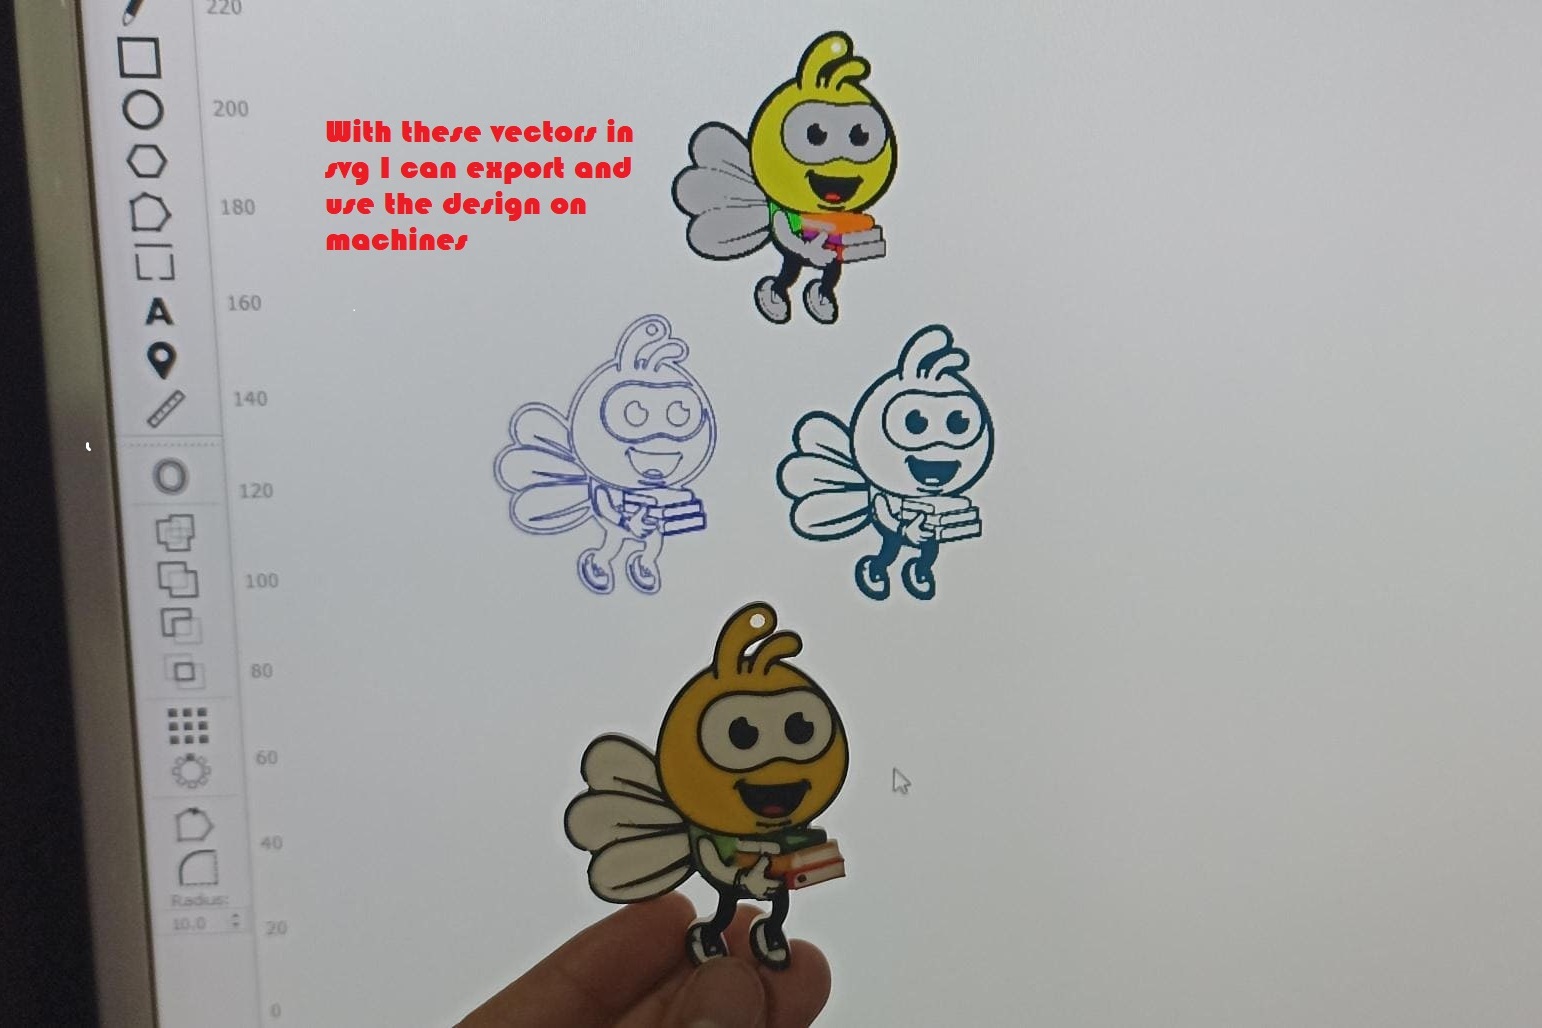
In the eleventh image, I present three versions of the same design: in color, as vectors, as outlines, and a 3D-printed version. LightBurn has enabled me to create DXF files that I can then use in other tools to add volume to my designs and create physical objects.
2D Vector Comparison
Comparison Table: Inkscape vs LightBurn
| Feature | Inkscape | LightBurn | Conclusion (From My Perspective) |
|---|---|---|---|
| Primary Focus | Vector graphic design (creation and editing of SVG). | Control and design software for laser cutters and CNC machines. | LightBurn is more aligned with my needs in the FabLab, as it focuses on digital fabrication. |
| Format Compatibility | Works natively with SVG. Can import/export DXF, PDF, EPS, etc. | Efficiently imports SVG and DXF. Exports files optimized for machines. | LightBurn is more efficient for working with DXF and SVG in digital fabrication. |
| Learning Curve | Steeper, especially for beginners in vector design. | Shorter and more agile, designed for quick results in fabrication. | LightBurn is easier to learn and use in my daily workflow. |
| Design Tools | Comprehensive set of graphic tools (shapes, text, paths, etc.). | Basic editing tools, focused on preparing files for cutting. | Inkscape is better for complex graphic design, but LightBurn is more practical for fabrication. |
| Optimization for FabLab | Not optimized for laser cutters or CNC machines. | Specialized for laser cutters and CNC, with specific tools for fabrication. | LightBurn is superior for my work in the FabLab. |
| Machine Control | No machine control functionalities. | Allows direct control and configuration of laser cutters and CNC machines. | LightBurn is essential for sending files directly to machines. |
| Workflow Efficiency | Slower for preparing files for cutting, as it is not specialized. | More agile and optimized for preparing and sending files to machines. | LightBurn is more efficient for my workflow in the FabLab. |
| Integration with Other Tools | Requires additional steps to convert SVG to DXF or prepare files for CNC, laser, or vinyl cutting. | Integrates seamlessly with machines and digital fabrication tools. | LightBurn simplifies my workflow by generating files ready for CNC, laser, and vinyl cutting. |
| Price | Free and open-source. | Paid (one-time license, affordable). | Although Inkscape is free, LightBurn offers added value that justifies its cost. |
Final Conclusion (From My Perspective)
Inkscape is ideal if I need to create complex graphic designs from scratch, but it is not optimized for digital fabrication.
LightBurn is more agile, user-friendly, and specifically designed for digital fabrication. It is perfect for preparing SVG or DXF files for CNC, laser engraving, vinyl cutting, and other tasks in the FabLab.
Decision: Since my primary focus is digital fabrication and not
complex graphic design, LightBurn is the best option for me.
Additionally, its ability to generate optimized DXF files allows me to easily
integrate it with other tools for creating 3D objects, templates, and more.
3D modeling
Summary of My Work During Fab Academy Week
In the 3D modeling section, I analyzed multiple platforms to create basic models, created a comparison table, and selected the best option to make an initial prototype of the case to protect my project.
1. SolidWorks
Program Description:
SolidWorks is a computer-aided design (CAD) software primarily used for 3D modeling of mechanical parts, assemblies, and technical drawings. It is widely used in engineering, industrial design, and manufacturing.
- What is it for? For creating parametric 3D models, simulations, renderings, and technical drawings.
- Difficulty Level (1-10): 7/10. It has a moderate learning curve but is very powerful once mastered.
- Extra Benefits:
- Advanced tools for mechanical design.
- Integration with simulation and analysis tools.
- Large community and learning resources available.
Steps to Create a Basic 3D Model in SolidWorks:
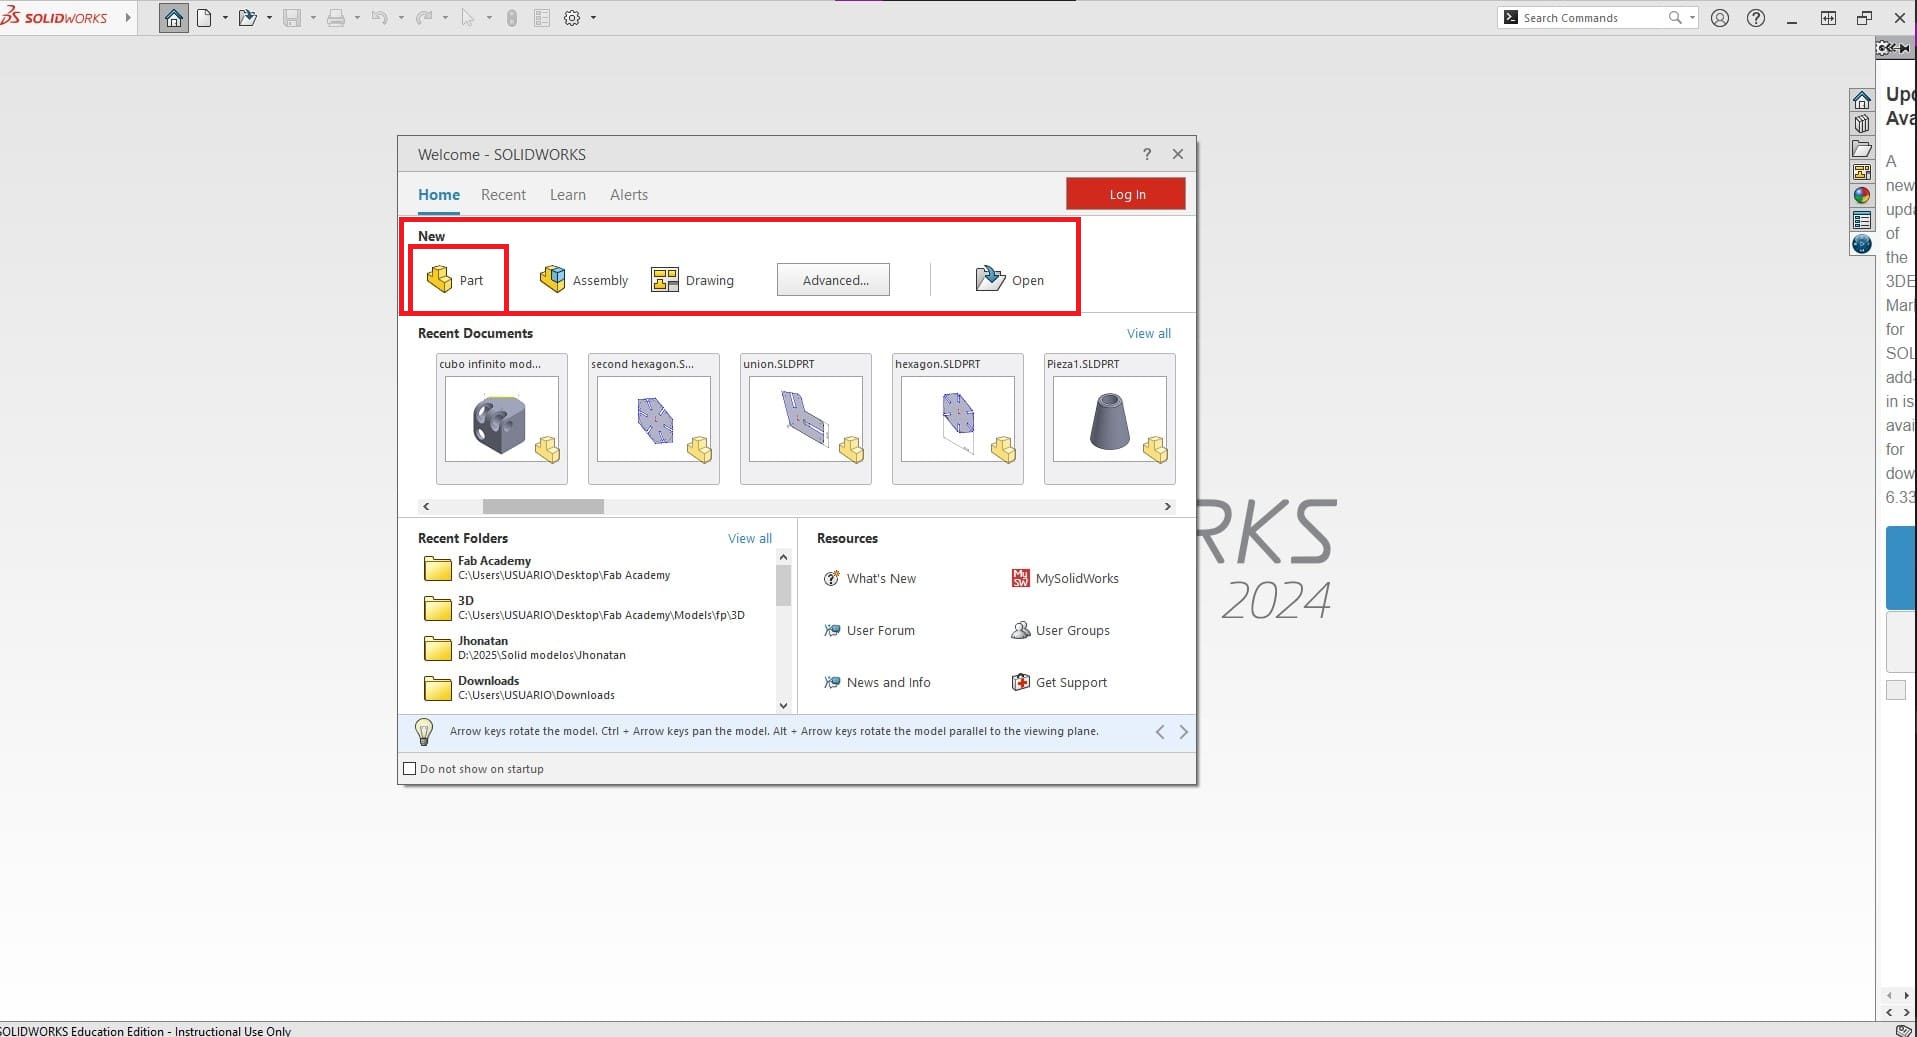
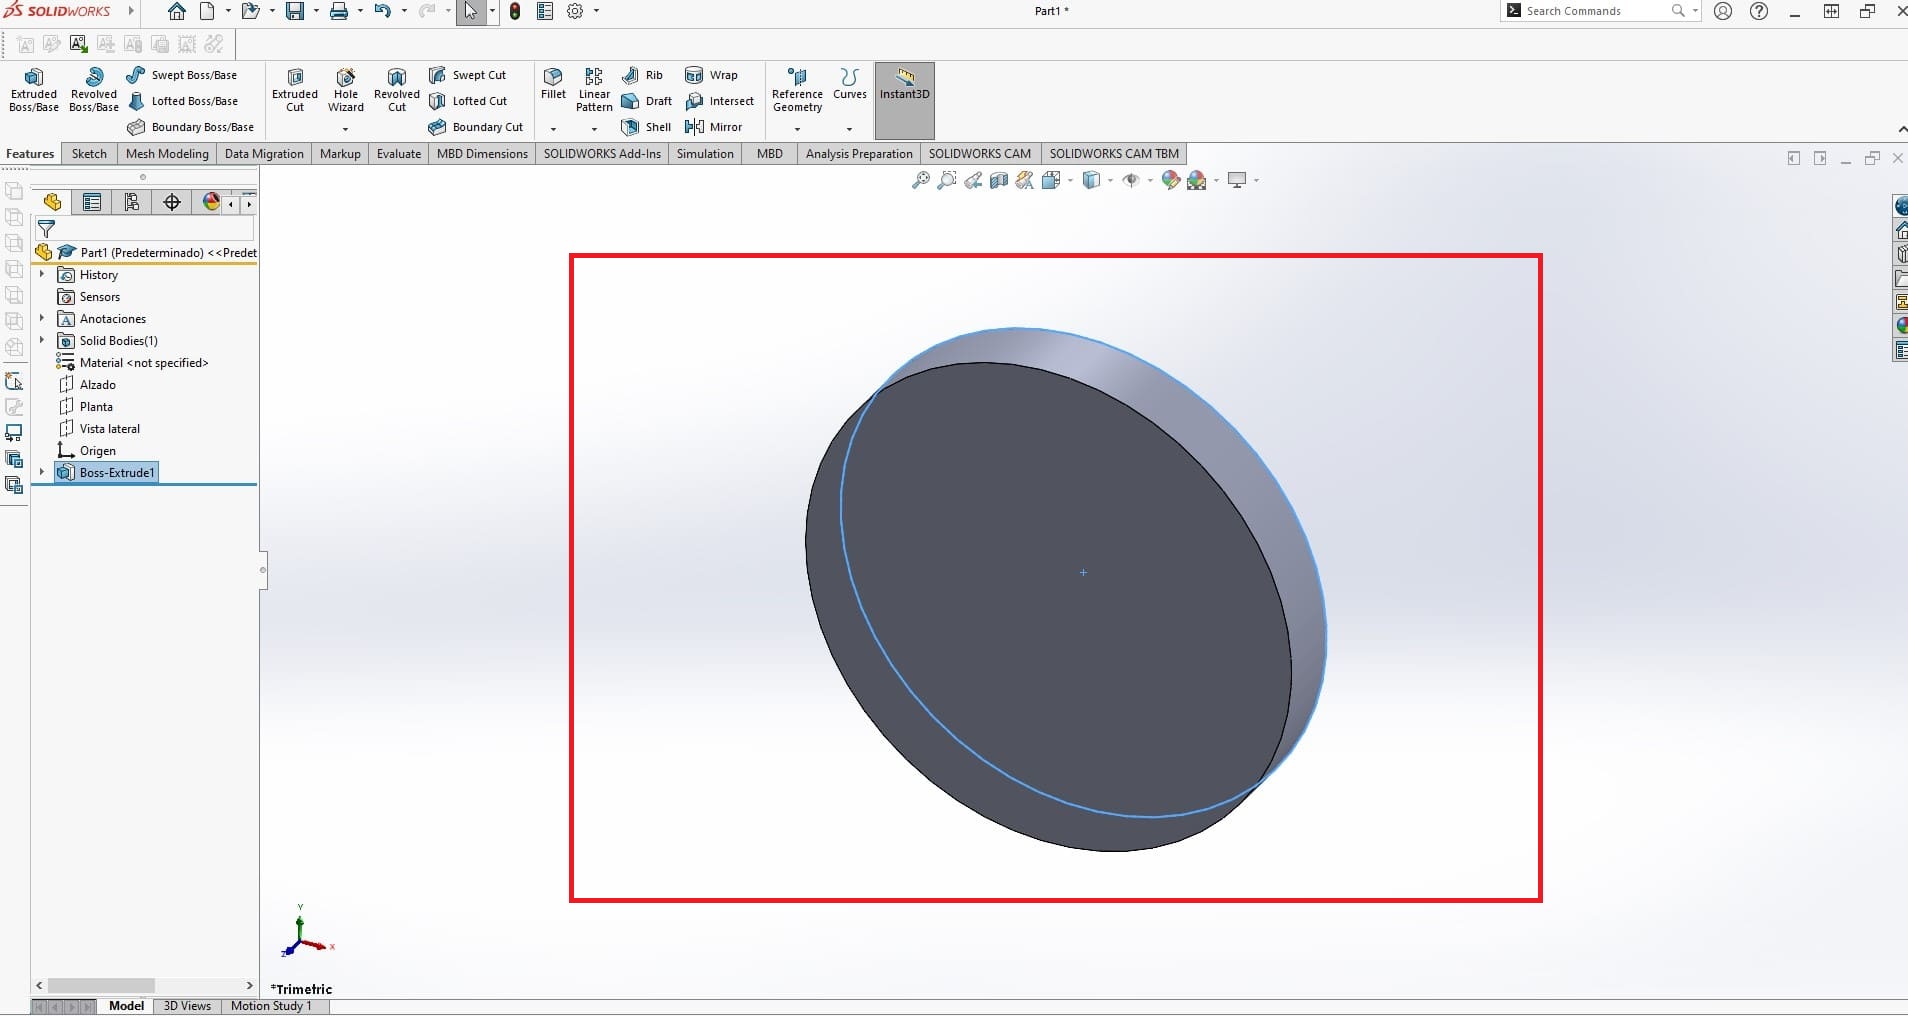
- Open the program and select "New" > "Part" to start a 3D model.
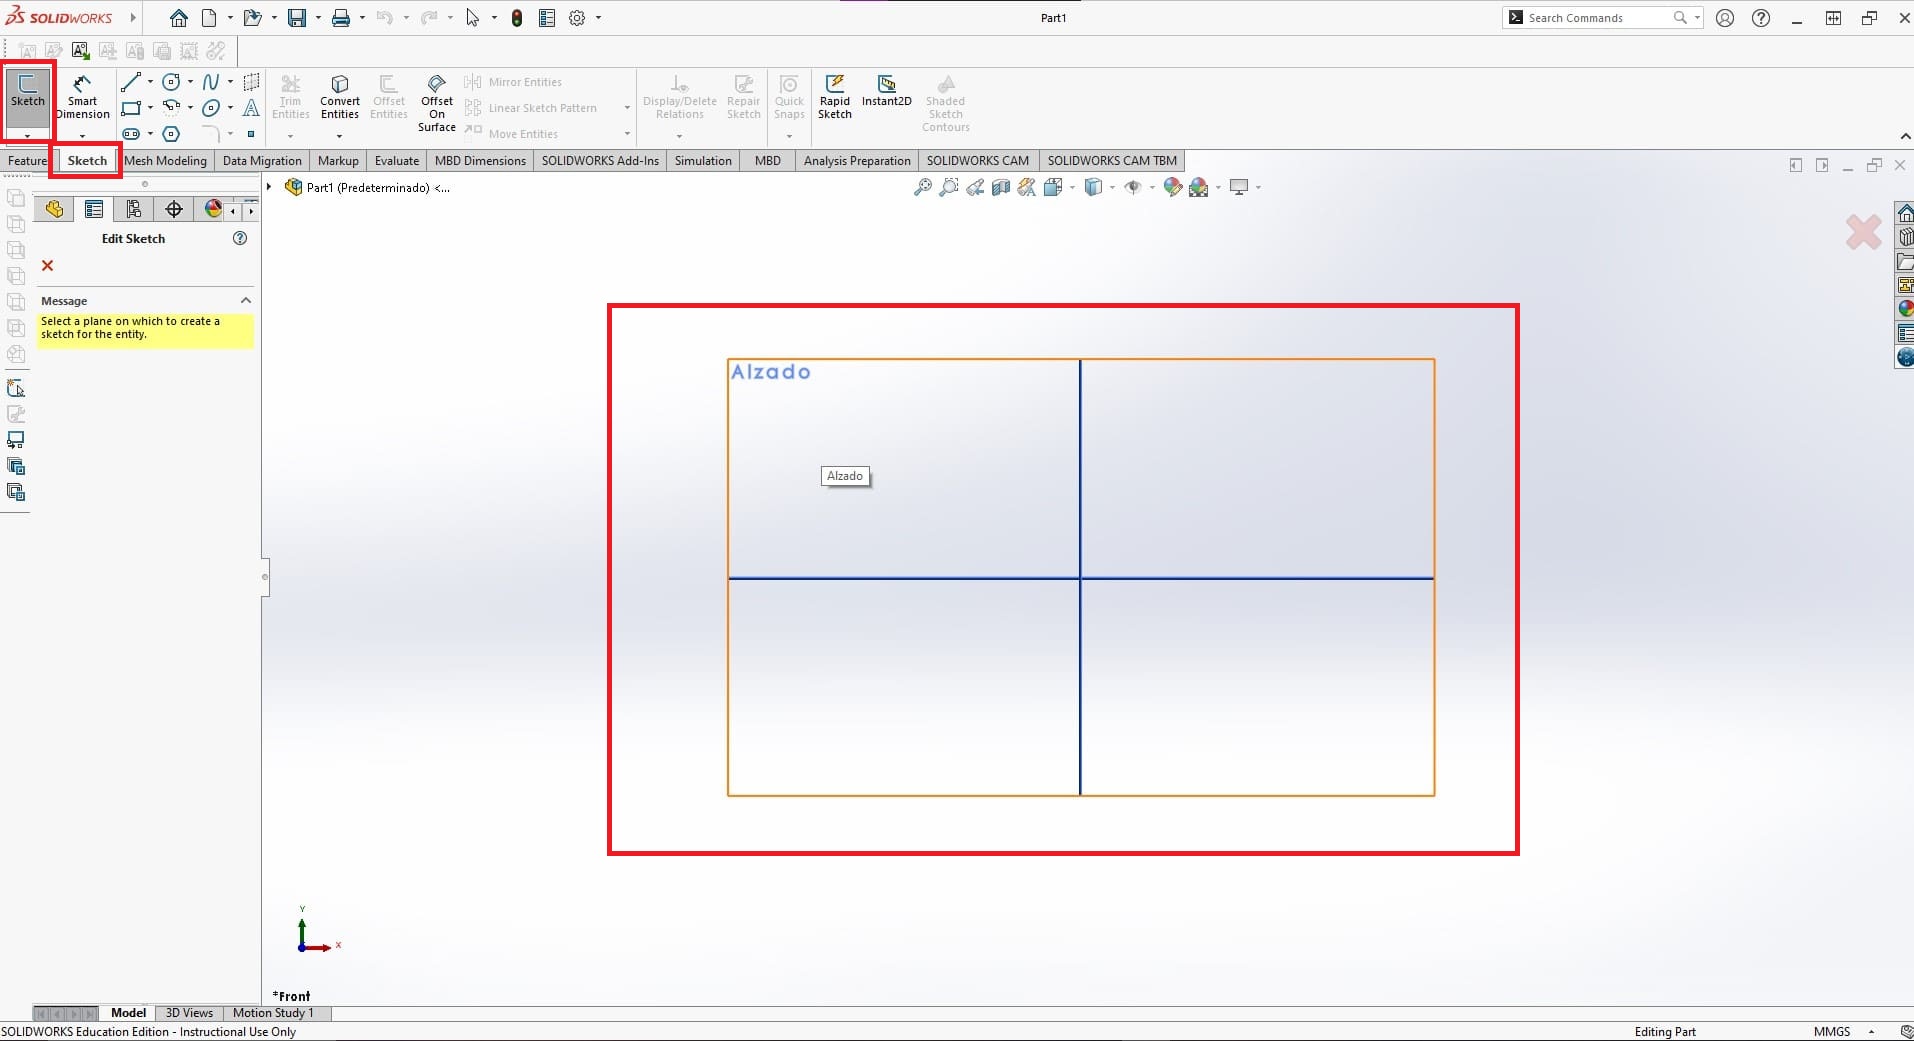
- Create a sketch by selecting a work plane and using tools like circles, lines, or rectangles.
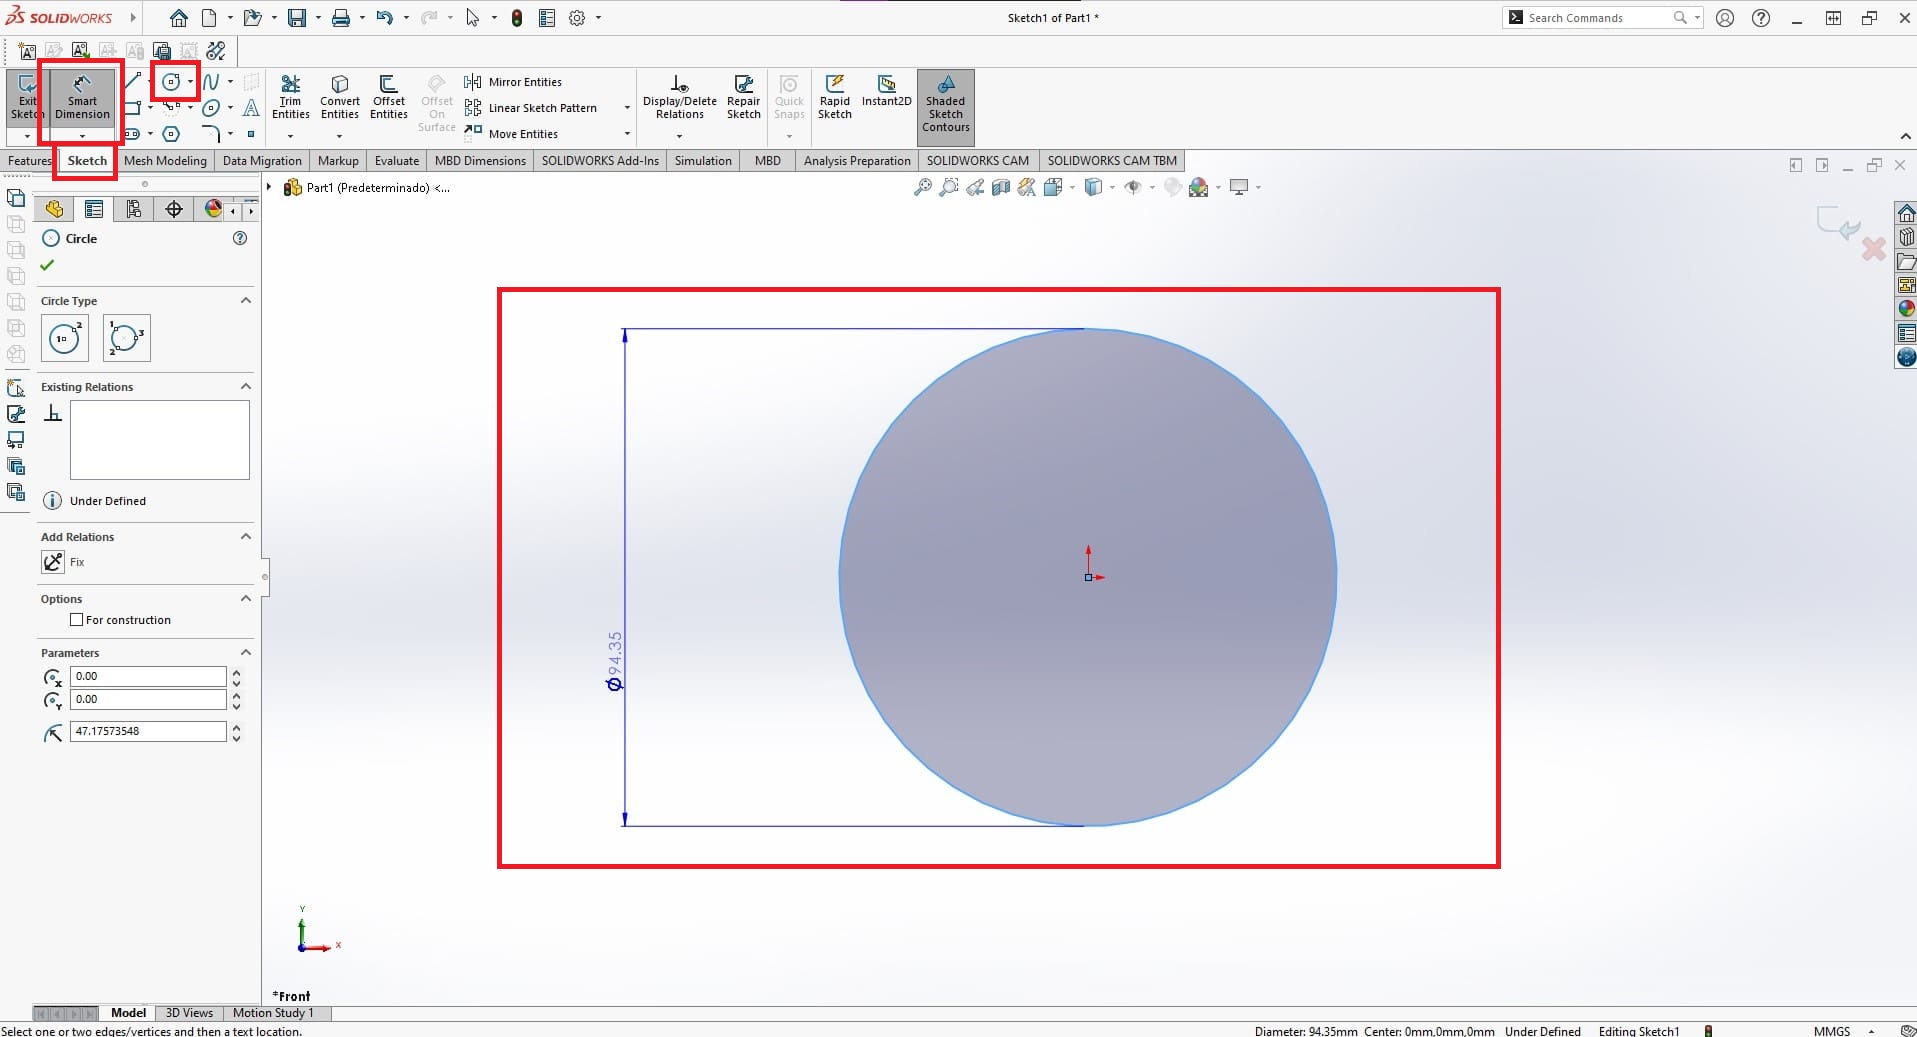
- Draw a circle with the origin at point (0,0) and adjust its dimensions using dimensions (measurement tool).
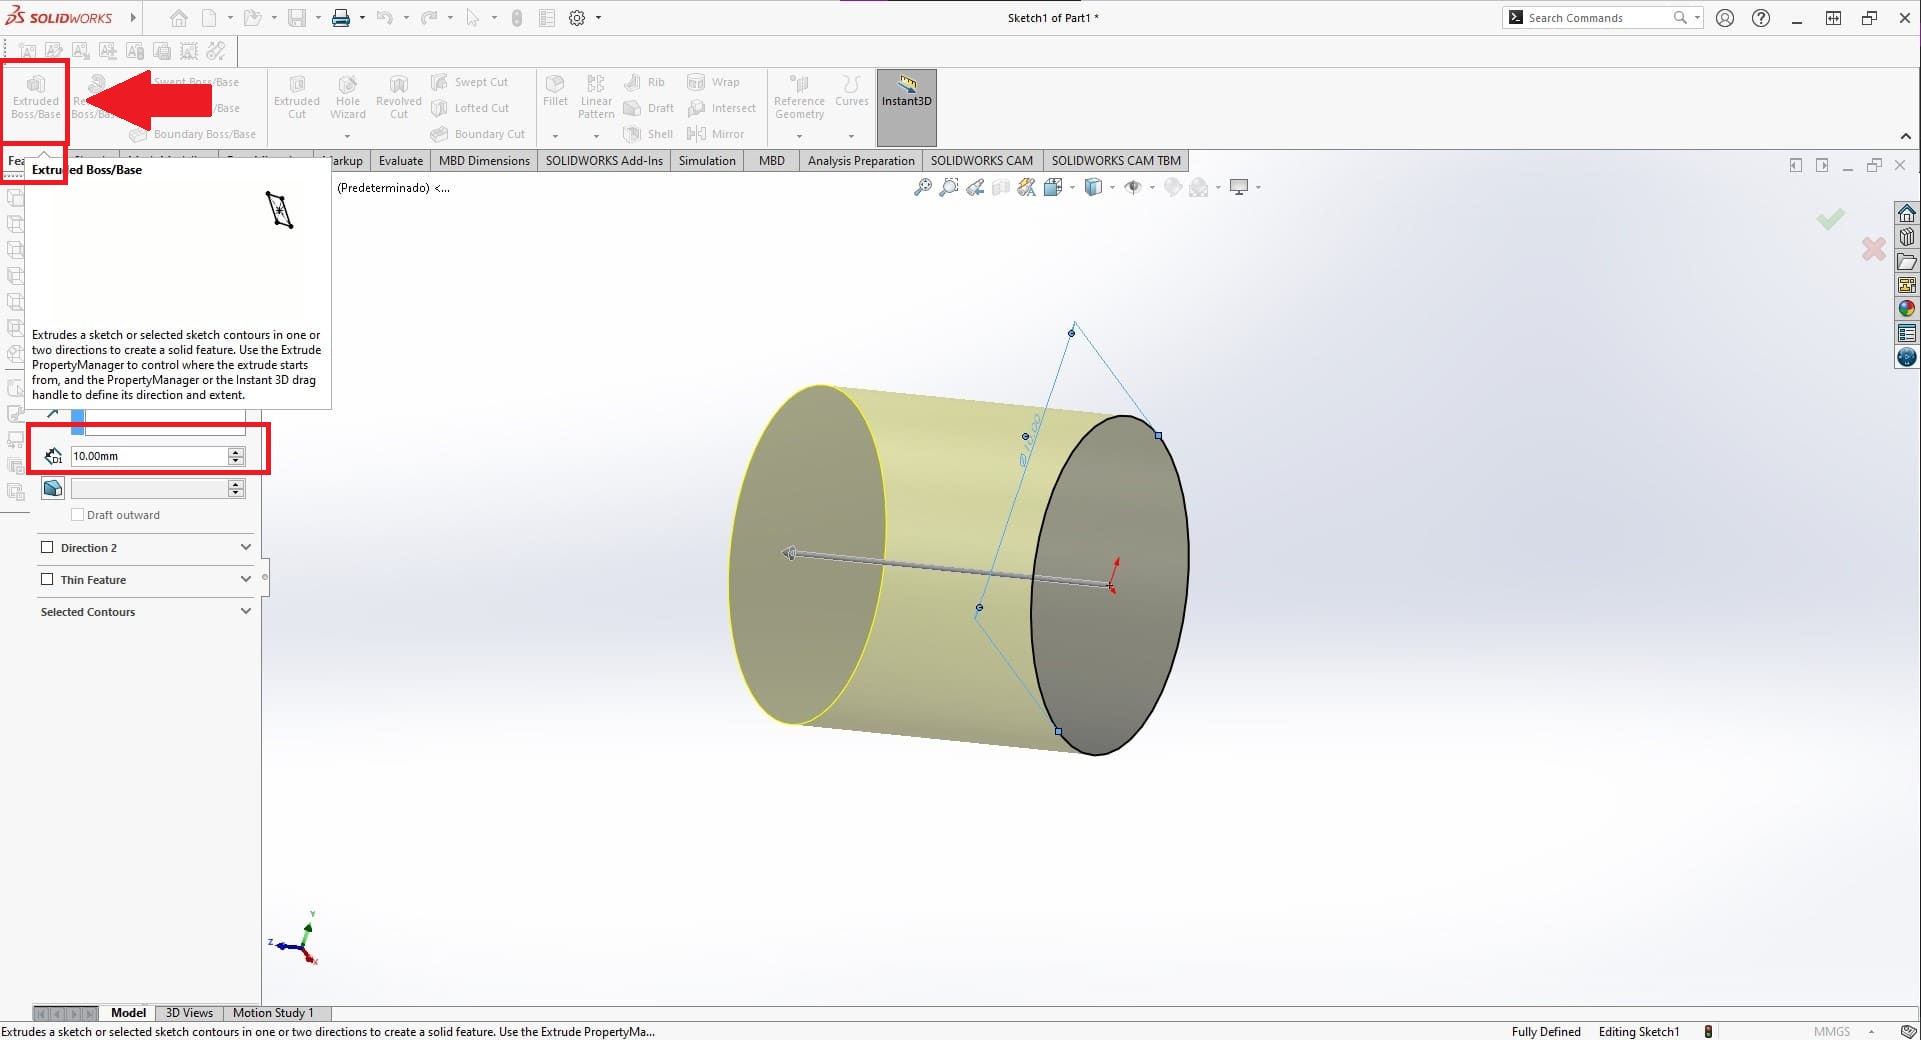
- To turn the sketch into 3D, use the "Extrude" option and define the desired height.
- Save your model and export it in the required format (STL, STEP, etc.).
|
STEP 1
|
|
STEP 2
|
|
STEP 3
|
|
STEP 4
|
|
STEP 5
|
2. Blender
Program Description:
Blender is an open-source 3D modeling, animation, and rendering software. It is very versatile and is used in organic design, animation, video games, and digital art.
- What is it for? For organic 3D modeling, animation, digital sculpting, rendering, and creating assets for video games.
- Difficulty Level (1-10): 8/10. It has a steep learning curve due to its wide range of features.
- Extra Benefits:
- Free and open-source.
- Advanced tools for animation and rendering.
- Active community and many tutorials available.
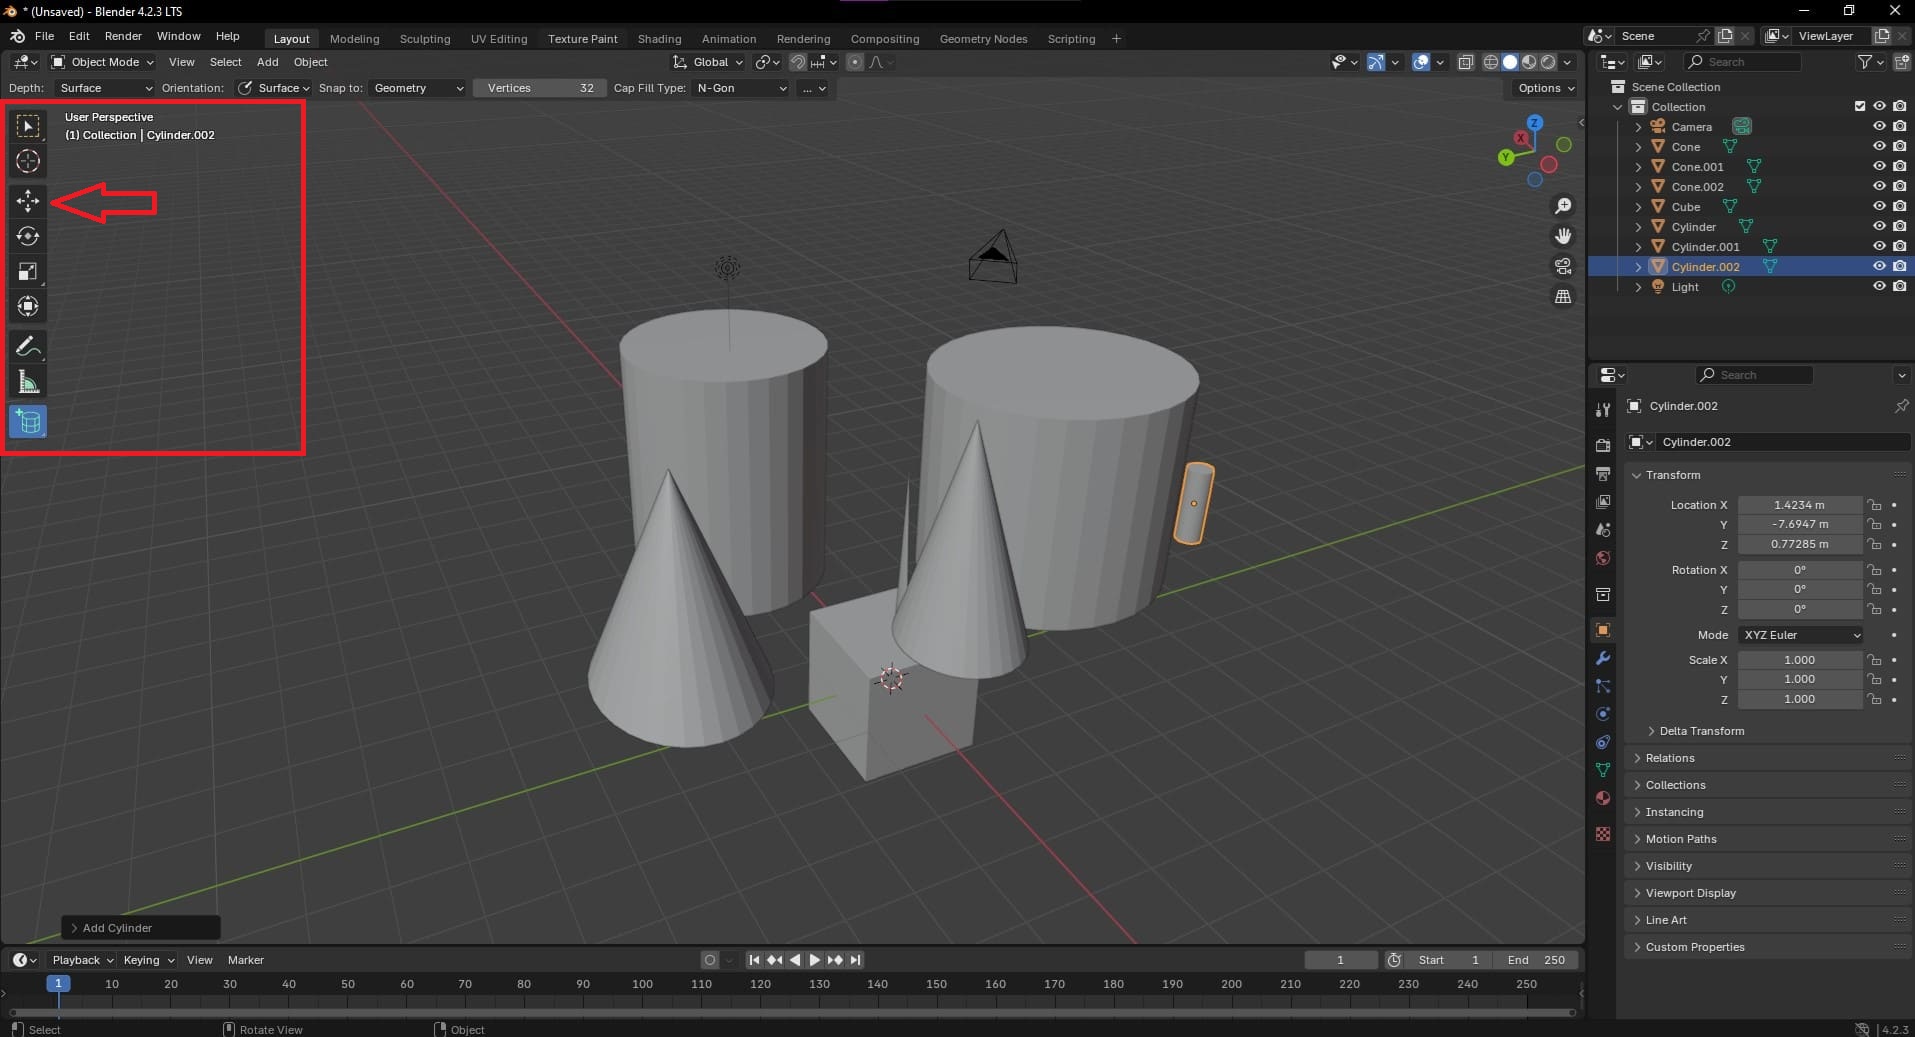
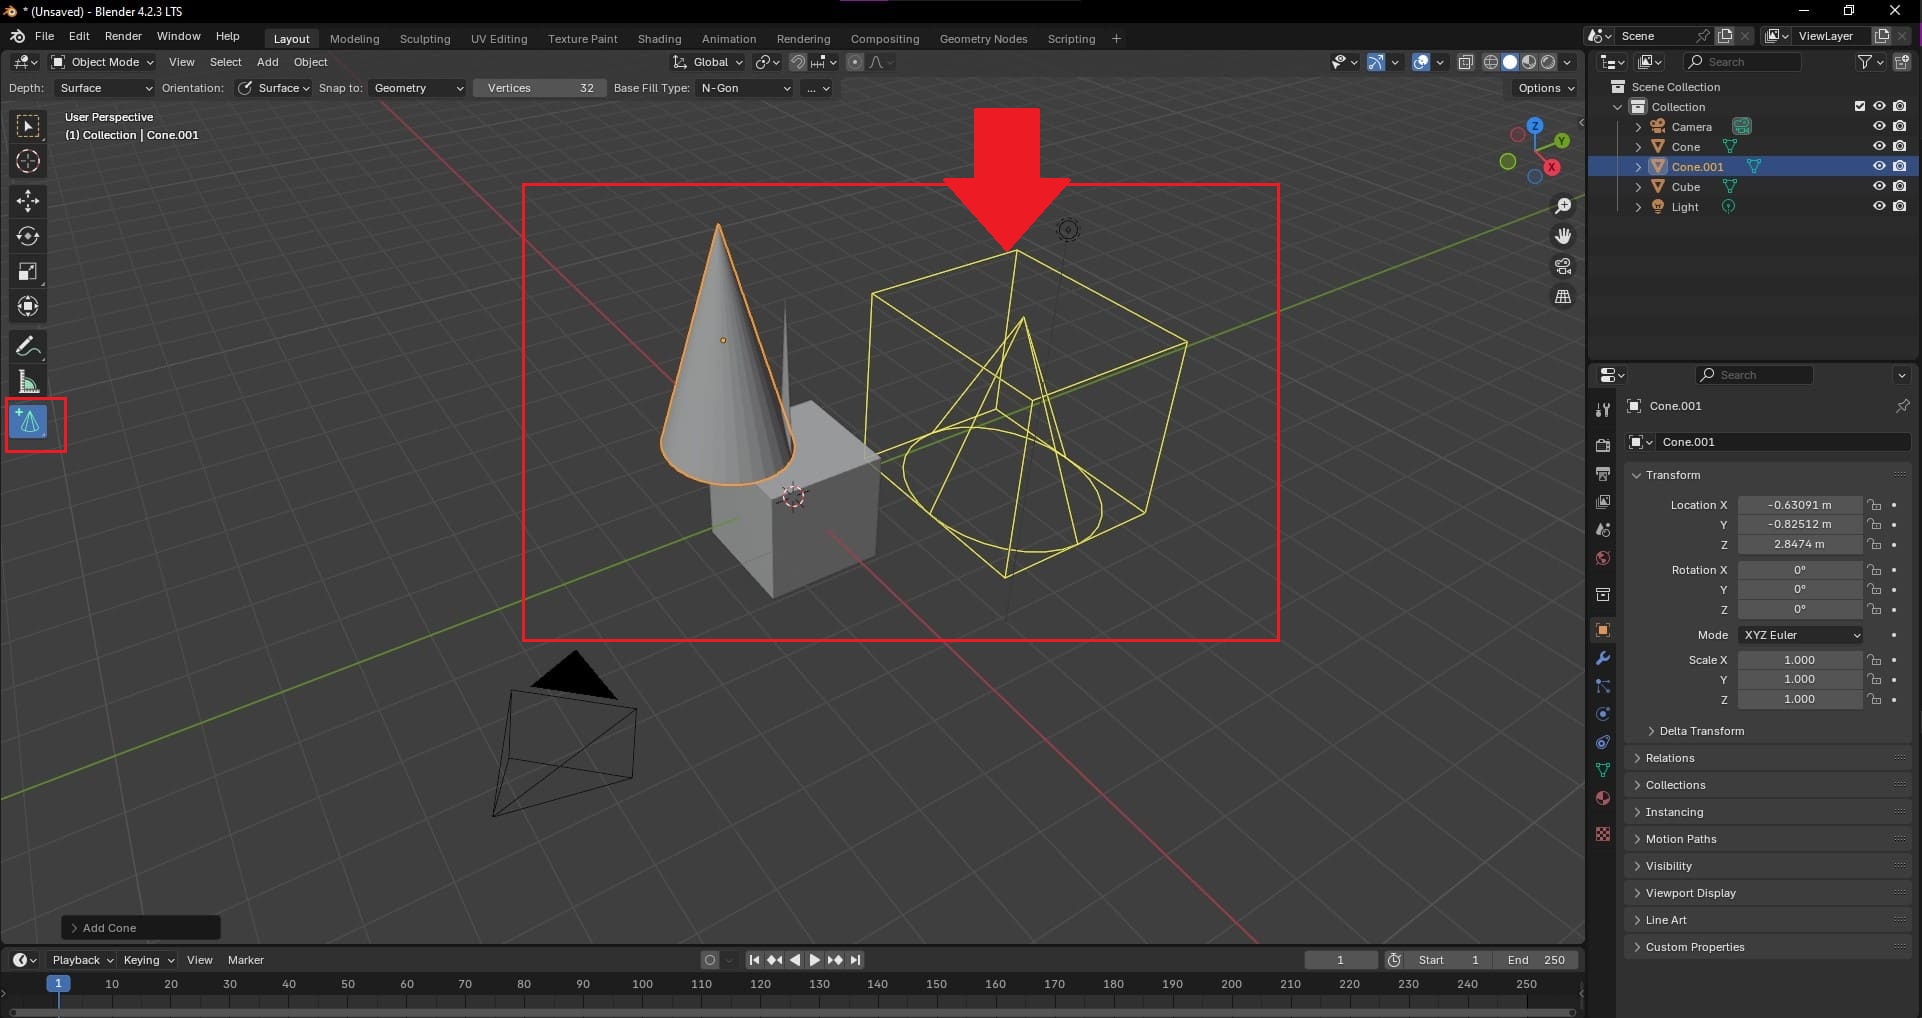
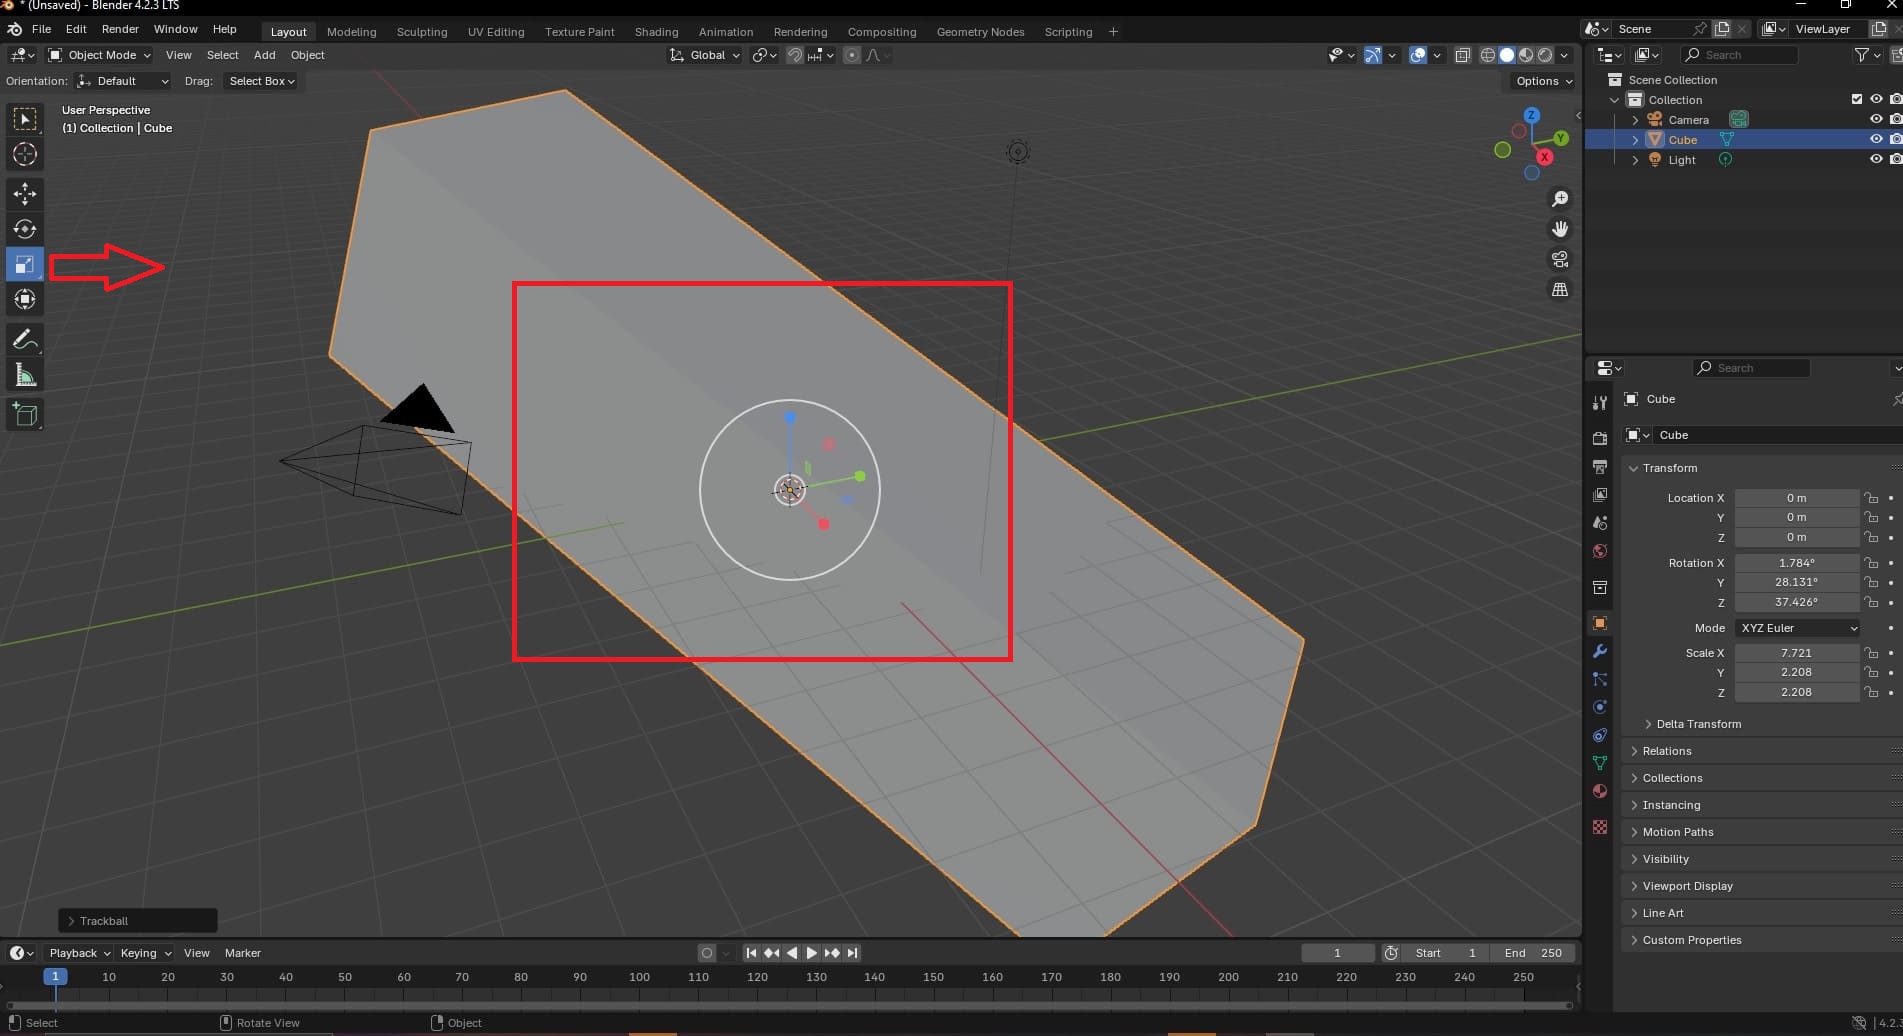
Steps to Create a Basic 3D Model in Blender:
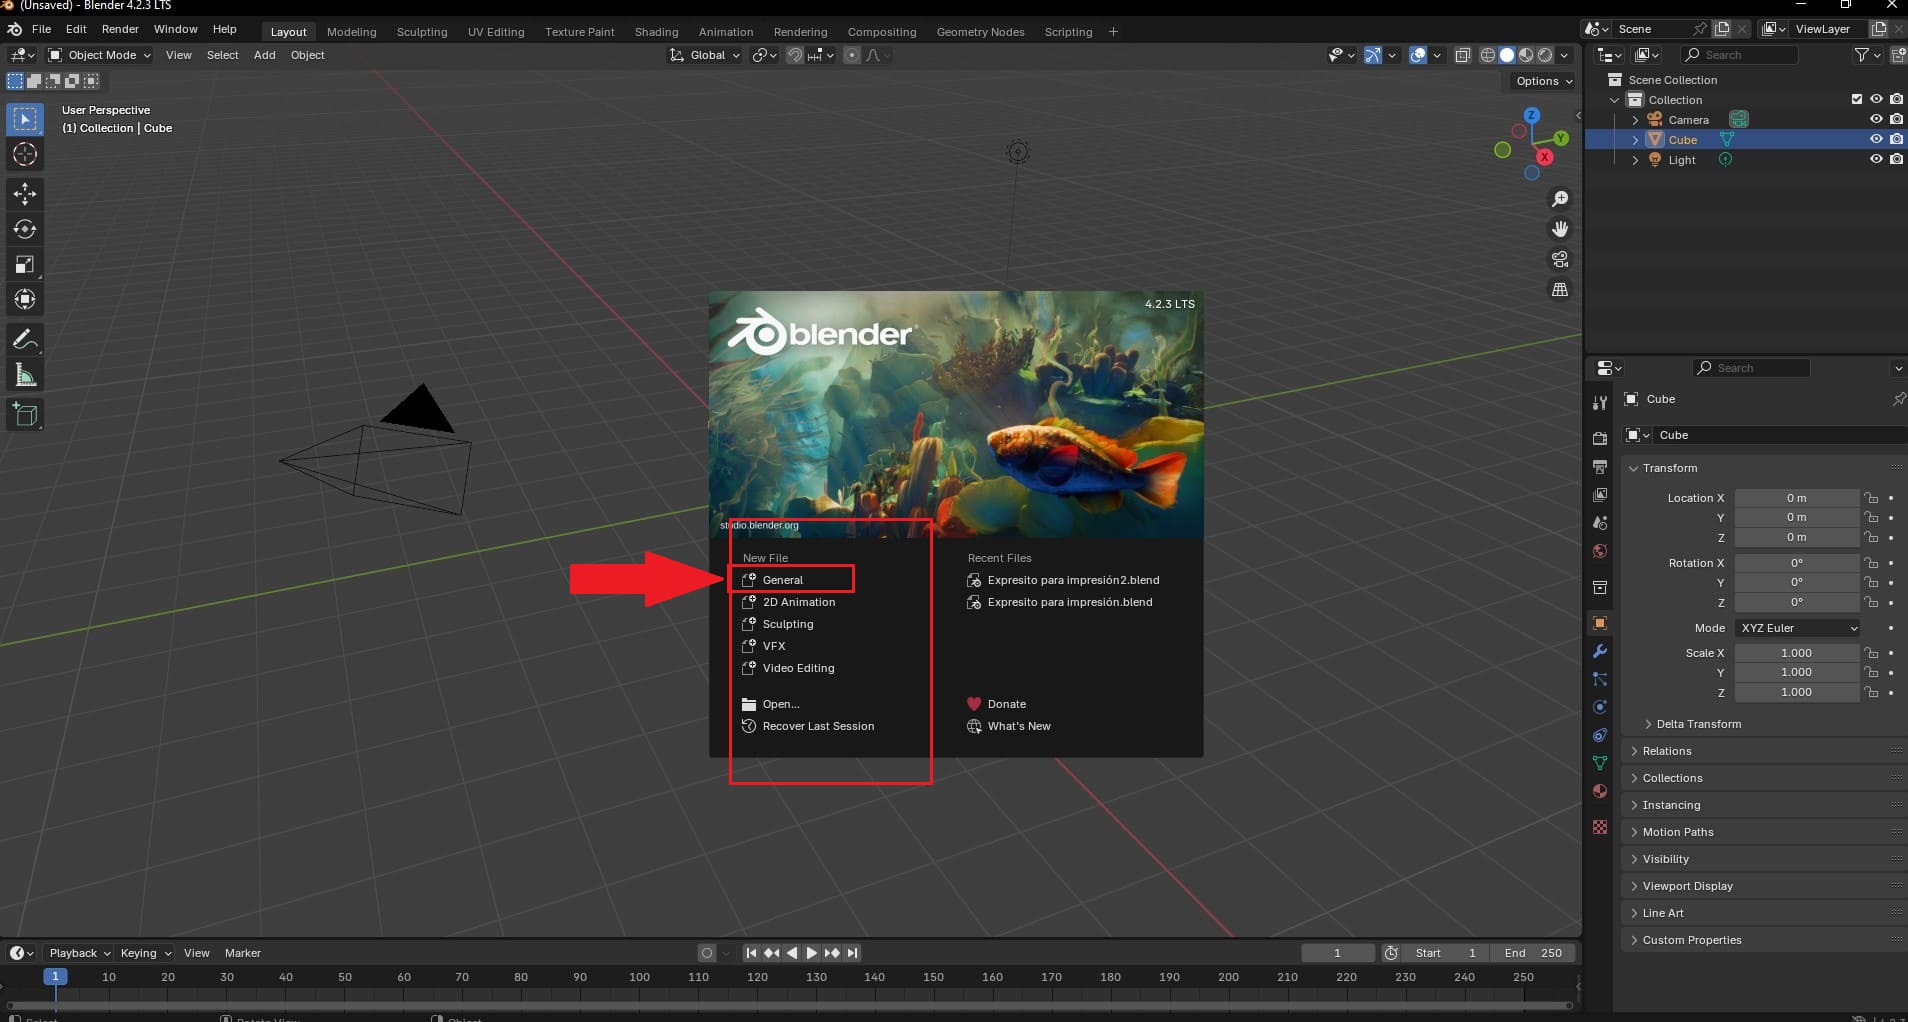
- Open the program and select "General" to start a new project.
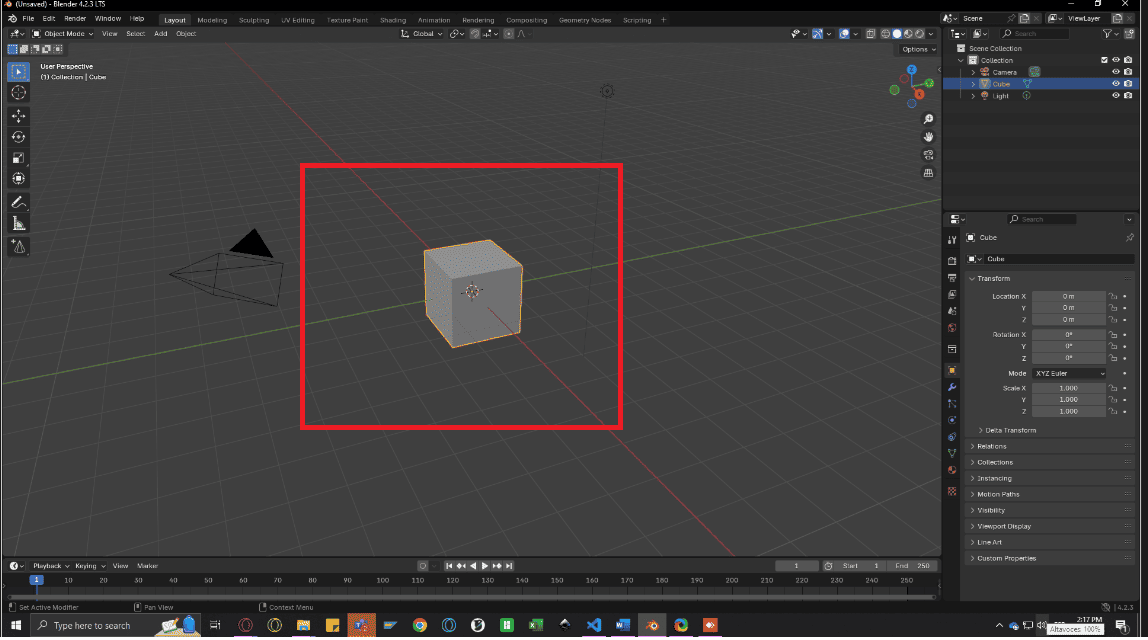
- In the initial scene, you will see a cube. You can delete it or use it as a base.
- To add new shapes, go to the left sidebar and select "Add" > "Mesh" > "Sphere," "Cube," etc.
- To add volume, use tools like "Extrude" or "Subdivide."
- Use transformation tools (move, rotate, scale) to adjust the shape.
|
STEP 1
|
|
STEP 2
|
|
STEP 3
|
|
STEP 4
|
|
STEP 5
|
3. Autodesk Inventor

Program Description:
Autodesk Inventor is a CAD software similar to SolidWorks, focused on parametric modeling, assemblies, and simulations.
- What is it for? For mechanical design, creating assemblies, and engineering simulations.
- Difficulty Level (1-10): 7/10. Similar to SolidWorks in complexity.
- Extra Benefits:
- Integration with other Autodesk products.
- Advanced tools for simulation and analysis.
- Widely used in the industry.
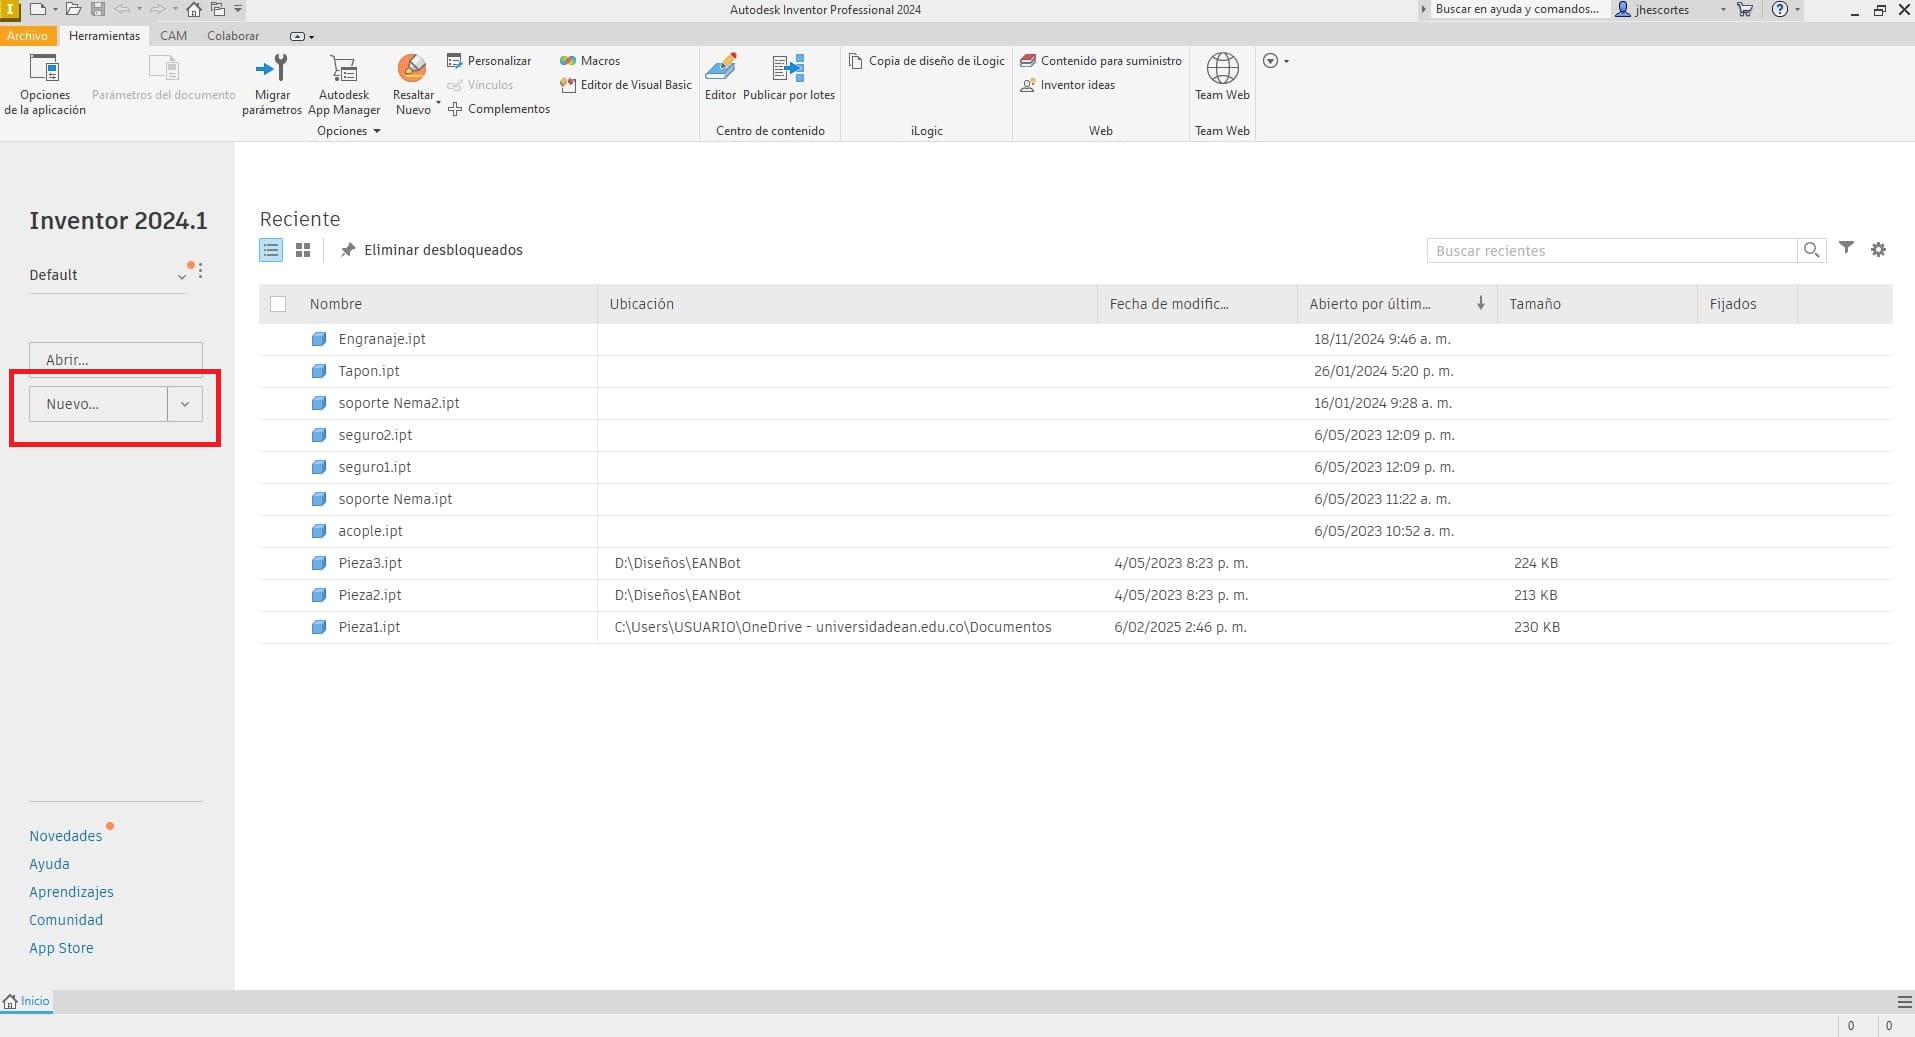
Steps to Create a Basic 3D Model in Autodesk Inventor:
- Open the program and select "New" > "Part" to start a 3D model.
- Create a sketch by selecting a work plane.
- Draw basic shapes (circles, rectangles) and adjust their dimensions using dimensions.
- Use the "Extrude" tool to add volume to the sketch.
- Save and export your model.
|
STEP 1
|
|
STEP 2
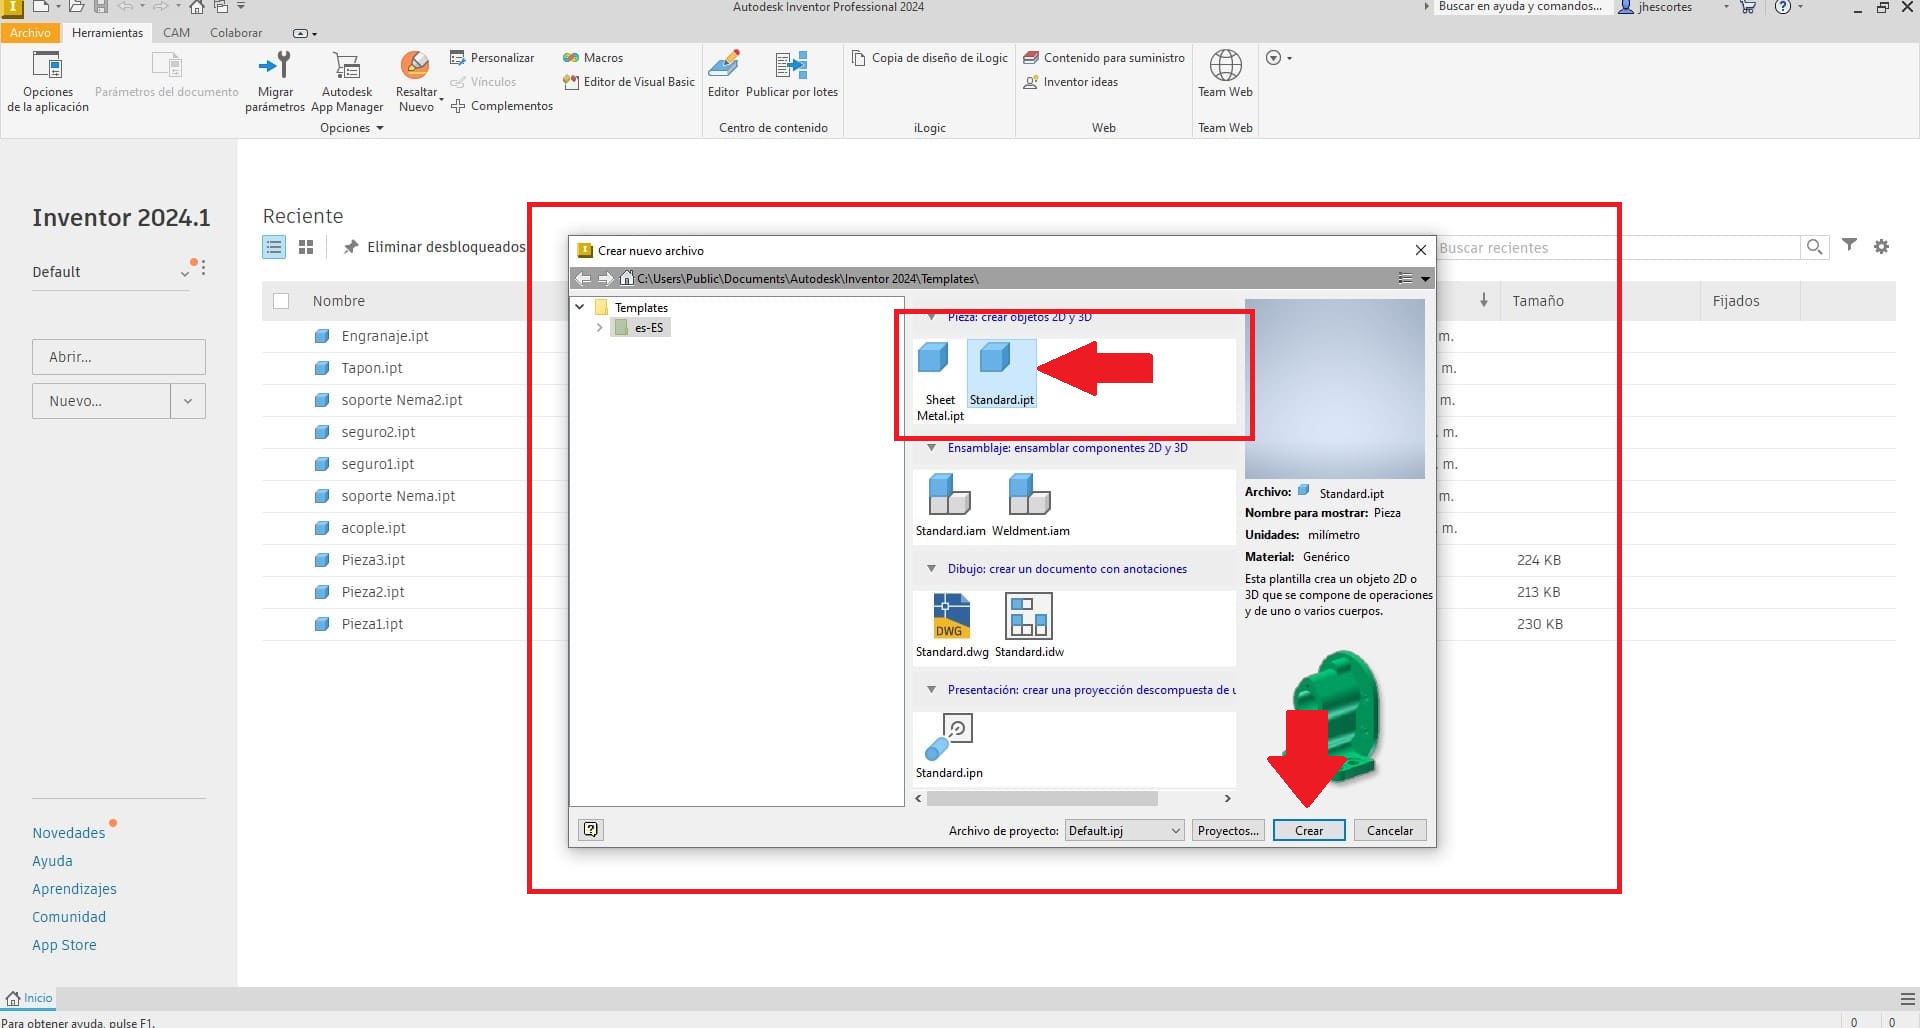
|
|
STEP 3
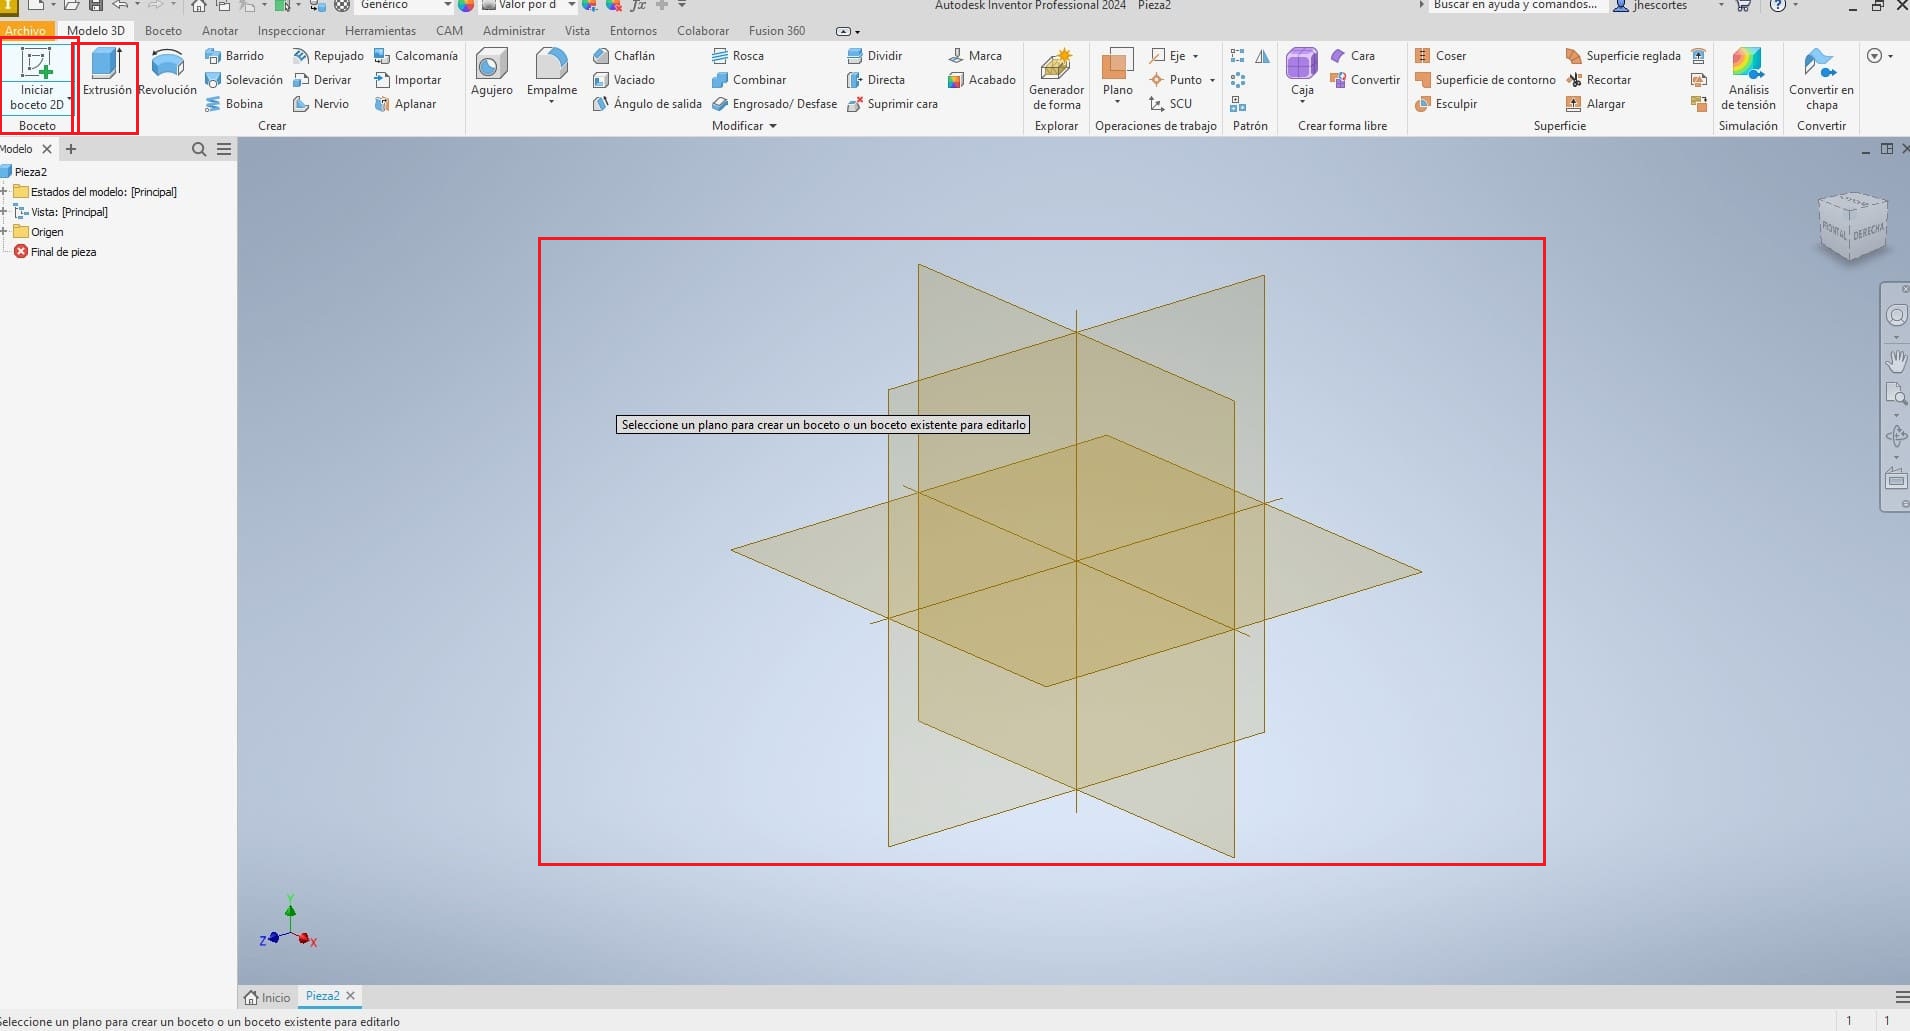
|
|
STEP 4
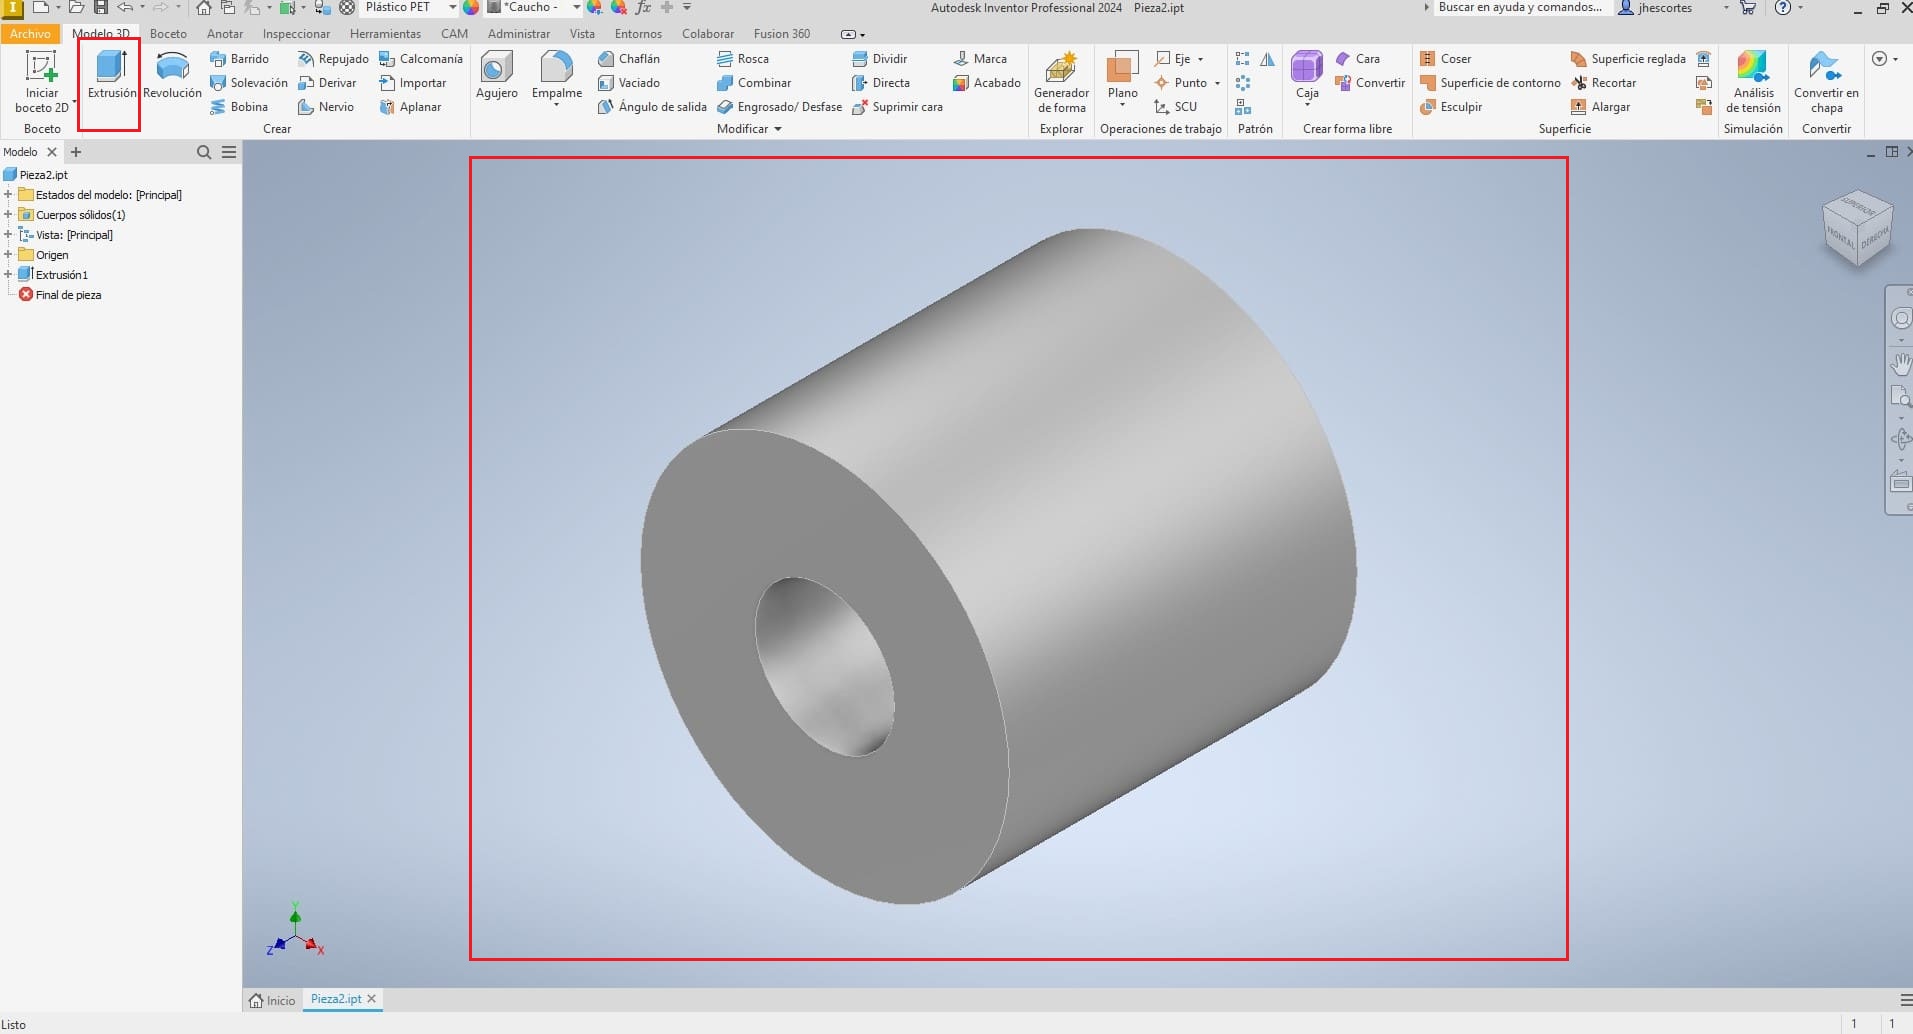
|
4. Tinkercad (Online, Free)
Program Description:
Tinkercad is an online, free, and easy-to-use 3D modeling tool. It is ideal for beginners and simple projects.
- What is it for? For creating basic 3D models, electronics simulations, and learning design concepts.
- Difficulty Level (1-10): 3/10. Very intuitive and easy to learn.
- Extra Benefits:
- Free and accessible from any browser.
- Ideal for beginners and quick projects.
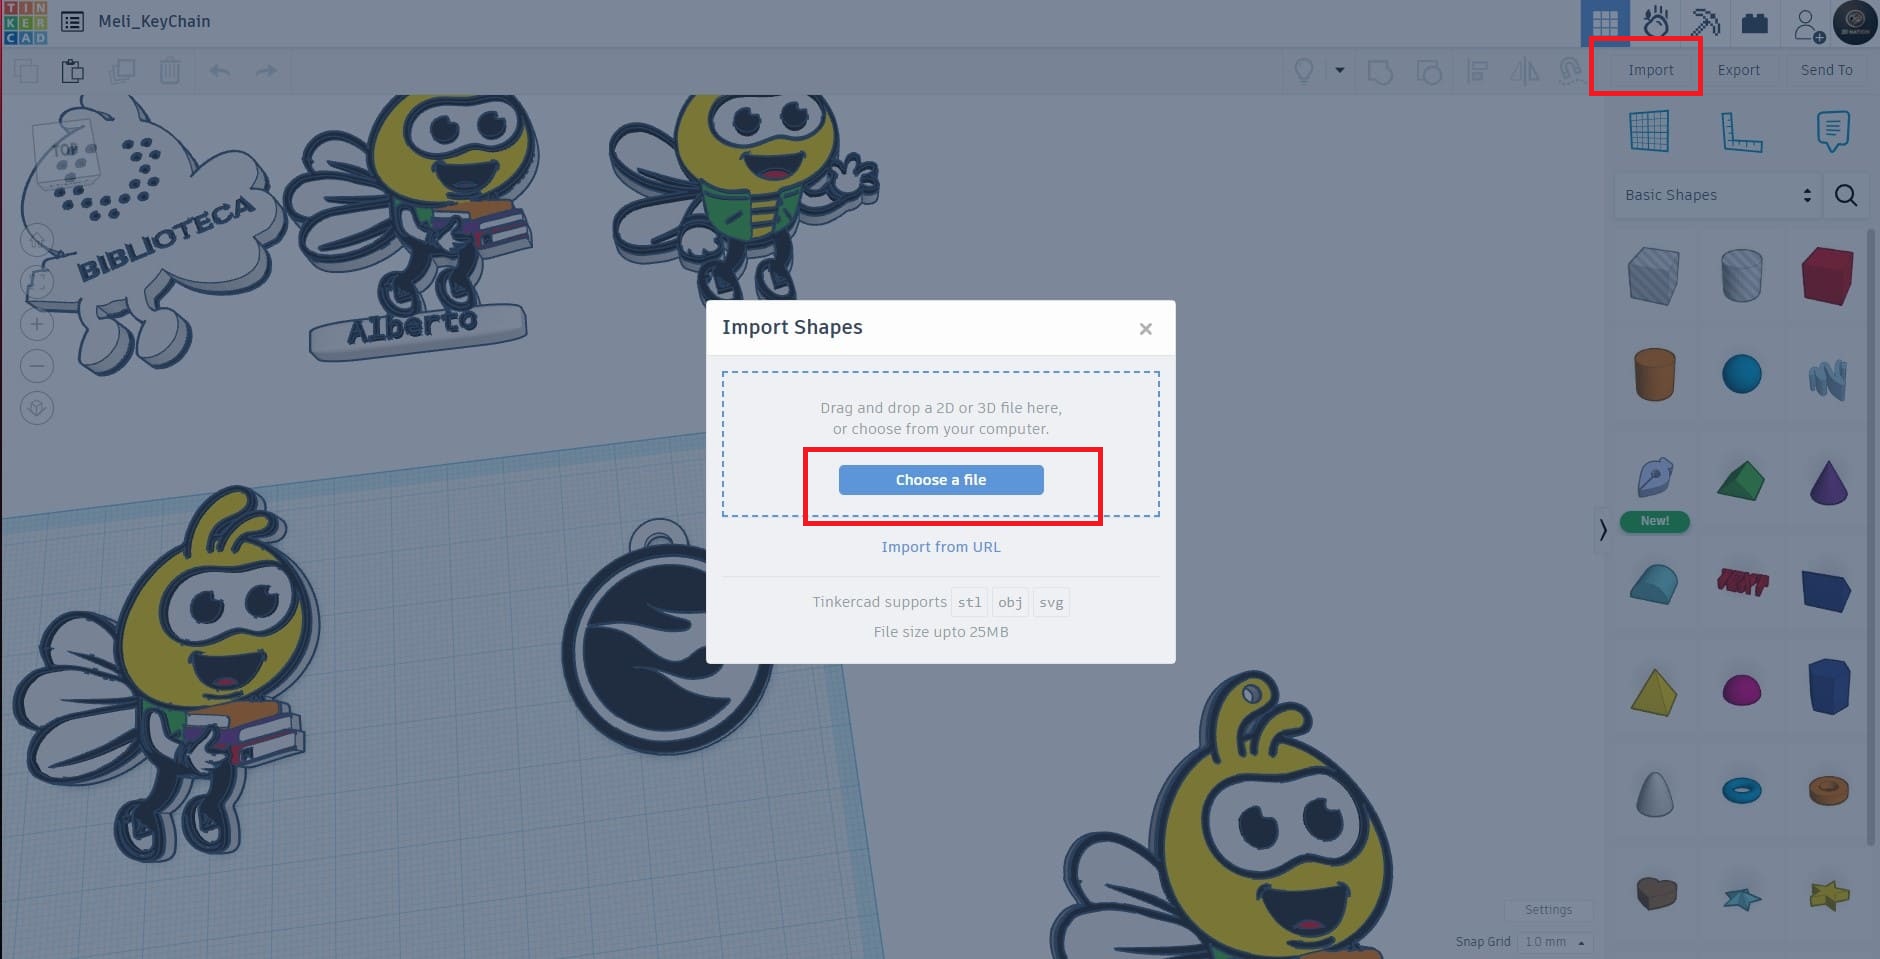
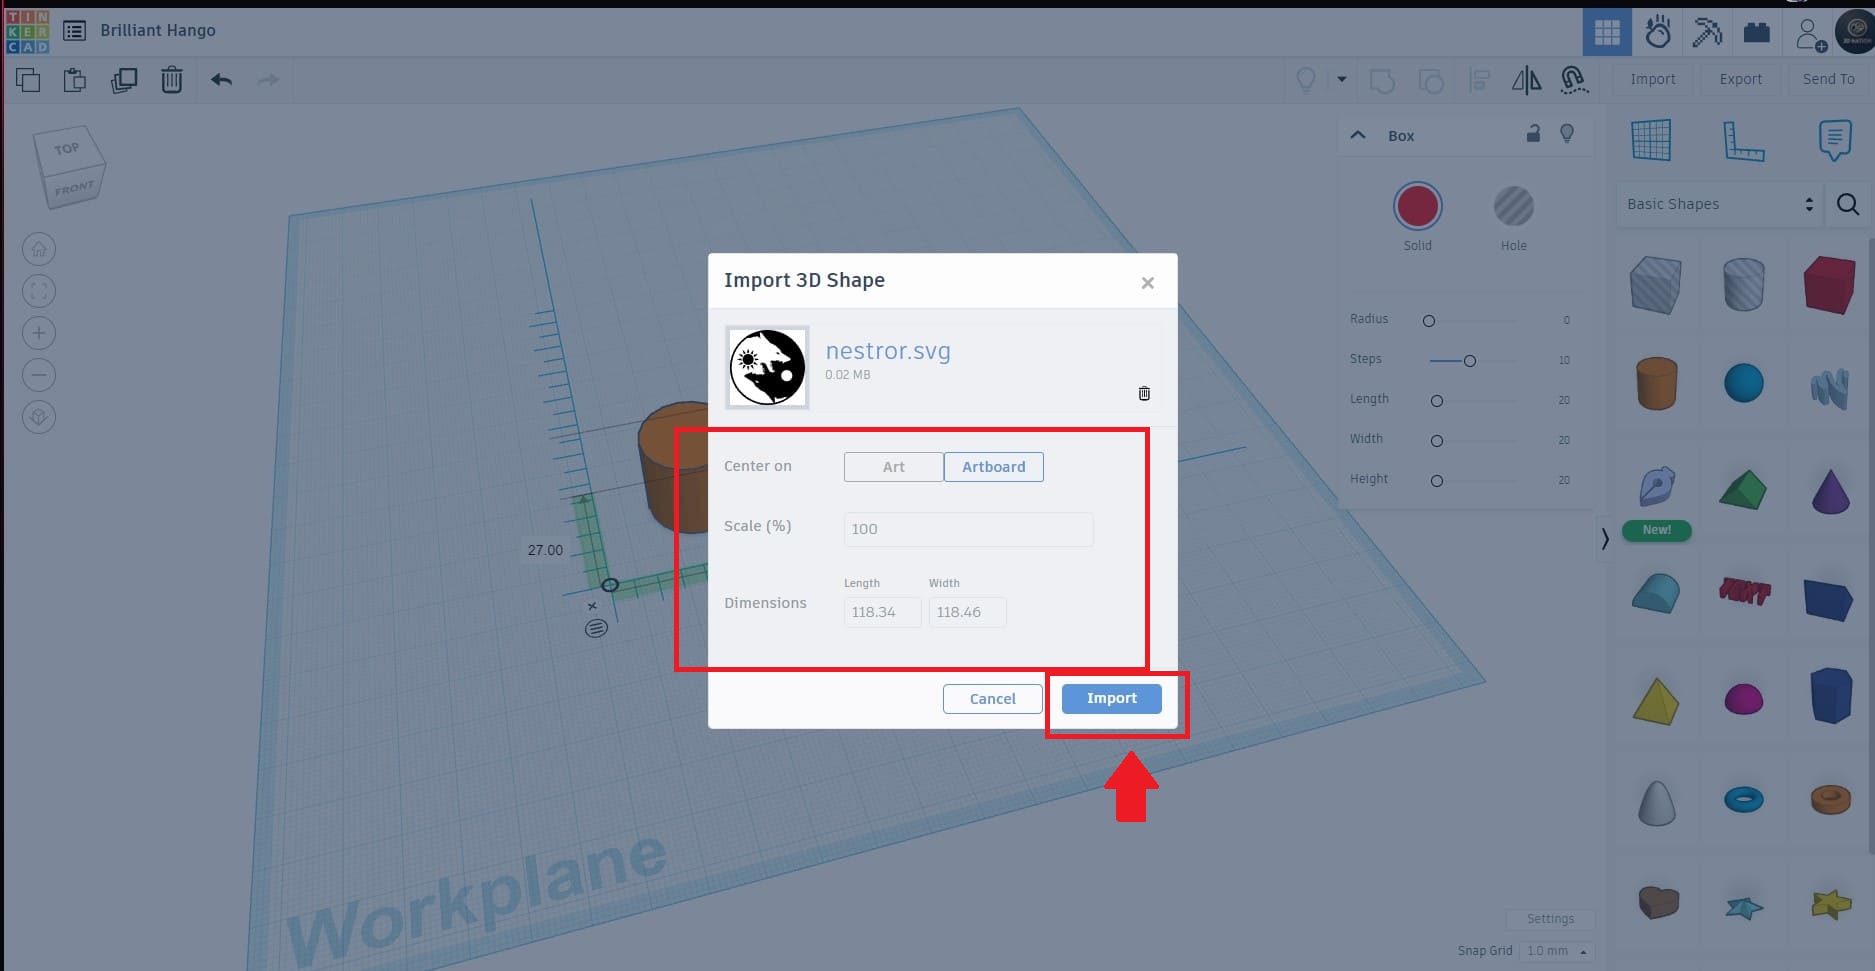
- Allows importing SVG files and exporting models for 3D printing.
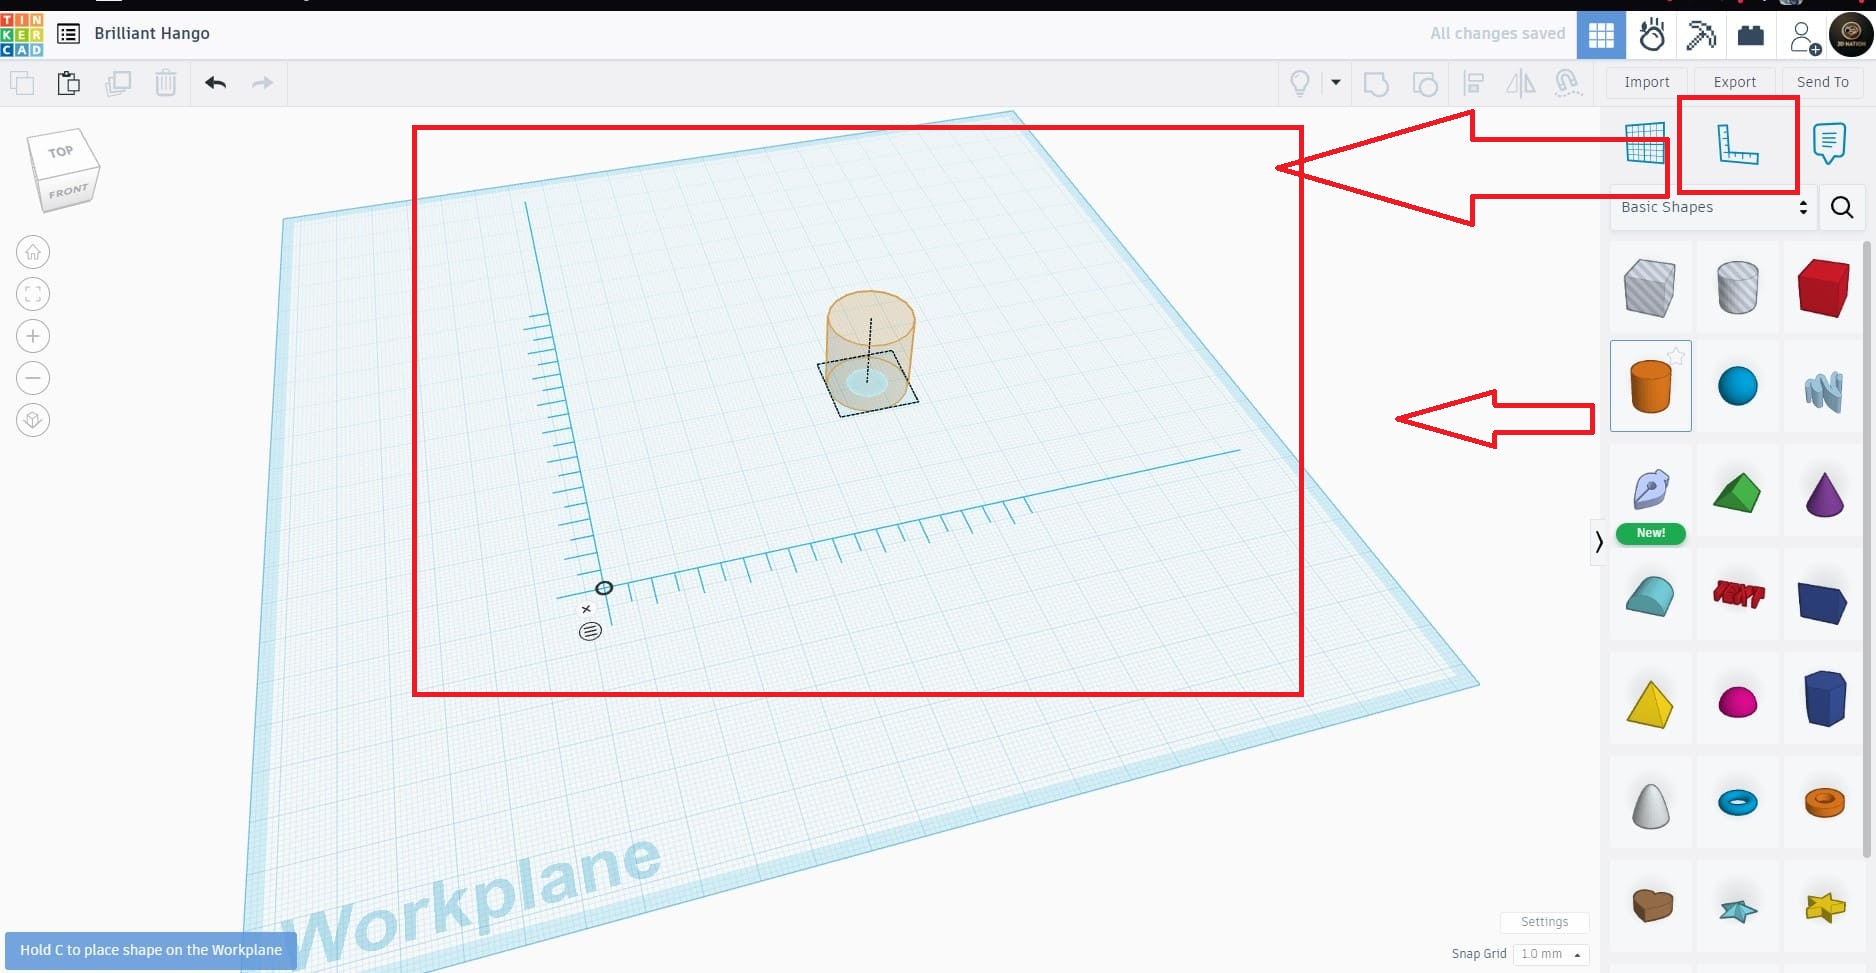
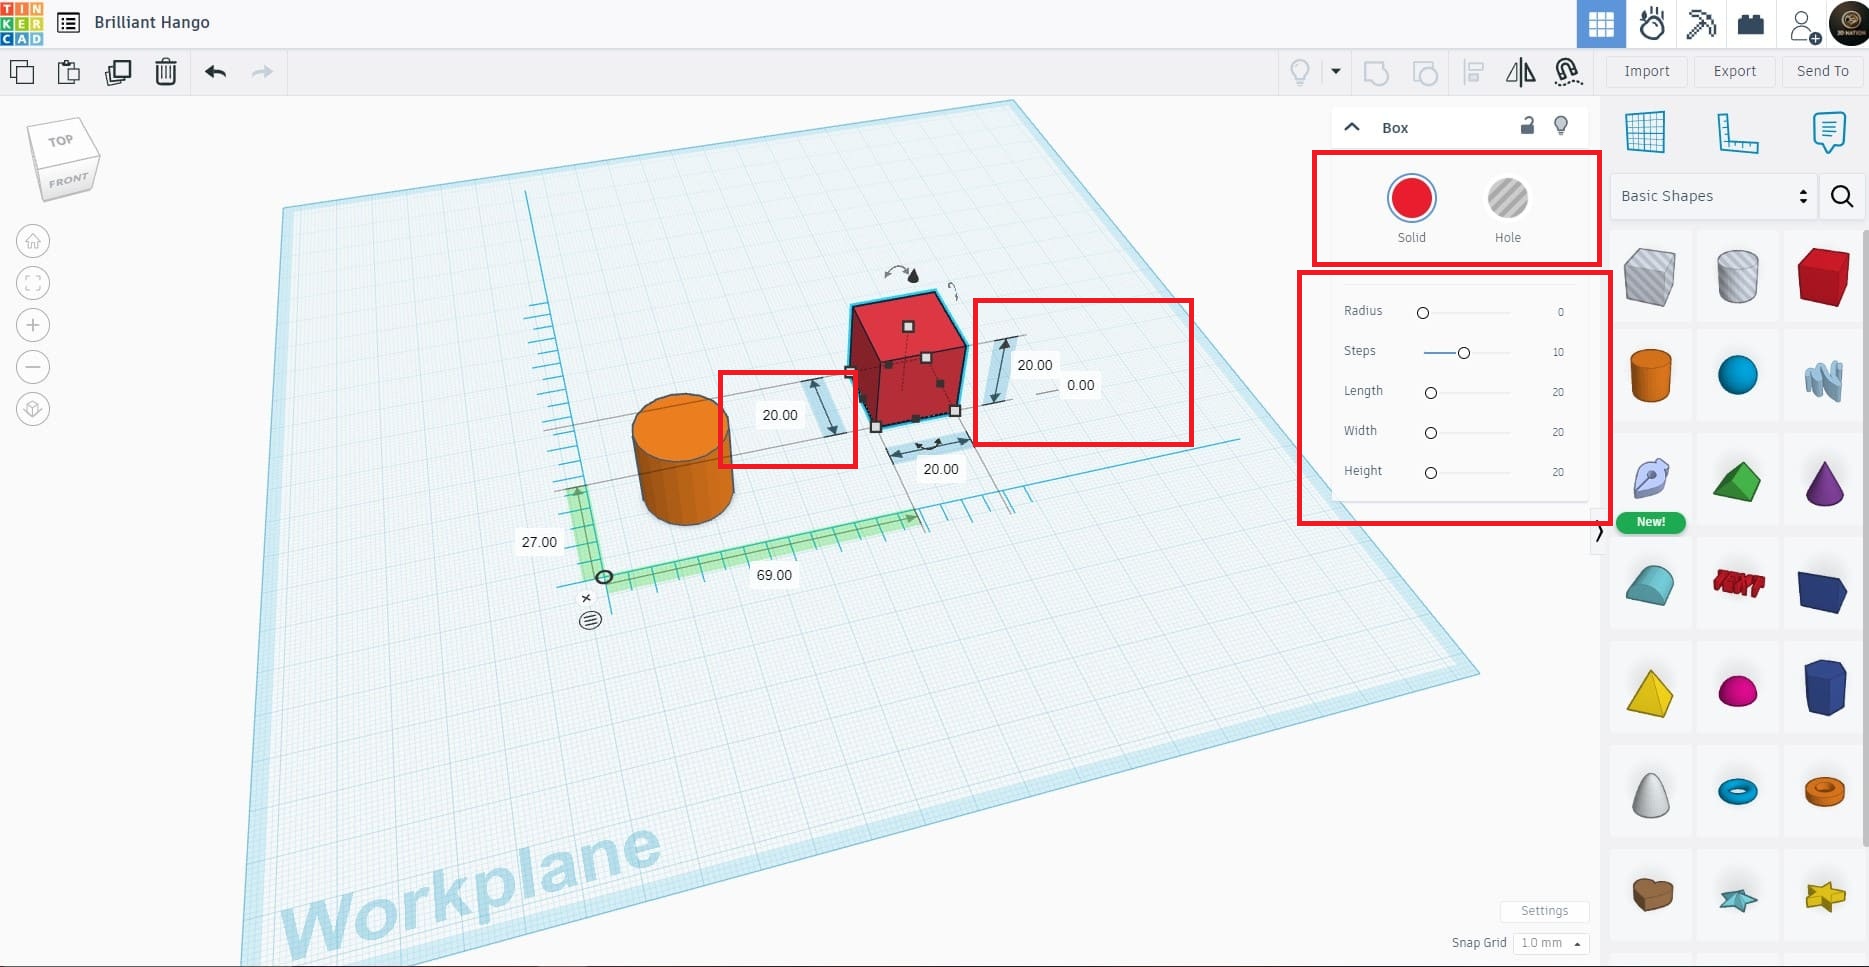
Steps to Create a Basic 3D Model in Tinkercad:
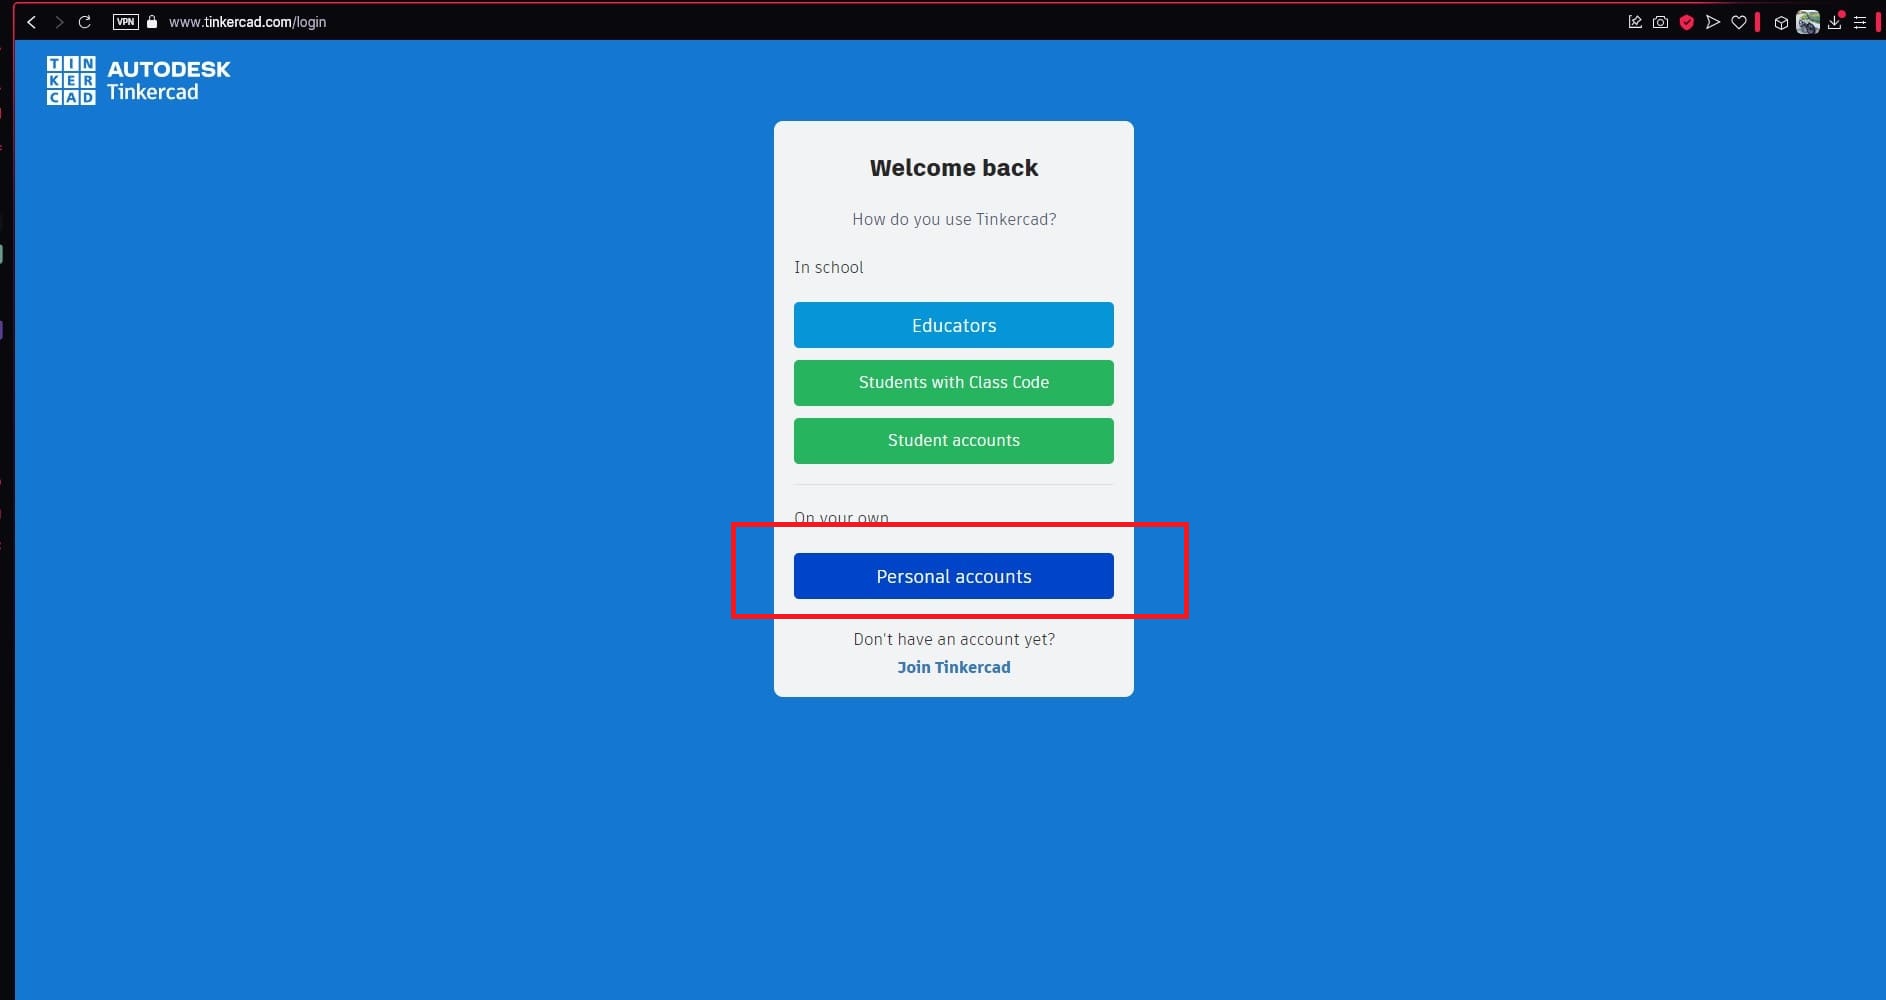
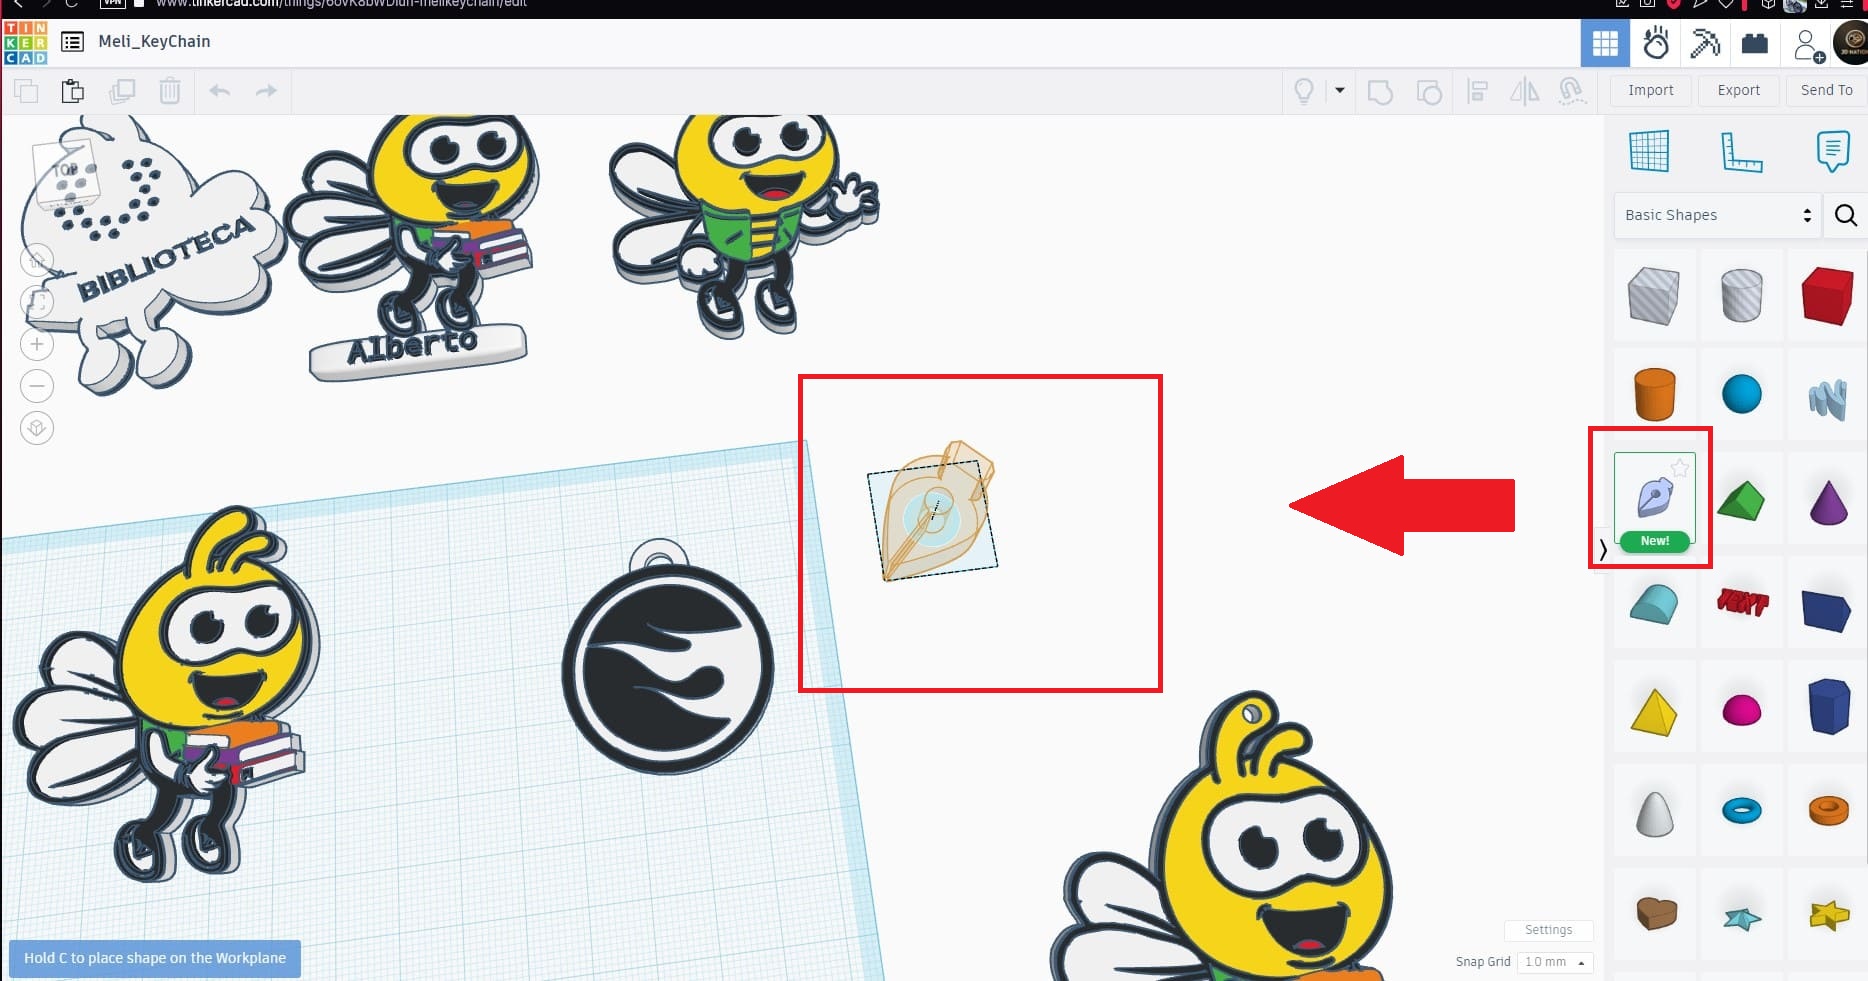
- Go to the Tinkercad website and log in (or create an account if you don’t have one).
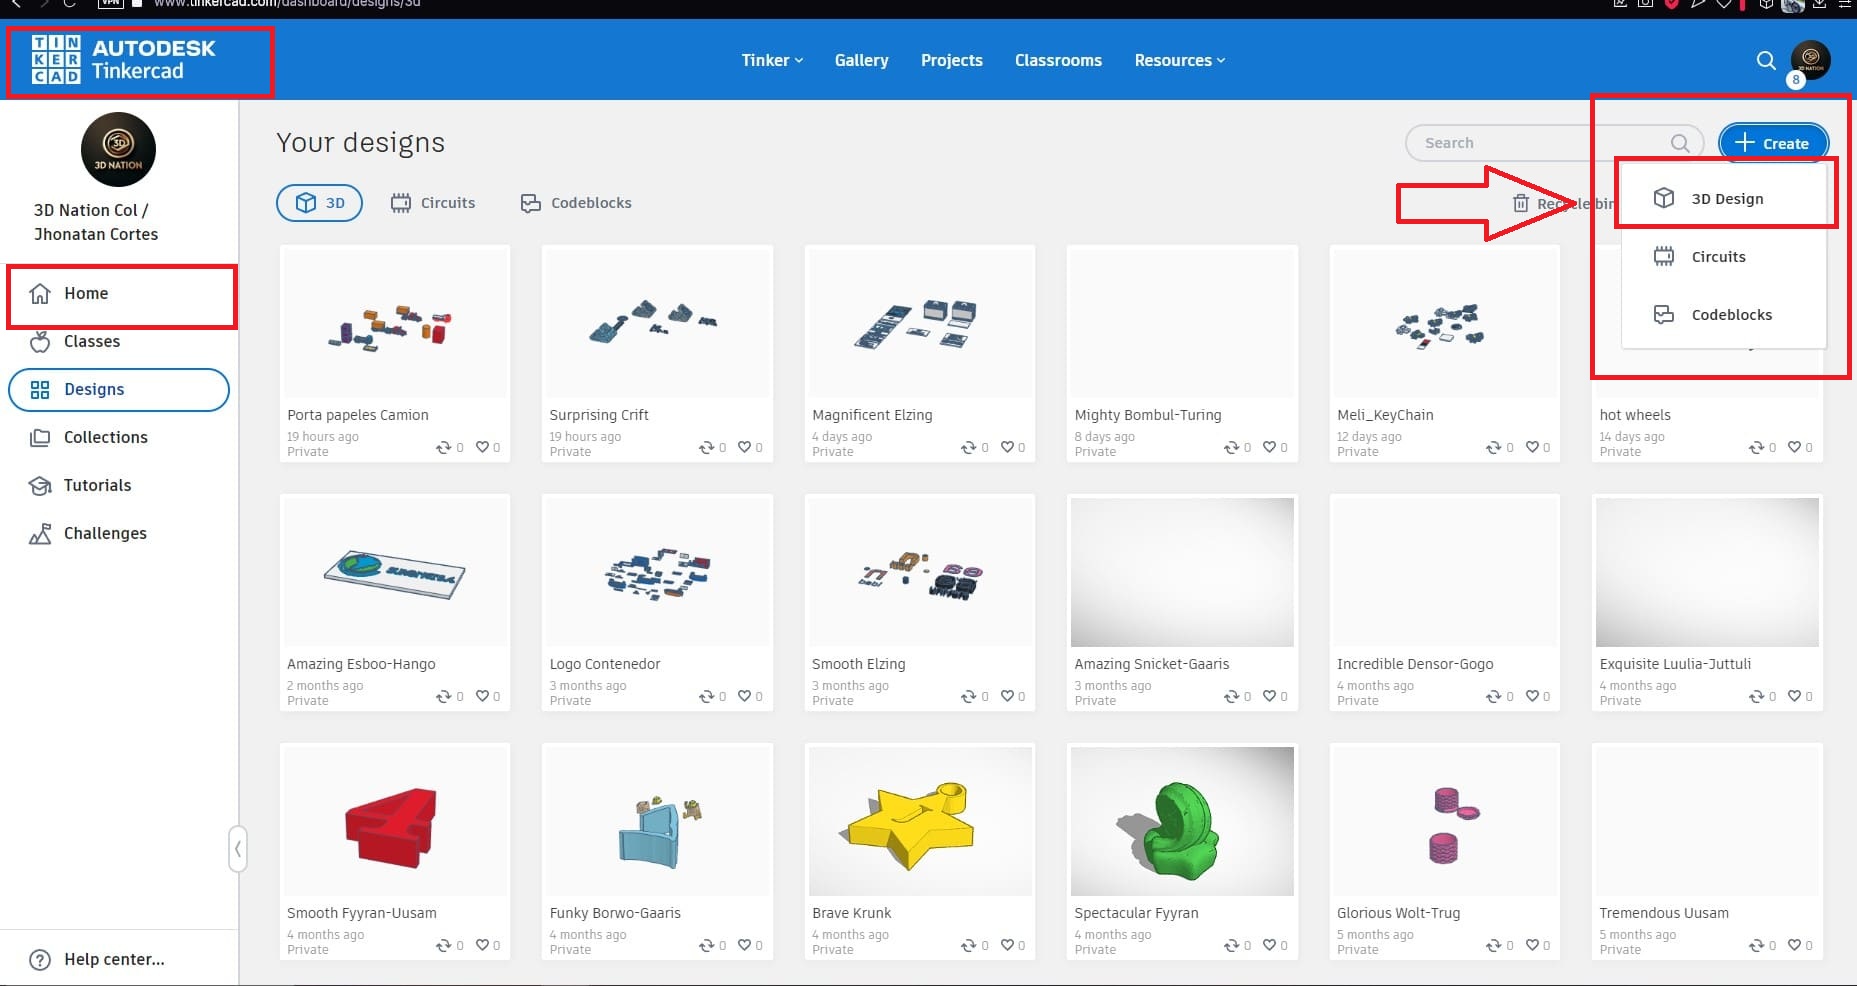
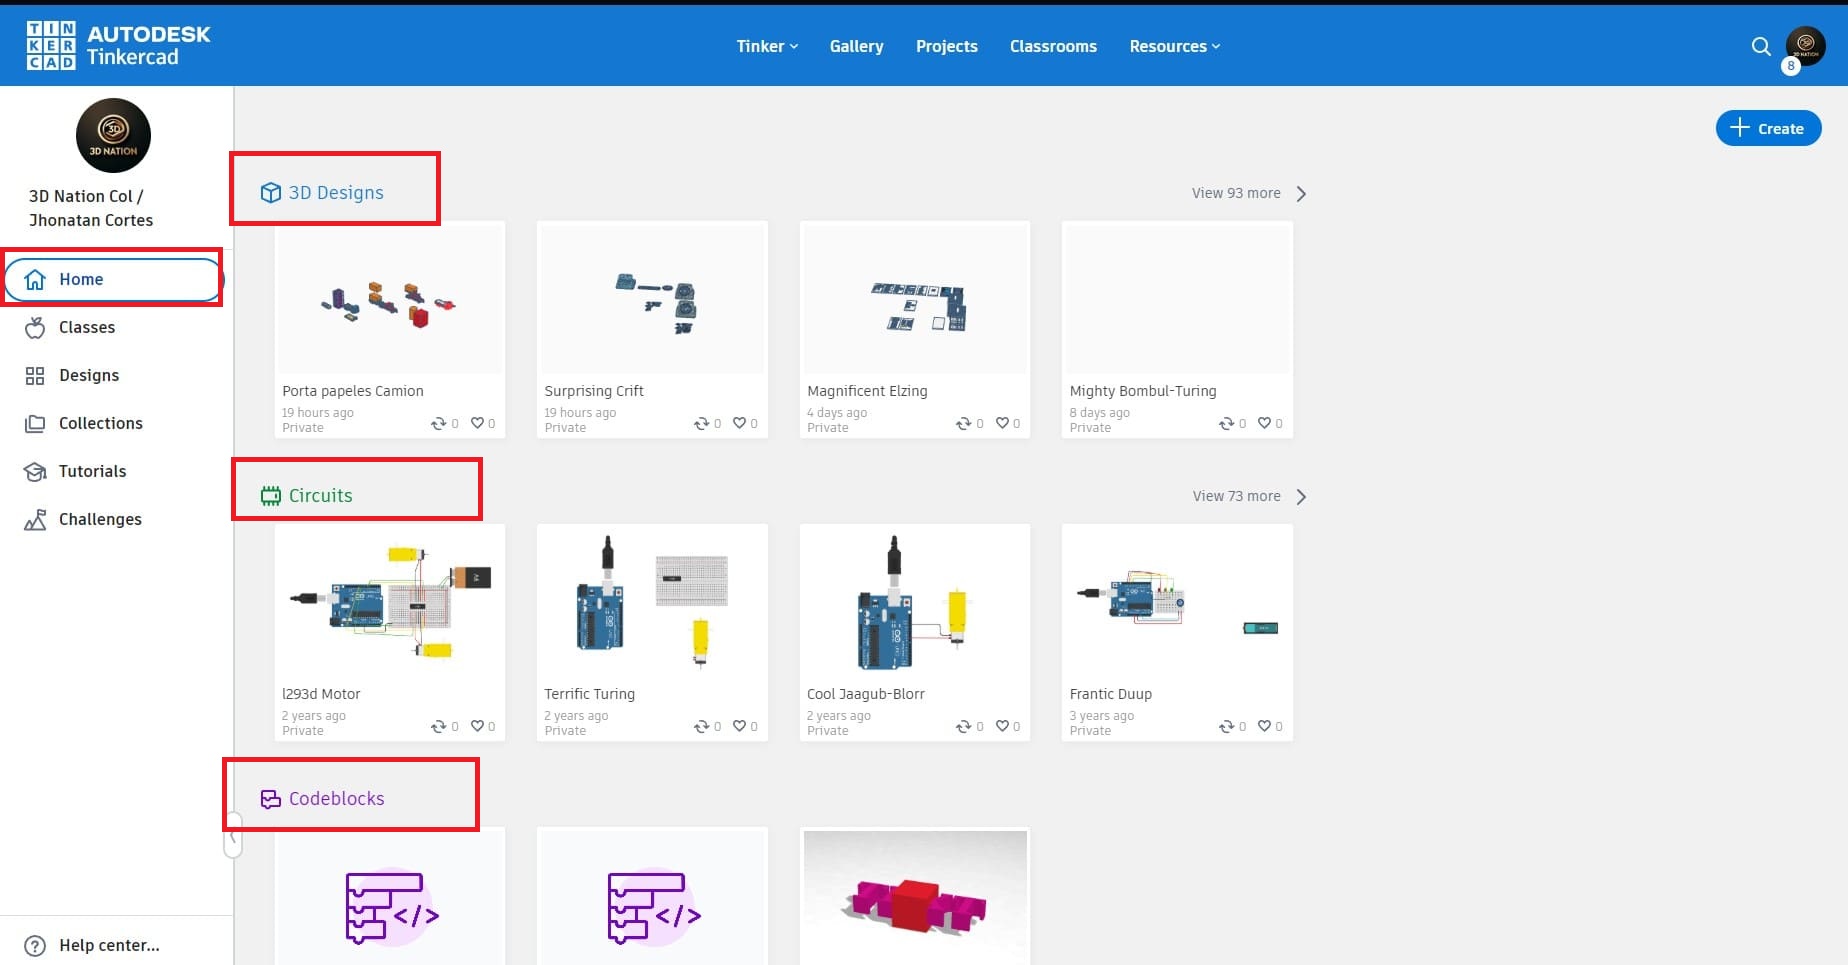
- Select "New" > "3D Design" to start.
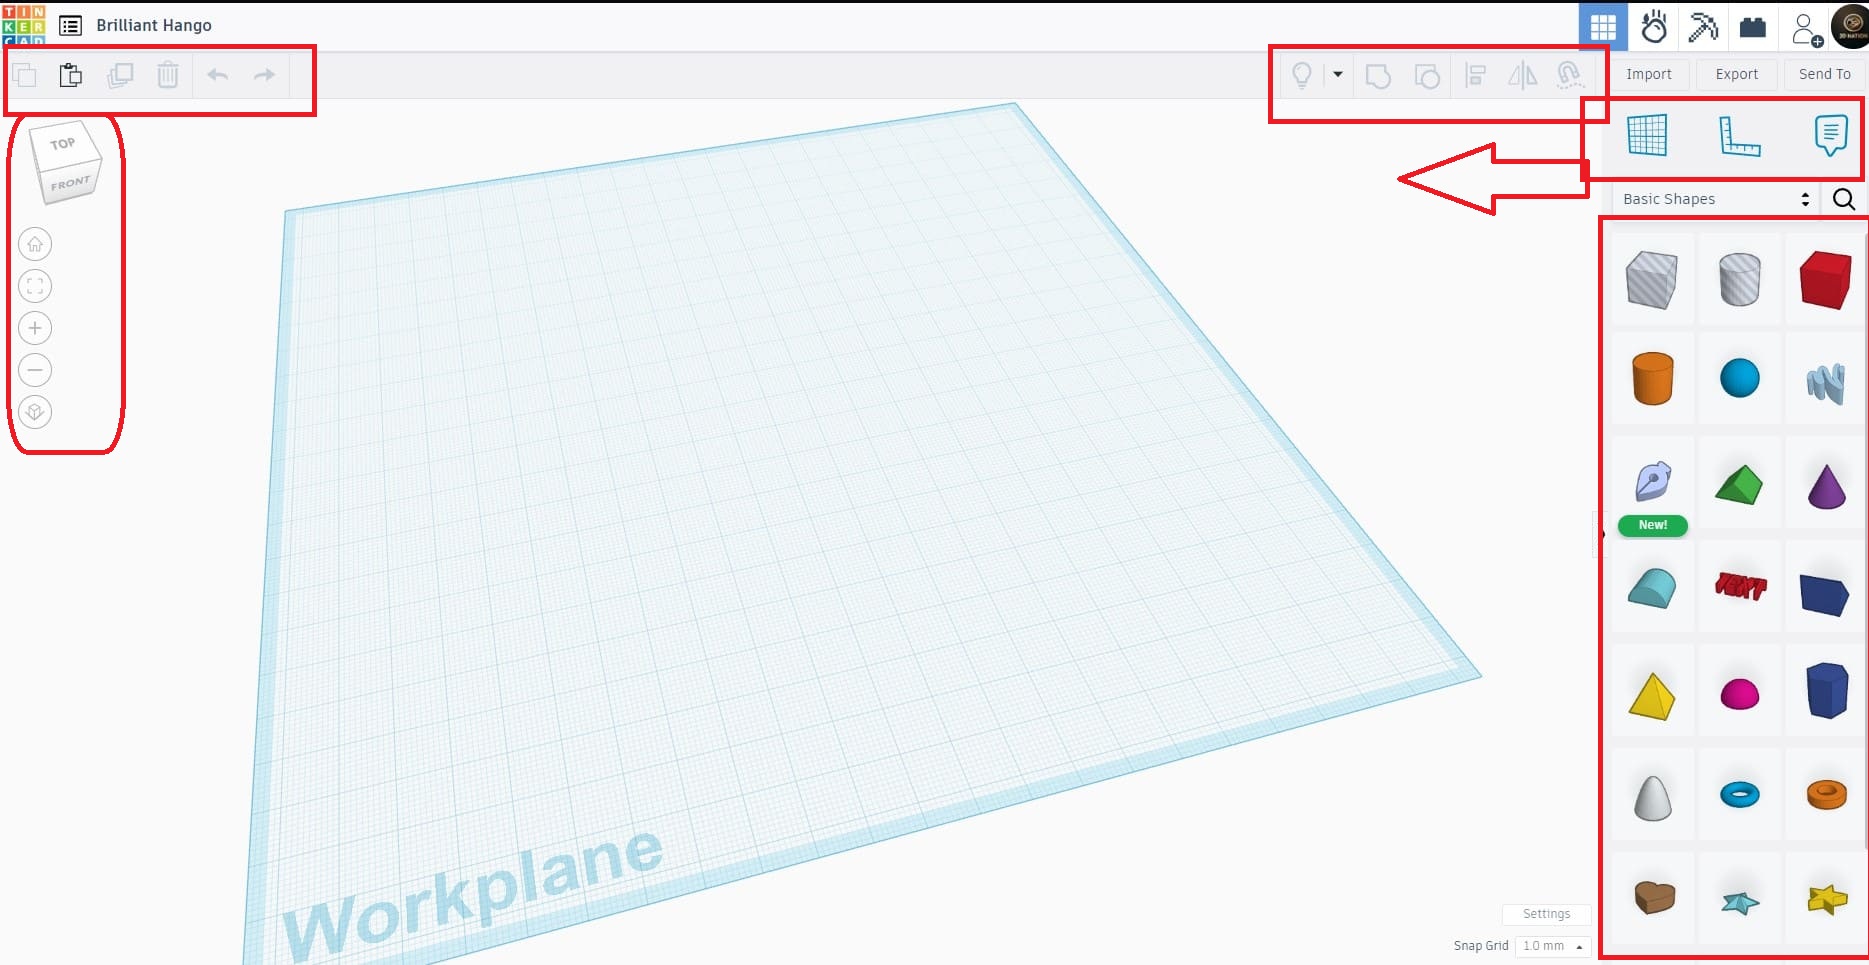
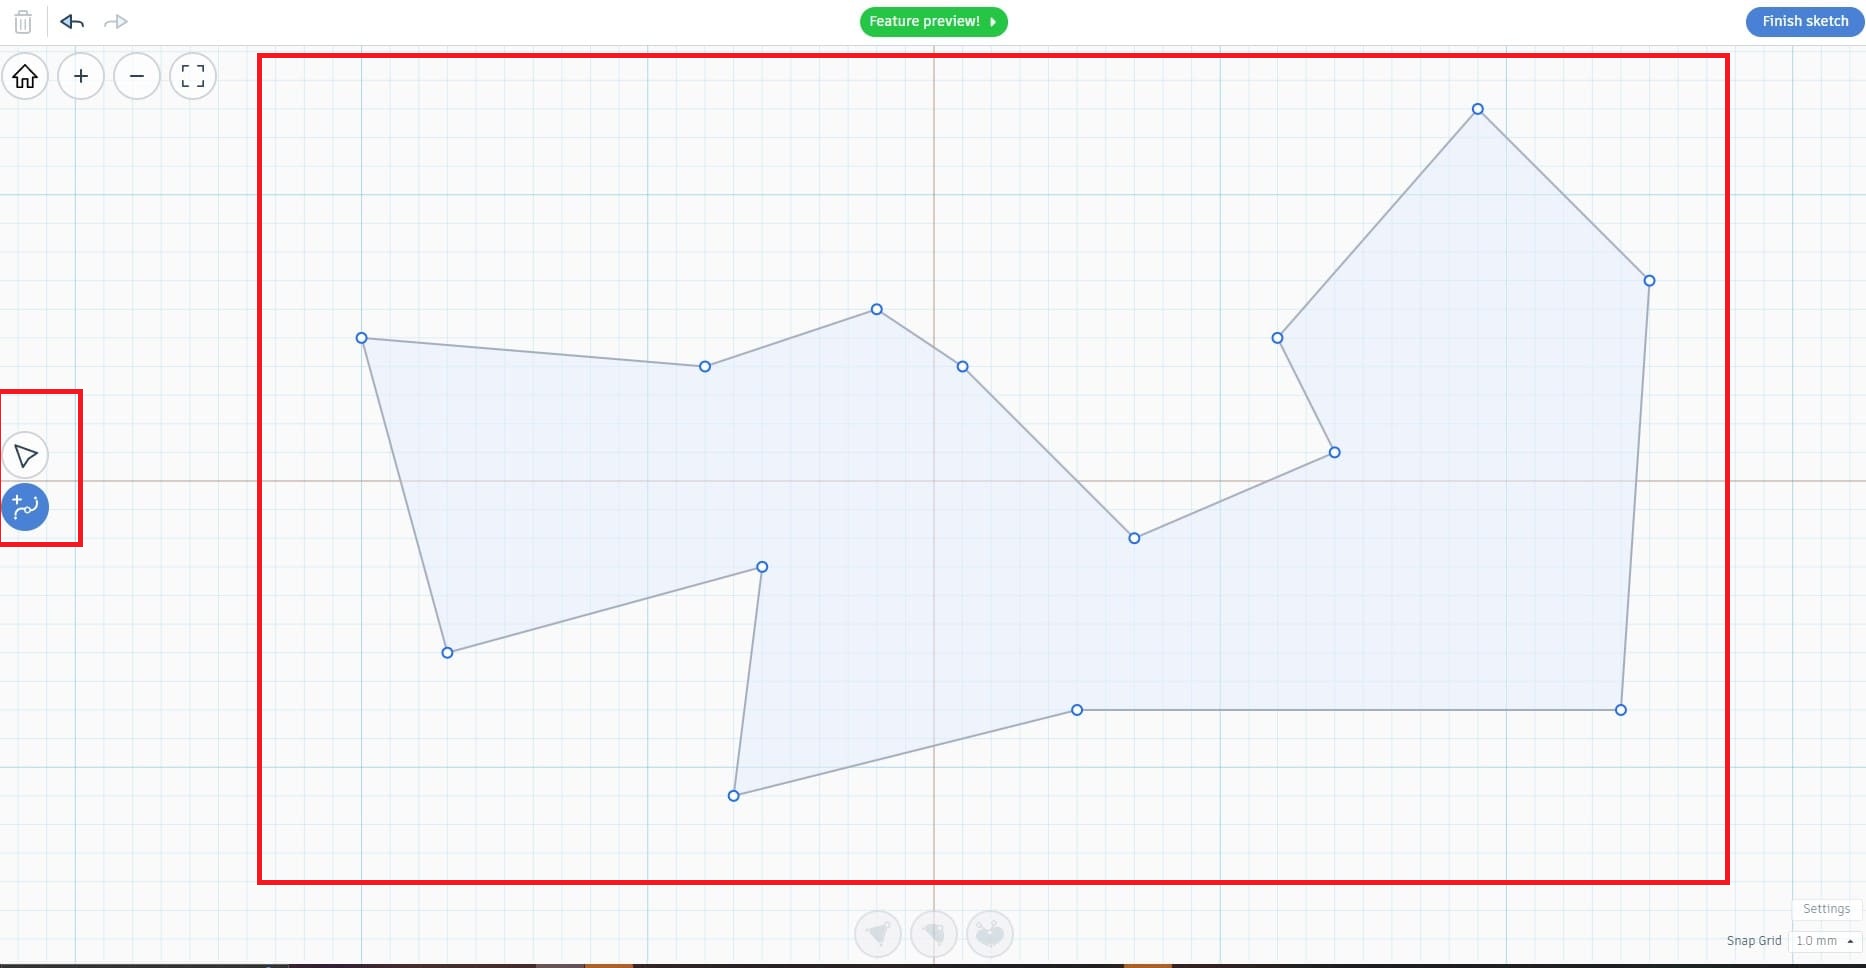
- Use the shape library on the right to add objects to the workplane.
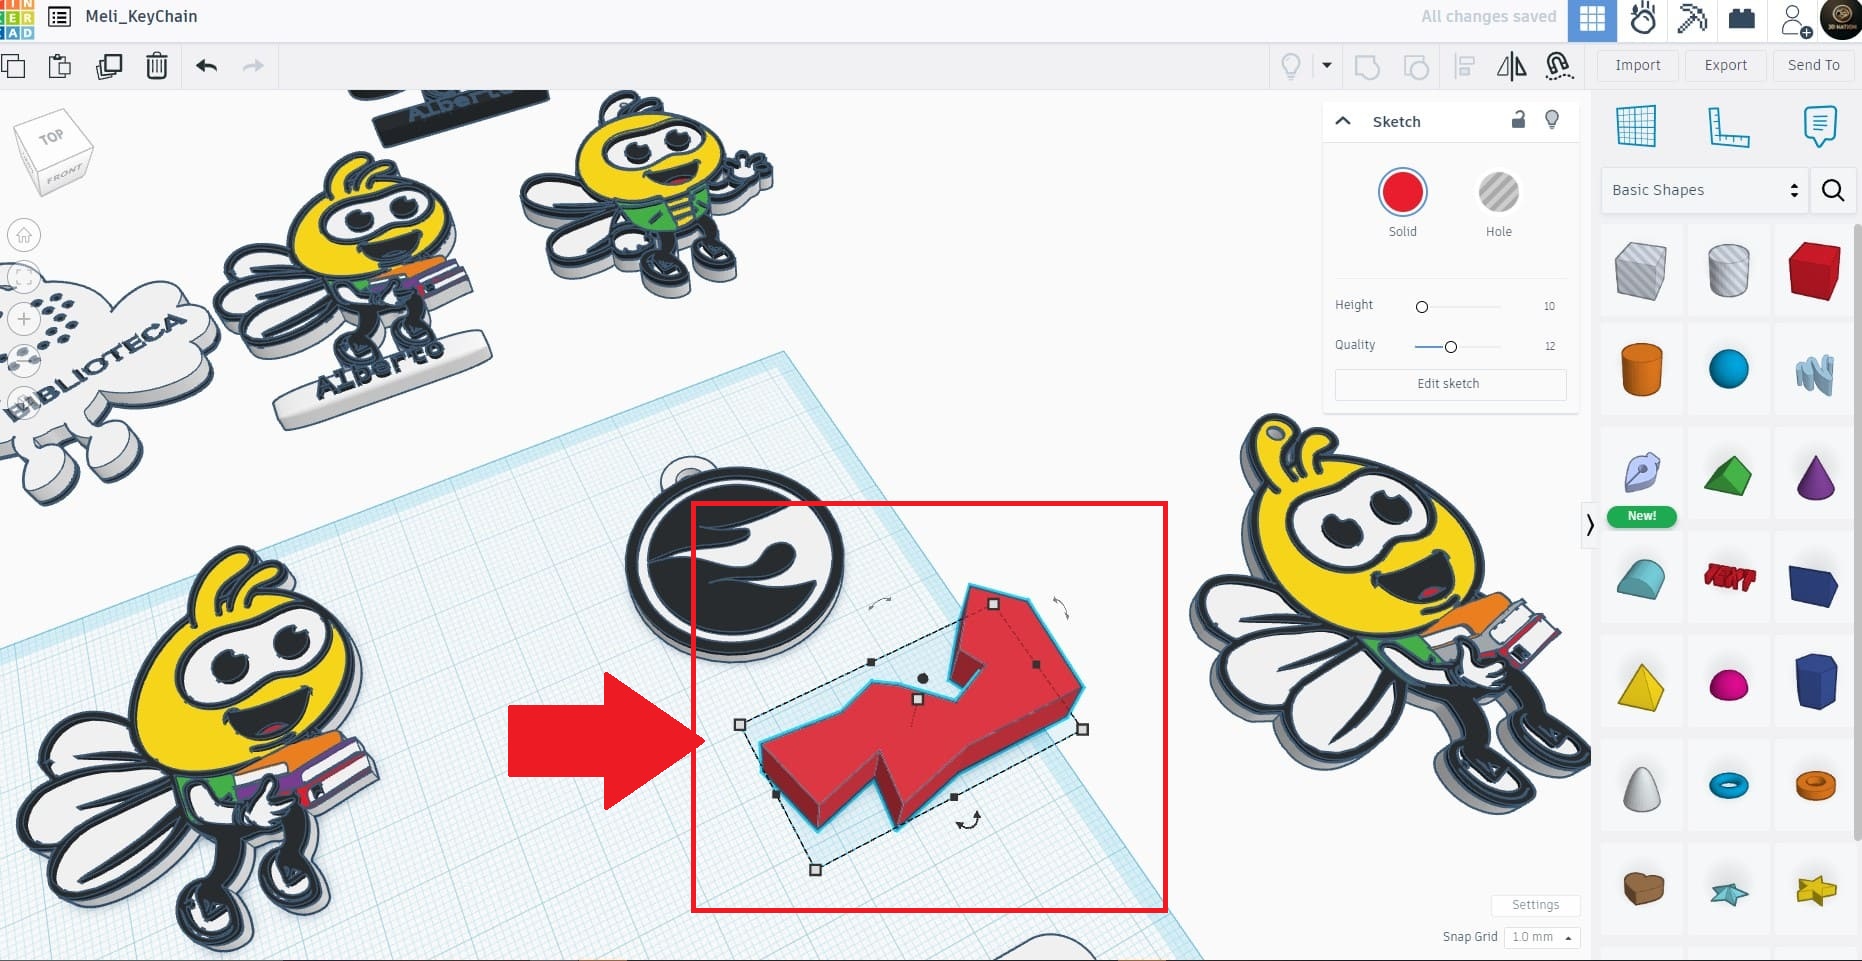
- Adjust the dimensions and positions of the shapes using transformation tools.
- Export your model in STL format for 3D printing.
|
STEP 1
|
|
STEP 2
|
|
STEP 3
|
|
Extra
|
3D modeling Comparison
Comparison Table: SolidWorks vs Blender vs Autodesk Inventor vs Tinkercad
| Feature | SolidWorks | Blender | Autodesk Inventor | Tinkercad |
|---|---|---|---|---|
| Primary Focus | Professional mechanical design and CAD. | 3D modeling, animation, and rendering. | Professional mechanical design and CAD. | Basic 3D modeling and education. |
| Ease of Use | Intuitive interface for engineers and mechanical designers. | Steep learning curve but powerful for artists and designers. | Interface similar to SolidWorks, focused on mechanical engineering. | Very easy to use, ideal for beginners and education. |
| Modeling Tools | Advanced tools for mechanical parts, assemblies, and technical drawings. | Organic modeling, digital sculpting, and animation tools. | Advanced tools for mechanical design and simulation. | Basic 3D modeling tools, ideal for simple projects. |
| Simulation and Analysis | Integrated stress, fluid, and motion simulation. | No native mechanical simulation tools (requires add-ons). | Integrated stress, dynamics, and kinematics simulation. | No simulation tools. |
| Rendering and Animation | Basic rendering, not its primary focus. | Advanced rendering and animation (Cycles and Eevee). | Basic rendering, not its primary focus. | Basic rendering, limited to simple views. |
| File Format Compatibility | Supports formats like STEP, IGES, STL, DWG, and more. | Supports formats like OBJ, FBX, STL, and more. | Supports formats like STEP, IGES, STL, DWG, and more. | Supports formats like STL and OBJ. |
| Cloud Collaboration | Integration with SolidWorks PDM for data management. | No native cloud integration. | Integration with Autodesk Vault and Fusion 360 for data management. | Fully cloud-based, easy to share and collaborate. |
| Price | Paid software, expensive (annual or perpetual licenses). | Free and open-source. | Paid software, expensive (annual or perpetual licenses). | Free and cloud-based. |
| Target Users | Mechanical engineers, industrial designers, and professional manufacturing. | 3D artists, animators, game designers, and enthusiasts. | Mechanical engineers, industrial designers, and professional manufacturing. | Beginners, education, and hobbyists for basic 3D modeling. |
| Common Applications | Designing mechanical parts, assemblies, and technical drawings. | Animation, organic modeling, digital sculpting, and rendering. | Designing mechanical parts, assemblies, and simulation. | Basic 3D modeling, quick prototyping, and educational projects. |
Why I Chose SolidWorks
After testing and comparing these tools, I decided to stick with SolidWorks for several reasons:
- Software Mastery: I already have advanced experience and knowledge of SolidWorks, which allows me to work efficiently.
- Focus on Mechanical Design: SolidWorks is specialized in mechanical design, which is my primary area of work.
- Professional Tools: It offers advanced tools for parts, assemblies, and simulations, which are essential for my projects.
- Integrated Simulation: The ability to simulate stress, fluids, and mechanical motion directly in the software is invaluable for my work.
- Industry Compatibility: It supports widely used formats like STEP, IGES, and DWG, making collaboration with other professionals easier.
When to Use the Other Tools?
Blender: I occasionally use it for projects requiring organic modeling or advanced rendering, such as visual presentations.
Autodesk Inventor: It’s a good alternative to SolidWorks, but since I already master the latter, I don’t see the need to switch.
Tinkercad: I recommend it for beginners or quick, simple projects, but it’s not sufficient for my professional needs.
Image Compression Process
Description of Iloveimg:
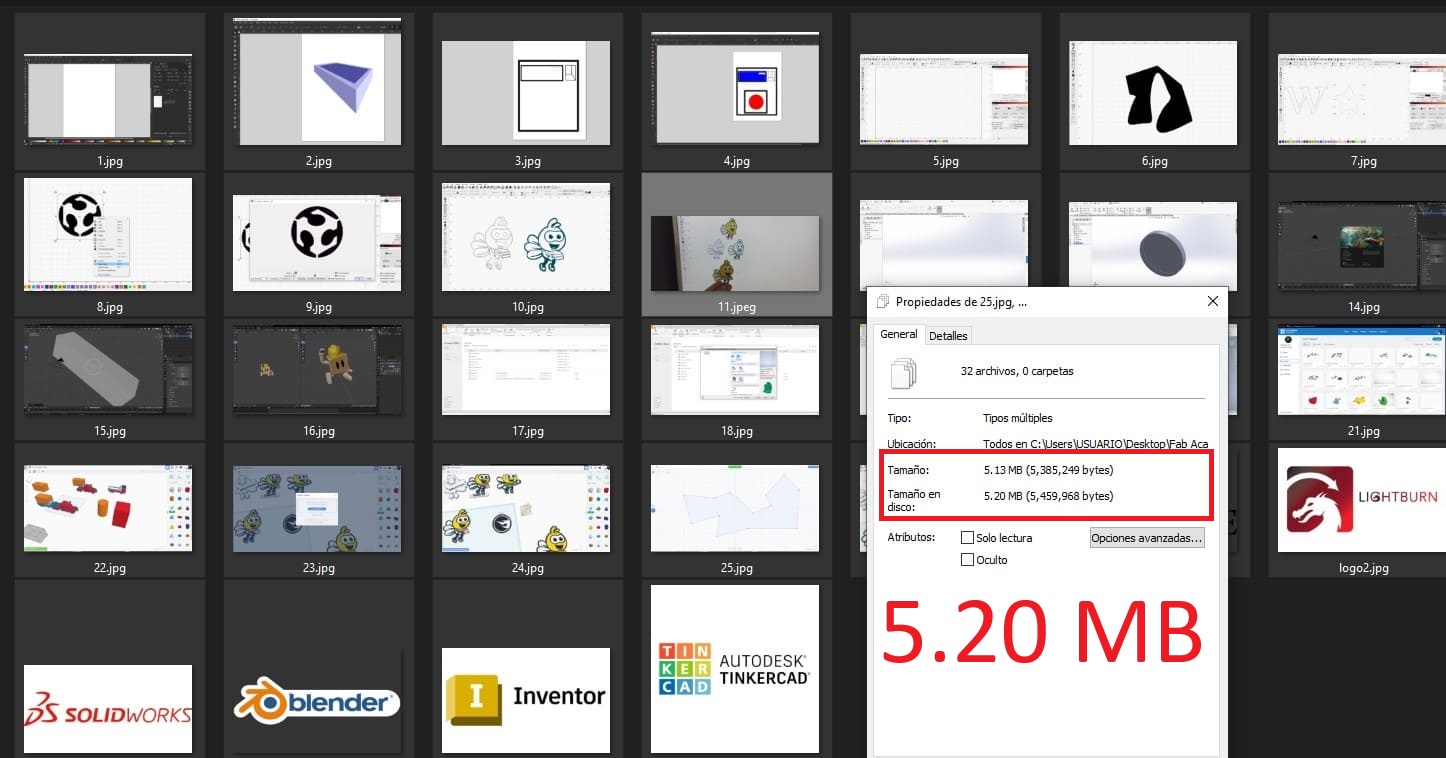
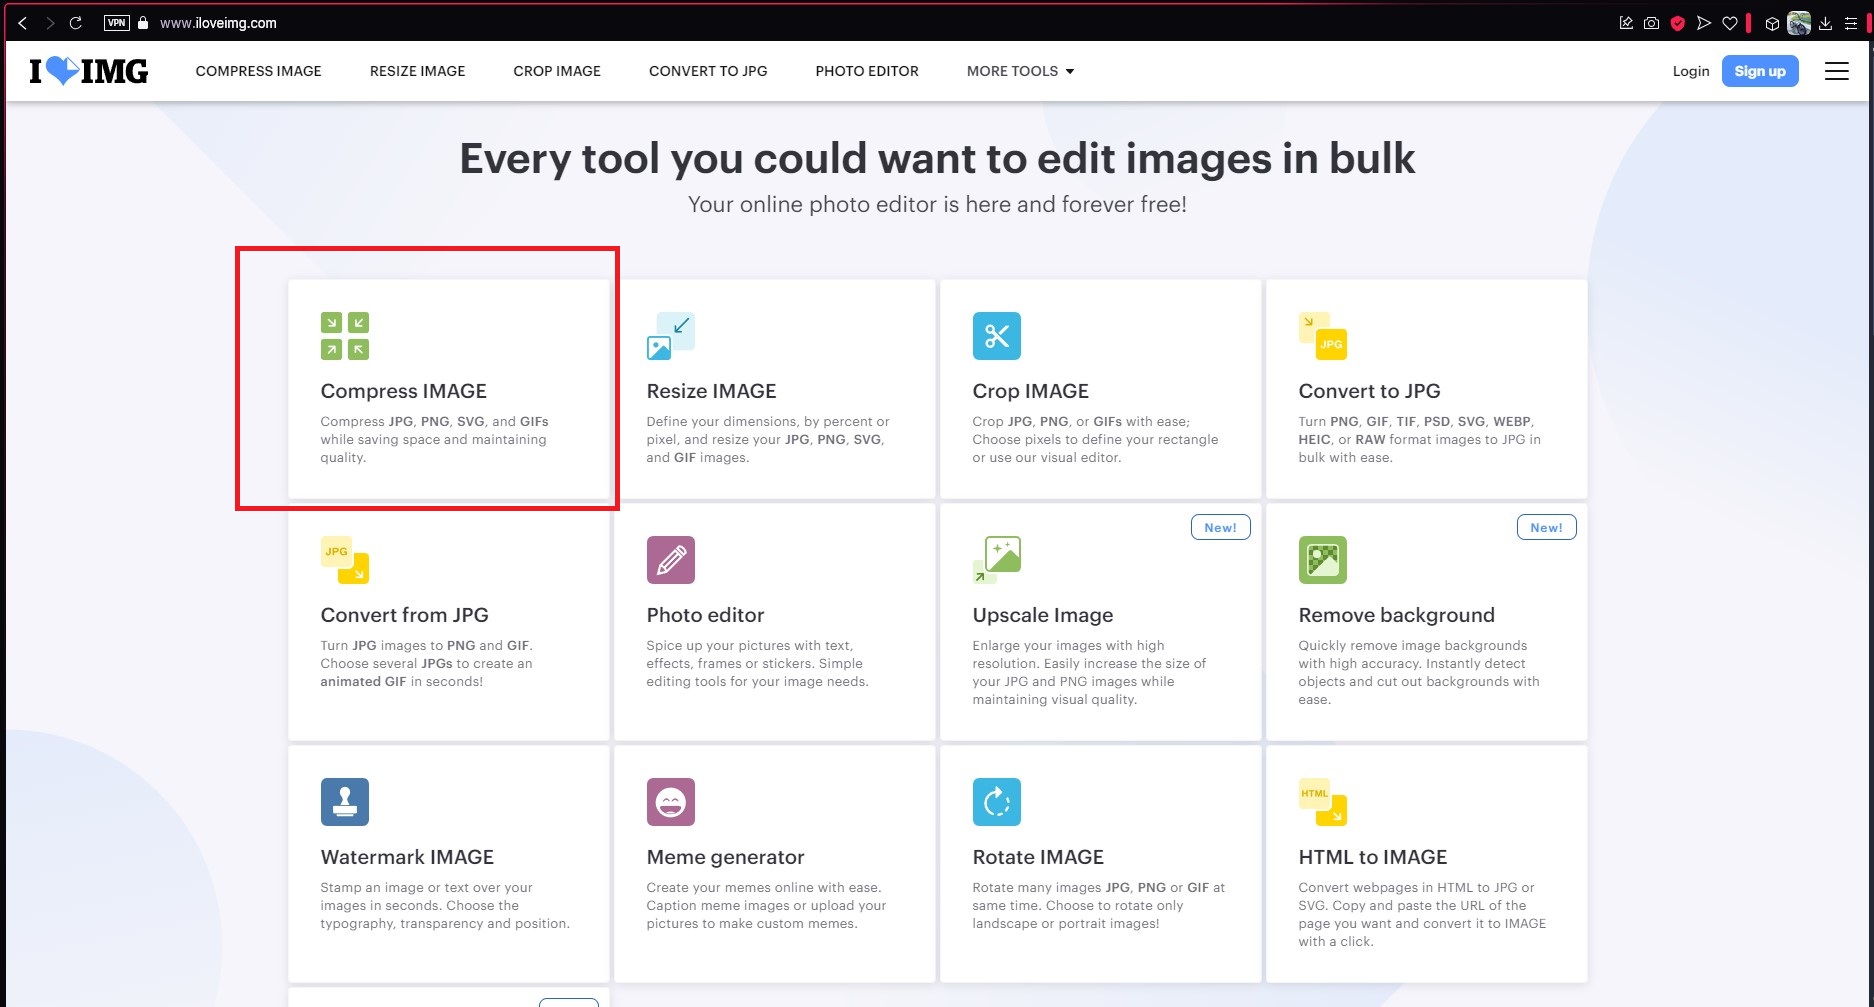
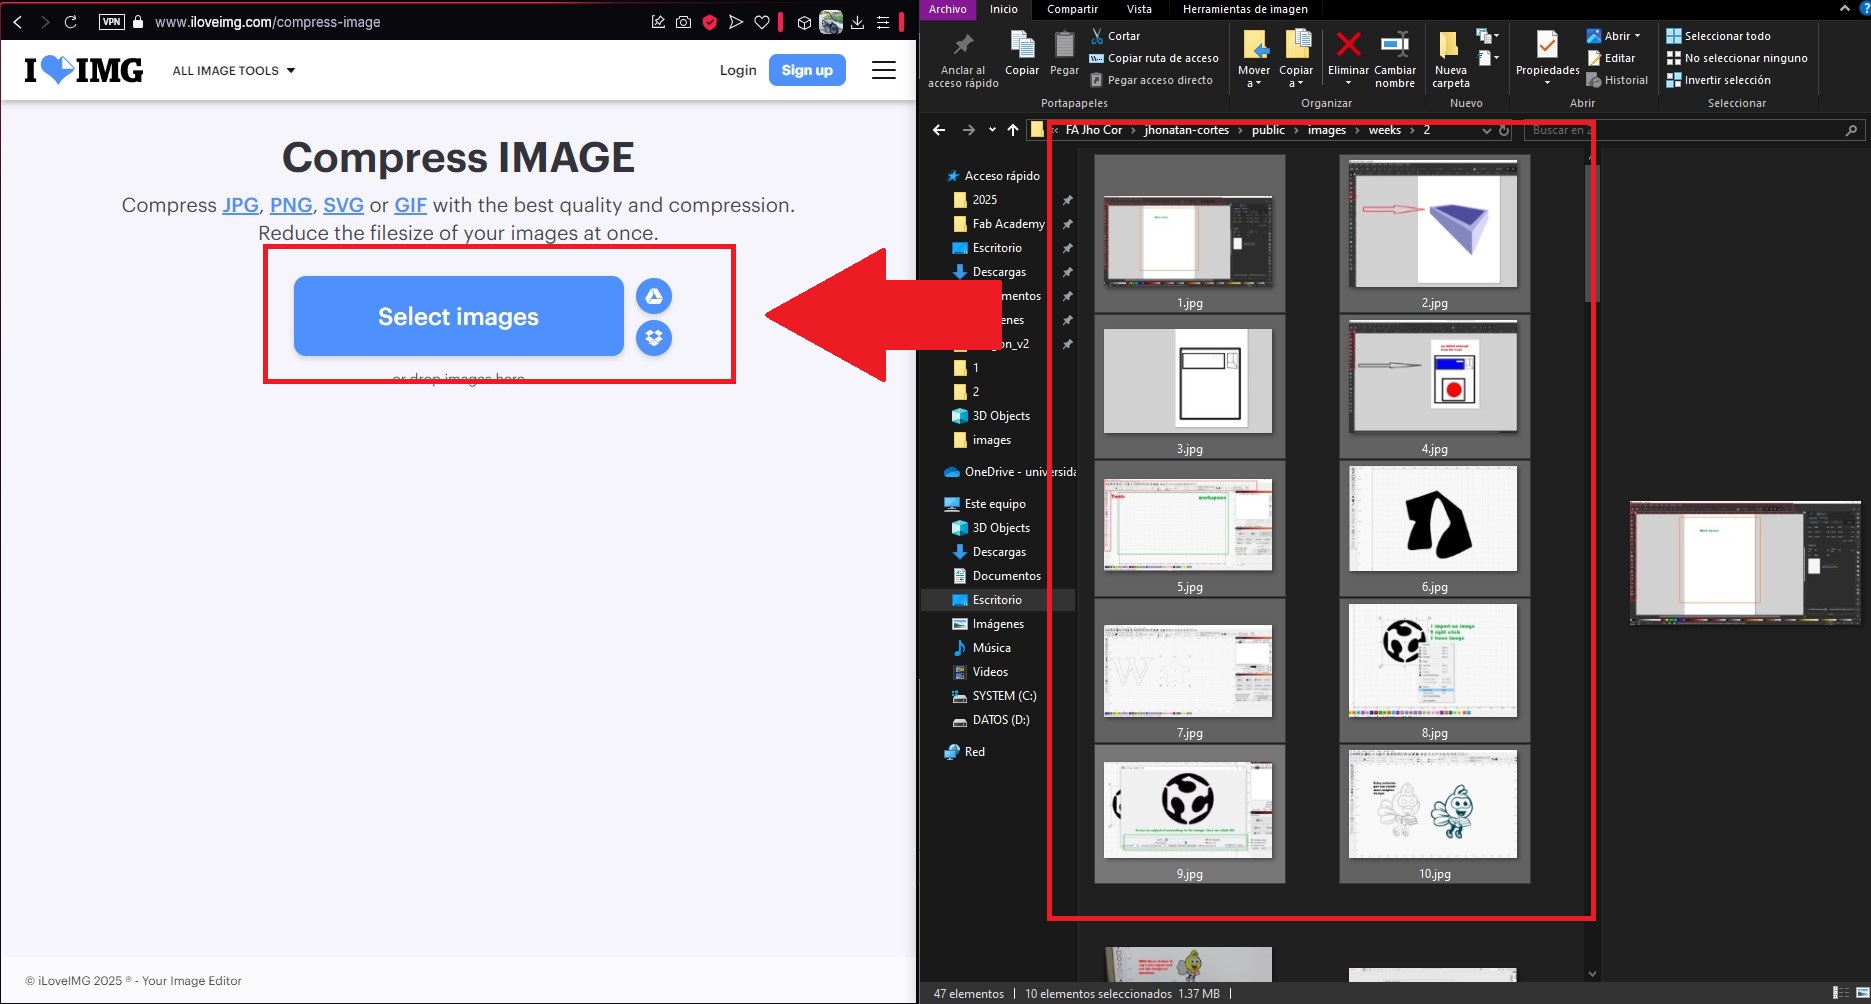
Iloveimg is a free, online tool designed for compressing and optimizing images. It is user-friendly and supports a wide range of image formats, including JPG, PNG, GIF, and more. Key features of Iloveimg include:
- Go to the Iloveimg website.
- Select the "Compress Images" option.
- Upload the images you want to compress (up to 30 at a time).
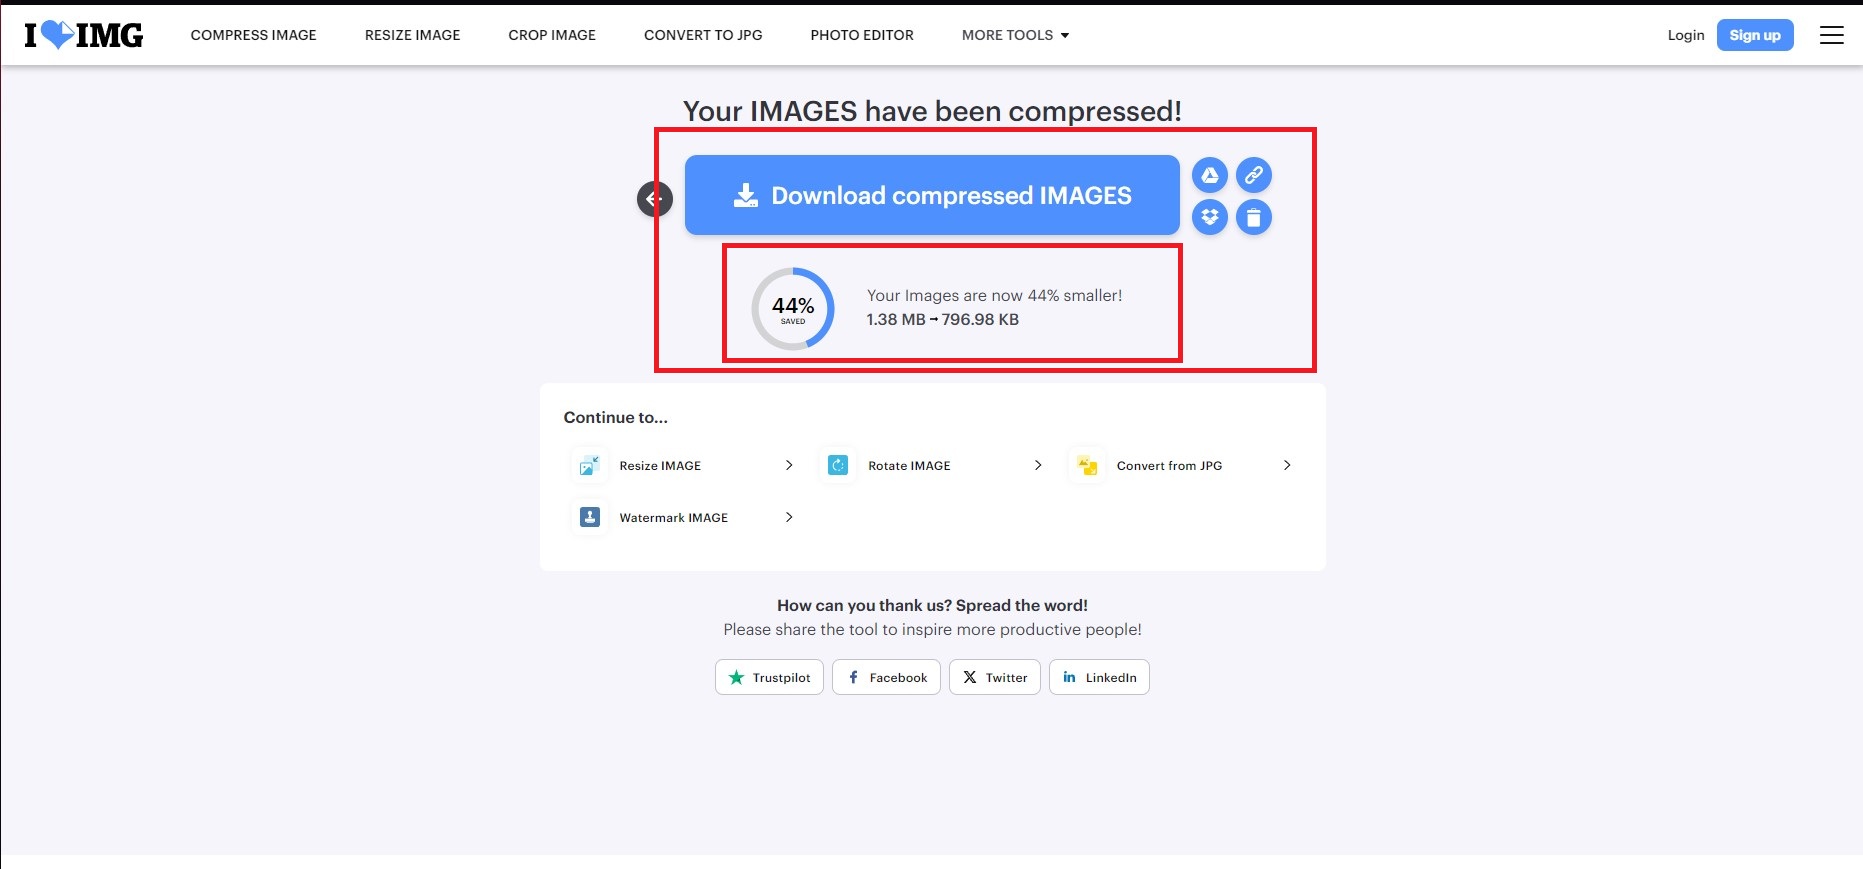
- The tool will show you the compression level and allow you to download the reduced images.
Personal conclusions from this week
Week 2 was quite extensive and required a lot of effort. I truly learned the differences between vector and raster, and why it is important to choose the software we work with wisely. It's crucial, especially in 3D, to remove paradigms, as our world is three-dimensional, and most CAD programs work with drawings that are later converted into 3D. This is a process that requires a significant learning curve, but it is not impossible. I did well with some programs I was already familiar with, but with others, I had forgotten part of the process and found it complex at first. However, after studying a bit, I was able to complete the examples. One area that could be improved is the availability of YouTube tutorials, as it's a very useful tool for learning, as well as the support from AI for understanding documentation, as some of it can be quite difficult to comprehend.
Downloads
- Inkscape
- LightBurn
- SolidWorks
- Blender
- Autodesk Inventor
- Thinkercad (Online)
- SolidWorks
2D Vector
3D Design
Final project

