My first assignment (Learning HTML and using GIT)
The first part of the assignment is to complete one or two Git tutorials to become familiar with the tool. The second part involves brainstorming and outlining ideas for a final project. For now, let’s concentrate on the first part—learning Git. As we go through the tutorials, it's important to document our progress, capturing the skills we learn and the challenges we overcome. A good guiding principle is: If you document it, it happened. This way, you'll have a detailed record to reference whenever needed, whether it's to revisit solutions or analyze problems you encountered along the way.
- Work though one or two GIT tutorials
- build a Personal Fab Academy Webpage
- On that webpage Describe yourself
- Describe your final project
visual points
Getting started
This was my first time working with HTML. Following my instructors instructions and looking at Frauke Waßmuth Fab page, I was able to figure how to get started. It also helped to have people around who have done this before. The first thing I did was download Git and visual studio code to my old laptop, as there was a small problem with the mac-book which I am currently waiting on IT to have time to look at. Once I downloaded the two programs, I followed the following Commands:
- Step 1. Run git bash
- Step 2. Type:
- Step 3. Type:
- Step 4. Type:
git config - -global user.name"Your name here" git config - -global user.email"Your email@example.com" -t rsa -C "Your email@example"Here I went ahead and made a copy of the ssh key and added it to my Git account. This can be done by going to preferences. Look for ssh key on the side menu. Were I found the add new key. Once I added the new key my PC was linked to my repository to my gitlab account. Next I went back to my bash terminal again and entered the following commands.
- Step 5.
- Step 6.
cd path/to/desired/foldergit clone https://gitlab.fabcloud.org/academany/fabacademy/2025/labs/kamplintfort/students/YouName-here.gitUsing the Terminal window in I created the folder git-Repos. Using the code: cd ~/Desktop, which changed the directory > to my desktop. To creat the new folder I went ahead and tpyed the command mkdir (make new directory). Now I just needed to copy the index to the folder.
git add *Type: git commit -m "Your commit message here"git pushWhat else I learned
I learned how to use Visual Studio Code (VS Code), which is a fantastic tool for working on HTML and other types of code. One of its great features is that it can be synchronized with GitLab, allowing you to manage your projects on the cloud easily. With VS Code, I can push my changes directly to the live page. It also keeps track of previous versions of your code, which is super helpful in case you need to revert to an earlier version after making a mistake. Another amazing feature is the Live Server extension. This allows you to preview your page in real-time on a local server, so you can see exactly how it will look when published. I did use a templet to get me stared from HTML5 UP.
I also learned how to compress images using GIMP. Here is a quick tutorial:
.jpg)
Some Tips and Tricks
Never having written code before, I spent a lot of time messing up this page. At one point,
I even managed to create something that looked more like a blank webpage than what I originally
intended a chaotic mess where everything was all over the place. The good news? I now know what
not to do. And when in doubt, Ctrl + Z (undo) is my best friend. A good friend of mine showed
me some great keyboard shortcuts that make coding and browsing so much easier. Not to mention
explaining things to me as I was messing them up.
Let’s say you come across something on someone else’s webpage and want to know how they did it.
Just press Ctrl + U to view the source code of the page, then Ctrl + F to search for specific
text or elements. You can also use Ctrl + S to save your work. These shortcuts
have been lifesavers, and I found them super helpful as a beginner. One of the most important
things I’ve learned is how to create sections in HTML. Sections are like framed areas that help
organize content on a webpage. Here's an example of how you can write such a section:
<div class="row"> <div class="col-6">Here is a link to a great website where I have looked up a lot of other tricks and bits of code: Visit W3Schools.com!
Update to what I have learned
Up to know it took me a little while to really get used to using VS code. Many of the tricks mentioned above have proven
to be very nice to use. Once of the more handy tricks that I have come to use is a lot of keyboard shortcuts. There is list
of them. My favorite one to do it is using command "X". This lets me cut out and past anything that I have highlight and moved
that part of the text where it fits better. Another cool feature is if you have highlighted a text or a HTML code that is in the
wrong place you can click and drag it into place. But my old time favorite is the live view. If you are working with two screens
this is a must. It shows you the page as you set it up. Giving you a direct update ever time you save with Command "S".
And for images rather than having hight and width. Just use width="50%". You can adjust the images size that way.
One of the things that every Fab-Academy Student will end up doing is having to make lists. To do this you just have to write the letters
"li" and hit enter. This than allows you to type things in a listed format. But do note that this must be done with
every line that you want to list under another. One of the biggest tricks that that has been really good for me to use is looking
at different code from other Fab-Academy pages. Anytime I see a function that I would like to know how this person did this I use the
this keyboard command to inspect the page option + command + U.
Next this is one that I have just started using. Everyone out there will misspell a word sooner or later. I myself have missed spelled
tons of works. And this have made my life a lot easier. I used to use chatgpt to correct my spelling and keep my original text. This is
a nice cheat but it takes up time. So does asking your friends to read you page to help you find a misspelled word. You can install spell checker
for VS code. I recommend checking this video out for a fast and simple explanation on
for installation. This features a blue wavey line under any misspelled words or words that happen to be unknown, you can than also add these
words to your page dictionary.
To keep things clean and organized on the script page where you are writing your documentation, I would also suggest adding offsets so you can
recognize where one topic starts and another one begins. Also you will have noticed by now that when you typing something down that you could basically
just keeps going. Avoid this doing and make sure that your text can be viewed in the space of your screen. For the most part I would say depending on how
you like to document things, keep it simple. You will notice that I have played around at first with split columns of text and so one.As cool as I
as I found this at first it was a pain to keep doing. It made it harder for me to later follow were I had left of my documentation. There are a lot of
trick and tips you will gather over time that will increase your workflow over time. But to help you long the way of your Fab-Academy HTML experience
I recommend video that has made my workflow speed up. Like I mentioned before the use of keyboard short cuts is crazy fast once you have them down. Personally
I used to think that the computer mouse was the faster way of getting things done, boy was I wrong. Have look at this video
to help with your work flow speed using VS code. There are loads more videos on how to setup you VS code to be faster and other tips that I myself will
still end up finding out later.
Over all the more time you spend and invest in learning HTML the faster you will become. It never hurts to ask your Fab mates how they solved issues
that they had with VS code or how they added things like a drop-down menu. I can only say that
having friends that can help explain things to you and video or even other Fab-Academy webpages will help you along the way.
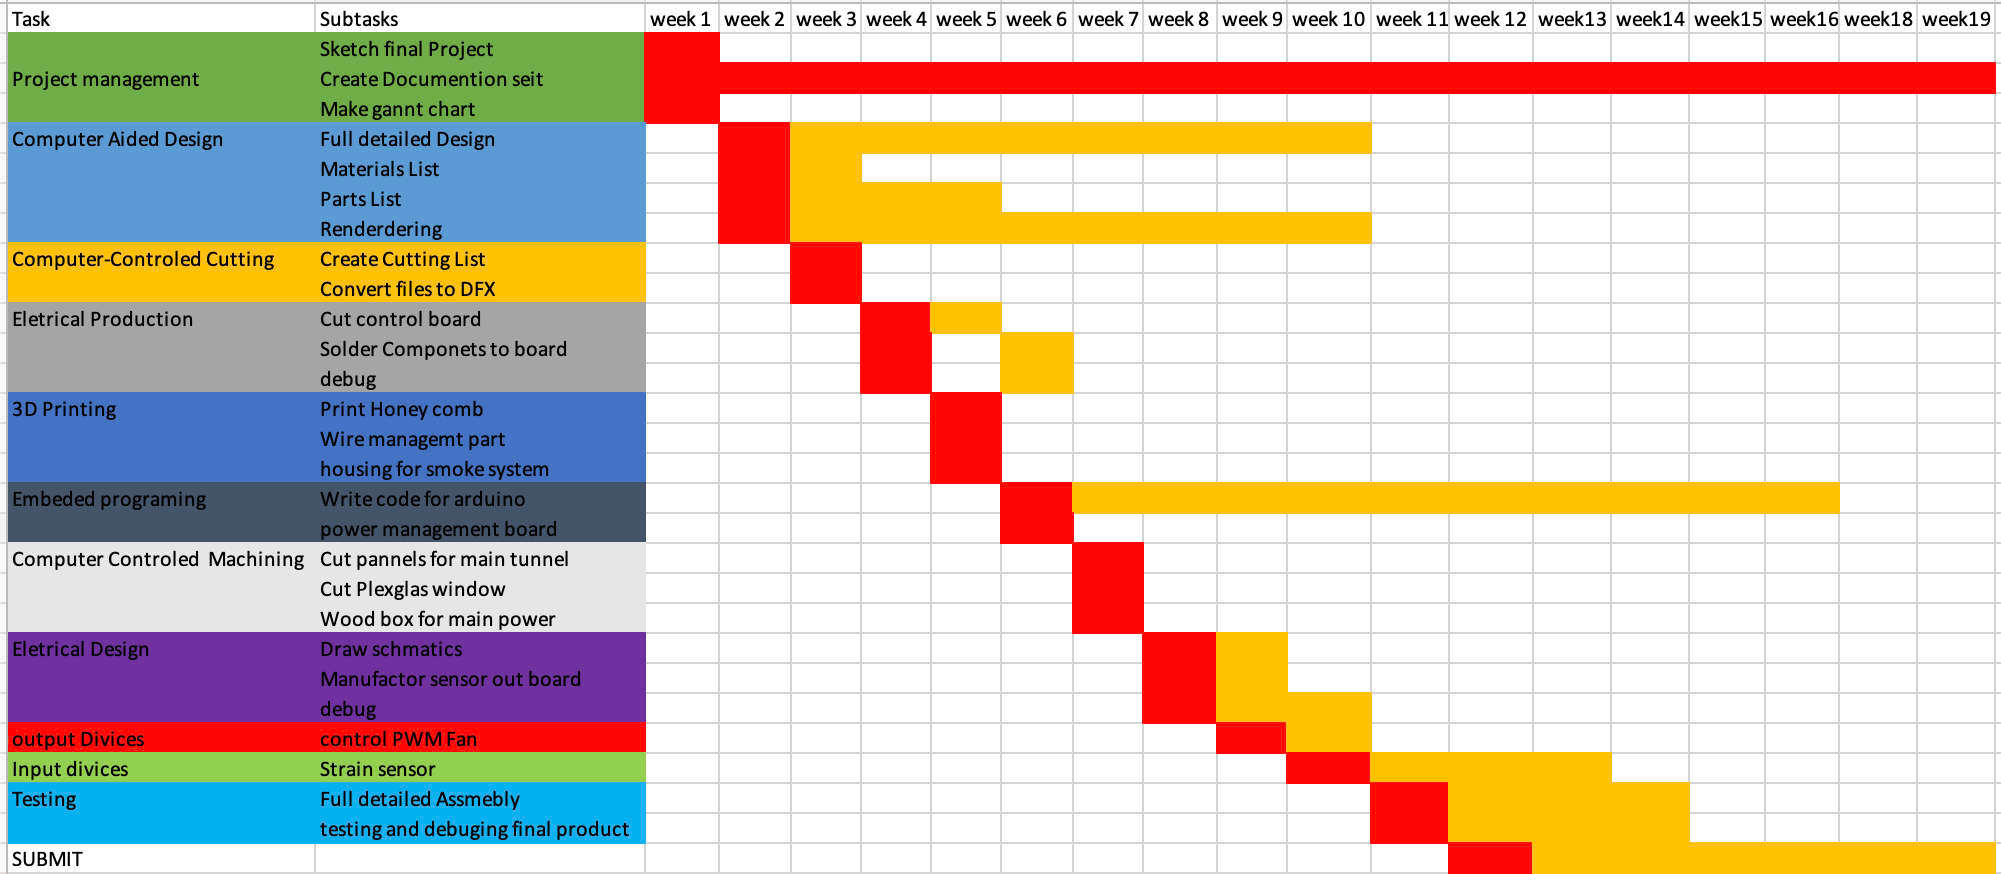
Project and time management
I have seen Gantt charts before and even had to create one in an exam, but up until now, they never seemed relevant for the projects I’m involved in. However, this year started off differently. I’ve never faced such a heavy workload before, and I quickly realized that I needed time management more than ever. With my calendar already packed with teaching commitments and the upcoming Fab Academy, I decided to see how well I could plan ahead using a Gantt chart. I turned to open-source office software and got to work. The red boxes on my chart represent the deadlines I’m aiming to meet, while the orange boxes highlight tasks that I expect to be more time-consuming—like electronics. They rarely go as smoothly as planned! I’m well aware that things might go sideways at some point, and I’m curious to see just how much of the Gantt chart will need to change over time. For now, though, I’m optimistic and ready to see how it all plays out. No plan is ever foolproof, but it’s worth a try!
My Conclusion
At first, I felt discouraged and overwhelmed by figuring out how Git works.
Reading the tutorials and dealing with my laptop not allowing me to install Git.
So, I decided to use my old laptop instead,
though I still hope to fix the issue on my main one. After attending our local meeting and talking
with former Fab Academy students, I made a great deal of progress this week. I’ve even reached the
point where I enjoy learning to code and understanding the different ways things can go wrong. The
fun part has been making the mistakes I needed to make and seeing the results in real time, it really
helped with my learning curve. The motto "failure is success" has taken on a whole new meaning for me.
When something doesn’t work, asking why it went wrong is a great first step in learning something new.
So, hopefully, this webpage works, even if it’s a little rough around the edges. It’s a good starting
point for my Fab Academy journey.
What I’ve learned is to take my time when working with HTML. By thinking beyond what I already know,
I can identify my mistakes and correct them. Asking for help isn’t a bad thing, it can actually lead
to great results. Organizing my ideas on paper first is also a useful tool for visualizing what I
want to do. I’m looking forward to improving both my skills and my webpage.
In the end, this week has been a valuable learning experience. Despite the initial frustration,
I’ve made significant progress and gained a better understanding of coding, problem-solving, and
the importance of persistence. Every mistake has been a lesson, and I now see challenges as opportunities
to grow. Moving forward, I’m excited to refine my skills, improve my webpage, and continue learning.
is just the beginning of my Fab Academy journey, and I’m eager to see where it takes me.