14 - Interface and Application Programming
This week I explored how to create software interfaces that let users interact with hardware. Basically, it is about making a way for people to control or monitor a device, like pressing a button on a screen to turn on a motor, or watching a graph update with real-time sensor data. The idea is to connect a micro-controller (like a raspberry pi pico or Arduino) with a user interface that is visual and user friendlier than raw serial output monitor. Interfaces can be built in all sorts of environments, depending on what you're trying to do.
There are many different types of GUI's (Graphical User Interfaces) that can be used. Each one has its Pros and Cons. I have made interfaces using Java before. This is also a long time ago. For this weeks assignment I decided to for with processing. There are many different programs that are also worth a good look over and I have gone ahead and listed them below. Also have a look at this weeks group assignment
Desktop GUI Frameworks
Web-Based GUI Tools
Intro to processing
Processing is an open-source programming program which allows you to create interactive applications quickly. It also has tones of tutorials on YouTube which was a great help in learning how to get started. I really enjoyed following this persons video tutorials. They explained each piece of the code and what it does. This made it very easy to create the interface. I found this program to very user friendly and would recommend for anyone who is a beginner.
Once you have an idea of how big the interface window should be. The code void setup() { size(400, 200); // Set the window size: width 400, height 200} lets you set up the size. Fill lets you adjust color: fill(255, 0, 0); // red, fill(0, 255, 0); // green, fill(0, 0, 255); // blue is the RGB color scale. Color range can be mixed form 0 to 255. Depending on the color needed. To not wast time the fastest way to find the color you want is just to use good old google and ask that color red has for example. Now you want the buttons to change color if they are selected. To do this we can do the following which is a basic if true or false question. Here is how it works. By typing the following statement fill(isOn ? color(0, 200, 0) : 200);, it asked if the button is on: use green and if button is off use gray, which is the 200 at the end of the statement. This next part was pretty cool to learn. Processing has a built-in variable function that tracks the mouses movement of the screen. This feature is called mouseX and mouseY and tracks the horizontal and vertical mouse movement via xy coordinate system. this helps with finding out if the mouse is on the button or not.
The next bit of code let me to create the buttons. The result was a little more 1990s microsoft looking window with two buttons.
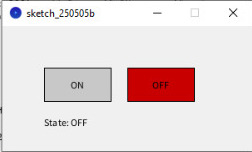
	// Button positions and sizes
float btnOnX = 50, btnOffX = 150;
float btnY = 50, btnW = 80, btnH = 40;

// System state
boolean isOn = false;

void setup() {
  size(300, 150);
}

void draw() {
  background(240);

  // ON button
  fill(isOn ? color(0, 200, 0) : 200);  // Green if ON, gray if not
  rect(btnOnX, btnY, btnW, btnH);
  fill(0);
  textAlign(CENTER, CENTER);
  text("ON", btnOnX + btnW / 2, btnY + btnH / 2);

  // OFF button
  fill(!isOn ? color(200, 0, 0) : 200);  // Red if OFF, gray if not
  rect(btnOffX, btnY, btnW, btnH);
  fill(0);
  text("OFF", btnOffX + btnW / 2, btnY + btnH / 2);

  // Show current state
  fill(0);
  textAlign(LEFT);
  text("State: " + (isOn ? "ON" : "OFF"), 50, 120);
}

void mousePressed() {
  // Check ON button
  if (mouseX > btnOnX && mouseX < btnOnX + btnW &&
      mouseY > btnY && mouseY < btnY + btnH) {
    isOn = true;
  }

  // Check OFF button
  if (mouseX > btnOffX && mouseX < btnOffX + btnW &&
      mouseY > btnY && mouseY < btnY + btnH) {
    isOn = false;
  }
}
Tunring on and off a fan
Couple of weeks ago in the assignment output devices I created a code to control the speed of the fan. There I used the pwm signal to measure the rotation using a built in function and the falling edge of the fan blade to get a reading on how fast the fan was rotating. Using the serial monitor windowI could set the speeds. By either typing on, which allowed me to have the fan turn at peek power or I could enter a value between 0 and 255 and by typing either 0 or the word off the fan would turn off.
The first thing I did here was go to my page on output devices and copy my original code and have it upload to the RP pi pico W. Next I needed a code that would combine the pi pico W with Processing GUI. So for the Processing GUI to connect by USB port We need to add a library. The line of code that is needed here is import processing.serial.*;. This line allows for the Communication between the raspberry pi Pico W and the Processing program. Next we need the line that declares a global variable to handle the USB serial communications. For this we can call it Serial myPort;.
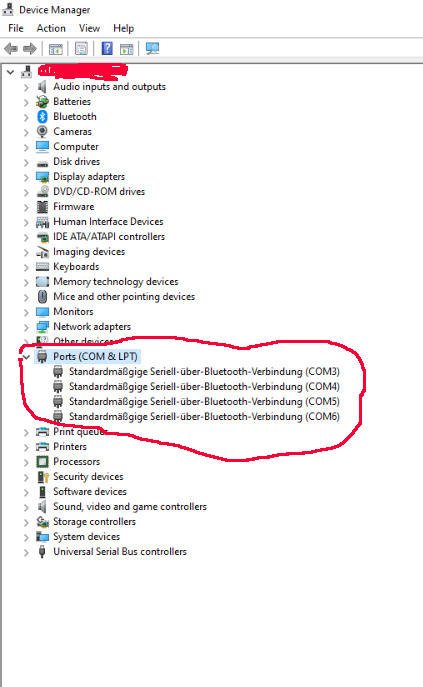
I did try to have the Processing program find the port automatically but I could not get it work. I found it easier to just add the com link manually. To to do this we just write the following lines. String portName = "COM8"; and myPort = new Serial(this, portName, 115200);. In my case here the board is connected to COM8 but this can change depending on your computer. For example if you power down your computer or attach to s different USB port it could be that the COM changes. To check to which port that your board connects to, you can go to device manager. You will also notice that there is also a baud rate which the board communicates in this case I used 115200. This you want to check with the code that you wrote for the board or sensor that you are using.
Putting the code together I ended up with a window with an ON and OFF buttons. Here I wanted to add a slider. Giving a little more control over the fans speed. To do this following code was needed, which also needed a second set of code to tell where the mouse is located.
	// Draw the slider
	fill(200);  // Slider background
	rect(20, 100, 255, 20);  // x, y, width, height

	fill(100);  // Slider handle
	rect(20 + fanSpeed, 95, 10, 30);  // Move handle with fanSpeed
Slider mouse interaction
	// If user clicks inside slider area
	if (mouseY > 100 && mouseY < 120 && mouseX > 20 && mouseX < 275) {
	  fanSpeed = constrain(mouseX - 20, 0, 255);  // Get fanSpeed from mouse
	  isOn = true;
	  myPort.write(fanSpeed + "\n");  // Send speed to Pico
	}
This allows the slider the slider to let the mouse adjust the pan speeds using the PWM signal from 0 to 255. So when either sliding or clicking the along the sliders area the rang of speed will be updated. The video below shows a demonstration of all the function working. The Video has been speed up to help with the compression. I used Mabbooks i-Movie to edit the short clip to play faster and free-compress to compress the film some more.
	import processing.serial.*;

Serial myPort;
String rpmValue = "0";
int fanSpeed = 255;  // Initial speed
boolean isOn = true;

void setup() {
  size(400, 300);

  // Directly connect to COM8
  String portName = "COM8";
  myPort = new Serial(this, portName, 115200);
  myPort.bufferUntil('\n');  // Wait for newline to read full RPM lines

  textFont(createFont("Arial", 16));
}

void draw() {
  background(240);

  fill(0);
  textAlign(LEFT);
  text("Fan Speed: " + fanSpeed, 20, 40);
  text("RPM: " + rpmValue, 20, 80);

  // Slider background
  fill(200);
  rect(20, 100, 255, 20);

  // Slider handle
  fill(100);
  rect(20 + fanSpeed, 95, 10, 30);

  // ON Button
  fill(isOn ? color(0, 200, 0) : 255);
  rect(20, 150, 80, 40);
  fill(0);
  textAlign(CENTER, CENTER);
  text("ON", 60, 170);

  // OFF Button
  fill(!isOn ? color(200, 0, 0) : 255);
  rect(120, 150, 80, 40);
  fill(0);
  text("OFF", 160, 170);
}

void mousePressed() {
  // Slider control
  if (mouseY > 100 && mouseY < 120 && mouseX > 20 && mouseX < 275) {
    fanSpeed = constrain(mouseX - 20, 0, 255);
    isOn = true;
    myPort.write(fanSpeed + "\n");
  }

  // ON Button
  if (mouseX > 20 && mouseX < 100 && mouseY > 150 && mouseY < 190) {
    isOn = true;
    fanSpeed = 255;
    myPort.write("ON\n");
  }

  // OFF Button
  if (mouseX > 120 && mouseX < 200 && mouseY > 150 && mouseY < 190) {
    isOn = false;
    fanSpeed = 0;
    myPort.write("OFF\n");
  }
}

// Reads RPM value from Pico's serial output
void serialEvent(Serial p) {
  String input = p.readStringUntil('\n');
  if (input != null) {
    input = trim(input);
    if (input.startsWith("Fan RPM:")) {
      rpmValue = input.substring(9).trim();  // Extract just the number
    }
  }
}