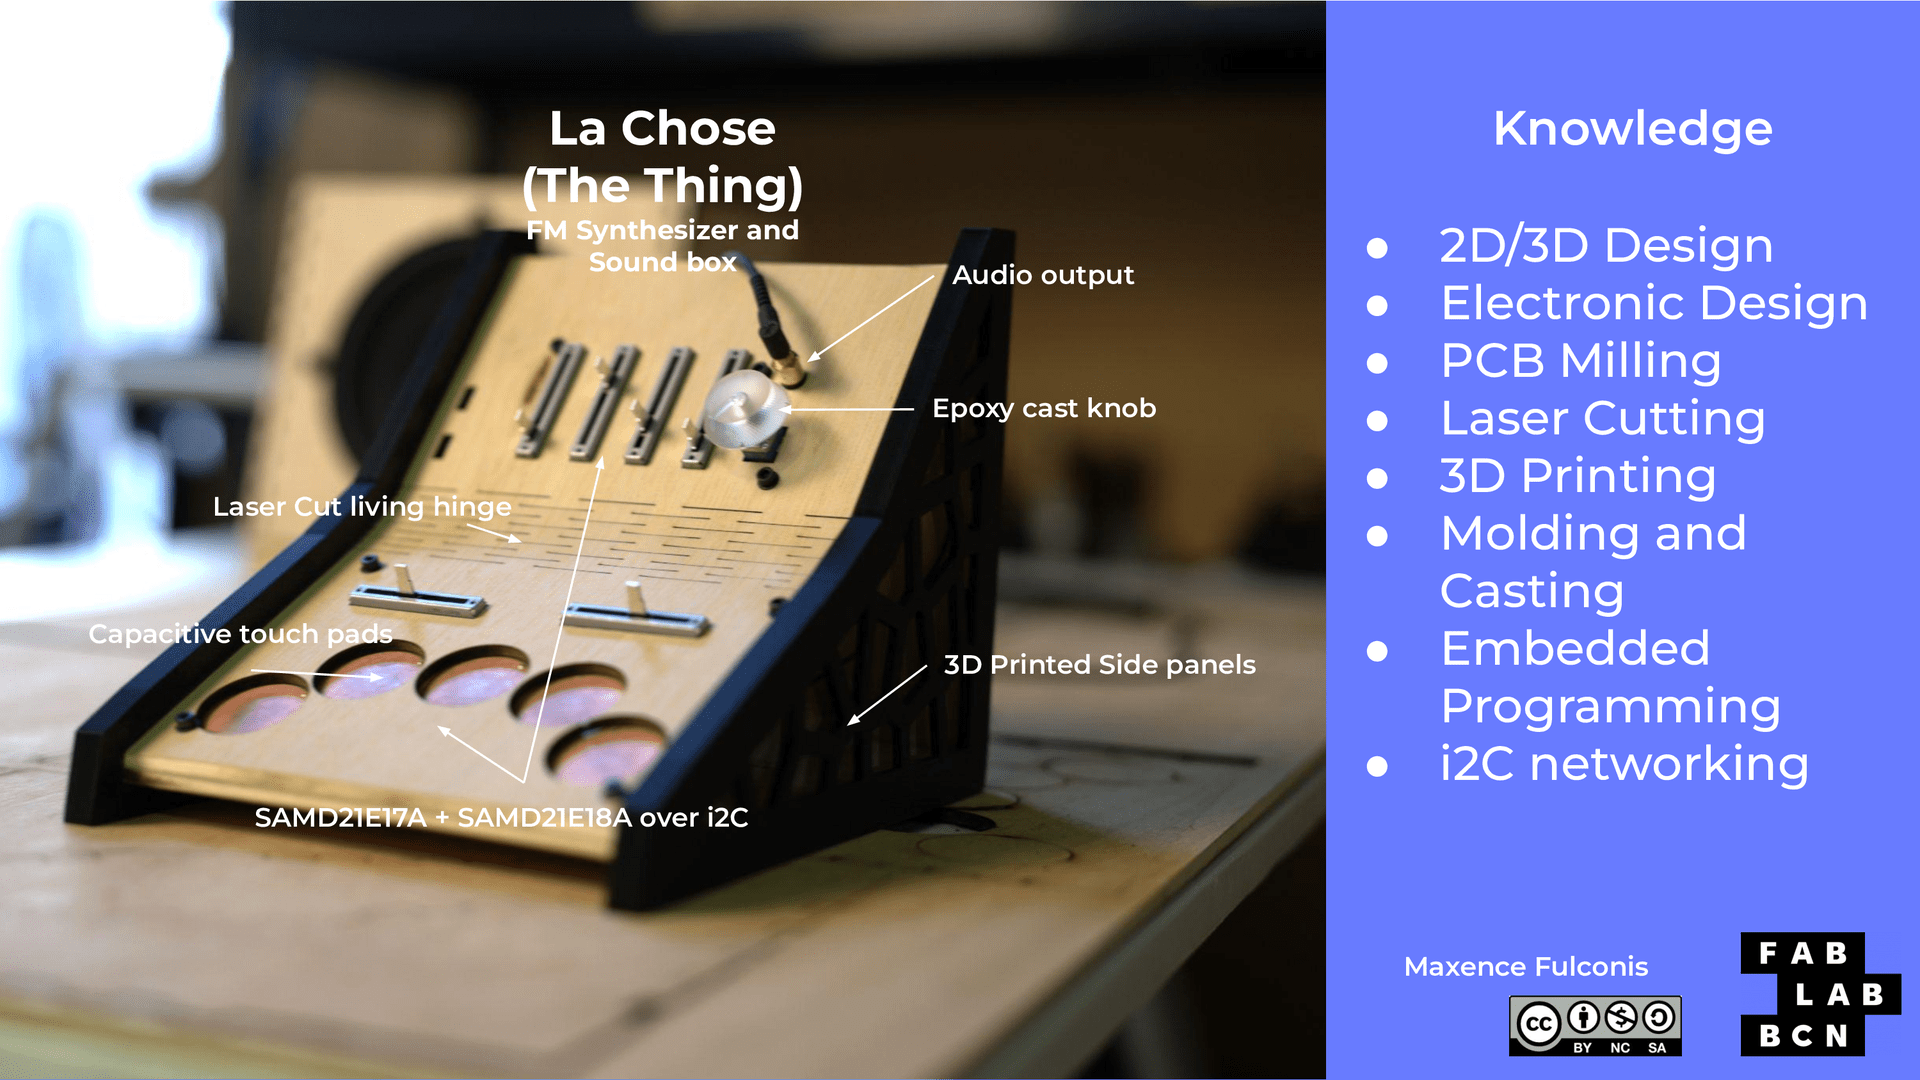
My Final Project

Final Project Draft Week 1: Simple Phone

Simple Phone Idea Sketch This first week we were tasked with coming up with an initial idea for a final project. I looked first towards projects like the FairPhone and the Light Phone. The FairPhone is an easily-repairable Android smartphone trying to use as many recycled and fair materials as possible. The Light Phone is an Android-based "dumb-phone" with an e-ink screen that allows you to access simple features such as calling, messaging, a calculator, calendar synced with google, and a few others. Both are very interesting projects but I felt that the FairPhone was too traditional in using Android and the Light Phone did not go far enough in open-source development and providing value for the users. While researching, I came across Paxo, a fully open-source smartphone using a custom-OS. Wanting to use some ideas from each of these projects, I thought of a simple phone to give people real access to their tech, instead of being locked behind the black box of glass, plastic and metal that we are now confronted with. I thought of a square 1 to 1 aspect ratio that differentiates it fromm the more traditional 16 by 9 and 18 by 9 aspect ratios of current smartphones, and makes it seem more like a tool than a content-consumption machine. With an e-ink display and simple calling and messaging capabilities, it would provide all the basic necessities of a phone, without the many distractions and attention-stealing of a traditional light emitting display. The Simple Phone also would have some modular components, much like Arduino Shield modules.

Some Ideas for Going Further

These modular kits come in the form of DIY kits with build instructions and explanations as to their functions. Each kit would have its own app on the phone to control it. My first thought was a simple analog synthesizer, due to my background in music. Tony gave me the idea of being able to route phone calls' outgoing voice through the synthesizer for some vocoder-style effects. After further reflection, this led to a camera kit for taking photos, which could either be a DSLR-style camera with integrated viewfinder or a simpler digital camera (although there would be the question of how to correctly display this on an e-ink screen?) These kits could also include a DAC (digital to analog converter) for playing high-quality audio files, or a simple recording kit with an omni-directional microphone and higher quality speaker. Not drawn in the image above could be a solar panel and extra battery kit for charging the phone and other devices while outdoors, or even some mechanical devices such as a clock.

Another Final Project Idea

While discussing with some of my classmates, I thought it would be a good idea to simplify and refine my project a little more. I wanted to keep the square form factor and the e-ink touch screen, but also wanted to apply the project more towards my passion and field of expertise, music. The Simple Phone became the "Simple Music Companion" (name to be confirmed at a later date...), a standalone basic accompaniment tool for musicians, which uses a microphone with pitch detection to pick up the basic chord structure of someone's playing, and accompanies the musician with some simple piano, with different stylistic and rhythmic options to be selected on the screen. It then is able to save the MIDI track of what it has performed and that can be used as the basis of a track in a DAW software later. With this idea in mind, I headed for week 2 and the CAD/3D modelling software portion of Fab Academy.

Final Project Modelling Week 2: Simple Music Companion

You can find the 3D model here.

Here is what it looks like from a back angle showing the kickstand and some of the features. Showing off 3D model render I started by designing the 2D cube, wanting to keep my design simple, and immediately ran into the very simple issue of not knowing how to round cube edges automatically... I made a relatively complex design, as shown below, using circles to round out the corners, not great... Initial design circles I then trimmed the points of the rectangle using the circles, leaving me with the following rounded square. Fillet tool Rhino After playing around with Rhino for a bit of time, I figured out I could build a rectangle with the Rounded attribute and select how rounded I wanted my corners! Much better. Rounded rectangle I then offset the resulting square to get the inner dimensions of the screen, and extruded both to get two objects, the screen and the outer shell of the project.

Backplate Render Issues

I made the outer shell protrude away from the screen in both directions, and then closed the back of it with another object, the backplate. It took me some time to get the backplate perfect, with a lot of different curves and modifications, so by the time I was happy it looked like the image below. backplate ugly Because of all the different intersecting curves, this was causing a rendering issue where some shadows appeared seemingly out of nowhere on the backplate. Looking at the Rhino documentation, I was able to fix the issue with the "MergeAllCoplanarFaces" command, which then resulted in a much less crowded backplate.

Kickstand

As you can see in the image above, I had been trying to work on a shape for a kickstand, and I wanted it to have a graceful curve. Using some ideas from the videos referenced above, I tried to edit the surface control points to make a curved kickstand, resulting in the following: initial curved kickstand idea initial curved kickstand render Putting some time into it made me think a curved kickstand was neither natural nor a good idea, so I simply made a straight kickstand, with a little cylinder attached to make it look rotative, as below. Straight kickstand render

Adding the Ports, Speaker, Microphone, and Volume Button

I decided that for a realistic looking model, I needed to add a few ports (USB type C and 3.5mm audio output), a speaker and microphone, and a volume rocker button. I found the USB type C dimensions from Mouser Electronics and replicated that into my project. USB Type C dimensions USB Type C design The speakers and microphone were simple radial arays that I cut away from the main shape, leaving a hole for the speaker and making the microphone a different material (metal). Here are some artistic renditions of the two. Microphone grille Speaker grille As for the volume rocker, I wanted it to curve along with the device's curve, so I created the basic shape and then projected it onto the outer shell of my device, before extruding the shape. Volume button And here is the render of the end result! Final Render Simple Music Companion With a little video to go along with it

Final Project Schedule and Planning

For the scheduling, I asked ChatGPT to write up a schedule for a synthesizer project, as I will be working on a modular synthesizer project. Week 1: Electronics Design and Initial Planning Day 1-2: Research electronic components needed for the synthesizer project. Day 3-4: Design the electronic circuitry and layout using appropriate software. Day 5: Review and finalize the electronics design, ensuring compatibility with other components. Week 2-3: Prototyping Week 2: Day 1-2: Start 3D printing prototype components. Day 3-4: Laser cut any necessary parts for the prototype. Day 5-6: Begin CNC milling for parts that cannot be 3D printed. Week 3: Day 1-2: Assemble initial prototype, integrating electronic components, and test basic functionality. Day 3-4: Identify any issues with the prototype and make necessary design revisions. Day 5-6: Continue refining and testing the prototype. Week 4-5: Building and Testing Week 4: Day 1-2: Begin building the final synthesizer based on the refined prototype design. Day 3-4: Test each component of the synthesizer individually. Day 5: Assemble the synthesizer and conduct overall functionality tests. Week 5: Day 1-2: Conduct thorough testing of the synthesizer, including electronics, sound output, and user interface. Day 3-4: Identify any issues or performance improvements needed and implement necessary changes. Day 5: Finalize the build and ensure all components are functioning correctly. Week 6: Documentation and Final Touches Day 1-2: Document the entire process including design decisions, prototyping challenges, and testing results. Day 3-4: Create user manuals and assembly instructions for the synthesizer. Day 5: Finalize any remaining adjustments to the synthesizer based on testing feedback. This schedule ensures that electronics design and testing are incorporated at the beginning of the project, allowing for seamless integration with the mechanical and software components during the prototyping phase. I would like to also incorporate an analog filter, and am thinking of using this basic equaliser from Sonelec Musique.