Week1. Project Managment
During this first week, we had to start with the basics, learning how to use Gitlab, as well as git in general, how to install it and how it works. We also had to create a website, which will be used to support our documentation throughout the course. We also looked at how to modify it, and how to add and process images for it. There was also time to reflect on our final project, and you can find all the information you need on the dedicated page.
What is Git and Gitlab?
Git is decentralised version management software. It is free and open source and was created in 2005 by Linus Torvalds, the creator of Linux. To put it more clearly, it is software that allows you to manage and modify different versions of something, in this case a website. Gitlab is an open source collaborative development platform based on the Git software.
install git
My operating system is Macintosh, and there are several ways of obtaining git. Initially, I tried to download git via homebrew because I thought it was necessary, but in reality, I didn't need it to install git. However, at the end of the week, I realised that I could download git.gui using homebrew, but I didn't use it because I'm used to using the terminal and it's pretty straightforward. I chose to do this via the terminal, as it is already installed on the computer by default for Mac and Linux. Various documents already exist for downloading git and using it, such as this tutorial from FabAcademy or, for my part, I used the site of a former student of my Fablab, Théo Gauthier, who, like me, had a Mac.
To start downloading git, all you have to do is enter this lines :
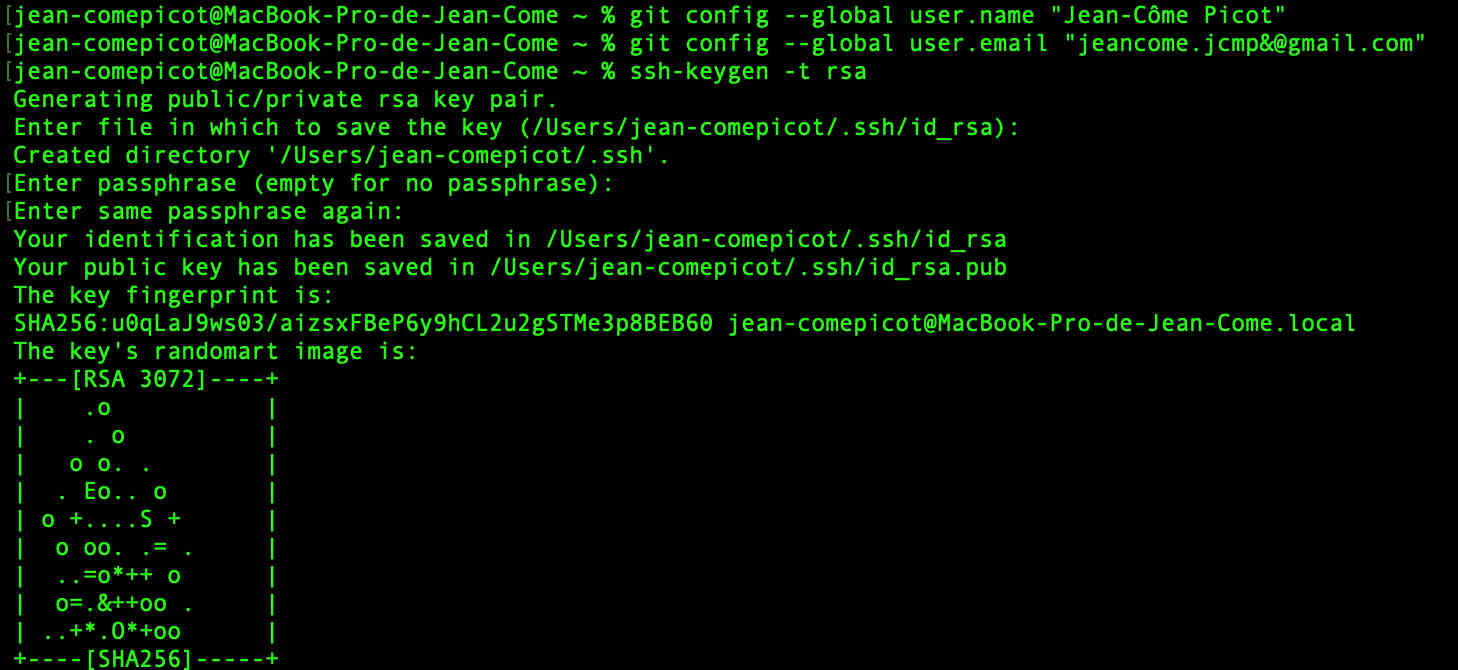
git config --global user.name "yourusername"git config --global user.email "youruseremail"Next you need to create the ssh key, which will link my terminal to my site, which is hosted on gitlab. To generate the key, simply enter the command :
ssh-keygen -t rsa -C "$youremail"At this point, it will ask you to create your user name and password, so make sure you remember them. Next, we ask our terminal to display our key with this command :
cat ~/.ssh/id_rsa.pubWe can then ask it to copy the public part to our clipboard. It's this part of our key that we should put on gitlab so that we can make transfers between the official site on gitlab and the modifications made on our local computer.To copy the key, simply enter :
pbcopy < ~/.ssh/id_rsa.pubYou then need to go to your gitlab session, go to user settings, go to ssh keys and add a new ssh key. You can now paste our new ssh key.
Our ssh key is now connected to our gitlab account. We can now transfer files between the two using terminal commands. We'll see below which git command we need to enter in order to transfer the site we made locally to Gitlab.
I had problems with the first transfer to Gitlab. I hadn't written down the password for my SSH key, so I had to create a feed token in Gitlab so that I could connect with it as the password for my SSH key. To create the feed token, it's quite simple, just go back to user settings, then access token, then add a new token, then enter its name, tick "api" and validate. I spent some time trying to figure out how to connect without the codes for my key, but with the help of Luc, my instructor, and this page, we finally managed to do it with the help of this documentation.
Creation of the website
Use of existing bass
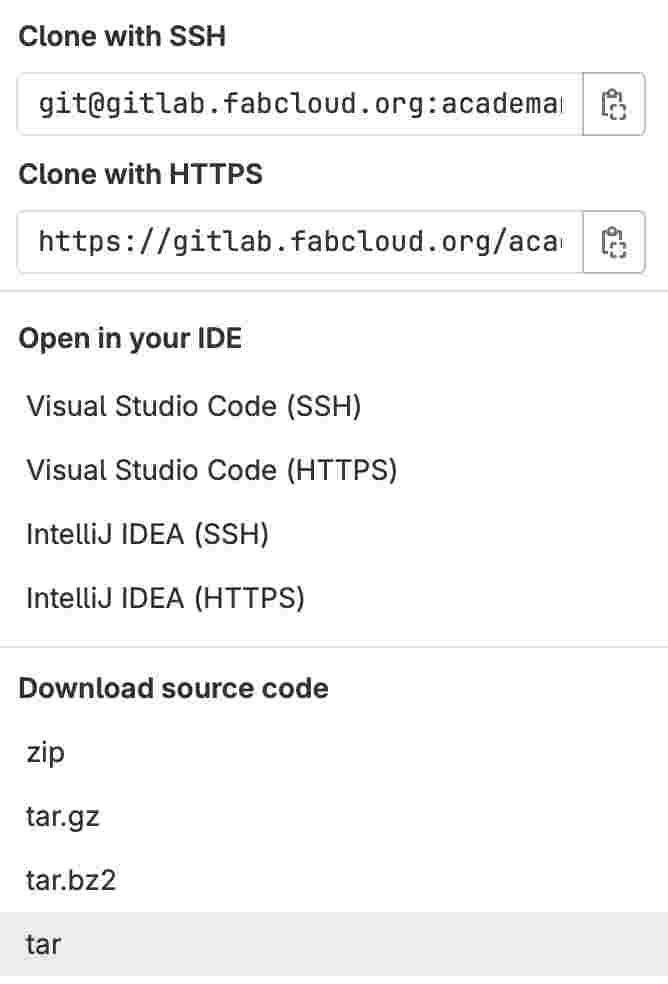
First of all, we can use the existing database to create the website by going to our Gitlab on the code tab, we can clone with SSH by copying and putting in the terminal or with HTTPS. We then make a copy of the file on our local computer with the window shown below.
Creation from scratch or from an existing template
To create my website, I chose to use existing templates because I thought they were prettier and easier to navigate. To do this, I downloaded the Arcana HTML5 template, which I then modified to match my expectations and by adding the various elements required, a tab on my weekly assignments, a tab on my final project and another about me. Using this template meant that I had to code my site directly in html, a language that scared me a bit at first, but you soon find your bearings and get the hang of using it. I really enjoyed coding my site to try and make it nice and pretty, but perhaps I spent too much time on it and soon found myself behind schedule with my documentation.
My template had icons, in order to have more and of varied nature, I downloaded the Font awesomelibrary by adding this line at the beginning of my code to quote it:
Then all we have to do is browse the site to find the icons we like and add the code for the chosen icon to our site code.
Modifications of the CSS
The CSS (Cascading Style Sheets) of a document is our code file to which the html refers. It governs the style of the website pages. It defines everything you see and is what makes the site beautiful. In my case, for the moment I've only modified the css to change the site's colours. Originally, the Arcana template I downloaded was light blue, a colour I wasn't necessarily a fan of. I went into my CSS and first looked for where to find the colour. While searching I found that the blue I was looking to change corresponded to the hexadecimal colour code #37c0fb. To find out, all I had to do was copy the colour codes and paste them into my browser, and the colour was automatically displayed. So I chose a colour using the sliders on the htmlcolorcodes site, I chose light green, a colour I like, which has the hexadecimal code #3fcc0e. To change the site's colours, I pasted the colour code in place of the old one each time it appeared in my CSS code.
Code editor
In order to modify the code in my template, I needed a code editor, and I chose to use Sublime Text, mainly because it was the one my teacher used and it seemed easy and pleasant to use. During my school years, I had programming lessons in the C language and we were asked to use Geany. I have bad memories of this software. On Windows, it worked very well, but on Mac, it wasn't up to scratch at all, so I took the easy way out by using an editor that my teachers already knew. I don't regret it because it works very well on Mac.
Chat GPT
Obviously, I made use of Chat GPT, as I didn't have a great deal of knowledge of coding and especially html to start with, so I often needed help. I didn't use it for any major projects in particular, but it can be very useful, even for trivial things. For example, if the code doesn't give the expected result, I can give the line to Chat GPT and it replies with the correction. It allows you to get results very quickly and accurately.
Switch the local site to Gitlab
To use git to transfer our site, I chose to use the terminal. So there are a few command lines to use in order to carry out the action. If you want to carry out the transfer, follow them in order:
-cd: To move between locations and go to the folder you want, just add the location name afterwards.
-ls: To see what's in the selected location
-git add . : To update the files
-git pull : to download the latest version
-git merge : To have a working copy
-git commit -m 'update name' : To name the transfer
-git push : To send our update to Gitlab
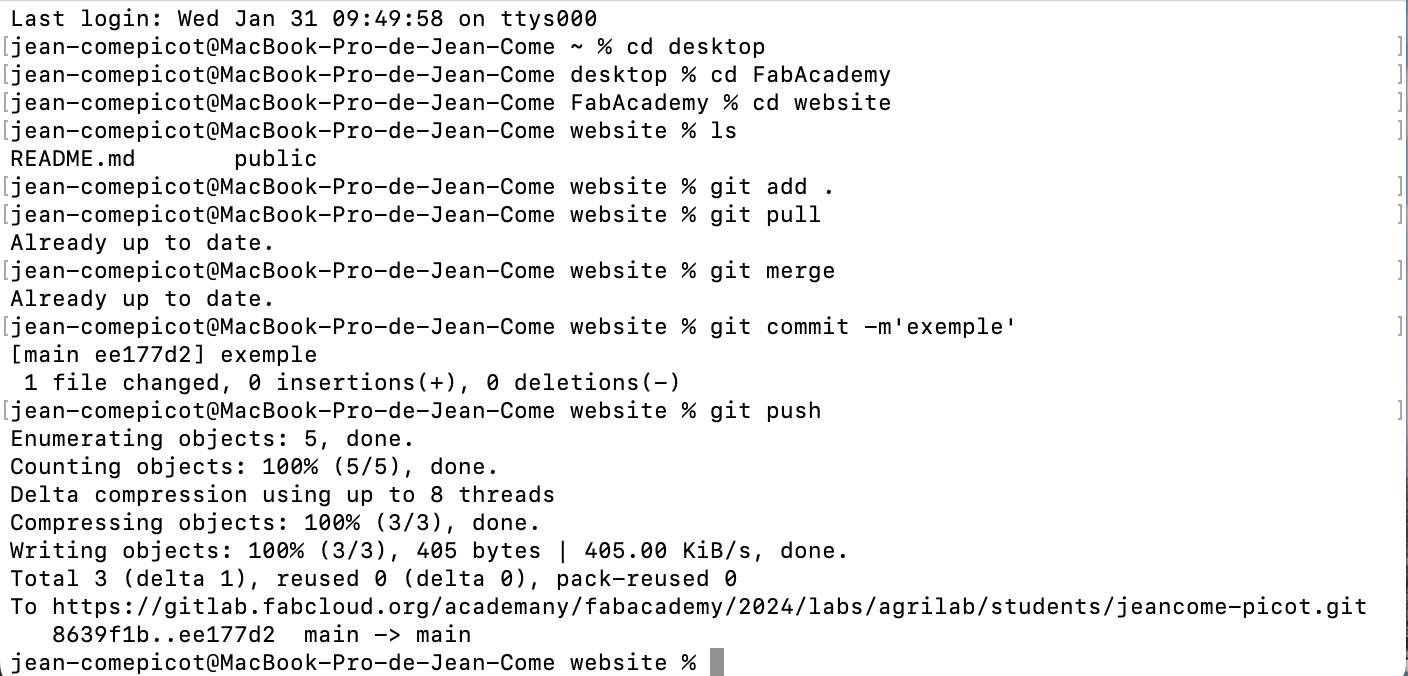
Here's an example of what my terminal looks like when I update it
If you have followed these steps correctly, you should have successfully uploaded your site and it is now up to date.
Image processing
In order to provide good documentation, you have to be very careful about image processing, which I didn't necessarily do very well at first, which soon led to a site that was far too heavy. I wanted to get IrfanView software to manage the quality of my images but it doesn't have a Mac version. I already had the Gimp software on my computer and had already used it, so I opted for this one. It offers the possibility of resizing images, changing their quality and changing the format, which provides the main functions I need. One criticism is that it's not the fastest to launch, which wastes a certain amount of time, and that you have to export the image to see how it looks at the required quality level.
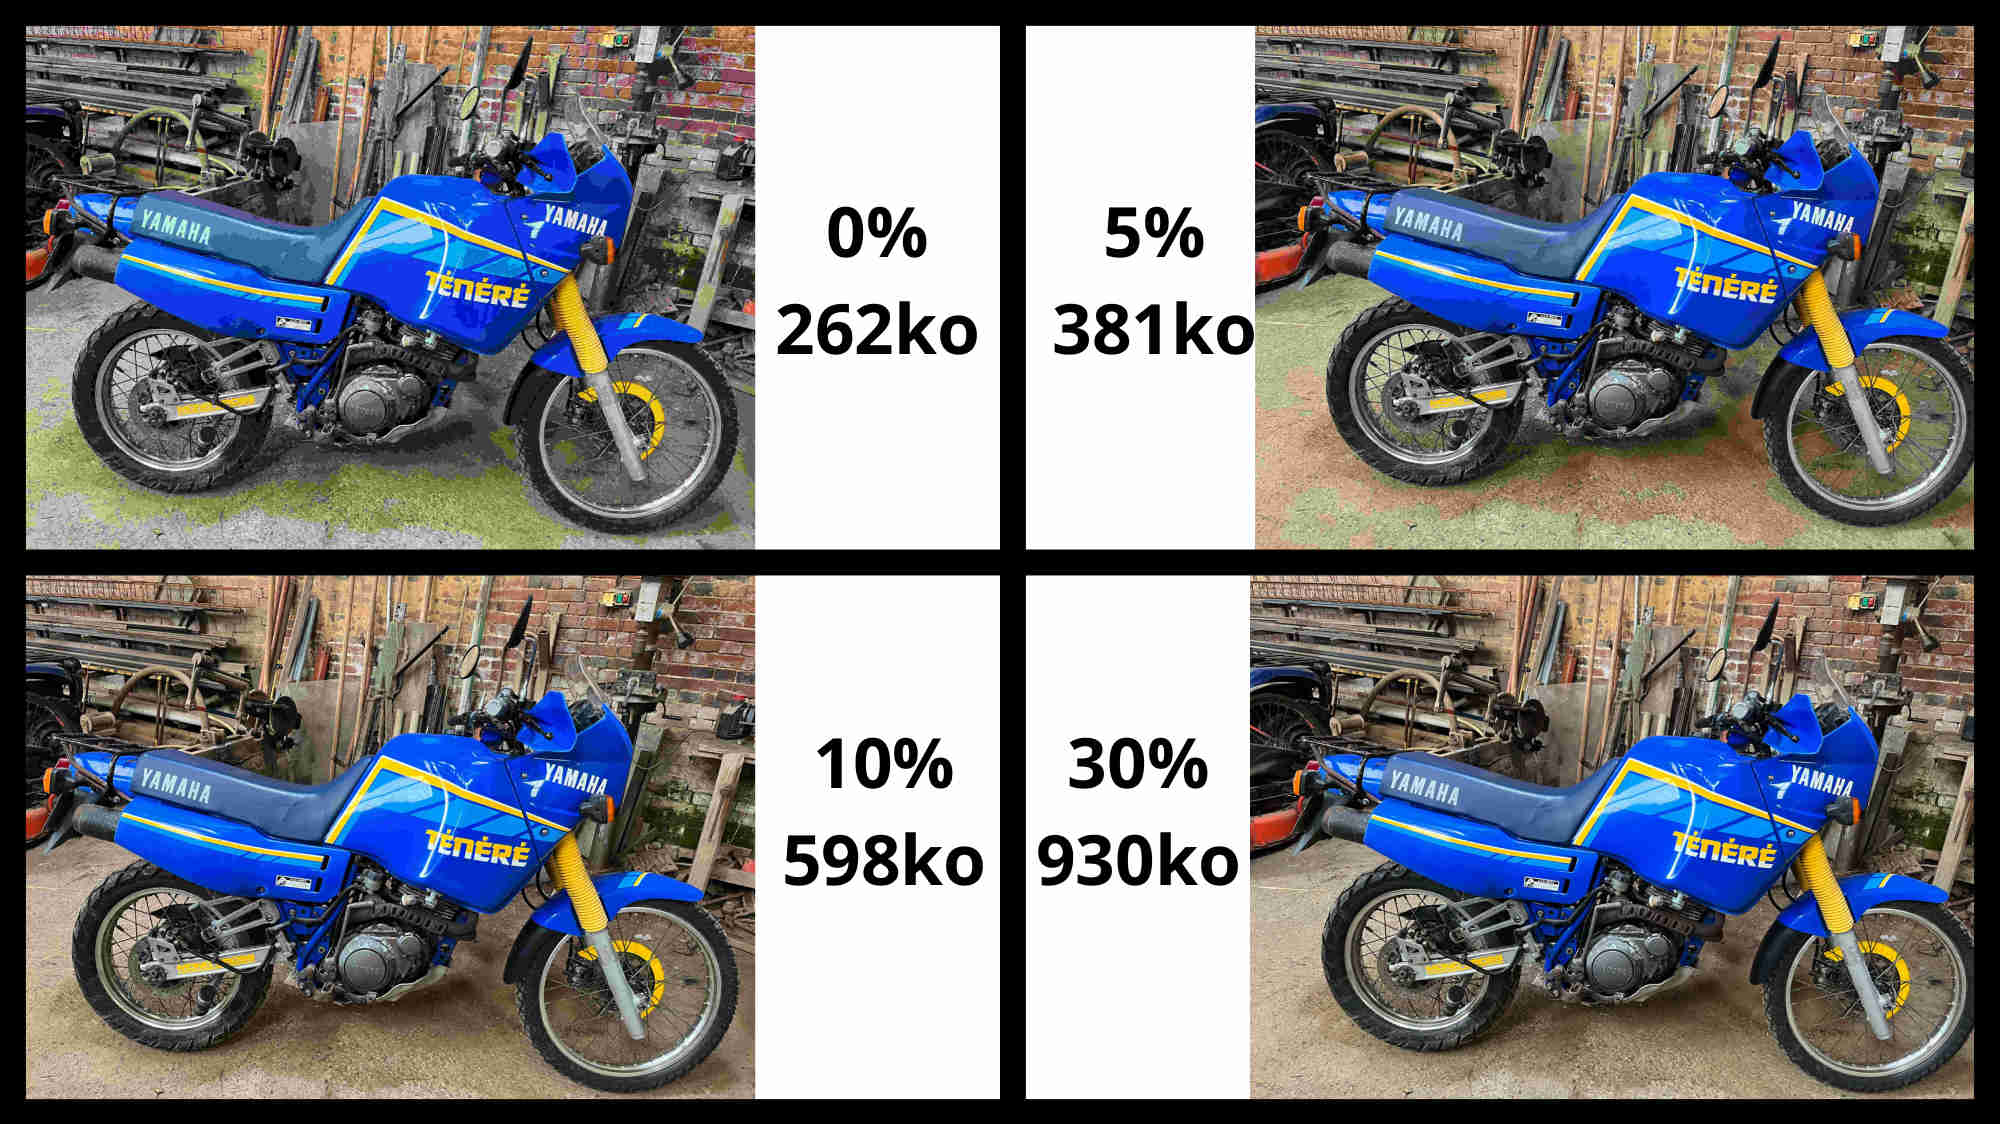
I tried a few tests to see which image quality gave the best results in relation to the file size. In general, at 10 or 20% I still get good image quality by considerably reducing the size of the image. The one I've published on the site is at 10% quality and is 598kb, unlike the original, which was 2.8mo, although there's no significant difference in quality. The different photos were compared using Canva software and the image was recompressed by a further 20%, so the overall quality was lowered again, but the comparison shows that there is no significant difference in quality.
As far as the screenshots I was able to take are concerned, I didn't use any particular software, just the functions of my computer. On a Macintosh, to take a screenshot all you have to do is press Control(command)+MAJ+4simultaneously. A cursor then takes the place of your mouse and all you have to do is select the area you want to capture. The selected image is then automatically placed on the desktop.
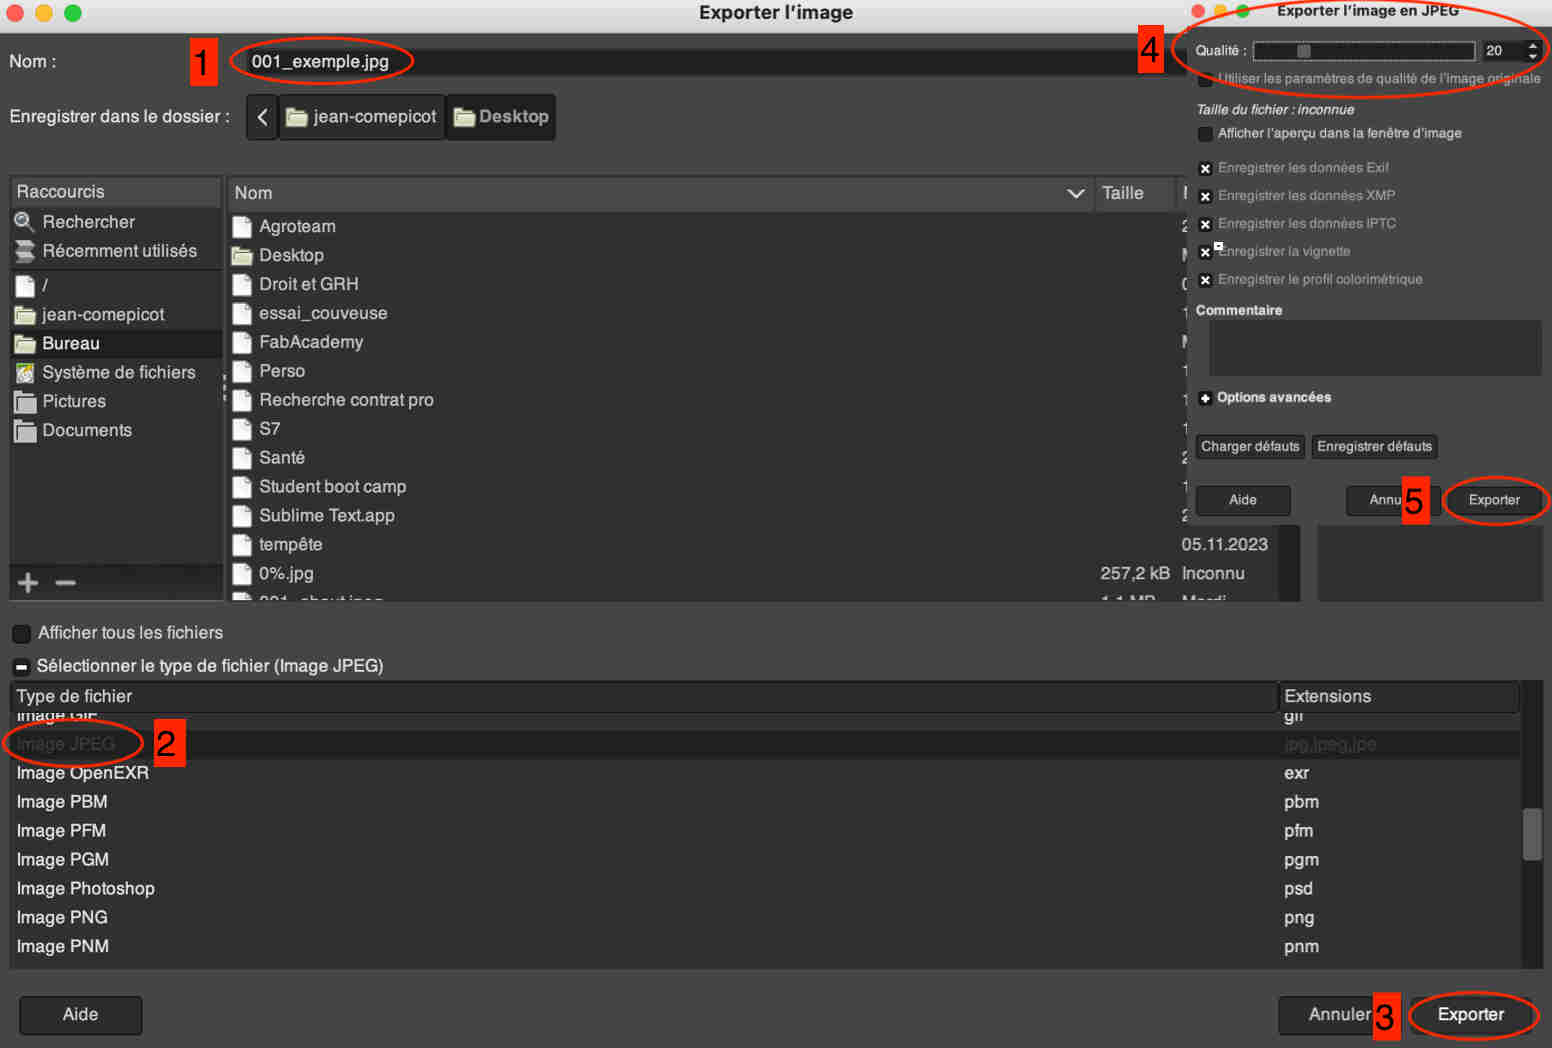
To process the image in Gimp, simply open it with the software and press control+E (export function). A window will open in which you can choose the file name and format, in my case I use JPEG. Just click on export, which opens a new window where you can adjust the quality to your liking and finally export. Follow the steps in the photo below.