15. Networking and Communications
Week 15 · 2023.04.26-2023.05.03
This week it was a week that started on how to connect two boards, and how would this aid the final project development.
So the objective has become to have to sources of data on one board, first if in an ultrasonic sensor, we have a specific range of data, in order to understand if the gripper is carrying out an element for processing, and second if its receiving a boolean value in order to turn on or off the workbench tool.
- [x] Linked to the group assignment page and reflected on your individual page what you have learned
- [x] Documented your project and what you have learned from implementing networking and/or communication protocols.
- [x] Explained the programming process(es) you used.
- [x] Outlined problems and how you fixed them.
- [x] Included design files (or linked to where they are located if you are using a board you have designed and fabricated earlier) and original code.
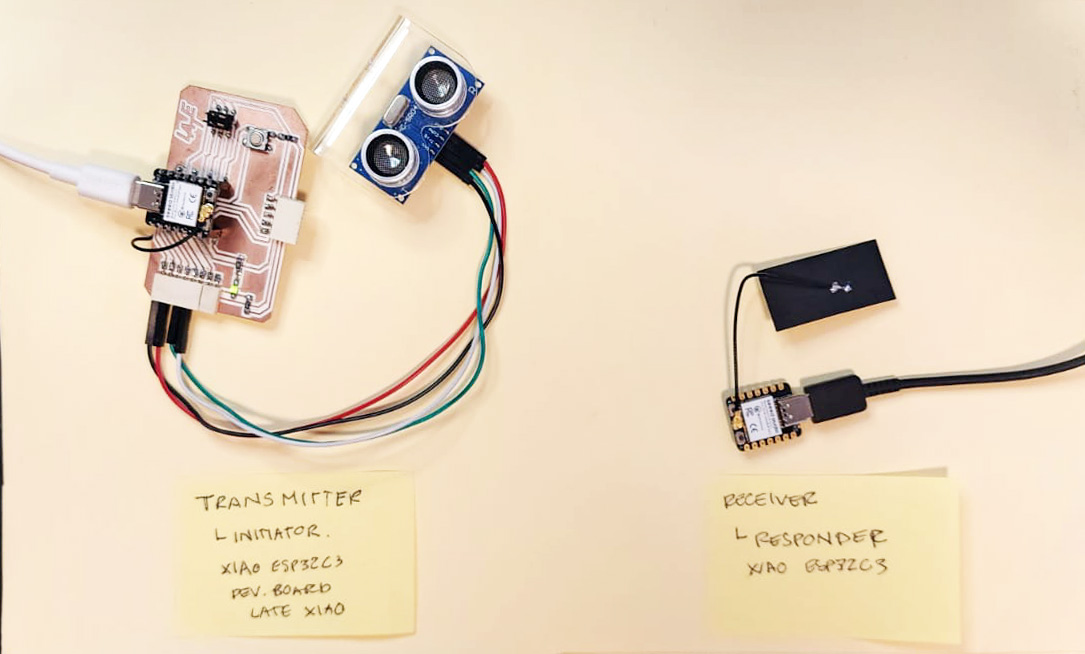
- [x] Included a ‘hero shot’ of your network and/or communications setup
Coding
After some research I found out that the ESP32, which I want to work with, has a wireless protocol to comunicate with other similar chips called ESP-NOW. It also works with the ESP8266 (for that it would be needed to change some libraries)
I based my code in that provided by The Workshop! and from the previous exercise connecting the ultrasonic sensor.
You should have installed the Wifi library in my case it is found in: ..\AppData\Local\Arduino15\packages\esp32\hardware\esp32\2.0.8\libraries\WiFi\src\WiFi.h
In order to be able to identify separately each board we need to obtain the MAC address
The following code helps out in such endeavour, some comments come from the original code, some others where added to help undestand it (in every code) · Obtain MAC Address:
/*
  ESP32 MAC Address printout
  esp32-mac-address.ino
  Prints MAC Address to Serial Monitor

  DroneBot Workshop 2022
  https://dronebotworkshop.com
*/

// Include WiFi Library
#include "WiFi.h"

void setup() {

  // Setup Serial Monitor
  Serial.begin(115200);

  // Put ESP32 into Station mode
  WiFi.mode(WIFI_MODE_STA);

  // Print MAC Address to Serial monitor
  Serial.print("MAC Address: ");
  Serial.println(WiFi.macAddress());
}

void loop() {

}
After uploading the code in both XIAOs I obtained the following:
Developer Board LATE XIAO MAC: 34:85:18:03:74:A8 New XIAO MAC: 34:85:18:05:8E:F0
Then you should take in account which will fill which position:
Initiator – This device initiates the transmission. It will require the MAC address of the receiving device. Responder – This device receives the transmission.
In my case I assigned the Dev. Board LATE XIAO as the Initiator and the New XIAO I resently bought as the Reponser, since the board would be able to connect to the sensor.
After some tweaking I came out with this code for the Inititator:
/*
  Ronan Bolaños based upon:
  ESP-NOW Demo - Transmit
  esp-now-demo-xmit.ino
  Sends data to Responder

  DroneBot Workshop 2022
  https://dronebotworkshop.com
*/

// Include Libraries
#include <esp_now.h>
#include <WiFi.h>

// Variables for test data
int int_value;
float float_value;
bool bool_value = true;

//Variables for declaring pins for distance sensor
const int trigPin = D0;
const int echoPin = D1;

//Variables for calculating distance
long duration;
int distance;

// MAC Address of responder - edit as required
uint8_t broadcastAddress[] = {0x34, 0x85, 0x18, 0x05, 0x8E, 0xF0};

// Define a data structure
typedef struct struct_message {
  char a[32];
  int b;
} struct_message;

// Create a structured object
struct_message myData;

// Peer info
esp_now_peer_info_t peerInfo;

// Callback function called when data is sent
void OnDataSent(const uint8_t *mac_addr, esp_now_send_status_t status) {
  Serial.print("\r\nLast Packet Send Status:\t");
  Serial.println(status == ESP_NOW_SEND_SUCCESS ? "Delivery Success" : "Delivery Fail");
}

void setup() {

  // Sets the trigPin as an Output
  pinMode(trigPin, OUTPUT);
  // Sets the echoPin as an Input
  pinMode(echoPin, INPUT);

  // Set up Serial Monitor
  Serial.begin(115200);

  // Set ESP32 as a Wi-Fi Station
  WiFi.mode(WIFI_STA);

  // Initilize ESP-NOW
  if (esp_now_init() != ESP_OK) {
    Serial.println("Error initializing ESP-NOW");
    return;
  }

  // Register the send callback
  esp_now_register_send_cb(OnDataSent);

  // Register peer
  memcpy(peerInfo.peer_addr, broadcastAddress, 6);
  peerInfo.channel = 0;
  peerInfo.encrypt = false;

  // Add peer
  if (esp_now_add_peer(&peerInfo) != ESP_OK){
    Serial.println("Failed to add peer");
    return;
  }
}

void loop() {

  // Clears the trigPin
  digitalWrite(trigPin, LOW);
  delayMicroseconds(2);
  // Sets the trigPin on HIGH state for 10 micro seconds
  digitalWrite(trigPin, HIGH);
  delayMicroseconds(10);
  digitalWrite(trigPin, LOW);
  // Reads the echoPin, returns the sound wave travel time in microseconds
  duration = pulseIn(echoPin, HIGH);
  // Calculating the distance
  distance = duration * 0.034 / 2;
  // Prints the distance on the Serial Monitor
  Serial.print("Distance: ");
  Serial.print(distance);
  Serial.println("cm");
  int_value = distance;

  // Format structured data
  strcpy(myData.a, "Distance measuring · LATE");
  myData.b = int_value;

  // Send message via ESP-NOW
  esp_err_t result = esp_now_send(broadcastAddress, (uint8_t *) &myData, sizeof(myData));

  if (result == ESP_OK) {
    Serial.println("Sending confirmed");
  }
  else {
    Serial.println("Sending error");
  }
  delay(2000);
}
And for the responder:
/*
  Ronan Bolaños based upon:
  ESP-NOW Demo - Receive
  esp-now-demo-rcv.ino
  Reads data from Initiator

  DroneBot Workshop 2022
  https://dronebotworkshop.com
*/

// Include Libraries
#include <esp_now.h>
#include <WiFi.h>

// Define a data structure
typedef struct struct_message {
  char a[32];
  int b;
} struct_message;

// Create a structured object
struct_message myData;


// Callback function executed when data is received
void OnDataRecv(const uint8_t * mac, const uint8_t *incomingData, int len) {
  memcpy(&myData, incomingData, sizeof(myData));
  Serial.print("Data received: ");
  Serial.println(len);
  Serial.print("Character Value: ");
  Serial.println(myData.a);
  Serial.print("Distance Value Sent: ");
  Serial.println(myData.b);
  Serial.println("cm");
  Serial.println();
}

void setup() {
  // Set up Serial Monitor
  Serial.begin(115200);

  // Set ESP32 as a Wi-Fi Station
  WiFi.mode(WIFI_STA);

  // Initilize ESP-NOW
  if (esp_now_init() != ESP_OK) {
    Serial.println("Error initializing ESP-NOW");
    return;
  }

  // Register callback function
  esp_now_register_recv_cb(OnDataRecv);
}

void loop() {

}
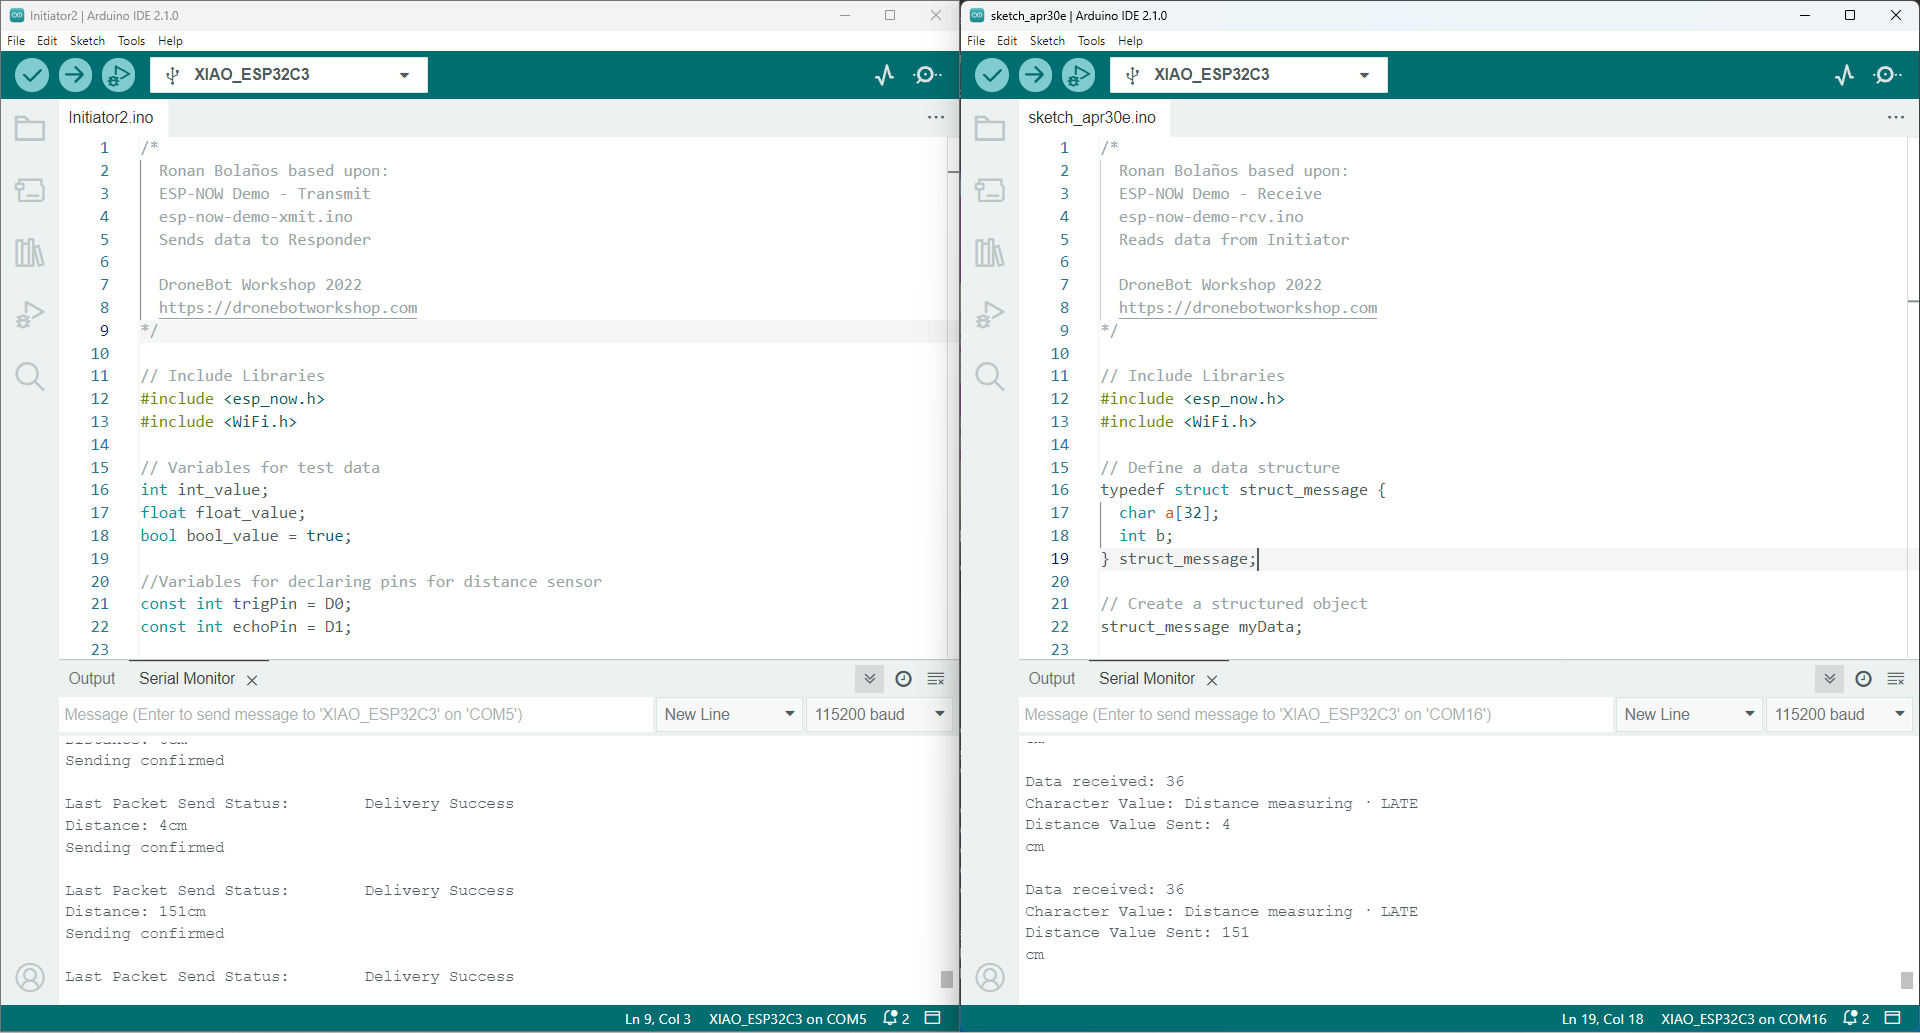
Besides learning about this stable protocol ESP-NOW, I learn some new coding understanding, although I haven’t got to the level of developing this by my self.
What is left for the final project is to introduce a signal from a digital output in the robotic arm so it can add to this signal of certain-distance that will help to check if there is an element in the gripper for processing, in order to start or halt the connection from the battery into the handheld tool for turning on or off.
I tried to get along with UDP or HTTP, after some problems which I was not able to overpass, changing the method helped to deliver easier.