Week 1 - Project management
As I am already familiar with basic git operations, I’ve decided to follow a tutorial on git-forking. My preconception about what forking does and when to use it. Going into this, I think forking is meant to be used when you are going to create a version of someone else’s repository for your own application and you need to change stuff. It is different from branching because the intention of a branch is to be merged back into the original branch. The purpose of a fork is not necessarily to be merged back to the original branch, however, it is possible to do so by creating a merge request. I am going to start by working through this tutorial.
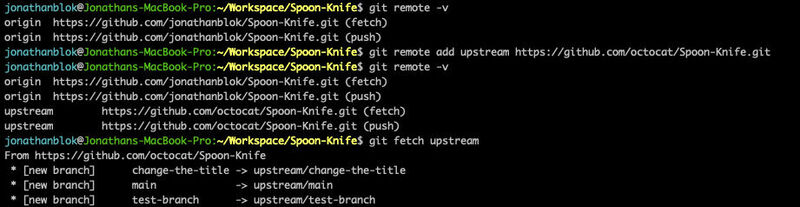
After reading the tutorial I wanted to try some examples, so I forked the example repository that is used in this tutorial by Github. In that tutorial I learned to use the git remote command by first checking the up- and downstream by git remote -v. Then I add the original repository as upstream git remote add upstream https://github.com/octocat/Spoon-Knife.git. After that I can pull changes from the origin repository with git fetch --all upstream.
Using mkdocs as a local development environment
I want to use mkdocs to mkdocs serve, however I had some problems installing mkdocs. My first issue was using pip instead of pip3. Then, I tried running mkdocs but that doesn’t work when you install something as a Python package. You need to run Python packages by python3 -m mkdocs. Then mkdocs complained about a missing theme and plugin not being installed. This is due to not installed the requirements in requirements.txt.
How to install mkdocs
- cd to my repo (actually that doesn’t matter unless you use pipenv)
pip3 install mkdocspip3 install -r requirements.txtpython3 -m mkdocs serve
Installing new mkdocs themes locally
pip3 install mkdocs-bootswatch
Installing new mkdocs themes on the GitLab environment
Find out what version of the theme you are using with
pip3 list, and then add the correct version to your requirements.txt file.
Command-Line Tools
imagemagick
Imagemagick is command-line tool useful for resizing and converting images.
Resizing images by percentage:
magick convert -resize 10% bauhaus_dessau_globe.jpg bauhaus_dessau_globe_resized.jpg
Inverting image colors:
magick convert sketch.png -channel rgb -negate sketch-negated.png
Here is a useful script I use for compressing all images in a directory:
#!/bin/bash

magick mogrify -format jpg *.heic
magick mogrify -format jpg *.HEIC
magick mogrify -format jpg *.png
magick mogrify -quality 80 *.jpg
magick mogrify -quality 80 *.JPG
magick mogrify -resize 800x *.jpg
magick mogrify -resize 800x *.JPG
rm *.heic
rm *.HEIC
rm *.png
ncdu
Space management tool, easy to find rule-breaking files.
Gitlab and CI/CL
Changing the theme of your homepage in the YAML file:
- Add the theme to the requirements file and set the version.
- Change the theme in the YAML file under theme.
CI/CL
The FabAcademy Gitlab instance uses a Jenkins-like CI/CL pipeline.
Changing the rendered branch on Gitlab
Finally, a note on the CI/CL process; it possible to make the ‘live’ site render a different branch from the default ‘main’. This can be done by changing a line in the file .gitlab-ci.yml. This file contains the rule - if: $CI_COMMIT_BRANCH == $CI_DEFAULT_BRANCH. This can be changed to $CI_COMMIT_BRANCH to == "develop" in order to make the “develop” branch be rendered.
Keygen
I used this guide to create a keypair with passphrase. I can show the public key using the following command:
ssh-keygen -lf id_ed25519.pub
256 SHA256:yhSXcwhtYfa4eiStNqCwh2FWlIjRDfjOOn3HdXFN/DE *************@gmail.com (ED25519)
2D editing tools
Inkscape
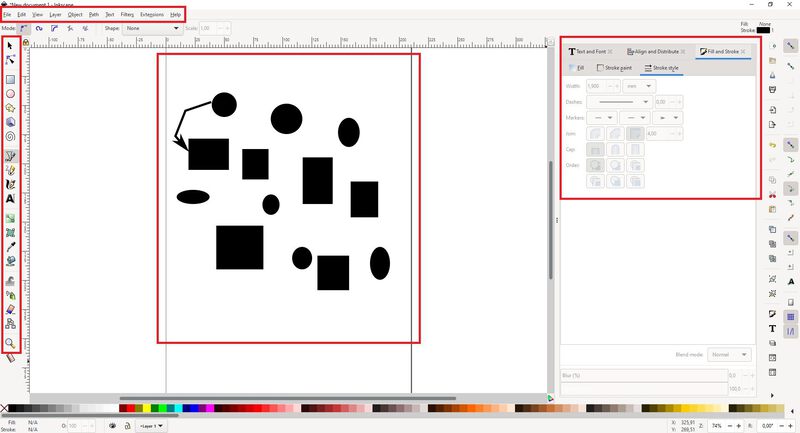
For conceptual sketches I like to use Inkscape. Inkscape is a powerful open-source and free vector drawing tool. The tabs I used often are ‘Fill and Stroke’ and ‘Align and Distribute’. It is easy to quickly create a model or a conceptual diagram, but also powerful when editing SVG files for instance for the CNC machine.
Generally, Inkscape’s use can be described as follows:
- In the center is your working area, in this case the size of an A4 page.
- On the left you have various drawing tools.
- On the right you can add/remove tabs that edit the properties of the shapes on the workspace.
- On the top you can select tabs to add to the panel on the right side.
GIMP and MSPaint
GIMP is complex Photoshop-like program that can be used to edit photos using layers and has many many more features. It has a steeper learning curve than other programs but is comparable to Photoshop in that regard. I use a Windows PC at home, and there I also use MSPaint to crop, resize, and transform images and screenshots.
GIMP’s layout is similar to that of Inkscape, with a central work pane in the center, common tools on the left, and layer controls on the right. More advance features can be accessed using the tabs at the top of the tool.
Sketch a possible final project.
Concept
My idea for a final project is to create a device which can be used to add distance sensing to cars or other vehicles such as trailers which don’t have them. The device can be attached to the back of a car using magnets and has a silicone exterior on the back side in order to protect the car’s paint. It uses two distance sensors to detect whether or not a warning sound needs to be played. Red, yellow, and green LEDs are also used to show whether or not it is safe to continue reversing the vehicle. The device needs an ON/OFF switch.

Two different audio chords could be played to indicate on which side the obstacle is, e.g. A major for the right side and G minor for the left. The device’s state is either ON/OFF and no further user interaction is required. When ON the device should poll the sensors and update the lights accordingly, when a new obstacle is detected or an existing obstacle moves closer an audio signal is generated to warn the user.
Challenges
- Selecting sensors that detect distance in a conical field i.e. cover a larger area when the area is further away. Shown in the illustration below it is important that the sensor measures an area (infrared?) and not in a straight line.
- Are strong-enough magnets available that can hold the device to the vehicle through a silicone case?
- Can I make a PCB that can play polyphonic sound or will I need to use monophonic sounds?
- Can this be made in such a way that it is at least a little weather-resistant?
- How can the LEDs be placed so that the can be visible from inside the vehicle?
- The electronics and interior parts need to be stable enough to handle the movement of the vehicle.
- Will the sensors be able to accurately detect obstacles when placed close together at the center of the car? Obstacles to the side can not be detected.
- Can I transmit the sound to the car via radio waves?

Materials and techniques
The exterior could be made from multiplex cut by the laser cutter, and treated in order to become weather-resistant. Alternately a 3D-printed exterior could be made using ABS, ASA, or PETG. Possibly, a combination of the two (wood + plastic). For instance, a 3D-printed skeleton with wood panels between. A silicone shell would protect the vehicle from damage while the device is attached. The electronics and battery need to be reachable in order to do maintenance and for replacing the battery.
DIY kits for cars exist as a component set, for instance this one.