Final Project
Plan Fixed date : May “a day”, 2022
Presentation date : June 13th, 2022
documented date : June 28th, 2022
Concept
Issue Question : “How might we avoid overuse of smartphone addictively in our daily lives without strain?”
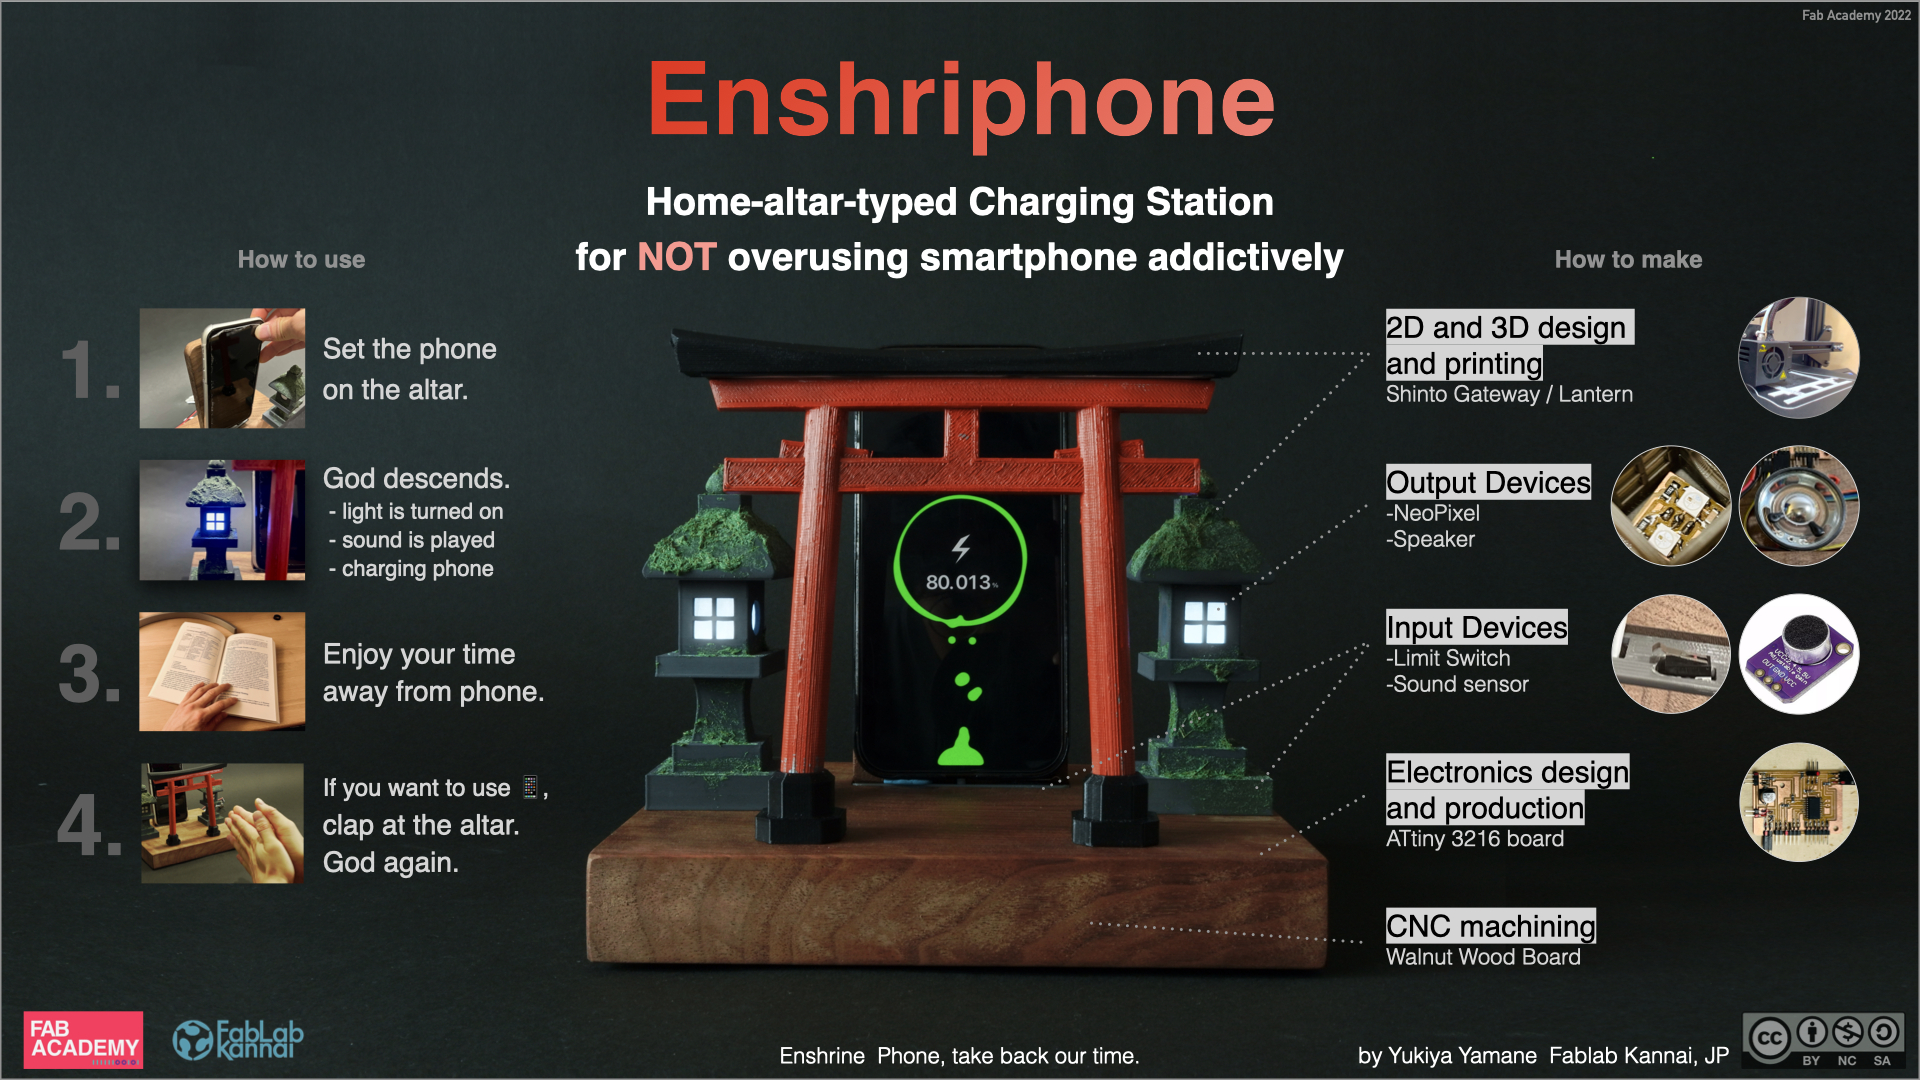
Answer : A new type of charging station to help us stop checking our smartphone so much at home.
Background
Smartphone addiction is real problem. And it’s everywhere. In today’s society, many people are addicted to their smartphones. We are spending more and more time using our smartphones. It has turned out that excessive use of smartphones has numerous negative effects.
The Association Between Smartphone Addiction and Sleep: A UK Cross-Sectional Study of Young Adults
Despite attempts to avoid overuse of smartphones, we cannot help using our smartphone.
- ex. Do not bring smartphones into the bedroom
- ex. Track usage time with screen time

Insight
There are many types of products that force people to stop using smartphones, but no one wants to use them because it’s stressful.
This is why I tried to create psychological distance from out smartphones with the help of God. In Shintoism, it is believed that a god exists for everything. Smartphones are now a kind of “God” with super-power in a modern society ,so I try to design an altar for it. In Japan, a home altar called “kamidana” is placed in traditional Japanese houses, and it will be redesigned for smartphones.

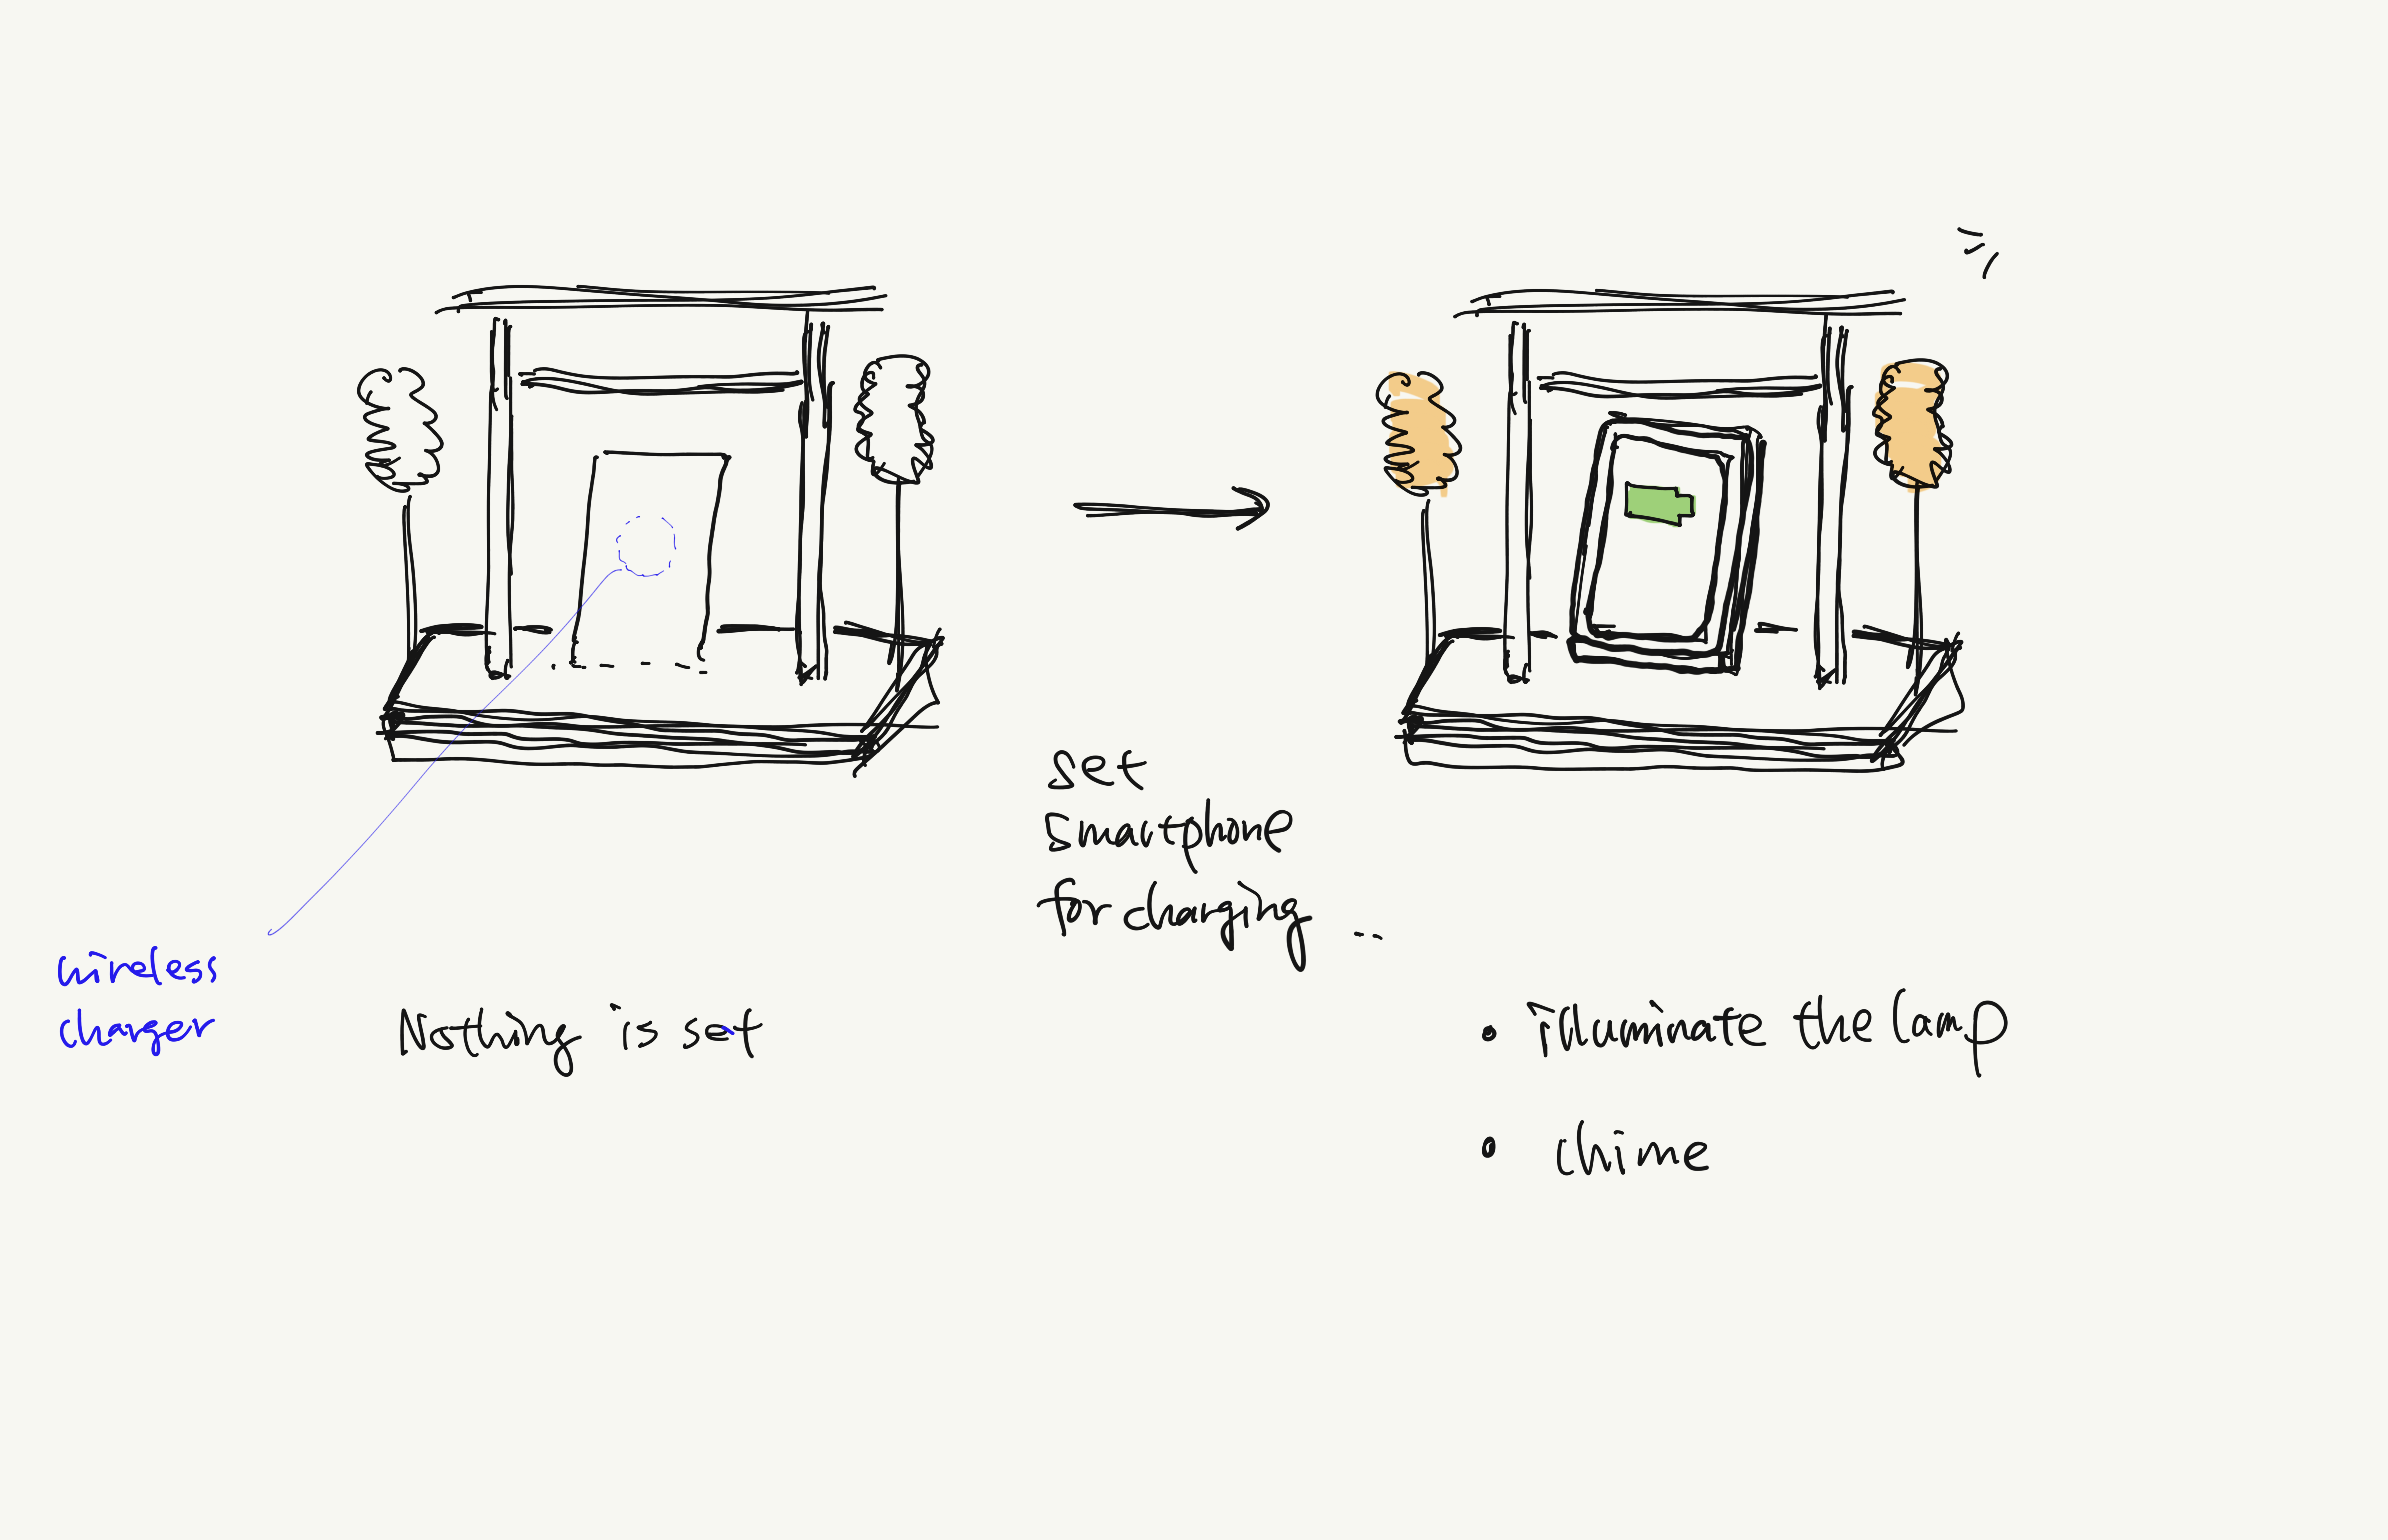
Sketch
When setting our smartphone on the alter, Got descends. Lanterns and mysterious sounds start to be lit and heard, charging the smartphone. While charging, we could avoid touching smartphone.
Function
- When you put your phone on the altar, it will charge wirelessly.
- Then, the lantern glows for 30 seconds (and the sound of a bell rings)
- When you hit an oak hand, it reacts.
What processes will be used?
- Set your mind at peace and place your smart phone (the sacred object) on the altar.
- Spend time without smartphones with a peaceful and mindfull mindset.
- If you feel like touching your smartphone, face yourself at the altar
- Remind yourself that your everyday smartphone is a SUPER-POWERFUL tool (as if it were a sacred tool).
Design Process
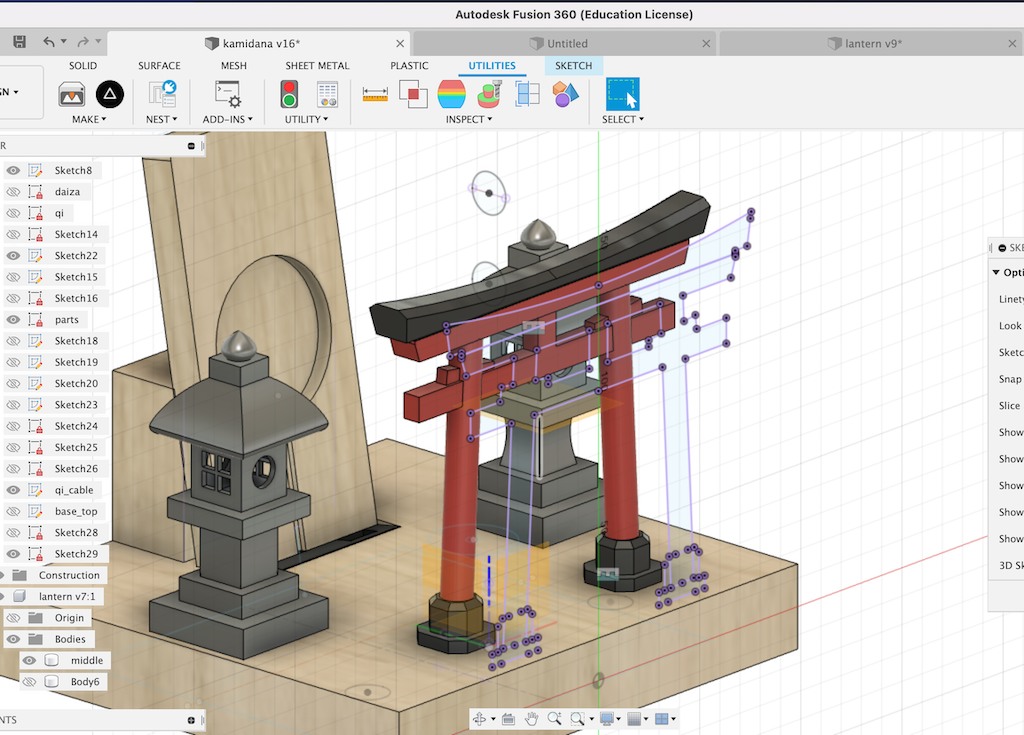
CAD Fusion 360
Overall
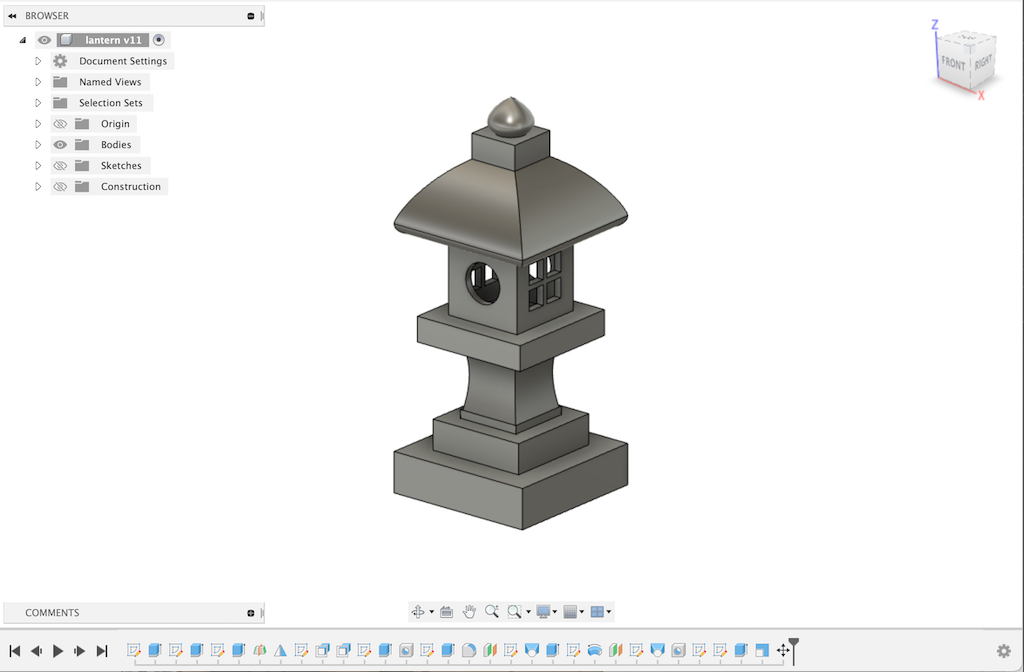
Lantern
Torii (entrance gateway)
Logo by illustrator
under construction
System Design
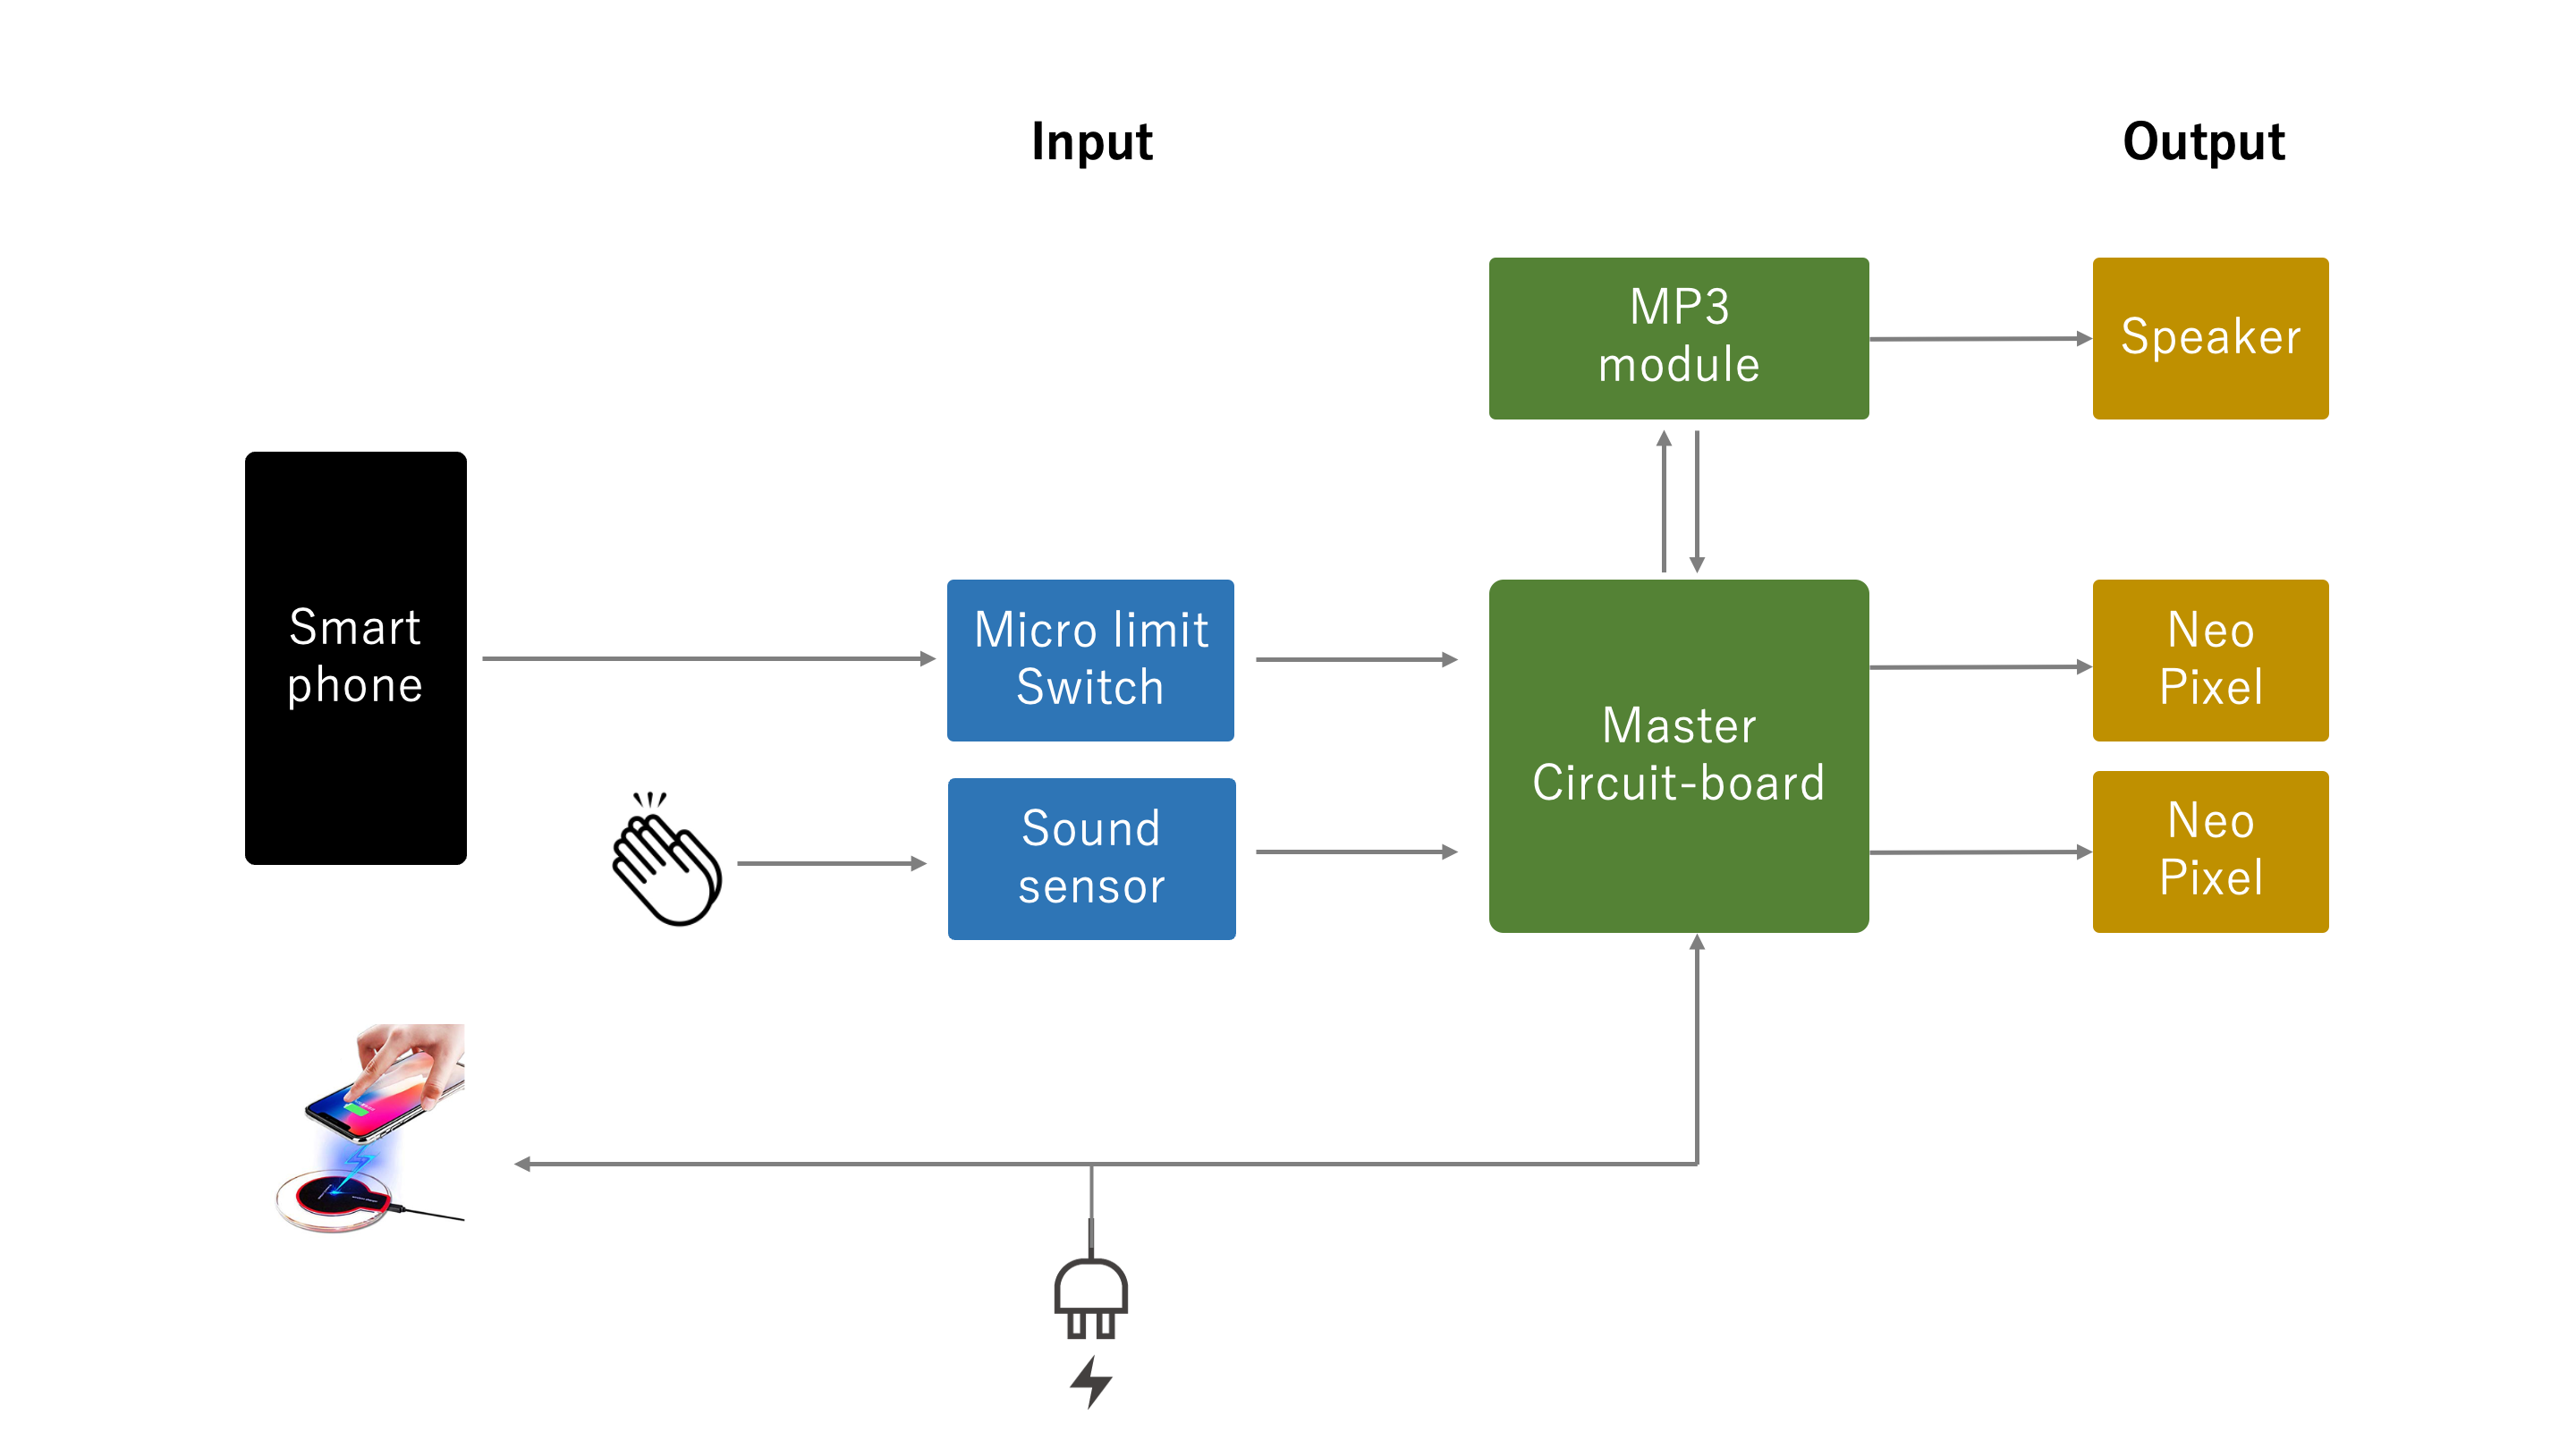
- IC : ATtyny 3216
- Output 1 : Neo Pixel x2
- Output 2 : Sound Speaker
- Input 1 : limit Switch
- Input 2 : Sound Sensor
- Ready-made : iPhone Qi Charger
Fabrication Process
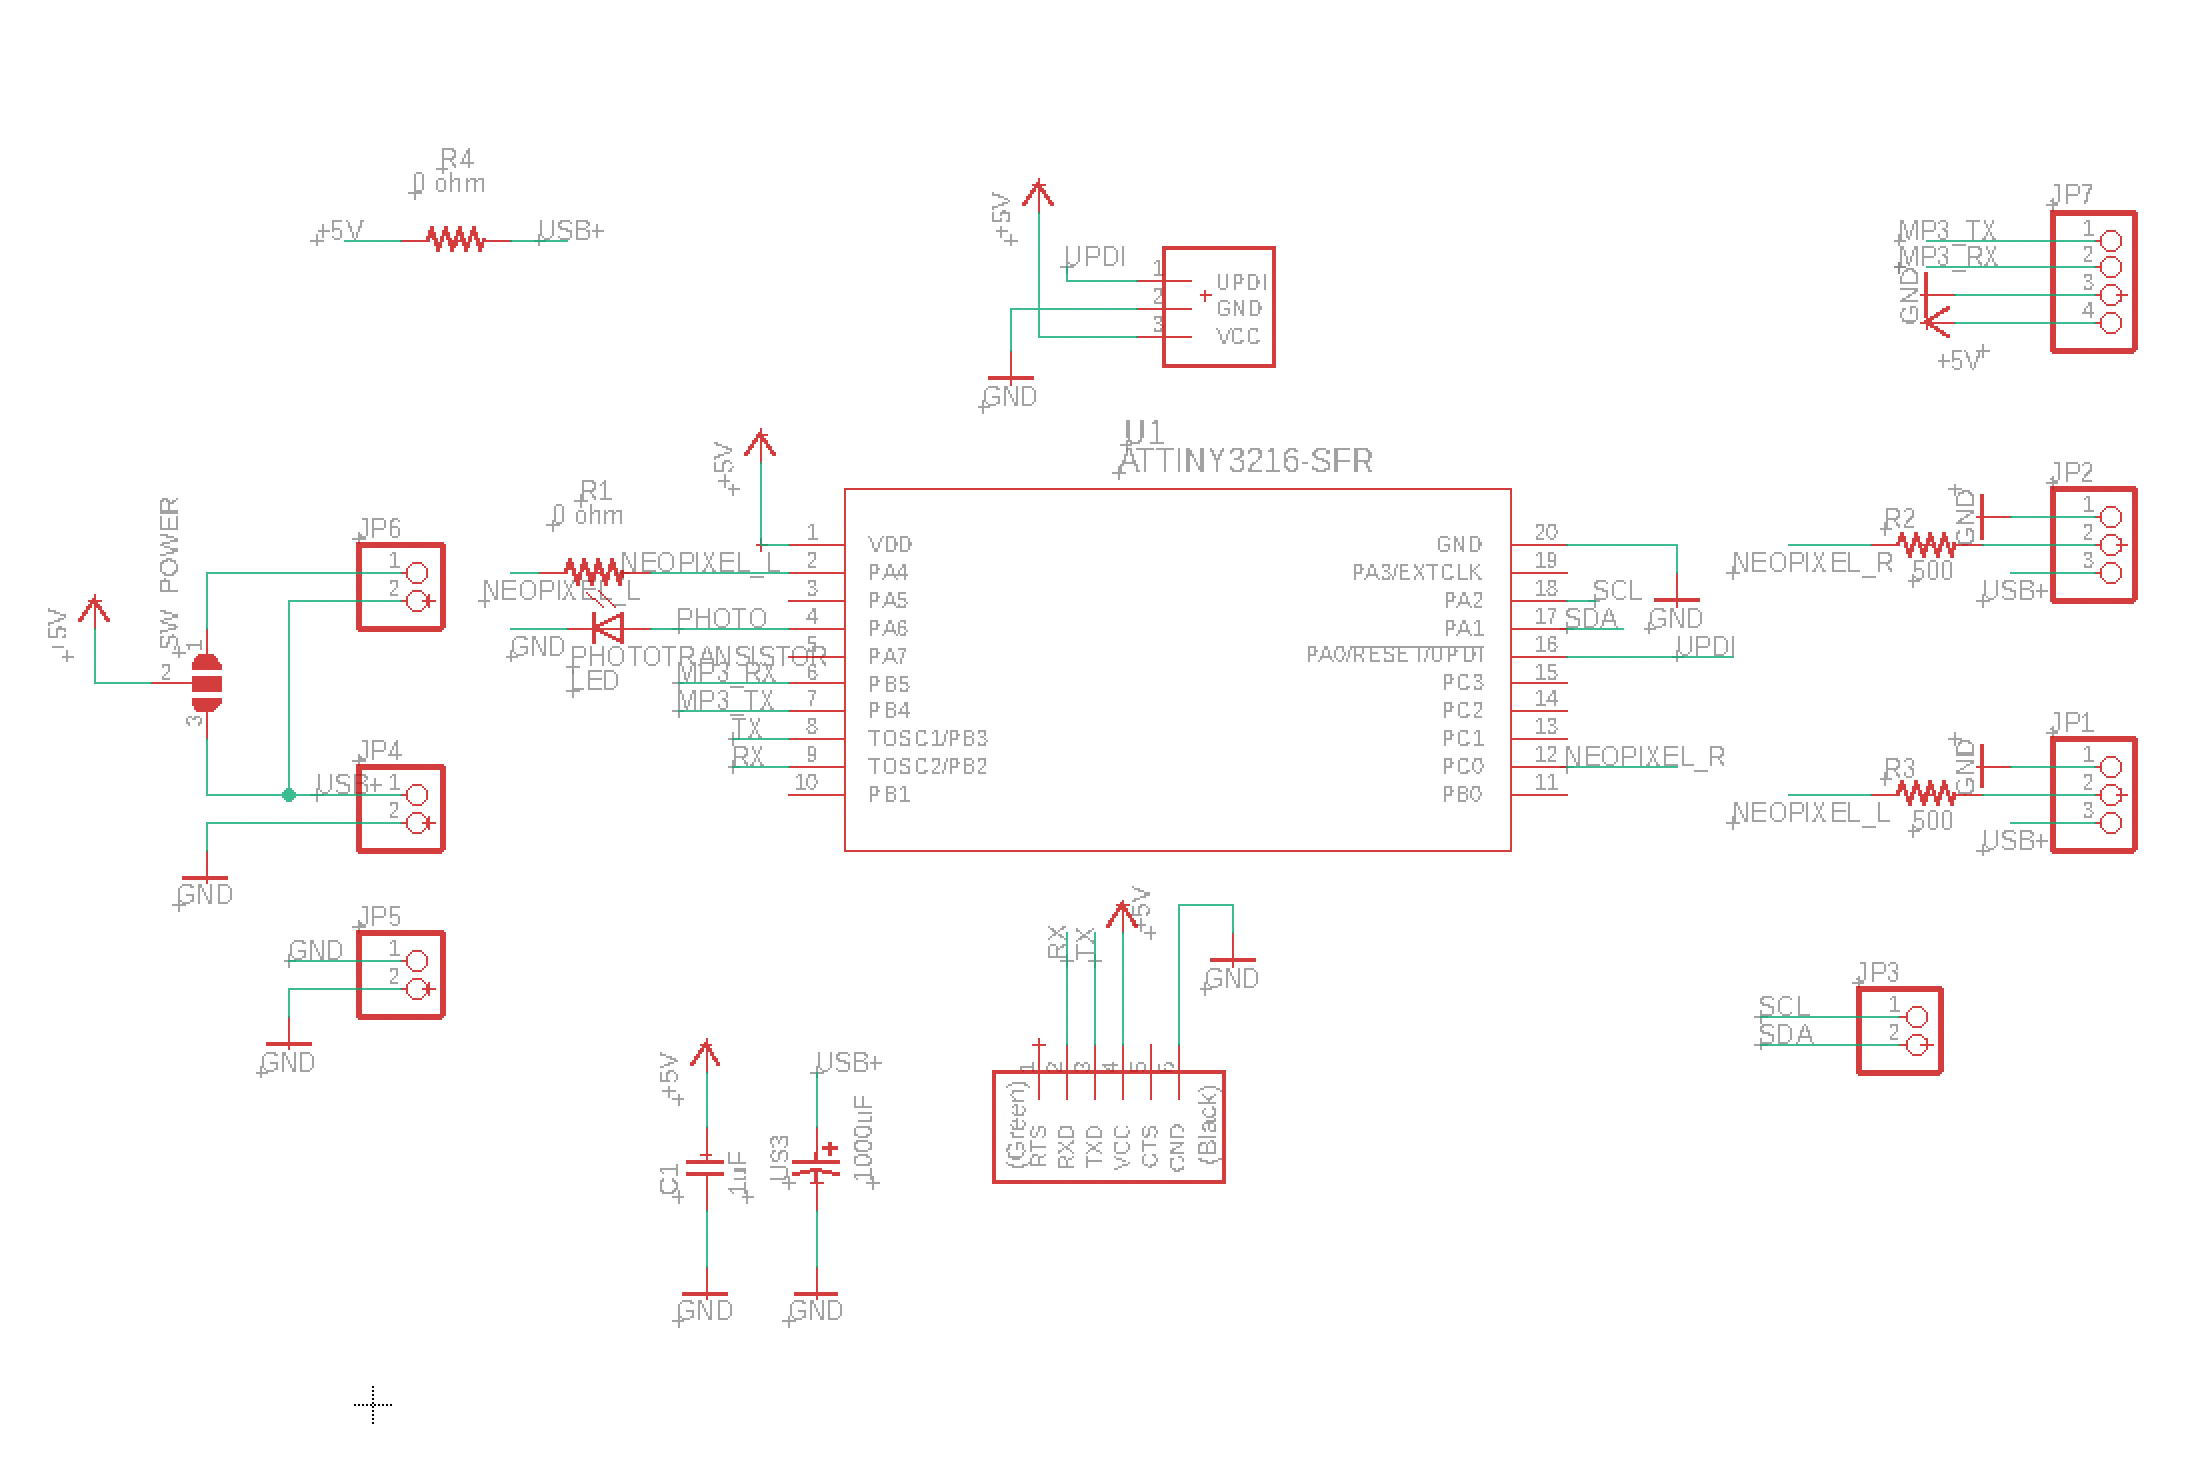
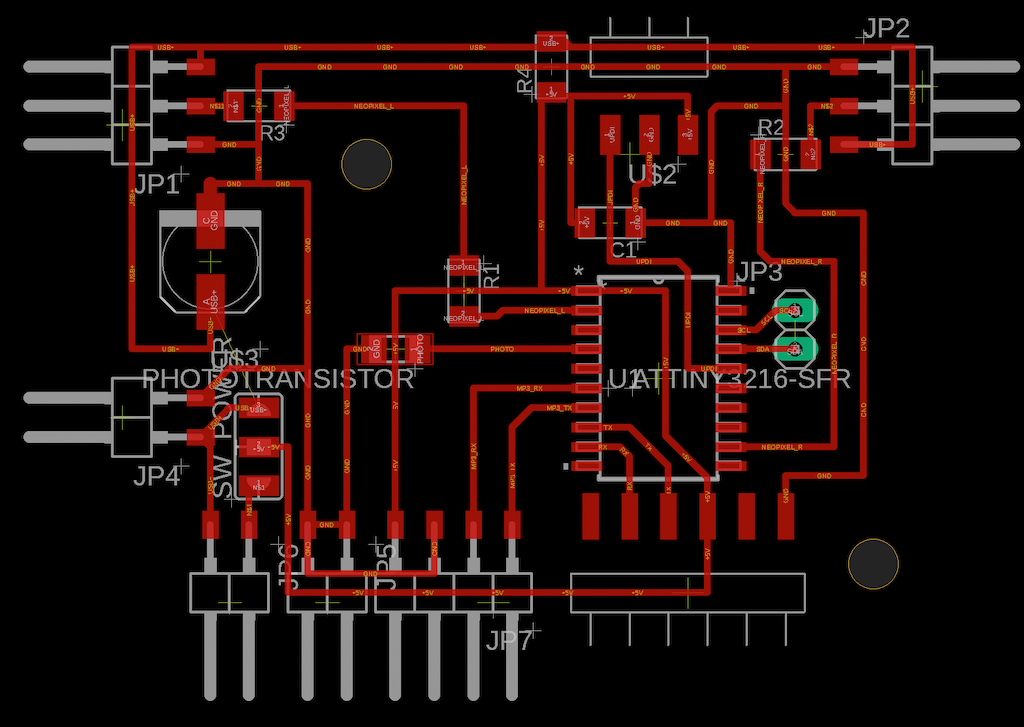
Design schematic by Eagle which contains of 2 Neopixels.
![]()
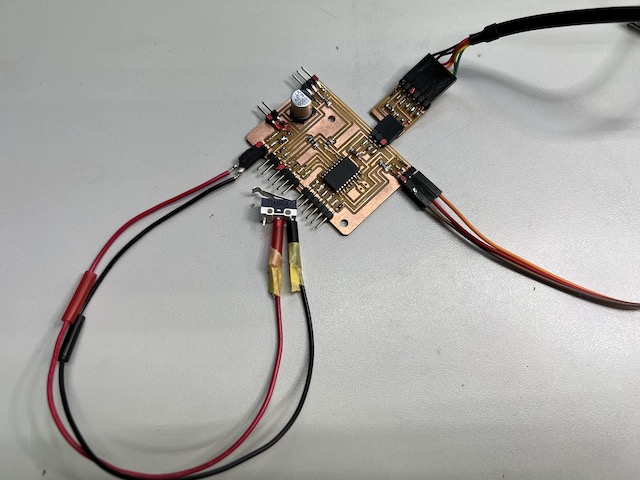
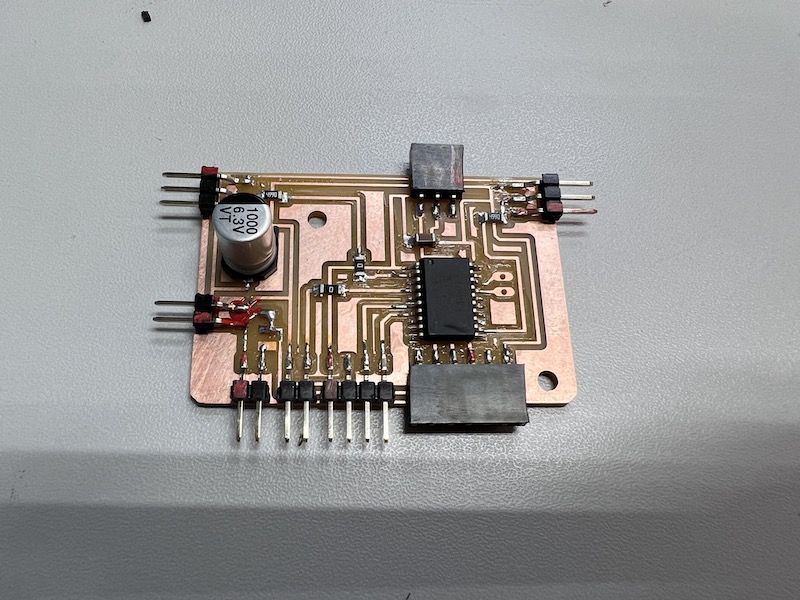
Make mini circuit board and soldering the parts

Fading in illumination
/*

NeoPixel LEDs

modified on 7 May 2019
by Saeed Hosseini @ Electropeak
https://electropeak.com/learn/

*/

#include <tinyNeoPixel.h>

#define PIN_R       10 //right
#define PIN_L       0 //left
#define NUMPIXELS 2

tinyNeoPixel pixels_R = tinyNeoPixel(NUMPIXELS, PIN_R, NEO_GRB + NEO_KHZ800); //right
tinyNeoPixel pixels_L = tinyNeoPixel(NUMPIXELS, PIN_L, NEO_GRB + NEO_KHZ800); //left

// int delayval = 500; // delay for half a second
// #define DELAYVAL 500 // Time (in milliseconds) to pause between pixels

void NeoFade_R(int FadeSpeed)
{
int fspeed;
for (int i = 0; i < NUMPIXELS; i++) { pixels_R.setPixelColor(i, 165, 242, 243); } for (int j = 1; j < 255; j=j+2)
{
pixels_R.setBrightness(j);
pixels_R.show();
delay(FadeSpeed);
}
}

void NeoFade_L(int FadeSpeed)
{
int fspeed;
for (int i = 0; i < NUMPIXELS; i++) { pixels_L.setPixelColor(i, 165, 242, 243); } for (int j = 1; j < 255; j=j+2)
{
pixels_L.setBrightness(j);
pixels_L.show();
delay(FadeSpeed);
}
}

void setup() {
pixels_R.begin();
pixels_R.clear(); // Set all pixel colors to 'off'

pixels_L.begin();
pixels_L.clear(); // Set all pixel colors to 'off'
}

void loop() {
NeoFade_L(50);
NeoFade_R(50);

}
Test blink
![]()
well done.
Output 2 : Sound Speaker
- I used MP3 Voice Module SKU: DFR0534
- Functional base was made in Week14 -Networking and Communications
Fail : When the code is integrated with other functions, sound is not played.
“Since it takes about 1 second after reset to initialize, it is also necessary to allow about 2 seconds after begin().”
→ So, I try to put a “delay(2000)” of 2 seconds before play and it played after I turned it on!
Input 1 : Micro limit Switch
- I used Tiaihua-1a 125v Micro limit switch
- It was made in Week14 -Networking and Communications
Input 2 : Sound Sensor
- I used MAX4466 Module
- When clapping, sensing the clapped sound by mic module. Cariblating the volume of sound by serial monitor. code is below.
Embedded Programming
Final Code
/*
   @file Voice Module.ino
   @brief
   @n [Get the module here]
   @n This example Set the voice module volume and playback
   @n [Connection and Diagram]()

   @copyright  [DFRobot](https://www.dfrobot.com), 2016
   @copyright GNU Lesser General Public License

   @author [carl](lei.wu@dfrobot.com)
   @version  V1.0
   @date  2017-11-3
*/

#include <SoftwareSerial.h>
#include <tinyNeoPixel.h>

#define PIN       0 //Neopixel left
#define NUMPIXELS 2

// mic
const int sampleWindow = 50; // Sample window width in mS (50 mS = 20Hz)
unsigned int sample;

// mp3
SoftwareSerial Serial1(5, 4);
unsigned char order[4] = {0xAA, 0x06, 0x00, 0xB0};

// Neopixel
tinyNeoPixel pixels = tinyNeoPixel(NUMPIXELS, PIN, NEO_GRB + NEO_KHZ800); //left,right

void setup() {
  //Serial.begin(115200);
  Serial1.begin(9600);
  volume(0x14);//Volume settings 0x00-0x1E

  // mic setup
  Serial.begin(9600);

  // neopixel setup
  pixels.begin();
  pixels.clear(); // Set all pixel colors to 'off'
}

void loop() {

  delay(2000); //Allow a little time after resetting.
  play(0x01);//Play the music specified audio:0x01-file0001

  // Serial1.write(order,4);//order play
  // delay(2000);

  //neopixel glows for 35 seconds and disappears
  delay(500);
  NeoFade(180);
  delay(500);
  //pixels.setBrightness(0); //try to clear all
  //pixels.show();
  NeoFadeout(50);

  //when claping hands, neopixel glows and disappears.
  while (1)
  {
    pixels.clear(); //try to clear all
    pixels.show();
    unsigned long startMillis = millis(); // Start of sample window
    unsigned int peakToPeak = 0;   // peak-to-peak level

    unsigned int signalMax = 0;
    unsigned int signalMin = 1024;

    // collect data for 50 mS
    while (millis() - startMillis < sampleWindow)
    {
      sample = analogRead(2); // pinno. PA6=2
      if (sample < 1024)  // toss out spurious readings
      {
        if (sample > signalMax)
        {
          signalMax = sample;  // save just the max levels
        }
        else if (sample < signalMin)
        {
          signalMin = sample;  // save just the min levels
        }
      } // if
    } //while
    peakToPeak = signalMax - signalMin;  // max - min = peak-peak amplitude
    double volts = (peakToPeak * 5.0) / 1024;  // convert to volts

    Serial.println(volts);

    if (volts > 4.9)  //when clap
    {
      delay(1500);
      play(0x03);//Play the bell
      // Serial1.write(order,4);//order play
      delay(100);
      NeoFade(10);
      NeoFadeout(10);
      delay(100);
      //pixels.setBrightness(0); //try to clear all
      //pixels.show();

    } //if
  } //while(1)

} //loop

// Neopixel variable definition

void NeoFade(int FadeSpeed)
{
  int fspeed;
  for (int i = 0; i < NUMPIXELS; i++) {
    pixels.setPixelColor(i, 255, 255, 200);
  } for (int j = 1; j < 255; j = j + 2)
  {
    pixels.setBrightness(j);
    pixels.show();
    delay(FadeSpeed);
  }
  //  pixels.setBrightness(0); //try to clear all
  //  pixels.show();
}

void NeoFadeout(int FadeSpeed)
{
  int fspeed;
  for (int i = 0; i < NUMPIXELS; i++) {
    pixels.setPixelColor(i, 255, 255, 200);
  } for (int j = 253; j > 0; j = j - 2)
  {
    pixels.setBrightness(j);
    pixels.show();
    delay(FadeSpeed);
  }
  //  pixels.setBrightness(0); //try to clear all
  //  pixels.show();
}

void play(unsigned char Track)
{
  unsigned char play[6] = {0xAA, 0x07, 0x02, 0x00, Track, Track + 0xB3};
  Serial1.write(play, 6);
}

void volume( unsigned char vol)
{
  unsigned char volume[5] = {0xAA, 0x13, 0x01, vol, vol + 0xBE};
  Serial1.write(volume, 5);
}
Parts by Parts
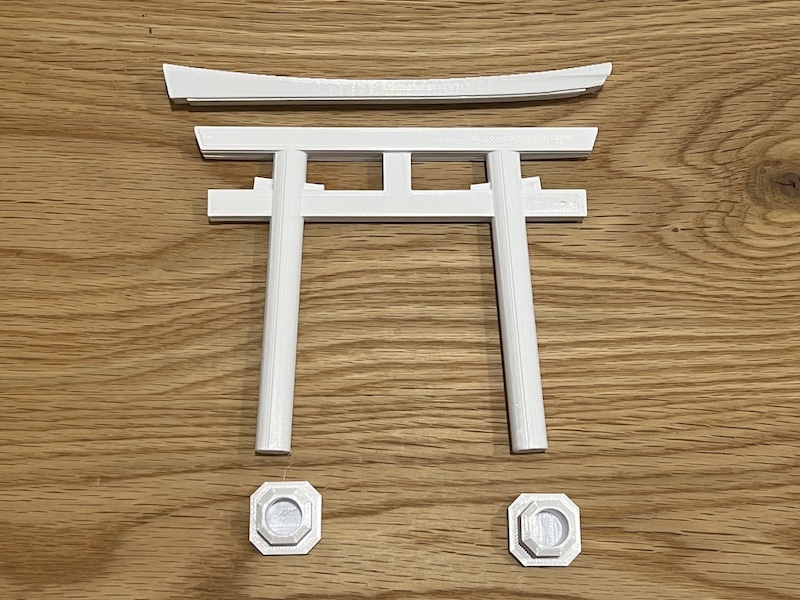
1. Lantern by 3D printer
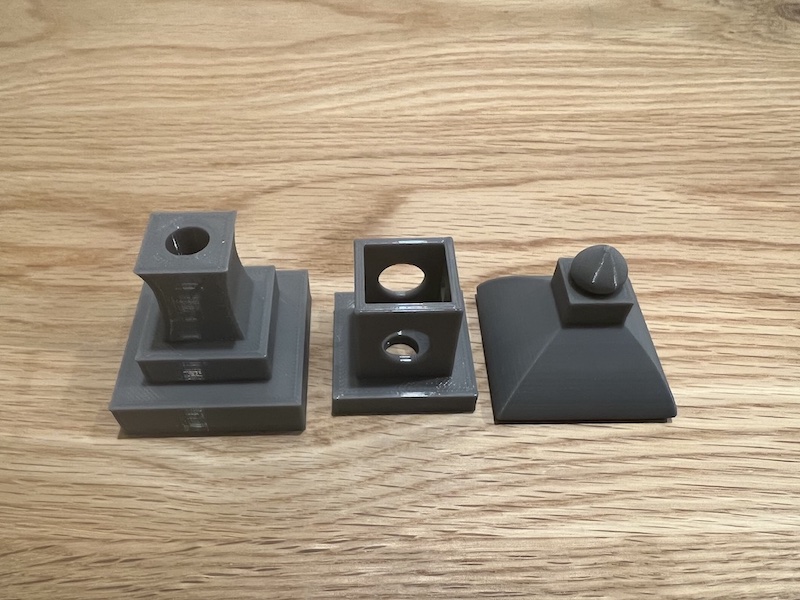
I decided to output each of the three parts and combine them. Adjust the size so that the circuit board fits inside the lantern.
Open the Cura and setting up below.
Lower & middle parts
- Low Quality
- infill 10% ,Cubic
- Wall Thickness 1.2mm
- layer height 0.28
Top parts are printed by “dynamic(high) quality” because the curved surface is noticeable.
- Dynamic Quality
- infill 20% ,Cubic
- Wall Thickness 1.2mm
- layer height 0.16
Printed parts
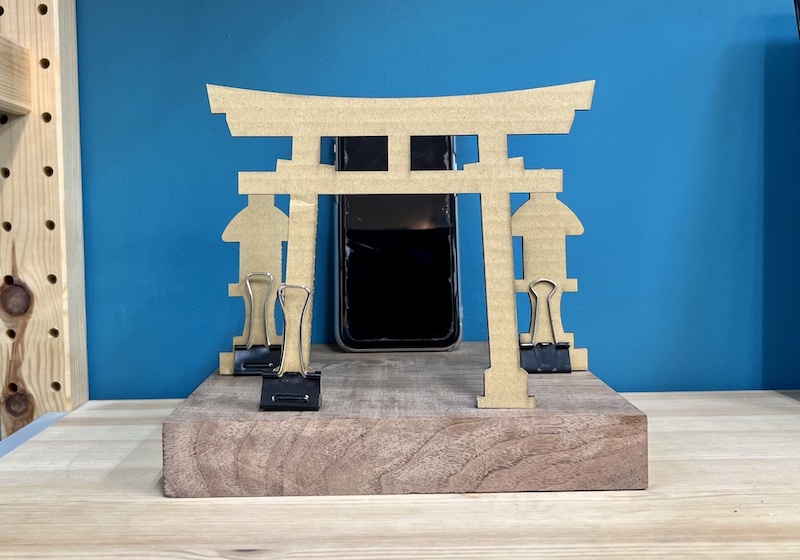
2. Entrance Gate(Torii) by 3D printer
A prototype was made on a card board to verify Gate’s size. Four different size of Gate were prepared and laid out on the actual board to check the size.: x0.8/x1.0/x1.2/x2.0 When I put them side by side, they were right between 1.0 and 1.2, so I decided on 1.1 times the size of Gate. The size is reasonably easy to set on the altar, yet reasonably hard to reach the smartphone in charging.
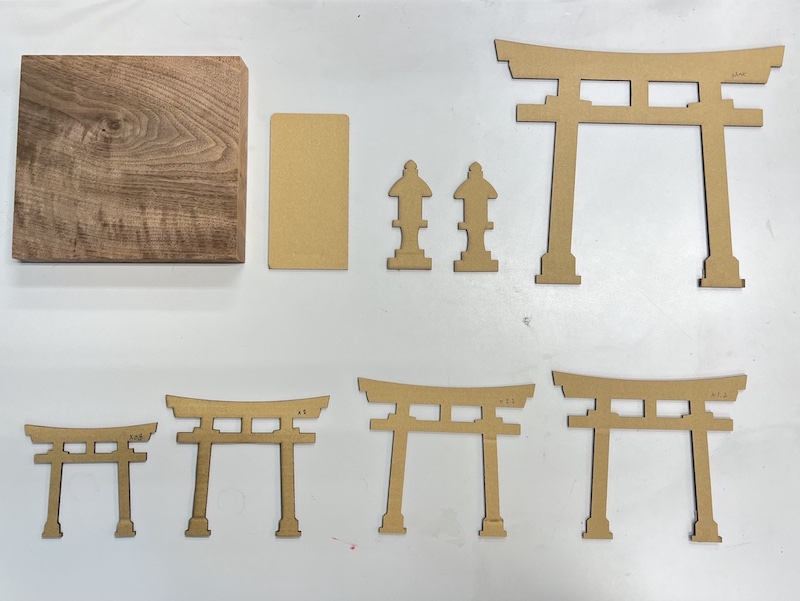
The output is laid down instead of standing up so that the output marks are not noticeable.
Output each of the three parts. done
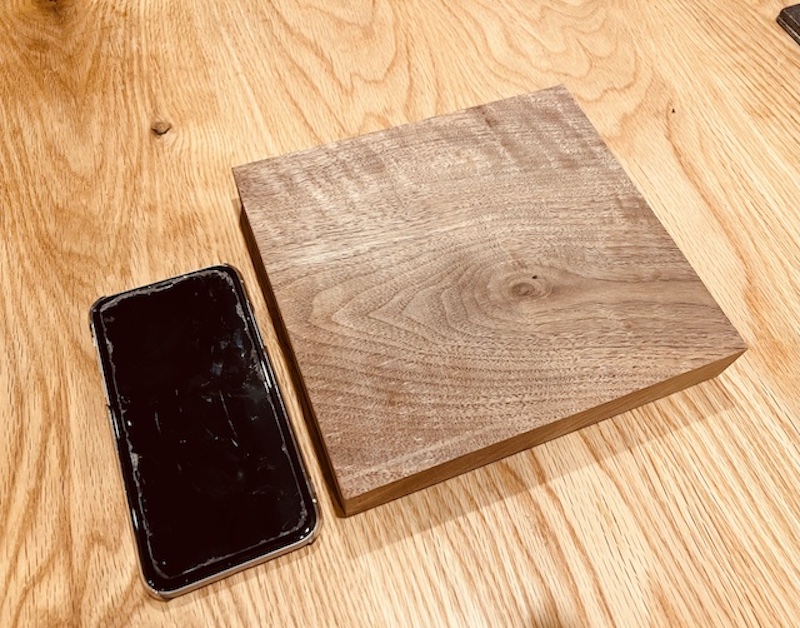
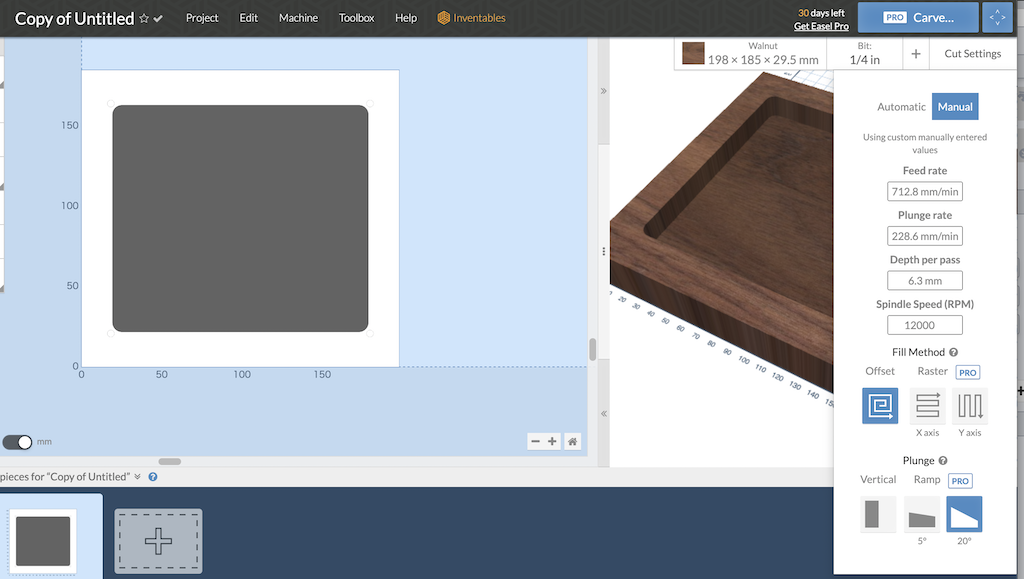
3. Base by CNC milling
Data transformation process: Fusion 360 > (stl by Shaper) > Easel > (.nc) > gsender > Genmitsu
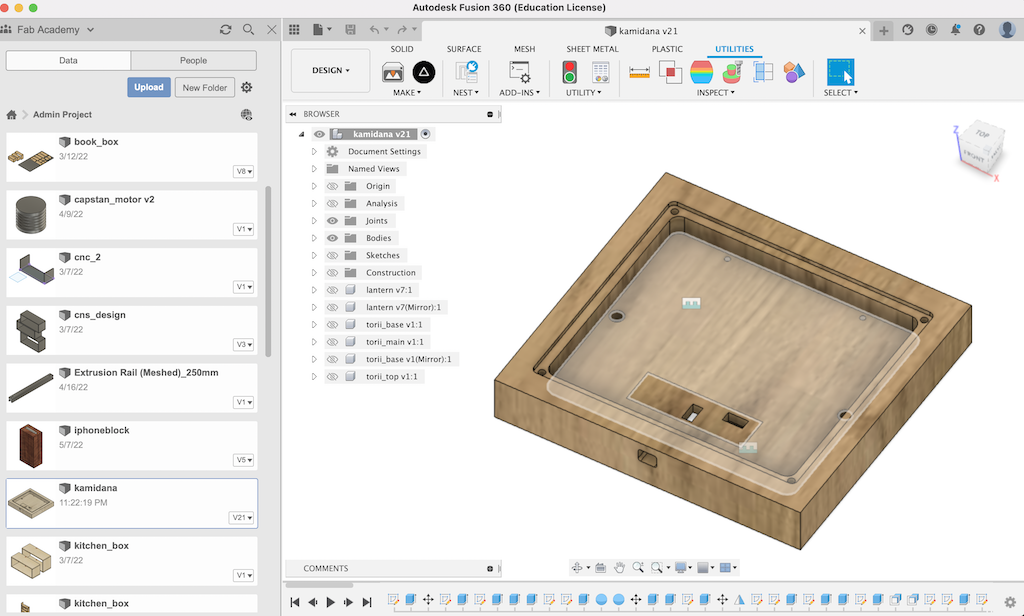
Shaper > single bodies layout

Move to Easel on web browser and inport svg.
Set up Easel by following this procedure
Select each face and set cut depth. (Note: that if it is smaller than the thickness of the bit, it will not be displayed)
After selecting Walnut, set “Cut setting”.
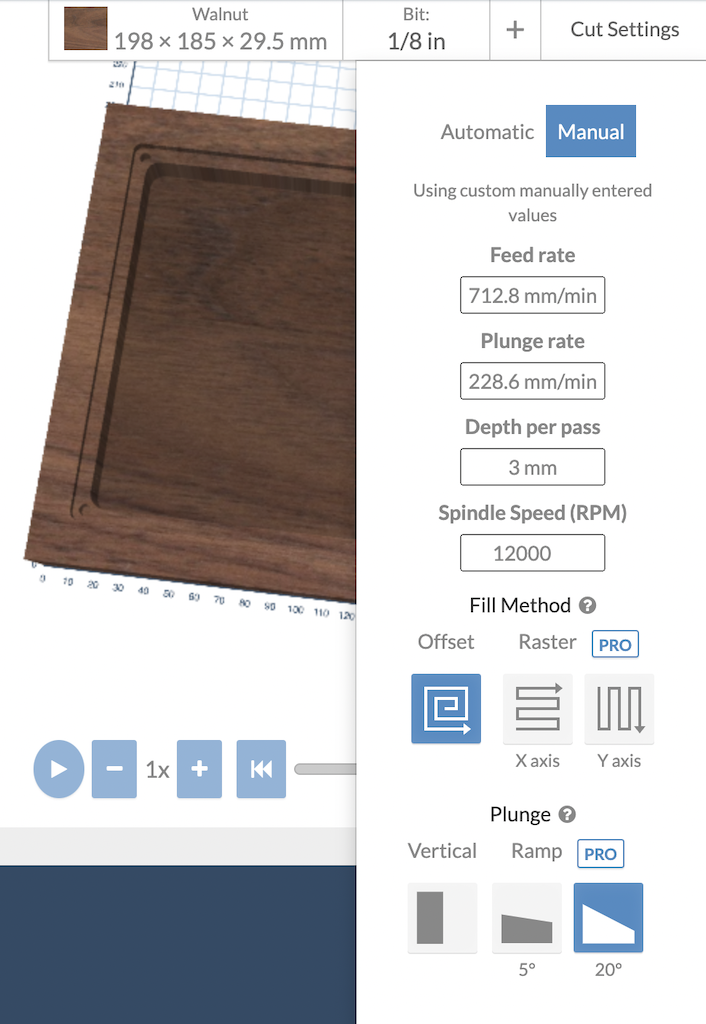
project > download g-code.
After downloading .nc file, I opened the file in Gsender
Milling Time!
Firmly fix xy=0,0 and cut the surface. Pay attention to the origin position so that it does not shift.
To be sure, I did air cut at z=40mm to confirm that the route is defined without any problem.
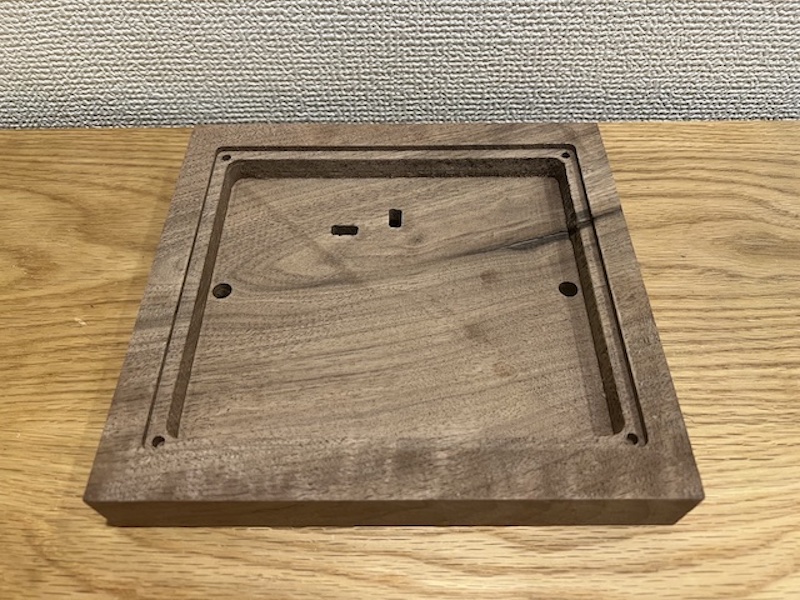
done!
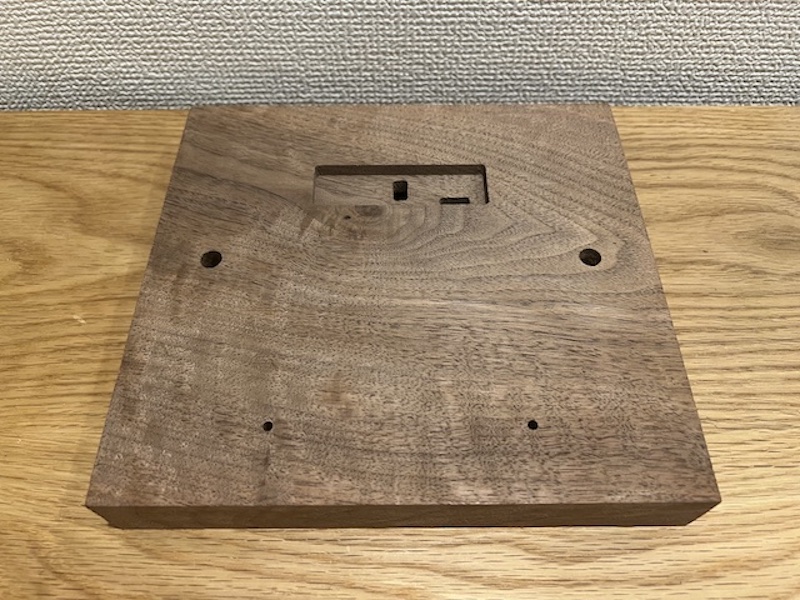
After that, the front and back sides are swapped, being careful not to swap the top and bottom sides.
Note: When exporting with Shaper, “single solid body” can only make the front side into a svg file, so it is necessary to swap the front and back sides in the design file only when exporting.
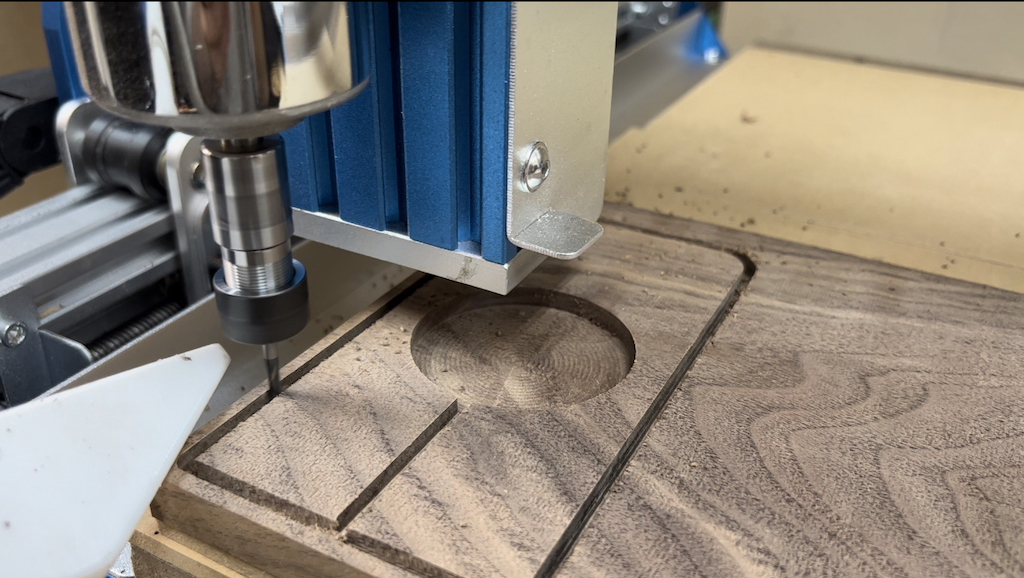
I started with the same 1/8 bit mill and settings as the surface, but found that it would take about 3h, so I decided to change the way I proceeded: after cutting as far as I could with 1/8 bit, I switched to 1/4 inch bit and again cut out the rest of the piece with easel > gsender.
We were able to finish grinding in about 40min.
4 insert nuts into the walnut board
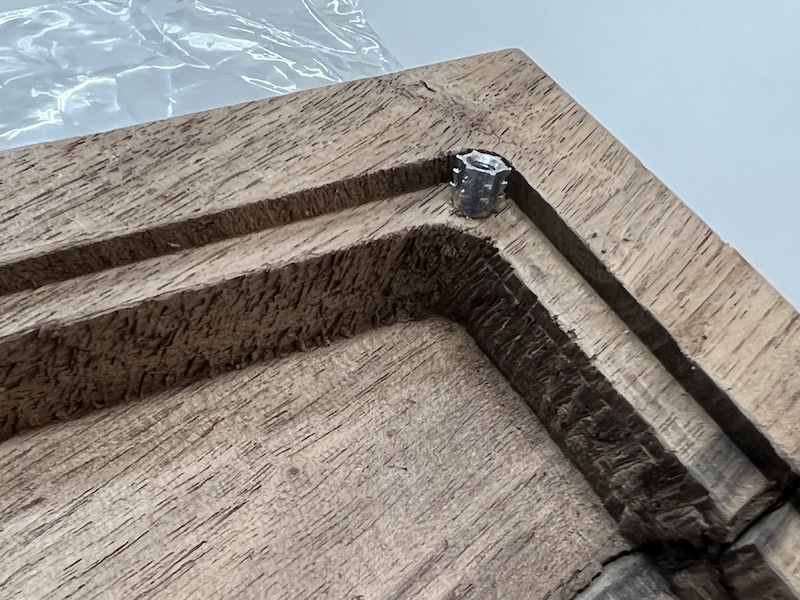
4. Support parts
Parts for jointing the base with the platform on which the iphone is installed and for fixing the switch.

Milling the iphone back support board
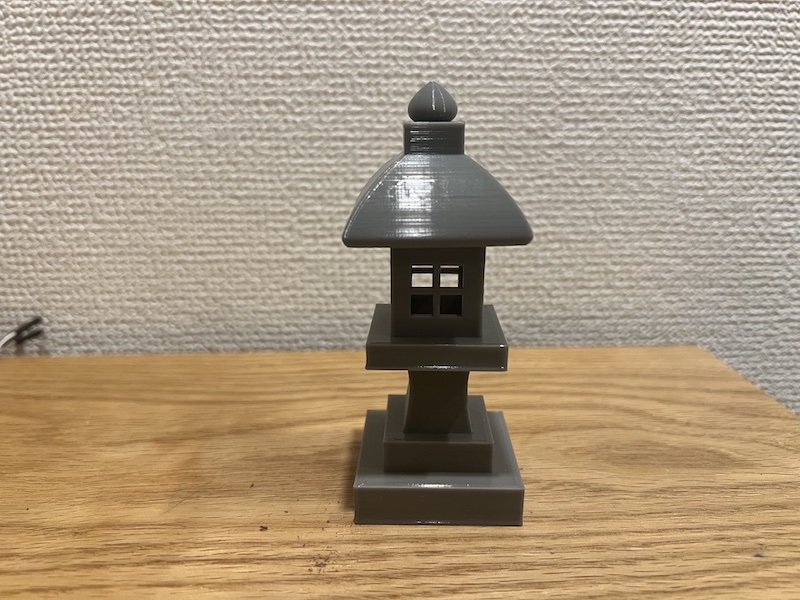
5.Painting the parts
I used the special painting for the lantern mos which is name TAMIYA Texture Paint(Grass Green). Painted the lantern parts with brush.

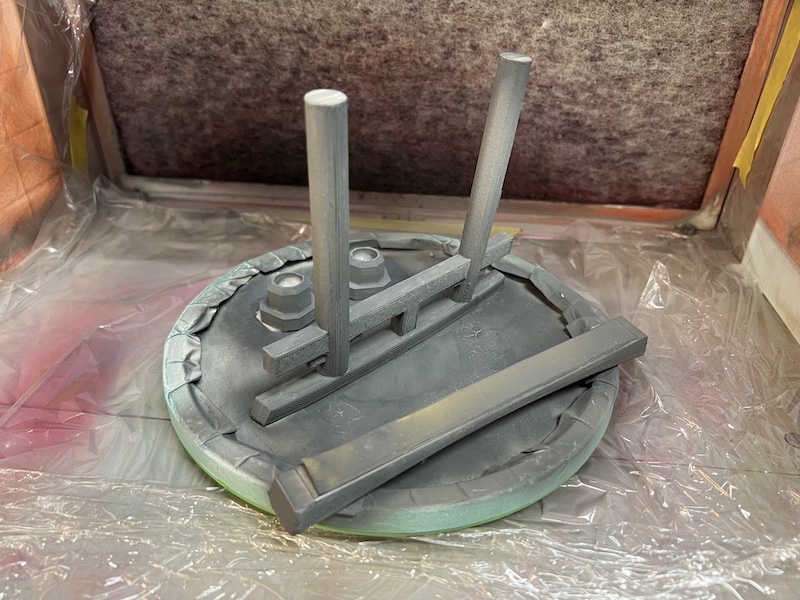
As for the Shinto Gateway, I used the airblushing with gray first
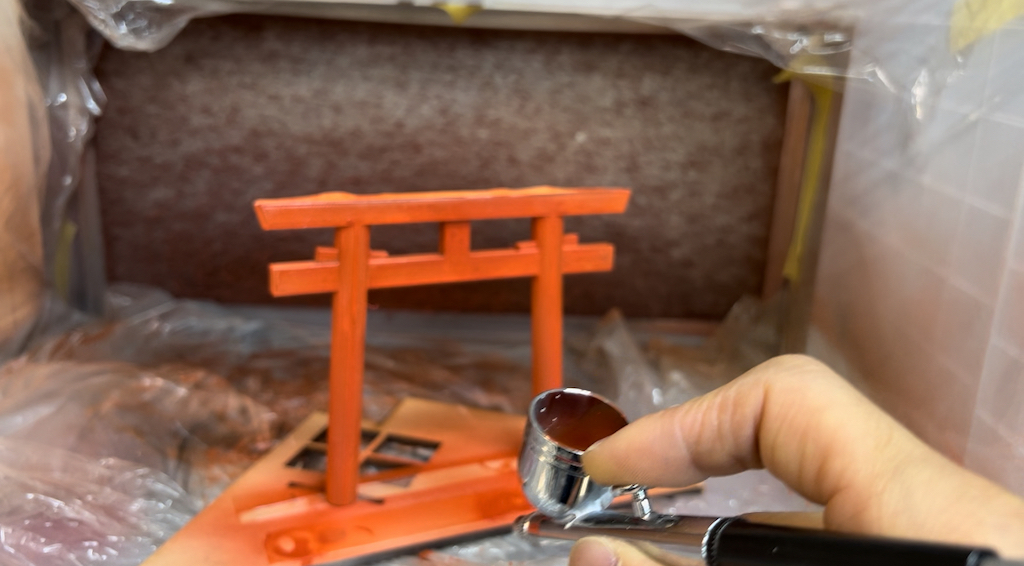
After gray, I painted the red and orange brended painting with airblushing over and over.
6.Wiring and Assembling
Glue all parts to the underside of the walnut board for storage and then organize the wiring.
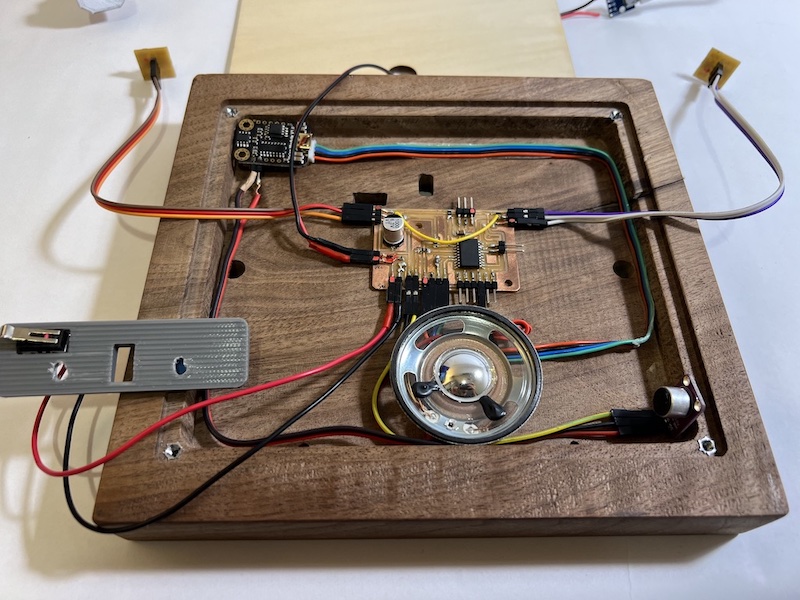
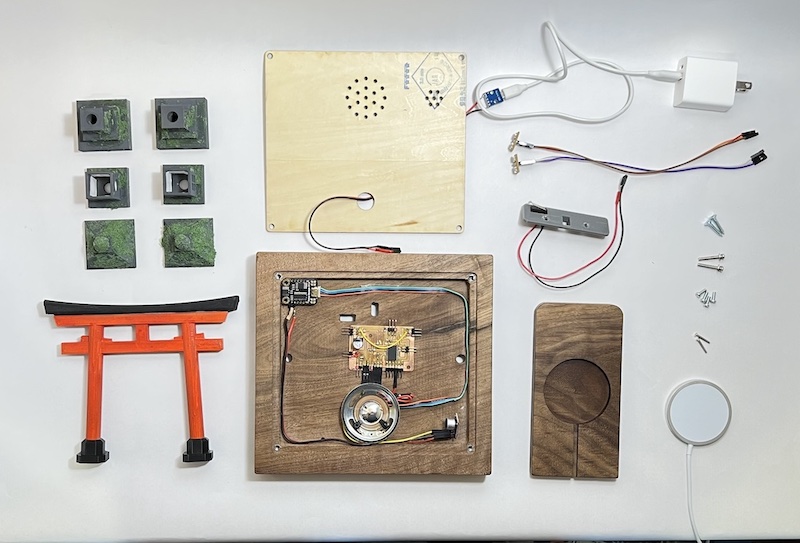
They are all parts I made and assemble.
7. Making quick studio and take hero shots.
I prepared a white background behind me, turned the lighting up, and shot photos and video. The slides and video were produced using that material with Adove Premier Pro and Illustrator.
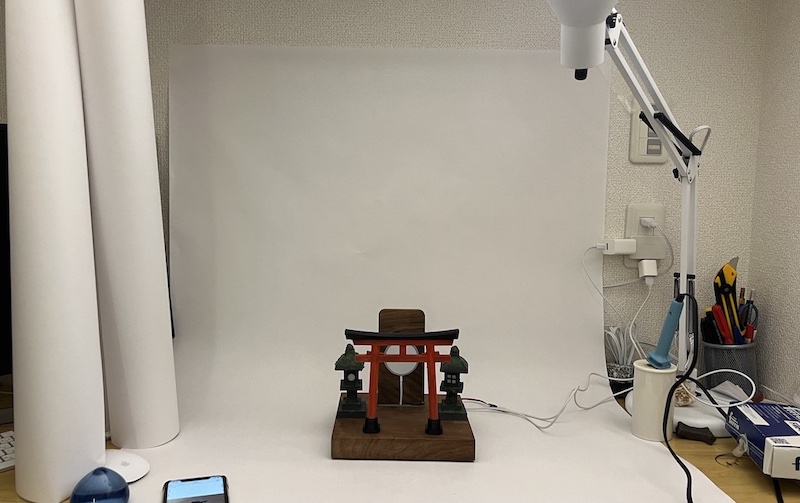
DONE!!!
Electric Design and Production
Master board
Schematic by Eagle :I designed the infrastructure to realize the system above.
- IC : ATtiny 3216
- Output 1 : Neo Pixel x2
- Output 2 : Sound Speaker
- Input 1 : limit Switch
- Input 2 : Sound Sensor
- Ready-made : iPhone Qi Charger
Output 1 : Neo Pixel Circuit-Board
![]()

Test blink
![]()
Output 2 : Sound Speaker
- I used MP3 Voice Module SKU: DFR0534
- Functional base was made in Week14 -Networking and Communications
Input 1 : Micro limit Switch
- I used Tiaihua-1a 125v Micro limit switch
- It was made in Week14 -Networking and Communications

Input 2 : Sound Sensor
- I used MAX4466 Module
- When clapping, sensing the clapped sound by mic module. Cariblating the volume of sound by serial monitor. code is below.
Embedded Programming
Final Code
/*
   @file Voice Module.ino
   @brief
   @n [Get the module here]
   @n This example Set the voice module volume and playback
   @n [Connection and Diagram]()

   @copyright  [DFRobot](https://www.dfrobot.com), 2016
   @copyright GNU Lesser General Public License

   @author [carl](lei.wu@dfrobot.com)
   @version  V1.0
   @date  2017-11-3
*/

#include <SoftwareSerial.h>
#include <tinyNeoPixel.h>

#define PIN       0 //Neopixel left
#define NUMPIXELS 2

// mic
const int sampleWindow = 50; // Sample window width in mS (50 mS = 20Hz)
unsigned int sample;

// mp3
SoftwareSerial Serial1(5, 4);
unsigned char order[4] = {0xAA, 0x06, 0x00, 0xB0};

// Neopixel
tinyNeoPixel pixels = tinyNeoPixel(NUMPIXELS, PIN, NEO_GRB + NEO_KHZ800); //left,right

void setup() {
  //Serial.begin(115200);
  Serial1.begin(9600);
  volume(0x14);//Volume settings 0x00-0x1E

  // mic setup
  Serial.begin(9600);

  // neopixel setup
  pixels.begin();
  pixels.clear(); // Set all pixel colors to 'off'
}

void loop() {

  delay(2000); //Allow a little time after resetting.
  play(0x01);//Play the music specified audio:0x01-file0001

  // Serial1.write(order,4);//order play
  // delay(2000);

  //neopixel glows for 35 seconds and disappears
  delay(500);
  NeoFade(180);
  delay(500);
  //pixels.setBrightness(0); //try to clear all
  //pixels.show();
  NeoFadeout(50);

  //when claping hands, neopixel glows and disappears.
  while (1)
  {
    pixels.clear(); //try to clear all
    pixels.show();
    unsigned long startMillis = millis(); // Start of sample window
    unsigned int peakToPeak = 0;   // peak-to-peak level

    unsigned int signalMax = 0;
    unsigned int signalMin = 1024;

    // collect data for 50 mS
    while (millis() - startMillis < sampleWindow)
    {
      sample = analogRead(2); // pinno. PA6=2
      if (sample < 1024)  // toss out spurious readings
      {
        if (sample > signalMax)
        {
          signalMax = sample;  // save just the max levels
        }
        else if (sample < signalMin)
        {
          signalMin = sample;  // save just the min levels
        }
      } // if
    } //while
    peakToPeak = signalMax - signalMin;  // max - min = peak-peak amplitude
    double volts = (peakToPeak * 5.0) / 1024;  // convert to volts

    Serial.println(volts);

    if (volts > 4.9)  //when clap
    {
      delay(1500);
      play(0x03);//Play the bell
      // Serial1.write(order,4);//order play
      delay(100);
      NeoFade(10);
      NeoFadeout(10);
      delay(100);
      //pixels.setBrightness(0); //try to clear all
      //pixels.show();

    } //if
  } //while(1)

} //loop

// Neopixel variable definition

void NeoFade(int FadeSpeed)
{
  int fspeed;
  for (int i = 0; i < NUMPIXELS; i++) {
    pixels.setPixelColor(i, 255, 255, 200);
  } for (int j = 1; j < 255; j = j + 2)
  {
    pixels.setBrightness(j);
    pixels.show();
    delay(FadeSpeed);
  }
  //  pixels.setBrightness(0); //try to clear all
  //  pixels.show();
}

void NeoFadeout(int FadeSpeed)
{
  int fspeed;
  for (int i = 0; i < NUMPIXELS; i++) {
    pixels.setPixelColor(i, 255, 255, 200);
  } for (int j = 253; j > 0; j = j - 2)
  {
    pixels.setBrightness(j);
    pixels.show();
    delay(FadeSpeed);
  }
  //  pixels.setBrightness(0); //try to clear all
  //  pixels.show();
}

void play(unsigned char Track)
{
  unsigned char play[6] = {0xAA, 0x07, 0x02, 0x00, Track, Track + 0xB3};
  Serial1.write(play, 6);
}

void volume( unsigned char vol)
{
  unsigned char volume[5] = {0xAA, 0x13, 0x01, vol, vol + 0xBE};
  Serial1.write(volume, 5);
}
BOM and Cost
Board Parts lists
| Parts | Price (Dollar) | source |
|---|---|---|
| [OVERALL] | ||
| Walnut Wood for alter | 25 | https://www.amazon.co.jp/dp/B095NYXJZC |
| Qi Charger | 20 | https://www.amazon.co.jp/gp/product/B09J4Z95DY/ref=ppx_yo_dt_b_asin_title_o00_s00?ie=UTF8&psc=1 |
| [Master CIRCUIT BOARD] | ||
| ATTINY3216 | 1 | https://www.digikey.jp/product-detail/ja/microchip-technology/ATTINY3216-SF/ATTINY3216-SF-ND/9947566 |
| Miler Speaker 5cm 8ohm 0.5W | 1 | https://akizukidenshi.com/catalog/g/gP-16023/ |
| MP3 module | 5 | https://akizukidenshi.com/catalog/g/gM-13708/ |
| Micro Limit Switch | 0.7 | https://www.aliexpress.com/item/32990903869.html |
| Sound Sensor MAX4466 Module | 8 | https://www.amazon.co.jp/dp/B07PWMFPSB |
| micro USB module DFR0534 | 5 | https://www.marutsu.co.jp/pc/i/31502363/ |
| SMD Alminium capacitor 1000uF | 3 | https://ja.aliexpress.com/item/33013065341.html?spm=a2g0o.order_list.0.0.4a41585anXU9QM&gatewayAdapt=glo2jpn |
| PinHD 1x3_2.54-SMD-90 x 2 | 0.5 | https://www.digikey.jp/product-detail/ja/PRPC040SAAN-RC/S1011EC-40-ND/2775214/?itemSeq=279757808 |
| PinHD 1x2_2.54-SMD-90 x 4 | 0.5 | https://www.digikey.jp/product-detail/ja/PRPC040SAAN-RC/S1011EC-40-ND/2775214/?itemSeq=279757808 |
| PinHD 1x6(FTDI) | 0.5 | https://www.digikey.jp/ja/products/detail/sullins-connector-solutions/NPTC031KFXC-RC/776053 |
| PinHD 1x3(UPDI) | 0.5 | https://www.digikey.jp/ja/products/detail/sullins-connector-solutions/NPTC031KFXC-RC/776053 |
| 500 ohm Registor x 2 | 0.3 | https://www.digikey.jp/product-detail/ja/RC1206FR-07499RL/311-499FRCT-ND/731891/?itemSeq=279755431 |
| 0 ohm Registor x 1 | 0.15 | https://www.digikey.jp/product-detail/ja/RC1206JR-070RL/311-0.0ERCT-ND/732131/?itemSeq=279755422 |
| [2 number of LEDs Board ] | ||
| Neo Pixel WS2812b x 2 | 0.56 | https://www.akiba-led.jp/product/1765 |
| 100ohm registor x 4 | 0.5 | https://www.digikey.jp/product-detail/ja/RC1206JR-070RL/311-0.0ERCT-ND/732131/?itemSeq=279755422 |
| 0.1 uF caoacitor x 4 | 0.5 | https://www.digikey.jp/product-detail/ja/yageo/CC1206KKX7RYBB104/311-1976-1-ND/5195878 |
| PinHD 1x3_2.54 x 2 | 0.5 | https://www.digikey.jp/product-detail/ja/PRPC040SAAN-RC/S1011EC-40-ND/2775214/?itemSeq=279757808 |
| TAMIYA Texture Painter | 5 | https://www.tamiya.com/japan/products/87111/index.html |
| Theat-set inserts and Insert nuts “onime-nut | 1 | https://www.monotaro.com/p/4175/4824/?displayId=5 |
TOTAL 79.7$
What questions need to be answered?
Answer: It means the things you need to figure out or learn to be able to make your final project
- How much wood do I need?
- How should I program arduino to create the desired functionality?
How will it be evaluated?
Answer: You need to list the elements of your project that must work successfully in order for your project to be considered a success.
- Whether or not the lantern glows when a smartphone is placed on the altar?
- Whether or not a sound is made when the smartphone is placed on the altar?
- Whether or not the lantern light up with a sound when I clap my hands?
- Whether the smartphone overheats when left it long time?
- Whether or not it feels beautiful as a product?
Files
3D model
Code
Electronics - master board
Electronics - NeoPixel board