Dotum - A Coordinate Measuring Machine
Welcome
This page is dedicated to my Fab Academy final project - Dotum.
A manual Coordinate Measuring Machine. A mechanical 3d scanner of sorts. Instead of light bouncing back and forth it uses a wired probe to help the machine determine the coordinates of points in physical space. Think of it like a short range wired Total Station.
I got the idea from an image I ran into on Pinterest around the time I was starting Fab Academy. After more research I found the company that made them was called Prodim Systems. They appear to have filed at least 2x Patents (1 doesn’t seem to be active while the other seems too similar to be acceptable but it shows up as active).
I didn’t manage to find a quote for how much they cost new but second hand units showed up on a few online marketplaces as going for over 5 digits.
As the patents are very limited I think it’s safe to say I designed pretty much everything in my final project.
Beyond the electronic components the others pre-made parts I’ll be using are dielectric magnets, regular/V/slew bearings, a bit of left over fishing line Marius gave and both Flat Coil Springs. In the end I got the ones I’m using from IKEA measuring tapes but not before spending way too long trying to print them. I did get some usable ones but for the lenghts needed they were too voluminous and caused problems with other components. Maybe with a smaller nozzle. I tried making some because I couldn’t find a supplier and was trying to avoid breaking functioning measuring tapes just for the spring.
Slide

Video
2023 Update
While the basic stayed the same I reworked all the mechanics to fix a few issues with keeping the wire in check. There’s room for improvement and I haven’t gotten to the point of calibration and measuring repeatability.
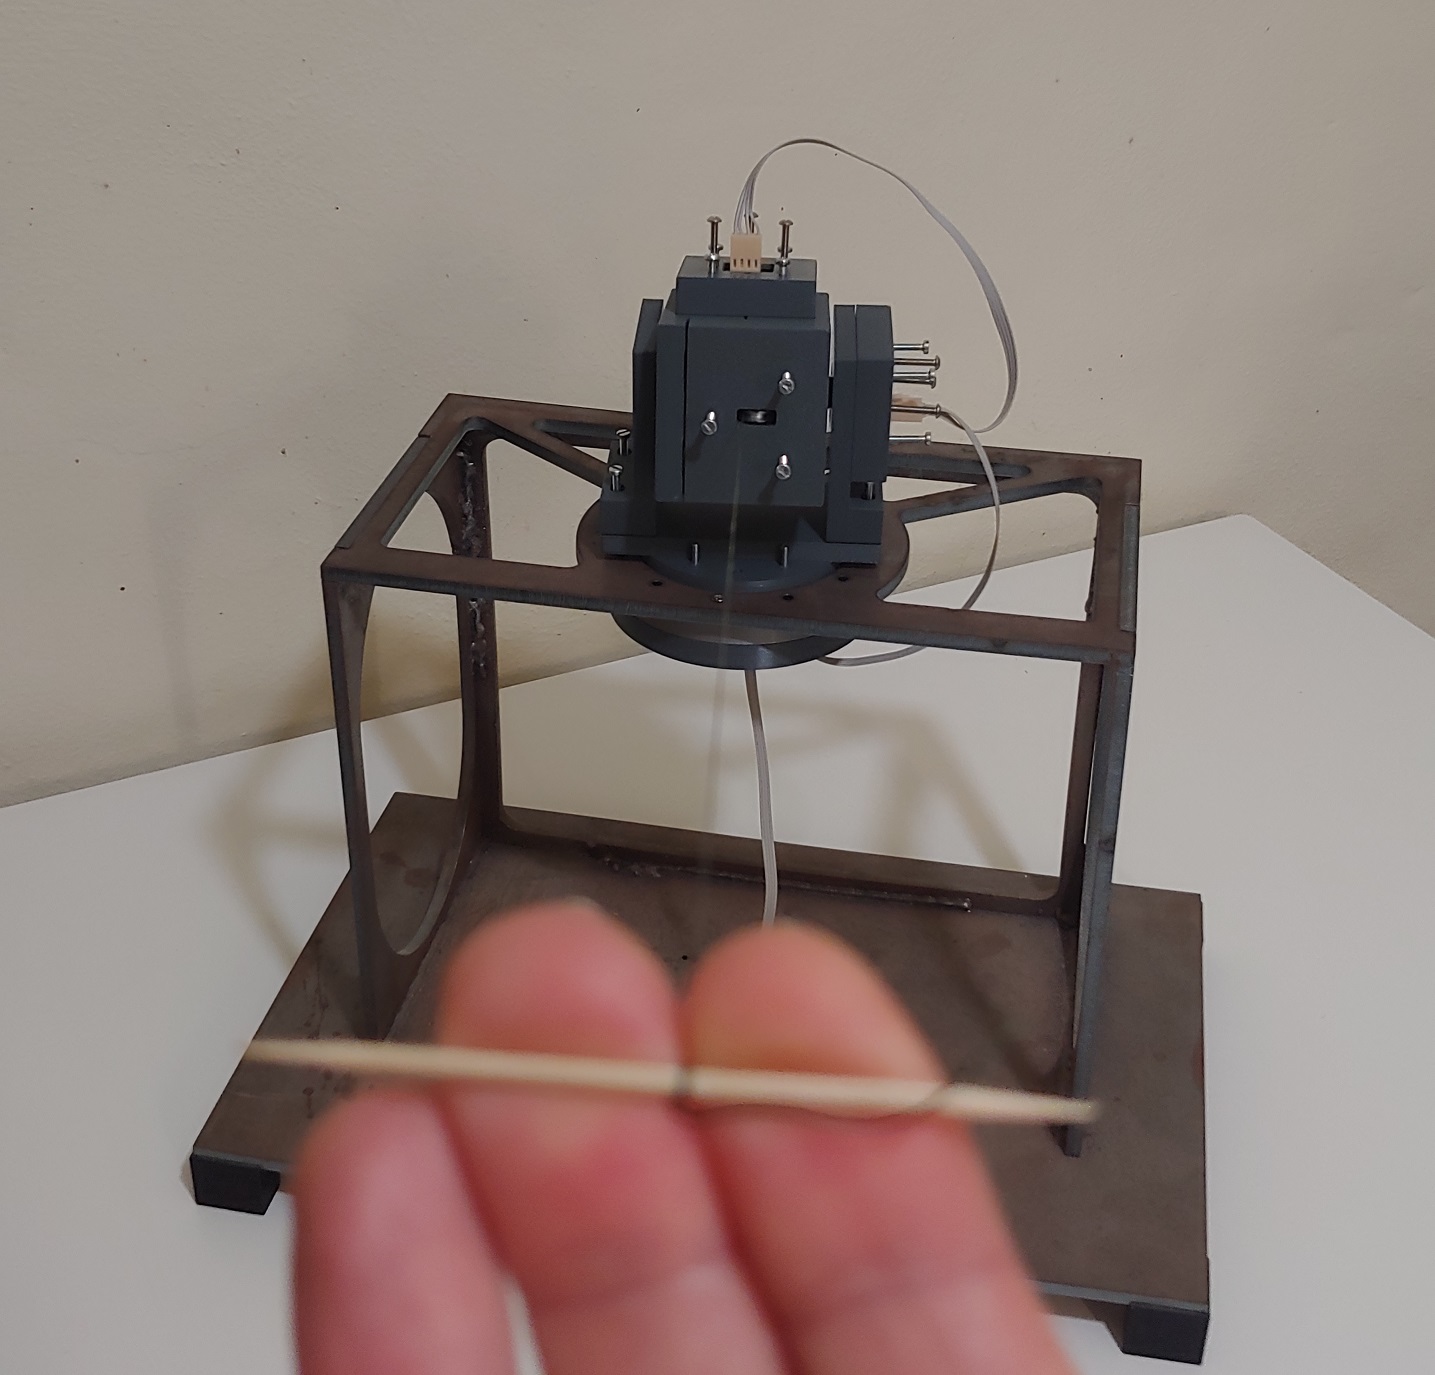
This is what it looks like when it’s moving.
Tracking raw sensor data.
All sensors are absolute rotary encoders. Using an incremental encoder to measure Radial distance would have saved a bit of work. At least I get a lot of precision out of it. Still need to refine the code that deals with the overflow and underflow of wrapping the sensor.
To replace a wired remote I went for a basic webserver that could run on a phone. Even if I’m running it on a laptop while I film with my phone…
The output will be an .asc point cloud. Now it’s just trying to convert coordinates for a single point and sticking them into the text box in the page. After the software is dealing correctly with Radial sensor overflow and underflow I’ll properly set initial R distance needed to accurately measure changes.
Now that I think about it I didn’t account for sensor wrapping on the Azimuthal and Polar sensors. Probably a reason for those wack numbers.
Not sure what the best way to export the point cloud will be. Maybe just a download button on the webserver. Given how large the point cloud can be I’ll probably need to look at the ESP32 file system so I can write the files directly to them without overloading the ESP32 memory.
It’ll be less noisy than a regular light based 3d scanner so reverse engineering certain objects will be easier. Some CAD software can import the point cloud directly; FreeCAD can do it.
Progress - Designin’ and Fabin’
Over the duration of Fab Academy we’re encouraged to document our Final Project progress and struggles so I did, thoroughly. 1st week is me choosing between 2 potential Final Projects so just skip to the 2nd update on Week 2 and onward.
I developed some of the parts within weekly assignments. The electronics development are mostly covered under Input Week with an extra page just for debugging. In Casting and Molding I tested what a Resin handle with an embeded metal prong might look like. For Outputs I chose a small monitor in case I had time to add it but for lack of time I had to cut it. For Wildcard week I got into welding and ended up welding the machine frame out of steel I had laser cut for me. And finally, in theory, during Interface and Application Programming I built a Serial Monitor for Windows from scratch to learn about .exe applications and the Windows API that manages USB Serial connections so that I could maybe built a program to collect, edit and manage the point clouds Dotum generates.
With a Webserver it’s easier to build an OS agnostic application so there might not be a need for a dedicated Windows program.
Cost
Excluding getting the metal lasercut for me to weld for Wildcard Assignment the overal cost is reasonable. The metal structure can be switched for anything, even the MDF prototype worked well enough. Only weight needs a consideration so the base stays in place.
Bill Of Materials
| Component | Unit Price | Quantity | Total |
|---|---|---|---|
| Xiao ESP32-C3 | 4,64 € | 1x | 4,64 € |
| AMS AS5600L | 3.50 € | 3x | 10,50 € |
| 6*3mm Diametric Magnet | 0,38 € | 3x | 1,14 € |
| Nigini NS25-G4 Female Plug | 0,028 € | 4x | 0,112 € |
| Nigini NS25-W4P Male Header | 0,078 € | 7x | 0,546 € |
| Nigini NS25-T Crimp Contact | 0,016 € | 16x | 0,256 € |
| 499Ω 1206 Resistor | 0,09 € | 3x | 0,27 € |
| 1kΩ 1206 Resistor | 0,09 € | 4x | 0,36 € |
| 100 nF Capacitor | 0,34 € | 3x | 1,02 € |
| Red LED SMD 1206 | 0,214 € | 1x | 0,214 € |
| Green LED SMD 1206 | 0,214 € | 2x | 0,428 € |
| Blue LED SMD 1206 | 0,214 € | 2x | 0,428 € |
| 4x Wire Flat Cable | 1€/M | 50CM | 0,50 € |
| 10*26*8 Bearings | 0,89 € | 3x | 2,67 € |
| 3*12*4mm V Bearing | 13,59€ / 20 | 1x | 0,68 € |
| IKea FIXA Tape Masure | 1,5 € | 2x | 3,00 € |
| Laser Cut + 6mm Steel | 65,04€ | 1x | 65,04 € |
| 3D Print - Axle | 0.75 * | 1x | 0.75 € |
| 3D Print - Enclosure Front | 1.74 * | 1x | 1,74 € |
| 3D Print - Enclosure Back | 1.12 * | 1x | 1,12 € |
| 3D Print - Sensor Flexures | 0.07 * | 3x | 0,21 € |
| 3D Print - Flexure Holder | 0.35 * | 2x | 0,70 € |
| 3D Print - Flexure Holder Azimuthal | 0.38 * | 1x | 0,38 € |
| 3D Print - Slew Bearing Top | 1.14 * | 1x | 1,14 € |
| 3D Print - Slew Bearing Bottom | 1.19 * | 1x | 1,19 € |
| 3D Print - Side Support | 0.55 * | 2x | 1,10 € |
| M3 Fine Thread Screws | 0,05 € | Lots | ~2,00 € |
| Total | Much | Many | 101,134 € |
| Total Minus Steel | Much Less | Many Less | 37,094 € |
* Using Prusa Slicer Currencyless Cost Predictions. Assuming 1-1€ for simplicity.
All prices are VAT excluded.
Licenses and IP
As I discussed during the Invention, intellectual property and income, any IP related to this project for which I have the sole ownership is shared on a Attribution-NonCommercial-ShareAlike 4.0 International or CC BY-NC-SA 4.0 license.
Files - 2022
Structure Components are FreeCAD files while Electronics are KiCAD files.
2022 - Mega328P & SAMD21 PCB + 3.3V-5V Daughters*
2022 - Dotum Source Code - Untested
2022 - SAMD21 PCB Controller Box ***
* - Mega328P might actually work. The problem was likely flipped I2C connectors.
** - The Steel Structure is still parametric in this file. To make FreeCAD slightly faster in 2023 I imported a .step version.
*** - I think.
Files - 2023
Again, FreeCAD and KiCAD files.
2023 - 2x Xiao ESP32-C3 PCBs - With/Without Battery *
2023 - Dotum Webserver Source Code **
2023 - Physical Models - 80Mb File
* - External pull resistors are wrong
** - Visual Studio Code recommended
A Few Thankyous
My parents, wouldn’t have survived this without them.
Prof. Neil for answering my many, many questions.
Luciana for putting up with this whole mess.
Suhas for acting as Local and Global evaluator when he didn’t have to.
Global Open Time Amigos for being there.
Shout out to Julian, Quentin, Krisjanis and André for helping extinguish a few fires too.
All Fab Academy students that know how hard this can be.
Special Mention
I’d like to also acknowledge Christoph Laimer as I’m using his model Slew Bearing.
He also has a nice video about it: