2. Project management
As things didn’t go according to plan i spent more time making sure Git was working properly than figuring out how and what to document. That means at least this week events might not be strictly in chronological order but by the end everything should make sense.
Tutorial videos
Starting with the clips I watched… I started with one here and there, went back multiple times to check and re-check what i was doing.
I started following the Student Bootcamps, which I highly recomend and you can find 2022’s edition here:
With the 5th and more important one embedded below.
I found this one on Youtube also pretty easy to follow. The Bootcamp one gets a bit messy when moving around all the Operating Systems.
Installing App Installer, Windows Terminal and Git.
In the 5# Bootcamp we’re told to go into the Microsoft Store and get App Installer and Windows Terminal. To my surprise my Store refused to install anything.

A few years ago I had a few troubles with the store so I knew I just had to reset it. Last time I used a Powershell command but I went looking for a GUI option in Windows settings first.
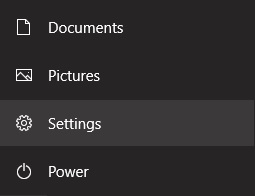
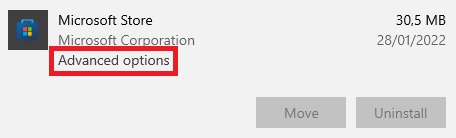
After finding the Microsoft Store in the installed apps list click on it and then on the Advanced Options that show up.
After scrolling down a bit you’ll find the big RESET buttons.
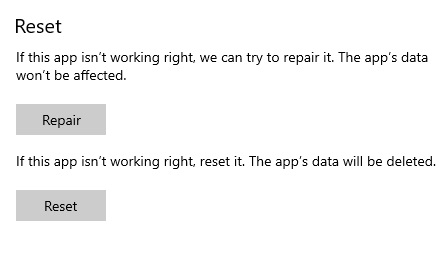
When dealing with misbehaving apps I tend to press all reset buttons I see and be done with it. I do have several backups of my data so if you don’t, make sure you won’t lose anything important when resetting stuff.
Restarted my computer just to be sure. Now if that fixes any problems you have, fantastic! In my case it just made all Microsoft Store shortcuts stop working without an error and upon closer inspection the Microsoft Store just straight up vanished from the installed programs. #Great

I guess this means I had to go look for the hard reset Powershell command I used before. Which I did. I think. Might not be the same but it did work so… meh.
Get-AppXPackage -AllUsers | Foreach {Add-AppxPackage -DisableDevelopmentMode -Register “$($_.InstallLocation)\AppXManifest.xml”}
Article said that if that hadn’t worked to try elevating command privaleges as an Unrestricted Command (confirming with Y after the 1st command)
Set-ExecutionPolicy Unrestricted

Get-AppXPackage -AllUsers | Foreach {Add-AppxPackage -DisableDevelopmentMode -Register “$($_.InstallLocation)\AppXManifest.xml”}
#Success, the store came back.
Went back to try and install the App Installer and the Windows Terminal. It started the process but while it failed again it did throw up an error code. Yey!
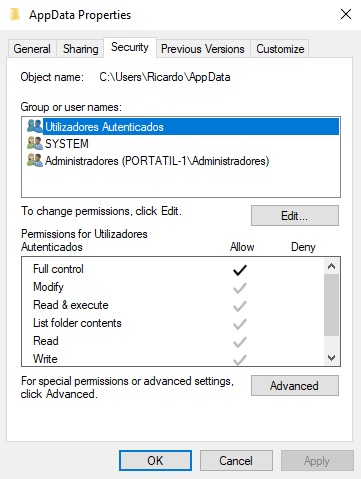
I got error 0x80070005 Access is denied and while I’m not entirely sure it only has 1 cause from everything I found I figured the most probable cause might be folder permission issues. Hopefuly you won’t have this but I just solved it by finding my AppData folder (which is a hidden folder you really shouldn’t be messing with unless you know what you’re doing) and allowing full access for authenticated users. Since I’m the only person using this computer I don’t expect any negative outcomes of this but your mileage may vary. In any case the folder can be found here:
C:\Users\<your user goes here>\
If you do need to try this you need to make sure hidden folders are visible, right click the AppData folder and after selecting Properties navigate to the Security Tab. After doing the thing it should look something like this:
Tried to install App Installer and the Windows Terminal again and it finally worked.
26/08/2022 Update
Here are 3 clips I stumbled upon on youtube that go over about how git works at a deeper level.
Actually getting Git working
So, once you have those 2 installed, open a Terminal Window and just type:
winget search git
Results will show a Git.Git somewhere.
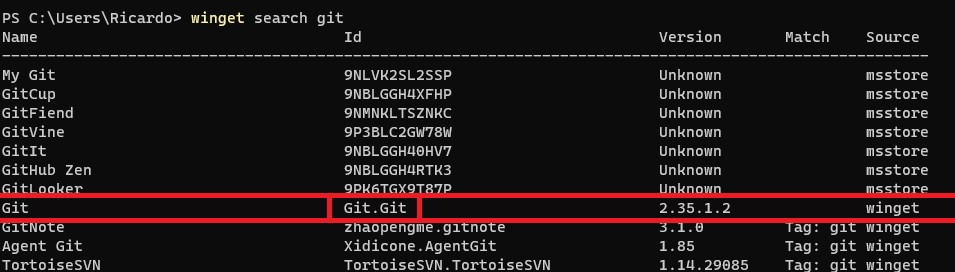
Now that we have the ID of what we want go ahead and install it with:
winget install Git.Git
After accepting a few safety pop-ups you should have Git installed. You can do a search on your computer for the Git Bash terminal, or just try typing:
git
or
git version
to make sure it installed correctly.
Configuring Git and creating a local repository
Go ahead and open Git Bash and configure the name and email that’ll show in your commits with:
git config --global user.name "Firstname Lastname"

git config --global user.email "your_email@example.com"
After navigating in the terminal to the folder you want to create a local repository run:
git init
If you want to comunicate with remote repositories you’ll need to configure an ssh key locally and as a FabAcademy student to your GitLab account.
Start by creating a new 2048-bit RSA ssh key with:
ssh-keygen -t rsa -b 2048 -C "Add a small name or something here so you remember what you made this key for."
If you also want to the actual files the ssh key is stored just type in the path and name when asked like this:

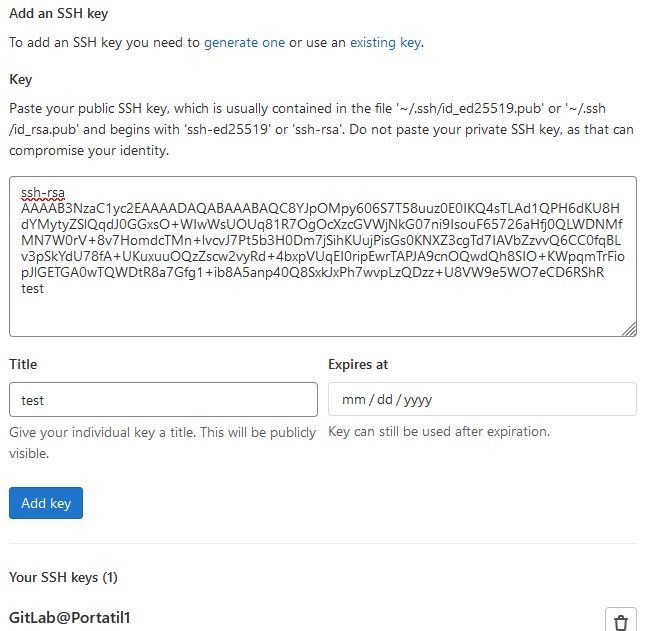
Once it’s done copy the ssh key into your Clipboard with the command (if you changed the name of the file remember to edit the command):
cat ~/.ssh/test.pub | clip
If you’re logged into your account you can just follow this link to your ssh config tab in your personal settings
Once there just paste it from the Clipboard.
And finally to make sure the connection between your local git and the remote git is working properly just use the command:
ssh -T git@gitlab.fabcloud.org
Now the first time you connect to a server it’ll start complaining about host authenticity so you need to type “Yes” once it asks about it or a fingerprint.
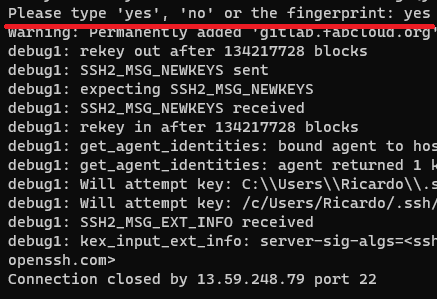
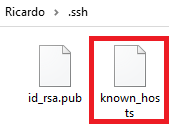
That will create a Known_hosts file on the .ssh folder that we don’t really need to worry about.
And hopefully once you try connecting again you’ll get a wonderfull success message!

Bonus1 - If you’re not using a default ssh key name you might have some problems
While finally getting around to write this I already had things running and might have accidentaly broken my ssh connection. I think my default ssh key is working fine but I wanted to add a new ssh key to my repository and now I dont know if it’s a limitation of the repository or how Windows handles SSH keys.
If I delete the default id_rsa files I get this error messages when trying to check my connection to GitLab

Doesn’t tell me much so I found the verbose command:
ssh -vT git@gitlab.fabcloud.org
Tried again and got this wall of text:
OpenSSH_8.8p1, OpenSSL 1.1.1m  14 Dec 2021
debug1: Reading configuration data /etc/ssh/ssh_config
debug1: Connecting to gitlab.fabcloud.org [13.59.248.79] port 22.
debug1: Connection established.
debug1: identity file /c/Users/Ricardo/.ssh/id_rsa type -1
debug1: identity file /c/Users/Ricardo/.ssh/id_rsa-cert type -1
debug1: identity file /c/Users/Ricardo/.ssh/id_dsa type -1
debug1: identity file /c/Users/Ricardo/.ssh/id_dsa-cert type -1
debug1: identity file /c/Users/Ricardo/.ssh/id_ecdsa type -1
debug1: identity file /c/Users/Ricardo/.ssh/id_ecdsa-cert type -1
debug1: identity file /c/Users/Ricardo/.ssh/id_ecdsa_sk type -1
debug1: identity file /c/Users/Ricardo/.ssh/id_ecdsa_sk-cert type -1
debug1: identity file /c/Users/Ricardo/.ssh/id_ed25519 type -1
debug1: identity file /c/Users/Ricardo/.ssh/id_ed25519-cert type -1
debug1: identity file /c/Users/Ricardo/.ssh/id_ed25519_sk type -1
debug1: identity file /c/Users/Ricardo/.ssh/id_ed25519_sk-cert type -1
debug1: identity file /c/Users/Ricardo/.ssh/id_xmss type -1
debug1: identity file /c/Users/Ricardo/.ssh/id_xmss-cert type -1
debug1: Local version string SSH-2.0-OpenSSH_8.8
debug1: Remote protocol version 2.0, remote software version OpenSSH_8.2p1 Ubuntu-4ubuntu0.3
debug1: compat_banner: match: OpenSSH_8.2p1 Ubuntu-4ubuntu0.3 pat OpenSSH* compat 0x04000000
debug1: Authenticating to gitlab.fabcloud.org:22 as 'git'
debug1: load_hostkeys: fopen /c/Users/Ricardo/.ssh/known_hosts2: No such file or directory
debug1: load_hostkeys: fopen /etc/ssh/ssh_known_hosts: No such file or directory
debug1: load_hostkeys: fopen /etc/ssh/ssh_known_hosts2: No such file or directory
debug1: SSH2_MSG_KEXINIT sent
debug1: SSH2_MSG_KEXINIT received
debug1: kex: algorithm: curve25519-sha256
debug1: kex: host key algorithm: ssh-ed25519
debug1: kex: server->client cipher: chacha20-poly1305@openssh.com MAC: <implicit> compression: none
debug1: kex: client->server cipher: chacha20-poly1305@openssh.com MAC: <implicit> compression: none
debug1: expecting SSH2_MSG_KEX_ECDH_REPLY
debug1: SSH2_MSG_KEX_ECDH_REPLY received
debug1: Server host key: ssh-ed25519 SHA256:JCWnquB9CdnH4ctlmBh6JGzw02iMui8j8KckmYNCq/M
debug1: load_hostkeys: fopen /c/Users/Ricardo/.ssh/known_hosts2: No such file or directory
debug1: load_hostkeys: fopen /etc/ssh/ssh_known_hosts: No such file or directory
debug1: load_hostkeys: fopen /etc/ssh/ssh_known_hosts2: No such file or directory
debug1: Host 'gitlab.fabcloud.org' is known and matches the ED25519 host key.
debug1: Found key in /c/Users/Ricardo/.ssh/known_hosts:3
debug1: rekey out after 134217728 blocks
debug1: SSH2_MSG_NEWKEYS sent
debug1: expecting SSH2_MSG_NEWKEYS
debug1: SSH2_MSG_NEWKEYS received
debug1: rekey in after 134217728 blocks
debug1: Will attempt key: /c/Users/Ricardo/.ssh/id_rsa
debug1: Will attempt key: /c/Users/Ricardo/.ssh/id_dsa
debug1: Will attempt key: /c/Users/Ricardo/.ssh/id_ecdsa
debug1: Will attempt key: /c/Users/Ricardo/.ssh/id_ecdsa_sk
debug1: Will attempt key: /c/Users/Ricardo/.ssh/id_ed25519
debug1: Will attempt key: /c/Users/Ricardo/.ssh/id_ed25519_sk
debug1: Will attempt key: /c/Users/Ricardo/.ssh/id_xmss
debug1: SSH2_MSG_EXT_INFO received
debug1: kex_input_ext_info: server-sig-algs=<ssh-ed25519,sk-ssh-ed25519@openssh.com,ssh-rsa,rsa-sha2-256,rsa-sha2-512,ssh-dss,ecdsa-sha2-nistp256,ecdsa-sha2-nistp384,ecdsa-sha2-nistp521,sk-ecdsa-sha2-nistp256@openssh.com>
debug1: SSH2_MSG_SERVICE_ACCEPT received
debug1: Authentications that can continue: publickey
debug1: Next authentication method: publickey
debug1: Trying private key: /c/Users/Ricardo/.ssh/id_rsa
debug1: Trying private key: /c/Users/Ricardo/.ssh/id_dsa
debug1: Trying private key: /c/Users/Ricardo/.ssh/id_ecdsa
debug1: Trying private key: /c/Users/Ricardo/.ssh/id_ecdsa_sk
debug1: Trying private key: /c/Users/Ricardo/.ssh/id_ed25519
debug1: Trying private key: /c/Users/Ricardo/.ssh/id_ed25519_sk
debug1: Trying private key: /c/Users/Ricardo/.ssh/id_xmss
debug1: No more authentication methods to try.
git@gitlab.fabcloud.org: Permission denied (publickey).
After some googling I assumed it was just trying to find the default key and not finding it. I dont know if it’s a Windows or a Repository thing, but I guess it’s irrelevant at this point.
I found out that if I create an ssh-agent with:
eval "$(ssh-agent -s)"
And add my custom key with:
ssh-add ~/.ssh/test
I can connect correctly again, but once I close the terminal the ssh-agent thing is probably reset so I needed a permanent solution.
Which I found, after much strugling. At this point very few people will want to know the strugle but I eventually figured out how the confir file for ssh kinda works. So here’s what you’ll have to do:
- Go to the hidden .ssh folder in:
C:\Users\<your user goes here>\
- Create a Text Document, a regular .txt file, name it “config” and then delete the extension to make it look like:

- Open that file with your prefered editor and add this:
Host gitlab.fabcloud.org
User YourUserGitNameGoesHere
Port 22
IdentitiesOnly=yes
PreferredAuthentications publickey
PasswordAuthentication no
# CMD
IdentityFile C:\Users\"YourOSUserGoesHere"\.ssh\test
# BASH
IdentityFile /c/Users/"YourOSUserGoesHere"/.ssh/test
Note: If you put the keys in folders remember the key path is to the extensionless (private) file, if it warns you the path is just a folder go edit the config file.
For a final test run
ssh T git@gitlab.fabcloud.org
again.
If you want to add more hosts I think you just need add a few paragrams and start with the HOST again.
When you push something git will probably warn you that the .pub identity file isn’t accessible.

This warning has to do with Git now. If you go to your repository folder there’s a .git folder next to the main docs folder.

Inside the .git folder there’s a “config” file you can open in a text editor with this inside:
[core]
    repositoryformatversion = 0
    filemode = false
    bare = false
    logallrefupdates = true
    symlinks = false
    ignorecase = true
    sshCommand = ssh -i ~/.ssh/GitLab/Certificate.pub <- if you added any extra folder inside the Windows .ssh folder you need to add them here.
[remote "origin"]
    url = git@YourPath.git
    fetch = +refs/heads/*:refs/remotes/origin/*
[branch "master"]
    remote = origin
    merge = refs/heads/master
And now we both know how to configure ssh in windows well enough to use multiple custom ssh keys.
Bonus2 - Getting Git Bash running in the Windows Terminal app
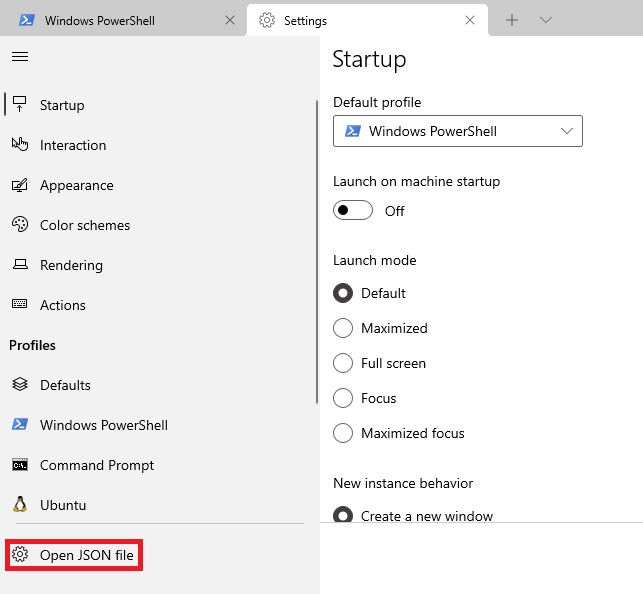
While looking for git tutorials to read I found this cool little bonus tip: Open the Windows Terminall Settings here:
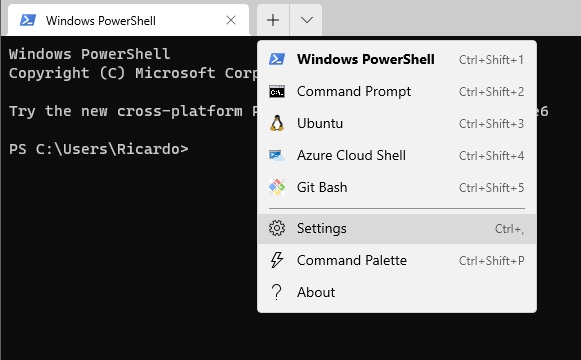
It will open another tab in the Terminal but you just want to open the settings JSON file.
Open that with any text editor you want to. I’ve gotten used to Sublime but that’s up to you. Look for the profiles part, it should look something like this:
    "profiles":
    {
        "defaults": {},
        "list":
        [
            {
                "commandline": "powershell.exe",
                "guid": "{61c54bbd-c2c6-5271-96e7-009a87ff44bf}",
                "hidden": false,
                "name": "Windows PowerShell"
            },
            {
                "commandline": "cmd.exe",
                "guid": "{0caa0dad-35be-5f56-a8ff-afceeeaa6101}",
                "hidden": false,
                "name": "Command Prompt"
            },
            {
                "guid": "{2c4de342-38b7-51cf-b940-2309a097f518}",
                "hidden": false,
                "name": "Ubuntu",
                "source": "Windows.Terminal.Wsl"
            },
            {
                "guid": "{b453ae62-4e3d-5e58-b989-0a998ec441b8}",
                "hidden": false,
                "name": "Azure Cloud Shell",
                "source": "Windows.Terminal.Azure"
            }
        ]
    },
Now you’ll want to add these lines:
,
            {
                "commandline": "C:\\Program Files\\Git\\bin\\bash.exe",
                "cursorColor": "#FFFF00",
                "cursorShape": "filledBox",
                "guid": "{90414fc0-ffb1-4e0e-89b0-3b96cd980c5f}",
                "icon": "C:\\Program Files\\Git\\IconFileName.png",
                "name": "Git Bash",
                "startingDirectory": "C:\\Users\\Git"
            }
Note: Even if you have Windows on another language leaving “Program Files” in the path should still work. Windows will figure it out on it’s own. If for some reason it doesn’t you can fix it quickly.
- commandline is just a link to the Bash.exe file. Think that’s the default location so it should work.
- Color and Shape are just to make things look more like the regular GitBash color scheme.
- guid is a bit more tricky, it needs to be unique so just use this to generate one. I just clicked once on the default config, copy pasted and it seems to be working fine.
- Icon path: Since I couldn’t really find the icon I just looked for one on the internet. If it’s still the same you can just right click and save this image.
- startingDirectory is pretty self-explainatory: link to the default working directory of your choosing. Since I only have 1 repository for now I’m linking straight there so I don’t need to “cd” everytime.
Configuring MkDocs
As I’ve already built website with html and php I figured I should check out the basics of MkDocs as building something from the ground up would take too much time.
mkdocs.yml
On the main git folder there’s a file called mkdocs.yml which stores all the configuration data for the server needs to build your website.
Once you open it you can go ahead and change the website title, author, etc; at the top
site_name: Your name - Fab Academy
site_description: Fab Academy documentation site for Your Name
site_author: Your name
copyright: Copyright Year Your name - Creative Commons Attribution Non Commercial
The first thing I wanted to figure out was how to structure the site map and all page hierarchy. After much trial and all the errors I couldn’t find the correct solution online so I had to ask for help. Along with Julian Gallimore we figured out navigation settings have to follow a specific syntax and be explicit. You’ll need to add something like this to the mkdocs file:
nav:
    - Home: index.md
    - Assignments:
      - assignments/week01.md
      - assignments/week02.md
    - Projects:
      - Final Project:
        - Final Project: projects/FinalProject.md
        - Progress:
          - projects/FinalProject/Week1.md
          - projects/FinalProject/Week2.md
      - Other Projects:
        - projects/OtherProjects/OtherProject1.md
        - projects/OtherProjects/OtherProject2.md
    - About:
      - about/about.md
      - about/agreement.md
Each colon means an individual menu/sub-menu and pages are .md files.
To costumize the colors you can follow the instructions at https://squidfunk.github.io/mkdocs-material/setup/changing-the-colors/. This website has a lot of detail on how to setup mkdocs.
I have mine set to:
primary: blue
accent: light blue
I kept the same code font but changed the text font to Nunito, you just need to name the font from Google Fonts.
The features: inside Theme are extra settings you can find here.
My site is using:
features:
  - navigation.tabs
  - navigation.instant
  - navigation.sections
  - navigation.top
  - toc.integrate
- navigation.tabs Shows all the Menus are presented in the header as tab buttons.
- navigation.instant Makes button clicks load as XHR updates instead of reloading the whole page.
- navigation.sections Removes the drop-down grouping for page headings and explicitly shows all page contents on the nav-bar. Only applies to page contents, sub-menus will still show up as drop-downs.
- navigation.top Adds a “Back to Top” button whenever the visitor scrolls up.
- toc.integrate Integrates the Table of Contents on the nav-bar.
Page Syntax
Default pages are a good starting point since they have a lot of code examples and how mkdocs interprets said code.
The basic MKDocs markdown syntax is easy to find online but this link might still be active.
Linking URLs
[Hyperlink](URL)
Relative URLs
Linking from the Index page is always straight forward and you only need to consider the home page URL.
The link on my home page to my 1st assignment use the code:
[here](assignments/week01.md)
But if I want to have a working link in this page I need to account for hierarchy and go back steps with “../”
In this case I need to use it once to go back into the “assignments folder” and then into the week01 folder.
Works with:
[Assignment 1](../week01)
Notice after the website creation we don’t link to individual .md files too.
Embedding Images
MKDocs has a quick function to embed images, internal or not.

Internal links can be relative and domain agnostic which can be important when site URL structure is changed by admins. It follows command line syntax in using “..” for going up folders on the hierarchy.
This image:

Was interpreted from this code

It’ also possible to use pure html to embed pictures using code like this:
Html has a simplified <img> element. Lean more about it here
Note1: I tried escaping the < with a regular \ but markdown/html didn’t like it so I had to get creative and use html character codes like <img> so it would show up as <img>. Both < and > need to be switched. (Both lettered and numeral codes work apparently.) I Started reading about the <pre> html tag but didn’t need it. (Also had to change it for pre tag.)
Here’s a character set list with the numeral codes and differences between a few encoding standards.
was generated with:
<img src="../../images/week02/BabyCat.jpg" alt="If You can read this an image didn't load - BabyCat HTML" width="310"/>
Note2: Aparently the relative path for HTML needs an extra back - “../” - and I don’t know why… Probably something to do with how markdown generates other paths.
It can be worth using pure html for pictures too when you want to force css properties, for example you have a picture that has more resolution than what you want to show, but re-risizing and re-enconding it might make it a larger file so you can just use the original picture and force it into a viewport of the size you want.
Embedding Hyperlinks into Images
You can add hyperlinks to images like this:
With:
[](../images/week02/FireTest1.gif)
To do the same with HTML you need something like:
<a href="../../images/week02/FireTest1.gif">
<img src="../../images/week02/BabyCat.jpg" alt="If You can read this an image didn't load - Baby Cat gif" style="width:310px">
</a>
Which generates:
Embedding Internal Videos
From what I could find there are a few plugins available to simplify embedding stuff on mkdocs but I couldn’t figure out the setup so I had to fallback to pure html iframes.
For audio/video html has simplified <video> and <audio> elements so might as well use them.
Note2: I tried escaping the < with a regular \ but markdown/html didn’t like it so I had to get creative and use html character codes <video> and <audio> to make that sentance. Both characters need to be exchanged for it to work. (Both named and numeric codes work apparently) Started reading about the <pre> html tag but didn’t need it. (Also had to change it for pre tag.)
Basic <video> structure is:
<video>
  <source src="../../path/Example1.mp4" type="video/mp4">
</video>
Note3: This clip was compressed with this Preset for Handbrake in case you wanna give it a try.
For more settings you can check this link here. People usually use more settings to show media player controls or change viewport size when the source is larger than we want to show on the page. So people can see the full quality when in full-screen mode or something.
Embedding External Videos
For external videos the default examples are good enough.
Vimeo:
<iframe src="https://player.vimeo.com/video/10048961" width="640" height="480" frameborder="0" webkitallowfullscreen mozallowfullscreen allowfullscreen></iframe>
Youtube:
<iframe src="https://www.youtube.com/embed/jjNgJFemlC4" width="560" height="315" frameborder="0" allow="autoplay; encrypted-media" allowfullscreen></iframe>
Embedding .pdf
I’ll be embedding some .pdf patents because of my final project so might as well mention it. Browsers seem to handle .pdf iframes well. Here’s a study of power density for Hydrogen Fuel Cell uses:
Note: Don’t forget the extra “../” compared to image paths.
<iframe src="../../images/week02/HydrogenPowerDensity.pdf" width="620" height="620"></iframe>
Embedding 3D Models
Aparently we can embed 3d models these days which is cool… This was the example code:
<iframe width="640" height="480" src="https://sketchfab.com/models/658c8f8a2f3042c3ad7bdedd83f1c915/embed" frameborder="0" allow="autoplay; fullscreen; vr" mozallowfullscreen="true" webkitallowfullscreen="true"></iframe>
Basic HTML Table
This default code example:
<table border="1">
    <thead>
        <tr>
            <th>ID</th>
            <th>First Name</th>
            <th>Last Name</th>
        </tr>
    </thead>
    <tbody>
        <tr>
            <td>235312</td>
            <td>John</td>
            <td>Doe</td>
        </tr>
        <tr>
            <td>453123</td>
            <td>Mark</td>
            <td>Jones</td>
        </tr>
        <tr>
            <td>998332</td>
            <td>Jonathan</td>
            <td>Smith</td>
        </tr>
        <tr>
            <td>345612</td>
            <td>Andrew</td>
            <td>McArthur</td>
        </tr>
        <tr>
            <td>453123</td>
            <td>Adam</td>
            <td>Fuller</td>
        </tr>
    </tbody>
</table>
Makes this:
| ID | First Name | Last Name |
|---|---|---|
| 235312 | John | Doe |
| 453123 | Mark | Jones |
| 998332 | Jonathan | Smith |
| 345612 | Andrew | McArthur |
| 453123 | Adam | Fuller |