Applications and Implications
This week was focused on finalizing our plans and ideas for our final projects. We looked at materials we still needed and other things to buy in order to create what we wanted.
The Basic Plan and What we Have Done
I'm still working with Whitney to make our seating orb. As of right now, we have the outer shell created, which we worked on during make something big week. We took a lot of inspiration for our shell from this design. The concept of geometric seating areas, or seating pods in general is not new, however ours is unique due to its light and sound features.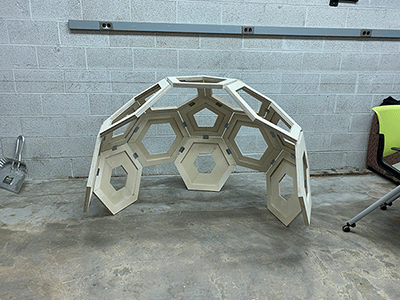
Our plan is to add half pentagons to the bottom of the structure so there are no large gaps like there currently are. We're then going to cut out various colors of acrylic to put on the inside of the hexagons and pentagons to add some color. We are also planning on making a base that this structure will sit on to add some height to our seating area overall. Both this and the extra bottom pieces will be made (hopefully) using the rest of the wood we were allotted for make something big week, so we won't need to buy any more. Since we each need a separate electronics portion, I am going to work on adding neopixels to go around the base, along with fairy lights that will illuminate and be woven in the gaps of the structure itself. The neopixels will turn on simply with a switch, and the fairy lights will turn on with an IR sensor. Whitney's electronics piece will be a button and speaker system that we will add to one of the bottom panels of the structure that will play different song options depending on what button is pressed.
What I've Designed
Whitney and I worked together to create the Fusion files for our different sized hexagons and pentagons that made up our structure. There were two different widths for our pentagon shapes and 4 different sizes for the hexagons. These were split up evenly, with each of us working to create cut files for the Axiom that would fit everything we needed. As of right now, I'm working on creating the half pentagons needed to fill the bottom of our structure. I will also design my board for the electronics component and do the coding for the lights.Current List of Materials
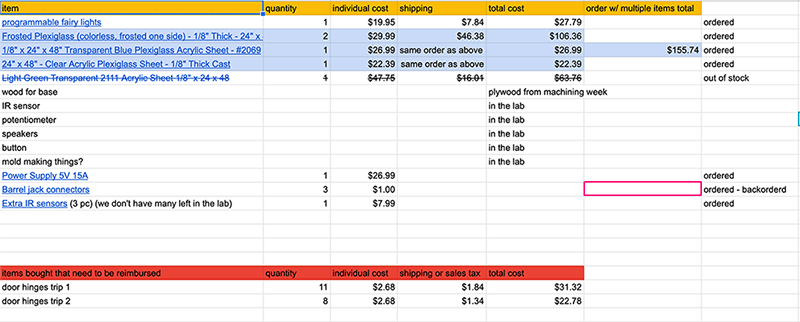
The following table is a list of materials we are planning on purchasing to create our project. The door hinges were used to construct the top part of our seating area, and they came from Home Depot. The 3 types of acrylic came from E Street Plastics, the fairy lights came from Sparkfun, the barrel jack connectors came from Digikey, and the power supply and extra ir sensors came from Amazon