Principles and Practices
Our first assignment other than creating our website was to come up with an idea (or ideas) for our final project.
As a hugely indecisive person, having the ability to make almost anything, and then having to vaguely decide on something to make in the first week was absolutely awful for me. Because I'm terrible at deciding on everything, I'm getting my way out of actually doing it for this assignment by listing all of my ideas. Ha!
The Camera
My first really good idea was to try and make a camera. My grandma had bought me a film camera for my birthday last year, but when I used it and went to get the film developed, I found out it didn't work. As I was trying to think of ideas for final projects, I figured it might be possible to make one. I looked for resources online and found this article which discussed a resin 3d printed camera! It seemed super cool and took relatively good pictures, so I figured I could integrate parts of that design into my own camera. My plan was to laser cut the body of the camera and 3d print the majority of the other pieces like the film reel/rewind lever/buttons/etc. I wasn't sure if I would be able to use clear resin to 3d print the lens of the camera like in the project that I linked, or if that would be too difficult, so I figured I could buy one if I needed to.The problem with this idea was that I wasn't really sure where to add the electronics piece of my project. After brainstorming that for a while, my favorite idea was to somehow give the camera a way to switch between taking photos and taking video, like digital cameras usually do. This is where my idea kind of peters out. I don't know how exactly I would switch between these two features, or even if it would be theoretically possible. I was thinking of making it a separate entity within the film camera as a sort of two-in-one, but I don't really know how that would work. I kind of feel like that would make it overcomplicated and bulkier than I wanted, and after thinking of some of my other ideas, I'm less enthusiastic about this one than I was originally.
The Chair
During my Intro to Digital Fabrication course that I took last semester, for one of our assignments I made a chair!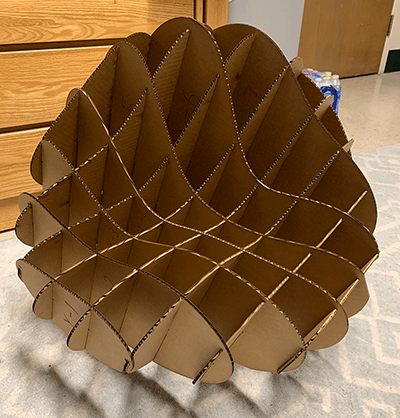
I really enjoyed doing this and was super happy with how it came out! Because this project was so fun for me, I thought about making a chair again for this class. For integrating electronics, I had a few ideas. I thought it would be cool to make a chair that automatically contours to your body so anyone could sit comfortably in it. Another idea I had was to make a chair that automatically pushed a person into the table they were sitting at. From that, the ideas of a chair that moves to you when you call it or moves around from your control came, but one of the other students in my node talked about how that reminded them of the people from the future in the movie Wall-e, which is not something I want to be encouraging or condoning, so now I'm less enthusiastic about that batch of ideas.
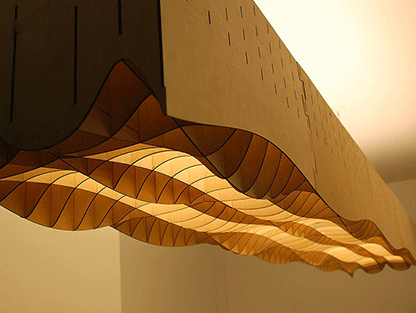
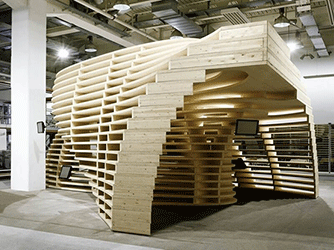
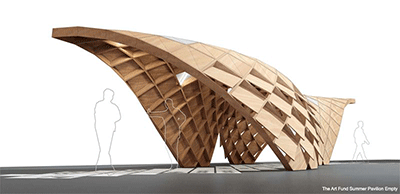
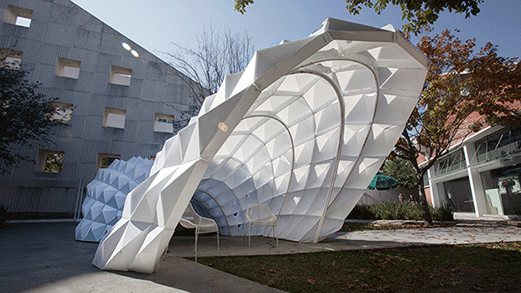
The Pavilion
One of my favorite parts about making the chair in my DigiFab class was the way it ended up looking. Because of this, I decided to research similar design elements, which led me to parametric design. I think parametric design is incredibly cool, and found lots of images for inspiration, including a few websites, which I'll add below.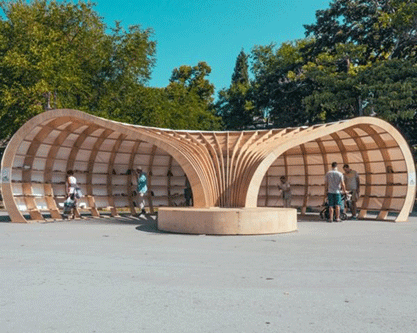
 Because of my limited funds, I was thinking of making my pavilion more of an extended arch or short walkway. For my electronics portion, I thought it would be interesting to have LEDs all along the walkway. I wasn't sure if I wanted them to be motion sensored, or have some sort of interaction, where when a person touches any part of the pavilion, light would ripple out from where they touched.
Pin/LED Interactive Art Thing
When I was looking at images for inspiration for my chair that contours to your body, I found this image.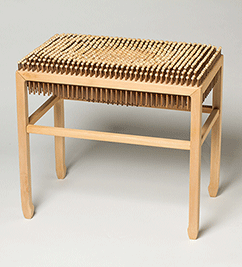
This reminded me of the plastic pin art things that I had as a kid, and this idea was born. Basically, I was thinking of making a giant version of one of those. I was thinking that it could be programmed with a screen with different display options, and people could come up and choose a shape it would display. The pins would then get pushed out by motors or some other electronic process, and whatever the shape was would take form. From talking with other students in my node, a couple of other versions of this were born. One had users draw on the small screen, and then whatever they drew would be displayed with the pins. Another had fiberoptics or LEDs instead of the pins.
I really liked those ideas and did some research for those as well, when I stumbled across Waterlight Graffiti, an art installation with a huge board of LEDs that light up when water is sprayed at them. This was super cool, and gave me more of a vision for what my project could look like if I went the LED route. I definitely like the idea of having some sort of drawing pad instead of preprogrammed things to display, but I'm not sure whether I like the pins or LEDs more for the piece. I think that the LEDs would look really cool, but they lose the definition and dimension that the pins would've added to my final project.