Prior knowledge
|
I've already made a bit of interface design in the past mainly with Visual Studio. |
Hero shot
Web Serial API
The Web Serial API allows to send and receive data with a serial device using JavaScript.
It allows for example, to use a website to communicate to a microcontroller connected to a computer via USB.
I'll create an interface using the Web Serial API and buttons to control some outputs on a microcontroller directly from my computer.
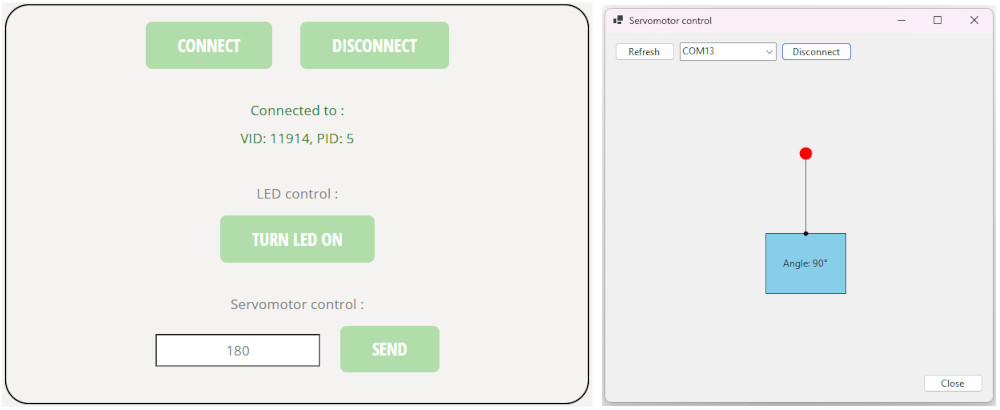
The interface is composed of :
-
Two buttons to connect and disconnect from a serial port ;
-
One button to toggle the value of a LED on a PCB ;
-
One button and an input box to type and modify the angle of a servomotor on a PCB.
Here's the interface (you can interact with it but be sure to send the code in the microcontroller first, LED on GPIO 3 and servomotor on GPIO0) :
This is the JavaScript code to interact with the buttons and the input box of the interface :
                                // Variables
                                let port;               // Serial device connection
                                let writer;             // Data to send to the device
                                let ledState = false;   // Keeps track of the LED status
                                let infoText = "";      // Empty string for display

                                // Displays status messages for the serial port connection
                                const statusLine1 = document.getElementById("statusLine1");
                                const statusLine2 = document.getElementById("statusLine2");

                                // For the "Connect" button
                                document.getElementById("connect").addEventListener("click", async () => {
                                    try {
                                        // Selection of serial port
                                        port = await navigator.serial.requestPort();

                                        // Open the serial connection
                                        await port.open({ baudRate: 115200 });

                                        writer = port.writable.getWriter();

                                        // Updates status messages for first line and sets color to green
                                        statusLine1.textContent = "Connected to :";
                                        statusLine1.style.color = "green";

                                        // Retrieves USB data about the device
                                        const info = port.getInfo();

                                        // Checks vendor and product IDs
                                        if (info.usbVendorId && info.usbProductId) {
                                            infoText = `VID: ${info.usbVendorId}, PID: ${info.usbProductId}`;
                                        } else if (info.usbVendorId) {
                                            infoText = `VID: ${info.usbVendorId}`;
                                        } else {
                                            infoText = "Unknown device";
                                        }

                                        // Updates status messages for second line and sets color to green
                                        statusLine2.textContent = infoText;
                                        statusLine2.style.color = "green";

                                        // Prints message in browser console
                                        console.log("Connected!");
                                    }
                                    // Error handling
                                    catch (err) {
                                        console.error(err);

                                        // Resets UI on failure
                                        statusLine1.textContent = "Not connected";
                                        statusLine2.textContent = "";
                                        statusLine1.style.color = "red";
                                    }
                                });

                                // For the "Disconnect" button
                                document.getElementById("disconnect").addEventListener("click", async () => {
                                    try {
                                        // Closes writer
                                        if (writer) {
                                            await writer.close();
                                            writer.releaseLock();
                                            writer = null;
                                        }

                                        // Closes serial connection
                                        if (port) {
                                            await port.close();
                                            port = null;
                                        }

                                        // Resets UI
                                        statusLine1.textContent = "Not connected";
                                        statusLine2.textContent = "";
                                        statusLine1.style.color = "red";
                                        ledState = false;
                                        document.getElementById("sendLED").textContent = "Turn LED ON";

                                        // Prints message in browser console
                                        console.log("Disconnected");
                                    }
                                    // Error handling
                                    catch (err) {
                                        console.error("Disconnect error:", err);
                                    }
                                });

                                // For the "Turn LED ON/OFF" button
                                document.getElementById("sendLED").addEventListener("click", async () => {
                                    // Checks port connection
                                    if (!writer) {
                                        alert("Not connected");
                                        return;
                                    }

                                    // Button reference
                                    const btn = document.getElementById("sendLED");

                                    // If the LED is OFF
                                    if (!ledState) {
                                        // Converts string "LED ON\n" into bytes
                                        const data = new TextEncoder().encode("LED ON\n");
                                        // Sends data
                                        await writer.write(data);

                                        // Updates UI and state
                                        btn.textContent = "Turn LED OFF";
                                        ledState = true;
                                    }
                                    // If the LED is ON
                                    else {
                                        // Converts string "LED OFF\n" into bytes
                                        const data = new TextEncoder().encode("LED OFF\n");
                                        // Sends data
                                        await writer.write(data);

                                        // Updates UI and state
                                        btn.textContent = "Turn LED ON";
                                        ledState = false;
                                    }
                                });

                                // For the "Send" button
                                document.getElementById("send").addEventListener("click", async () => {
                                    // Checks port connection
                                    if (!writer) {
                                        alert("Not connected");
                                        return;
                                    }

                                    // Reads input from the text field
                                    const text = document.getElementById("angleValue").value;

                                    // Converts input into bytes
                                    const data = new TextEncoder().encode(text + "\n");

                                    // Send data
                                    await writer.write(data);

                                    // Clears text after sending
                                    document.getElementById("angleValue").value = "";
                                });
Before connecting to the microcontroller, I need to insert a code in it to control the outputs depending on the data received from the interface.
                                ###########################
                                ### Code in MicroPython ###
                                ###########################

                                # Modules of the XIAO-RP2040 for GPIOs control and PWM generation
                                from machine import Pin, PWM

                                # Set pin 3 as LED output
                                led = Pin(3, Pin.OUT)

                                # Set pin 0 as servo output
                                servo = PWM(Pin(0))
                                # Set servo frequency
                                servo.freq(50)

                                # Function that converts an angle (0-180) to a duty cycle
                                def set_angle(angle):
                                    # Safety if values are under 0 or above 180
                                    if angle < 0:
                                        angle = 0
                                    if angle > 180:
                                        angle = 180

                                    # Servo pulse width range : ~500µs to ~2500µs
                                    min_us = 500
                                    max_us = 2500

                                    # Angle to pulse width conversion
                                    pulse_us = min_us + (max_us - min_us) * angle / 180

                                    # Pulse width to PWM duty conversion
                                    # RP2040 PWM : 16-bit (0-65535), 20ms period = 20000µs
                                    duty = int(pulse_us * 65535 / 20000)

                                    # Send PWM signal
                                    servo.duty_u16(duty)

                                # Infinite loop
                                while True:
                                    # Variable that reads the shell's data
                                    shell = input()

                                    # If the shell reads "LED ON"
                                    if shell == "LED ON":
                                        # Turns LED ON
                                        led.value(1)

                                    # If the shell reads "LED OFF"
                                    elif shell == "LED OFF":
                                        # Turns LED OFF
                                        led.value(0)

                                    # If the shell reads a value between 0 and 180
                                    elif 0 <= int(shell) <= 180:
                                        # Sets servomotor angle
                                        set_angle(int(shell))
The LED is connected to the GPIO 3 and the servomotor to the GPIO 0 of the XIAO-RP2040, if you want to change this, you must change the GPIOs in the MicroPython code.
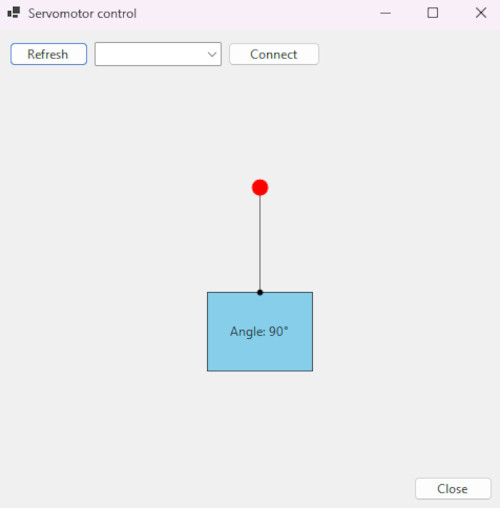
Windows Forms App
I used Visual Studio to make a Windows Forms App to make an app to control a servomotor with my mouse.
It allows for example, to use a website to communicate to a microcontroller connected to a computer via USB.
The interface is composed of :
-
Two buttons to refresh and connect or disconnect from a serial port ;
-
A drawing that can be interacted with to control the servomotor :
-
One button to close the application ;
Here's the final result :
Here's the C# code :
// Libraries for drawings and forms
using System;
using System.Drawing;
using System.Windows.Forms;
using System.IO.Ports; // Library for serial communication
namespace Servomotor_control
{
public partial class Form1 : Form
{
// ========================================== //
// ================= SERIAL ================= //
// ========================================== //
private SerialPort serialPort = new SerialPort(); // Creation of object serialPort
private float lastSentAngle = -1; // Latest stored angle
// Method to refresh the detected ports
private void RefreshPorts()
{
comboBoxPorts.Items.Clear(); // Clears the current list
string[] ports = SerialPort.GetPortNames(); // Detects every serial ports
Array.Sort(ports); // Sorts the ports alphabetically and numerically
comboBoxPorts.Items.AddRange(ports); // Adds every port name in the dropdown list
// If a port is available, automatically connect to it
if (comboBoxPorts.Items.Count > 0)
comboBoxPorts.SelectedIndex = 0;
}
// Method to send the angle value through the serial port
private void SendAngle(float angle)
{
// Checks if the new angle is too similar to the last one
if (Math.Abs(angle - lastSentAngle) < 1) return;
// Updates the latest stored angle
lastSentAngle = angle;
// If the serial port is available, send stored angle value
try
{
if (serialPort.IsOpen)
{
serialPort.WriteLine(((int)angle).ToString());
}
}
catch
{
// ignore disconnect errors
}
}
// =========================================== //
// ================= DRAWING ================= //
// =========================================== //
private float angleDeg = 90f; // Angle value
private float length = 100f; // Length of line
private bool dragging = false; // User interaction detection
private Rectangle rect = new Rectangle(200, 250, 100, 75); // Creation of rectangle
private PointF endPoint; // Stores the current end of the rotating line
// Drawings and forms
protected override void OnPaint(PaintEventArgs e)
{
base.OnPaint(e); // Default drawing behavior
var g = e.Graphics; // Drawing surface
g.SmoothingMode = System.Drawing.Drawing2D.SmoothingMode.AntiAlias; // Makes lines smoother
// Fills rectangle blue with black border
g.FillRectangle(Brushes.SkyBlue, rect);
g.DrawRectangle(Pens.Black, rect);
// Puts pivot at the top center of the rectangle for the line rotation
PointF pivot = new PointF(
rect.X + rect.Width / 2f,
rect.Y
);
double rad = angleDeg * Math.PI / 180.0; // Converts degrees to radians
// Line endpoint calculation
endPoint = new PointF(
pivot.X + (float)(Math.Cos(rad) * length),
pivot.Y - (float)(Math.Sin(rad) * length)
);
// Draws a line
g.DrawLine(Pens.Black, pivot, endPoint);
// Draws a line a draggable red circle (endpoint)
int r = 8;
g.FillEllipse(Brushes.Red, endPoint.X - r, endPoint.Y - r, r * 2, r * 2);
// Draws a line a black circle at pivot point
g.FillEllipse(Brushes.Black, pivot.X - 3, pivot.Y - 3, 6, 6);
// Angle value text
string text = $"Angle: {angleDeg:0}°";
SizeF textSize = g.MeasureString(text, this.Font);
// Center text inside the rectangle
PointF textPos = new PointF(
rect.X + (rect.Width - textSize.Width) / 2f,
rect.Y + (rect.Height - textSize.Height) / 2f
);
// Draws angle value text
g.DrawString(text, this.Font, Brushes.Black, textPos);
}
// Checks if user clicked near the red endpoint
private void OnMouseDown(object sender, MouseEventArgs e)
{
if (Distance(e.Location, endPoint) < 20)
dragging = true;
}
// If the red endpoint is dragged
private void OnMouseMove(object sender, MouseEventArgs e)
{
if (!dragging) return;
// Recalculates pivot
PointF pivot = new PointF(
rect.X + rect.Width / 2f,
rect.Y
);
float dx = e.X - pivot.X;
float dy = pivot.Y - e.Y;
// Converts mouse position into an angle
double rad = Math.Atan2(dy, dx);
double deg = rad * 180.0 / Math.PI;
// Only accept angles in the top half of the rectangle between 0° and 180° and sends it to serial port
if (deg >= 0 && deg <= 180)
{
angleDeg = (float)deg;
SendAngle(angleDeg);
Invalidate();
}
}
// Checks how close the mouse click is to the draggable endpoint
private float Distance(Point a, PointF b)
{
float dx = a.X - b.X;
float dy = a.Y - b.Y;
return (float)Math.Sqrt(dx * dx + dy * dy);
}
// =========================================== //
// ================= APP ===================== //
// =========================================== //
public Form1()
{
InitializeComponent(); // Initialization of application
DoubleBuffered = true; // Enables double buffering (drawing happens off-screen first, then displayed)
// Controls mouse buttons interaction
MouseDown += OnMouseDown;
MouseMove += OnMouseMove;
MouseUp += (s, e) => dragging = false;
}
// Method to close the application
private void btnClose_Click(object sender, EventArgs e)
{
Close(); // Closes the application500
}
// Method to refresh the detected ports
private void btnRefresh_Click(object sender, EventArgs e)
{
RefreshPorts(); // Calls method
}
// Method to connect and disconnect to a port
private void btnConnect_Click(object sender, EventArgs e)
{
// Function to disconnect
if (serialPort.IsOpen)
{
serialPort.Close();
btnConnect.Text = "Connect";
return;
}
try
{
// Function if no ports are selected
if (comboBoxPorts.SelectedItem == null)
{
MessageBox.Show("Please select a COM port.", "Warning !"); // A message box appears
return;
}
// Serial port configuration
serialPort.PortName = comboBoxPorts.SelectedItem.ToString();
serialPort.BaudRate = 115200;
serialPort.NewLine = "\n";
serialPort.Open();
btnConnect.Text = "Disconnect";
}
catch (Exception ex)
{
MessageBox.Show(ex.Message); // A message box appears
}
}
// Method to disconnect the port when closing the application
protected override void OnFormClosing(FormClosingEventArgs e)
{
if (serialPort.IsOpen)
serialPort.Close();
base.OnFormClosing(e);
}
// Method when the application is launched
private void Form1_Load(object sender, EventArgs e)
{
RefreshPorts(); // Calls method
}
private void Form1_Shown(object sender, EventArgs e)
{
this.ActiveControl = null;
}
}
}
Before connecting to the microcontroller, I need to insert a code in it to control the output depending on the data received from the interface.
                                ###########################
                                ### Code in MicroPython ###
                                ###########################

                                # Modules of the XIAO-RP2040 for GPIOs control and PWM generation
                                from machine import Pin, PWM

                                # Set pin 0 as servo output
                                servo = PWM(Pin(0))
                                # Set servo frequency
                                servo.freq(50)

                                # Function that converts an angle (0-180) to a duty cycle
                                def set_angle(angle):
                                    # Safety if values are under 0 or above 180
                                    if angle < 0:
                                        angle = 0
                                    if angle > 180:
                                        angle = 180

                                    # Servo pulse width range : ~500µs to ~2500µs
                                    min_us = 500
                                    max_us = 2500

                                    # Angle to pulse width conversion
                                    pulse_us = min_us + (max_us - min_us) * angle / 180

                                    # Pulse width to PWM duty conversion
                                    # RP2040 PWM : 16-bit (0-65535), 20ms period = 20000µs
                                    duty = int(pulse_us * 65535 / 20000)

                                    # Send PWM signal
                                    servo.duty_u16(duty)

                                # Infinite loop
                                while True:
                                    # Variable that reads the shell's data
                                    shell = input()

                                    # If the shell reads a value between 0 and 180
                                    if 0 <= int(shell) <= 180:
                                        # Sets servomotor angle
                                        set_angle(int(shell))
The servomotor to the GPIO 0 of the XIAO-RP2040, if you want to change this, you must change the GPIO in the MicroPython code.
Useful file(s) (Click to download)
- Web Serial API MicroPython code (Thonny)
- Windows Forms App MicroPython code (Thonny)
- Windows Forms App C# code (Thonny)
Assignments checklist
- ✅Linked to the group assignment page.
- ✅Documented your process.
- ✅Explained the UI that you made and how you did it.
- ✅Explained how your application communicates with your embedded microcontroller board.
- ✅Explained any problems you encountered and how you fixed them.
- ✅Included original source code (or a screenshot of the app code if that4s not possible).
- ✅Included a hero shot of your application running & communicating with your board.