Week 15 — Interface & Application Programming
Group assignment
- Compare as many tool options as possible.
- Document the work on the group work page and reflect on the individual page what I learned.
Group assignment reference
For the group assignment, Zequan Lin documented the comparison of interface and application programming tool options on his Week 15 page. I use his page as the group assignment reference for this week:
Zequan Lin — Week 15 Interface and Application Programming group assignment
Individual assignment
- Write an application for an embedded board that interfaces a user with an input and/or output device.
Learning outcomes
- Implement a user interface using programming and explore communication with a microcontroller board that I designed and made.
Checklist
- Linked to the group assignment page.
- Documented the process.
- Explained the UI that I made and how I made it.
- Explained how the application communicates with the embedded microcontroller board.
- Explained problems encountered and how I fixed them.
- Included original source code.
- Included hero shots of the application running and communicating with the board.
Documentation
This week about interface and application programming, and I will build my interface and application on top of the code which I made on week 11 about networking and communication.
https://fabacademy.org/2026/labs/formshop/students/yaroslav-artsishevskiy/assignments/week11.html
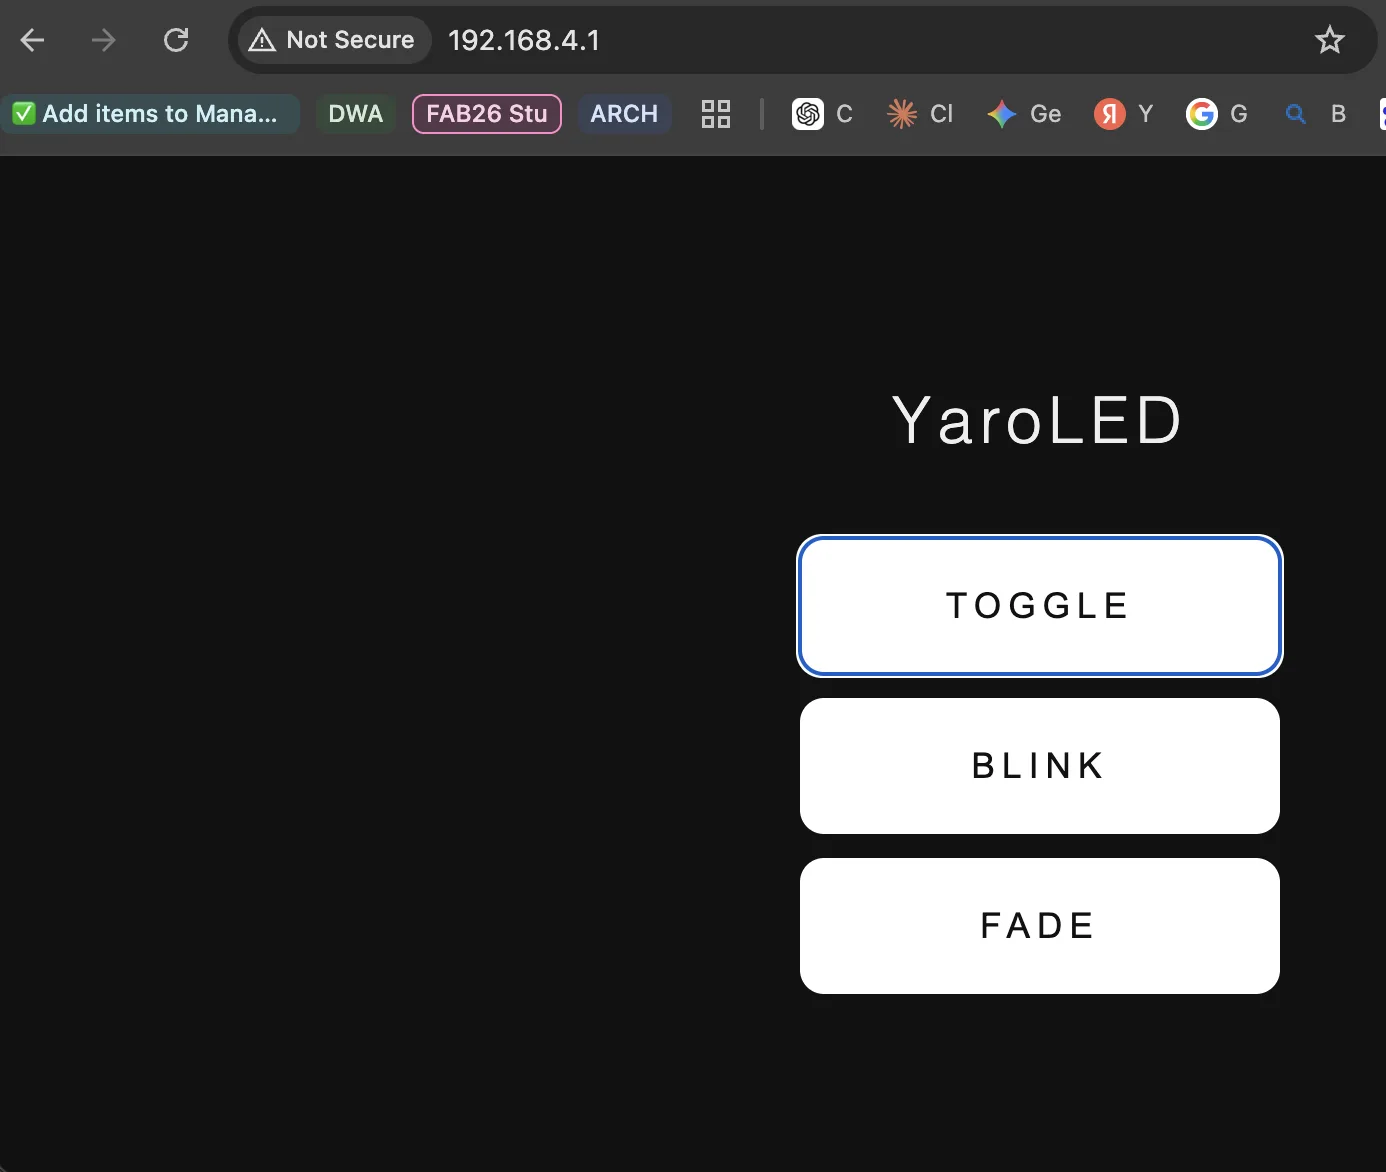
When I practice with Wi-Fi and UDP, I build two files, one client and one server, and I successfully control an LED from one board by another. Now I want to build a similar approach and control the LED from the web interface. Simple web interface with a button, only a button.
1. Button UDP
This is my Week 11 UDP receiver with a small web server added.
How it works:
1. The ESP32 makes its own Wi-Fi network "YaroUDP" (same as Week 11).
2. I connect my laptop or phone to that network.
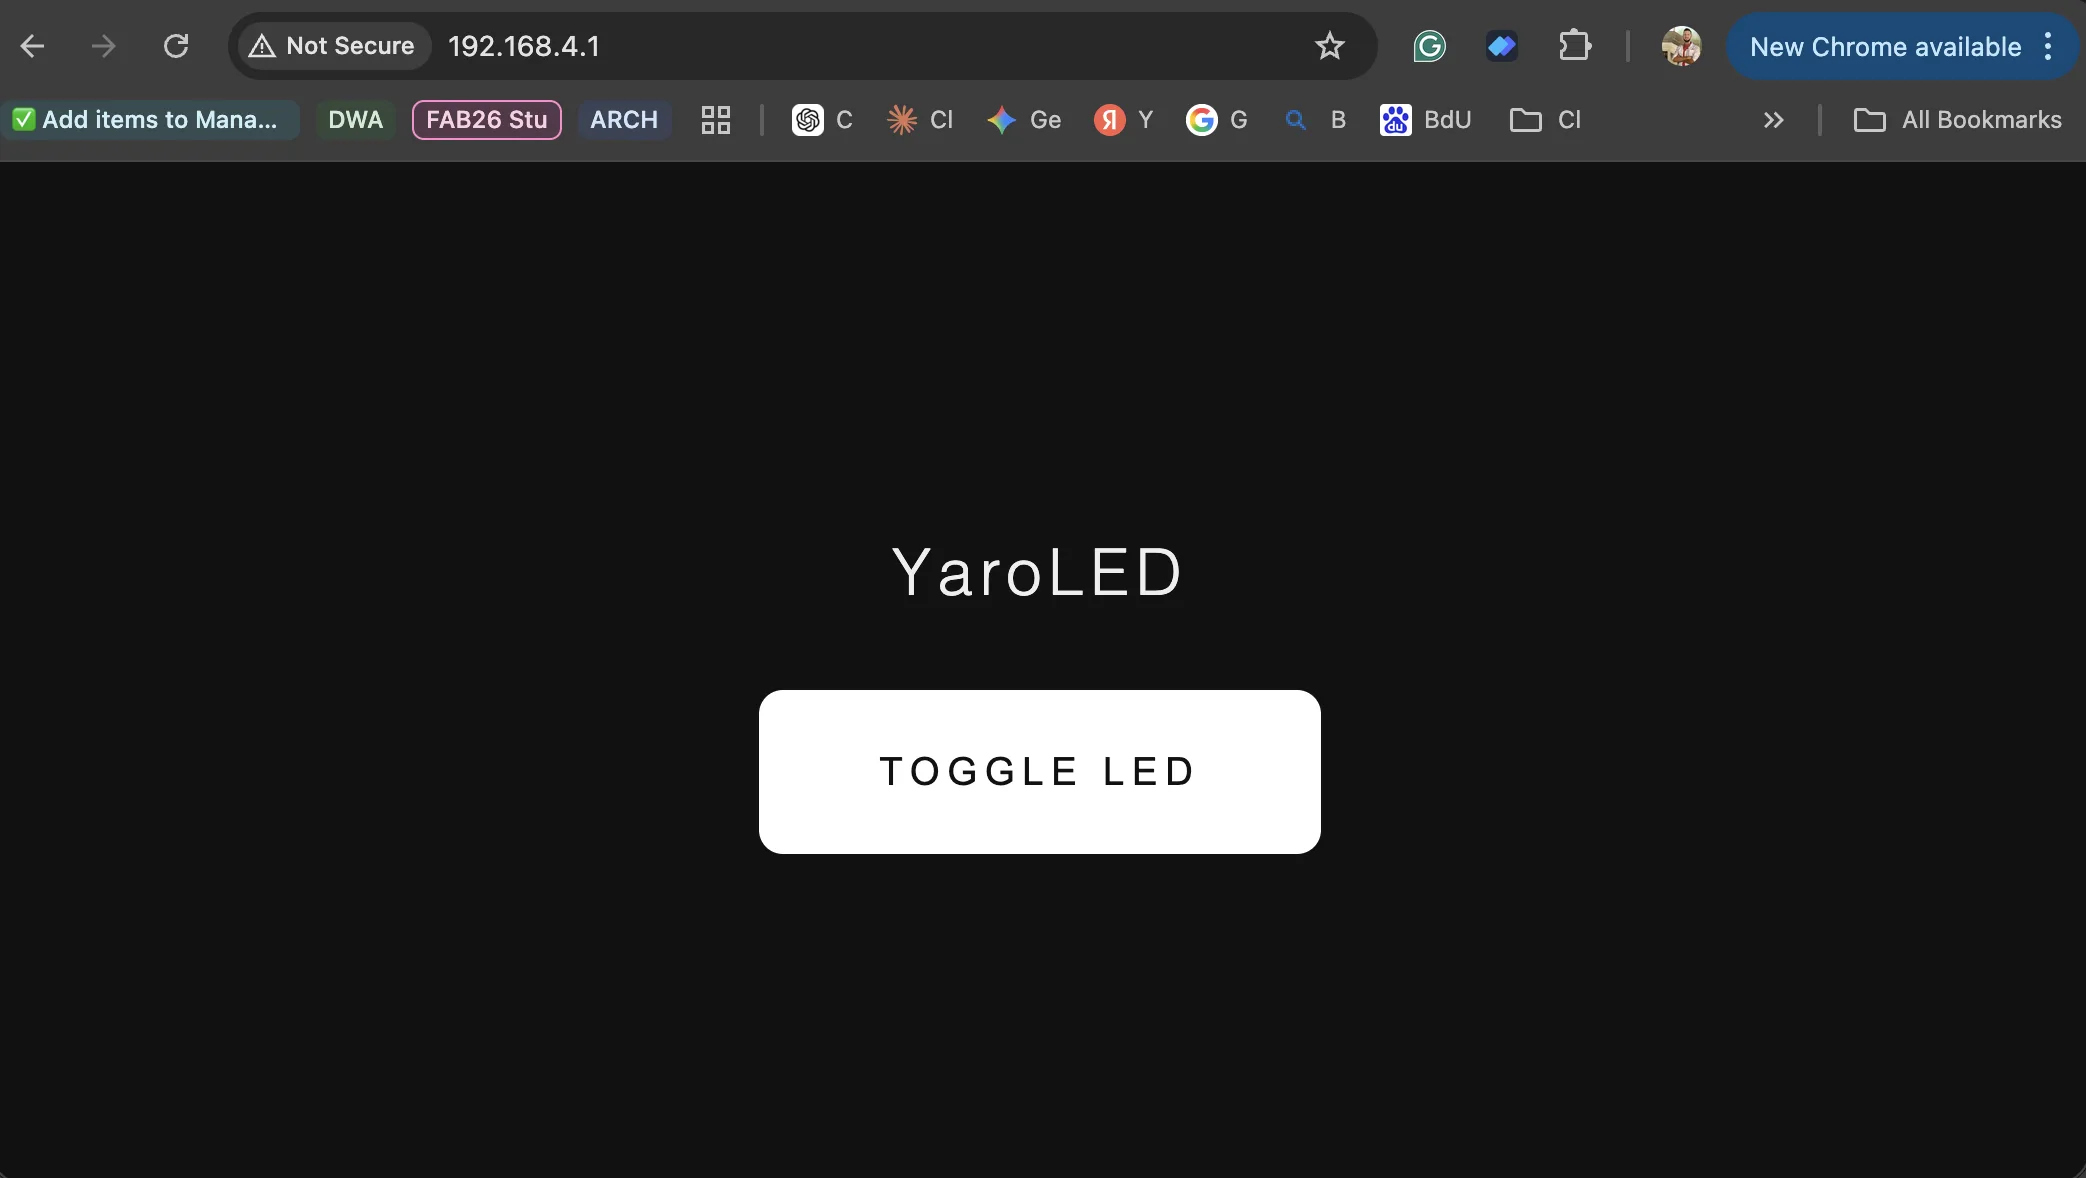
3. I open http://192.168.4.1 in any browser.
4. The board serves a tiny HTML page with one button.
5. Clicking the button asks the board to toggle its LED.
The Week 11 UDP listener is still here too — left as-is, so the same board can also receive UDP packets from another ESP32 if I want. Week 15 only adds the web server next to it.
Code:
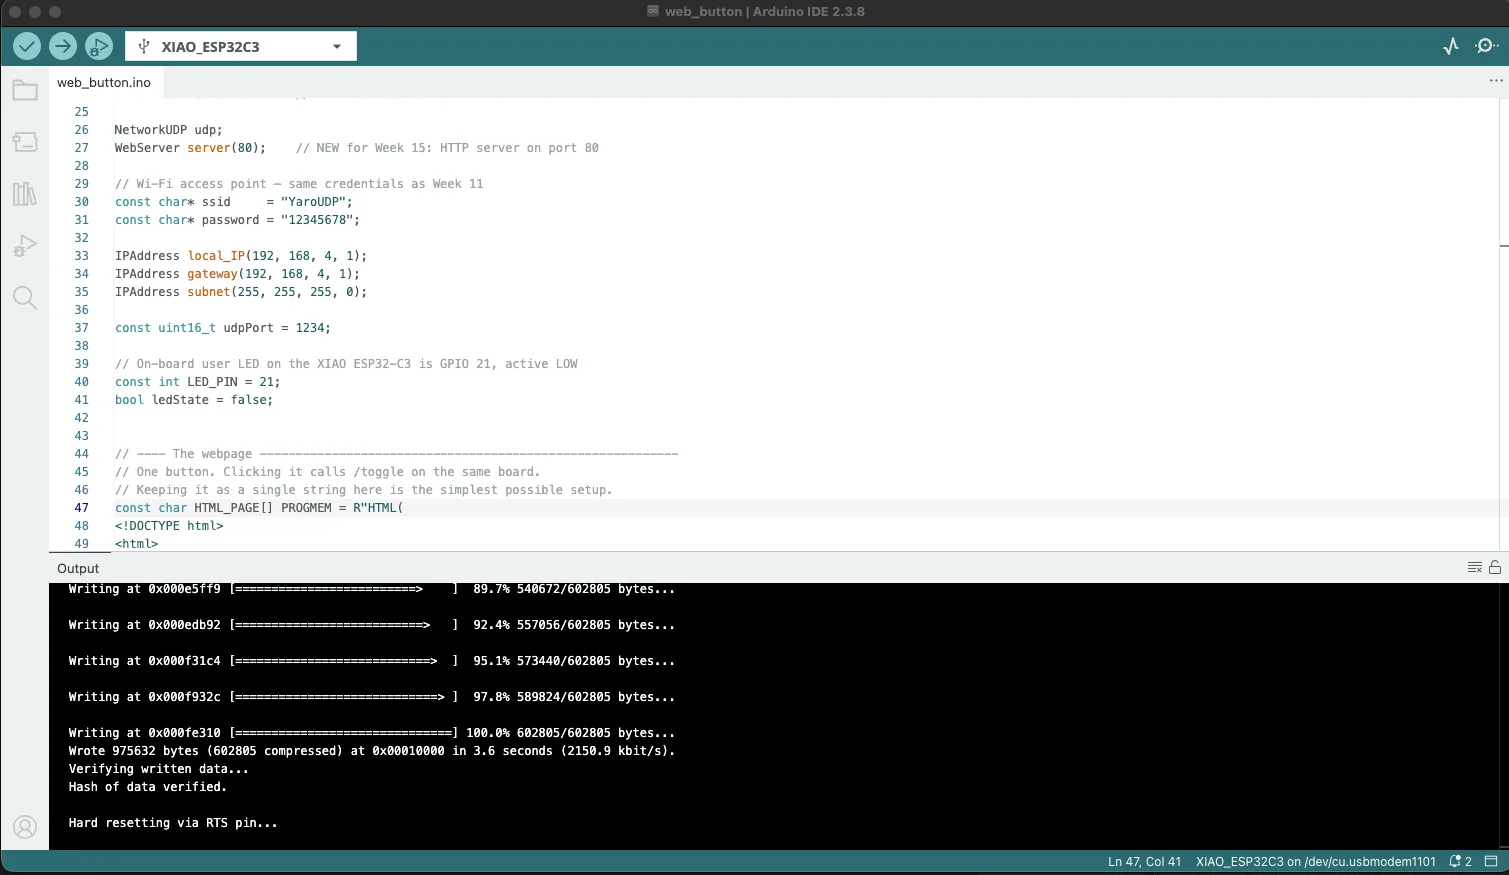
#include <Arduino.h>
#include "Network.h"
#include "WiFi.h"
#include <WebServer.h> // NEW for Week 15: small built-in
HTTP server
NetworkUDP udp;
WebServer server(80); // NEW for Week 15: HTTP server on port 80
// Wi-Fi access point —
same credentials as Week 11
const char* ssid = "YaroUDP";
const char* password = "12345678";
IPAddress local_IP(192, 168, 4, 1);
IPAddress gateway(192, 168, 4, 1);
IPAddress subnet(255, 255, 255, 0);
const uint16_t udpPort = 1234;
// On-board user LED on
the XIAO ESP32-C3 is GPIO 21, active LOW
const int LED_PIN = 21;
bool ledState = false;
// ---- The webpage
----------------------------------------------------------
// One button. Clicking
it calls /toggle on the same board.
// Keeping it as a
single string here is the simplest possible setup.
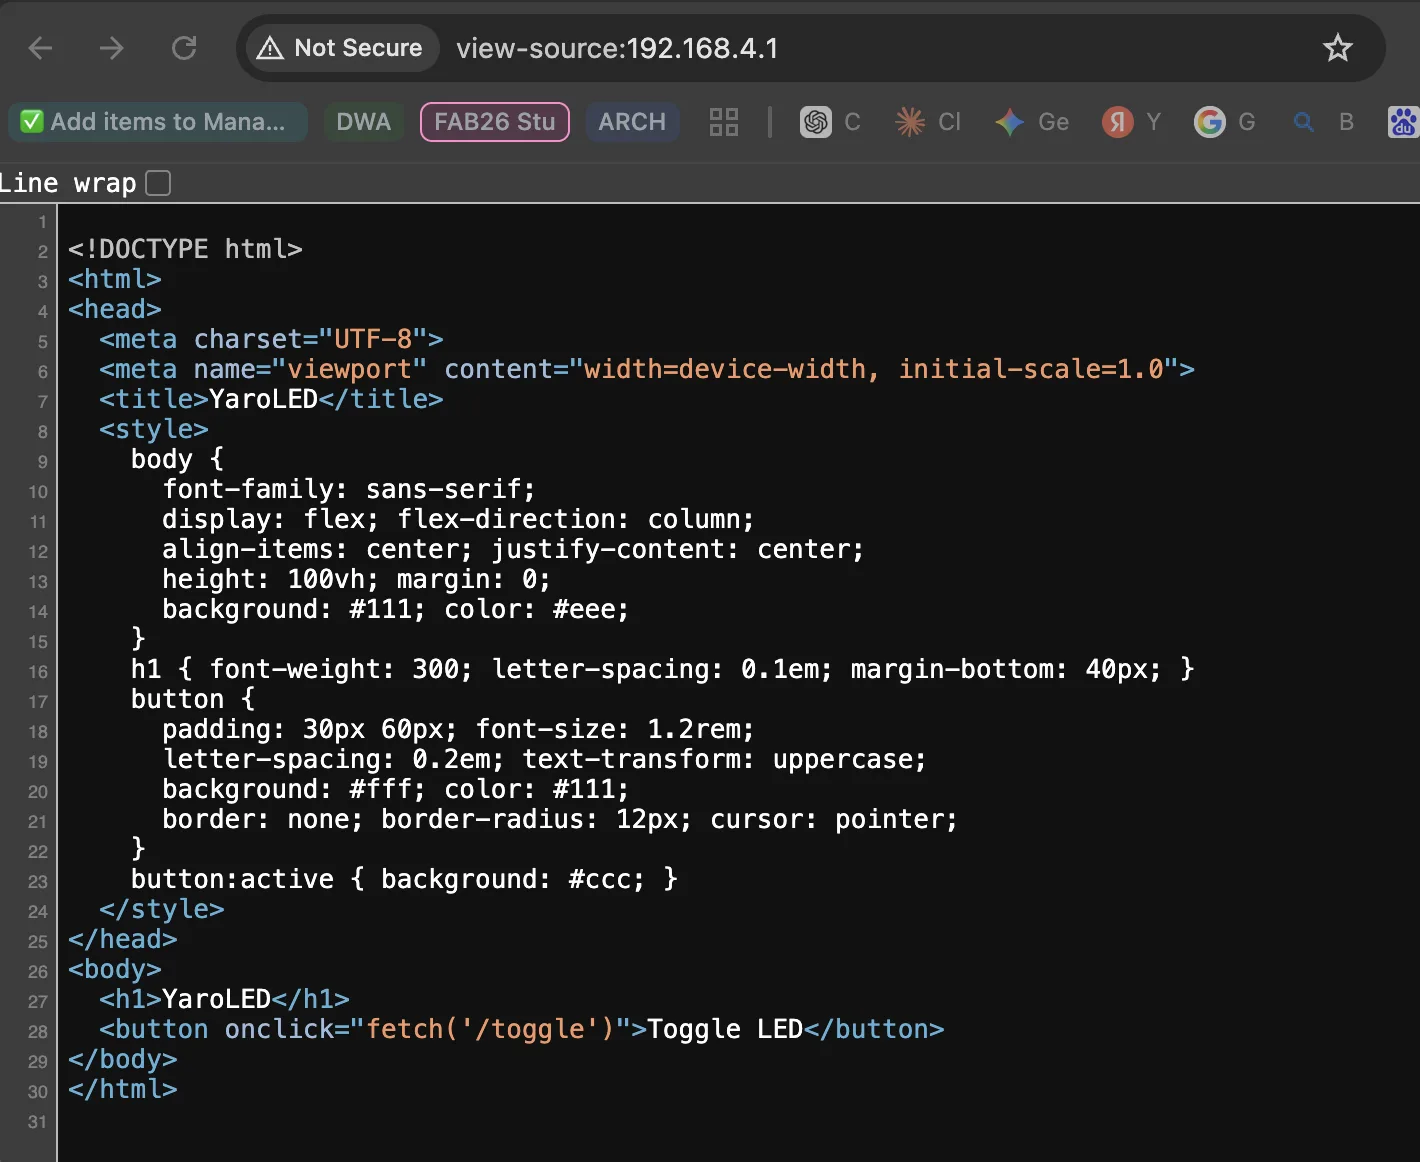
const char HTML_PAGE[] PROGMEM = R"HTML(
<!DOCTYPE html>
<html>
<head>
<meta charset="UTF-8">
<meta name="viewport"
content="width=device-width, initial-scale=1.0">
<title>YaroLED</title>
<style>
body {
font-family: sans-serif;
display: flex; flex-direction: column;
align-items: center; justify-content:
center;
height: 100vh; margin: 0;
background: #111; color: #eee;
}
h1 { font-weight: 300; letter-spacing:
0.1em; margin-bottom: 40px; }
button {
padding: 30px 60px; font-size: 1.2rem;
letter-spacing: 0.2em; text-transform:
uppercase;
background: #fff; color: #111;
border: none; border-radius: 12px;
cursor: pointer;
}
button:active { background: #ccc; }
</style>
</head>
<body>
<h1>YaroLED</h1>
<button
onclick="fetch('/toggle')">Toggle LED</button>
</body>
</html>
)HTML";
// ---- HTTP handlers
--------------------------------------------------------
// When the browser asks
for "/" — send the HTML page.
void handleRoot() {
server.send_P(200, "text/html", HTML_PAGE);
}
// When the button calls
"/toggle" — flip the LED and reply OK.
void handleToggle() {
ledState = !ledState;
digitalWrite(LED_PIN, ledState ? LOW
: HIGH); // LOW = ON (active LOW)
Serial.println(ledState ? "LED ON" : "LED OFF");
server.send(200, "text/plain", "OK");
}
// ---- Setup
----------------------------------------------------------------
void setup() {
Serial.begin(115200);
delay(1000);
// LED
pinMode(LED_PIN, OUTPUT);
digitalWrite(LED_PIN, HIGH); // start OFF
// Wi-Fi access point — exactly like Week 11
Network.begin();
WiFi.mode(WIFI_AP);
WiFi.softAPConfig(local_IP, gateway,
subnet);
WiFi.softAP(ssid, password);
// UDP listener — exactly like Week 11
udp.begin(udpPort);
// NEW for Week 15: register the two URLs and
start the web server
server.on("/", handleRoot);
server.on("/toggle", handleToggle);
server.begin();
Serial.println("Ready");
Serial.print("AP IP: ");
Serial.println(WiFi.softAPIP());
// 192.168.4.1
Serial.println("Open http://192.168.4.1 in your
browser");
}
// ---- Loop
-----------------------------------------------------------------
void loop() {
// NEW for Week 15: let the web server handle
any incoming HTTP requests
server.handleClient();
// Week 11 UDP listener — kept exactly as it
was
int packetSize = udp.parsePacket();
if (packetSize) {
char incoming[255];
int len = udp.read(incoming, sizeof(incoming) - 1);
if (len > 0) incoming[len] = '\0';
Serial.print("Received UDP: ");
Serial.println(incoming);
}
}After flashing the Xiao ESP32 with my custom board
New Wi-Fi UDB access point available for connection.
On the web interface it is one button with one function only
Video IMG_7885.MOV
Here
<button onclick="fetch('/toggle')">Toggle LED</button>
What fetch('/toggle') does
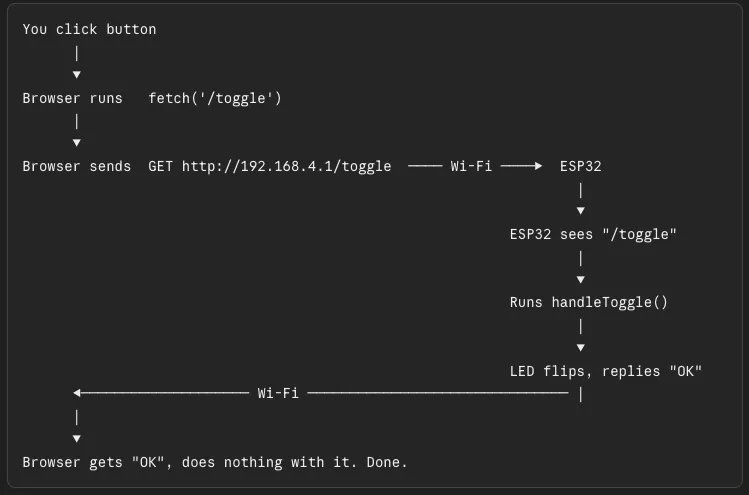
fetch is a JavaScript command that means "go ask the server for this URL". It's the same thing your browser does when you type a URL in the address bar — but invisible, in the background, without leaving the page.
So when you click the button, browser quietly asks the ESP32: "Hey, give me the page at /toggle."
The browser doesn't care what comes back. It just sends the request.
Where the request goes
The browser is currently looking at http://192.168.4.1. So when JavaScript says fetch('/toggle'), the browser fills in the missing part and sends the request to:
http://192.168.4.1/toggle
That request travels over Wi-Fi to the ESP32.
What the ESP32 does with it
In setup():
server.on("/toggle", handleToggle);
This is a rule. It says: "Whenever someone asks for the URL /toggle, run the function called handleToggle."
So the ESP32 receives the request, the URL is /toggle, looks at its rules, finds the matching one, and runs handleToggle():
void handleToggle() {
ledState = !ledState; // flip true ↔ false
digitalWrite(LED_PIN, ledState ? LOW : HIGH); // change the pin
server.send(200, "text/plain", "OK"); // reply "OK"
}
The LED toggles. The ESP32 sends back a tiny reply that just says "OK". The browser receives "OK" and ignores it (because we didn't tell it to do anything with the reply).
The whole journey in one picture
2. 3 Buttons UDP
Now I just want to add a few more buttons and control different behavior of the LED.
Three buttons in the browser:
[Toggle] — turn the LED on or off (same as before)
[Blink] — LED blinks once per second
[Fade] — LED fades smoothly up and down
How it works:
Each button calls a different URL on the ESP32:
/toggle → flip ON ↔ OFF (and stop any animation)
/blink → enter blink mode
/fade → enter fade mode
The board remembers the current mode in a variable. The main loop() runs the animation for whichever mode is active.
#include <Arduino.h>
#include "Network.h"
#include "WiFi.h"
#include <WebServer.h>


NetworkUDP udp;
WebServer server(80);


const char* ssid     = "YaroUDP";
const char* password = "12345678";


IPAddress local_IP(192, 168, 4, 1);
IPAddress gateway(192, 168, 4, 1);
IPAddress subnet(255, 255, 255, 0);


const uint16_t udpPort = 1234;


// On-board user LED on
the XIAO ESP32-C3 is GPIO 21, active LOW
const int LED_PIN = 21;


// ---- Modes
----------------------------------------------------------------
// The LED can be in one
of three modes. The current mode tells loop()
// what to do on every
iteration.
enum Mode { MODE_OFF, MODE_ON, MODE_BLINK, MODE_FADE };
Mode currentMode =
MODE_OFF;


// ---- The webpage
----------------------------------------------------------
// Three buttons. Each
one calls a different URL with fetch().
const char HTML_PAGE[] PROGMEM = R"HTML(
<!DOCTYPE html>
<html>
<head>
  <meta charset="UTF-8">
  <meta name="viewport"
content="width=device-width, initial-scale=1.0">
  <title>YaroLED</title>
  <style>
    body {
      font-family: sans-serif;
      display: flex; flex-direction: column;
      align-items: center; justify-content:
center;
      height: 100vh; margin: 0;
      background: #111; color: #eee;
    }
    h1 { font-weight: 300; letter-spacing:
0.1em; margin-bottom: 40px; }
    .row { display: flex; flex-direction:
column; gap: 12px; }
    button {
      padding: 24px 60px; font-size: 1.1rem;
      letter-spacing: 0.2em; text-transform:
uppercase;
      background: #fff; color: #111;
      border: none; border-radius: 12px;
cursor: pointer;
      min-width: 240px;
    }
    button:active { background: #ccc; }
  </style>
</head>
<body>
  <h1>YaroLED</h1>
  <div class="row">
    <button
onclick="fetch('/toggle')">Toggle</button>
    <button
onclick="fetch('/blink')">Blink</button>
    <button
onclick="fetch('/fade')">Fade</button>
  </div>
</body>
</html>
)HTML";


// ---- HTTP handlers
--------------------------------------------------------
void handleRoot() {
  server.send_P(200, "text/html", HTML_PAGE);
}


// /toggle: flip between
ON and OFF, and leave any animation mode.
void handleToggle() {
  if (currentMode == MODE_ON) currentMode = MODE_OFF;
  else                        currentMode = MODE_ON;
  Serial.println(currentMode == MODE_ON ? "ON" : "OFF");
  server.send(200, "text/plain", "OK");
}


// /blink: enter
blinking mode.
void handleBlink() {
  currentMode = MODE_BLINK;
  Serial.println("BLINK");
  server.send(200, "text/plain", "OK");
}


// /fade: enter fading
mode.
void handleFade() {
  currentMode = MODE_FADE;
  Serial.println("FADE");
  server.send(200, "text/plain", "OK");
}


// ---- Setup
----------------------------------------------------------------
void setup() {
  Serial.begin(115200);
  delay(1000);


  pinMode(LED_PIN, OUTPUT);
  digitalWrite(LED_PIN, HIGH);  // start OFF (active LOW)


  Network.begin();
  WiFi.mode(WIFI_AP);
  WiFi.softAPConfig(local_IP, gateway,
subnet);
  WiFi.softAP(ssid, password);


  udp.begin(udpPort);


  server.on("/",       handleRoot);
  server.on("/toggle", handleToggle);
  server.on("/blink",  handleBlink);
  server.on("/fade",   handleFade);
  server.begin();


  Serial.println("Ready");
  Serial.print("AP IP: ");
  Serial.println(WiFi.softAPIP());
}


// ---- Loop
-----------------------------------------------------------------
// Two jobs every loop:
//   1. Let the web server handle any new HTTP
requests.
//   2. Update the LED according to the current
mode.
//
// We use millis() (not
delay()) so the web server keeps responding while
// the LED animates.
delay() would freeze the whole board.
void loop() {
  server.handleClient();


  switch (currentMode) {


    case MODE_OFF:
      digitalWrite(LED_PIN, HIGH);     // OFF (active LOW)
      break;


    case MODE_ON:
      digitalWrite(LED_PIN, LOW);      // ON
      break;


    case MODE_BLINK: {
      // Blink once per second: ON for 500 ms,
OFF for 500 ms.
      // (millis() / 500) % 2 gives
0,1,0,1,0,1... once every 500 ms.
      bool on = (millis() / 500) % 2 == 0;
      digitalWrite(LED_PIN, on ? LOW : HIGH);
      break;
    }


    case MODE_FADE: {
      // Smooth fade up and down using PWM
(analogWrite).
      // A sine wave gives a nice breathing
curve.
      // millis() * 0.002 means a full cycle
takes ~3 seconds.
      float wave = (sin(millis() * 0.002) + 1.0) / 2.0;
// 0.0 to 1.0
      int brightness = wave * 255;                       // 0 to 255
      // Active LOW means we have to invert:
255 = full ON for analogWrite
      analogWrite(LED_PIN, 255 - brightness);
      break;
    }
  }


  // Week 11 UDP listener — kept as it was
  int packetSize = udp.parsePacket();
  if (packetSize) {
    char incoming[255];
    int len = udp.read(incoming, sizeof(incoming) - 1);
    if (len > 0) incoming[len] = '\0';
    Serial.print("Received UDP: ");
    Serial.println(incoming);
  }
}
Video IMG_7886.MOV
Before the LED has just one mode: ON or OFF,
controlled by digitalWrite.
To add blinking and fading, the LED needs to
do something over time — change every few hundred milliseconds for
blinking, change smoothly for fading. That means the loop() has to keep updating the LED, not
just react to button clicks.
So 2 things is changed:
1.
A "mode" variable. Instead
of just ledState (on/off),
the board remembers which mode it's in: off, blinking, or fading.
2. The loop animates the LED based on the current mode, the same way it already checks for HTTP requests.
Each button just changes the mode. The
actual animation happens in loop().
One important detail
For fading, the LED needs to be controlled
with PWM (smooth dimming), not just on/off. On the XIAO
ESP32-C3, analogWrite()
works on the on-board LED pin and gives us 0–255 brightness levels. 0 = full ON (active LOW), 255 = OFF.
Created a file, ran a command, read a file
What changed from the previous version
1. A "mode" instead of a
boolean. Before, the LED was just on or off (bool ledState). Now it has a mode
— off, on, blink, or fade — stored in a single variable:
enum Mode { MODE_OFF, MODE_ON, MODE_BLINK, MODE_FADE };
Mode currentMode = MODE_OFF;
enum
is just a way to give names to numbers so the code reads nicely. MODE_OFF is really 0, MODE_ON
is 1, etc., but writing MODE_BLINK is much clearer.
2. Two new HTML buttons. Each one calls a different URL:
<button onclick="fetch('/toggle')">Toggle</button>
<button onclick="fetch('/blink')">Blink</button>
<button onclick="fetch('/fade')">Fade</button>
3. Two new handlers on the ESP32.
handleBlink() and handleFade() just change currentMode. They don't touch the LED —
that's the loop's job.
4. The loop now animates the LED.
This is the most important change. Before, the LED only changed when a button
was clicked. Now, on every iteration of loop(), the board looks at currentMode and decides what the LED
should do right now:
switch (currentMode) {
  case MODE_OFF:   digitalWrite(LED_PIN, HIGH);  break;
  case MODE_ON:    digitalWrite(LED_PIN, LOW);   break;
  case MODE_BLINK: /* on or off based on time */ break;
  case MODE_FADE:  /* smooth sine wave */         break;
}
The two important tricks for animation
Blinking with millis() instead of delay().
digitalWrite(LED_PIN, LOW);  delay(500);
digitalWrite(LED_PIN, HIGH); delay(500);
That works for the LED, but delay() freezes the whole board
— the web server can't respond, and can't click another button. So instead, we
ask "what time is it?" with millis()
(milliseconds since boot) and use math to figure out if the LED should be on or
off right now:
bool on = (millis() / 500) % 2 == 0;Every half-second, this flips between true and false. The loop keeps running freely.
Fading with a sine wave. sin() gives a smooth wave between -1 and
+1. We shift it to 0..1 and then to 0..255 to get a smooth brightness value. analogWrite() (PWM) is what makes the
LED actually dim smoothly instead of just on/off.
float wave = (sin(millis() * 0.002) + 1.0) / 2.0;  // 0.0 to 1.0
int brightness = wave * 255;
analogWrite(LED_PIN, 255 - brightness);  // inverted because active LOW
Change 0.002
to make it faster (e.g. 0.005)
or slower (e.g. 0.001).
What "active LOW" means (since it keeps coming up)
The on-board LED on the XIAO is wired so that LOW turns it on and HIGH turns it off — opposite of what you'd expect. That's why:
·
digitalWrite(LED_PIN, LOW) = ON
·
digitalWrite(LED_PIN, HIGH) = OFF
·
For PWM, analogWrite(LED_PIN, 0) = full brightness, analogWrite(LED_PIN, 255) = off — so I write 255 - brightness to invert it.
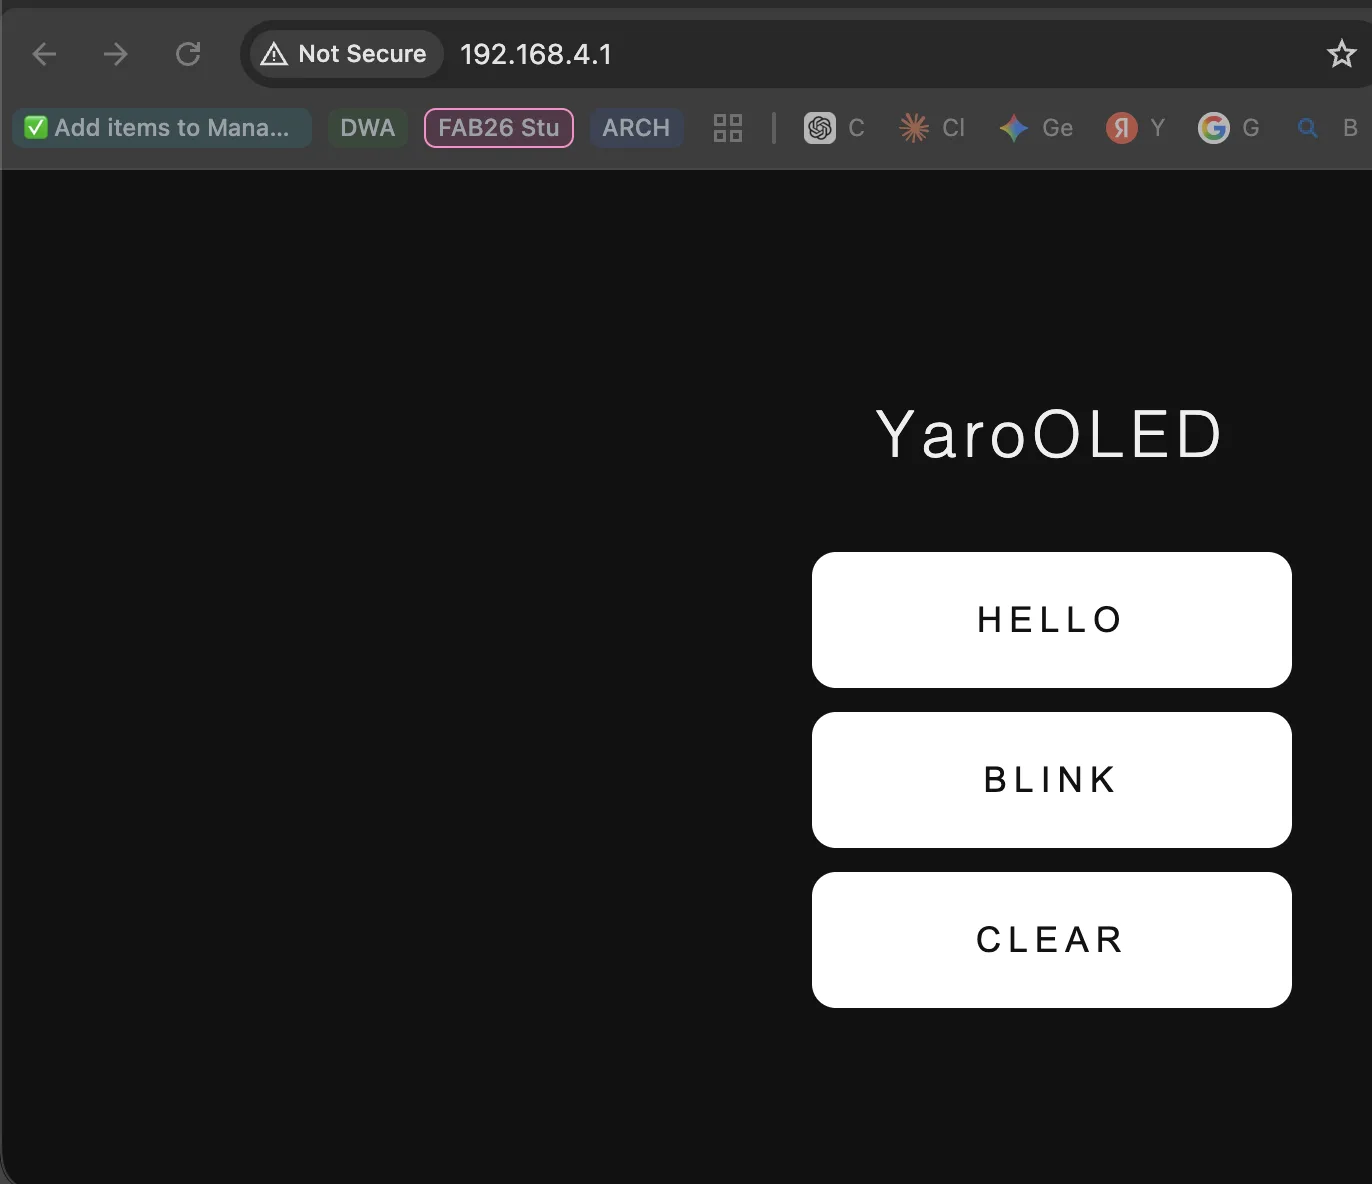
3. Expantion board and OLED Screen
The plan
Same approach as before. Add the OLED next to the LED. Three buttons:
1. Show "Hello" — display the word, hold it
2. Blink — show "Hello", hide it, repeat
3. Clear — wipe the screen
The library to install in Arduino IDE: U8g2 (search "U8g2" in the Library Manager, install the one by oliver). It's already installed if you've used the OLED before in any Seeed example.
Created a file, ran a command, read a file
Before you flash — install the library
In Arduino IDE: Sketch → Include Library → Manage Libraries → search "U8g2" → install the one by oliver. This is the standard library for this OLED and it's what the official Seeed wiki uses too.
What changed from the LED version
The structure is identical — same Wi-Fi setup, same web server, same mode-based loop. Only three things are different:
1. Two new lines at the top to set up the screen:
#include <U8x8lib.h>
U8X8_SSD1306_128X64_NONAME_HW_I2C u8x8(/* reset=*/ U8X8_PIN_NONE);
U8x8
is the "text-only" mode of the U8g2 library — much simpler than full
graphics, plenty for "Hello". The constructor knows to use the
default I2C pins (D4 = SDA, D5 = SCL on the XIAO), which is exactly how the
OLED is wired on the expansion board.
2. Two helper functions instead of digitalWrite:
void drawHello() {
  u8x8.clearDisplay();
  u8x8.setFont(u8x8_font_chroma48medium8_r);
  u8x8.setCursor(4, 3);
  u8x8.print("Hello");
}
void clearScreen() {
  u8x8.clearDisplay();
}
The screen uses character cells,
not pixels. The screen is 16 columns × 8 rows of 8×8 pixel cells. setCursor(4, 3) means column 4, row 3 —
roughly centered for a 5-letter word.
3. The loop only redraws when something changes.
This is the one new idea worth
understanding. With an LED, calling digitalWrite
every loop iteration is fine. With an OLED, redrawing every iteration flickers
the screen and slows the board. So the loop remembers which mode it
drew last time and only redraws when the mode changes:
if (lastDrawnMode != MODE_HELLO) {
  drawHello();
  lastDrawnMode = MODE_HELLO;
}
The exception is blink mode,
which has to keep changing the screen — but it does so on a timer (every 500
ms) rather than every loop, using millis()
the same way as the fading LED before.
#include <Arduino.h>
#include "Network.h"
#include "WiFi.h"
#include <WebServer.h>
#include <U8x8lib.h>     // U8g2's "text only" mode —
simpler and uses less memory


// OLED on the expansion
board: SSD1306, 128x64, I2C.
// This constructor
matches the one in the official Seeed wiki.
U8X8_SSD1306_128X64_NONAME_HW_I2C
u8x8(/* reset=*/ U8X8_PIN_NONE);


NetworkUDP udp;
WebServer server(80);


const char* ssid     = "YaroUDP";
const char* password = "12345678";


IPAddress local_IP(192, 168, 4, 1);
IPAddress gateway(192, 168, 4, 1);
IPAddress subnet(255, 255, 255, 0);


const uint16_t udpPort = 1234;


// ---- Modes
----------------------------------------------------------------
// Same idea as before:
a single variable says what the screen should do.
enum Mode { MODE_CLEAR, MODE_HELLO, MODE_BLINK };
Mode currentMode =
MODE_CLEAR;


// ---- The webpage
----------------------------------------------------------
const char HTML_PAGE[] PROGMEM = R"HTML(
<!DOCTYPE html>
<html>
<head>
  <meta charset="UTF-8">
  <meta name="viewport"
content="width=device-width, initial-scale=1.0">
  <title>YaroOLED</title>
  <style>
    body {
      font-family: sans-serif;
      display: flex; flex-direction: column;
      align-items: center; justify-content:
center;
      height: 100vh; margin: 0;
      background: #111; color: #eee;
    }
    h1 { font-weight: 300; letter-spacing:
0.1em; margin-bottom: 40px; }
    .row { display: flex; flex-direction:
column; gap: 12px; }
    button {
      padding: 24px 60px; font-size: 1.1rem;
      letter-spacing: 0.2em; text-transform:
uppercase;
      background: #fff; color: #111;
      border: none; border-radius: 12px;
cursor: pointer;
      min-width: 240px;
    }
    button:active { background: #ccc; }
  </style>
</head>
<body>
  <h1>YaroOLED</h1>
  <div class="row">
    <button
onclick="fetch('/hello')">Hello</button>
    <button
onclick="fetch('/blink')">Blink</button>
    <button
onclick="fetch('/clear')">Clear</button>
  </div>
</body>
</html>
)HTML";


// ---- Helper functions
-----------------------------------------------------
// Draw
"Hello" on the screen at a fixed position.
void drawHello() {
  u8x8.clearDisplay();
  u8x8.setFont(u8x8_font_chroma48medium8_r);
  u8x8.setCursor(4, 3);   // column 4, row 3 (in 8x8 character cells)
  u8x8.print("Hello");
}


// Wipe the screen.
void clearScreen() {
  u8x8.clearDisplay();
}


// ---- HTTP handlers
--------------------------------------------------------
void handleRoot() {
  server.send_P(200, "text/html", HTML_PAGE);
}


void handleHello() {
  currentMode = MODE_HELLO;
  Serial.println("HELLO");
  server.send(200, "text/plain", "OK");
}


void handleBlink() {
  currentMode = MODE_BLINK;
  Serial.println("BLINK");
  server.send(200, "text/plain", "OK");
}


void handleClear() {
  currentMode = MODE_CLEAR;
  Serial.println("CLEAR");
  server.send(200, "text/plain", "OK");
}


// ---- Setup
----------------------------------------------------------------
void setup() {
  Serial.begin(115200);
  delay(1000);


  // OLED setup
  u8x8.begin();
  u8x8.setFont(u8x8_font_chroma48medium8_r);
  u8x8.clearDisplay();


  // Wi-Fi access point — same as before
  Network.begin();
  WiFi.mode(WIFI_AP);
  WiFi.softAPConfig(local_IP, gateway,
subnet);
  WiFi.softAP(ssid, password);


  udp.begin(udpPort);


  server.on("/",      handleRoot);
  server.on("/hello", handleHello);
  server.on("/blink", handleBlink);
  server.on("/clear", handleClear);
  server.begin();


  Serial.println("Ready");
  Serial.print("AP IP: ");
  Serial.println(WiFi.softAPIP());
}


// ---- Loop
-----------------------------------------------------------------
// Important: we only
redraw the screen when something *changes*, not on every
// loop iteration.
Constantly redrawing flickers the OLED and slows everything.
//
// We remember which
mode we drew last time. If the mode is the same as last
// time, we don't
redraw. The only exception is BLINK mode, which has to keep
// updating to make the
text appear and disappear.
void loop() {
  server.handleClient();


  static Mode lastDrawnMode = MODE_CLEAR;
  static bool blinkVisible  = false;
  static unsigned long lastBlink = 0;


  switch (currentMode) {


    case MODE_CLEAR:
      // Only clear once when entering the mode
      if (lastDrawnMode != MODE_CLEAR) {
        clearScreen();
        lastDrawnMode = MODE_CLEAR;
      }
      break;


    case MODE_HELLO:
      // Only draw once when entering the mode
      if (lastDrawnMode != MODE_HELLO) {
        drawHello();
        lastDrawnMode = MODE_HELLO;
      }
      break;


    case MODE_BLINK:
      // Toggle "Hello" on/off every
500 ms using millis()
      if (millis() - lastBlink >= 500) {
        lastBlink = millis();
        blinkVisible = !blinkVisible;
        if (blinkVisible) drawHello();
        else              clearScreen();
      }
      lastDrawnMode = MODE_BLINK;
      break;
  }


  // Week
11 UDP listener — kept as it was
  int packetSize = udp.parsePacket();
  if (packetSize) {
    char incoming[255];
    int len = udp.read(incoming, sizeof(incoming) - 1);
    if (len > 0) incoming[len] = '\0';
    Serial.print("Received UDP: ");
    Serial.println(incoming);
  }
}
Video IMG_7887.MOV
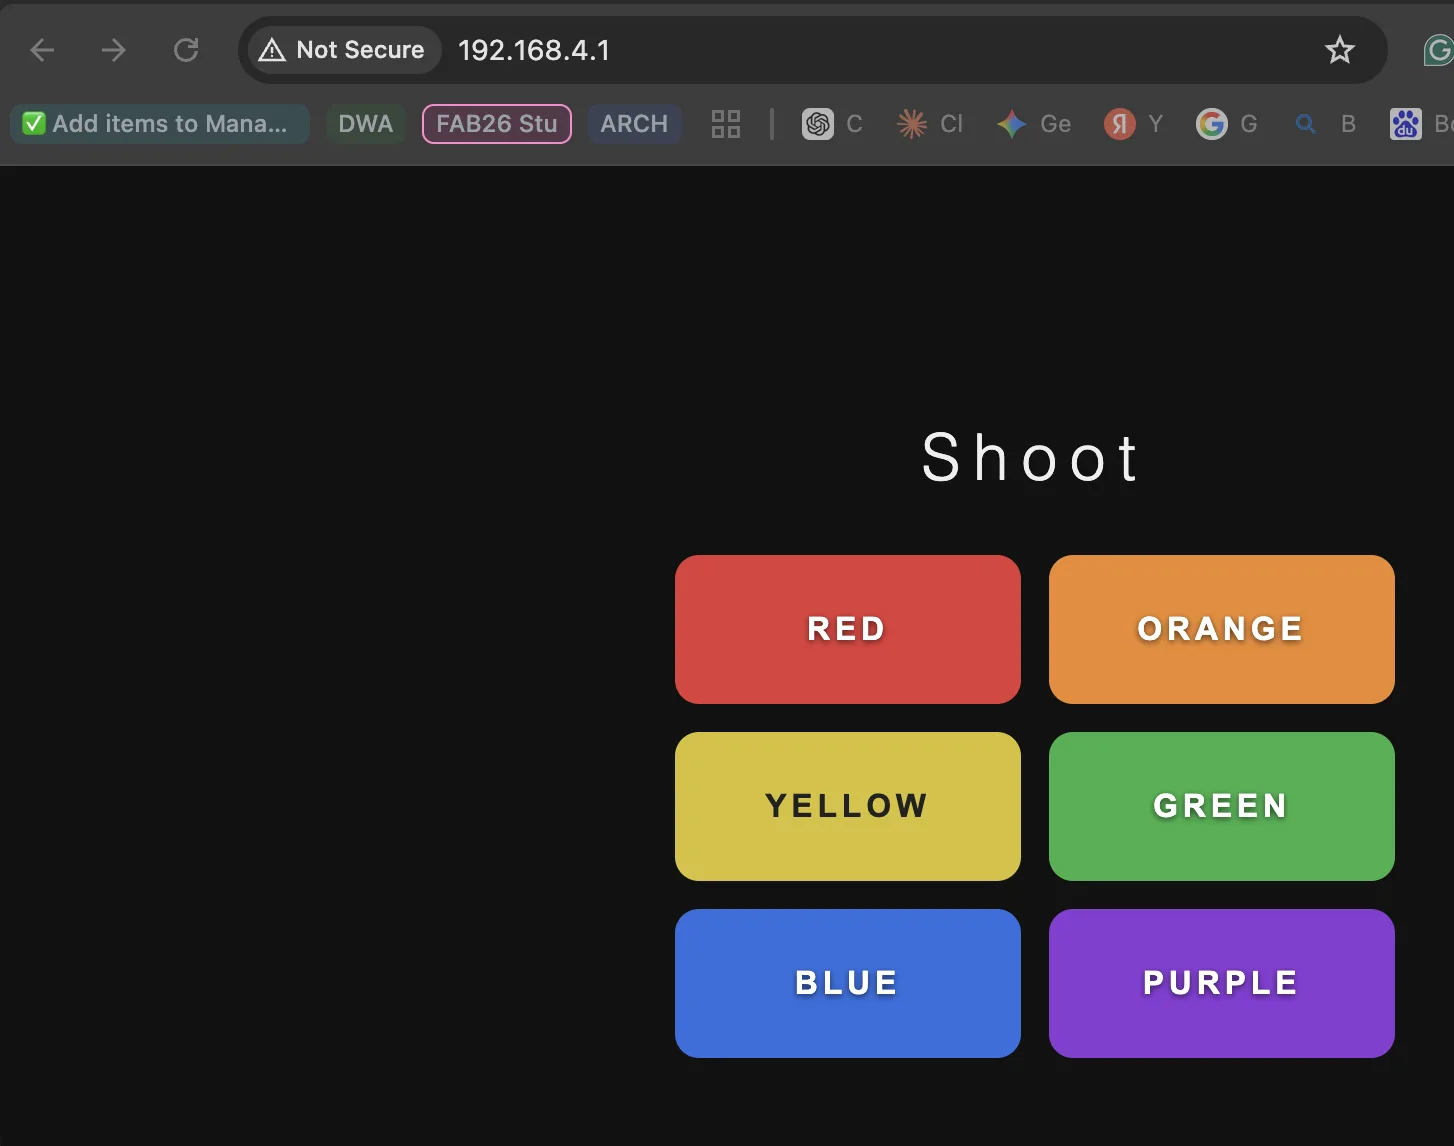
4. LED Shoot
The idea
You click a colored button → a bullet of that color is born at LED 0 → it travels down the strip one LED per frame → vanishes at the end. You can shoot multiple bullets in a row, and they'll travel down the strip at the same time (each one is independent).
The trick is the firmware needs to track multiple bullets at once. So each bullet has:
· a position (which LED it's currently on)
· a color
Every frame, every bullet moves one step forward. When it reaches the end, it disappears.
Created a file, ran a command, read a file
What you'll see
A 2×3 grid of big colored buttons in the browser. Click red — a red dot starts at LED 0, walks down the strip, disappears at the end. Click red, orange, blue in quick succession — three bullets travel along the strip with little gaps between them, like tracer fire.
The one new idea: an array of bullets
This is the first time we've needed to track multiple things happening at once. The trick is a small array, where each slot holds one bullet:
struct Bullet {
  int  position;   // which LED, or -1 if empty
  CRGB color;
};
Bullet bullets[10];  // up to 10 bullets at the same time
A struct
is just a way to bundle related variables together. Instead of two separate
arrays (positions[] and colors[]), we have one array where each
slot has both pieces of info.
How firing works
When you click a button, the handler walks through the array and finds the first empty slot:
for (int i = 0; i < MAX_BULLETS; i++) {
  if (bullets[i].position < 0) {        // empty slot
    bullets[i].position = 0;            // born at LED 0
    bullets[i].color    = color;
    return;                             // done
  }
}
If all 10 slots are full, the new shot is dropped — but that would only happen if you click 10 times faster than bullets can finish travelling, which is essentially impossible.
How animation works
Once every 50 ms (controlled by BULLET_STEP_MS), the loop:
1. Clears the strip (so old bullet positions disappear)
2. Draws every active bullet at its current position
3. Moves every bullet one step forward
4. Frees any bullet that went past the end of the strip
for (int i = 0; i < MAX_BULLETS; i++) {
  if (bullets[i].position >= 0) {
    leds[bullets[i].position] = bullets[i].color;   // draw
    bullets[i].position++;                          // move
    if (bullets[i].position >= NUM_LEDS) {
      bullets[i].position = -1;                     // free slot
    }
  }
}
FastLED.show();
The millis()
timing is the same trick as before — animate without delay() so the web server keeps
responding.
Easy customization
·
Faster bullets → change BULLET_STEP_MS from 50 to 25
· Slower bullets → change to 100
·
More buttons → just add another
<button> in HTML and
another else if in handleShoot()
· Bullet trails (each bullet leaves a fading tail behind it) → that's the next nice upgrade if you want it
#include <Arduino.h>
#include <FastLED.h>
#include "Network.h"
#include "WiFi.h"
#include <WebServer.h>


// ---- Strip ----
#define LED_PIN     D0
#define NUM_LEDS    30
#define BRIGHTNESS  60
CRGB leds[NUM_LEDS];


// ---- Wi-Fi ----
NetworkUDP udp;
WebServer server(80);


const char* ssid     = "YaroUDP";
const char* password = "12345678";


IPAddress local_IP(192, 168, 4, 1);
IPAddress gateway(192, 168, 4, 1);
IPAddress subnet(255, 255, 255, 0);
const uint16_t udpPort = 1234;


// ---- Bullets
--------------------------------------------------------------
// We can have up to
MAX_BULLETS travelling along the strip at the same time.
// Each one remembers
its position (which LED it's currently on) and its color.
// position = -1 means
"this slot is empty" — no bullet here.
#define MAX_BULLETS 10


struct Bullet {
  int
position;    // current LED
index, or -1 if unused
  CRGB color;
// bullet color
};
Bullet bullets[MAX_BULLETS];


// How fast bullets
move: one step every BULLET_STEP_MS milliseconds.
// Smaller = faster. 50
ms is a nice readable speed.
const unsigned long BULLET_STEP_MS = 50;
unsigned long lastBulletStep = 0;


// ---- Helper: fire a
new bullet -------------------------------------------
// Find the first empty
slot in the bullets array and put a new bullet there.
// If all slots are
full, the new shot is silently dropped (rare edge case).
void fireBullet(CRGB color) {
  for (int i = 0; i < MAX_BULLETS; i++) {
    if (bullets[i].position < 0) {
      bullets[i].position = 0;
      bullets[i].color
= color;
      return;
    }
  }
}


// ---- The webpage
----------------------------------------------------------
// Six big colored
buttons. Each one calls /shoot?color=NAME with fetch().
const char HTML_PAGE[] PROGMEM = R"HTML(
<!DOCTYPE html>
<html>
<head>
  <meta charset="UTF-8">
  <meta name="viewport"
content="width=device-width, initial-scale=1.0">
  <title>YaroShoot</title>
  <style>
    body {
      font-family: sans-serif;
      display: flex; flex-direction: column;
      align-items: center; justify-content:
center;
      min-height: 100vh; margin: 0; padding:
20px;
      background: #111; color: #eee;
    }
    h1 { font-weight: 300; letter-spacing:
0.2em; margin-bottom: 30px; }
    .grid {
      display: grid;
      grid-template-columns: 1fr 1fr;
      gap: 14px;
      width: 100%;
      max-width: 360px;
    }
    button {
      padding: 28px 12px;
      font-size: 1rem;
      letter-spacing: 0.15em;
      text-transform: uppercase;
      color: #fff;
      border: none;
      border-radius: 12px;
      cursor: pointer;
      font-weight: 600;
      text-shadow: 0 1px 3px rgba(0,0,0,0.6);
      transition: transform 0.05s ease;
    }
    button:active { transform: scale(0.95); }
    .red
{ background: #e23a3a; }
    .orange { background: #ee8a2a; }
    .yellow { background: #d6c12a; color: #222;
text-shadow: none; }
    .green
{ background: #2fb24a; }
    .blue
{ background: #2d6fe0; }
    .purple { background: #8a3ad6; }
  </style>
</head>
<body>
  <h1>Shoot</h1>
  <div class="grid">
    <button class="red"
onclick="fetch('/shoot?color=red')">Red</button>
    <button class="orange"
onclick="fetch('/shoot?color=orange')">Orange</button>
    <button class="yellow"
onclick="fetch('/shoot?color=yellow')">Yellow</button>
    <button class="green"
onclick="fetch('/shoot?color=green')">Green</button>
    <button class="blue"
onclick="fetch('/shoot?color=blue')">Blue</button>
    <button class="purple"
onclick="fetch('/shoot?color=purple')">Purple</button>
  </div>
</body>
</html>
)HTML";


// ---- HTTP handlers
--------------------------------------------------------
void handleRoot() {
  server.send_P(200, "text/html", HTML_PAGE);
}


// Read the color name
from the URL and fire a bullet of that color.
void handleShoot() {
  String c = server.arg("color");
  CRGB color = CRGB::White;   // default fallback


  if
(c == "red")    color = CRGB::Red;
  else if (c == "orange") color = CRGB(255, 100, 0);
  else if (c == "yellow") color = CRGB::Yellow;
  else if (c == "green")  color = CRGB::Green;
  else if (c == "blue")   color = CRGB::Blue;
  else if (c == "purple") color = CRGB(150, 0, 200);


  fireBullet(color);
  Serial.print("Shoot ");
  Serial.println(c);


  server.send(200, "text/plain", "OK");
}


// ---- Setup
----------------------------------------------------------------
void setup() {
  Serial.begin(115200);
  delay(500);


  // Strip
  FastLED.addLeds<WS2812B, LED_PIN, GRB>(leds, NUM_LEDS);
  FastLED.setBrightness(BRIGHTNESS);
  FastLED.clear();
  FastLED.show();


  // Mark all bullet slots as empty
  for (int i = 0; i < MAX_BULLETS; i++) bullets[i].position = -1;


  // Wi-Fi
  Network.begin();
  WiFi.mode(WIFI_AP);
  WiFi.softAPConfig(local_IP, gateway,
subnet);
  WiFi.softAP(ssid, password);
  udp.begin(udpPort);


  // Web routes
  server.on("/",      handleRoot);
  server.on("/shoot", handleShoot);
  server.begin();


  Serial.println("Ready");
  Serial.print("AP IP: ");
  Serial.println(WiFi.softAPIP());
}


// ---- Loop
-----------------------------------------------------------------
void loop() {
  // 1. Handle any new HTTP requests (button
clicks)
  server.handleClient();


  // 2. Move and draw bullets, but only every
BULLET_STEP_MS milliseconds
  //
so the animation has a steady, readable speed.
  if (millis() - lastBulletStep >= BULLET_STEP_MS) {
    lastBulletStep = millis();


    // Clear the strip for this frame
    FastLED.clear();


    // For each active bullet: draw it at its
current position, then move
    // it one step forward. If it has gone past
the end, deactivate it.
    for (int i = 0; i < MAX_BULLETS; i++) {
      if (bullets[i].position >= 0) {
        // Draw at current position (only if
still on the strip)
        if (bullets[i].position < NUM_LEDS) {
          leds[bullets[i].position] = bullets[i].color;
        }
        // Advance one step
        bullets[i].position++;
        // If gone past the end, free the slot
        if (bullets[i].position >= NUM_LEDS) {
          bullets[i].position = -1;
        }
      }
    }


    FastLED.show();
  }
}
Video IMG_7889.MOV
5. LED Shooting light Game
For this part, for the game idea, I want to ask AI and explain what kind of game I would like to build.
Ai request:
Based
on this code, can you make a game where lights come from the end, like
different colors? For example, now we have six, and I need to shoot the same
color to eliminate. Like orange plus orange, it will eliminate. Then I need to
shoot red and then green if it will be red and green in the line. The idea is
that there's a rainbow LED coming from the end to the beginning, and I need to
recognize the color and shoot it to destroy one by one by different colors.
When colors can come to the beginning, it's a game over, and it can be a
message "Game Over." So far, no difficulty, only level one, and just
normal speed.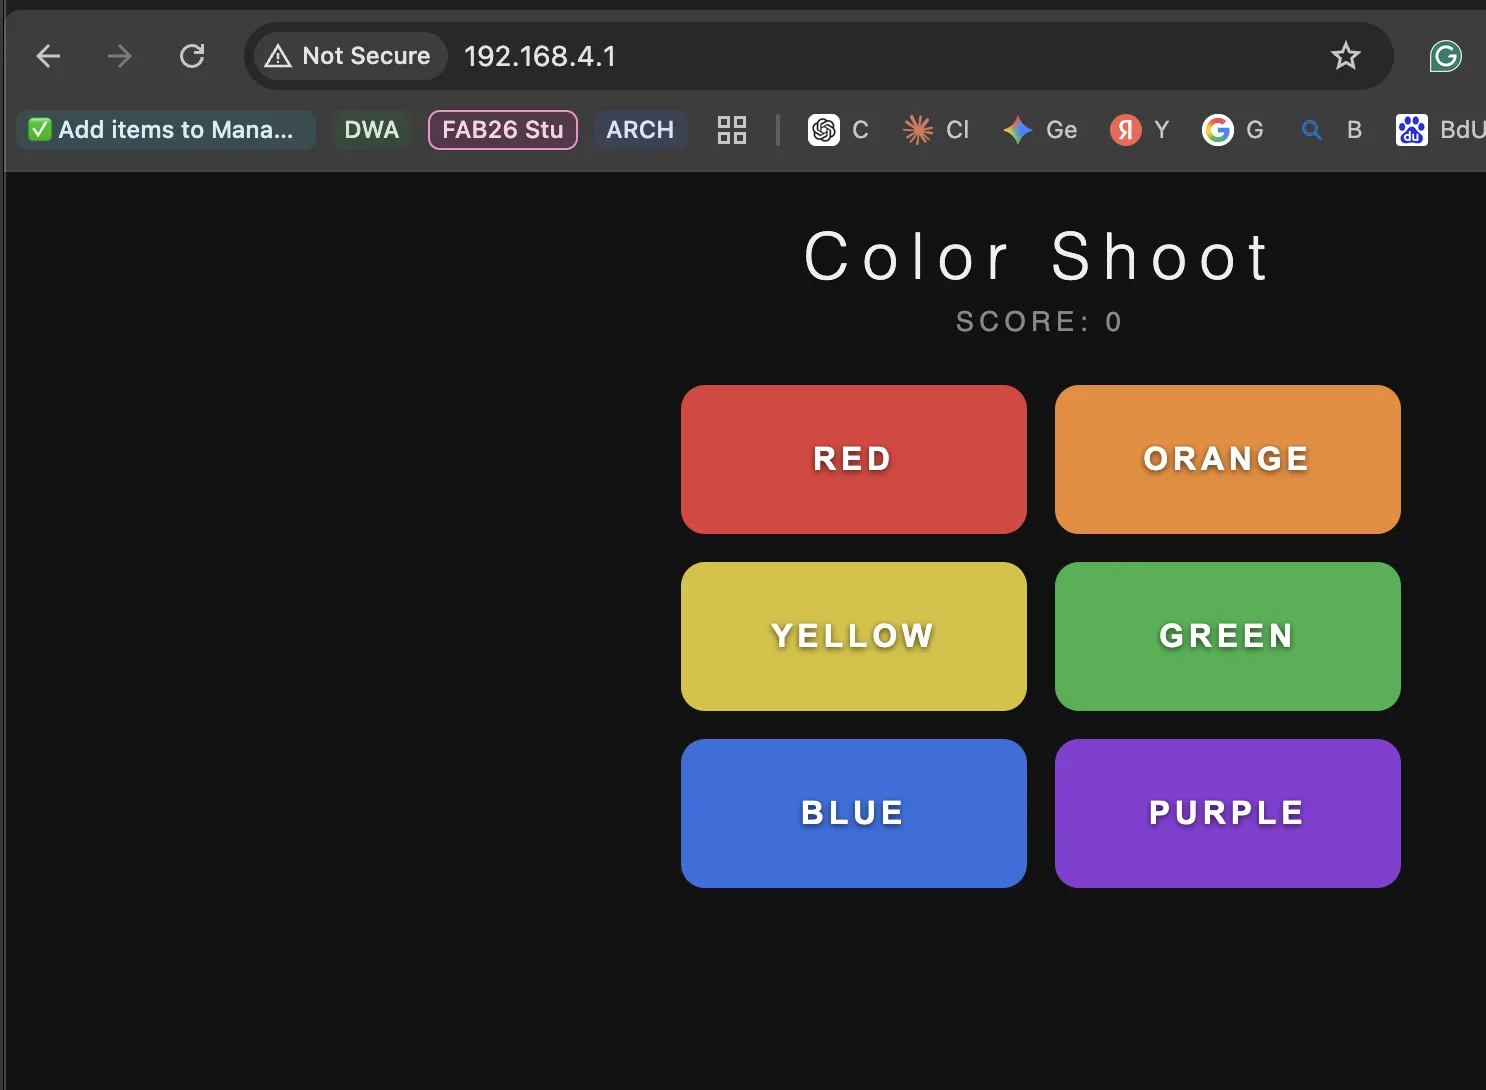
Video IMG_7890.MOV
Downloadable source files
These files are included as downloadable copies of the Arduino sketches used in this assignment, matching the six numbered folders from the project notes.
- 1 Web receiver Button:
web_button.ino - 2 3 Buttons UDP:
web_modes.ino - 3 Web screen:
web_oled.ino - 4 LED Test:
rainbow_blink.ino - 5 Shoot:
web_shoot.ino - 6 Game:
web_game.ino
Reflection
This week I practiced how to build an application and interface for my board. In the beginning it was quite easy, because I did not start from zero: I built it on top of my existing Week 11 networking project. I already had the board making a Wi-Fi network and communicating, so now I only needed to add the browser interface and connect buttons to actions.
But when the task became more complex, especially with more buttons, OLED graphics, colors, and the LED shooting game idea, I could see that I still need to learn more about interface design and graphics. HTML was a good and simple way to make the first interface, because any phone or laptop can open it, but for more serious applications I need more practice with how to organize screens, states, and visual feedback.
For my final project, I will probably use Python for the application side, and the interface already exists as part of the dashboard I started building. This week was useful because now I understand the connection better: the interface is not just decoration, it is the part where the user can actually talk to the embedded system and understand what the board is doing.