Week 1
Principles and Practices
I had the privilege of attending the first session of the Fab Academy conducted by Professor Neil Gershenfeld of MIT. During the session, I gained valuable insights into digital fabrication, the course schedule, rights and responsibilities, and project management methodologies, including spiral and parallel development techniques. The recorded lecture is available on the official Fab Academy website for reference. Fab Academy
1. Website Development:
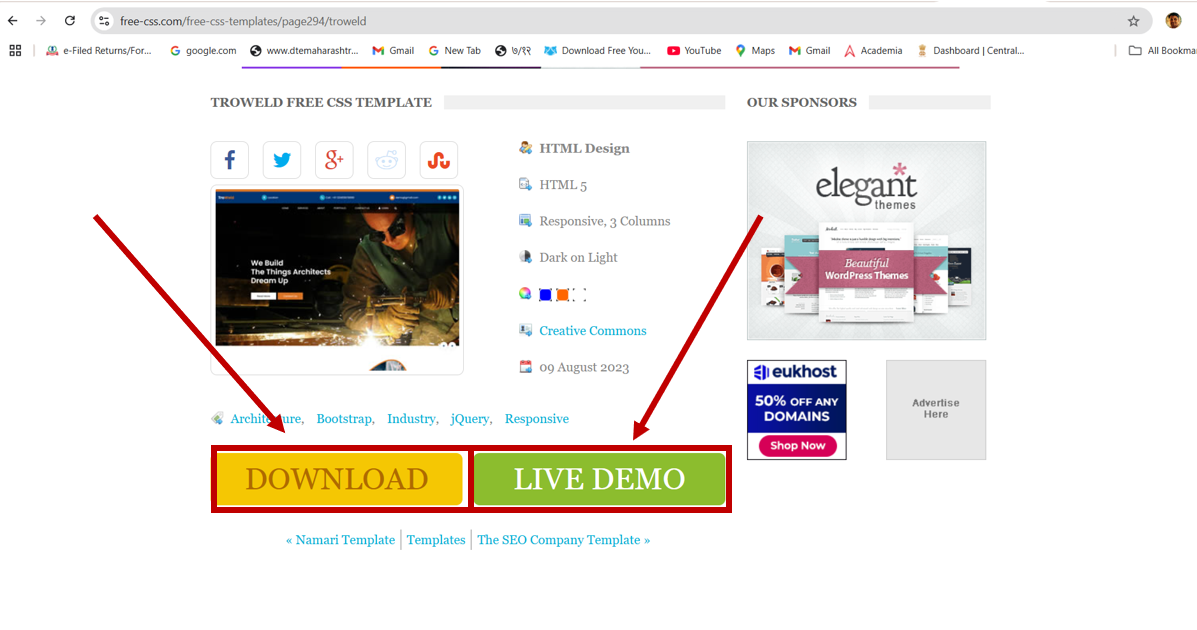
After attending the first session, I began developing my website. To enhance my understanding of HTML coding, I visited the W3Schools website, which provided comprehensive learning resources. As the next step, I visited https://www.free-css.com/ to download a suitable website template for my application. I explored various templates by using the "Live Demo" tab to preview the overall design, layout, and functionality. Once I identified a template that met my requirements, I used the "Download" button to obtain the template for further development Following this session, I began my work by visiting https://www.free-css.com/free-css-templates. I explored various templates by using the "Live Demo" feature to preview their design and functionality. Once I selected a suitable template, I downloaded it using the "Download" option to proceed.
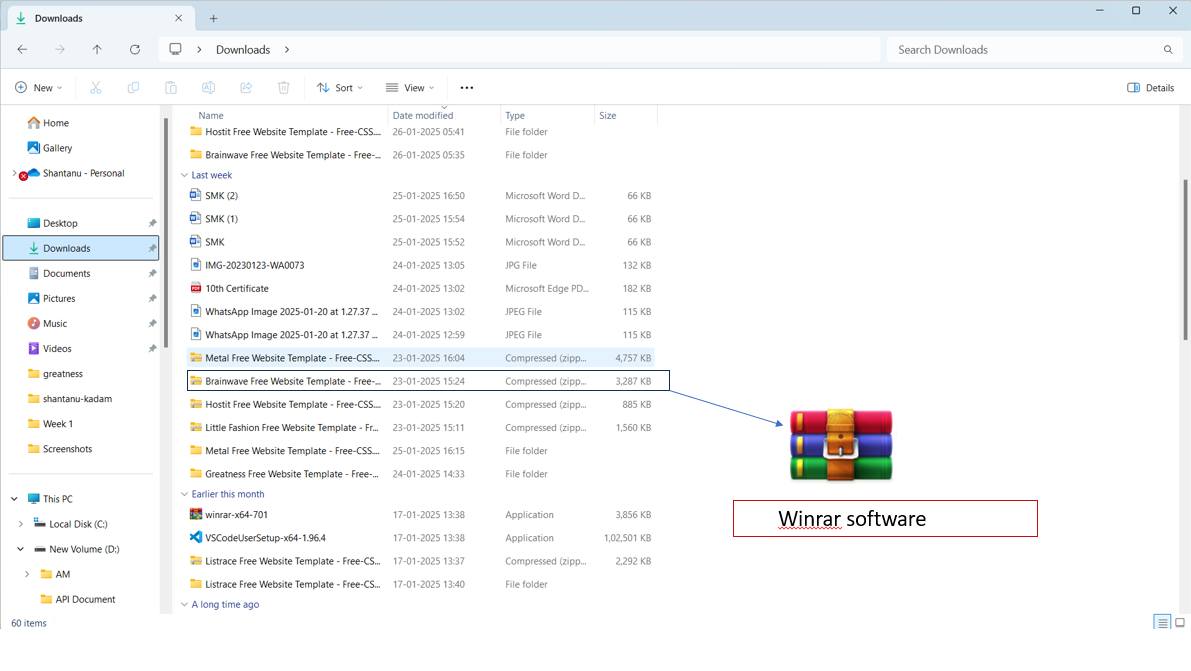
The website folder was downloaded in zip format and saved in the "Downloads" folder. The zip file was then extracted using WinRAR software. After extraction, the code was edited and customized using Visual Studio Code (VS Code) to meet the specific requirements of the project.
Some folders and files are displayed with the .html extension; we have to edit those files according to our requirements.
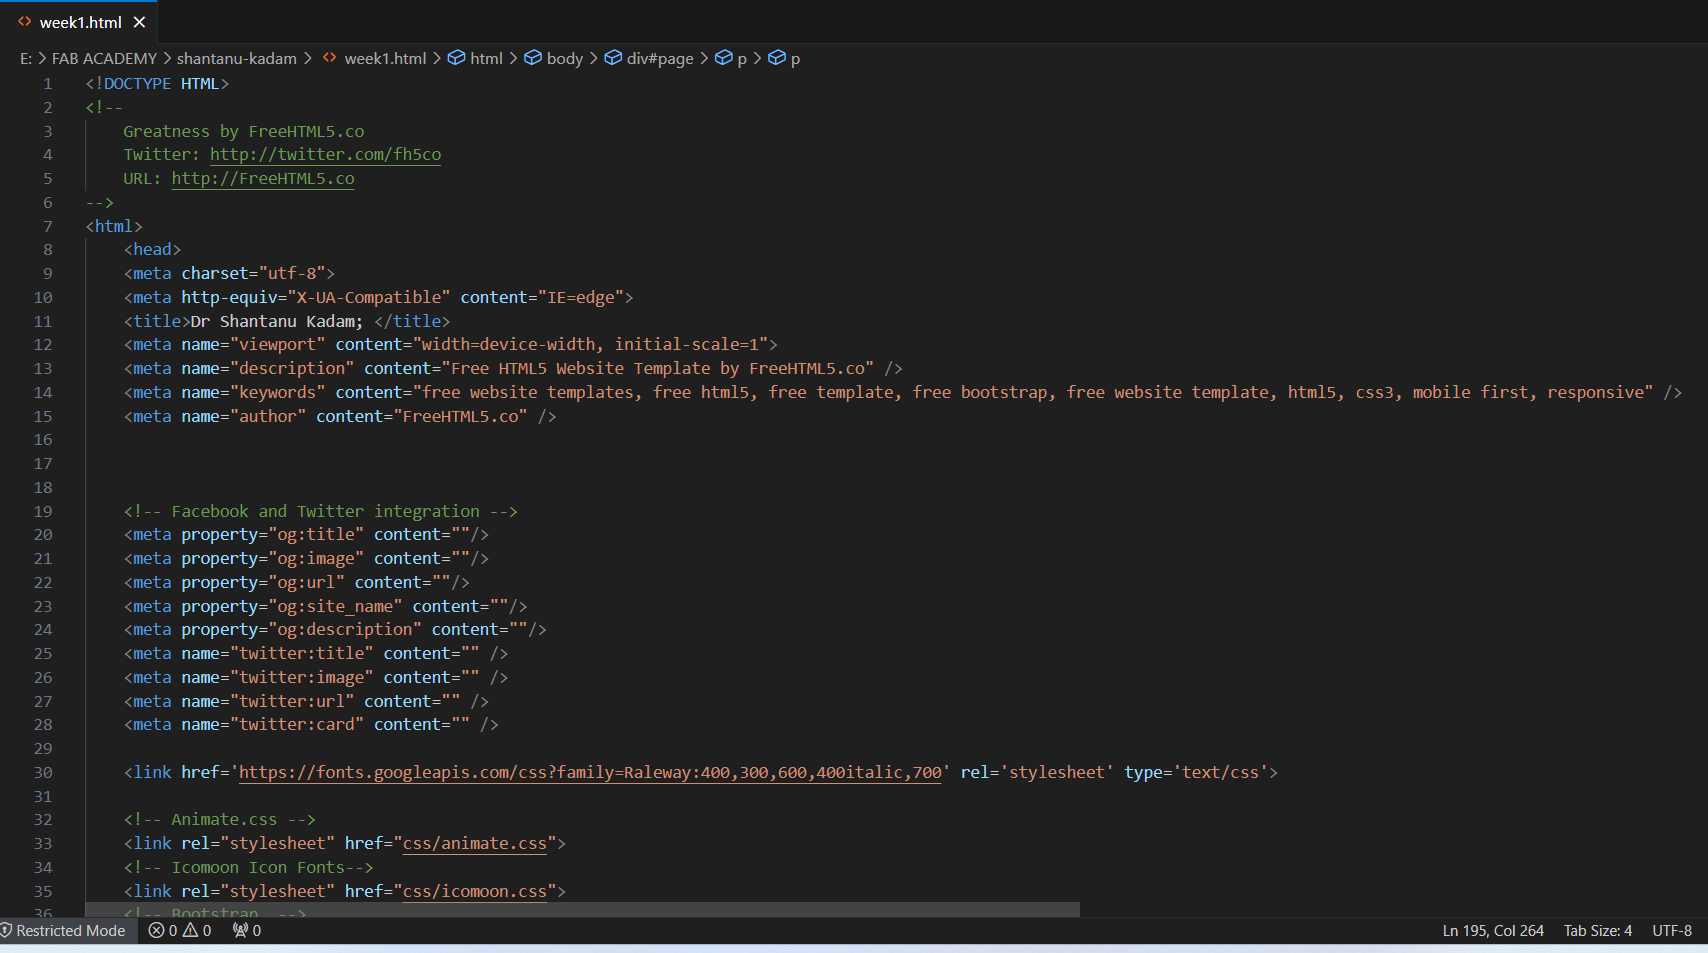
The HTML file was opened in Notepad using Visual Studio Code (VS Code). The displayed code represented the entire structure of the website.
I then made the necessary changes to the code to customize the website according to my specific requirements.
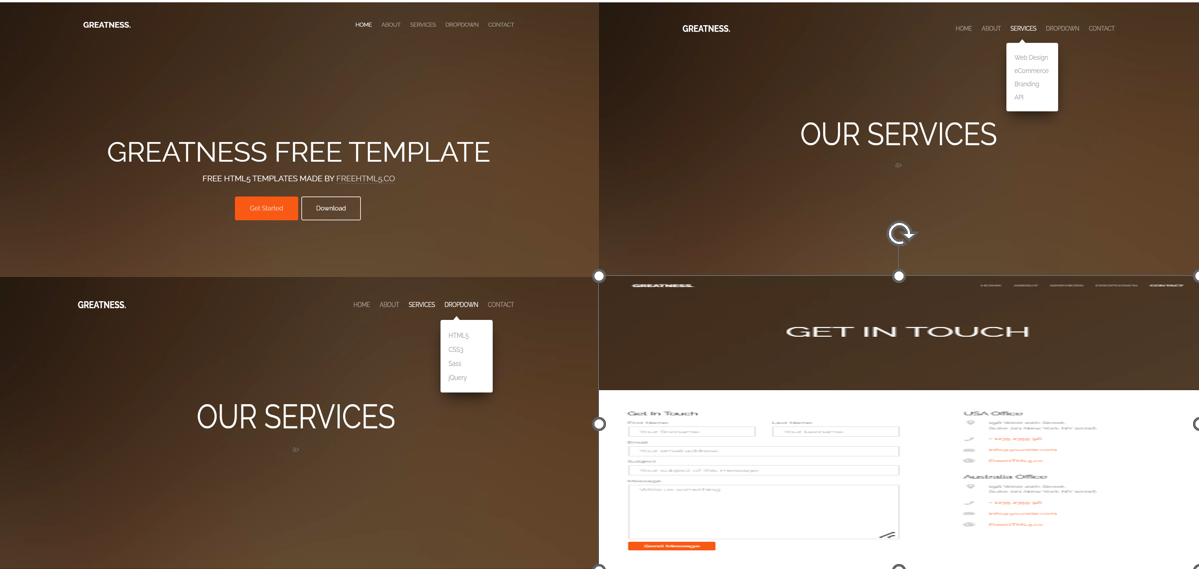
Here is the code of the website; I have taken the template from a website.
I have taken a free template and made changes according to my requirements. Here are some screenshots of the default template.
I began by working on the homepage. On this page, I replaced the original title, "Greatness," with "Dr. Shantanu Kadam."
To achieve this, I modified the title tag in the code as follows:
< title>Dr Shantanu Kadam< /title>.
This change ensures that "Dr. Shantanu Kadam" is displayed in the browser's title bar.
Next, I updated the index of the website, changing it from "Greatness" to "Fab Academy." Additionally,
I made some changes to the navigation bar to improve its functionality and align it with the website’s theme.
For all these modifications, I referred to the W3Schools website as a resource for guidance.
Here are some of the basic HTML commands I utilized during the process:
Commands as follows
		    < html>: Marks the beginning and end of an HTML document.

			< head>: Contains the header information of the document.

			< title>: Specifies the title of the page, which is displayed in the browser tab.

			< body>: Contains the main content of the webpage.

			< h1> to < h6>: Define headings of different sizes, with < h1> being the largest.

			< p>: Defines a paragraph of text.

			< a>: Creates a hyperlink.

			< img>: Inserts an image into the webpage.

			< ul>: Creates an unordered list.

			< ol>: Creates an ordered list.

            < !--Comment Here-- >
These tags were essential in making the required changes and customizing the website according to my specific requirements.

After making the necessary changes to the template code, the webpage was updated and displayed in this style.
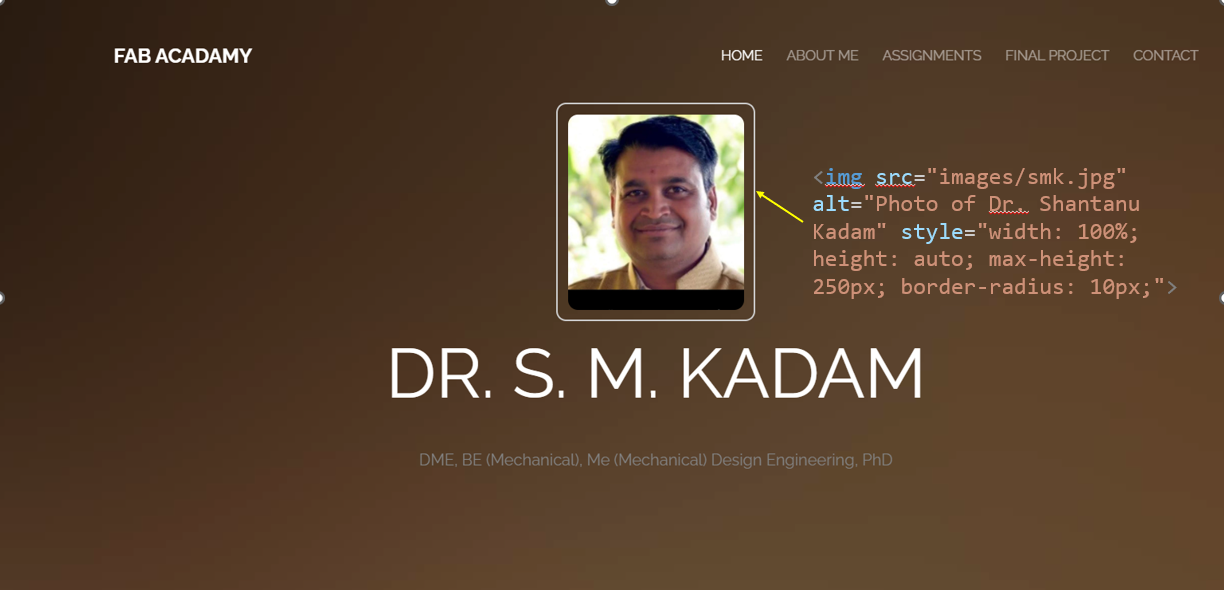
On the "About Me" page, I added my image using the appropriate image tag in the code.

In the "Assignment" tab, I added 19 assignment sections to reflect the structure of the Fab Academy course, which spans 19 weeks. Each week
includes a compulsory assignment, and these sections were organized and displayed week-wise for clarity.

I have two ideas for my final project for the Fab Academy. Therefore, I have included both project names under the "Final Project" tab.

On the "Contact Me" page, I have provided my detailed address, contact numbers, and email address. In the footer section, I have included links to all my social media profiles for easy connectivity and say thanks to every one for visiting my web side.
2. Version Control:
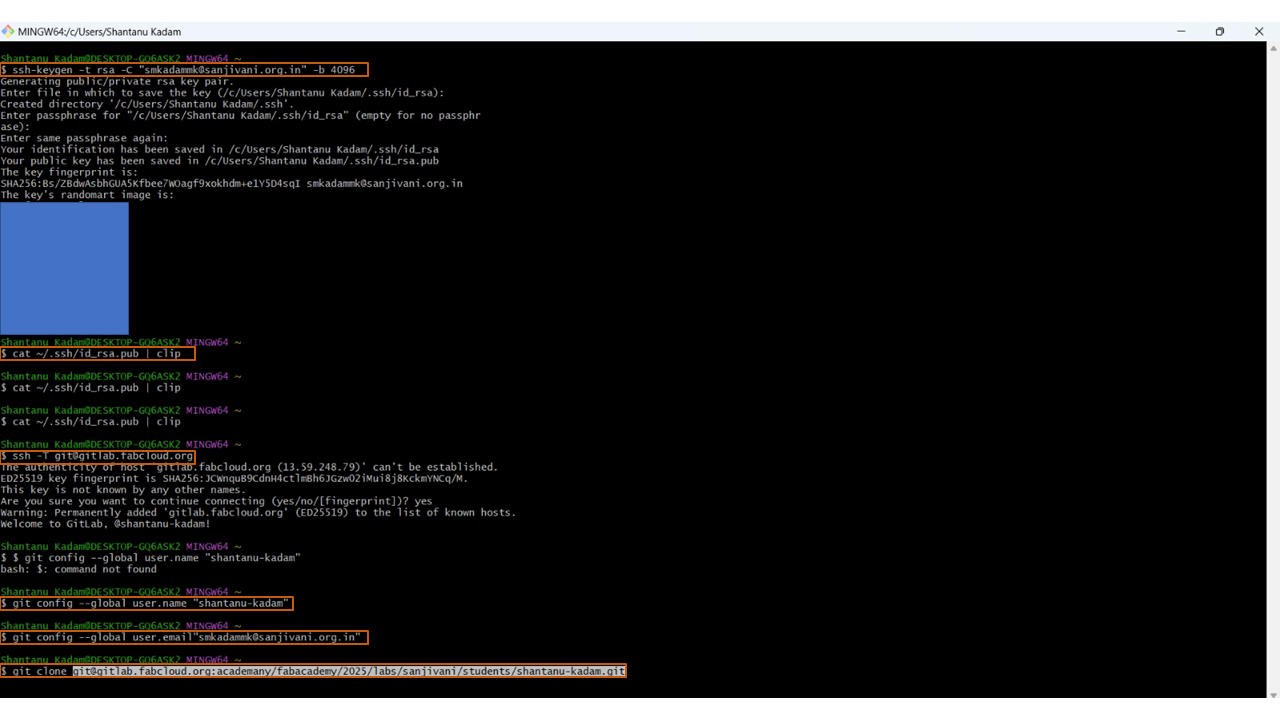
I used Git bash is a widely used package for Windows, providing a powerful command-line interface for Git operations. Therefore, we selected Git Bash to store and manage data efficiently while cloning repositories to GitLab FabCloud.

I studied and utilized the official Git Bash website's tutorials for learning and implementation.
Git Workflow -
Clone the repository from a remote server to your local machine.
Make changes to the files as needed.
Stage the changes to prepare them for saving.
Commit the changes to your local repository.
Push the committed changes to the remote server to share with others.
Pull updates from the remote repository when needed to keep your local copy up to date.
Commands used in Git
1. ssh-keygen -t rsa -C "Email ID" -b 4096
--Used to generate keygen
2. cat ~/.ssh/id_rsa.pub | clip
--Used to copy the key
3. ssh -T git@gitlab.fabcloud.org
--It initiates the SSH connection to the gitlab.fabcloud.org server
4. $ git config --global user.name "USER NAME"
--used to set global user name
5. $ git config --global user.email "Your mail ID"
--stores your email in global configuration file of git
6. $ git clone < copylink >
--It will creates a local copy of the git repository on computer
7. git pull
--used to fetch and download content from a remote repository
8. git add --all
--Used to add the files or changes to the repository.
9. git commit -m"mesaage"
--Commits the changes to local git repository
10. git push
--used to upload local repository content to a remote repository
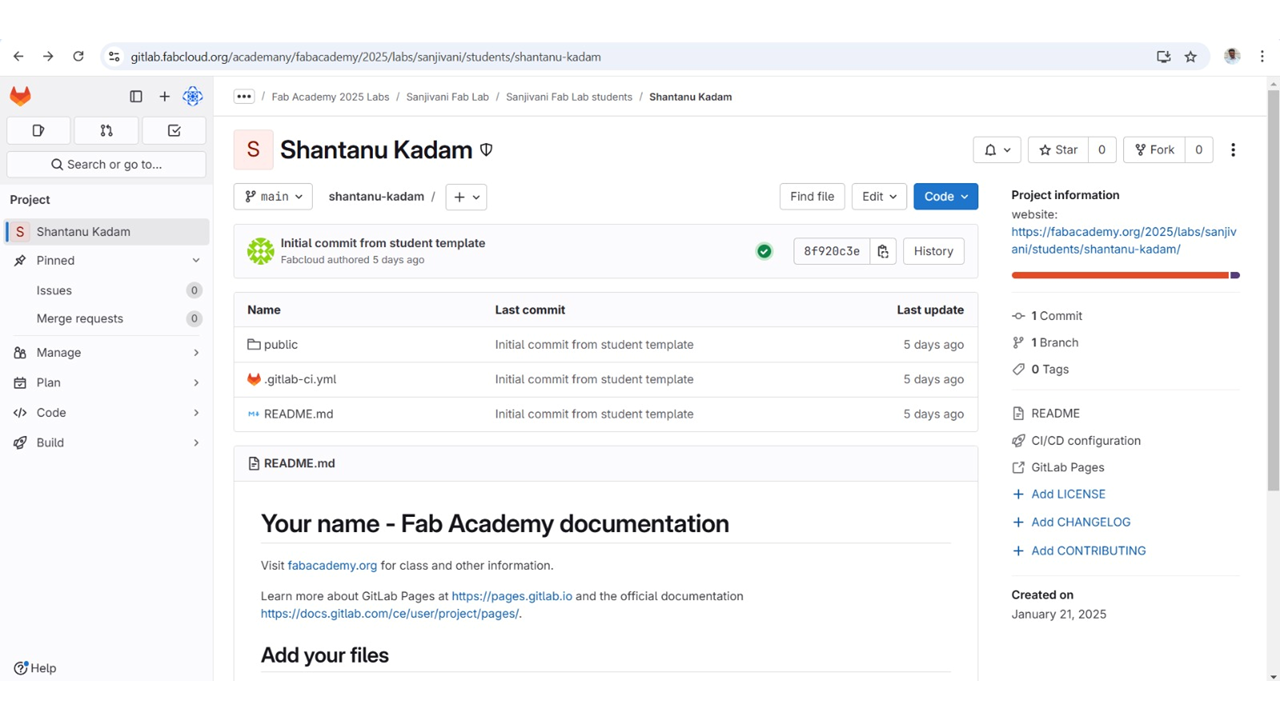
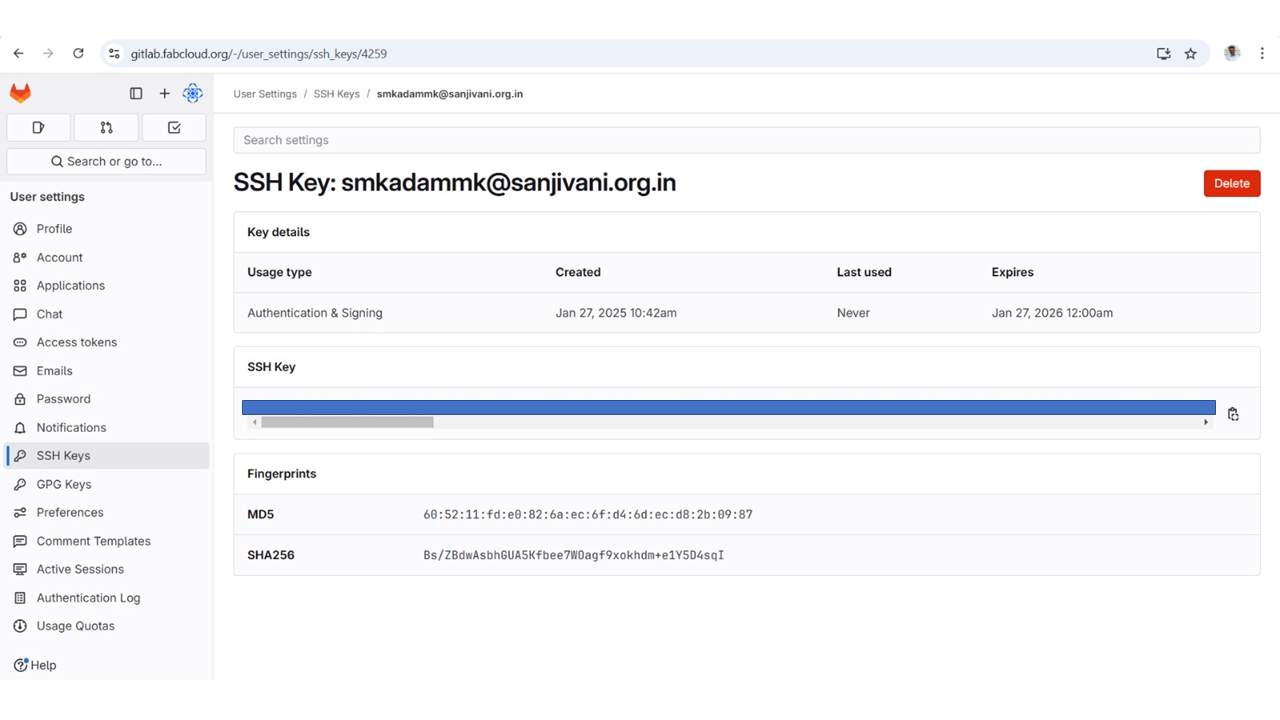
This is my fabcloud profile

Click o Profile then Preferences
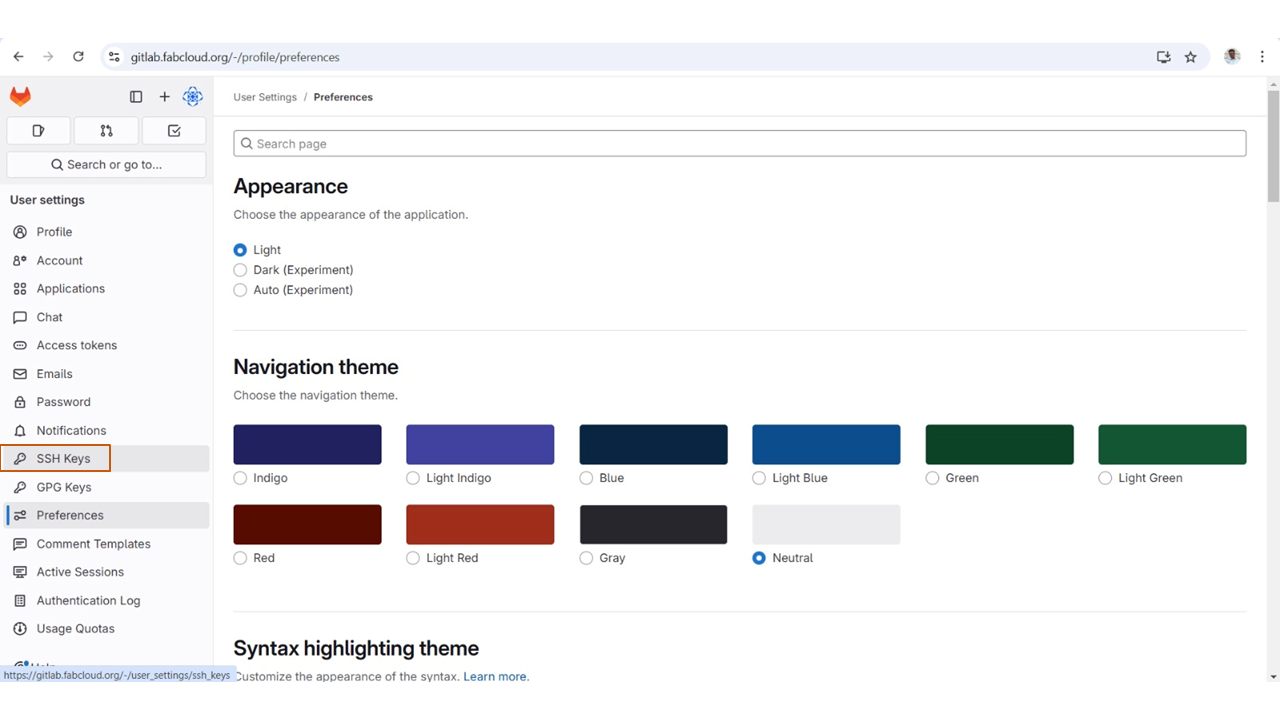
after this go to SSH Keys option
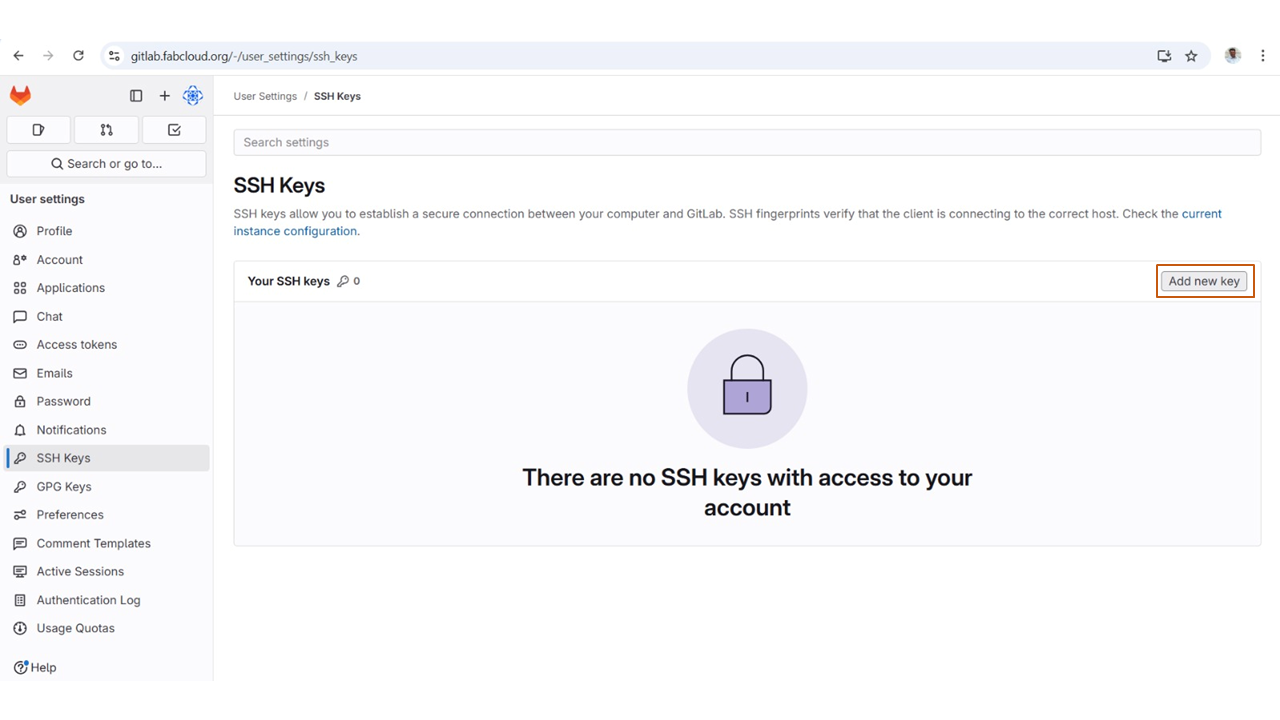
Click on add key options
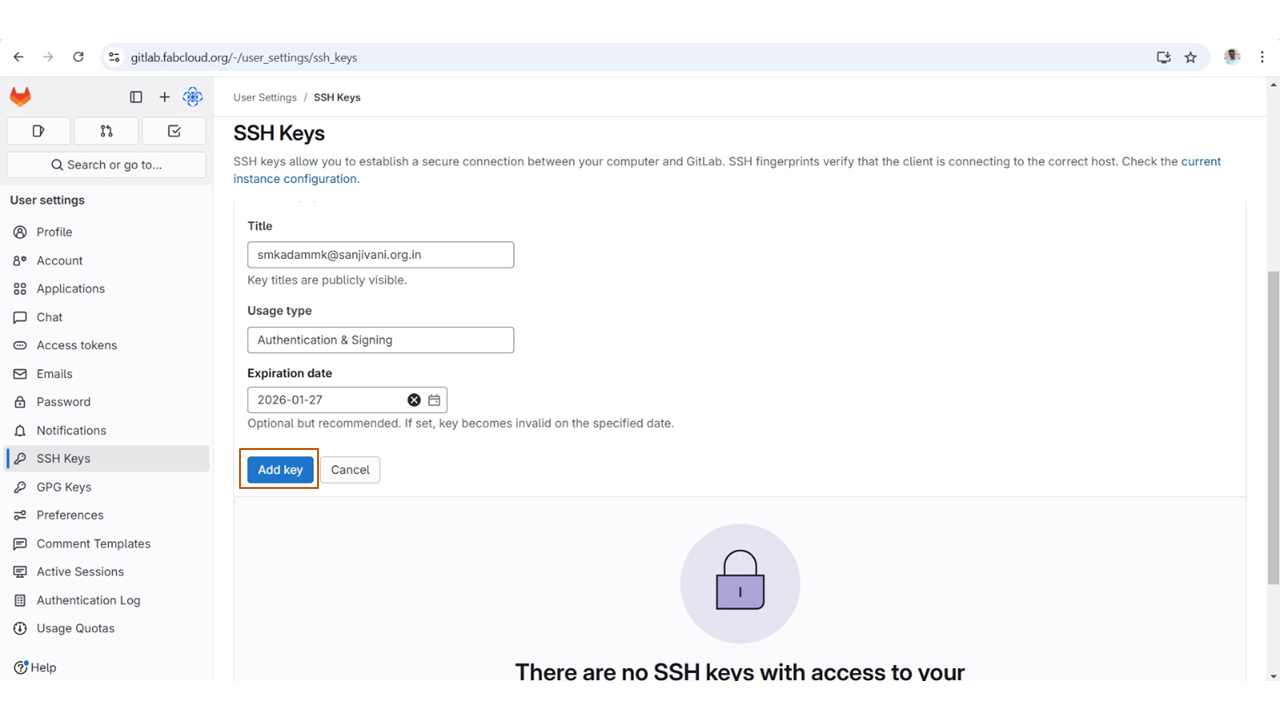
After that Click on key option
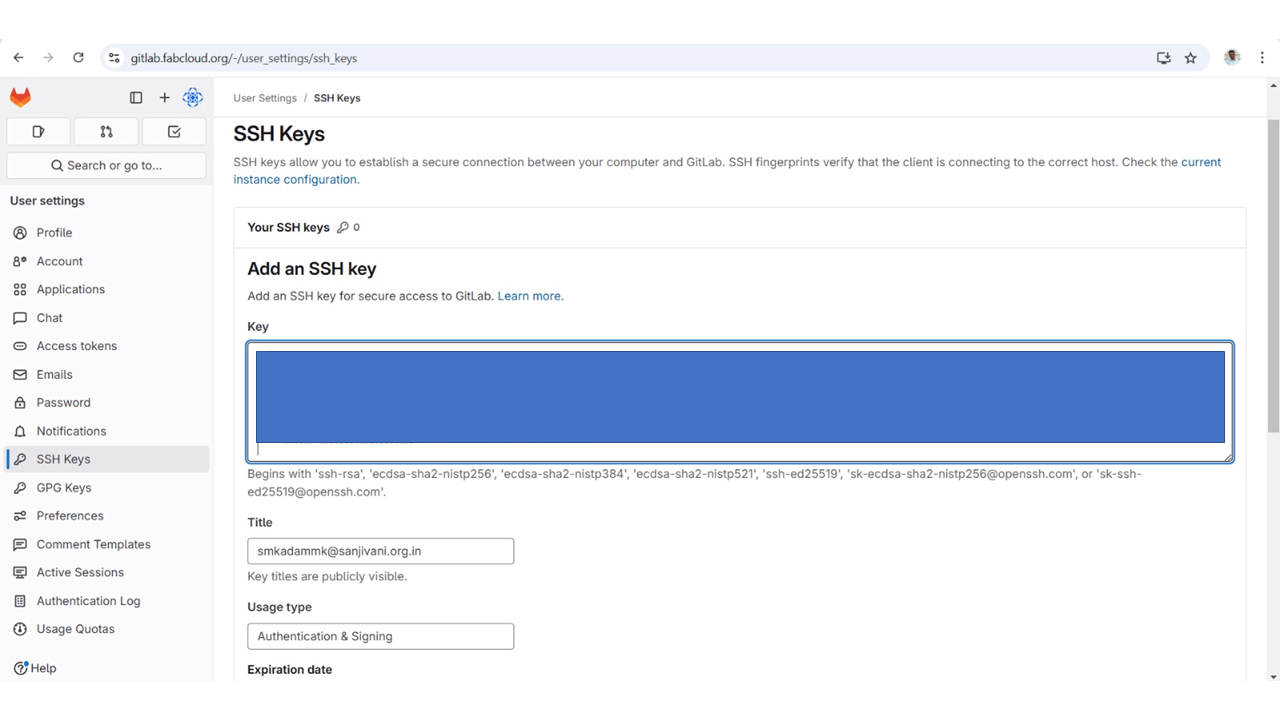
I have pasted the key in above dialogue box
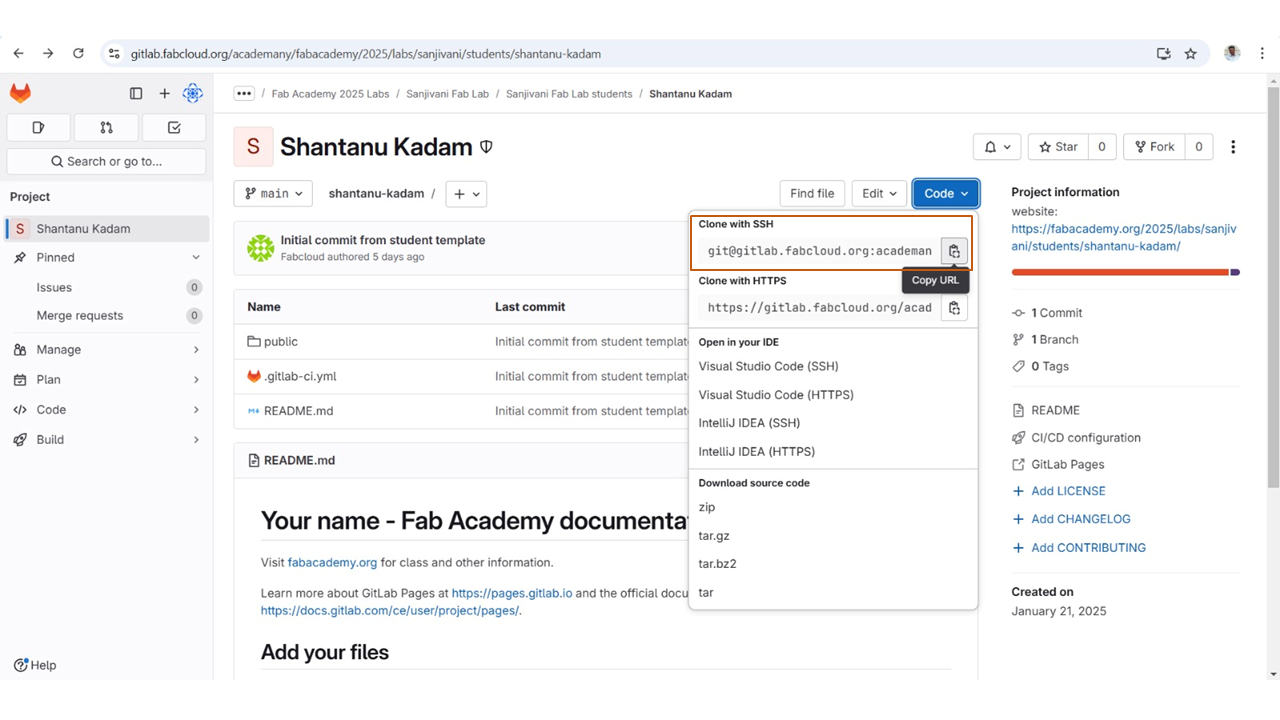
For Clonning that website on the cloud I copied the SSH Key from my profile and pasted that in Git Bash in git clone command
Commands used in Git
1. ssh-keygen -t rsa -C "Email ID" -b 4096
--Used to generate keygen
2. cat ~/.ssh/id_rsa.pub | clip
--Used to copy the key
3. ssh -T git@gitlab.fabcloud.org
--It initiates the SSH connection to the gitlab.fabcloud.org server
4. $ git config --global user.name "USER NAME"
--used to set global user name
5. $ git config --global user.email "Your mail ID"
--stores your email in global configuration file of git
6. $ git clone < copylink >
--It will creates a local copy of the git repository on computer
7. git pull
--used to fetch and download content from a remote repository
8. git add --all
--Used to add the files or changes to the repository.
9. git commit -m"mesaage"
--Commits the changes to local git repository
10. git push
--used to upload local repository content to a remote repository
3. Project Management:
Final project plan and sketch
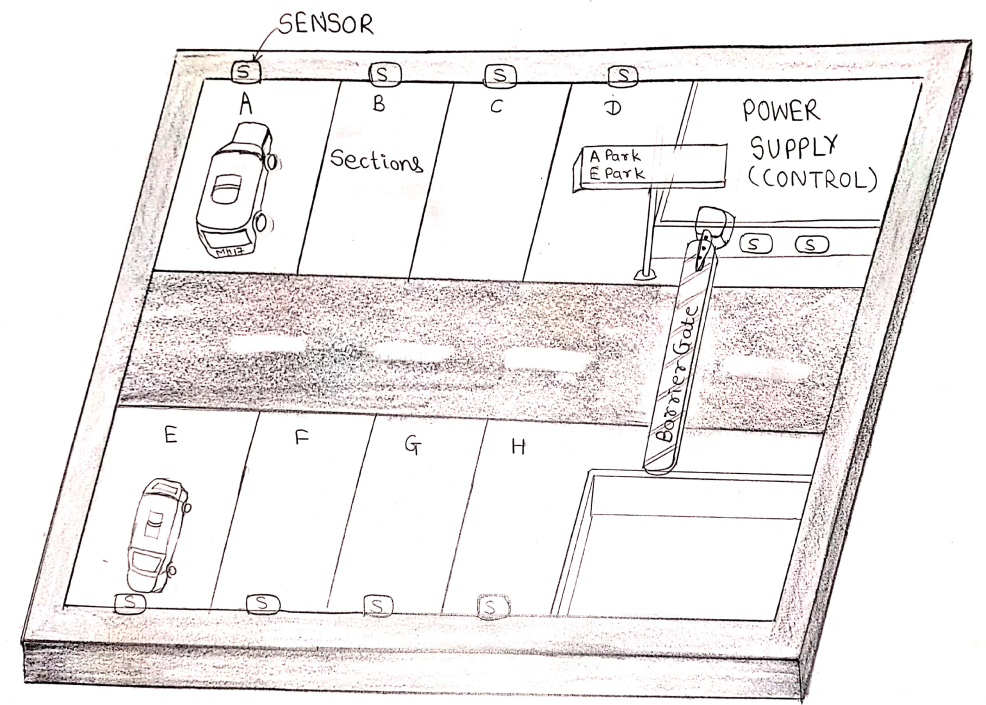
1. Smart Parking Systems
The rapid growth of urban populations and the increasing number of vehicles on roads have exacerbated parking problems in cities worldwide. Traditional parking systems, which realy on manual management and static signage are often inefficient, resulting in wasted time, traffic congestion, and driver frustration. Furthermore, the absence of real-time information about parking availability forces drivers to spend significant time circling around in search of empty spaces, contributing to increased traffic density and air pollution.
To address these challenges, the integration of Internet of Things (IoT) technologies into parking management systems has emerged as a transformative solution. Smart Parking Systems (SPS) leverage IoT-enabled devices to optimize parking space utilization, provide real-time updates on parking availability, and offer automated payment options. These advancements enhance the parking experience for users while improving the overall efficiency of urban mobility.
Overview of Smart Parking Systems
A Smart Parking System utilizes a network of sensors, communication protocols, and data analytics to monitor and manage parking spaces in real time. The system enables users to:
1. Locate available parking spaces quickly.
2. Reserve parking spots in advance.
3. Make secure digital payments, eliminating the need for physical interaction with parking meters or staff.
IoT-enabled parking sensors detect the occupancy status of parking spaces and transmit this data to a centralized server. The server updates parking availability information on a mobile app or user interface in real time. Additionally, GPS-based navigation aids users in finding the nearest available parking space and guides them to their destination.
Objectives
The primary objectives of this project are:
• To design and implement an IoT-based Smart Parking System that provides real-time updates on parking availability.
• To enable users to reserve parking spots in advance through a mobile app.
• To facilitate secure and seamless digital payments for parking services.
• To reduce the time spent searching for parking spaces, thereby decreasing traffic congestion and minimizing carbon emissions.
• To enhance the efficiency of parking lot management, contributing to smarter urban infrastructure.
System Design and Components
The Smart Parking System incorporates the following key components:
1. IoT Sensors: Sensors installed in parking spaces detect occupancy and transmit data to the central server.
2. Communication Protocols: Reliable communication protocols ensure seamless data exchange between sensors, servers, and user interfaces.
3. Mobile Application: A user-friendly app provides real-time parking information, reservation features, and secure payment options.
4. System Architecture: The centralized server processes data from IoT devices, integrates it with user queries, and delivers real-time updates.
Benefits of the Smart Parking System
The implementation of a Smart Parking System offers several advantages:
•For Users:
o Saves time by providing real-time updates on parking availability.
o Reduces frustration with the ability to reserve parking spots in advance.
o Simplifies the payment process through secure, digital platforms.
•For Urban Infrastructure:
o Decreases traffic congestion and associated pollution levels.
o Improves the overall efficiency of parking management systems.
o Supports the development of smart cities by integrating advanced technologies into public services.
Conclusion
This project focuses on the design and implementation of an IoT-based Smart Parking System, which aims to revolutionize parking management in urban areas. By leveraging cutting-edge technologies such as IoT sensors, communication networks, and mobile app solutions, the system addresses critical parking challenges, contributing to smoother urban mobility and sustainable city development. Through its innovative approach, the Smart Parking System is a step forward in creating smart cities that prioritize user convenience, environmental sustainability, and efficient resource management.
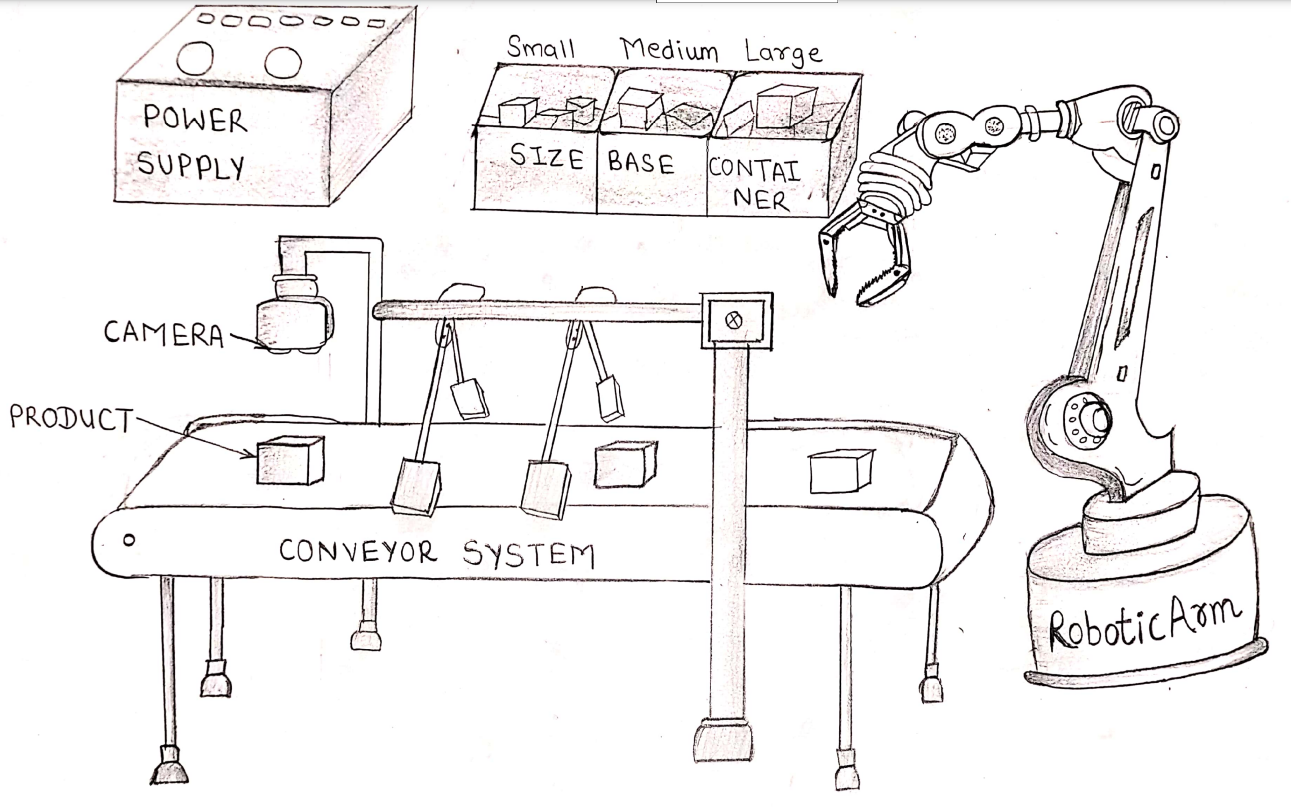
2. Robotic Arm System for Object Sorting
The increasing demand for automation in industrial environments necessitates innovative solutions for efficient sorting processes. This project proposes the design and development of an advanced 6-axis servo robotic arm system integrated with a camera and a controller to address the industrial challenge of sorting objects by size and color into designated bins.
To address these challenges, the integration of Internet of Things (IoT) technologies into parking management systems has emerged as a transformative solution. Smart Parking Systems (SPS) leverage IoT-enabled devices to optimize parking space utilization, provide real-time updates on parking availability, and offer automated payment options. These advancements enhance the parking experience for users while improving the overall efficiency of urban mobility.
System Overview
The proposed system consists of a conveyor belt, a camera, a controller, a robotic arm with servo motors, and a defaulter mechanism. The workflow is as follows:
1. A camera positioned above the conveyor belt continuously monitors objects in motion.
2. The computer vision system identifies the size and color of each object.
3. The controller processes this data in real-time and generates commands for the robotic arm.
4. The 6-axis servo robotic arm picks up identified objects and places them in designated bins.
5. Faulty or unidentifiable objects are sorted separately by the defaulter mechanism.
6. The dual operation of the robotic arm and defaulter ensures seamless sorting without congestion.
Objectives
• To develop an automated sorting system using a 6-axis servo robotic arm.
• To integrate a computer vision-based camera system for real-time object detection.
• To implement a controller for processing data and executing robotic commands.
• To incorporate a defaulter mechanism for managing unidentifiable or faulty objects.
• To optimize sorting efficiency and minimize processing delays.
Key Features
• High-Precision Sorting: The 6-axis servo robotic arm ensures accurate placement of objects.
• Real-Time Processing: The integration of computer vision allows instant data analysis and decision-making.
• Defaulter Mechanism: Manages faulty objects to maintain an uninterrupted workflow.
• Industrial-Grade Performance: Designed for speed, precision, and reliability in manufacturing environments.
Expected Outcomes
• Improved sorting accuracy for industrial applications.
• Enhanced efficiency in object classification and placement.
• Reduced manual labor and increased automation.
• A scalable solution adaptable to different industries and sorting requirements.
Conclusion
By integrating robotics, computer vision, and real-time control, this project presents a cutting-edge solution for industrial sorting challenges. The combination of a high-precision robotic arm and an intelligent sorting mechanism enhances workflow efficiency and reliability, making it a valuable addition to modern manufacturing and automation systems.