Week 14. Moulding and Casting
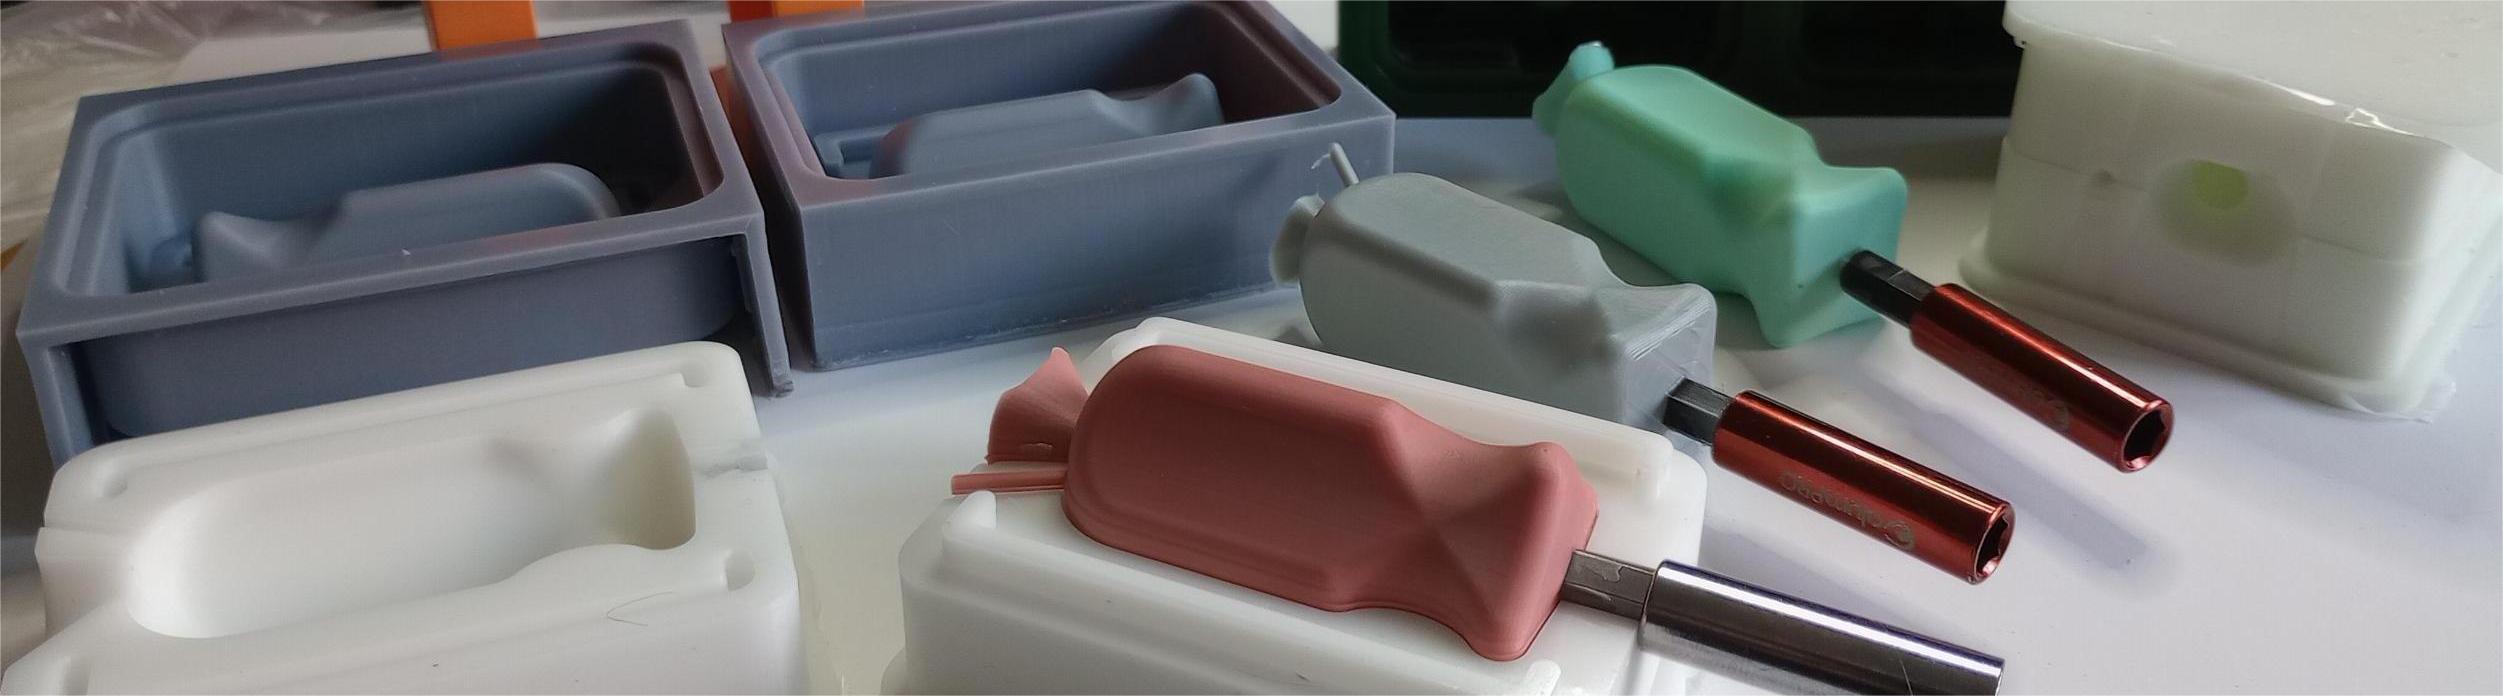
Table of Contents
- WEEKLY PLAN
- GROUP ASSIGNMENT
- INDIVIDUAL ASSIGNMENT: MOULD DESIGN, MANUFACTURING AND CASTING
- USEFUL LINKS AND RESOURCES
- FILES
WEEKLY PLAN
Group assignment:
- Review the safety data sheets for each of your molding and casting materials
- Make and compare test casts with each of them
- Compare printing vs milling molds
Individual assignment:
- Design a mold around the process you'll be using, produce it with a smooth surface finish that does not show the production process, and use it to cast parts.

GROUP ASSIGNMENT
This is the link to the Fab Lab León Group Assignments page. Since I am completing the group assignment on my own I left the documentation on this page.
SAFETY OF CASTING MATERIALS
When using casting materials such as resin and silicone it is essential to follow precise instructions and adhere to safety measures to ensure optimal results and personal safety.
SILICONE
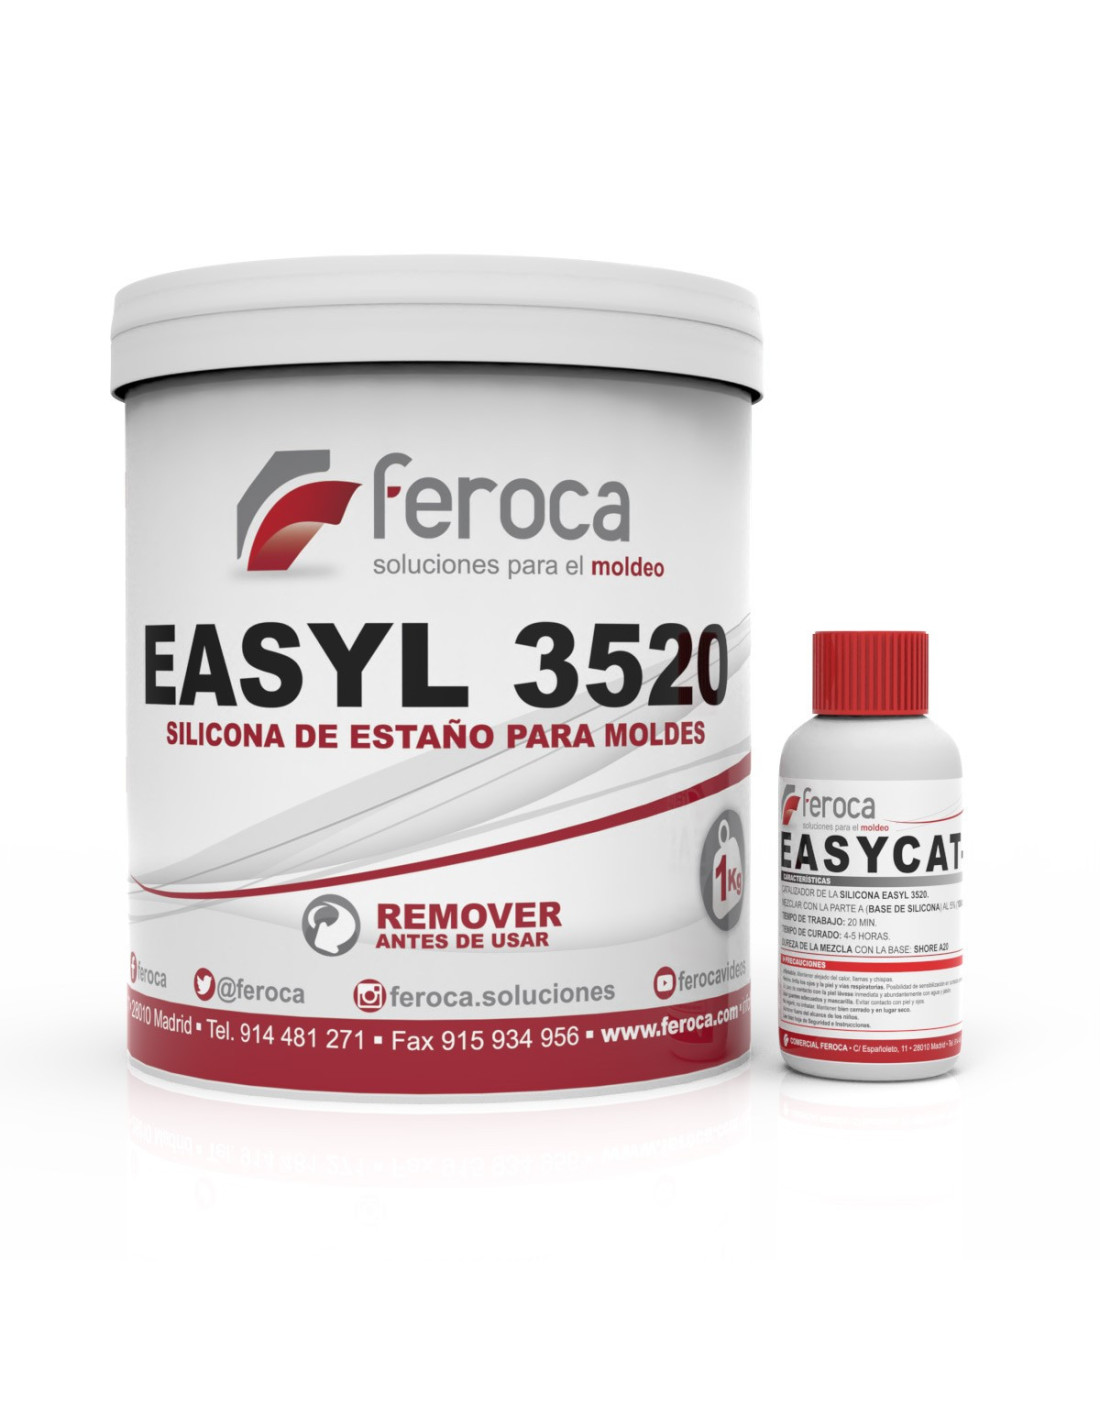 EASYL 3520 from Feroca is a two-component silicone elastomer (parts A and B) that cures at room temperature, the base (part A) has the appearance of a viscous liquid that, after the addition of EASYCAT-20 catalyst (part B), transforms into an elastic material
Application Instructions
- Mixing Ratio: Measure 100 parts of the base (Part A) and add 5 parts of the catalyst (Part B).
- Mixing Process: Thoroughly mix both components until a homogeneous mixture is achieved.
- Working time: 20 minutes
- Curing: Allow the silicone to cure at room temperature. The working time is approximately 20 minutes, and full curing occurs within 4 to 5 hours.
Safety Measures
- Wear chemical-resistant gloves to prevent skin contact.
- Use safety goggles to protect eyes from splashes.
- Work in a well ventilated area
More information can be found in the Safety Datasheet Datasheet_EASYL_3520_PARTEA.pdf
RESIN
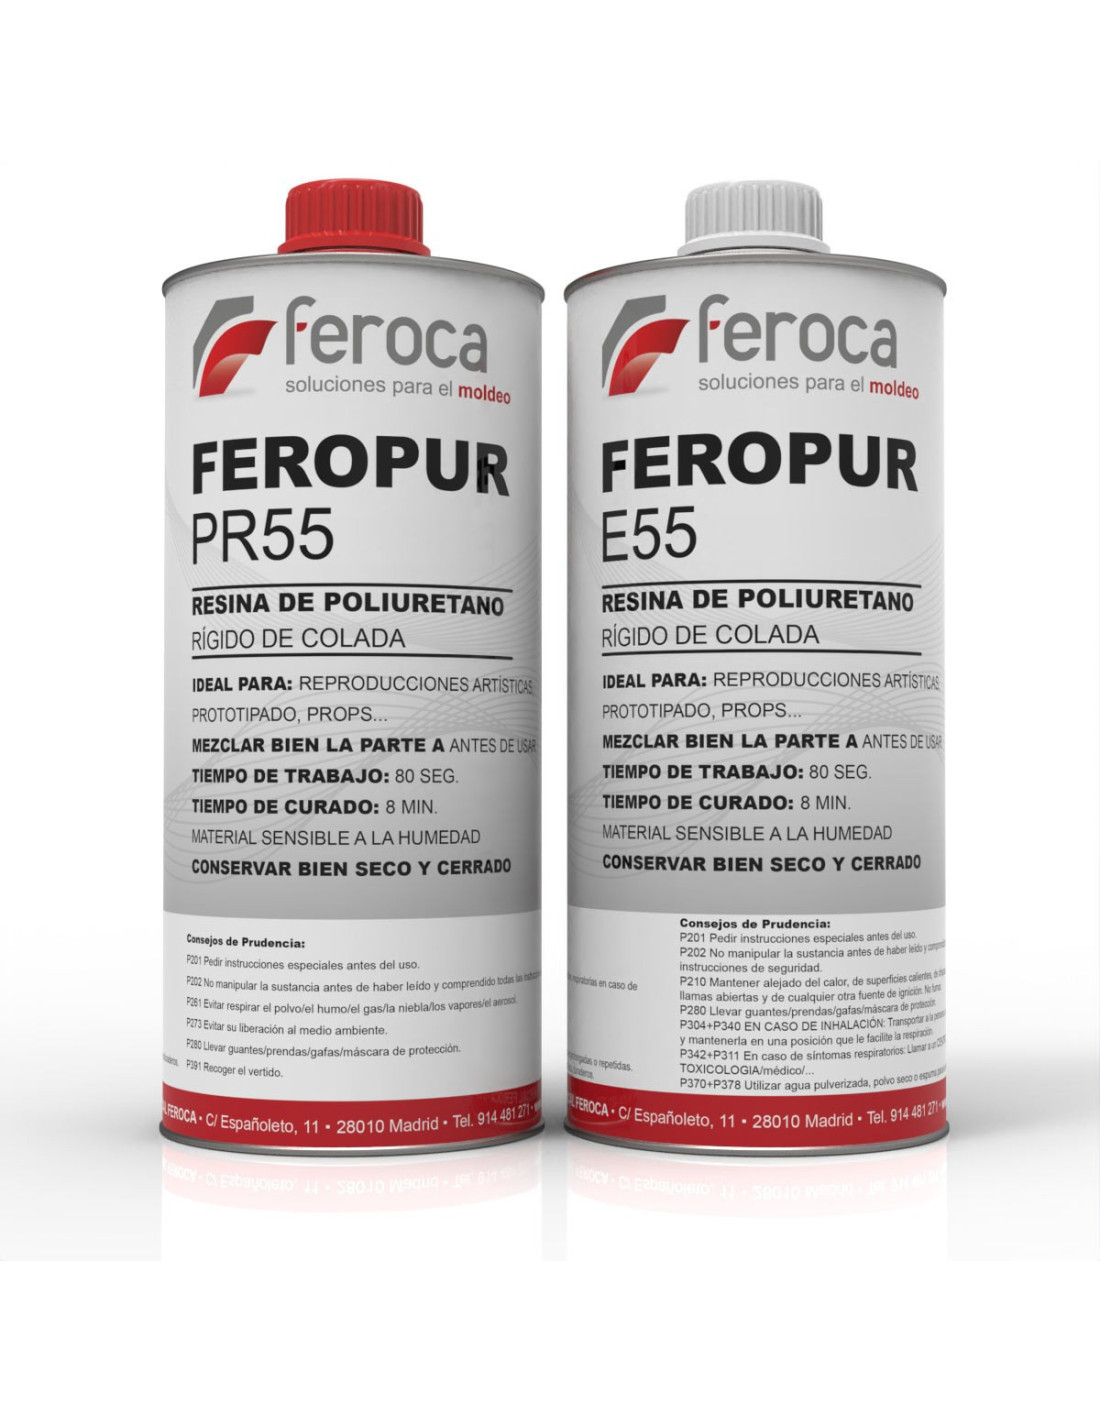 FEROPUR PR55+E55 is a fast two-component polyurethane that hardens at room temperature to work by casting. The product consists of a colorless resin(polyol) and a yellowish colored hardener(isocyanate). It is commonly used for the reproduction of parts in silicone molds, negatives, mock-ups and prototypes.
Application Instructions
- Shake the resin strongly in order to homogenize it before use
- Mixing Ratio: Measure equal parts by volume or weight of Part A (polyol) and Part B (isocyanate). 100A:100B
- Application: Pour the mixture into the mold promptly, as the working time is approximately 80 seconds.
- Curing: Allow the resin to cure at room temperature. The demoulding time is around 8 minutes.
The safety measures are the same as discribed above. More information can be found in the Safety Datasheets Datasheet_HS_FEROPUR_E55.pdf ; Datasheet_HS_FEROPUR_PR55.pdf
Top
INDIVIDUAL ASSIGNMENT: MOULD DESIGN, MANUFACTURING AND CASTING
MOULD DESIGN
For this week´s assignment I am designing an object and the mould to cast the designed piece.
In particaular i am designing the compact screwwdriver handle that will have a magnetic bit holder attached.
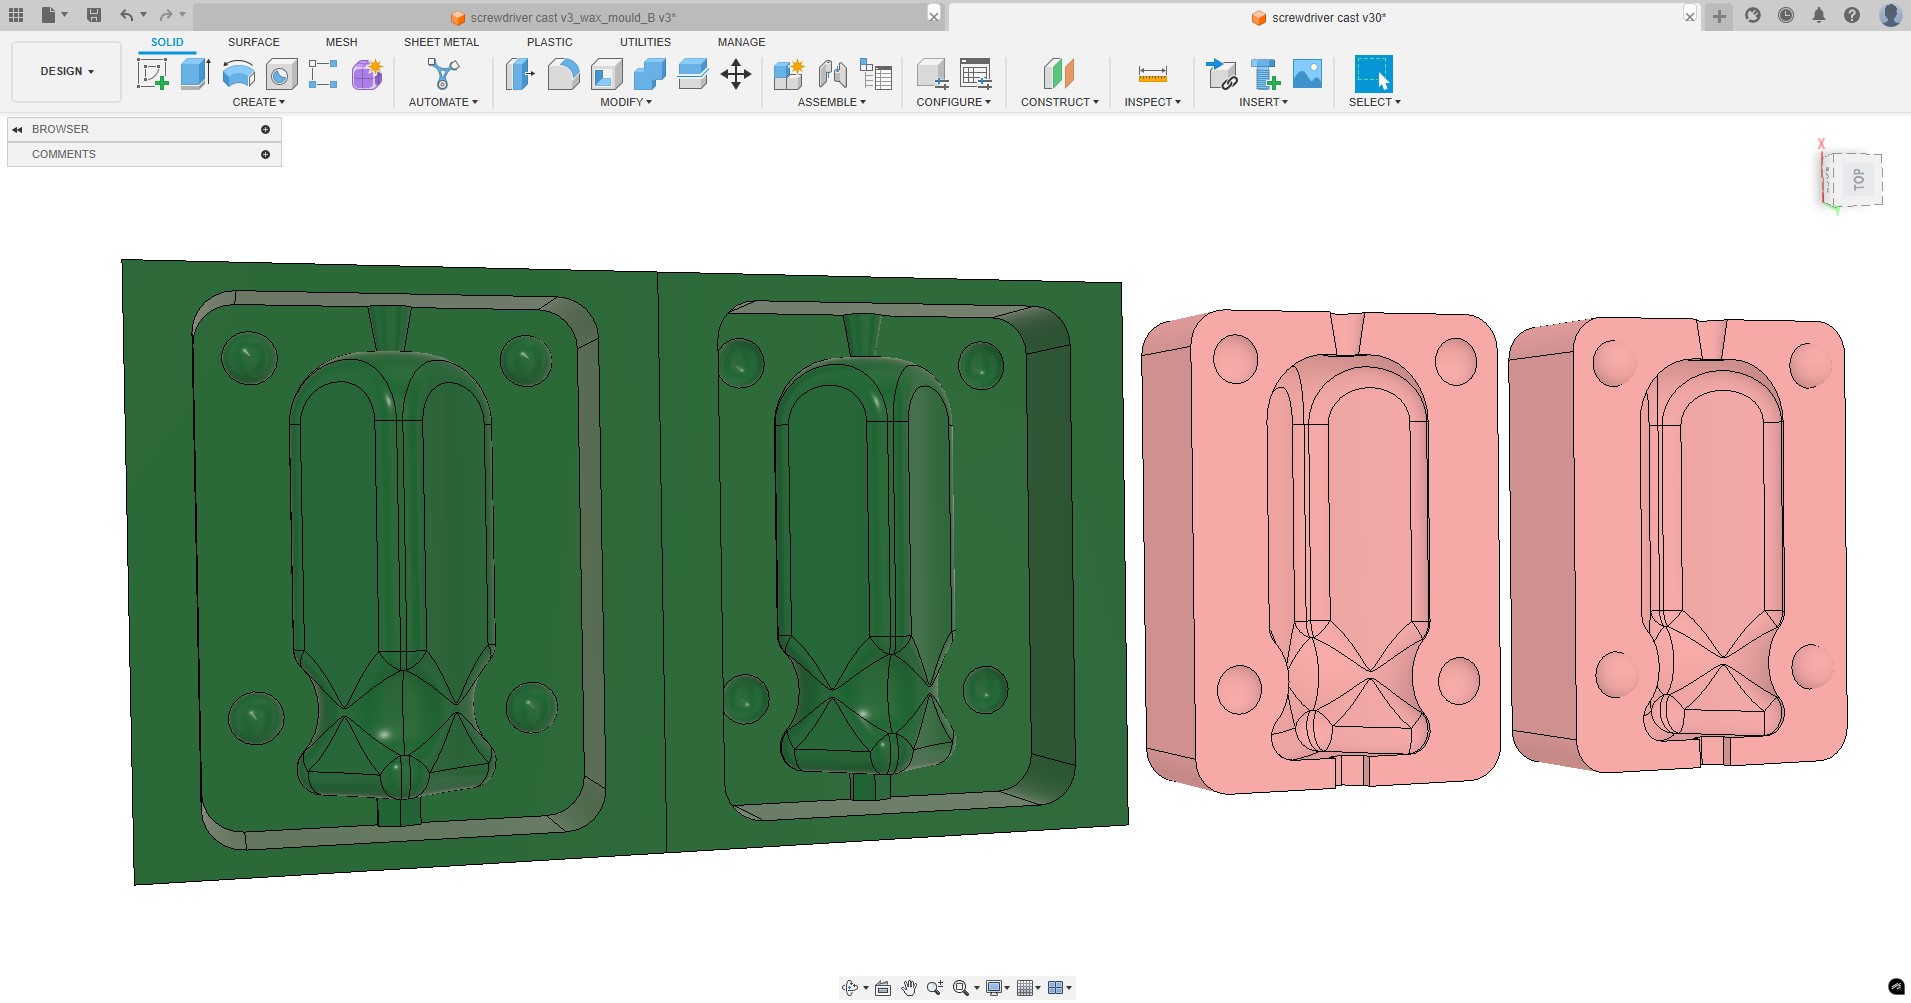
I start by designing the screwdriver in fusion. I have a piece of wax 150x88x37 to machine both parts of the mould, so I have to take this into account to design a handle that fits within those constrains.
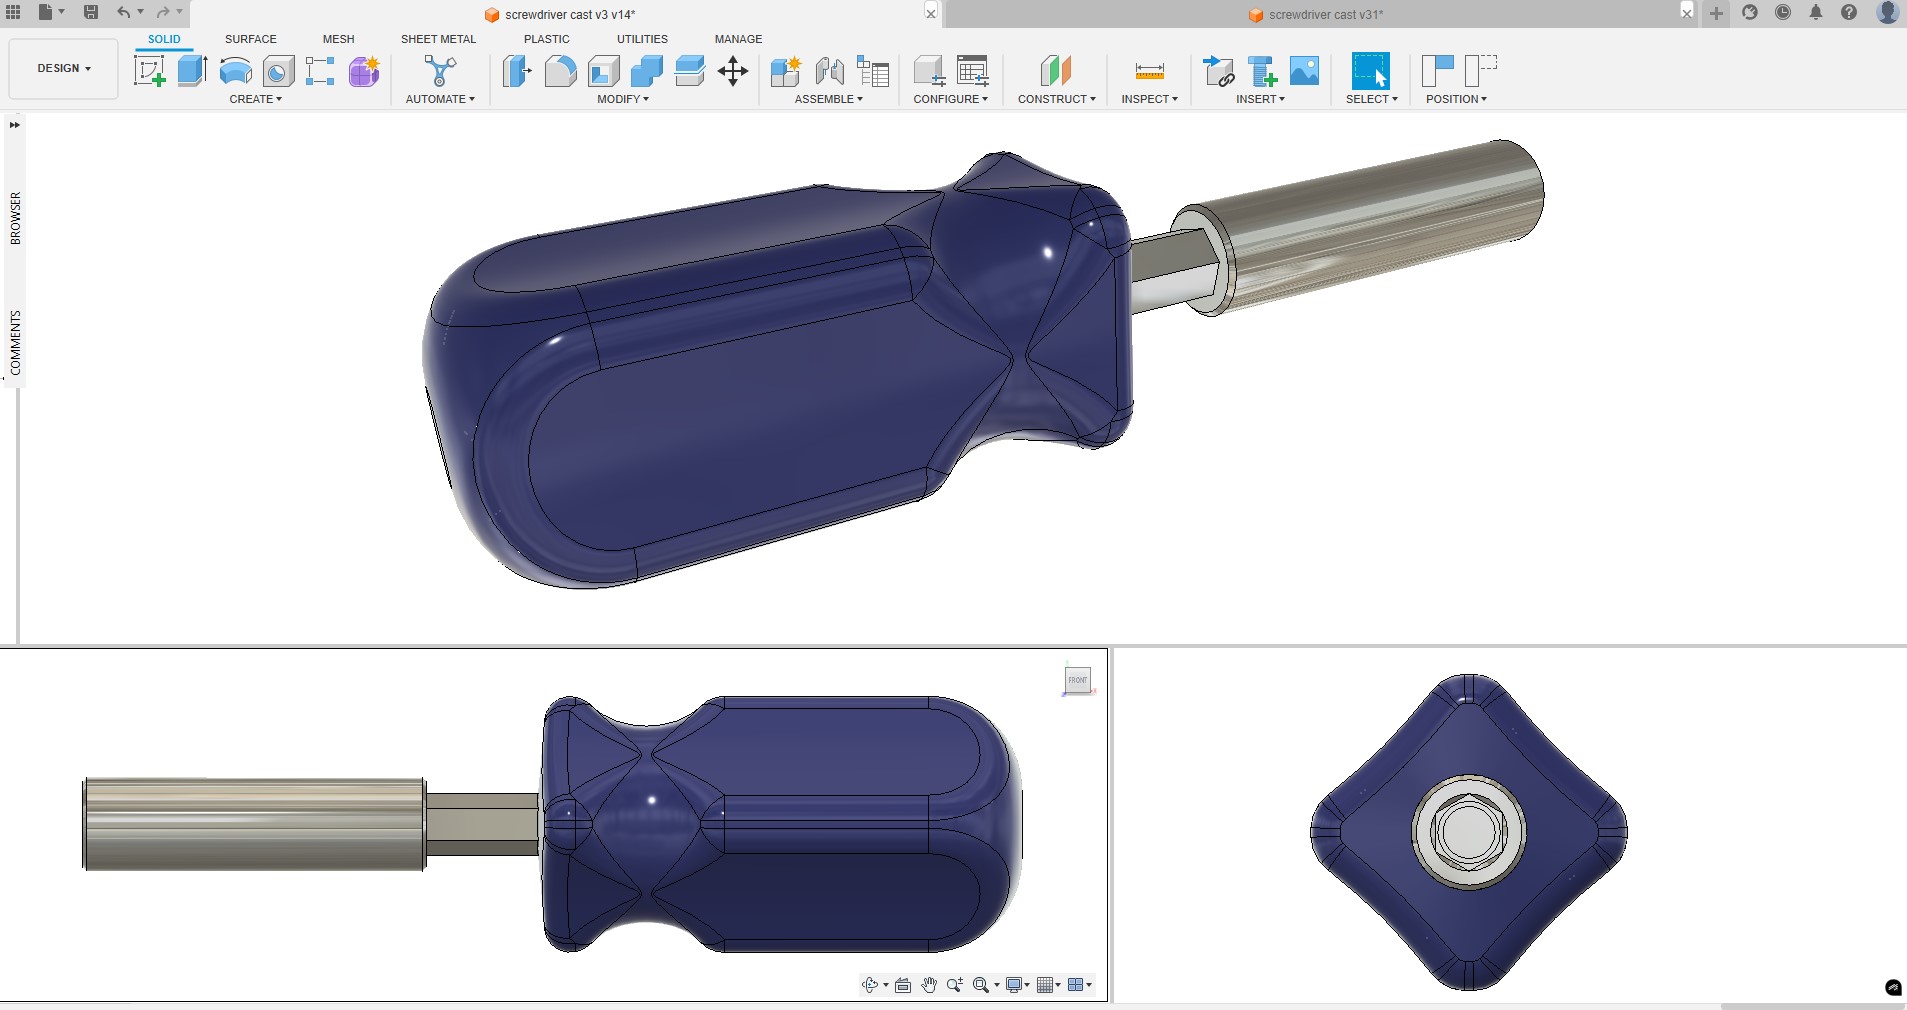
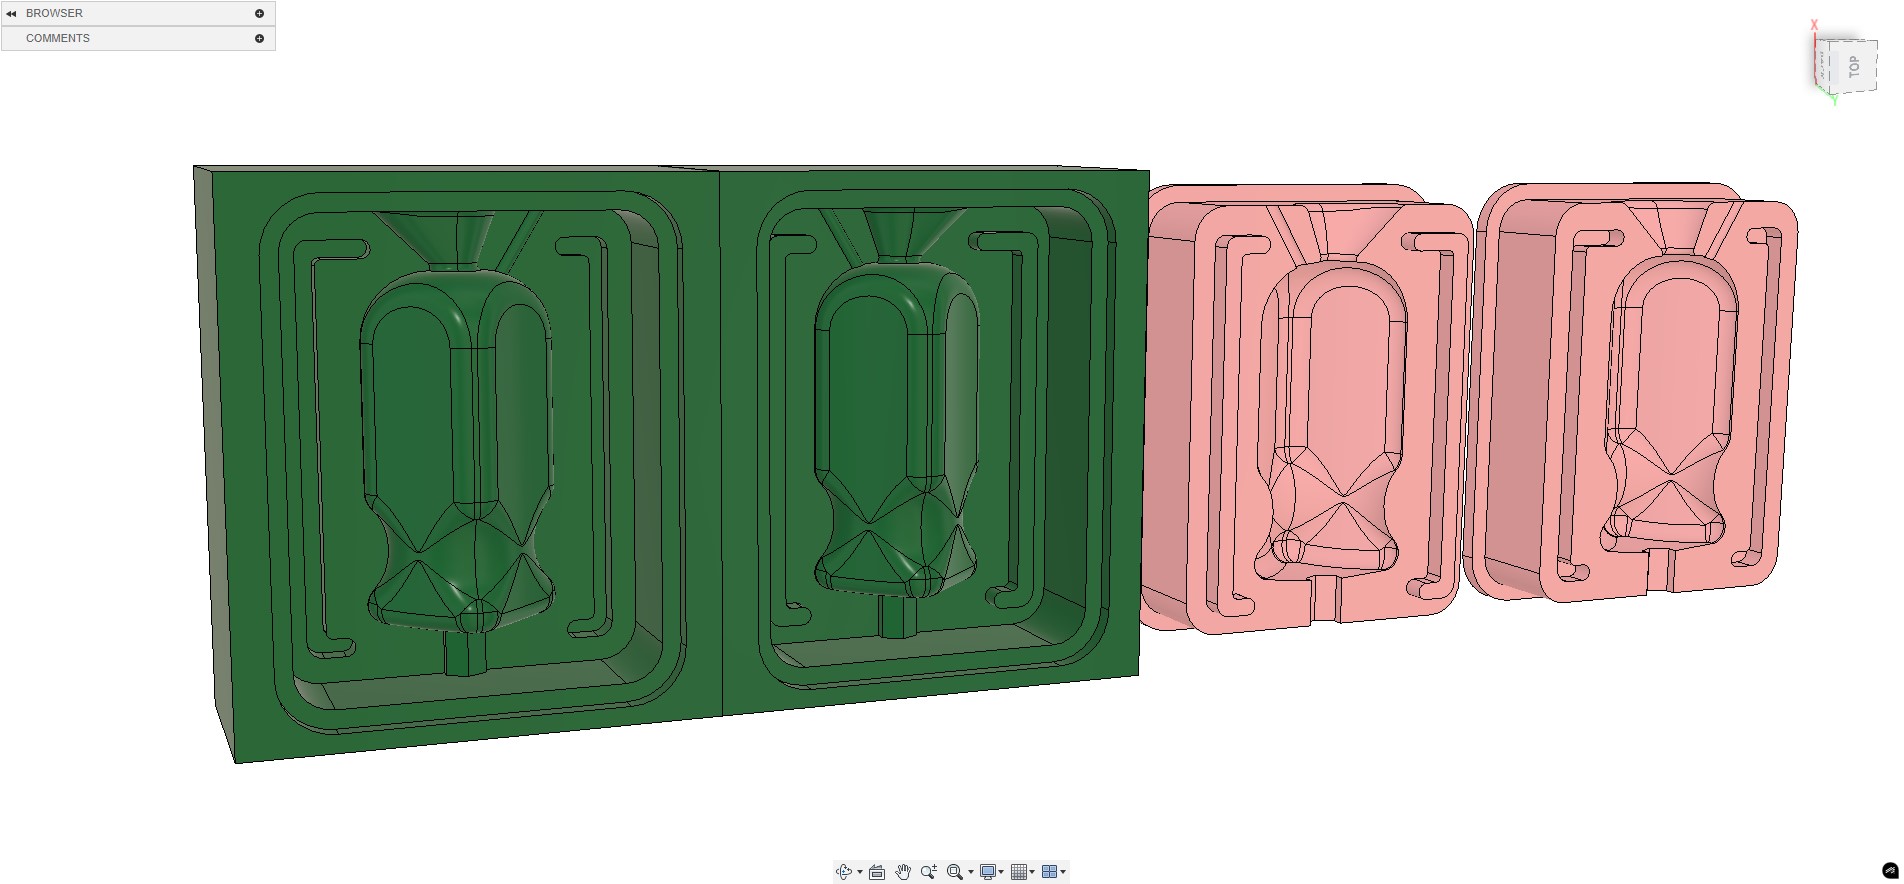
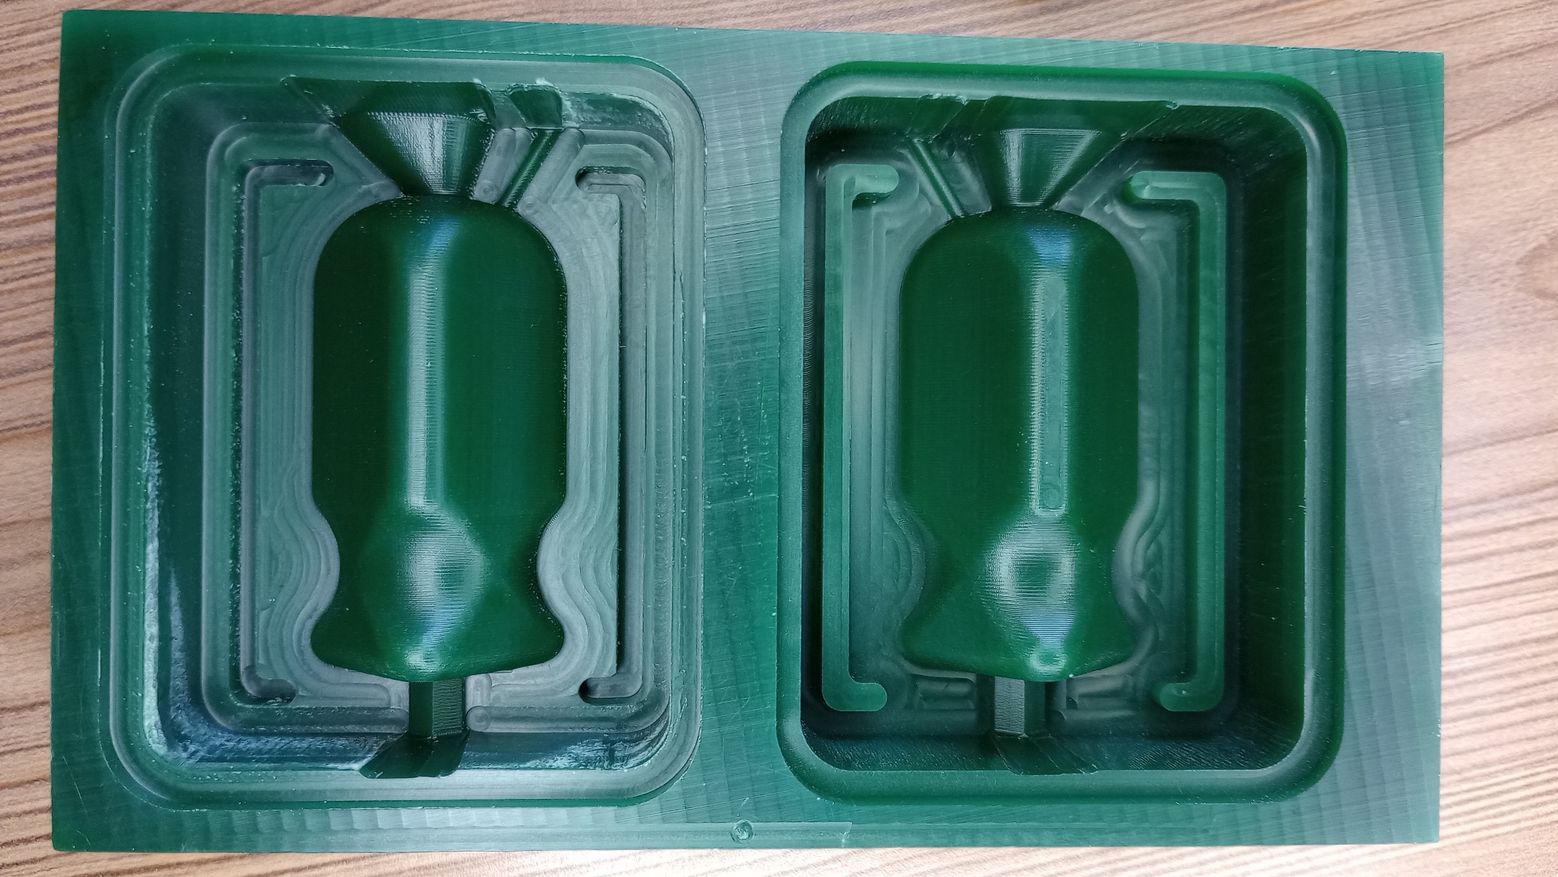
Based on the handle design, I create the two halves of the wax mold (green), and from them, I can create the silicone molds.
After the meeting with my instructors from Fab Lab León they provided me with a series of proposal to improve the moulds.
- Adding a vent for the air to escape when casting with resin
- Changing the spherical keys to align the mould for a linear channel
- Making the pouring hole bigger
- Adding a recces around the edge of the wax moulds to aid with the release of the silicone
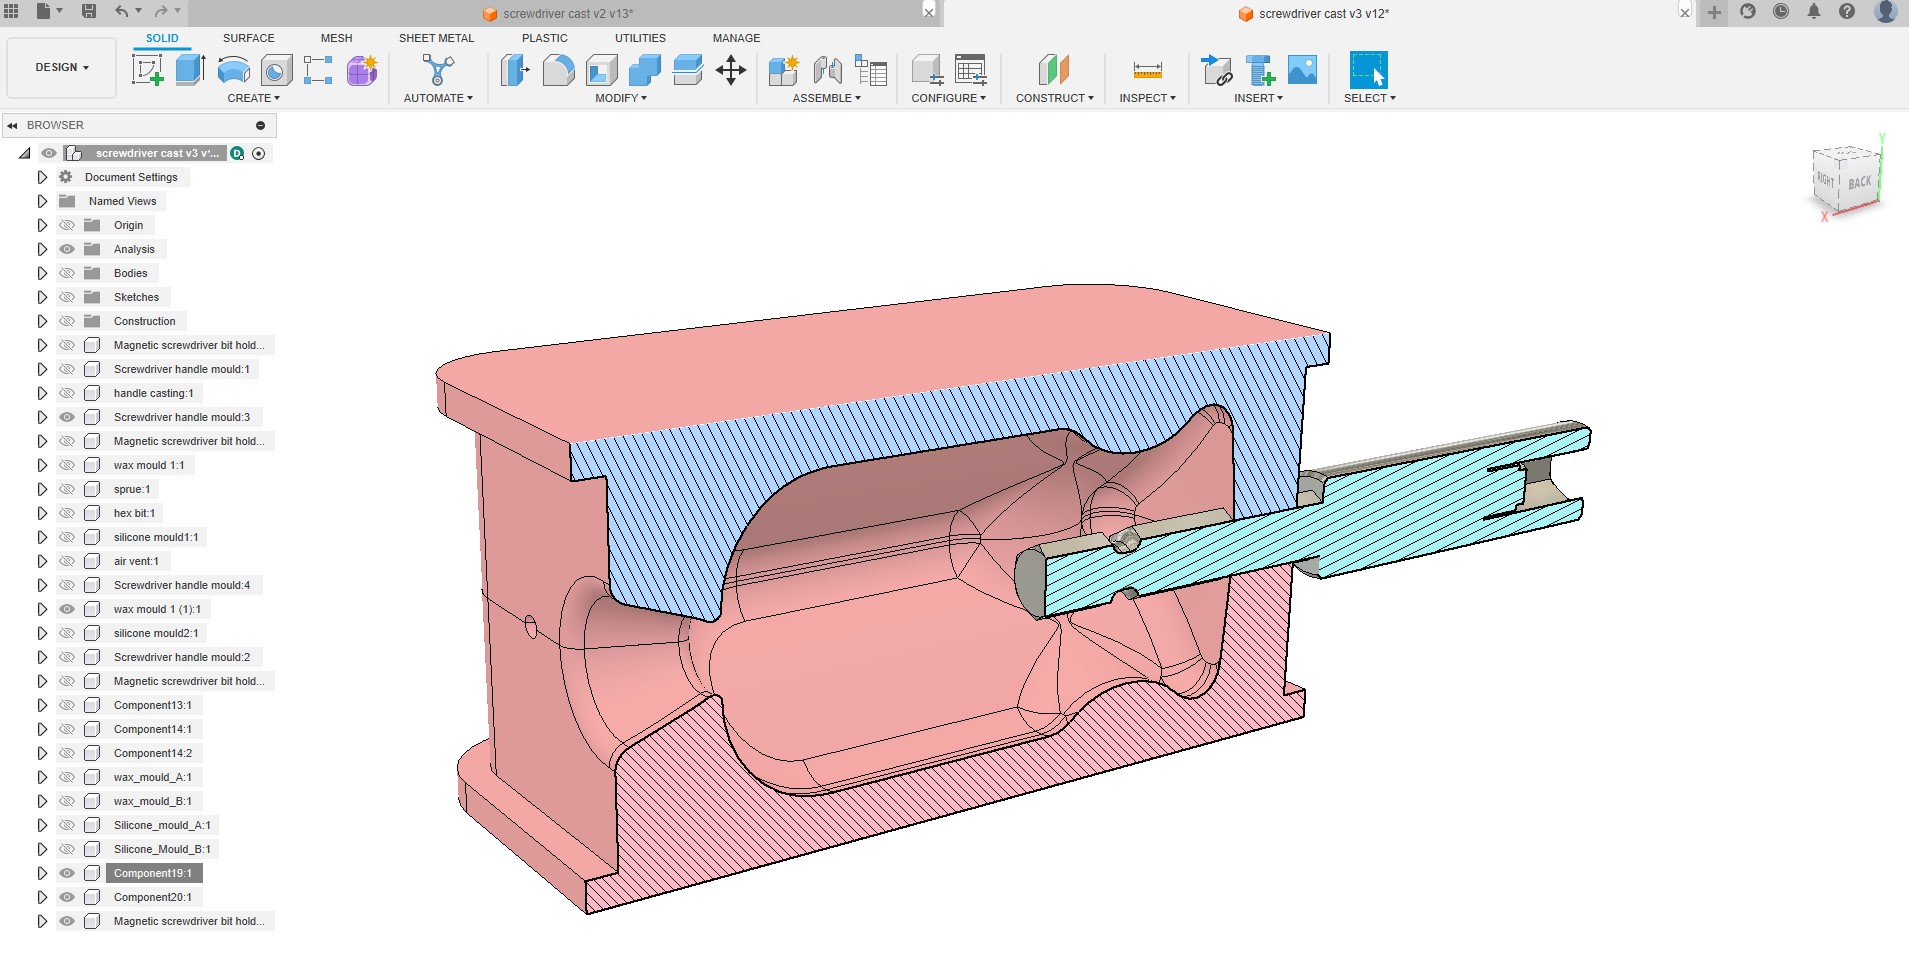
- There is some concern with the metallic magnetic bit keeping in place during casting, so we decide to make a 3D printed support to hold it in place and aligned.
After making these changes I ended with version 2 of the moulds. I also had to mirror the moulds so when put together the vent, sprue and keys align properly.
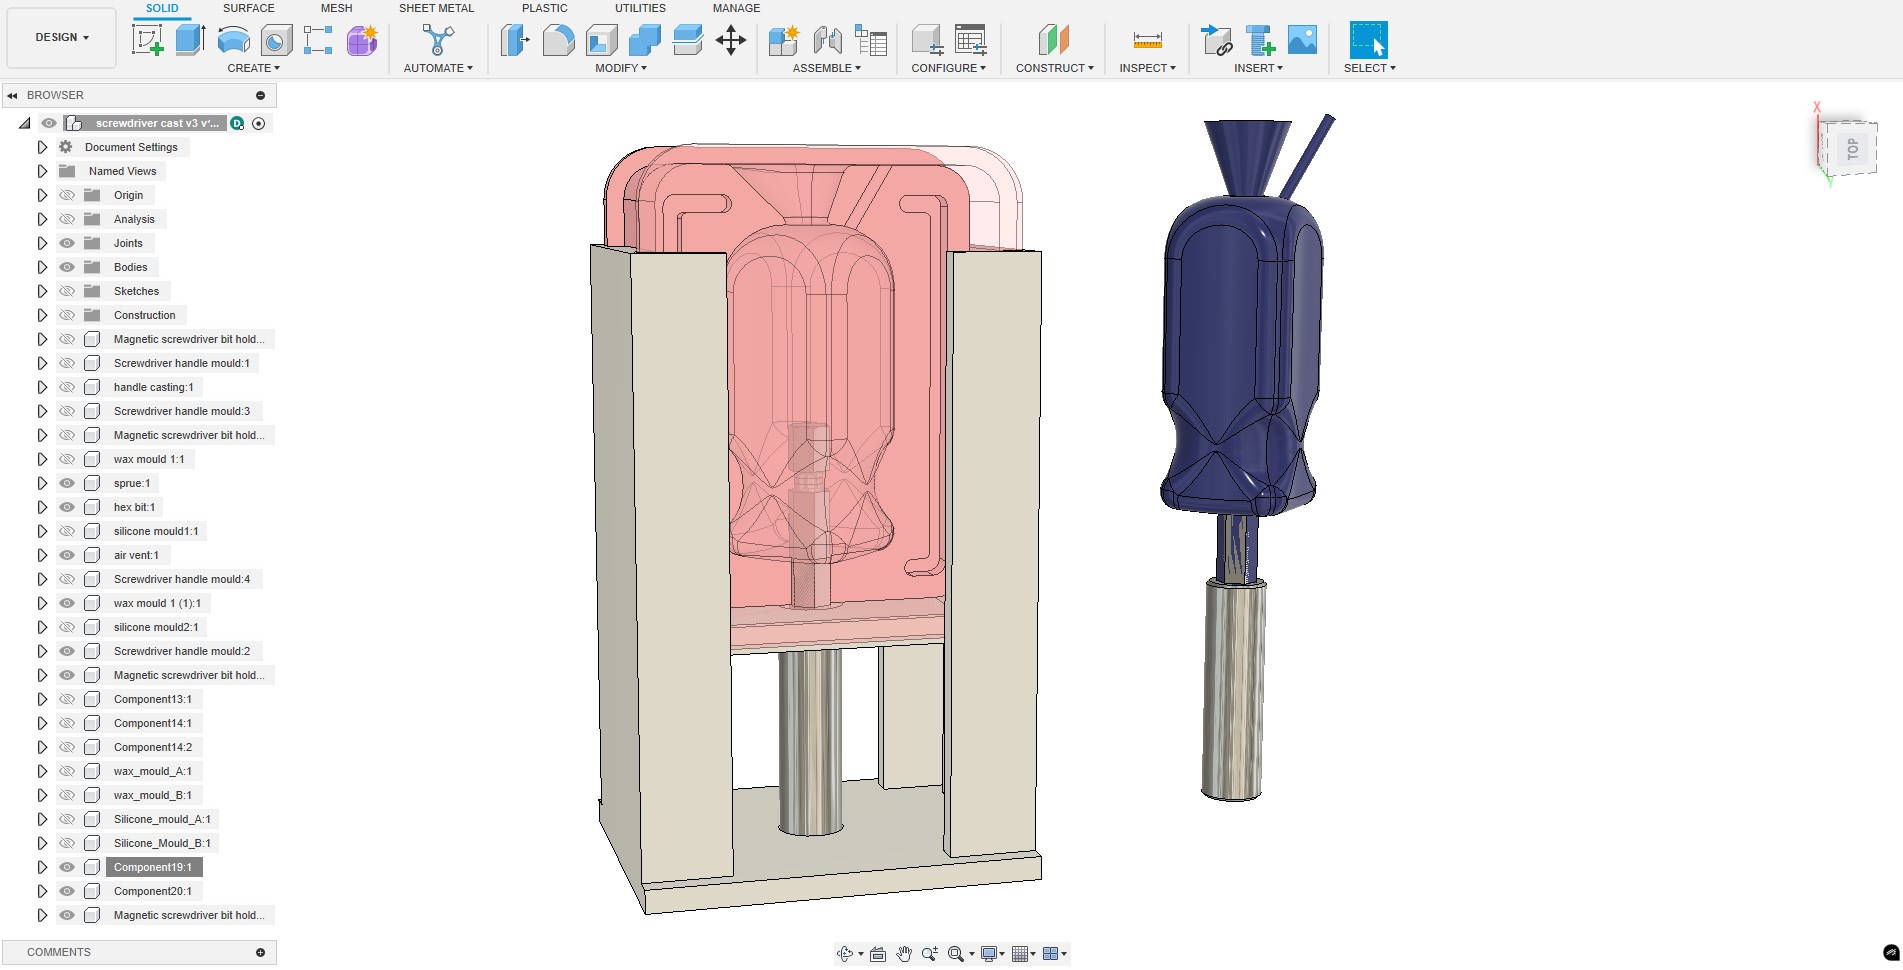
To ensure that the suitability of the design before machining it I check the final result in Fusion abd i design a support for the moulds.
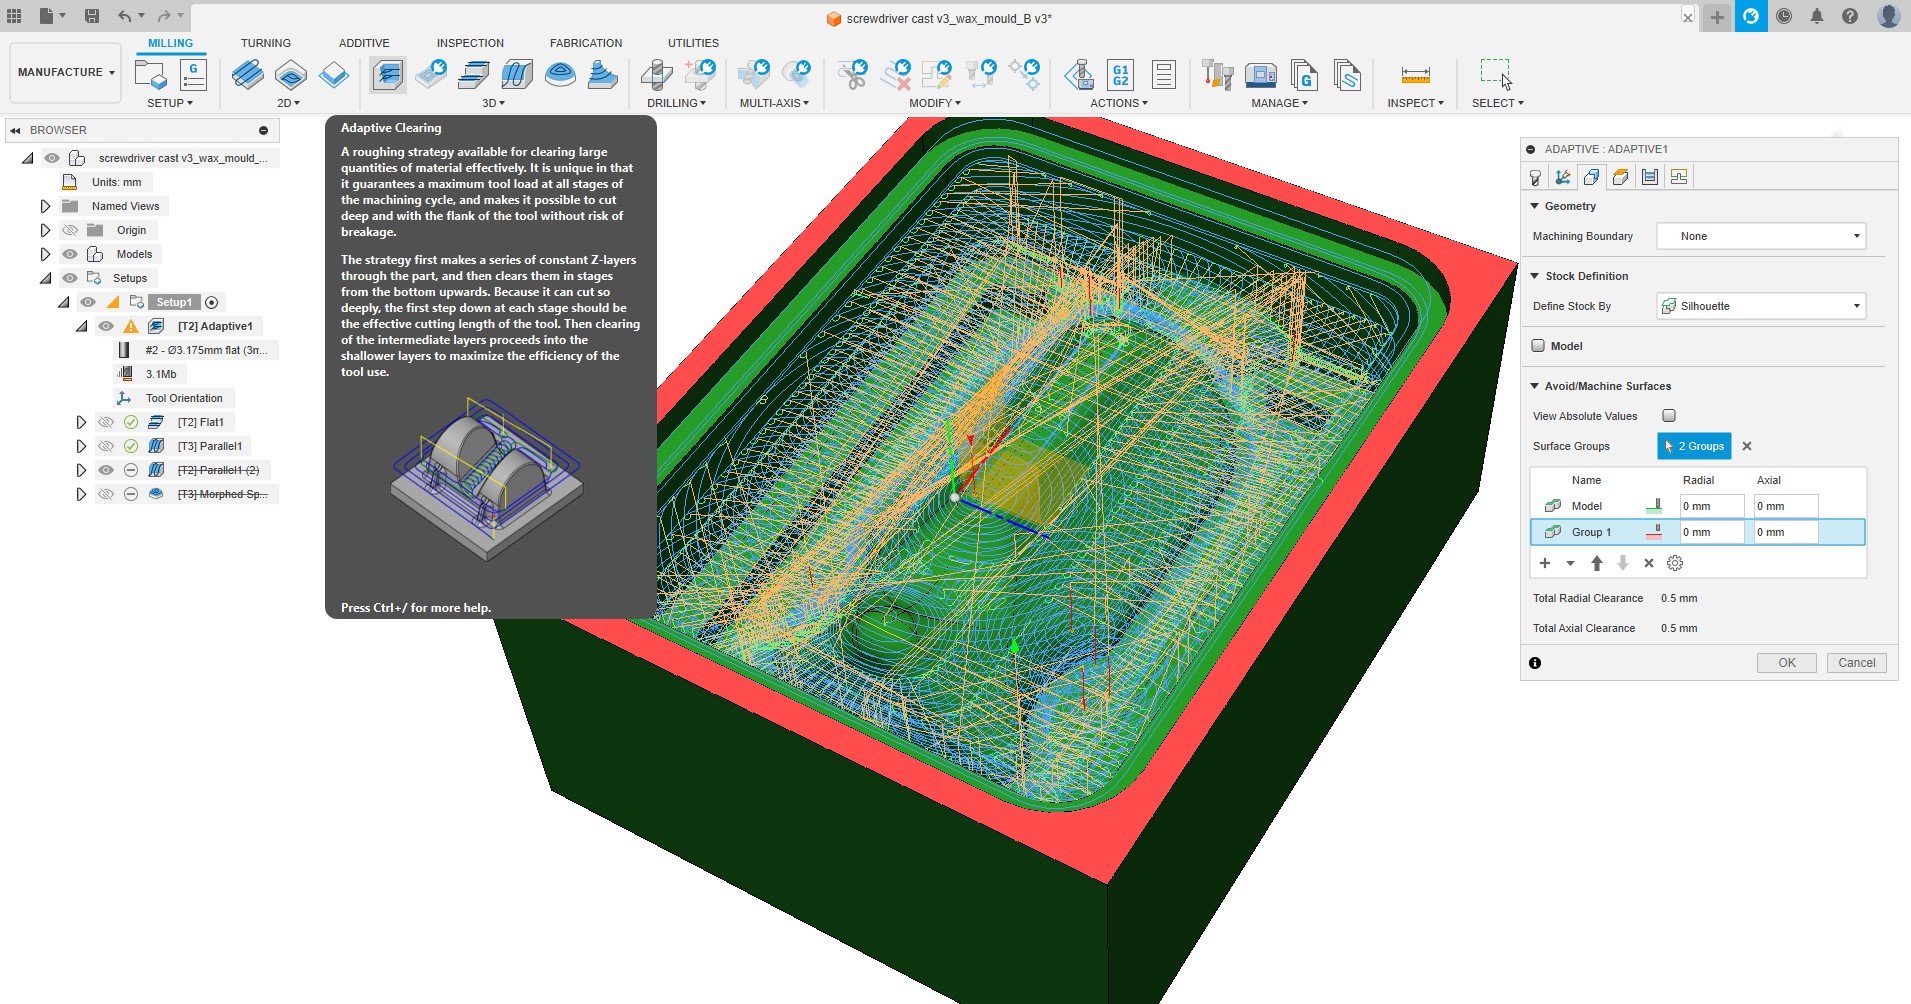
I am using the CAM functionalities of Fusion to generate the toolpaths to machine the wax moulds. I start by adding the milling tools I may use to machine, including the tool holder of the CNC so I can check for clashes with the stock.
In Fusion there are several strategies to choose from. For the roughing strategy I select “Adaptative Clearing”
This strategy first makes a series of constant Z-layers through the part and then clears them in stages from the bottom upwards.
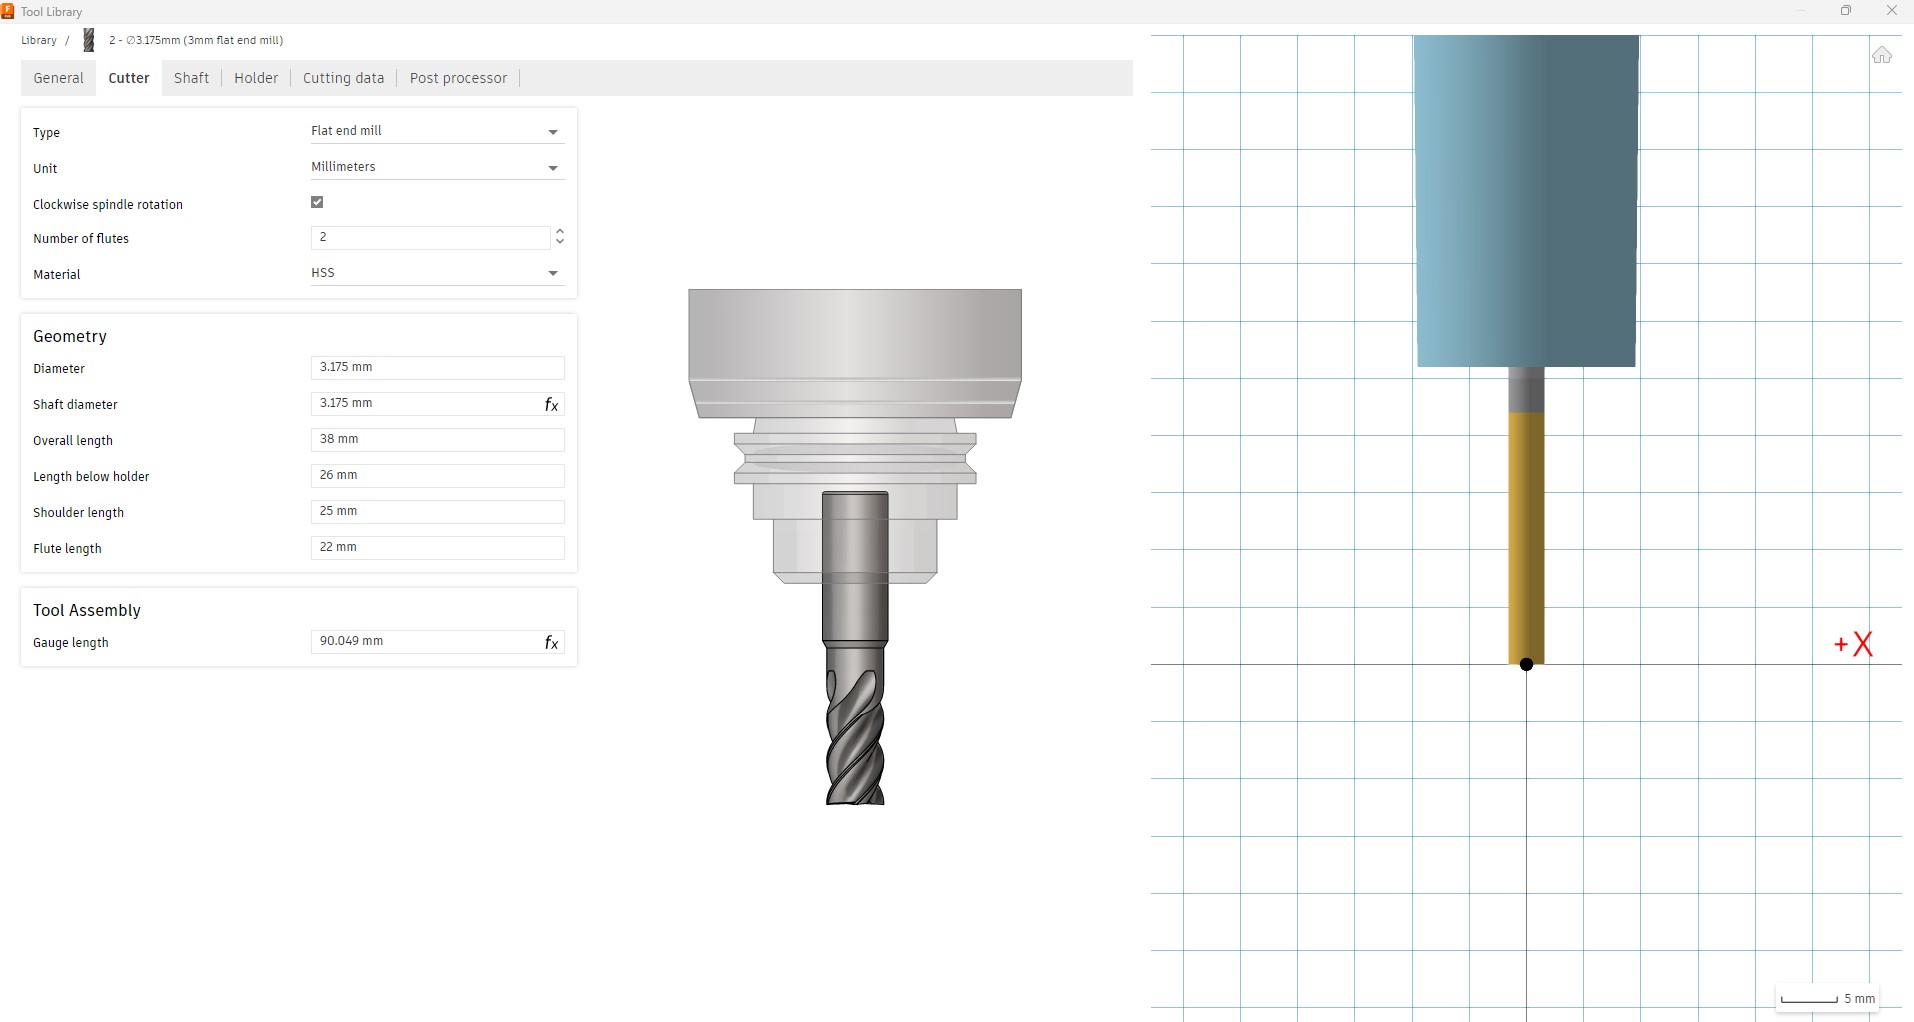
I am using a 2mm flat-end cutter with a 22mm flute length.
Next, I generate a “Flat” toolpath. This is a finishing strategy for flat surfaces. These will finish the walls and bottom surfaces of the mould with the same tool as before.

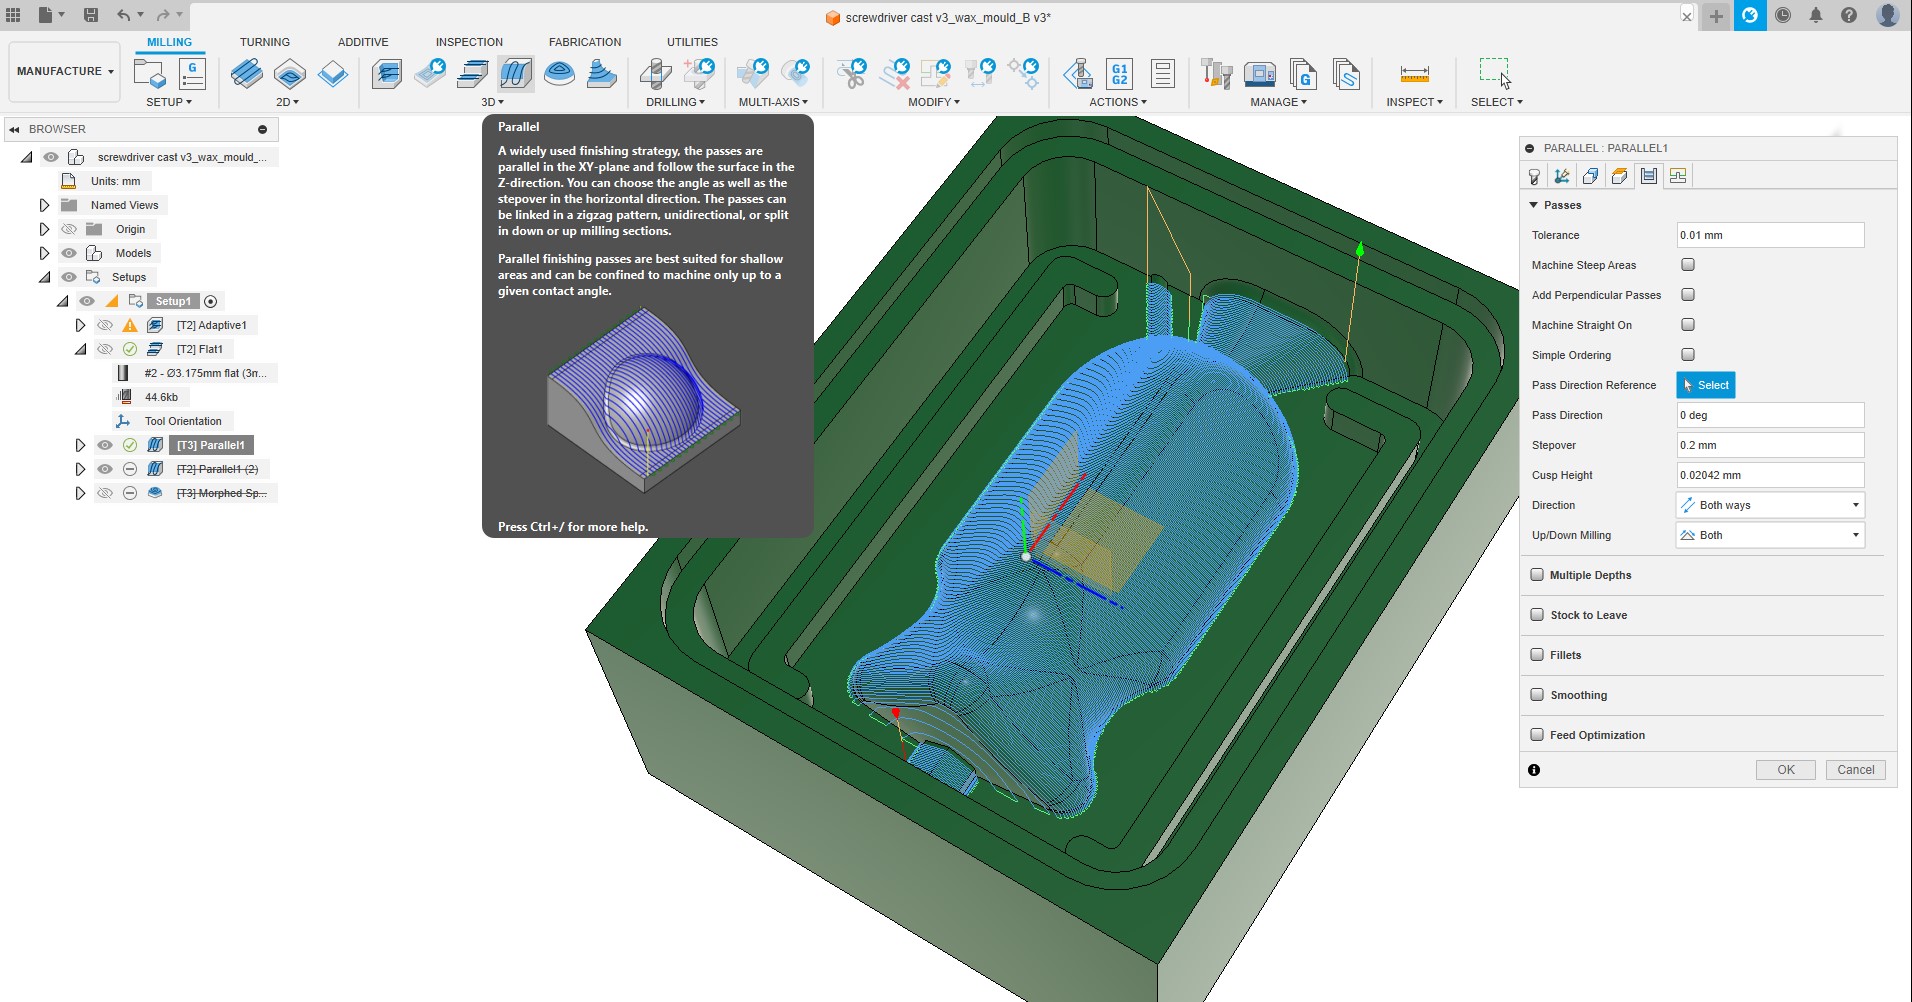
Finally, I use a “parallel” finishing strategy that I am applying only to the remaining surfaces to machine. The tool I selected for this strategy is a 2-flute tapered conical end mill with a R0.5 ball nose.
I use the simulation feature to check the 3 strategies and that there are no clashes with the stock.
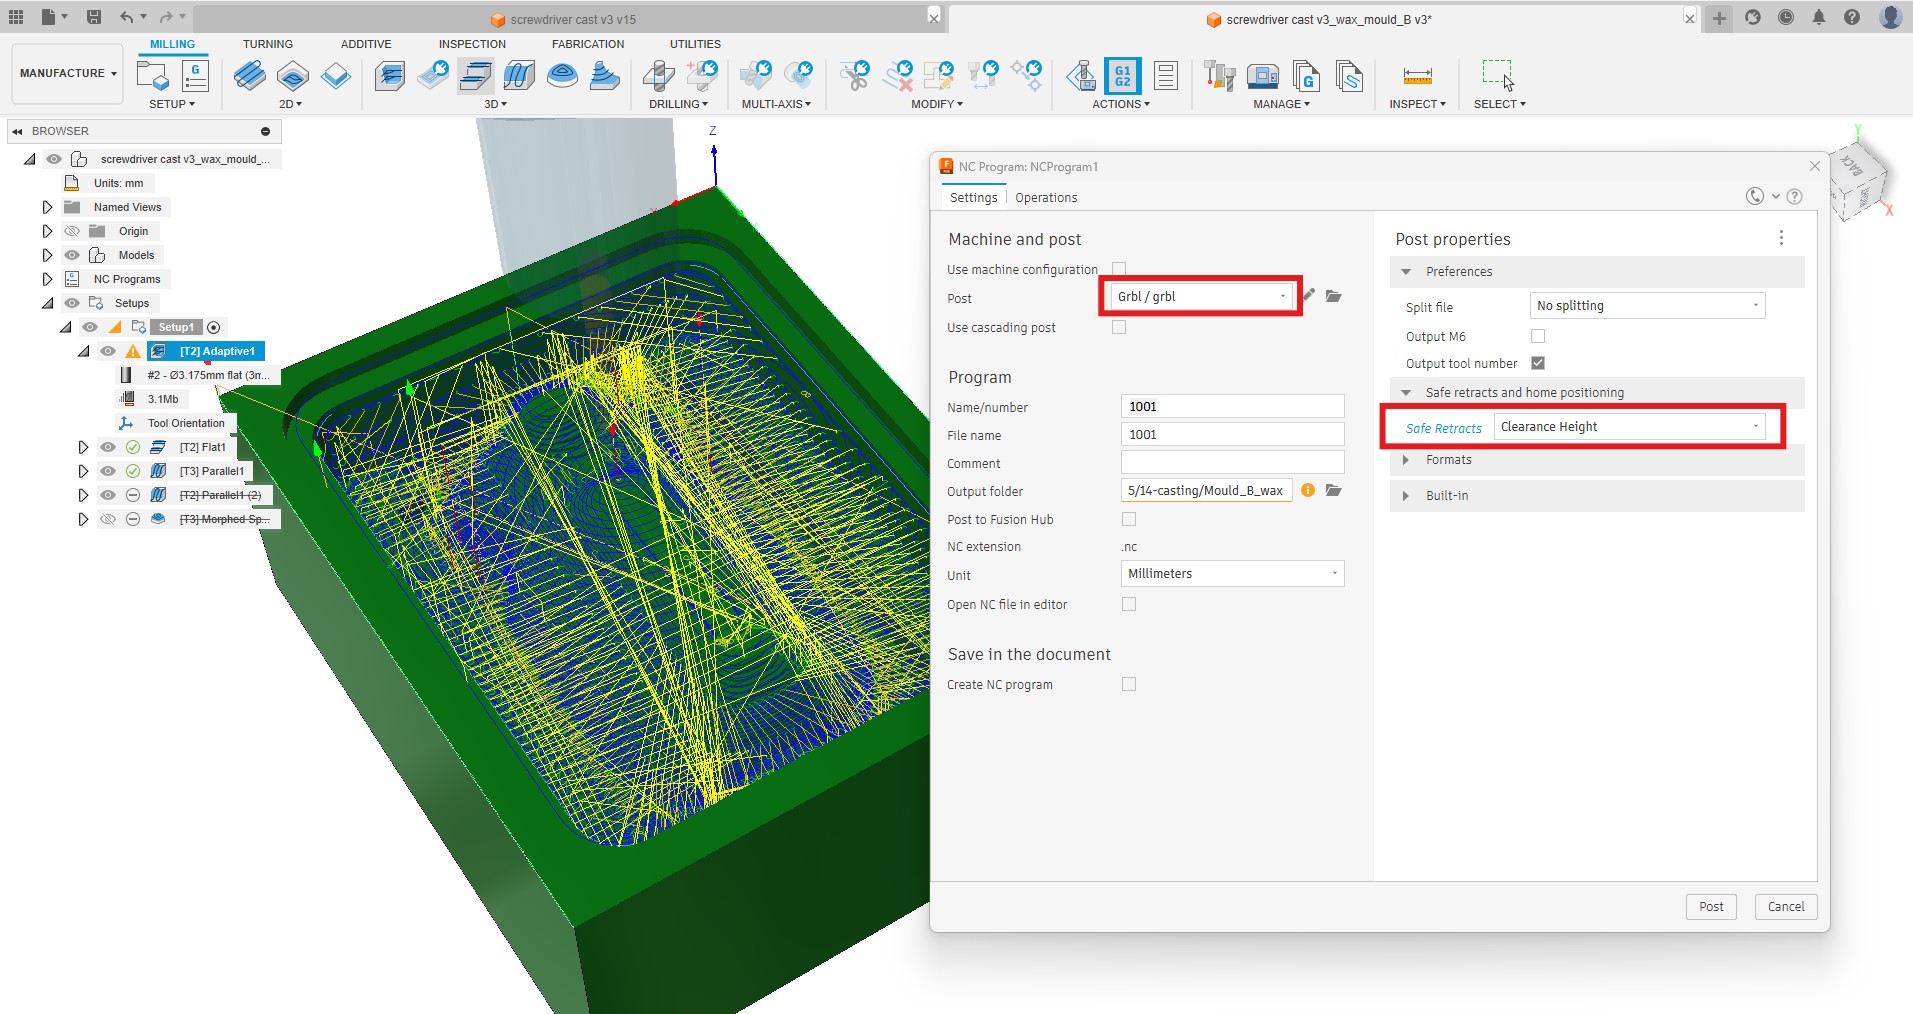
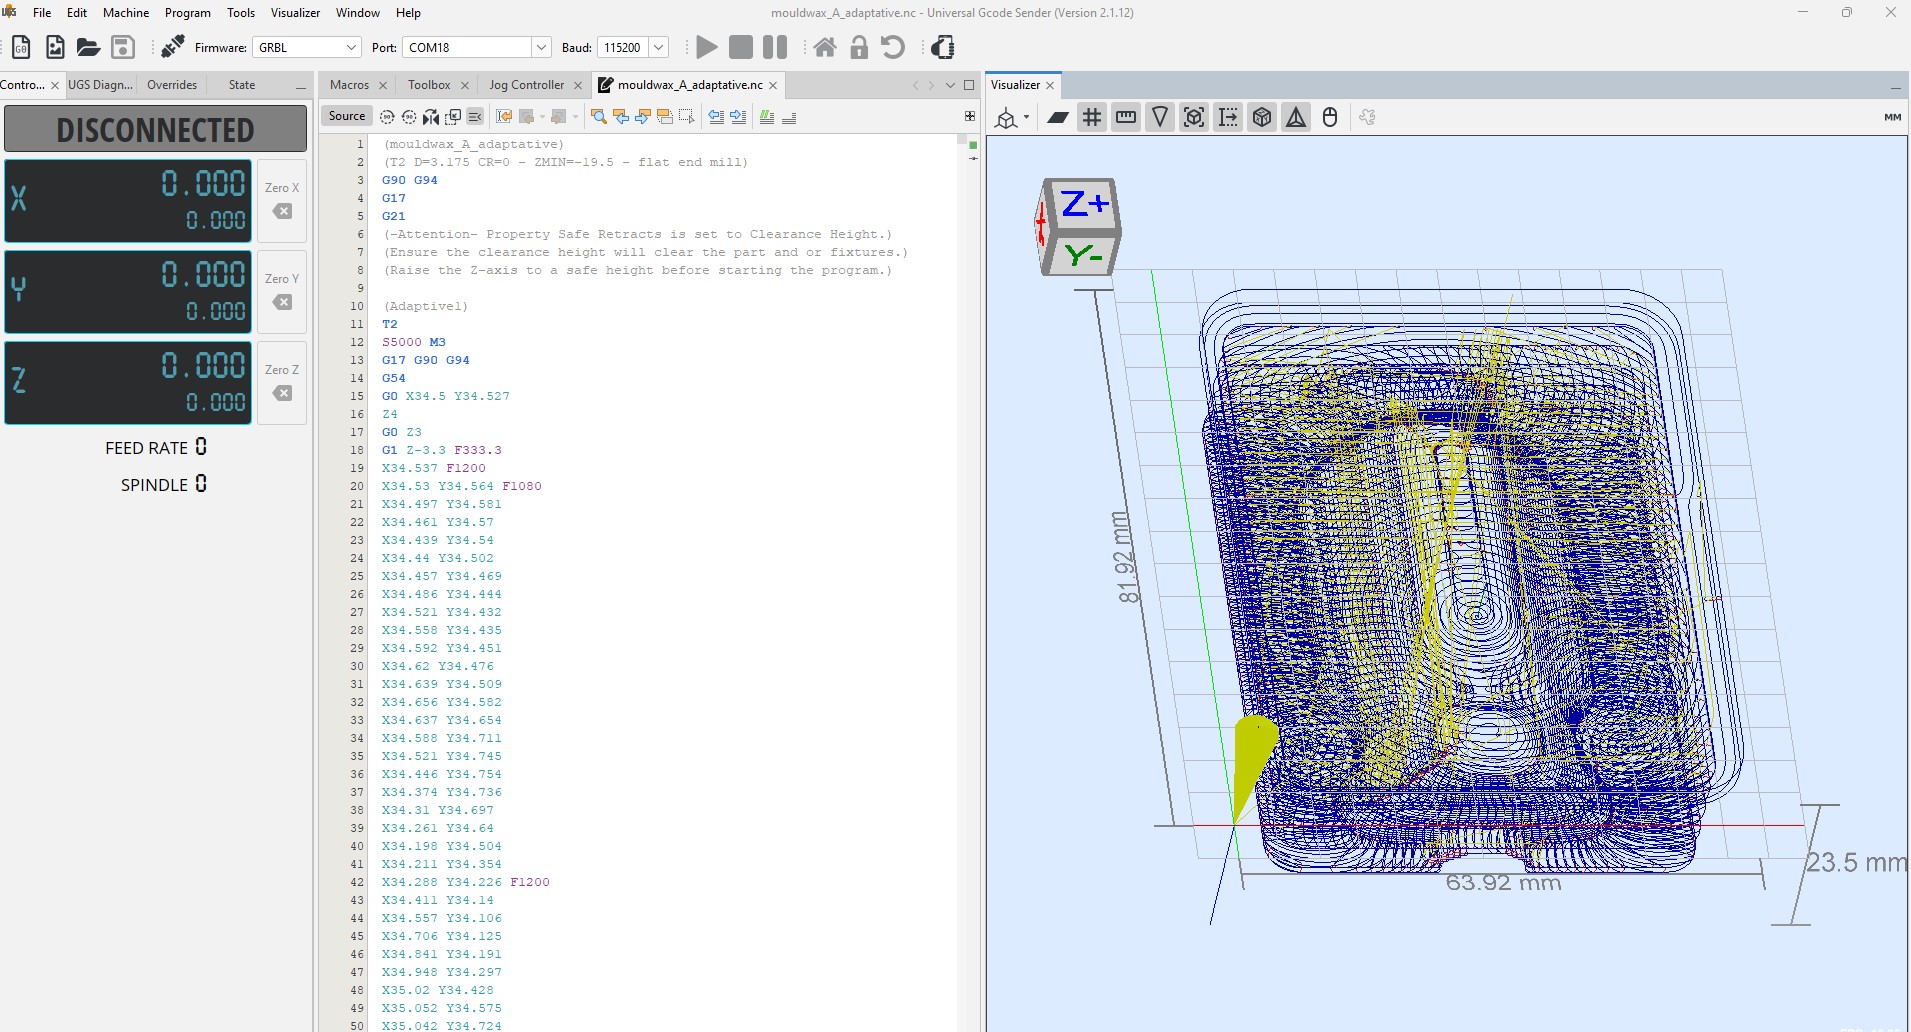
Then, I export the gcode files using the postprocessor for GRBL files. I also have to change the safe retract to clearance height to avoid hitting the Z+ switch limit of the machine.
The g-code file can now be open in UGS (Universal G-code Sender)
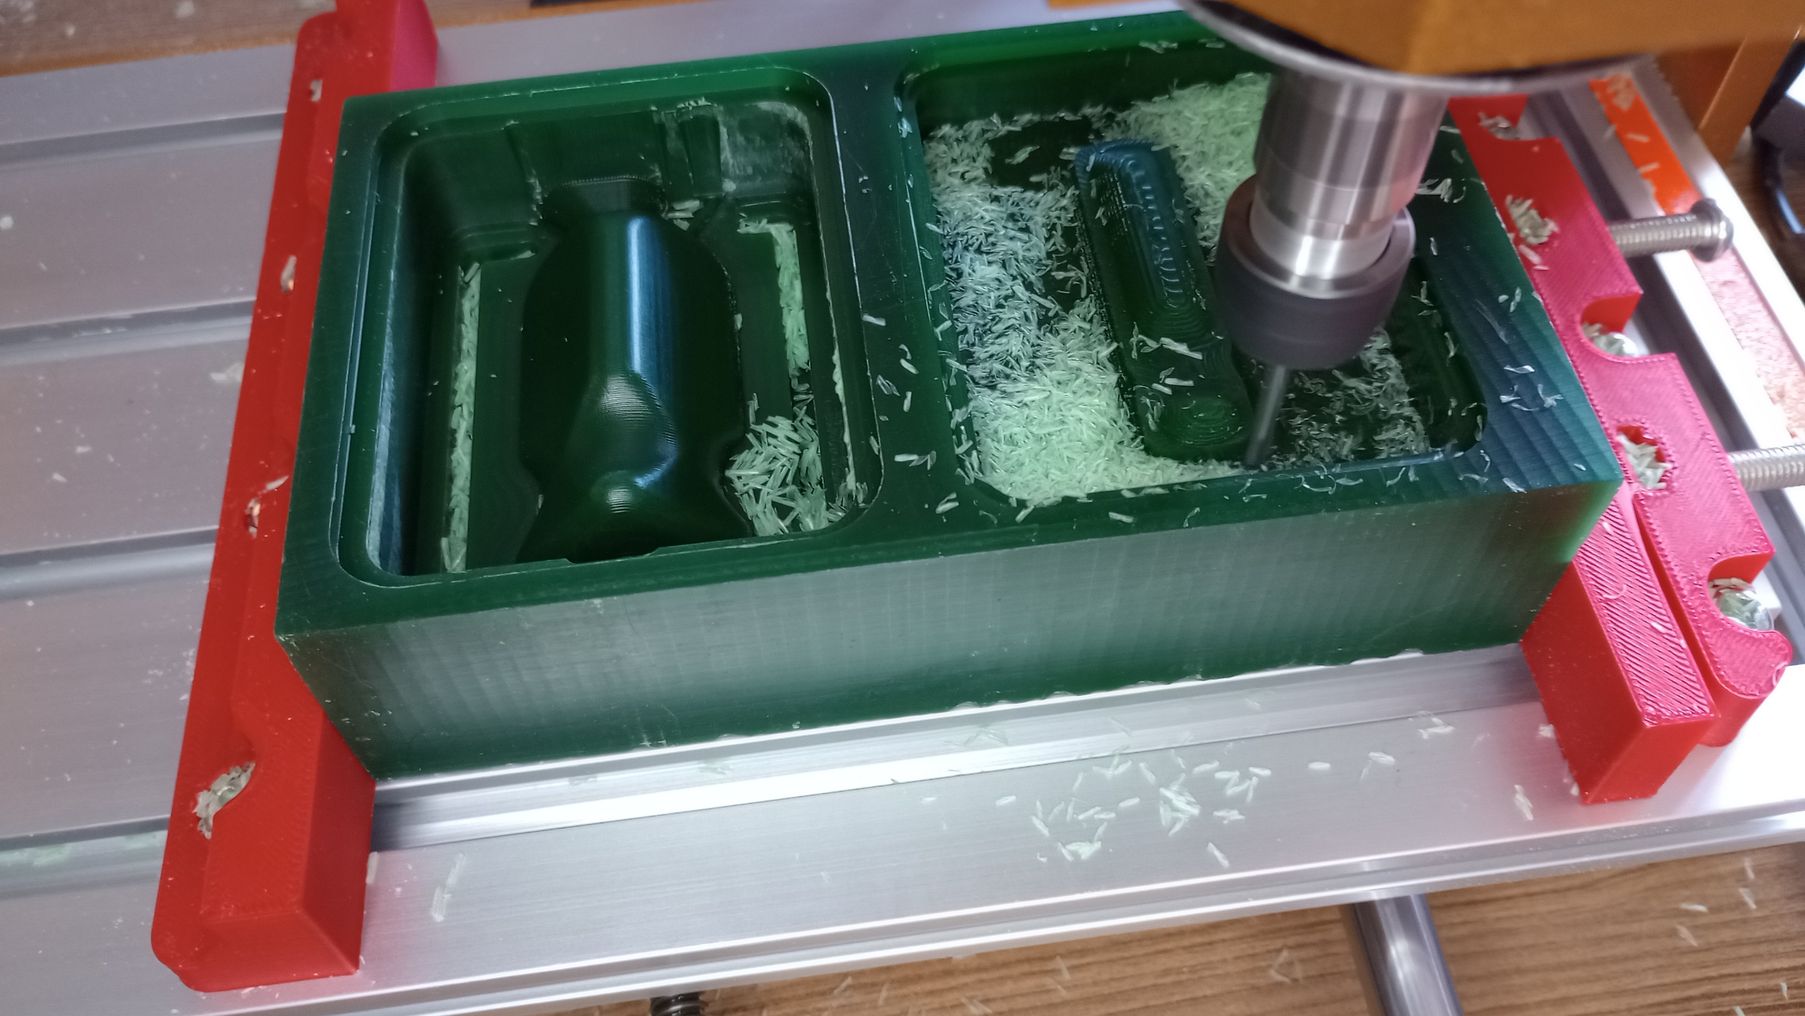
CNC MACHINING MOULDS
To machine the moulds, I am using the CNC milling machine Lunyee 3018 Pro Max, kindly lent to me by Fab Lab León.
Before machining the wax stock, I began by testing with a high-density foam block. This turned out to be a wise decision, as I encountered several difficulties. These included incorrectly setting the Z0 and breaking a bit when I sent the machine to XY zero.
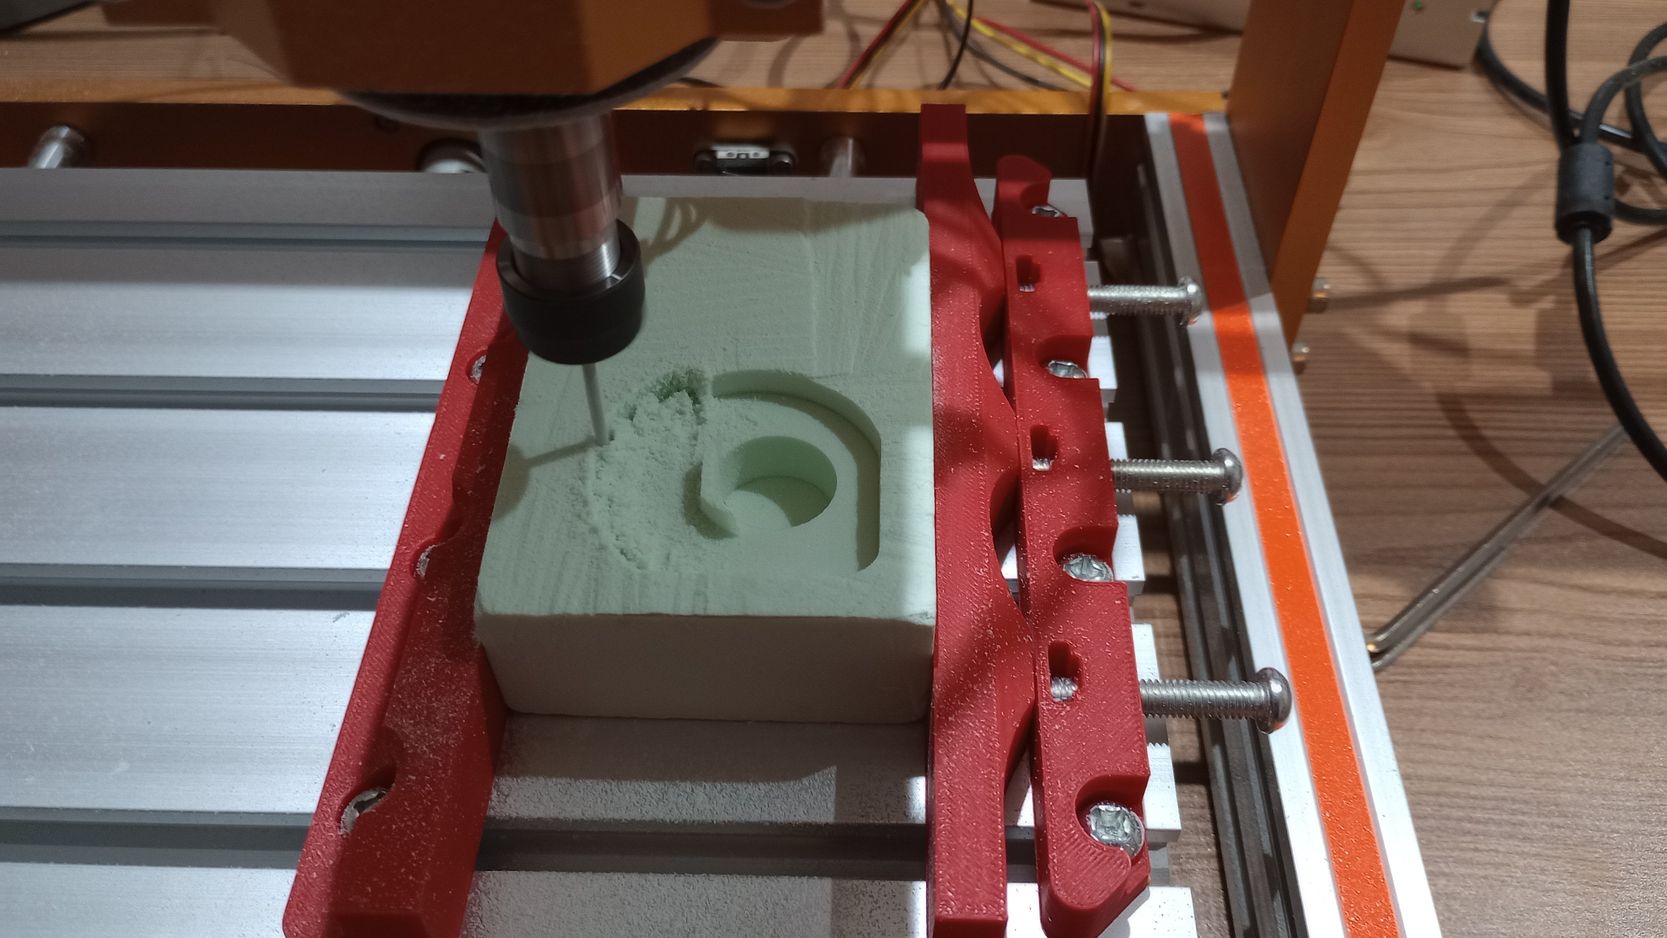
After switching to a 1/8-inch, 2-flute end mill and reusing the same foam stock, I completed the toolpaths and felt confident to machine the wax stock.
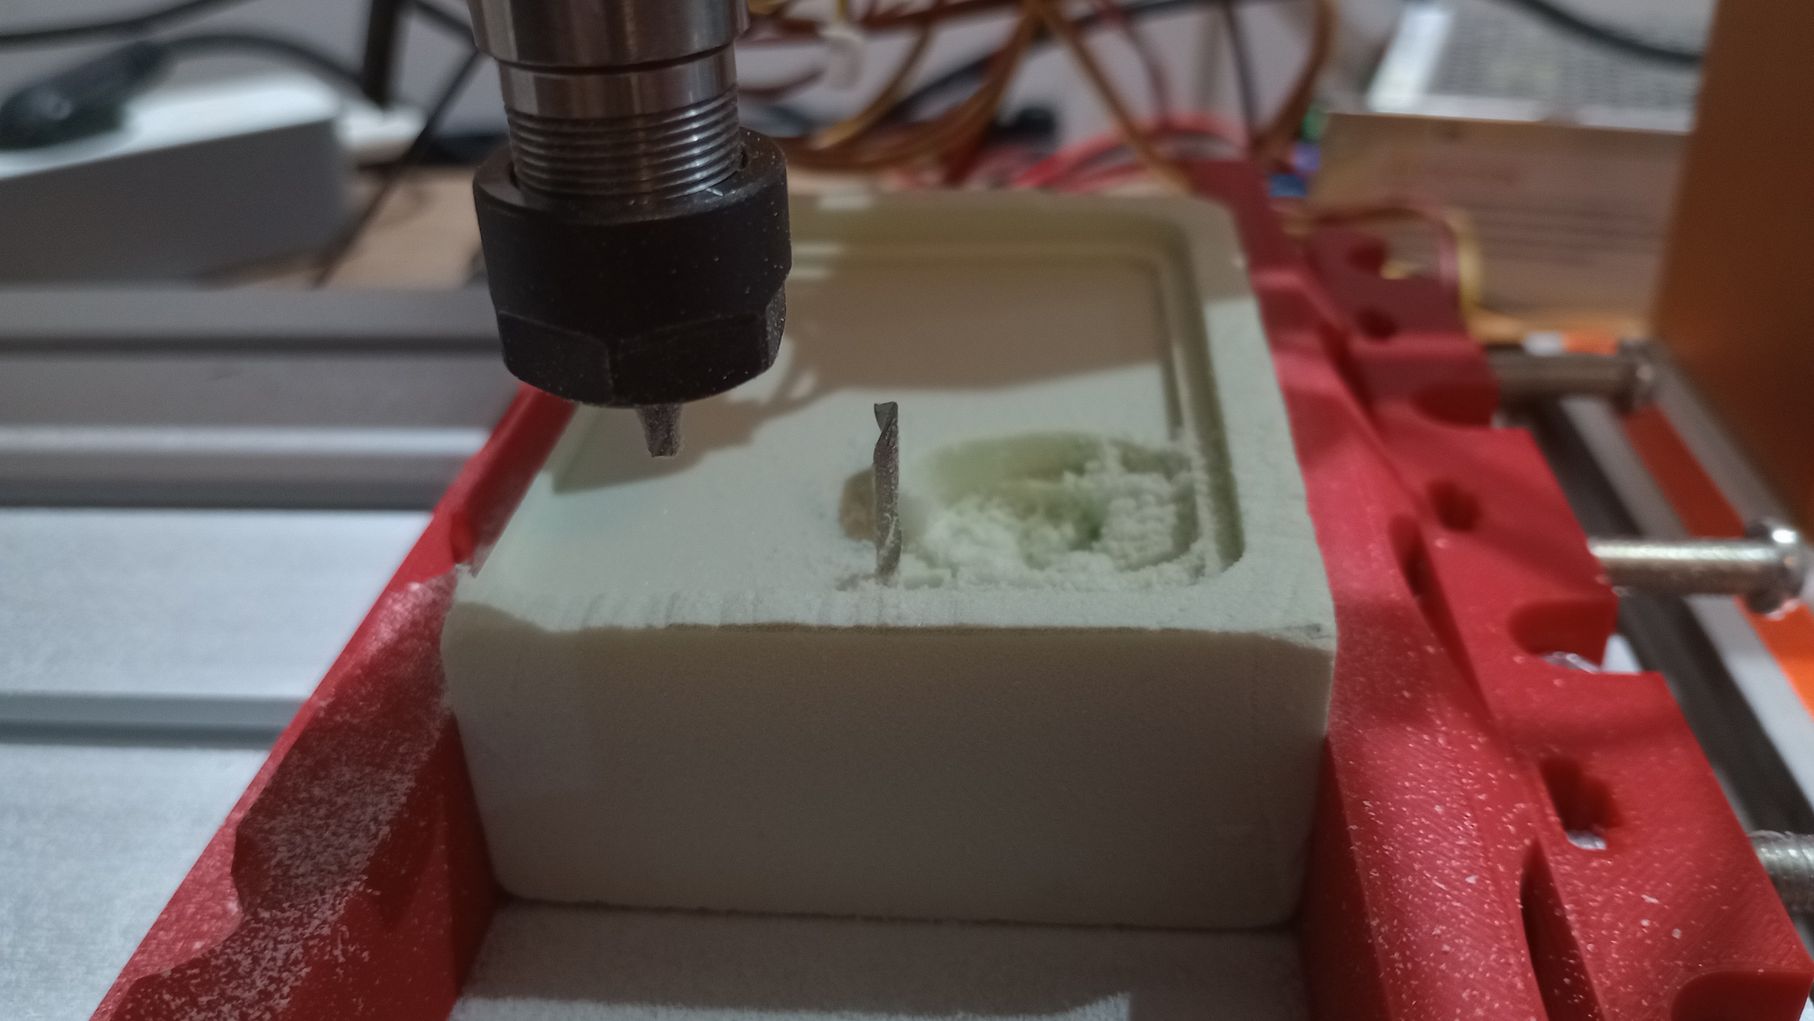
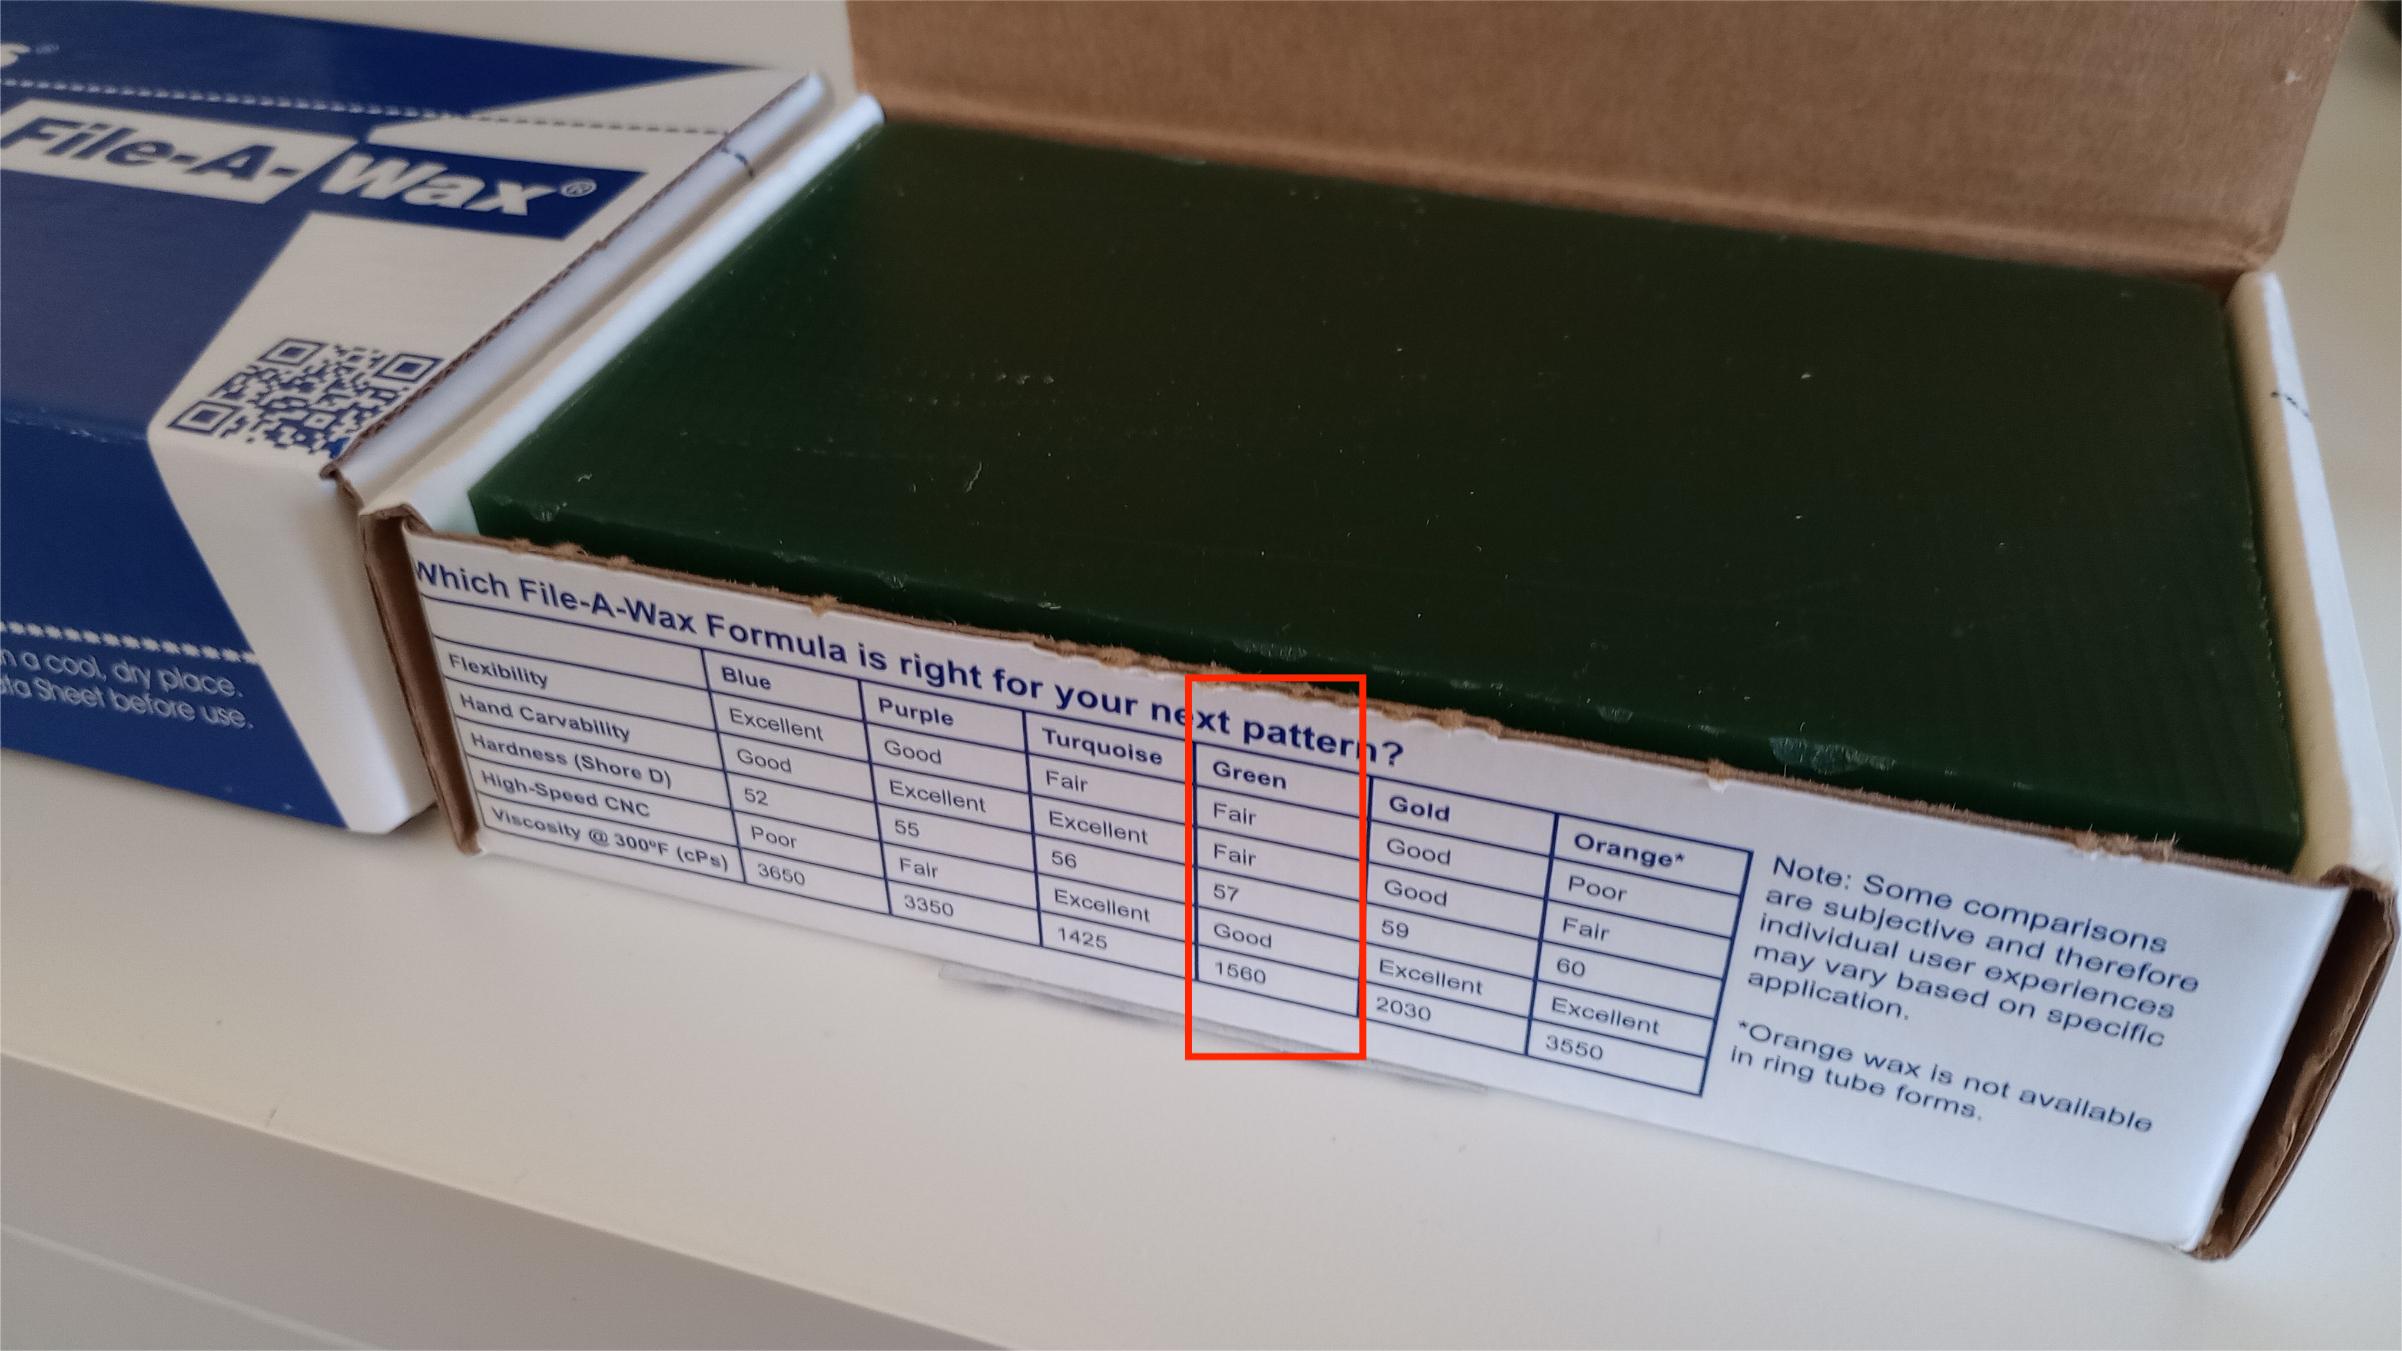
I set up the wax stock in the CNC and I save the absolute coordinates of the work origin in case I have to zero the tool head again. The material I am using is the green File-A-Wax from Ferris, which is a hard, non flexible wax designed for intricate carvings and detailed engraving
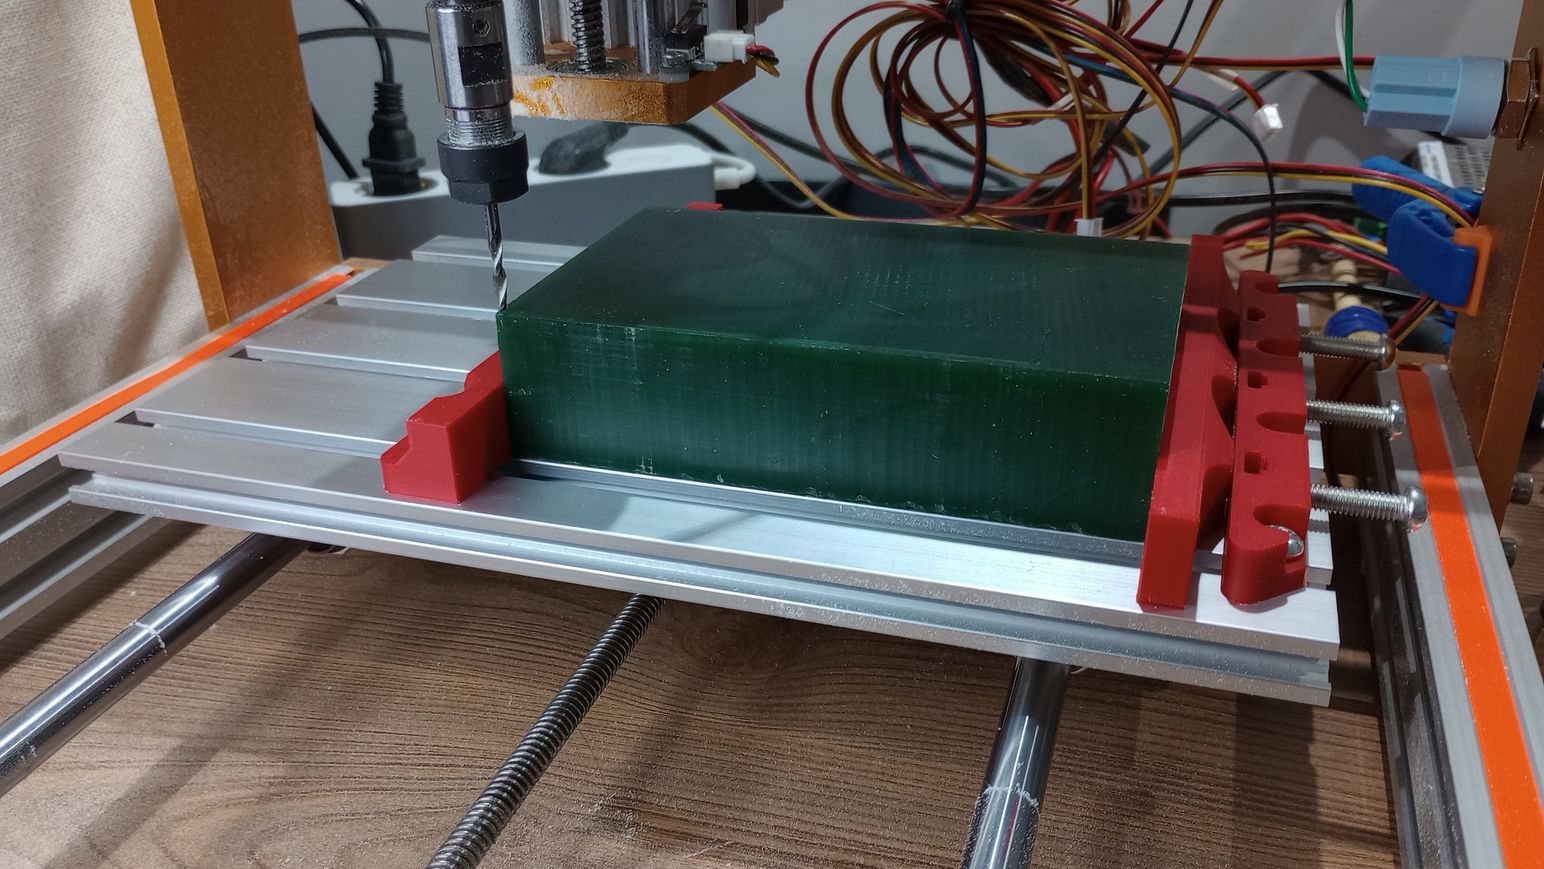
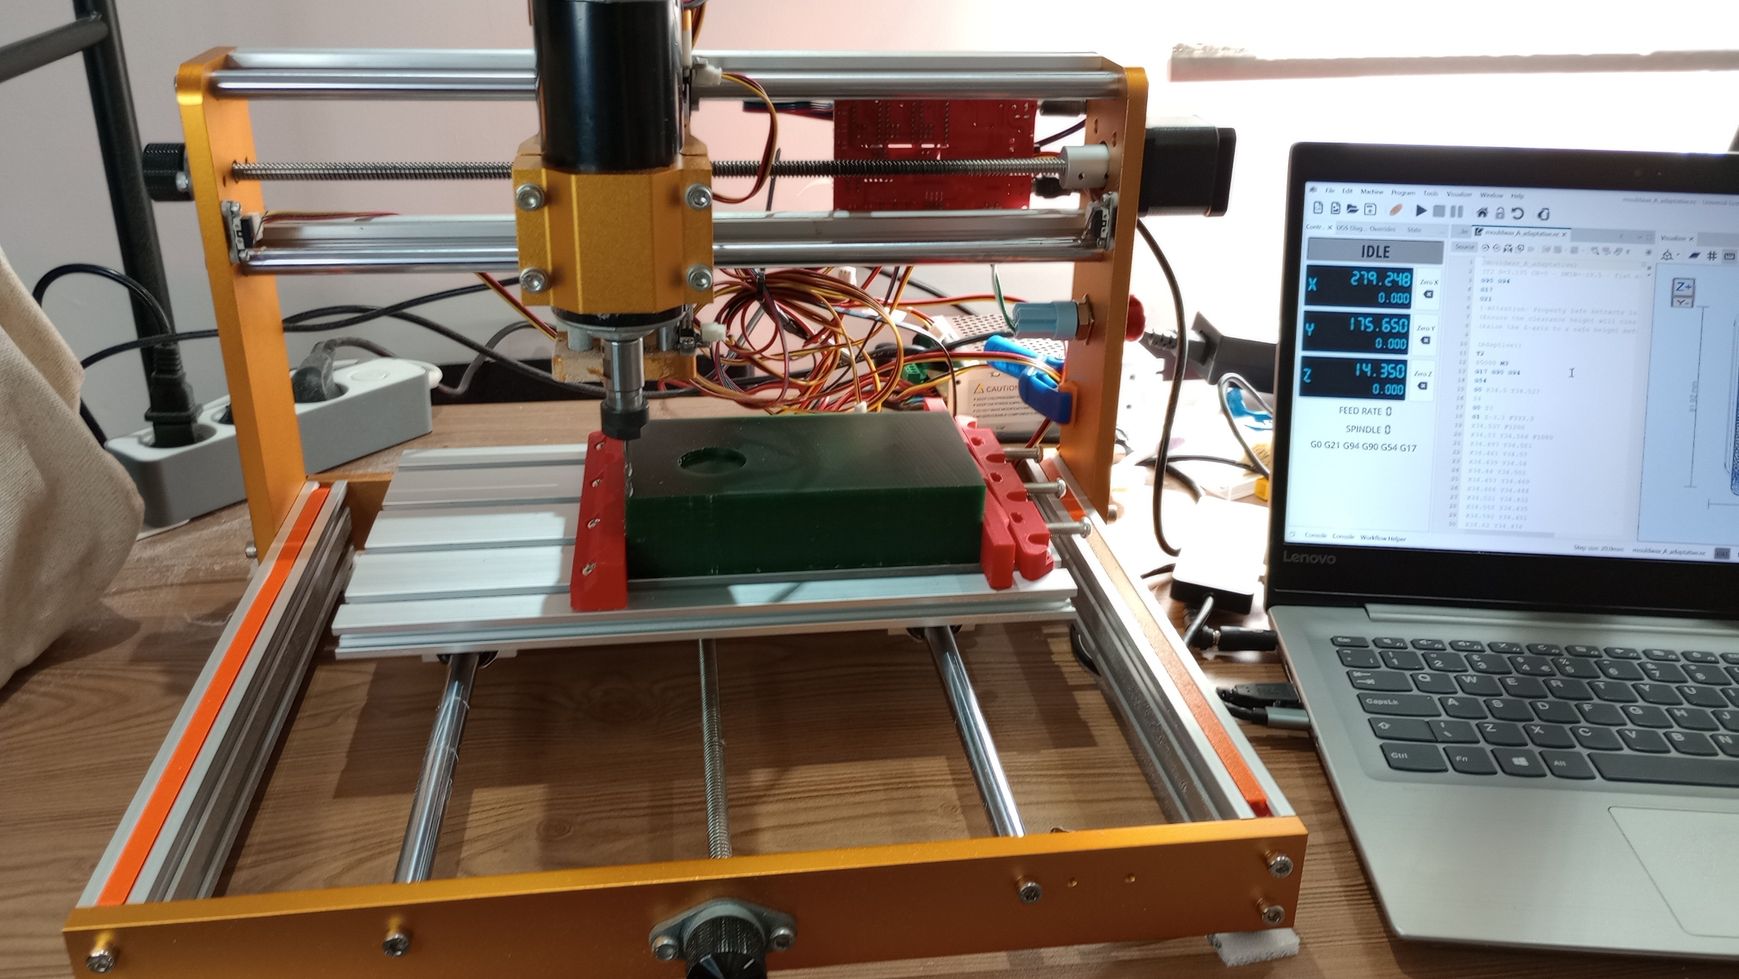
I had to reduce the tool retraction distance because the wax stock is higher than the foam one, and the tool head was hitting the Z+ limit switch. After that change, I send the rough adaptative clearance strategy which took 1h 15 min to complete.
The flat strategy, which finishes the flat surfaces and walls took 6 minutes.
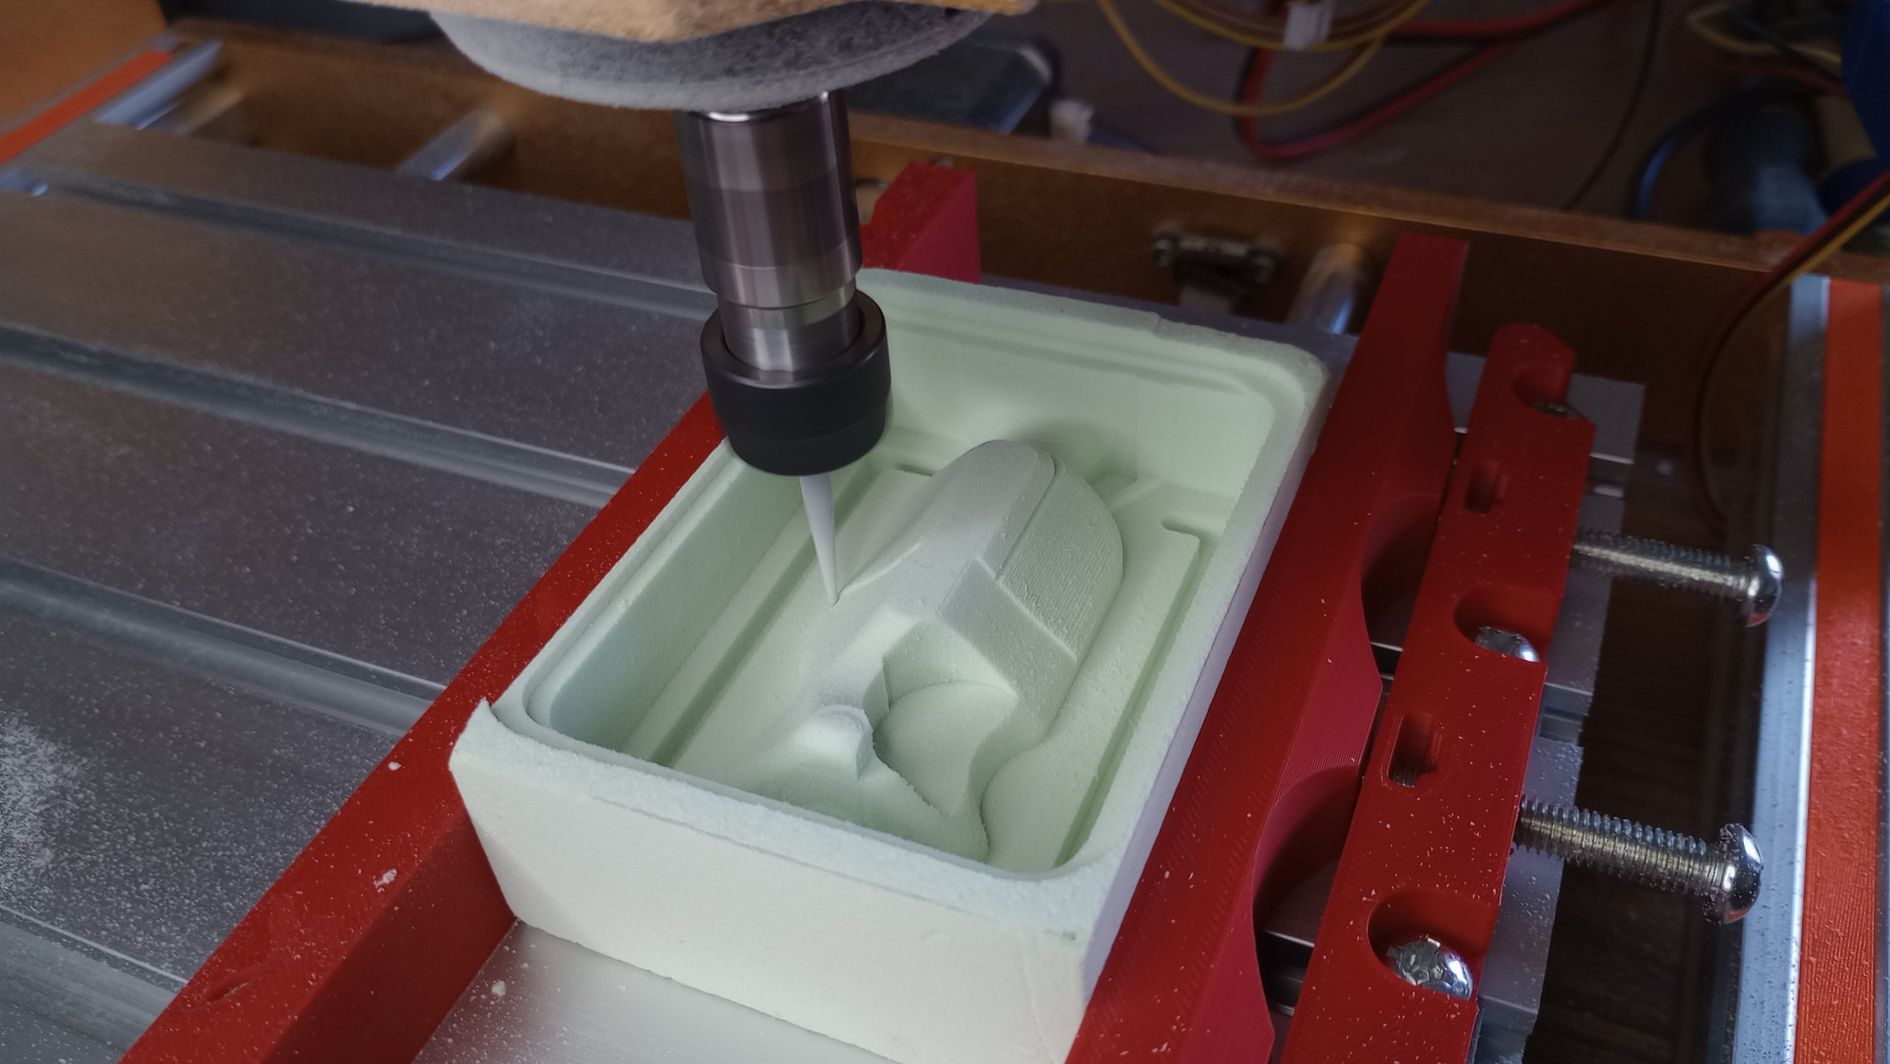
I change the tool to a 2-flute tapered conical end mill with a R0.5 ball nose and set the Z0 again. I send the parallel finishing strategy that took about 30 min to complete.
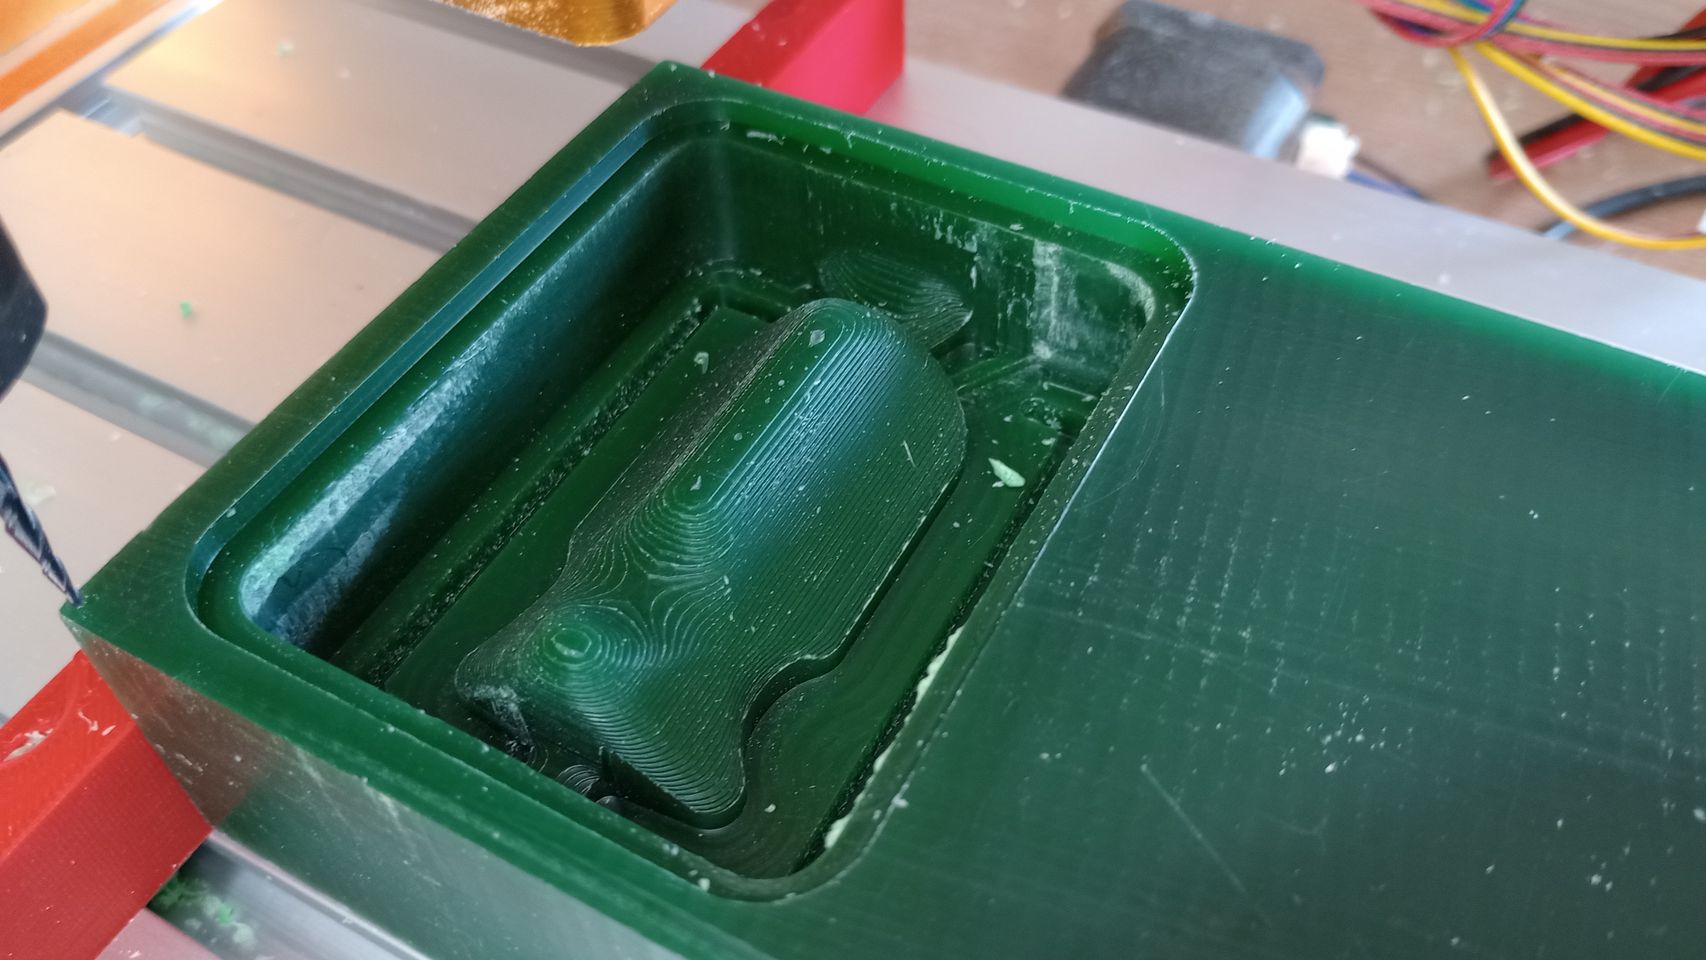
I repeat the same process with the second part of the mould and the machining of the wax moulds is successfully completed.
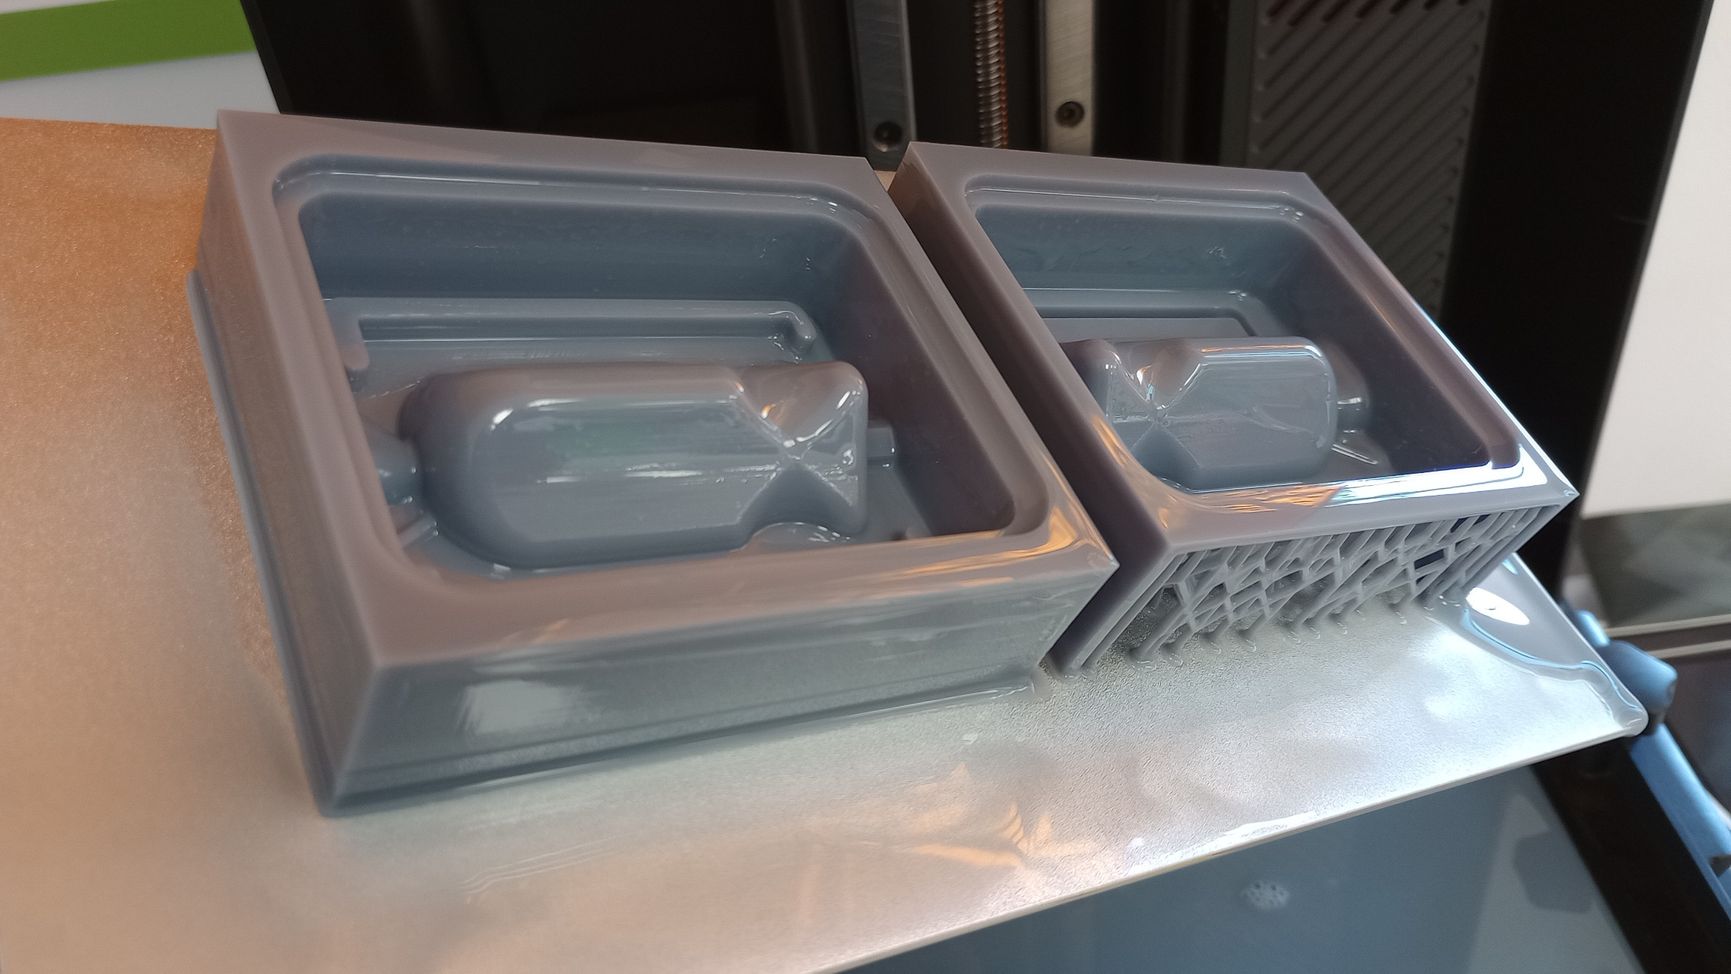
3D PRINTING MOULDS
To compare different manufacturing processes of the moulds, I am also using a resin 3D printer to print the negative of the silicone moulds. The printer I am using is a Creality Halot Mage Pro with Standard Resin from AnyCubic.
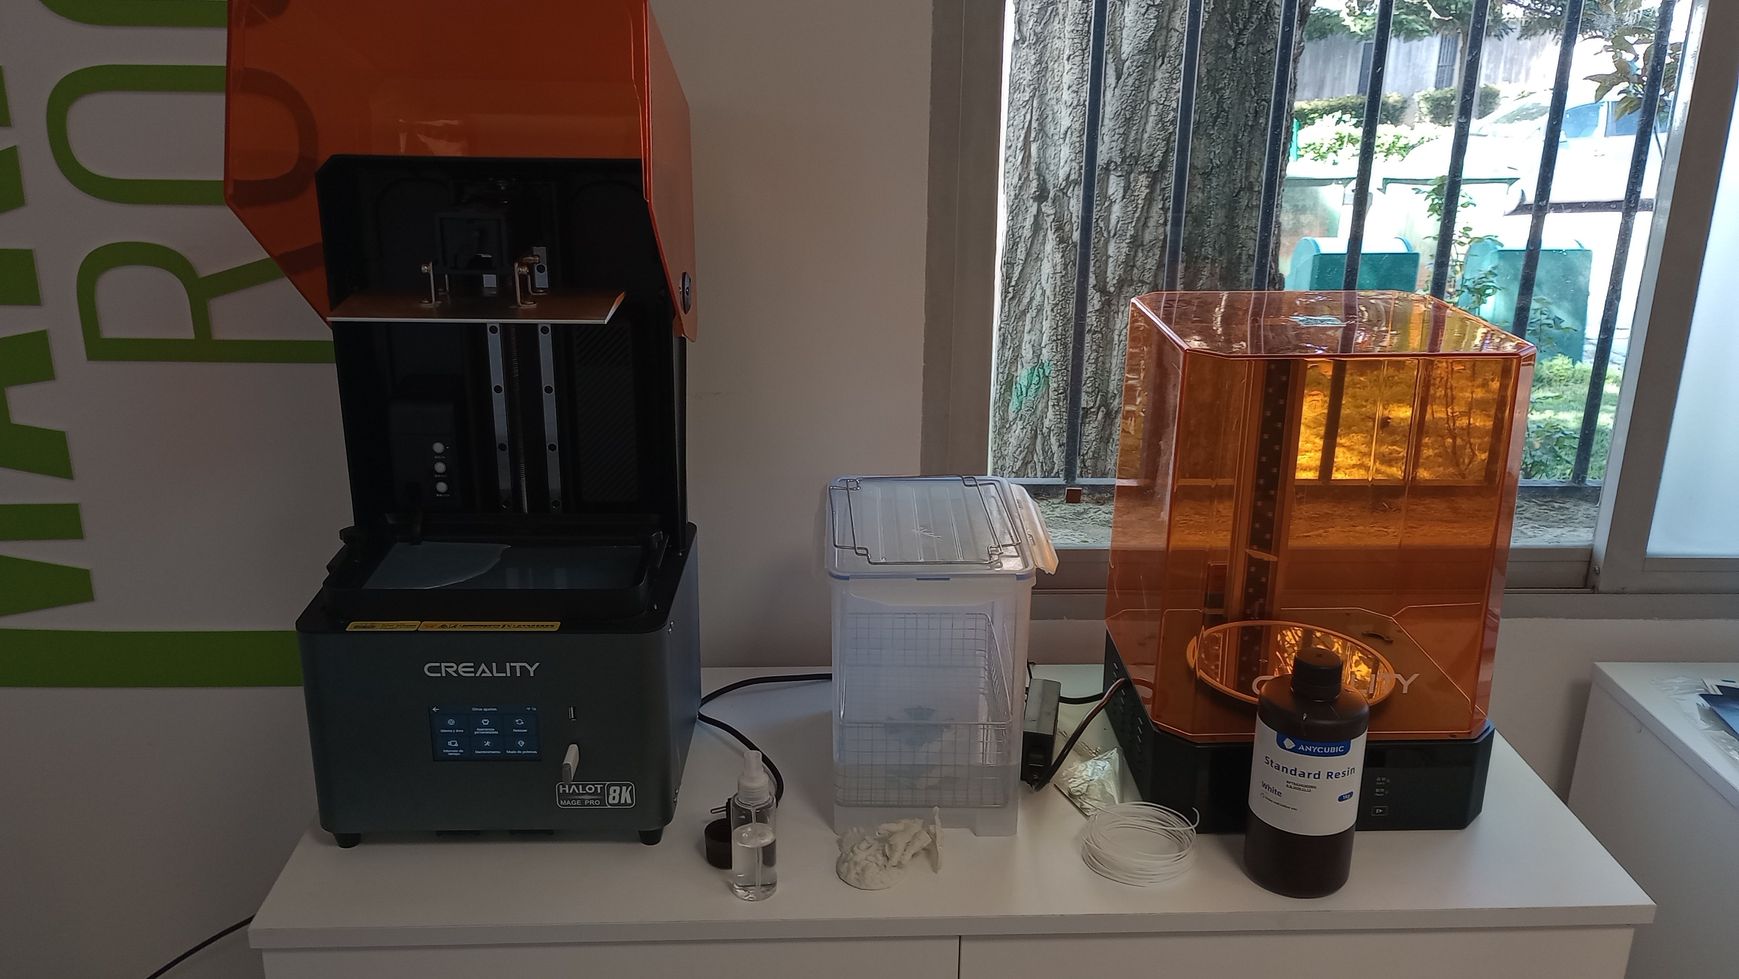
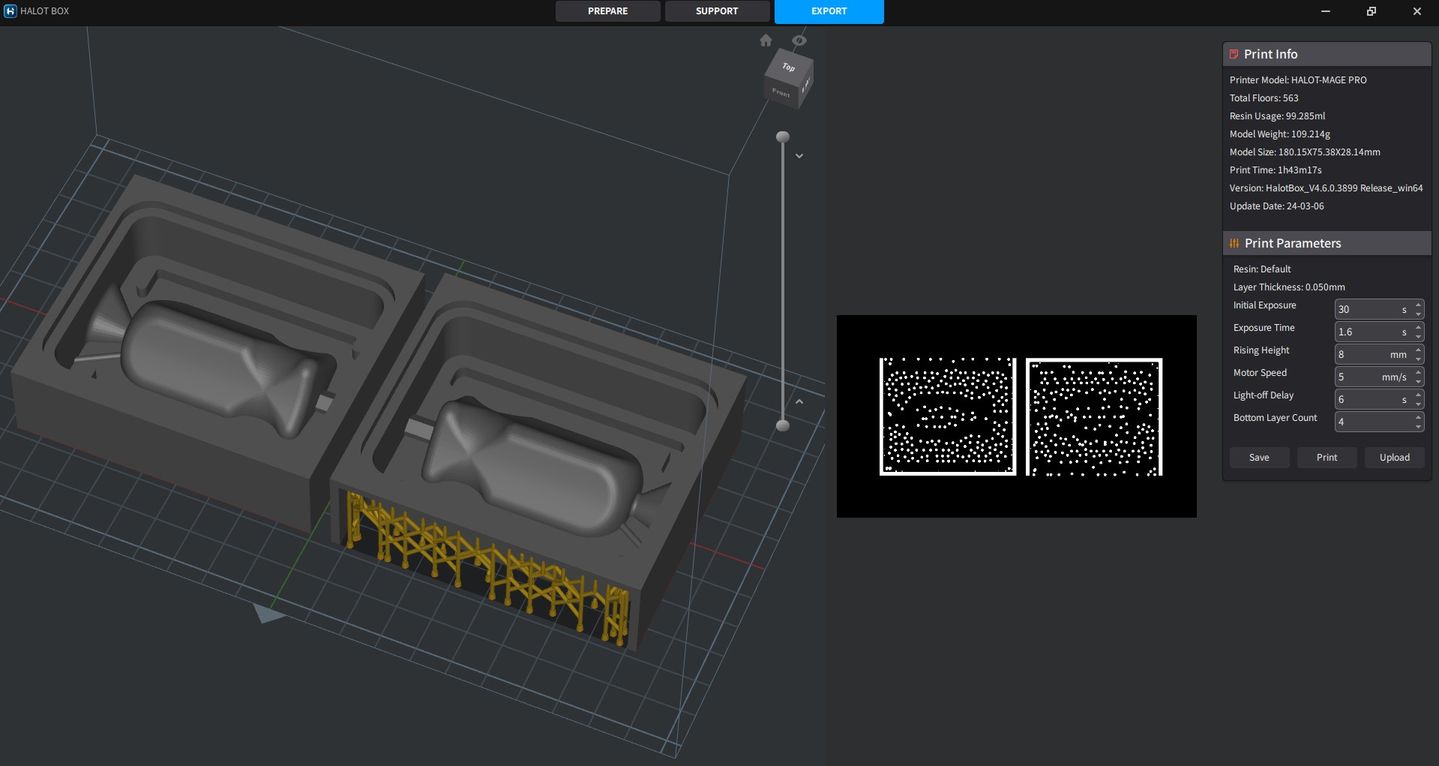
After 1h 40 min of printing I remove the parts from the printing plate and the supports. I wash the pieces in a bath of alcohol using the cleaning option of the curing station. Then I let the pieces dry and I cure them for 10 minutes in the UV curing station.
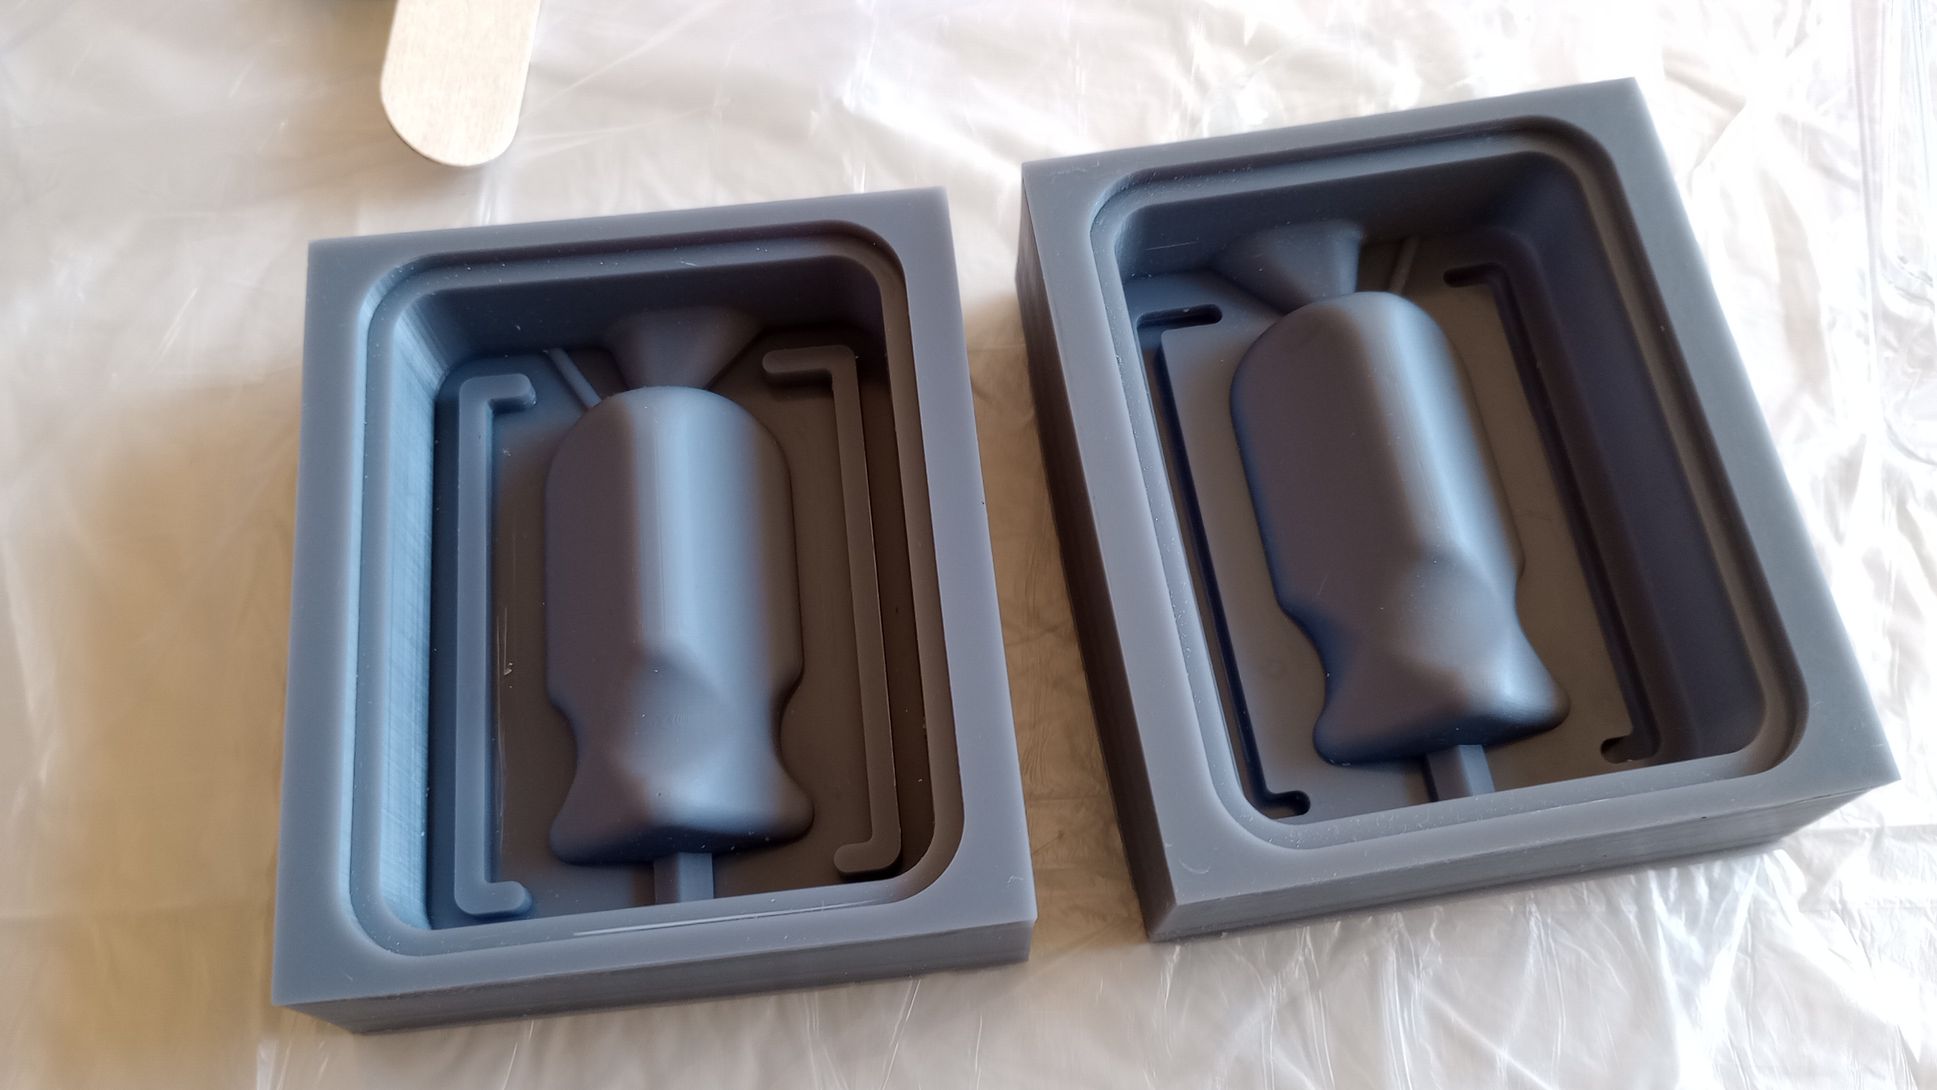
CASTING SILICONE MOULDS
For casting the silicone moulds I am using Easyl 3520 from Feroca. This silicone is recommended for the application of moulds for casting plaster, polyester resin, polyurethane resin, epoxy resin, fiberglass, wax, soap, and bronze.
The base (Parta A) and the catalyst (Part B) are mixed at a 100:5 ratio.
Based on the volume of the space to be filled, (obtained from Fusion CAD model) I estimated I need the following quantities:
- Part A = 180 g
- Part B = 9g

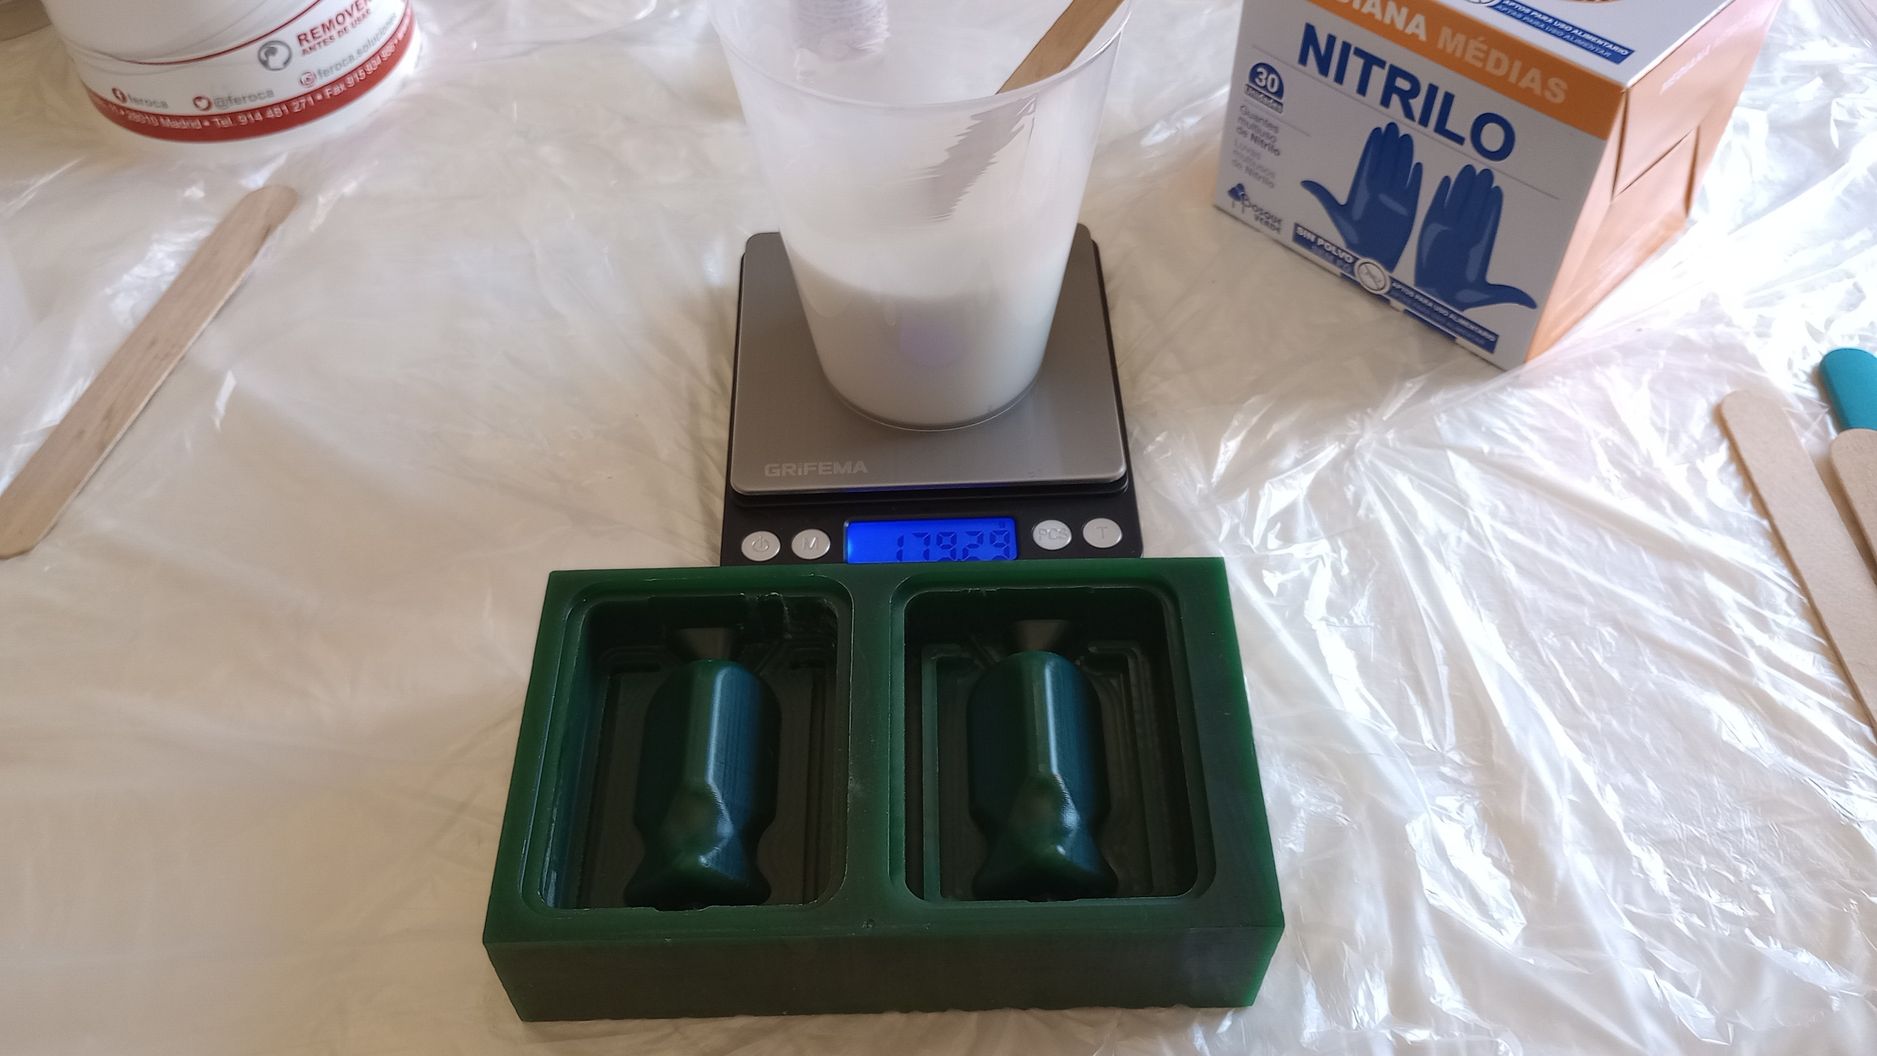
The working time of the silicone mixture is 20 minutes so I take a few minutes to mix the parts well and I pour the mix slowly to avoid bubbles.
I follow the same procedure to cast onto the 3D-printed moulds. The photo below shows the casting of silicone moulds for both the wax and resin 3D-printed versions.
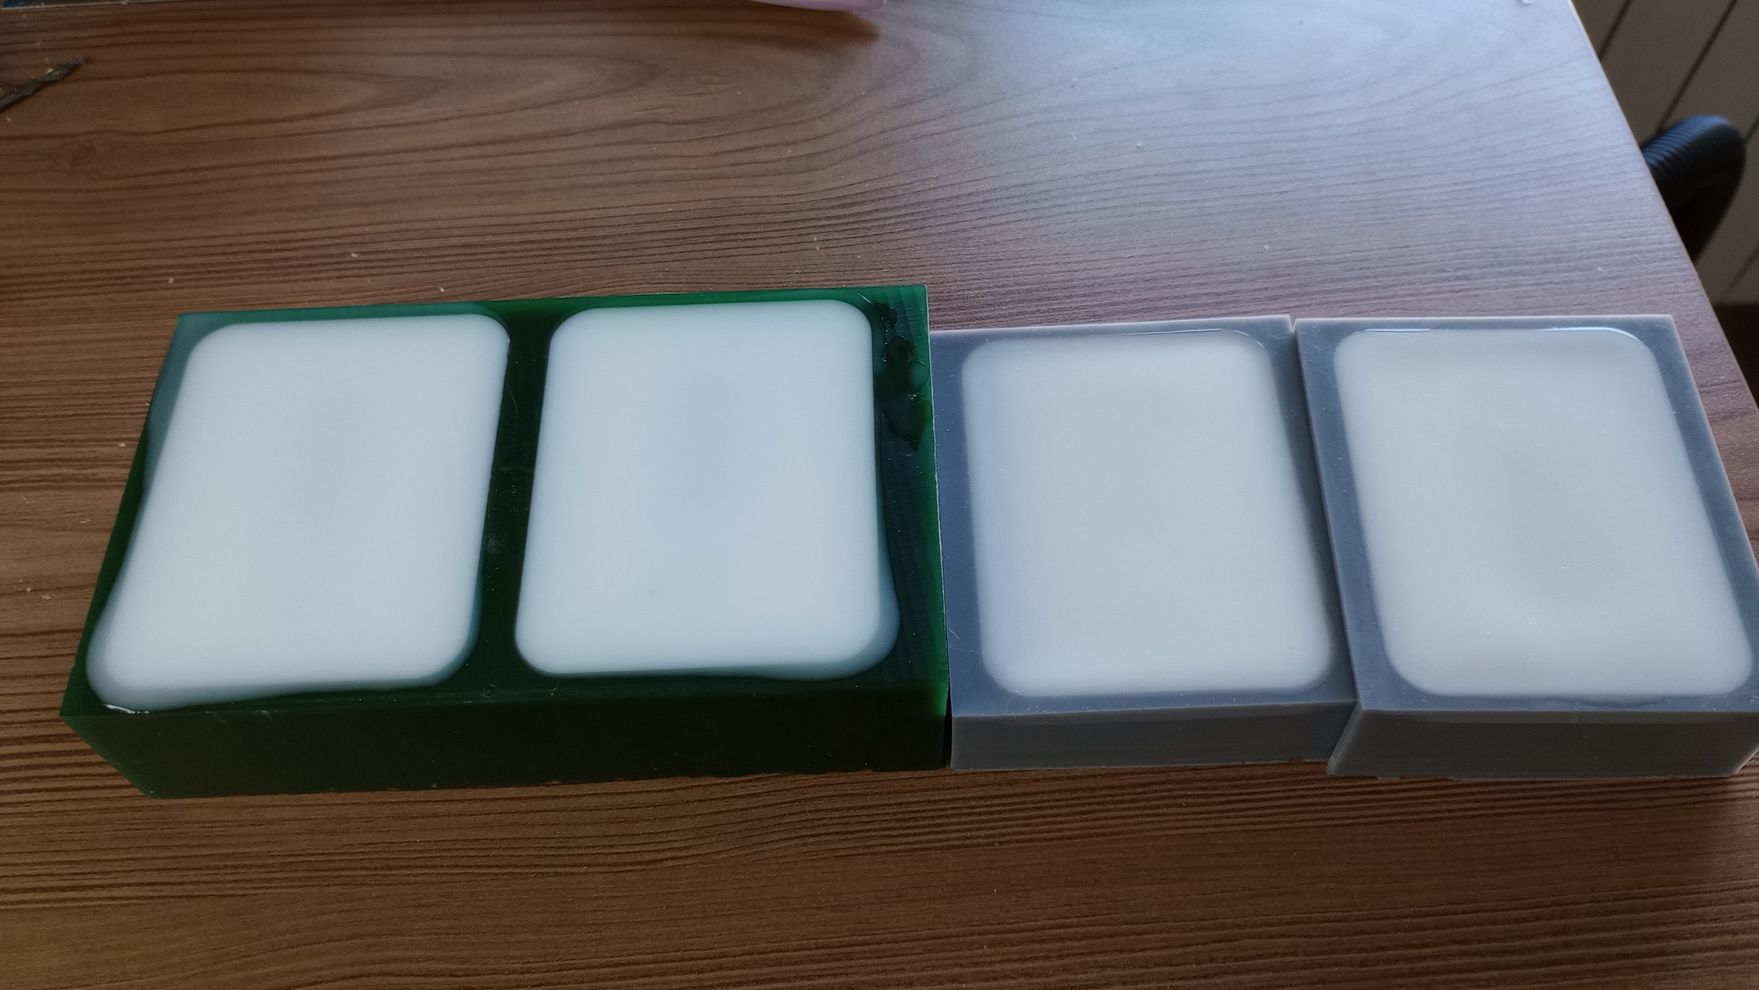
The silicone cures at room temperature, with a recommended curing time of 4-5 hours. However, after this time, the silicone is clearly not ready, so I wait about 10 hours before demoulding.
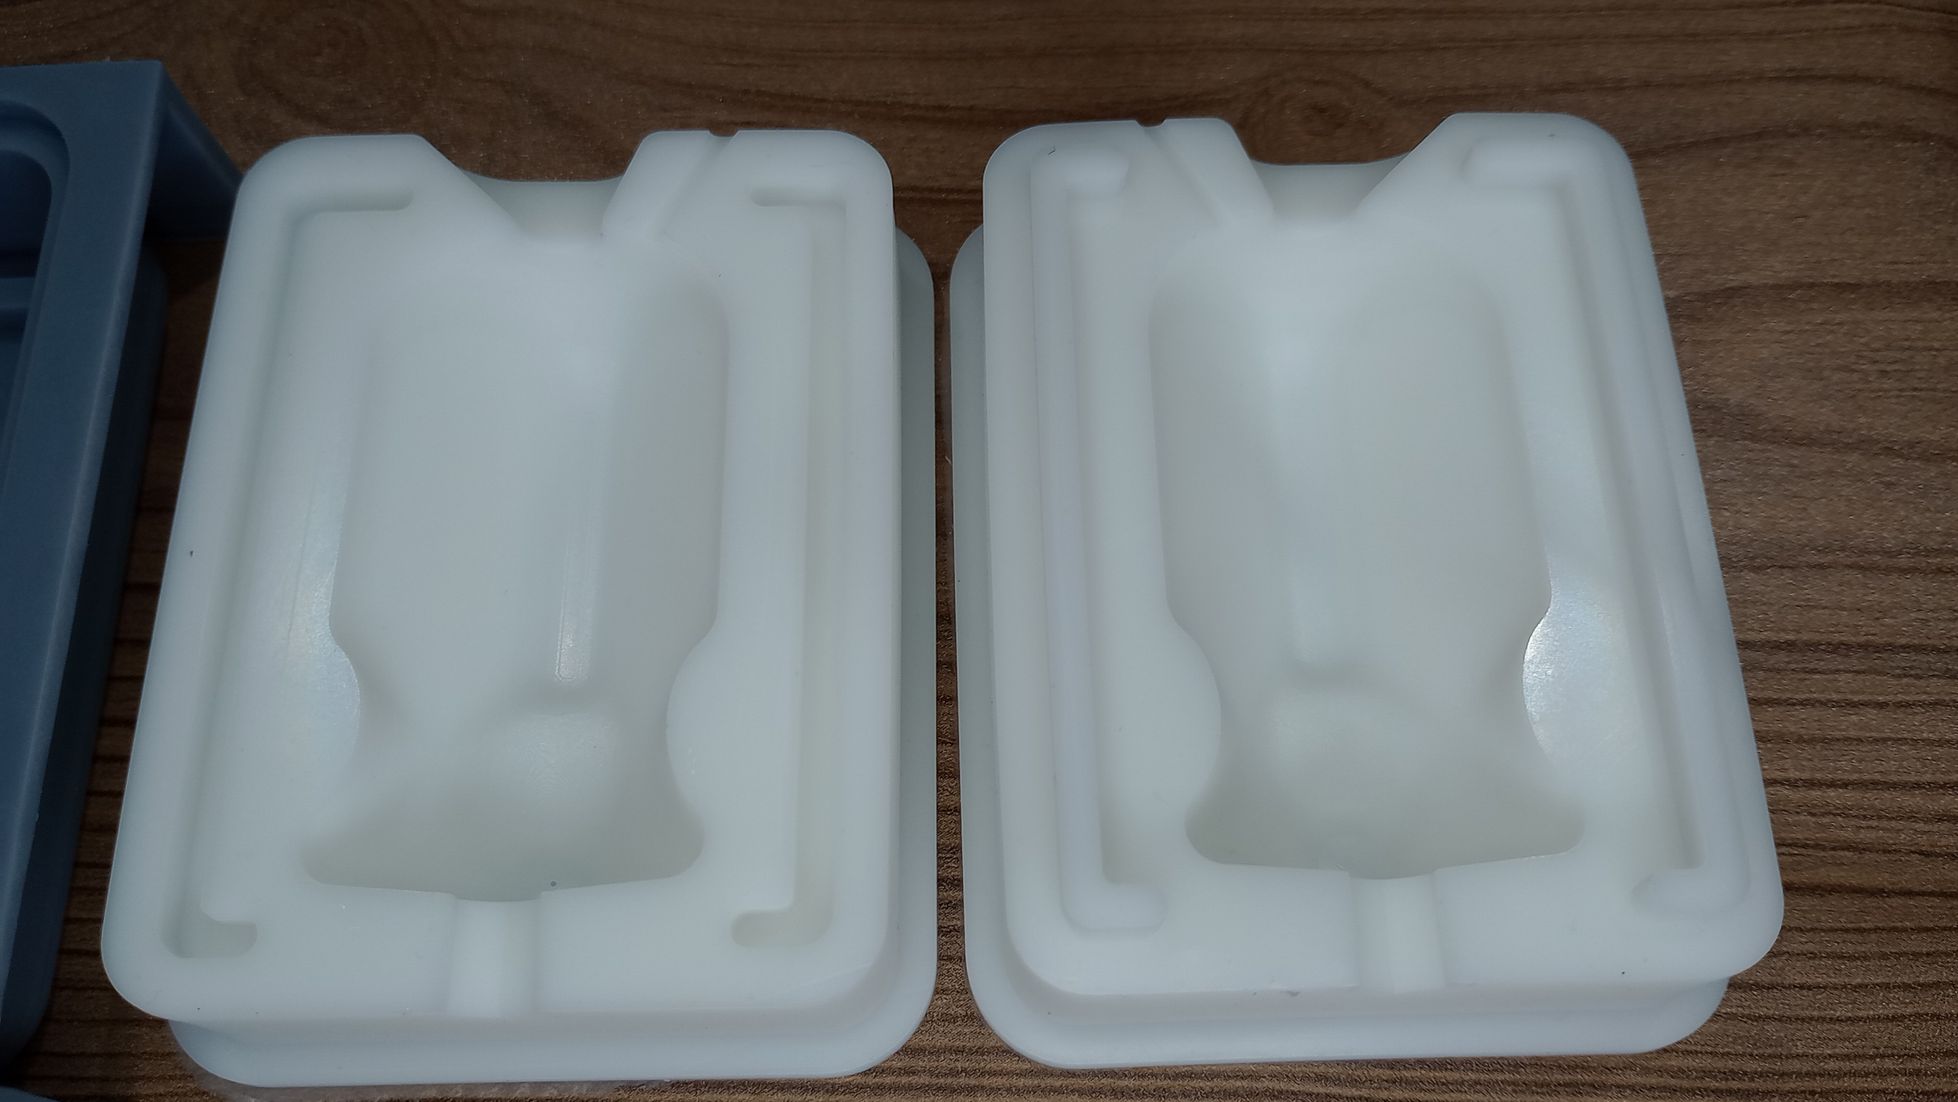
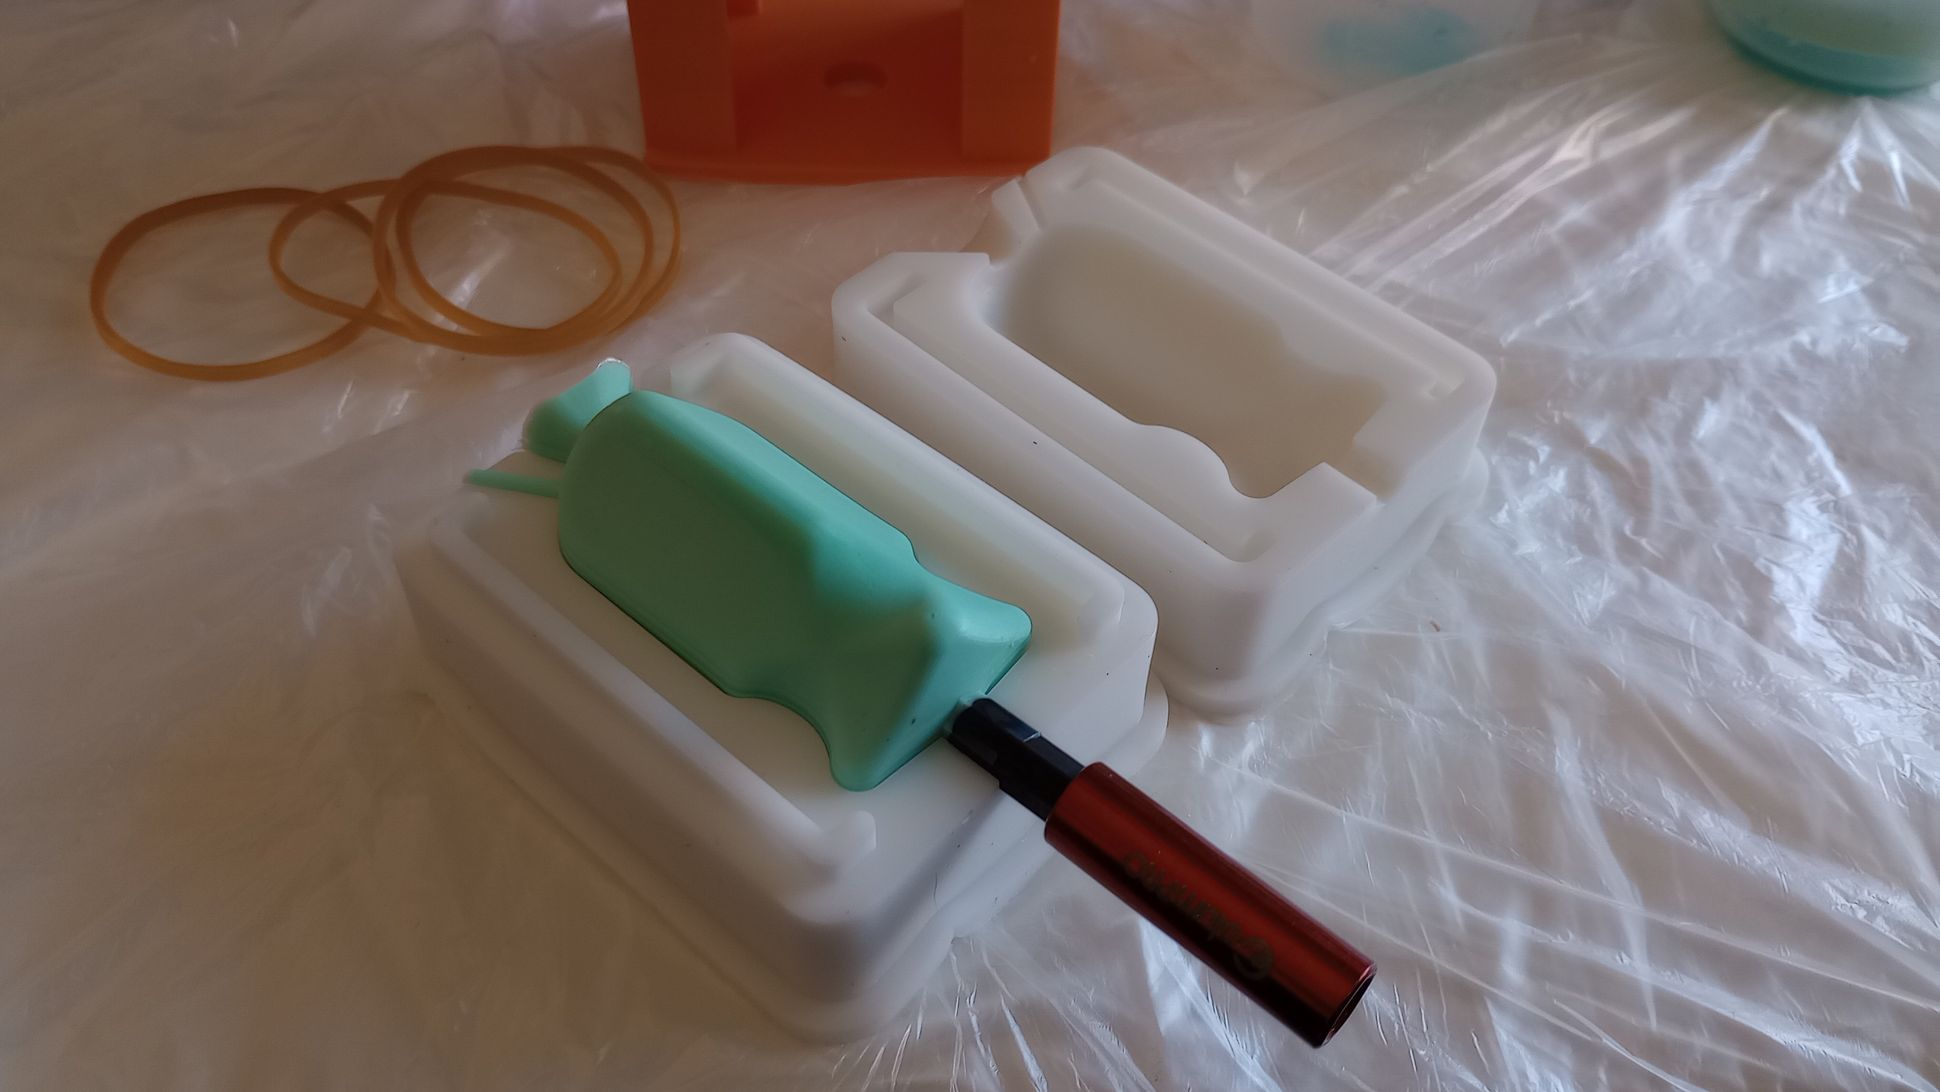
The demoulding process goes well as it is a straightforward part, although the silicone seems to adhere more strongly to the 3D-printed moulds.
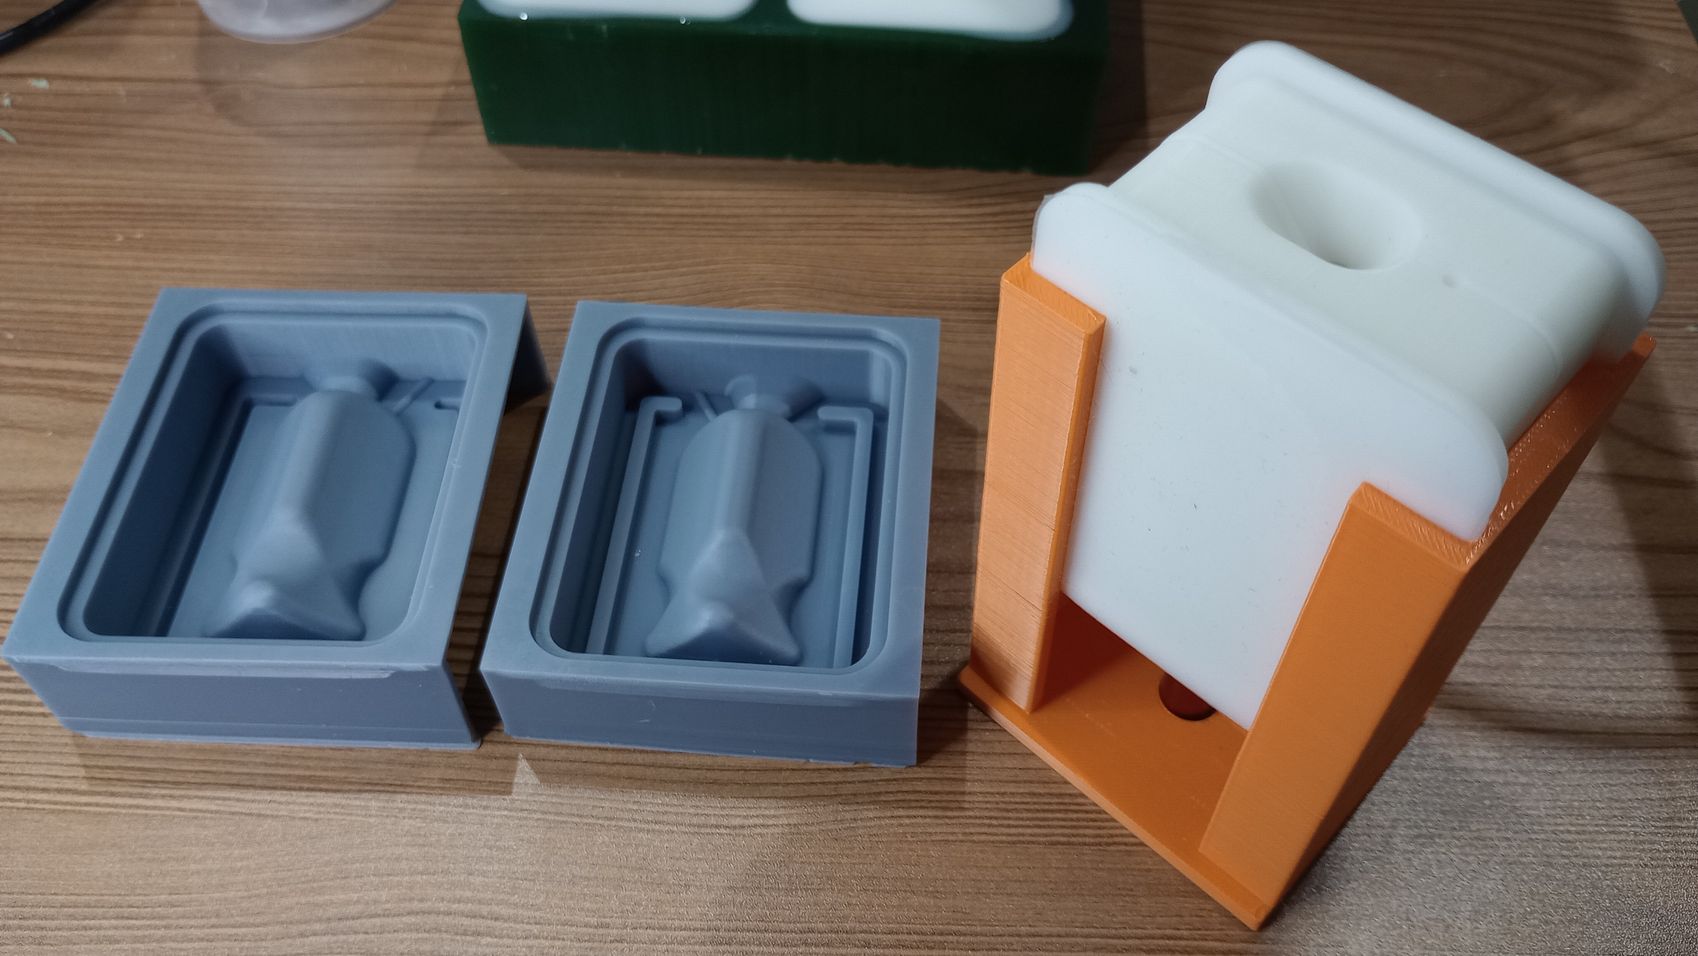
I 3D printed and tested the jig I designed in Fusion, which I will use to hold the molds vertically and ensure the magnetic bit is perpendicular.
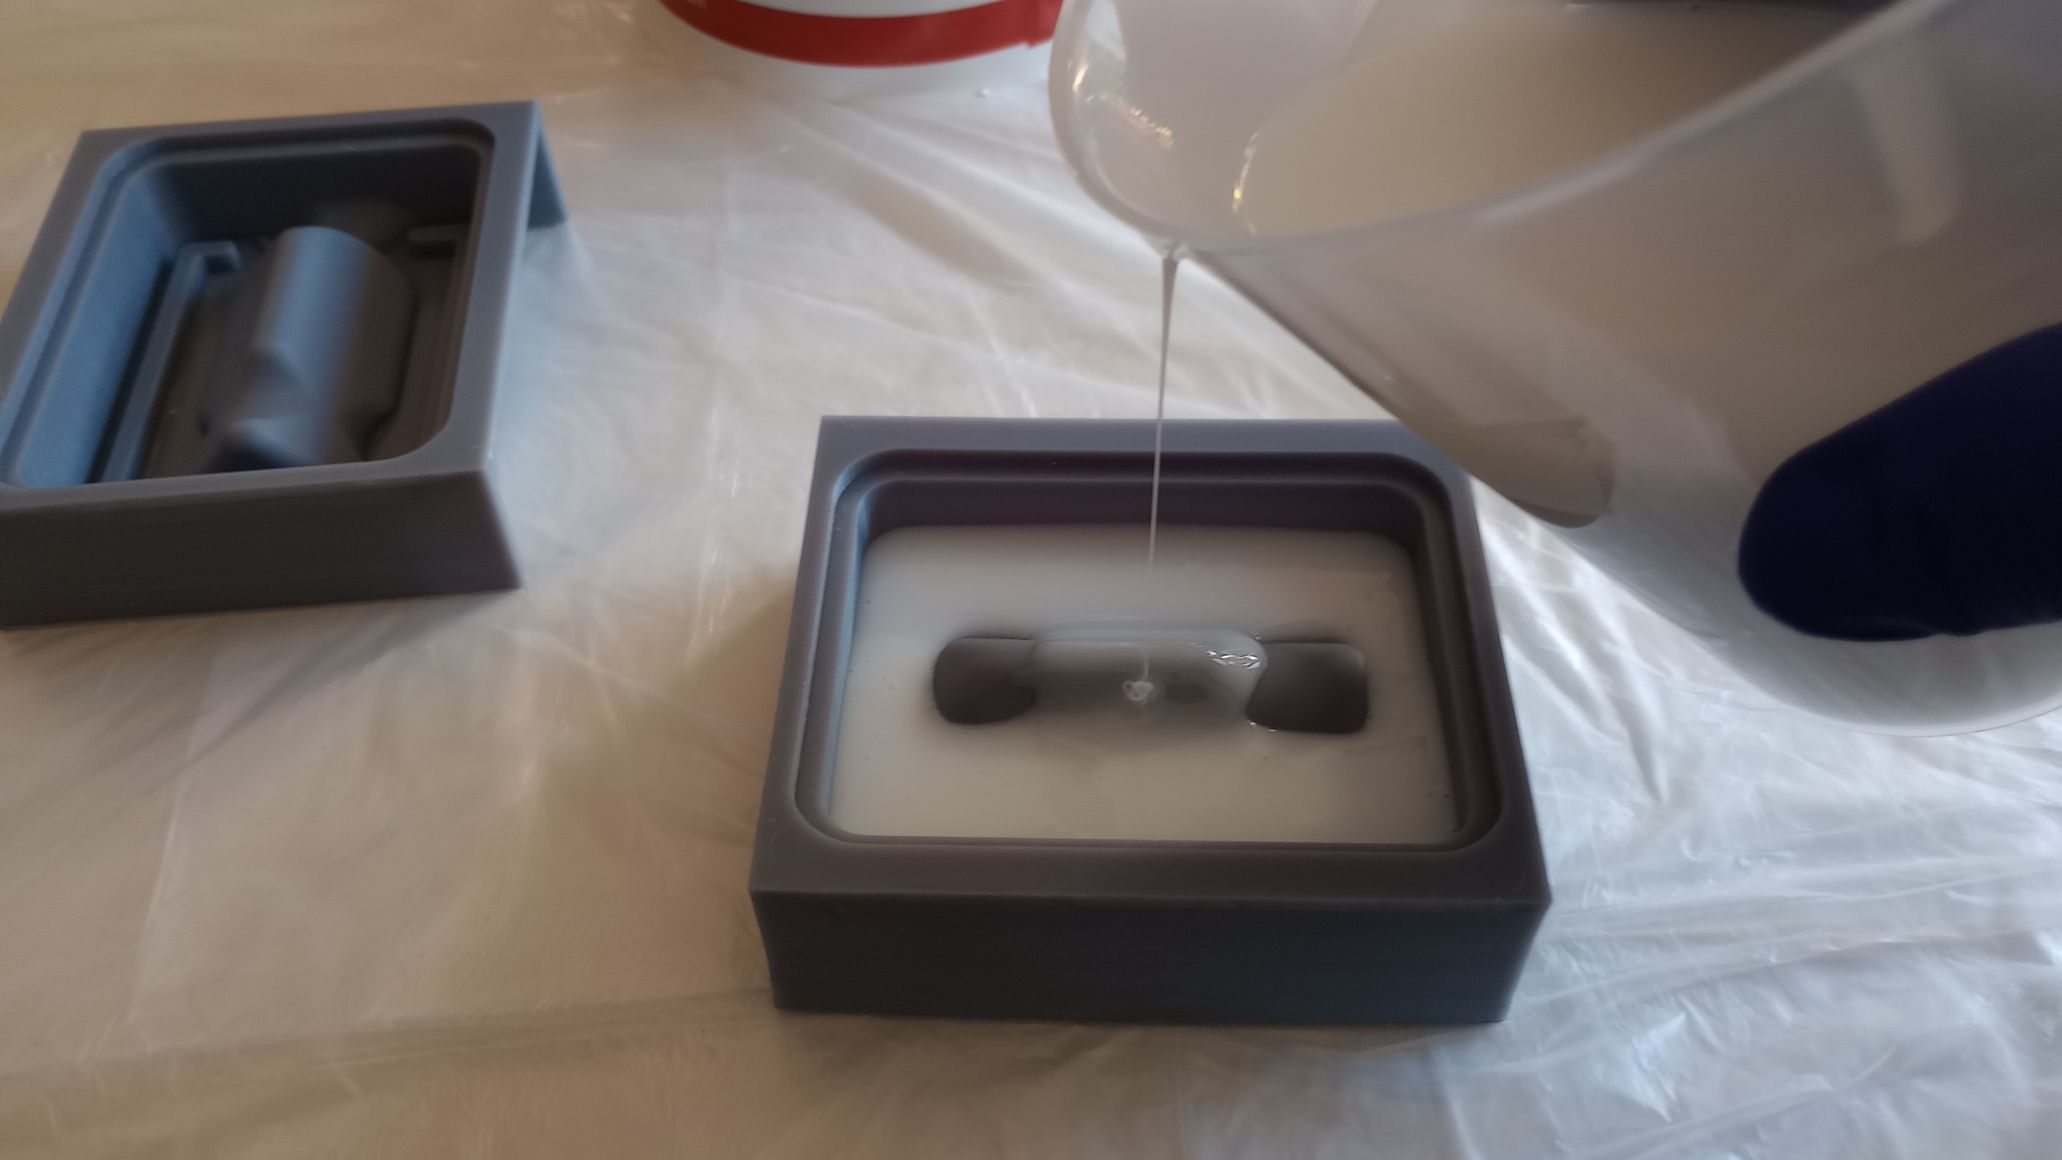
RESIN CASTING
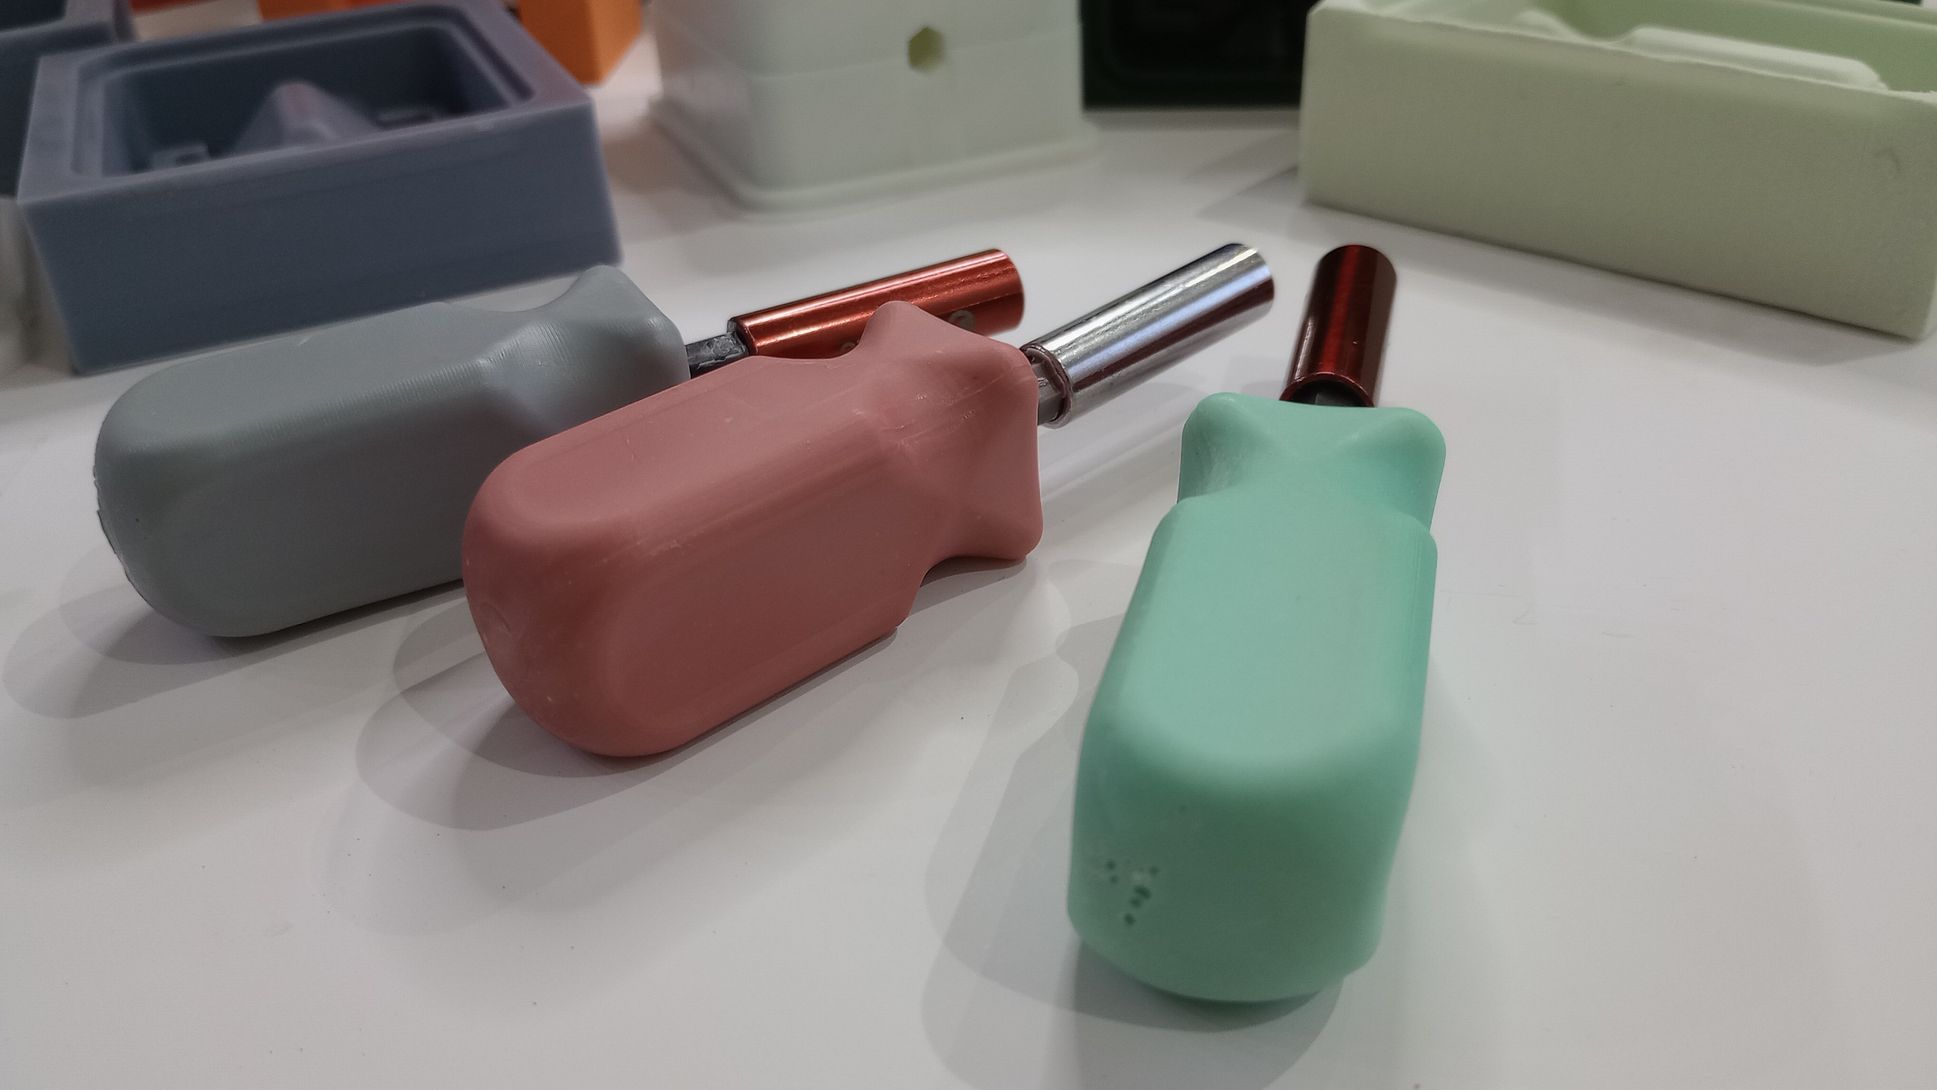
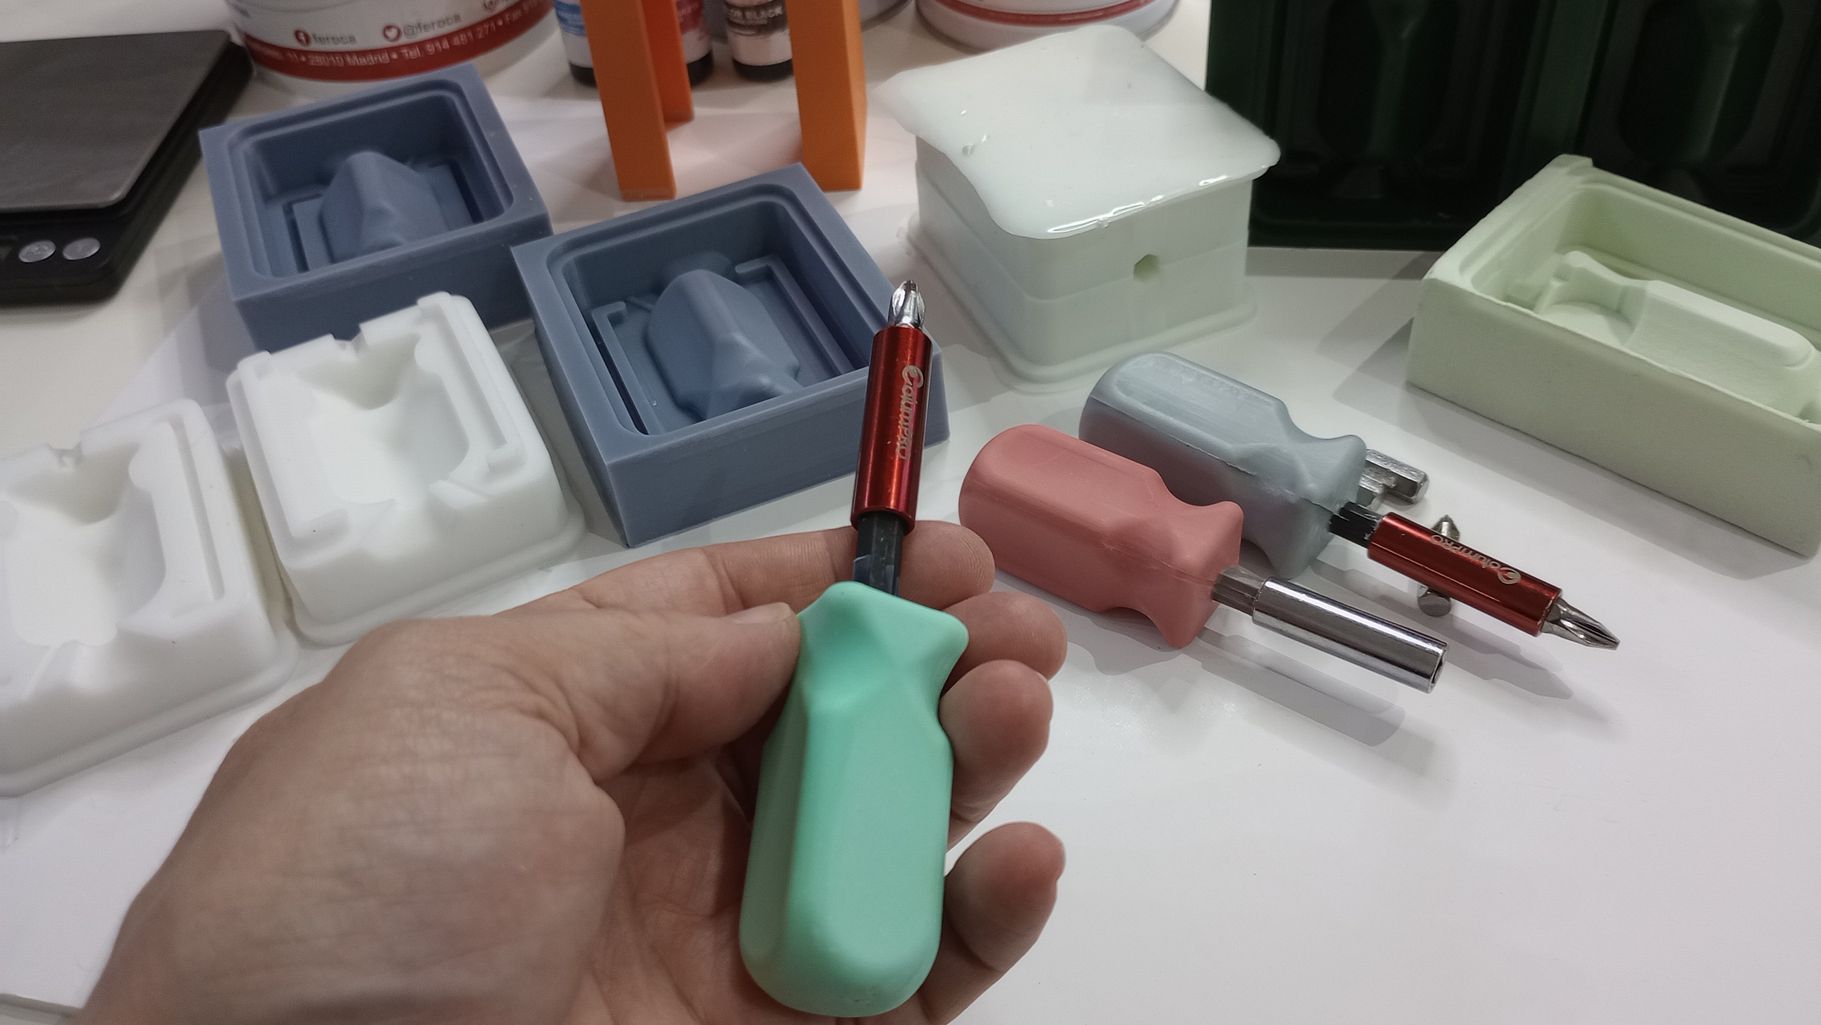
For casting the handles, I am using the resin FEROPUR PR55+E55 from Feroca, mixed with three different pigments. I secure the two parts of the molds with rubber bands, then insert the magnetic bit holder and place the molds in a 3D-printed support. Next, I prepare the containers and measure equal parts of component A and component B.
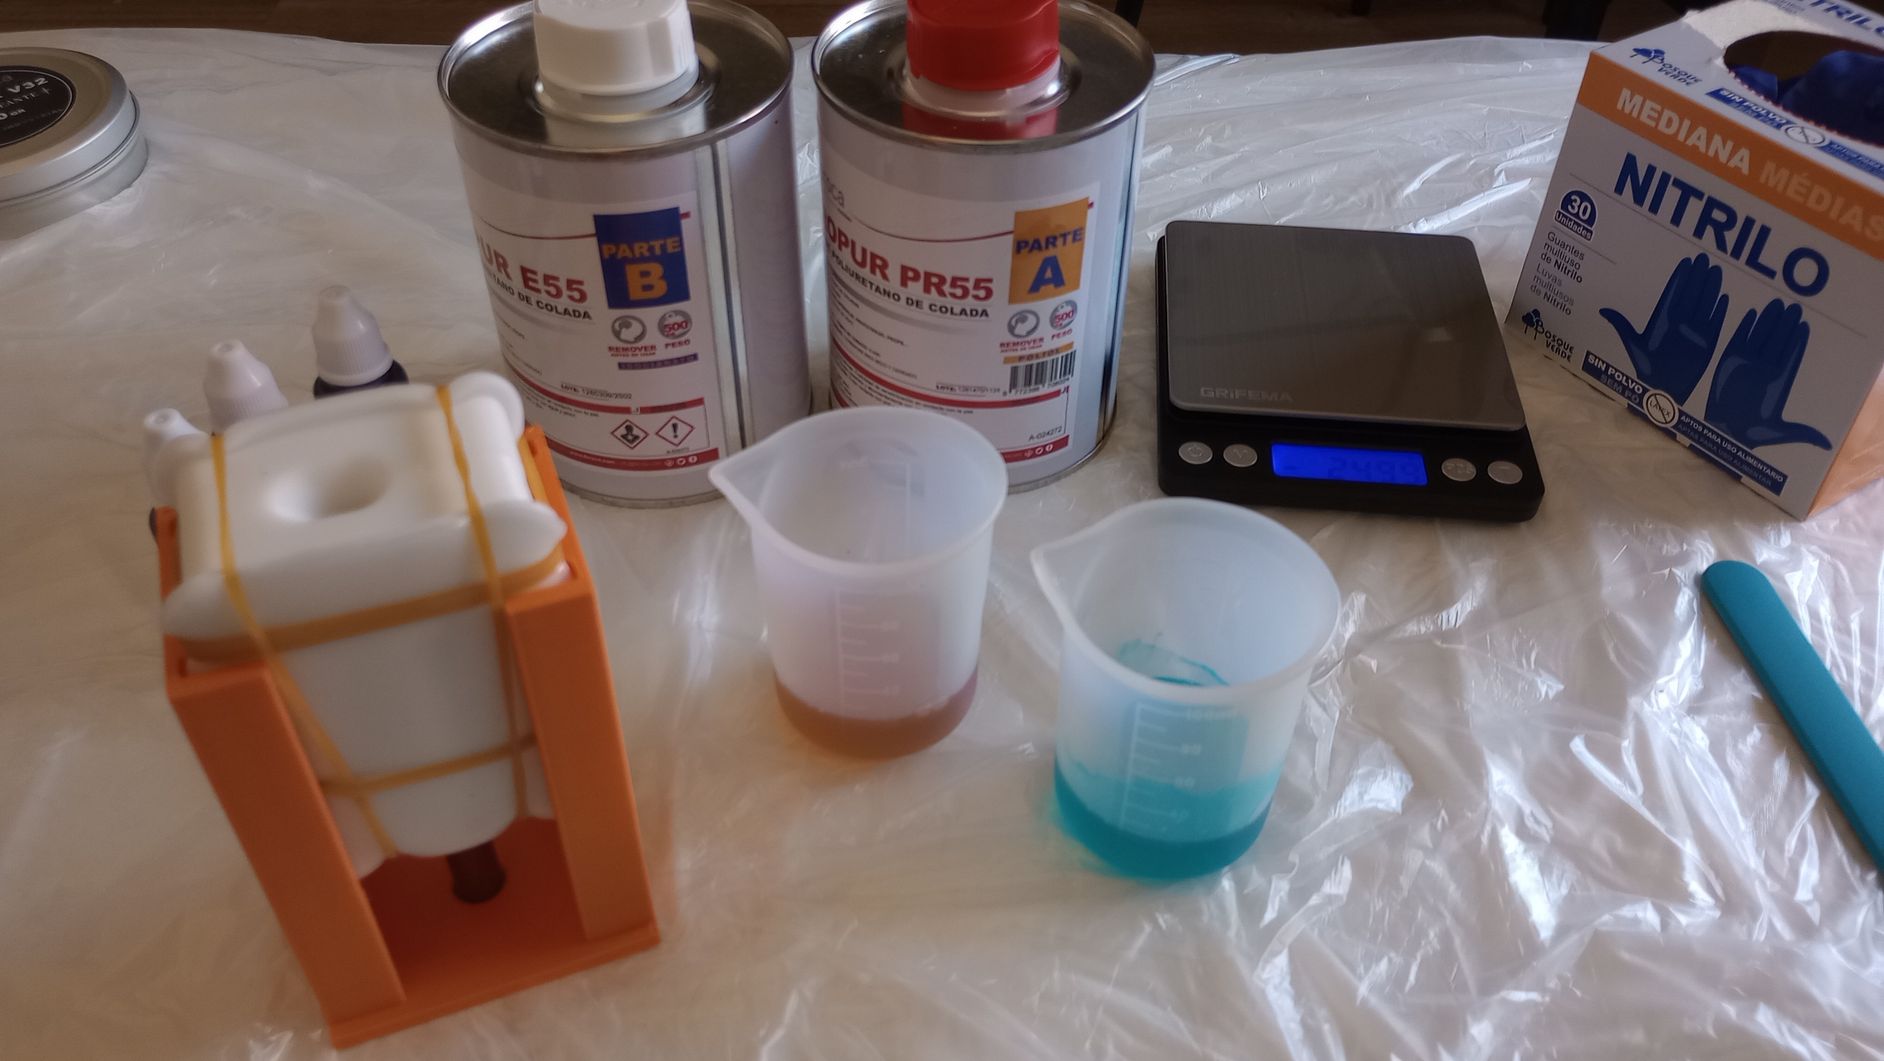
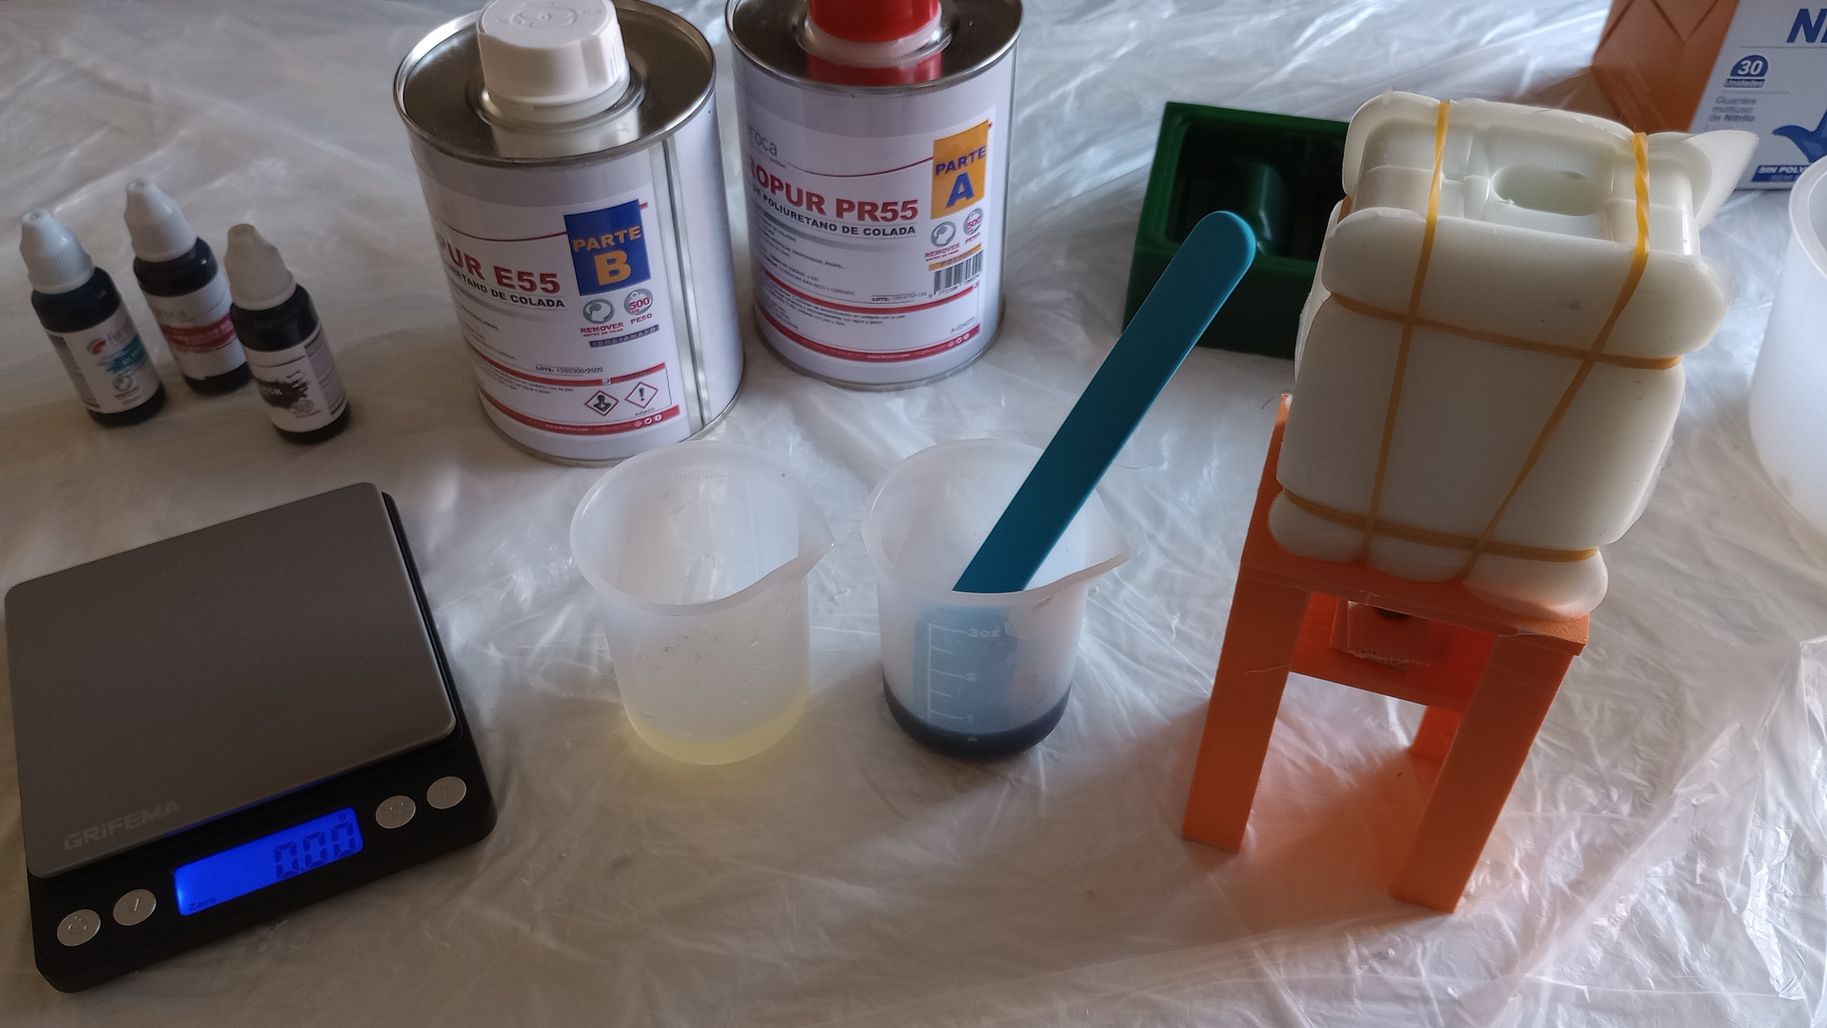
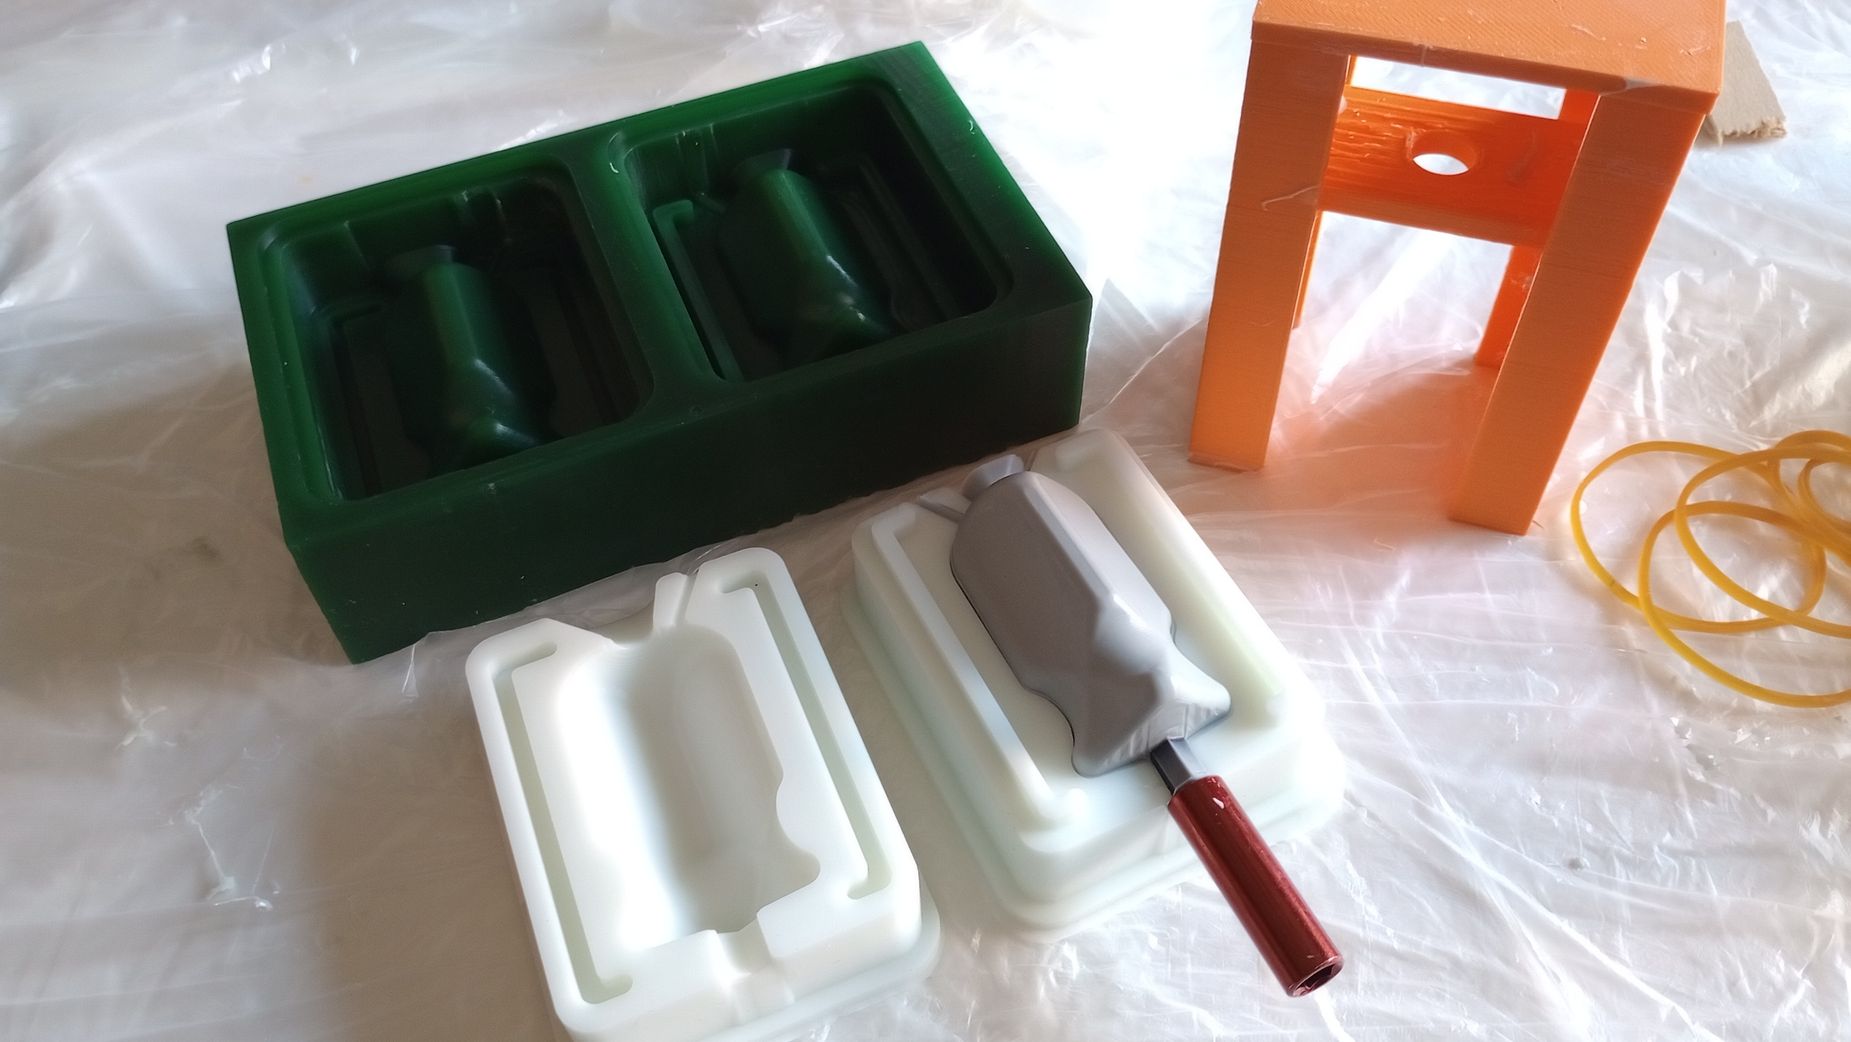
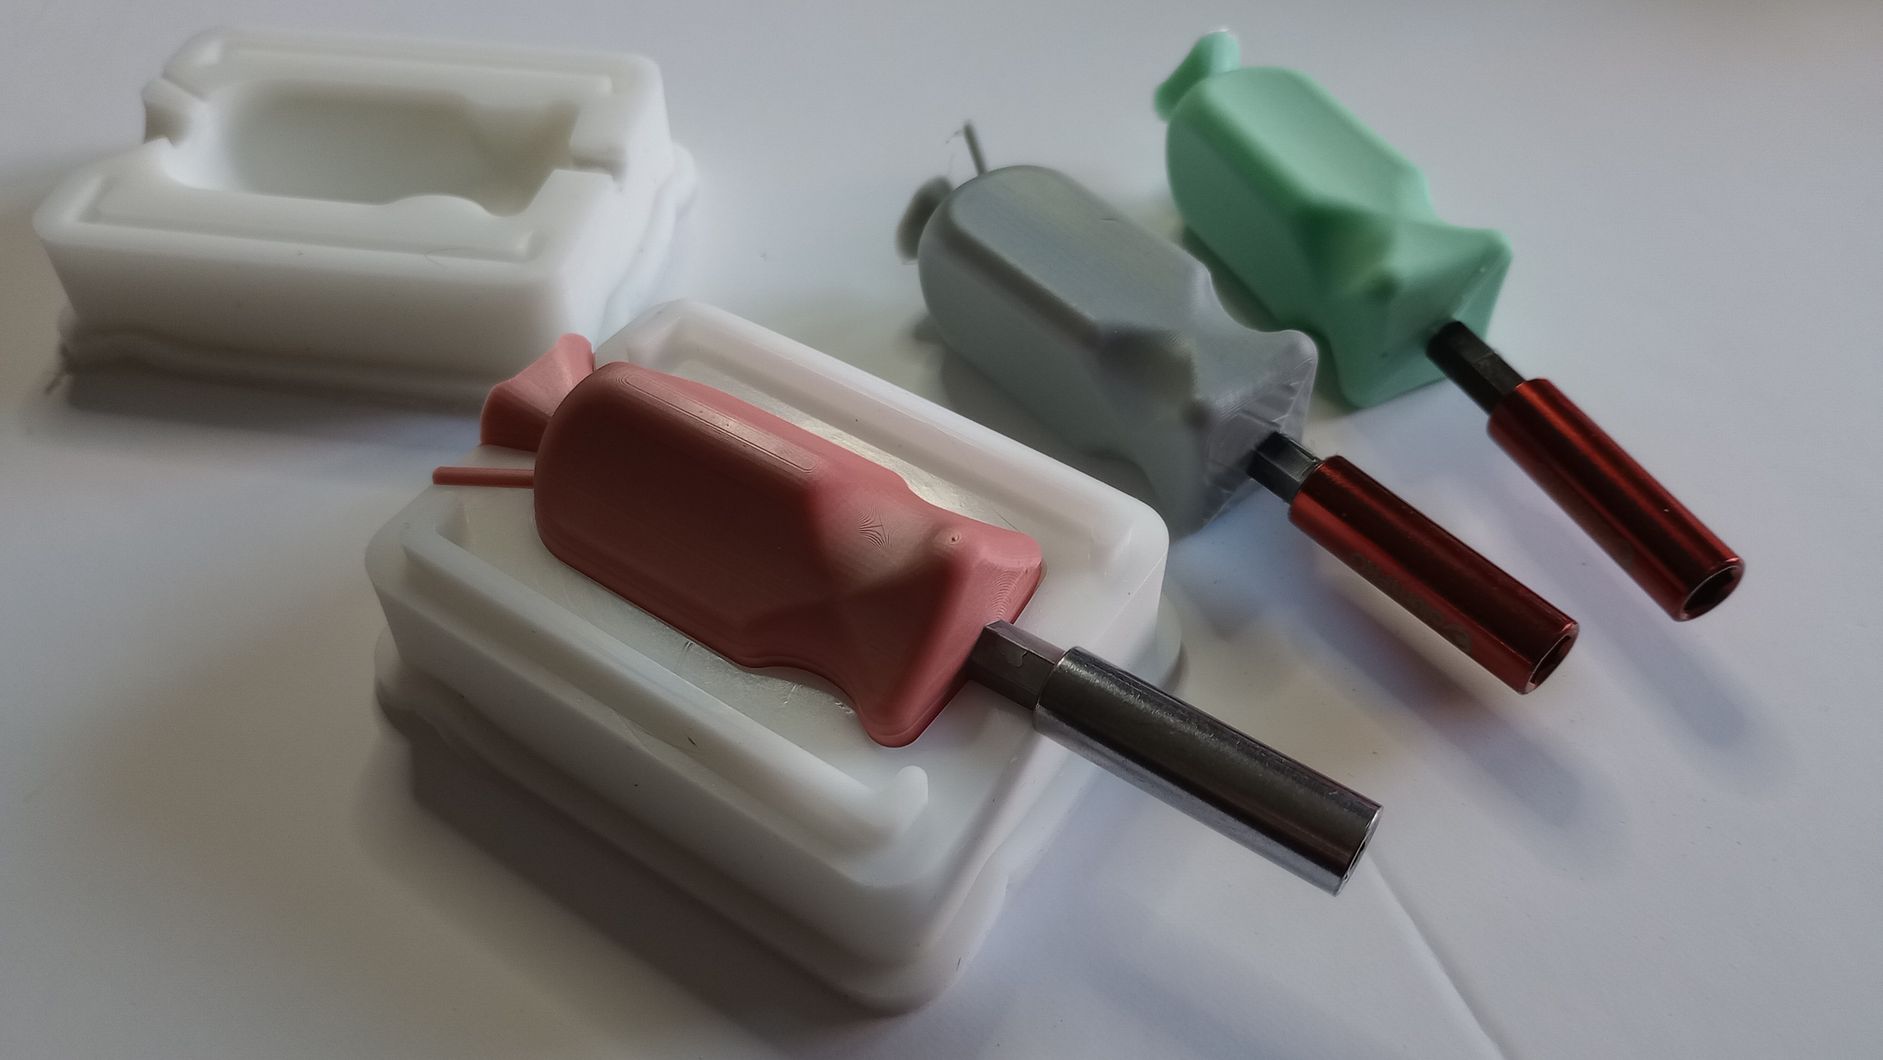
Since the working time is only 80 seconds, I mix the two parts thoroughly and pour the mixture into the mold without delay. I calculated that this project will require approximately 50 ml of resin. The resin has a very low viscosity, allowing it to flow easily into the mold. After 10 minutes, the pieces are ready to be demoulded, and they require a bit of post-processing to remove the vent, sprue, and seams. I cast both molds using negative molds made with CNC and the 3D-printed molds.
|
Casting on silicone mould from CNC wax mould |
Casting on silicone from resin 3D printing mould |
|
|
Negative Mould fabrication |
The manufacturing of the wax moulds requires the generation of different toolpaths, toolchanges, etc. The fabrication process can take several hours |
Requires washing and curing but the fabrication time is shorter |
|
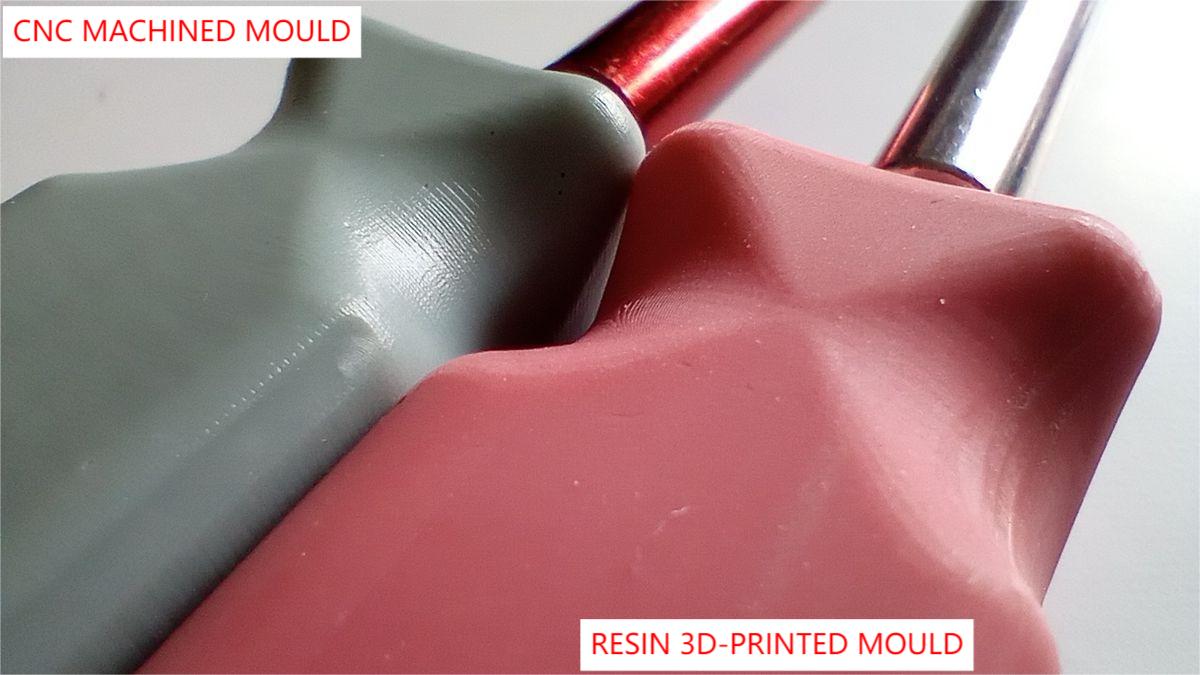
Quality of negative mould |
Good quality finish. |
Excellent quality |
|
Demoulding of silicone cast |
Silicone demoulding very easy |
Silicone demoulding takes some effort. |
|
Quality of resing parts |
Some machining marks are noticeable with small seam marks. The quality could have been increased by machining another parallel toolpath perpendicular to the previous one. Some bubbles present at the top. |
Very smooth surface with small seam marks Some bubbles present at the top. |
USEFUL LINKS AND RESOURCES
- Feroca - Provider of molding materials
- FreemanWax - Manufacturer and supplier of waxes and other casting materials
FILES
CAD model of mould part A: Mould_A_screwdriver.stl
CAD model of mould part B: Mould_B_screwdriver.stl
Safety Sheet for green File-A-Wax from Ferris: Datasheet_Ferris_File-A-Wax_Green.pdf
Safety Sheet for Silicone EASYL 3520 Base + Catalyst from Feroca: Datasheet_EASYL_3520_PARTEA.pdf
Safety Sheet for Feropur PR55+E55 -Rigid Polyurethane Resin: Datasheet_HS_FEROPUR_E55.pdf ; Datasheet_HS_FEROPUR_PR55.pdf
Top