Week 11 - Embedded Networking and Communications
Table of Contents
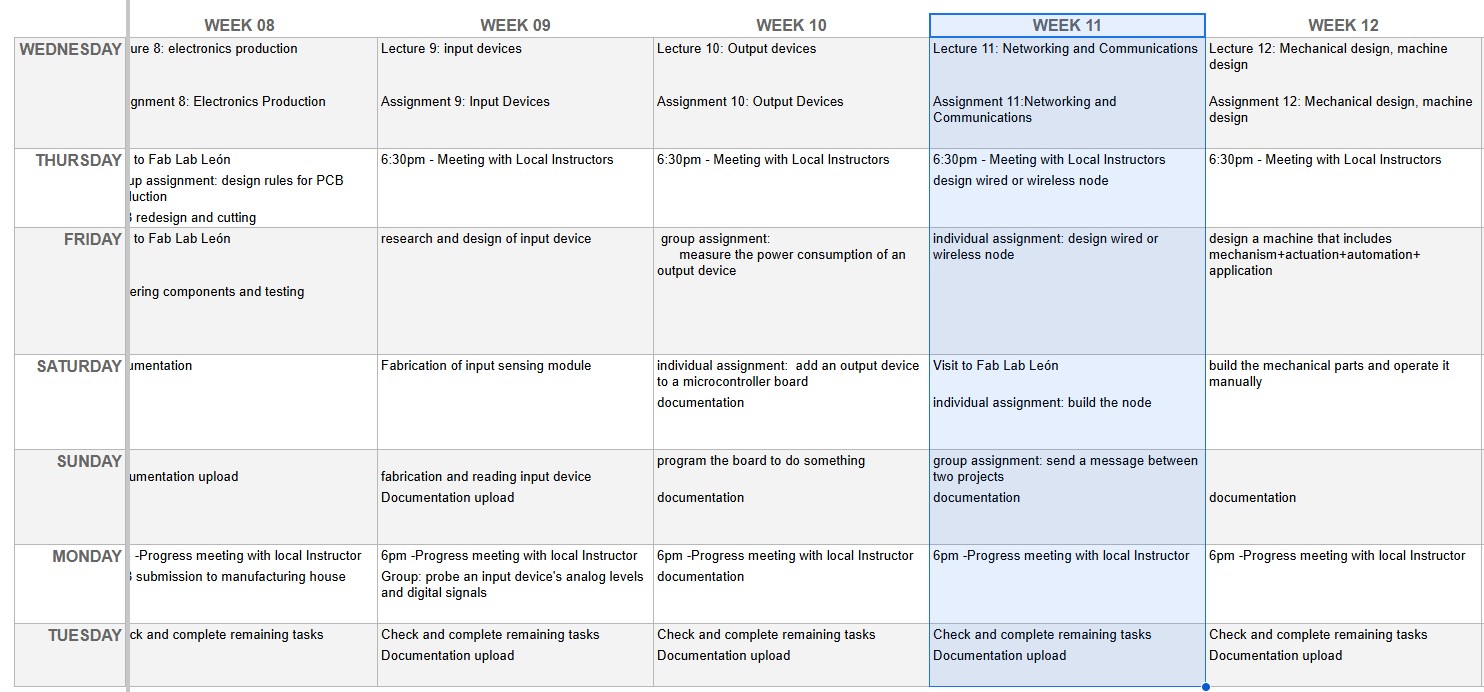
WEEKLY PLAN
Group assignment:
- Send a message between two projects
Individual assignment:
- Design, build and connect wired or wireless node(s) with network or bus addresses and a local input and/or output devices
GROUP ASSIGNMENT
This is the link to the Fab Lab León Group Assignments page. Since I am completing the group assignment on my own I left the documentation on this page.
SENDING MESSAGE BETWEEN TWO PROJECTS
To send a message between 2 projects I am going to connect a Seeed Studio XIAO ESP32C6 to a smartphone via Bluetooth Low Energy (BLE).
For this, I'll need to configure the XIAO as a BLE server, therefore allowing the phone to discover and connect to the XIAO, enabling data exchange. Here's a step-by-step guide based on the information from Seeed Studio's documentation
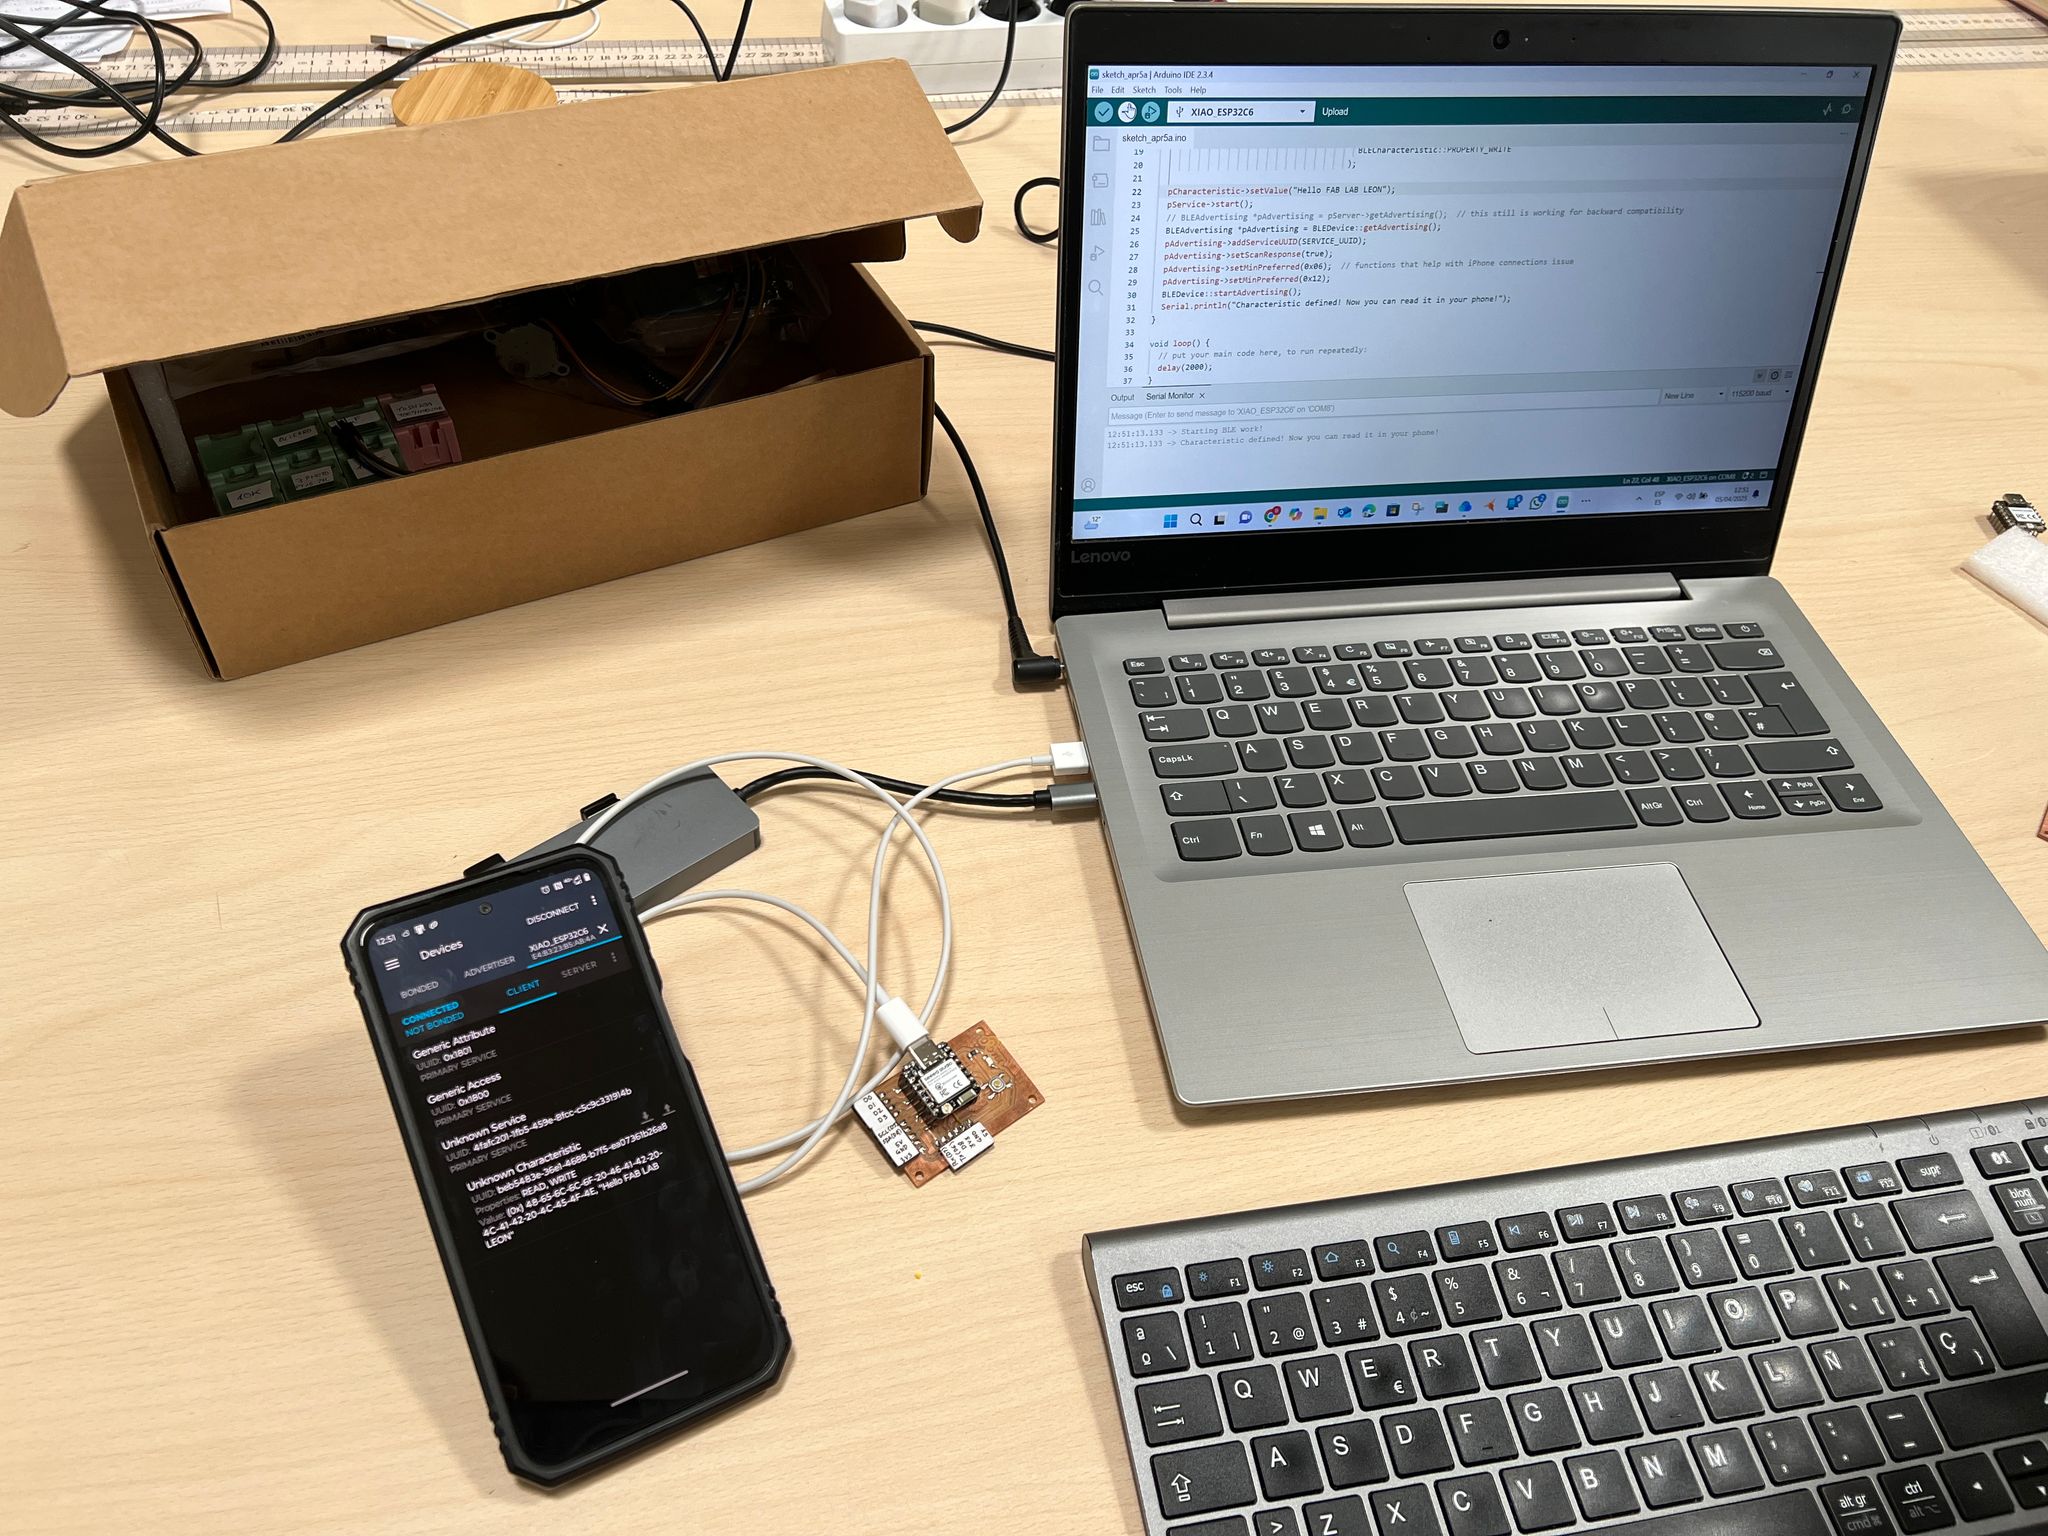
In Arduino IDE I select the XIAO ESP32C6 board and the correctect port. Then I install the required libraries: BLEDevice, BLEUtils and BLEServer.
In Arduino IDE I use the following code based on the code from Seeed Studio's documentation to configure XIAO ESP32C6 as a BLE Server that advertises a service and a characteristic.
Then I upload the program to the XIAO board.
//Server Code
#include <BLEDevice.h>
#include <BLEUtils.h>
#include <BLEServer.h>

#define SERVICE_UUID "4fafc201-1fb5-459e-8fcc-c5c9c331914b"
#define CHARACTERISTIC_UUID "beb5483e-36e1-4688-b7f5-ea07361b26a8"

void setup() {
Serial.begin(115200);
Serial.println("Starting BLE work!");

BLEDevice::init("XIAO_ESP32C6");
BLEServer *pServer = BLEDevice::createServer();
BLEService *pService = pServer->createService(SERVICE_UUID);
BLECharacteristic *pCharacteristic = pService->createCharacteristic(
CHARACTERISTIC_UUID,
BLECharacteristic::PROPERTY_READ |
BLECharacteristic::PROPERTY_WRITE
);

pCharacteristic->setValue("Hello FAB LAB LEON");
pService->start();
// BLEAdvertising *pAdvertising = pServer->getAdvertising(); // this still is working for backward compatibility
BLEAdvertising *pAdvertising = BLEDevice::getAdvertising();
pAdvertising->addServiceUUID(SERVICE_UUID);
pAdvertising->setScanResponse(true);
pAdvertising->setMinPreferred(0x06); // functions that help with iPhone connections issue
pAdvertising->setMinPreferred(0x12);
BLEDevice::startAdvertising();
Serial.println("Characteristic defined! Now you can read it in your phone!");
}

void loop() {
// put your main code here, to run repeatedly:
delay(2000);
}
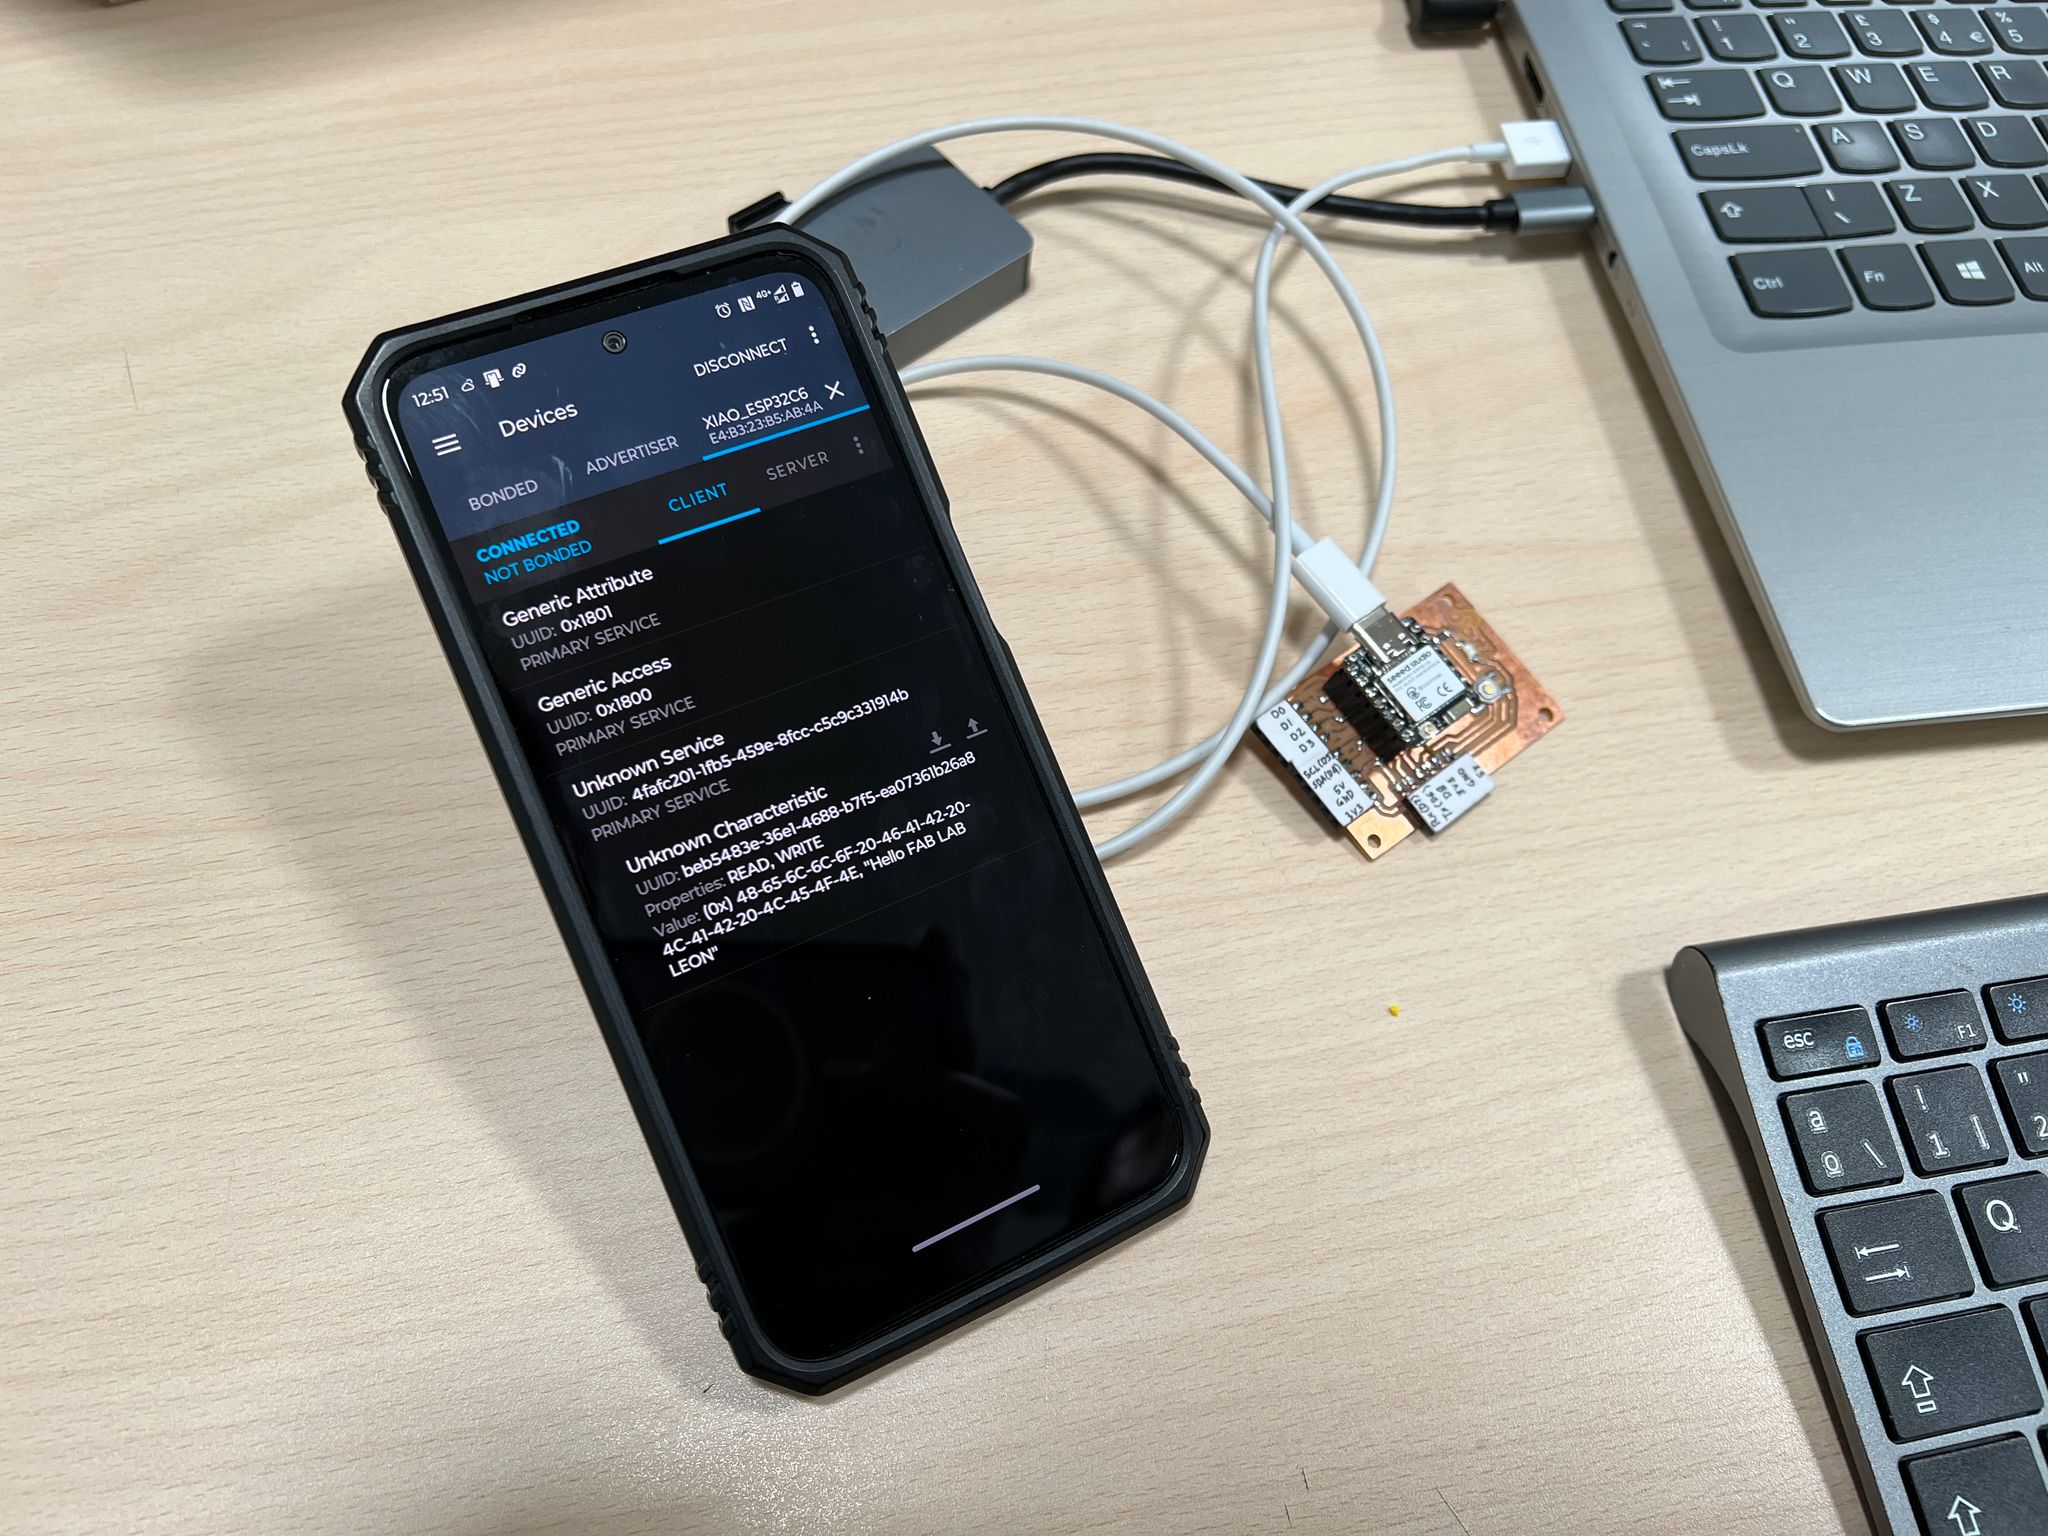
To connect using a Smartphone I install the BLE Scanner app nRF Connect
Once installed I open the BLE scanner app and start scanning for nearby BLE devices. I look for a device named "XIAO_ESP32C6" .
Once connected, I see the advertised service and characteristic. In the app I can read the current value "Hello FAB LAB LEON".
Top
INDIVIDUAL ASSIGNMENT
Bluetooth Low Energy (BLE) sensor data exchange
Bluetooth Low Energy (BLE) is a wireless communication technology designed for short-range data exchange with very low power consumption. BLE is optimized for short distance (typically up to 100m) transmission of small amounts of data (low bandwidth). To save energy, BLE remains in sleep mode constantly except for when a connection is initiated. Some applications of BLE are wearables, smart homes, smart appliances, and tracking beacons.
An application of BLE is the possibility of connecting and sending data between two microcontrollers ESP32. This involves setting up one as a BLE server and the other as a BLE client. The server advertises services and characteristics; the client connects and reads/writes data.
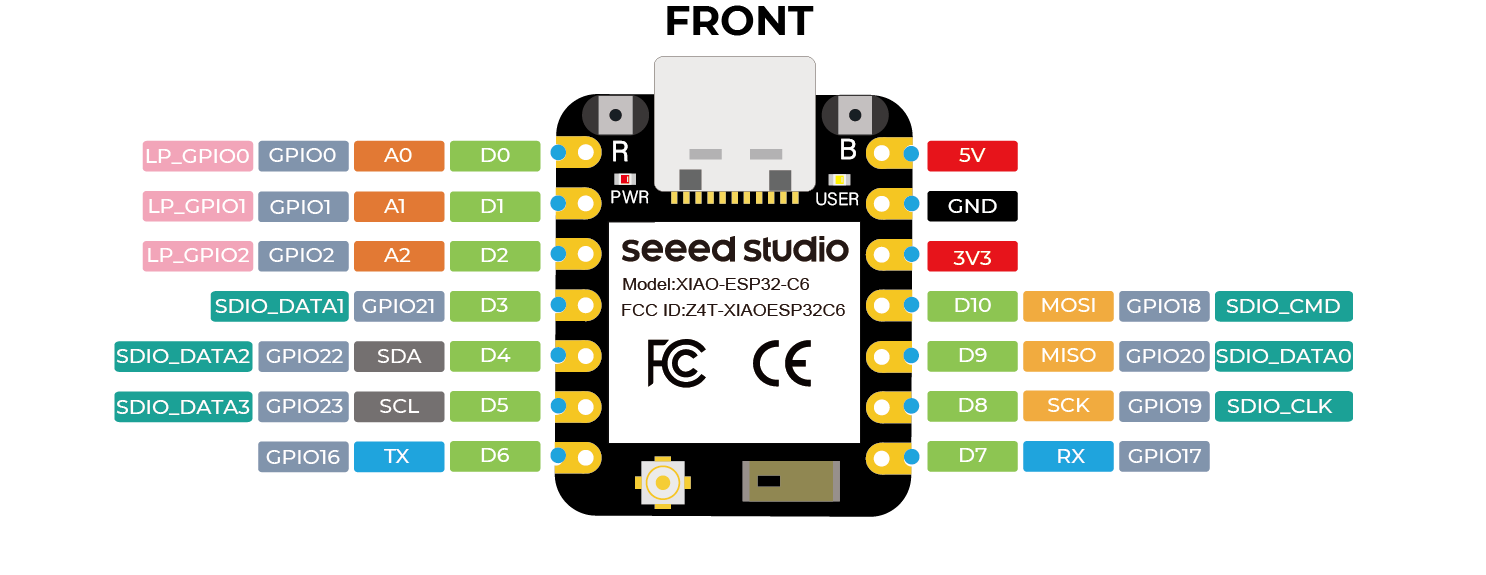
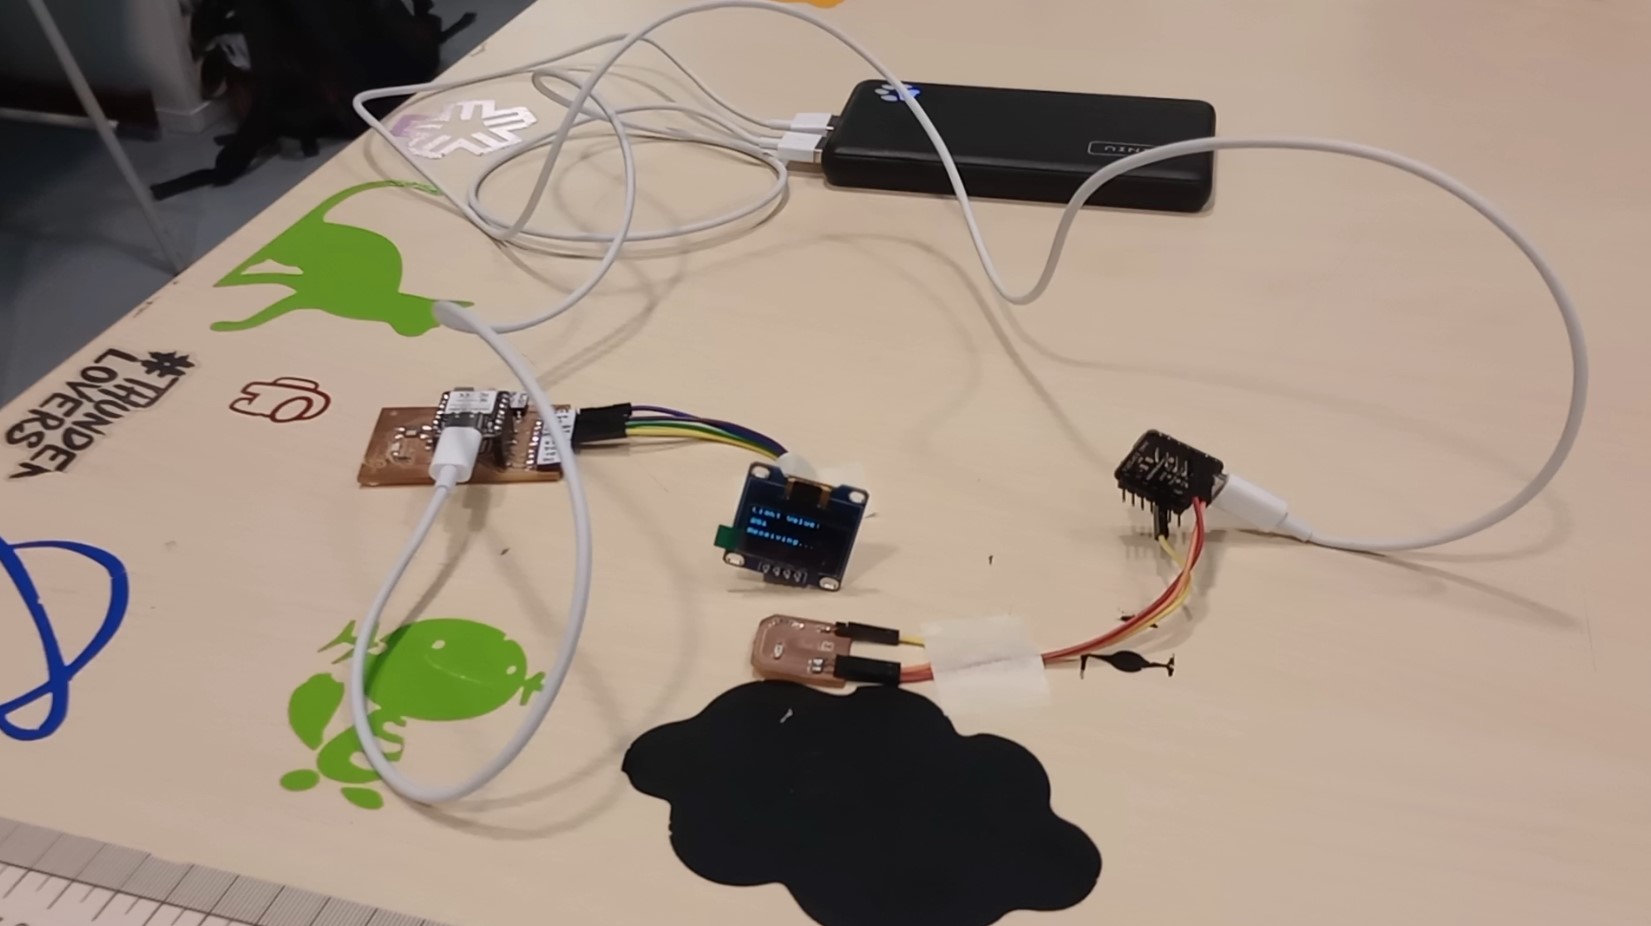
The XIAO ESP32C6 can act either as a client or as a server. I have purchased 2 of these micro-controllers so I am going to set up one as server and the other as client. The client will have a light sensor connected, so it will send the readings to the server. The server will display the data on an OLED screen.
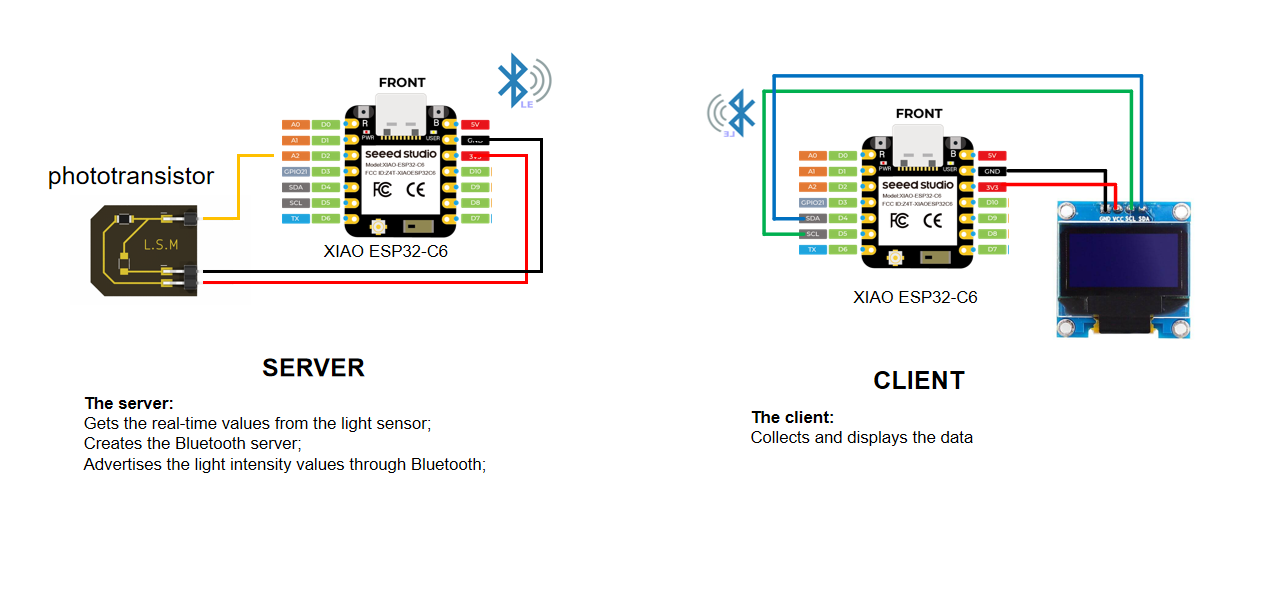
For the server I start with the code from the Seed Studio wiki for the XIAO ESP32C6
I remove the libraries and parts of the code that were not needed, as I am not using the same modules. Next, I define the pin where the phototransistor is connected on the XIAO (D2) and I set the phototransistor pin as input.
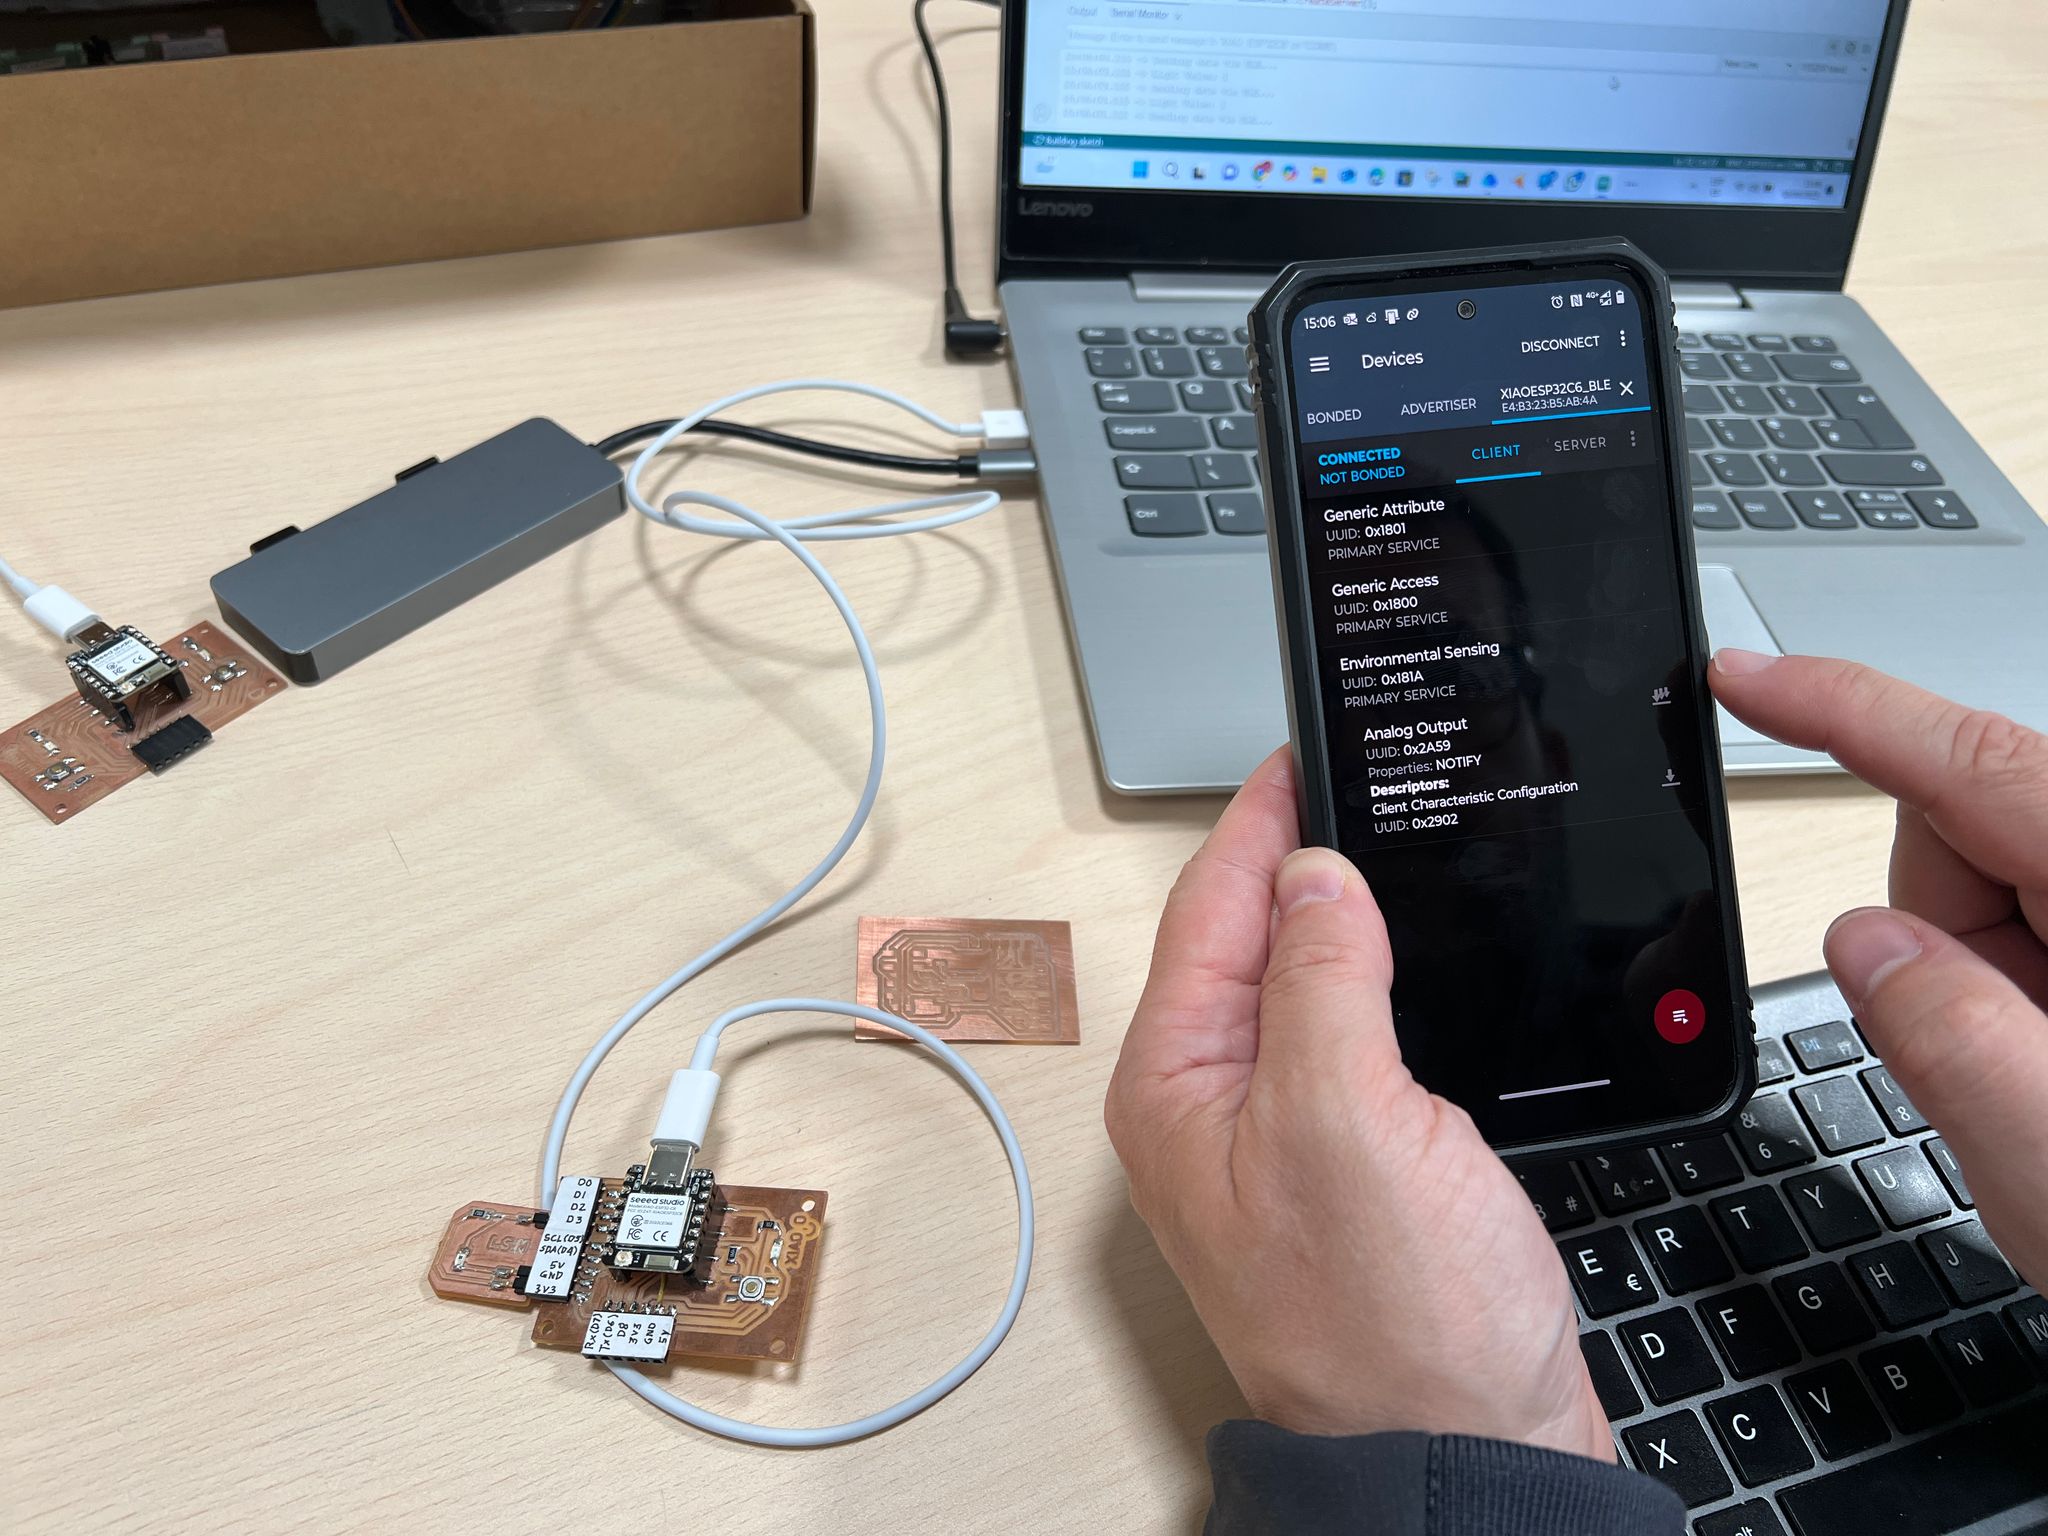
After uploading the program to the XIAO working as Server, I use the nRF Connect App to search for the Bluetooth device and checking if sending the sensor data.
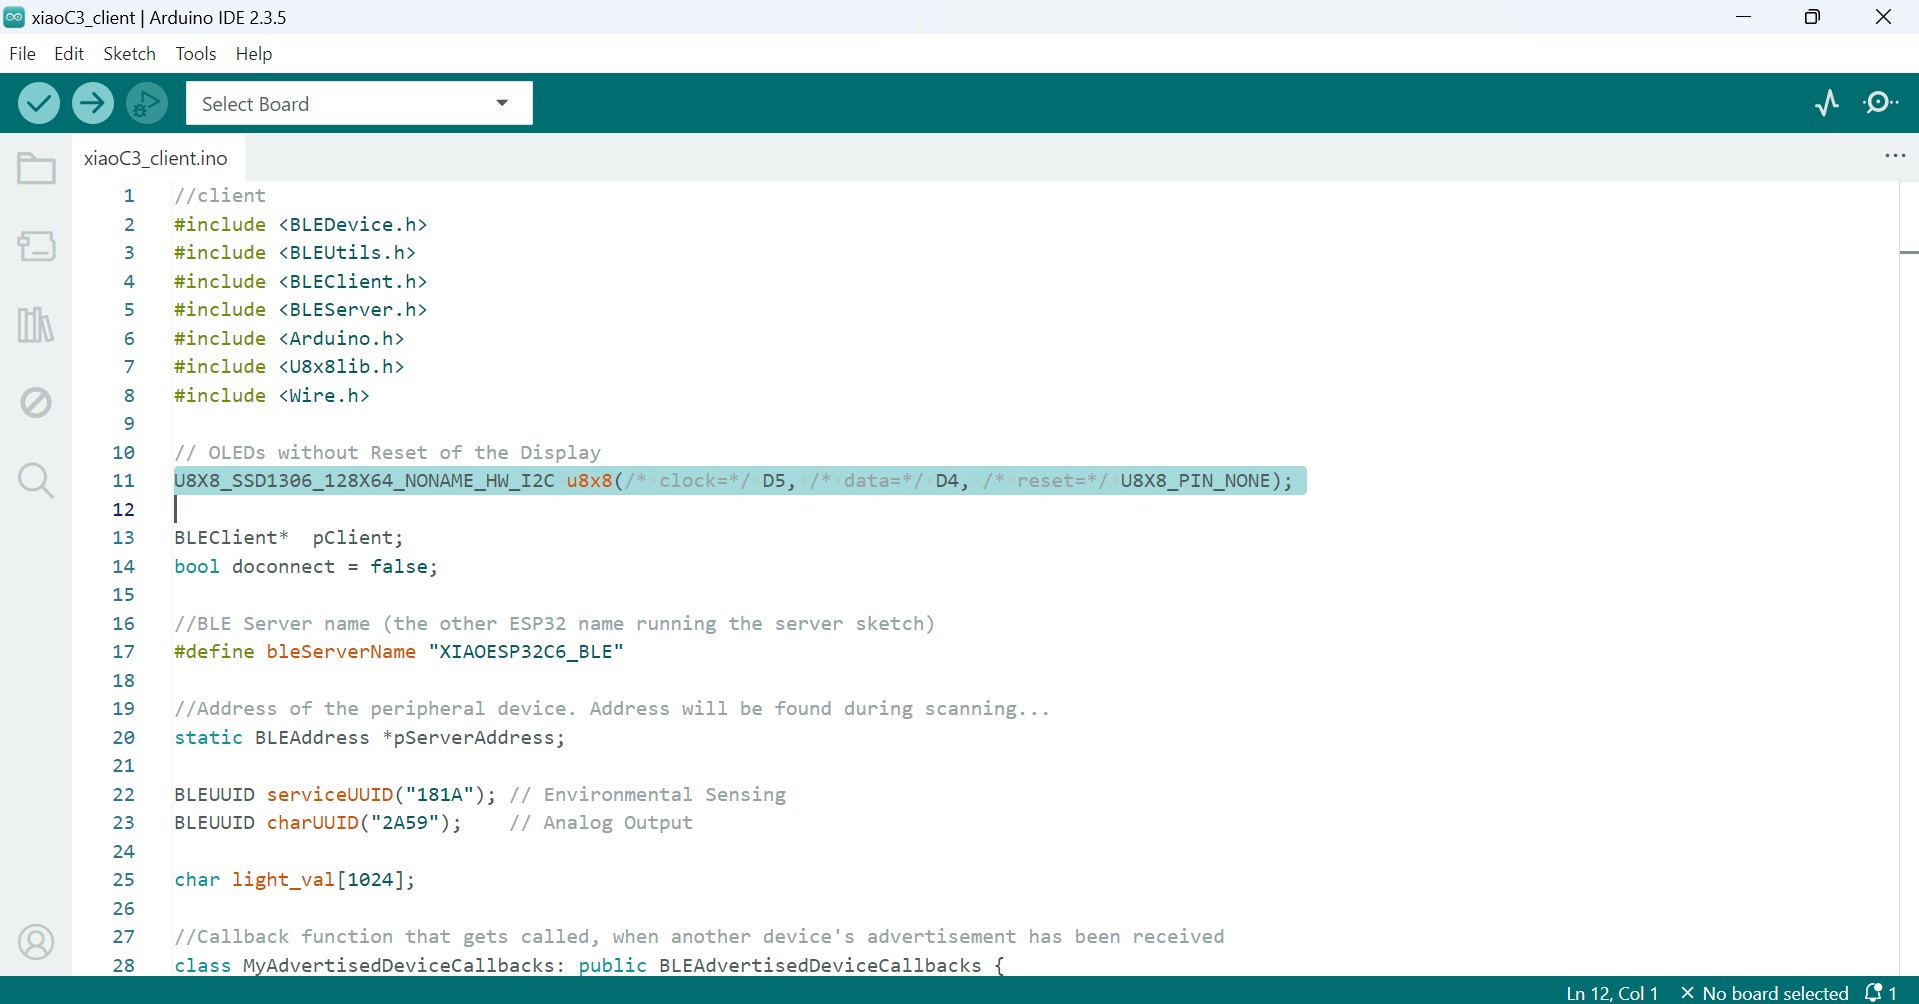
Next, I take the other XIAOESP32 C6, which acts as client and I connect the OLED screen.
I connect SCL to pin D5 and SDA to pin D4.
The Bluetooth communication works and the server is sending data to the client. Unfortunately, the data displayed is always 1.
TROUBLESHOOTING
Initially I was using a FabXIAO with XIAO ESP32C3 and a XIAO ESP32C6 on my development board.
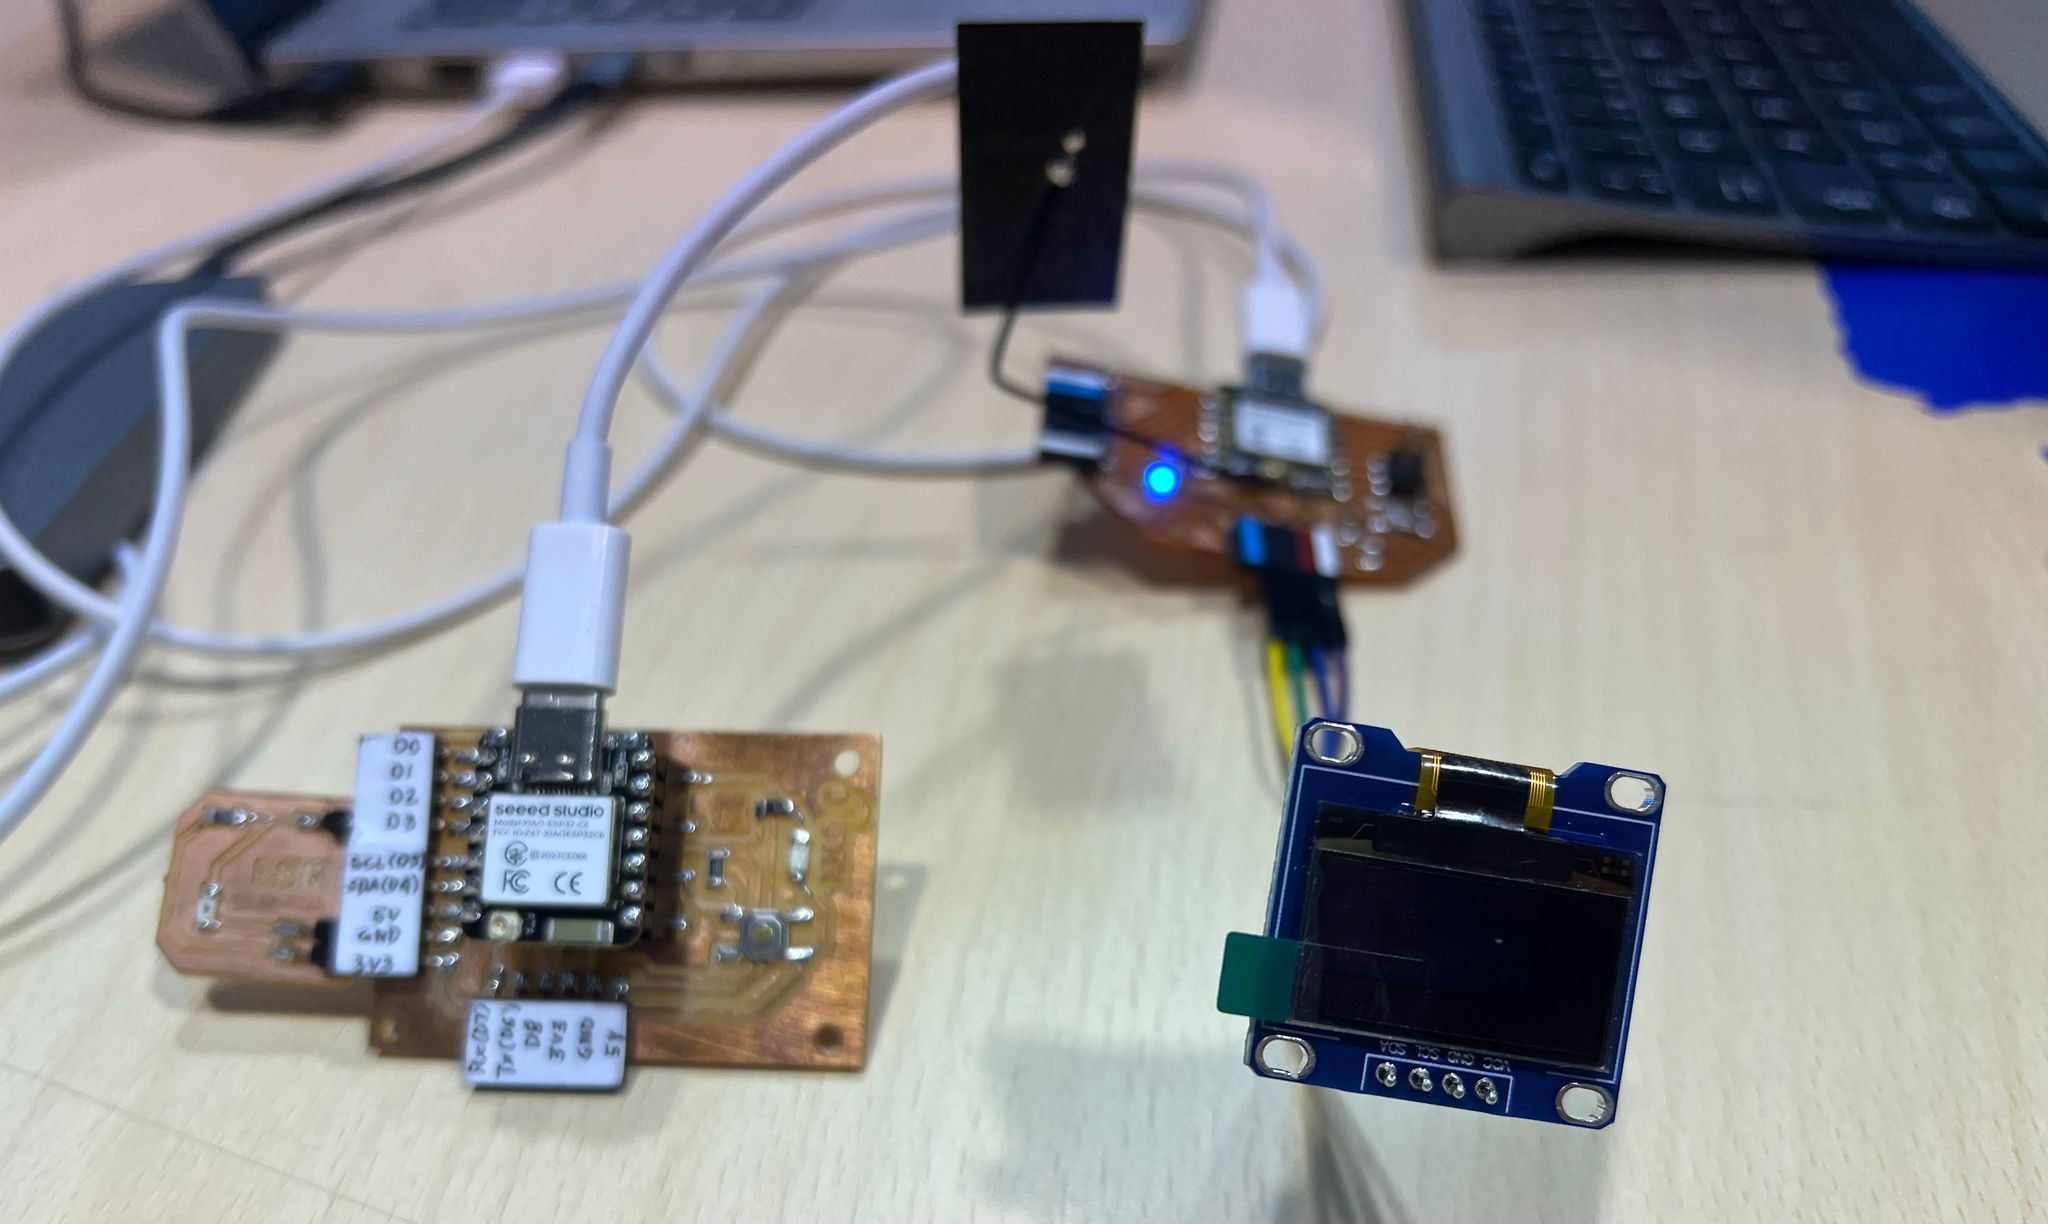
Although I didn't have an additional development board, I decided to use two XIAO ESP32C6 from now on. The photo-transistor sensor is now connected to the XIAO board with jumper wires.
I began by checking the connections and pins, and everything appeared to be in order.
Thanks to my instructor Nuria, I realised that I had mistakenly used `digitalRead()` in the server program instead of `analogRead()`. After correcting the program, I started receiving new readings; however, they seemed inconsistent, providing erratic measurements from the light sensor.
Pablo guided me in the right direction, indicating that I needed to re-map the voltage readings from the phototransistor pin to a specific range of values.
First, I used the serial monitor to observe the voltage input on the D2 pin, measuring it both in low-light conditions and under direct light. I obtained values ranging from 100 to 3300.
The syntax for the `map()` function is as follows:
- map(value, fromLow, fromHigh, toLow, toHigh)
Consequently, the modified code for the server looks like this:

Finally, the BLE data transfer works well, and the system displays accurate values that responds to changes in light intensity.
USEFUL LINKS AND RESOURCES
- nRF Connect for Mobile
- Seeed Studio's documentation: Bluetooth Usage with Seeed Studio XIAO ESP32C6
- Arduino Library BLE for ESP32 Arduino Core
FILES
Program to send message via BLE: BLE_mobile_hello_fab_lab_leon.ino
Server program for Bluetooth Low Energy (BLE) sensor data exchange: xiao_sp32_c6_server.ino
Client program for Bluetooth Low Energy (BLE) sensor data exchange: xiao_sp32_c6_client.ino
Top