Week 01. Principles and practices / Project Management
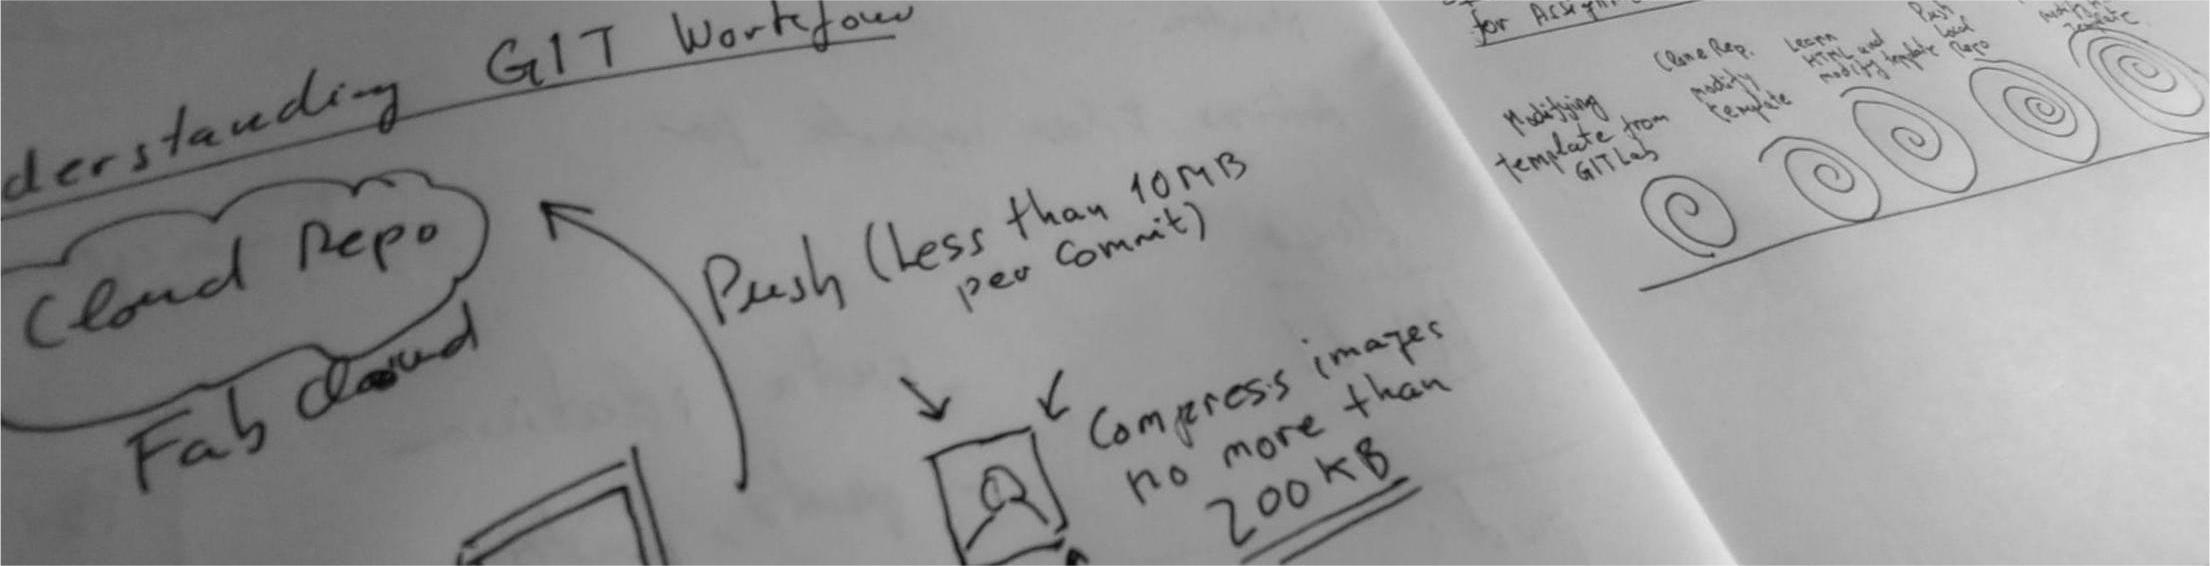
Table of Contents
- WEEKLY PLAN
- PERSONAL SITE DEVELOPMENT
- PROPOSAL FOR FINAL PROJECT IDEA
- USEFUL LINKS AND RESOURCES
- REFLECTION
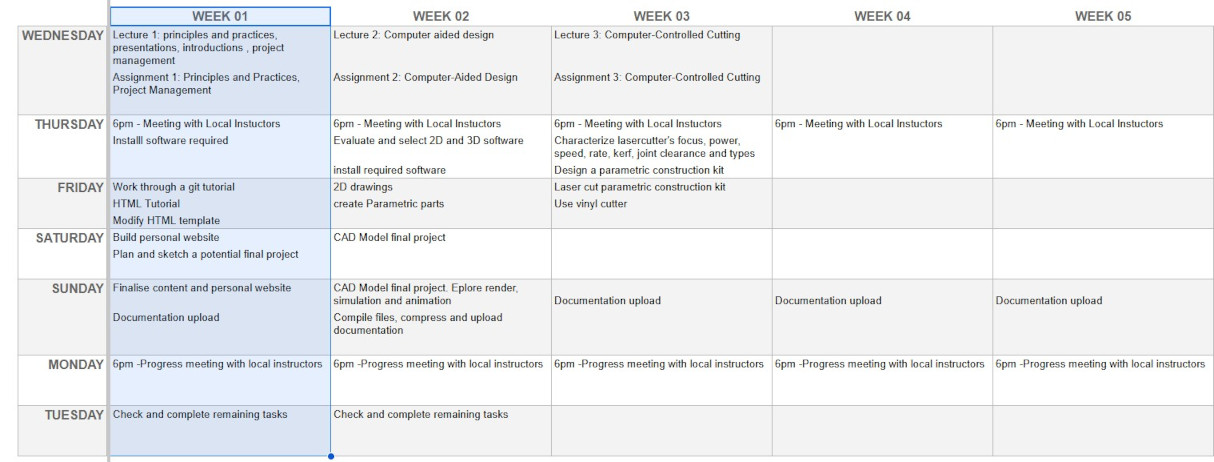
WEEKLY PLAN
- Plan and sketch a potential final project
- Read, sign the student agreement and commit it to repository
- Work through a git tutorial
- Build a personal website in the class archive describing yourself and your final project
- Upload documentation to the class archive
PERSONAL SITE DEVELOPMENT
First spiral: modifying template using GITlab
As we have been provided with a website template, and with the idea of applying the Spiral Development approach of making something you can test and then add features, I am going to access my GITlab and attempt to change something using the editor to check the website updates accordingly.
First, I open index.html and select “Edit”. In the editor window I introduce my name, add a Commit message and hit “Commit changes”
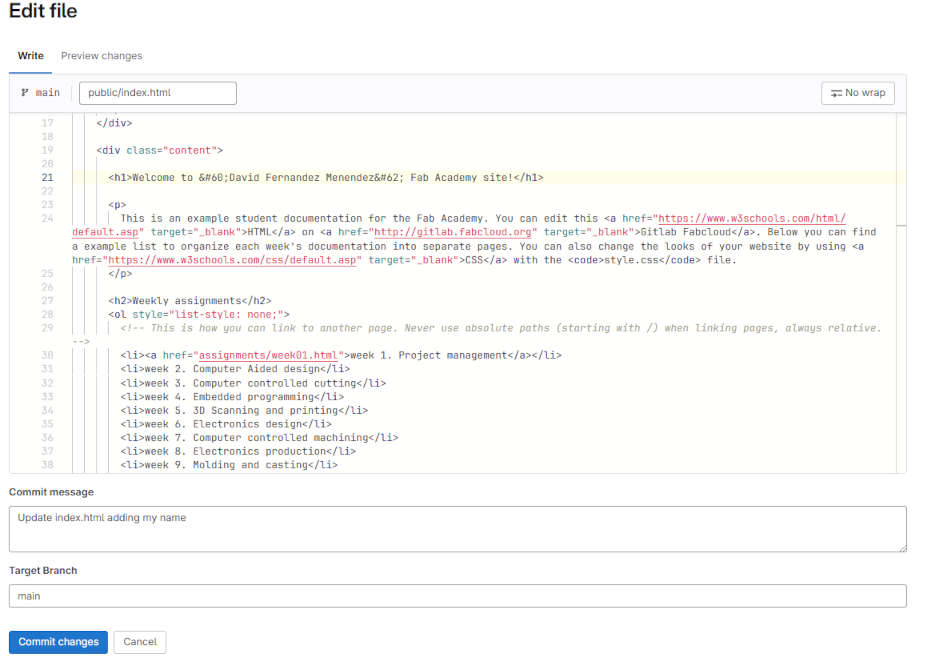
After a minute or so the webpage is updated. I realise the angle brackets are still there so I go back and remove them. I “Commit“ the changes again and it works! I pat myself on the back.
Second spiral: clone repository and work locally
Using the method explained could be an option to document my Fab Academy work, however we are strongly encouraged to work locally.
This means I need a tutorial.
Therefore, I follow the Git Simple Cheat Sheet and I install Git Bash.
Next, I follow the tutorial to generate the SHH key and I add it to my GitLab.
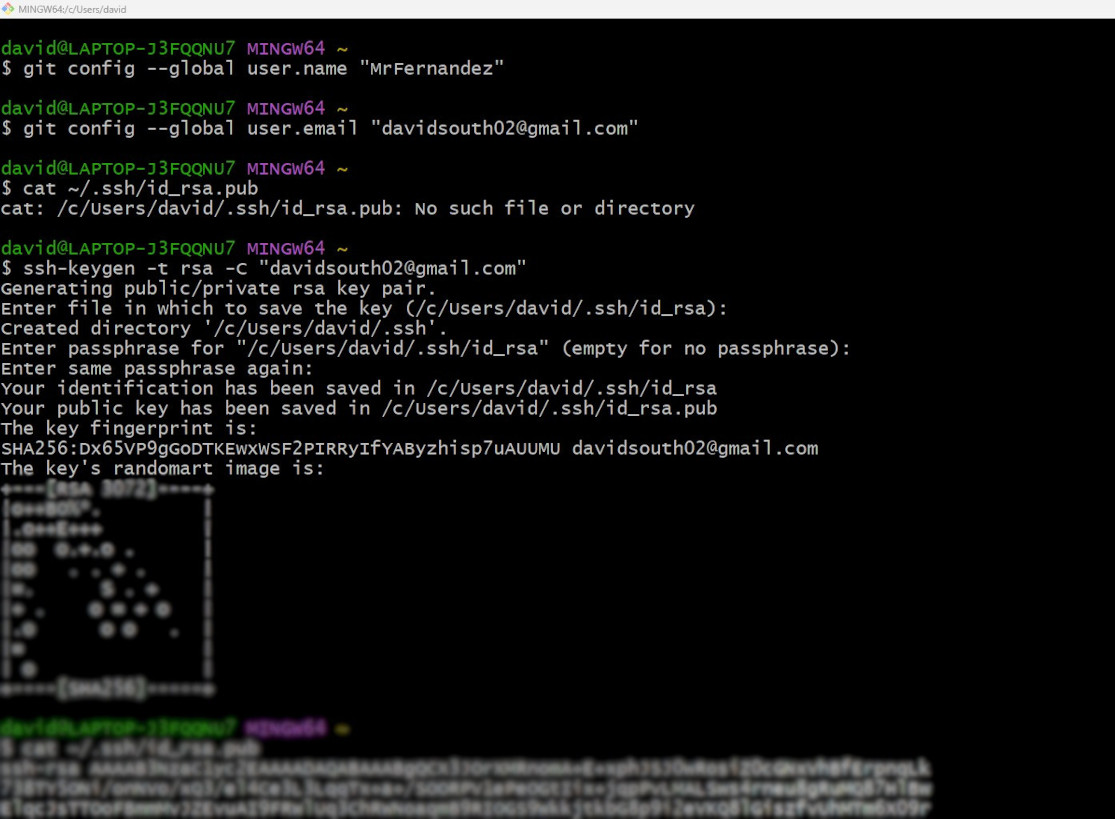
I create a folder and I use the following command to clone my repository.
git clone git@gitlab.fabcloud.org:academany/fabacademy/2025/labs/leon/students/david-fernandez.gitNow I have a clone of my repository on my local drive.
Third spiral: modifying template (and learning some HTML)
Now I need a code editor so I install both VS Code and Brackets. I see that the team behind Brackets is introducing a new code editor, Phoneix Code, so decide to try it.
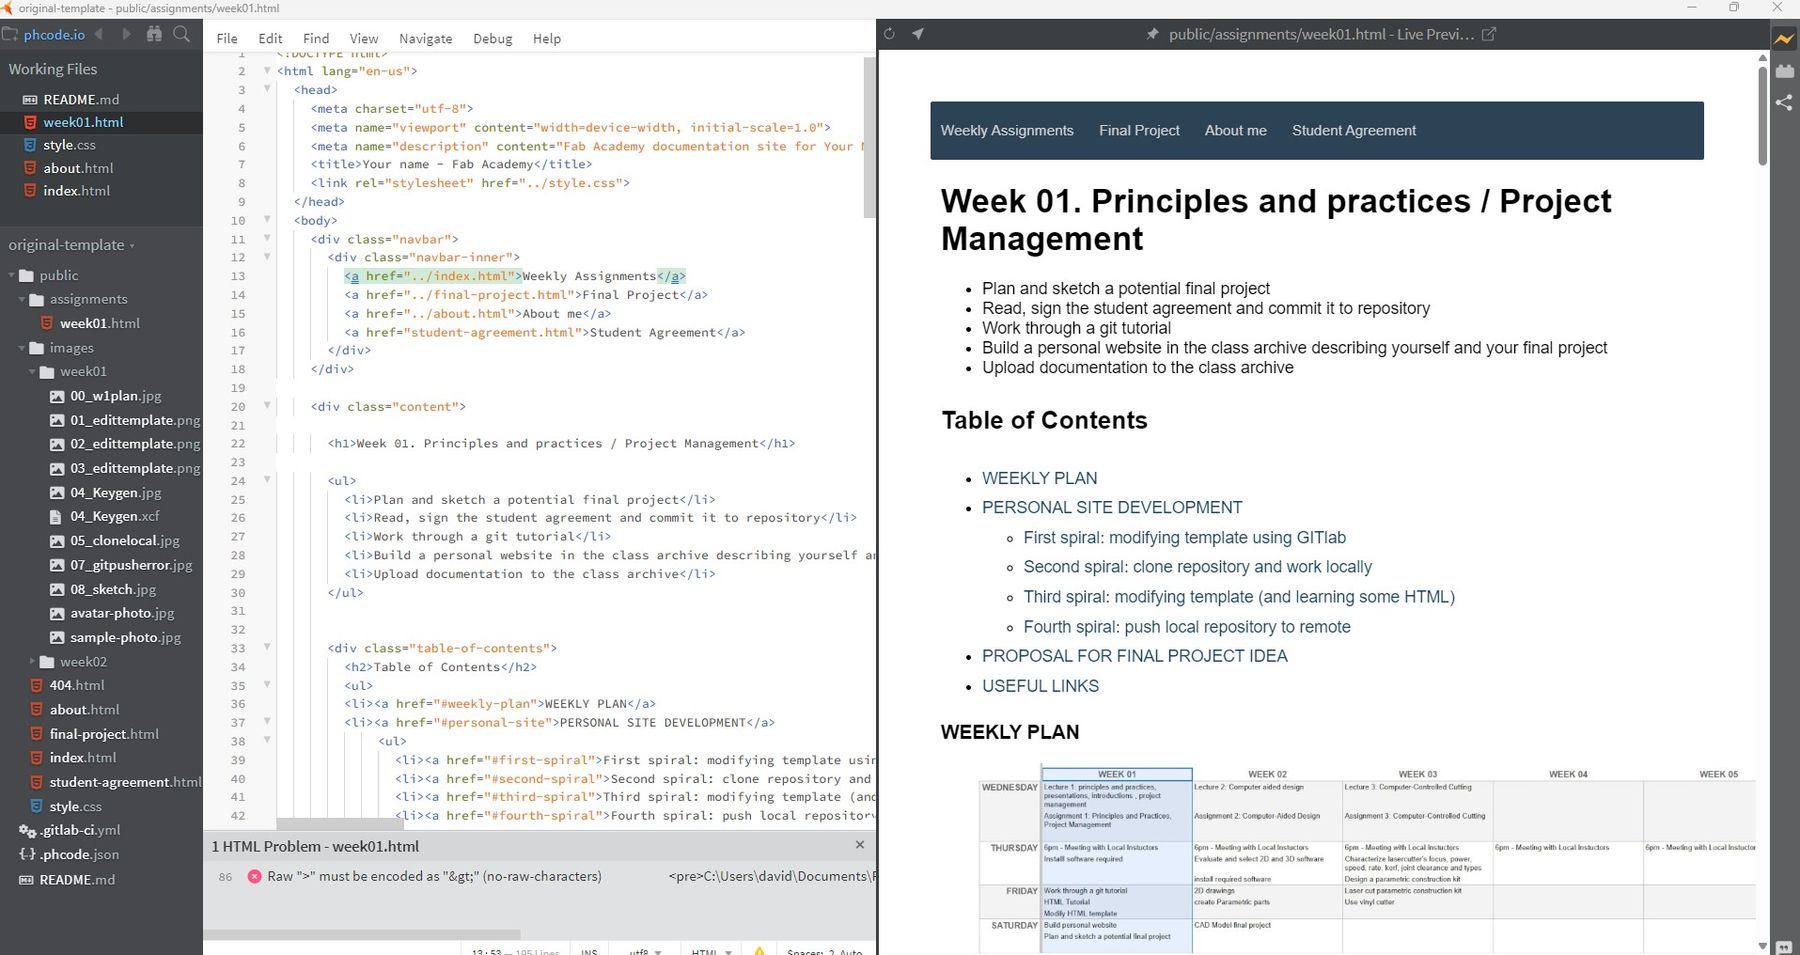
An advantage of these type of editors is that they show a live preview of the web-page. For example you can select an element on the preview and the relevant code is highlighted. I find this very useful as I am not familiar with HTML code.
I find this tutorial from Fab Academy HTML Basics very useful as it shows me the basics of HTML, from formatting text, adding images and document structure and adding hyperlinks between HTML documents.
I start to modify the template and learn the basics of HTML. Since I need to use this webpage for documentation throughout the course, I want to develop a clear structure for the pages and manage the content effectively.
I began by experimenting with various styles in the CSS document, which outlines how HTML elements such as text, navigation menus, images, and margins are displayed.
I have organized the structure for each week's documentation based on Rico's recommendations during his presentation at the Student Boot Camp. A typical page will include the following sections:
- Assignment title
- Table of contents
- List of tasks to complete
- Weekly plan
- Work process detail
- Useful links
- Digital files
- Learning outcomes
Fourth spiral: push local repository to remote
I made several changes to the template and documented the work I have completed so far. Now, it’s time to use Git Bash to commit these changes and push them to the remote repository.
Below is the workflow of commands I will use to complete these steps:
- git status: to check status of your local/remote repository
- git pull: to download the latest version of the remote repository to your local
- git add . : Add new files/changes
- git commit -m "COMMIT MESSAGE" : adds a description of the update to keep track of changes
- git push: Uploading repository
Everything goes well until the push step. I get the following error
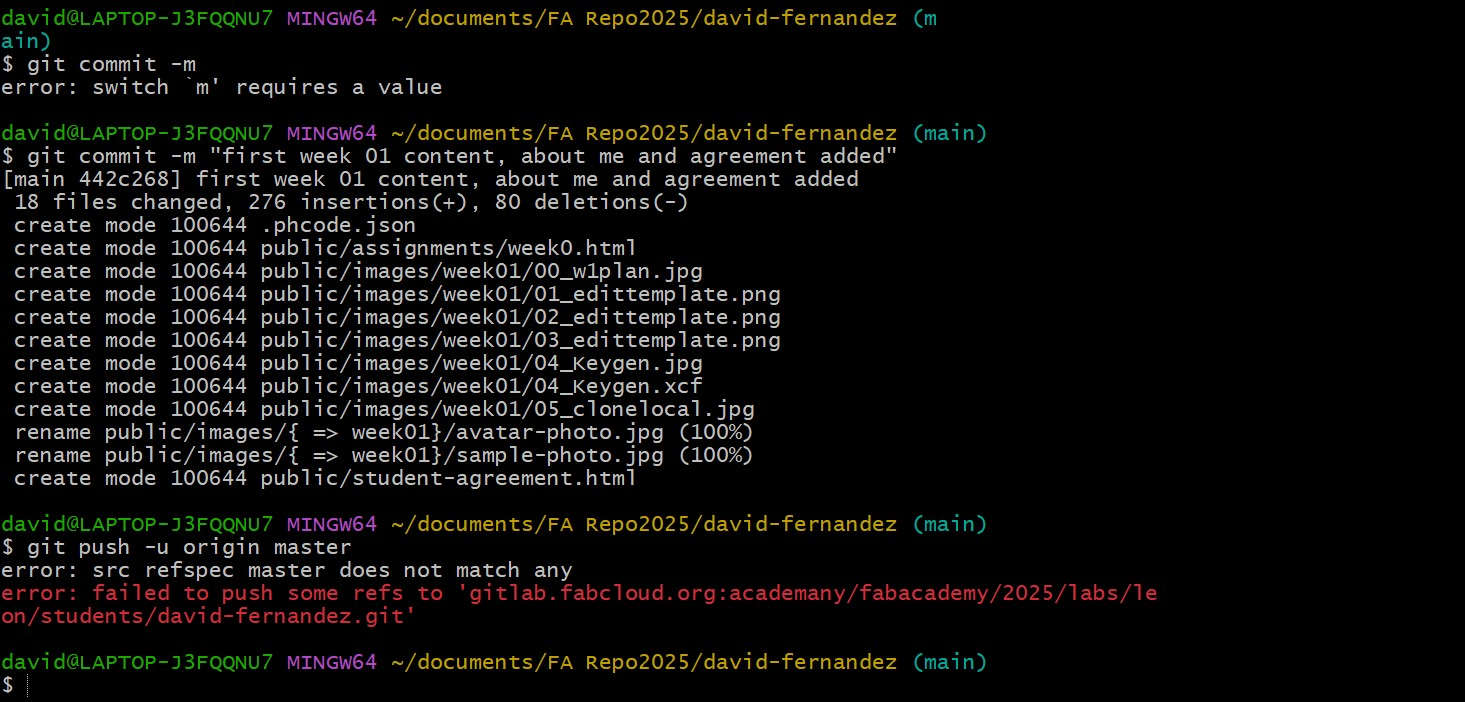
I return to the original template and decide to proceed with fewer changes. I repeat the command workflow, and it seems to work.
I also realized I didn't use the correct command line to push:
git push -u origin mainAfter adding all the changes, I push them again. However, I notice that none of the images are visible in the website previews.
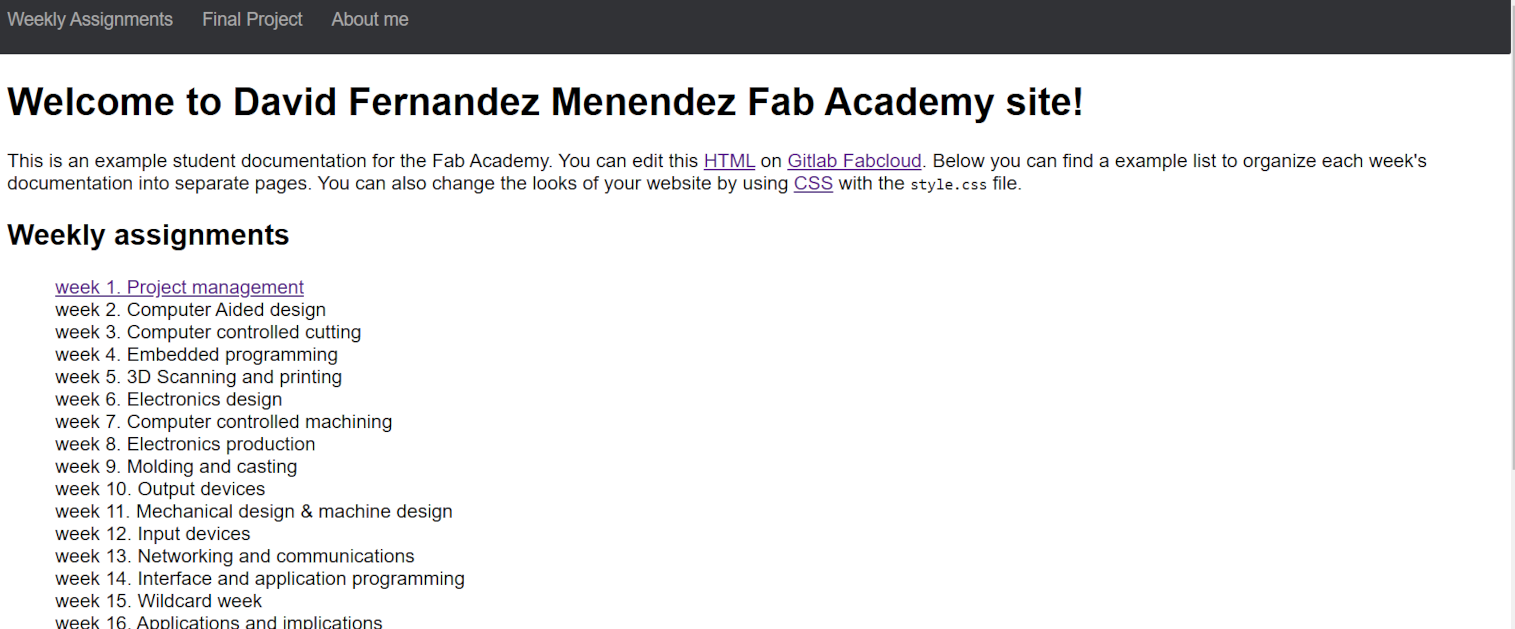
I verify that the images are in the correct folder within the GitLab repository and check the source paths of the images. After a while, I refresh the website, and the images appear; it seems that they just needed some extra time to update.
Here there is a screenshot of how the page looks after the changes in the code editor.
Fifth spiral: adapting new HTML template for website
While I like the original template due to its simple design and manageable amount of code, I have decided to explore other HTML templates for my website.
I find the templates from HTML UP to be the most appealing and suitable for presenting and navigating the course documentation. I download both the "Editorial" and "Phantom" templates. I really like the style of the Editorial template, but I prefer the tile system in the Phantom template, so I start experimenting with the code.
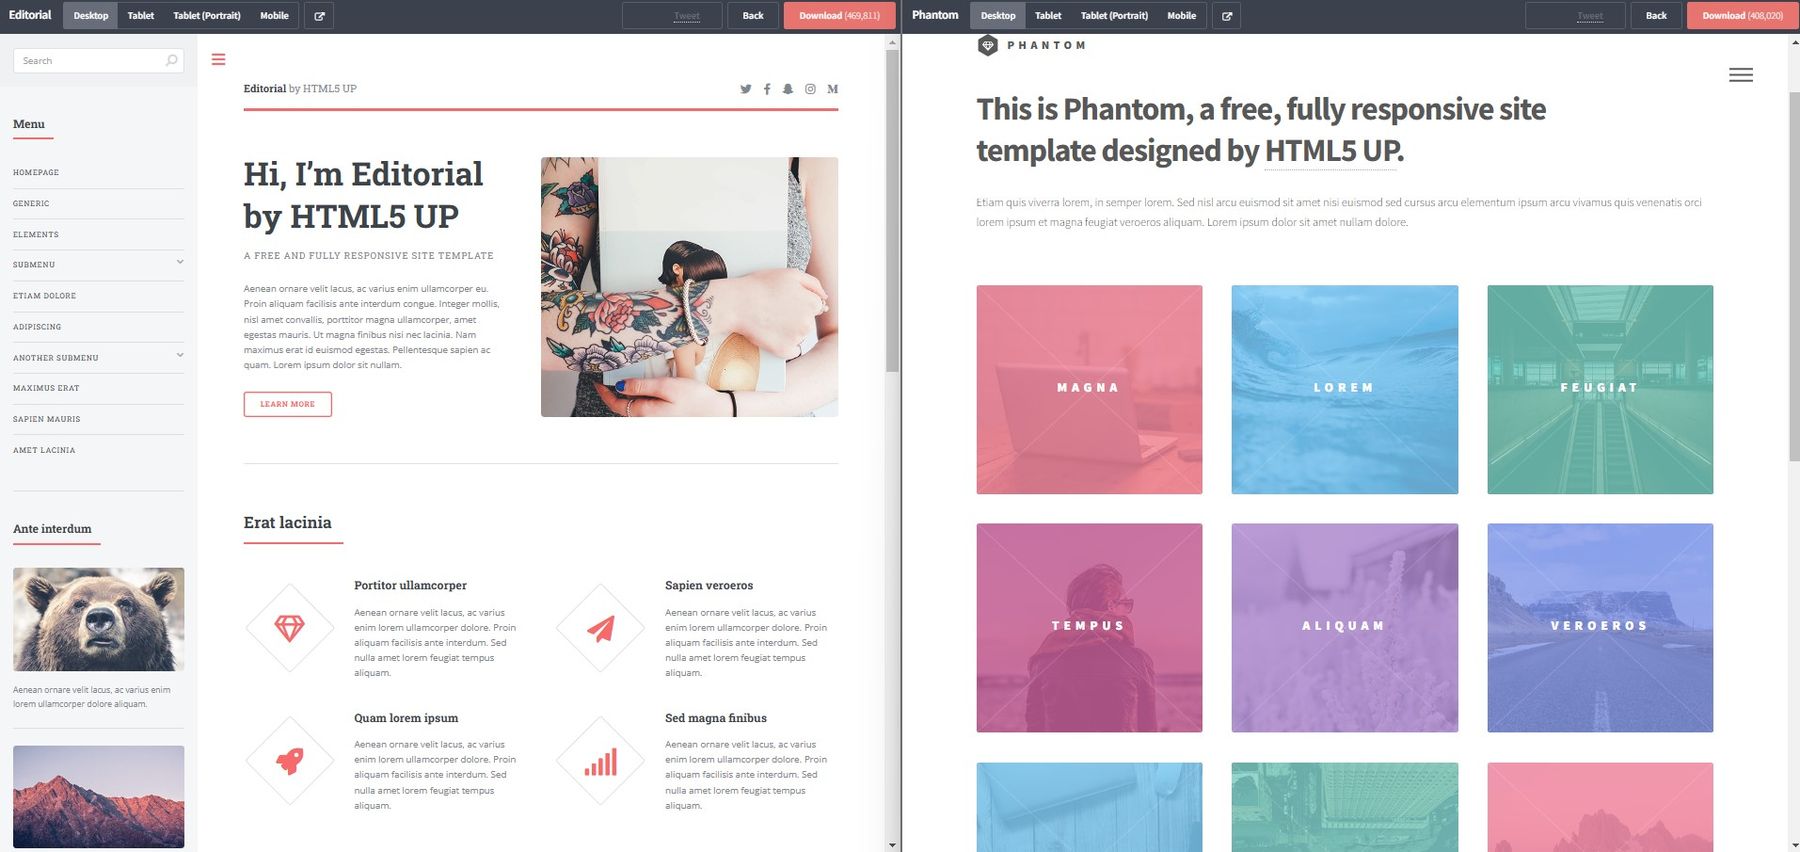
I removed several elements from the Editorial template to simplify it and added new elements such as the tiles from Phantom. I also followed a YouTube tutorial to incorporate a table of contents, making navigation within the page easier.
Once I had a functioning version of the new HTML for the website, I decided to push it to the remote repository.
After some research and a few failed attempts, I was unsure how to proceed. I tried pushing the new HTML repository from a different folder, but it didn’t work.
I reached out to my local instructors, and they pointed me in the right direction. I started by cloning my repository again. Then, I pasted all the files of the new template into the “Public” folder.
Finally, I executed the workflow command to push the new content to GitLab.
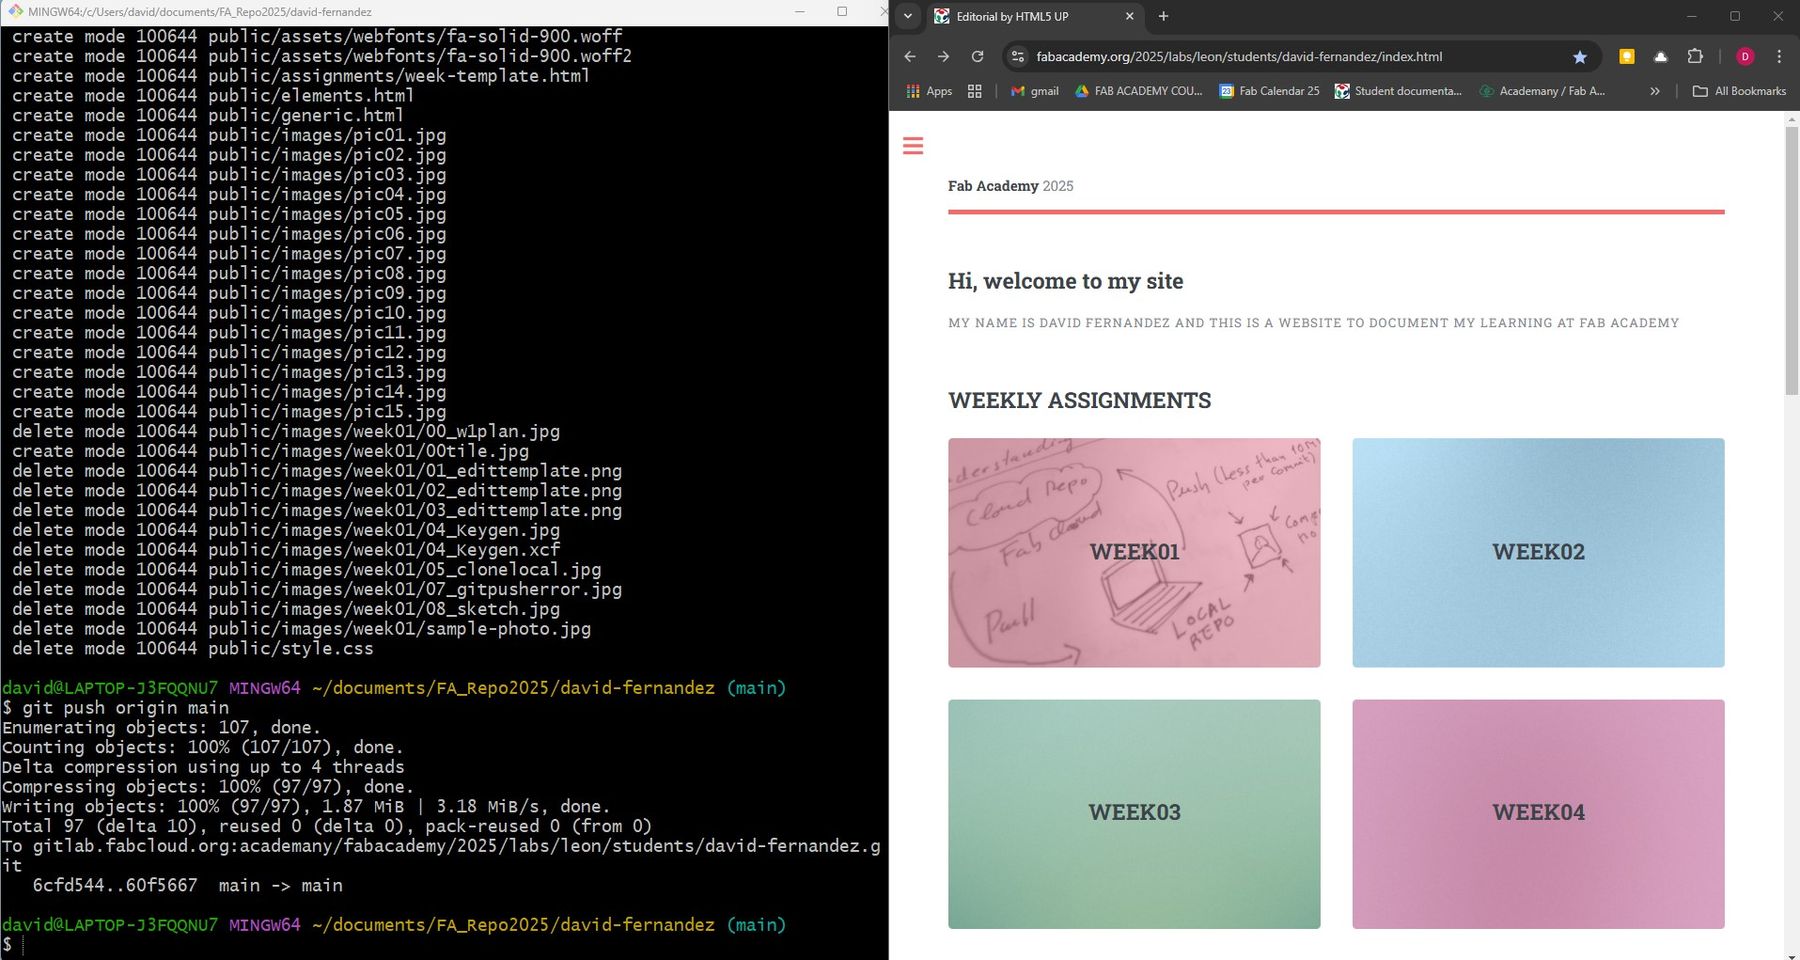
It’s working! Now that I am happy with the new template, I can fill the page with the content for week 1's assignment.
File Size and Image Compression
We have been reminded of the importance of resizing images to around 200KB. In terms of file sizes, it is important to remember that a Git push to the remote repository must be fewer than 10MB and that the total maximum storage available for each student in the repository is 100MB.
I am going to use .PNG when using images with transparent background and to .JPEG for the rest. For most images I am using a width of 800px, and I increase it up to 1280px when there are lots of details in the image. For the image optimization I am using GIMP with a plugin to perform batch resizing. During the Saturday session, Rico recommended using another batch converter; XnConvert which I also find useful.
PROPOSAL FOR FINAL PROJECT IDEA

As a proposal for my final project, I have sketched a compact dual-axis solar panel tracker. Solar panels come in many sizes and configurations. For this project, I would like to explore technologies that maximise the performance of solar panels, in this particular case by designing and fabricating a device that tracks the movement of the Sun.
By aligning with the Sun's position in the sky, the solar beams can hit the solar panel perpendicularly, thus maximising the amount of energy intercepted.
To track the Sun's daily motion from East to West and its seasonal North-South movement, the tracker will require 2 degrees of freedom, utilising actuators or gears that enable movement around the azimuth and altitude axes.
The tracker will require light sensors to detect the Sun´s position, allowing the microcontroller to send signals to the tracking mechanism to adjust it accordingly.
These adjustments can take place at intervals of 20 to 30 minutes, ensuring that both the controller and motors consume minimal energy.
When the Sun sets, the tracker should automatically move to a resting position, and in the morning, when the Sun rises, it should “wake up” and return to its initial position.
I also find it interesting to allow the possibility of receiving data on a smartphone regarding the tracker’s performance and controlling its movements from the device, such as moving it to its resting or initial position.
I believe this device is useful for charging batteries or small devices when there is no access to a main electricity source. Here are some situations where this device could be particularly handy:
- camping
- outdoor events or fair
- Living in or travelling through remote areas
- during power outages
- in disaster zones
Keeping cost and material constraints in mind, the solar tracker should be compact, approximately the size of a PC monitor.
I anticipate that this project will require further research on the types of sensors and actuators to be used. Additionally, I will need to create a detailed CAD model, design and integrate the controller, sensors, and actuators, and determine the most suitable materials and digital fabrication technologies for each component.
USEFUL LINKS AND RESOURCES
- Git Simple Cheat Sheet
- HTML Basics Tutorial
- Phoenix Code Code editor
- HTML Cheat Sheet
- W3 HTML Schools (open in new window) HTML tutorial
- How To Design Table Of Contents For Your Website Using HTML, CSS & JS (Part 1) Video tutorial
- HTML UP HTML templates
- XnConvert Batch image converter
- GIMP batch image resize
- Adrián Torres website
- Andrea Rubio website
REFLECTION
As this was the first assignment of the course and I was tackling a topic I wasn’t familiar with, I felt a bit anxious about the week ahead.
I decided to adopt the spiral development approach discussed in the first lecture and during the Student Bootcamp. This method helped me progressively complete the assignment, building on each "spiral" as I moved forward. There were certainly some setbacks along the way, but I understand that these are part of the learning process.
Having access to plenty of resources, tutorials, and examples from previous students’ repositories was extremely helpful in completing the assignment. Additionally, the support from local and international instructors was invaluable during this initial stage.
While I can’t claim to be a master programmer in HTML I can say that I now have a better understanding of version control. I have developed a structure and workflow to document the rest of the Fab Academy course, and I can use website development tools to modify existing templates.
Week 1 done and dusted! Bring on week 2!
Top