
Week 17: Applications & Implications
Assignment
- Plan a final project masterpiece that integrates the range of units covered, answering:
- What will it do?
- Who's done what beforehand?
- What sources will you use?
- What will you design?
- What materials and components will be used?
- Where will they come from?
- How much will they cost?
- What parts and systems will be made?
- What processes will be used?
- What questions need to be answered?
- How will it be evaluated?
- Your project should incorporate:
- 2D and 3D design
- Additive and subtractive fabrication processes
- Electronics design and production
- Embedded microcontroller design, interfacing, and programming
- System integration and packaging
- Where possible, you should make rather than buy the parts of your project
- Projects can be separate or joint, but need to show individual mastery of the skills, and be independently operable
Introduction to Week 17
Week 17 is the first week since the beginning week where we get to focus on showing a 'Masterpiece'. In the middle ages, this term referred to a piece produced by an apprentice aspiring to become a master craftsman in the old European guild system. The craftman's fitness to qualify for guild membership was judged in part by his Masterpiece. Great care was therefore taken to produce a fine piece in whatever the craft was, whether confectionary, painting, goldsmithing, knifemaking, leatherworking, and many more.
For us at Fabacademy, this means showing the techniques that we have mastered over the span of our time at Fab Academy.
Core Skills
This includes how to envision, design, prototype, and produce digital and physical systems using modern fabrication tools and methods. Fab Academy is structured around project-based learning and iterative problem-solving. Core skills include:
- Computer-Aided Design (CAD) where we learn 2D and 3D design software (like Inskcape, Fusion 360, Rhino). This is for modelling parts, structures, and systems with precision.
- Computer-Aided Manufacturing (CAM): Once a design is created, it must be translated into instructions for machines. We learn to generate toolpaths and configure machine settings for various digital fabrication tools. We learn to operate machines like laser cutters, vinyl cutters, CNC routers, and 3D printers, Resin printers, and PCB Mills – and to calibrate, and fix problems when things don't go to plan.
- Electronics: We learn how to design, fabricate, and program our own microcontroller-based systems from scratch as well as assemble the systems.
This includes circuit design using tools like KiCad, Eagle, Altium. We learn design rules and how to create schematics, lay traces in the PCB design, separate the layers to prepare for slicing before we finally mill. Then we are taught how to prepare the copper, PCB mill, and machine settings for the milling and how to trouble shoot if there are errors during or post milling. We also learn how to test the board using a multimeter and then again after soldering.
Programming and Integration
We learn programming related modules where we learn to program microcontrollers (often ATtiny or ESP32-based) using C, Python, or Arduino frameworks, to write firmware that interfaces with sensors, motors, and displays.
The emphasis is to bring together all these skill sets and create a complete system. This means integrating:
- Mechanics (Designing moving parts, understanding load, friction, and structural integrity)
- Electronics (Embedding logic, sensors, and actuators into physical systems)
- Software (Writing programs to control behavior, visualize data, or communicate between devices)
- Interfaces (Building graphical or tactile interfaces for human interaction (like buttons, screens, or web-based UIs)
In addition there is a very strict documentation process which must be done daily and weekly. The purpose is displaying ability to communicate technically and explain designs, code, failures, and iterations in a way that others can learn from.
In the course of doing this documentation one demonstrates ability to version control using GIT and web development basics such as building and managing a personal documentation website using HTML, CSS and sometimes Javascript.
We are also reminded constantly about keeping an eye on the management of the project and time management. The process is designed to be intense, and getting ones arms around all these aspects enables us to complete our Masterpiece.
Final Project - Luminous
I am creating a Final Project Page where I present my final project to show that I have "mastered" the aforementioned techniques. It is possible to see all the aspects from ideation to assembly and includes all the files.
The Idea – 'Luminous' - What will it do?
Luminous is a minimalist smart lamp that blends Mondrian-inspired simplicity with precise architectural form and smart, motion-responsive control, and dimming control.
Over time, I've come to value simplicity. I find that too many objects—especially lights and devices—ask too much from us. Too many buttons, too many steps.
With Luminous, I wanted to create something that doesn't demand to be used but simply responds. It illuminates when you enter, dims easily with a discrete key — without noise, buttons, or visual clutter. My hope is that it feels less like operating a device, and more like being accompanied by one. By bringing function to the background, it allows its form to speak: a quiet architectural object in the room, not a piece of technology — just light, when you need it.
At the same time, Luminous is designed to act as an objet d'art—something beautiful to live with and admire, a subtle presence that enriches the space beyond mere function.
The Design – Who's done what beforehand?
I explored the Fab Academy database for lamp projects. A few surfaced — imaginative and technical — but I didn't find anything that combined artistic form with function through a PIR sensor. The emphasis felt quite different from mine.
- Marjo Leinonen created a light with capacitive touch buttons on plywood for dimming
- Tin Valetic created a smart lamp including sensors for temperature, humidity, and methane gas. It will have an LCD to track these metrics and an LED ring to light up the space.
- Elena Cardiel created a very cool project – a lamp able to recognize the ambient light level and presence of the user to personalize the light of small-medium spaces, illuminating just the part of the room/table that is being used.
As far as I can tell nobody blended art with function in a lamp format.
What will you design?
I have designed Luminous. It is an elegant lamp which responds to motion. Architecturally it carries a sculptural weight. Clean, deliberate lines give it structure.
A part of me was blown away by Piet Mondrian's journey — how he moved from natural forms toward pure abstraction, reducing shapes to verticals, horizontals, (and primary colours). Luminous embraces this reductionist simplicity not as absence, but as purity. Like Mondrian's creations, it strips away distraction to achieve harmony.
There is a calm geometry to its verticals and diagonals which hold each other in place. It doesn't imitate anything. Its simple form suggests a figure, and the logic of its lines invites attention but doesn't demand it.
I like to think that its beauty comes from how honestly it fulfils its role — and that is judged by its materials, its clarity, and its quiet intelligence. It's not decorative for decoration's sake, but meaningful in every line and surface.
From an engineering standpoint, a passive infrared sensor detects movement and brings the light to life — no switches, no interruptions, just awareness. Brightness is adjusted with something tactile, a key. It runs on an ESP32 microcontroller, and in the future other functionality such as Wi-Fi, temperature display, scheduling.
Materials and Components
The lamp is made from several materials. The legs and arms are made from Iroko African Teak which is CNC milled. Filleted 3D printed wire covers, made from high quality muted white PLA fit into the wood seamlessly. The neck, waist connectors and base are also made from the same 3D printed PLA as is the wire cover on the neck. The Fusion designed key covering the potentiometer for the dimming functionality is made from a custom mixed white and transparent Resin. Finally, there is a thick beautiful wire cover made of a synthetic golden colour and looks refined.
The components used internally are my development board with an ESP32, with slots for PIR sensor with voltage dividers. There are also capacitors around the voltage reducer and close to the MCU. I also included a Mosfet for switching, a transformer for turning AC 100-240v into DC 24V and 1.25A. Then a step down (buck) converter to ring one wire from 24V down to 5v in the circuit to power the logic and the other one remaining at 24v to power the 24 LED.
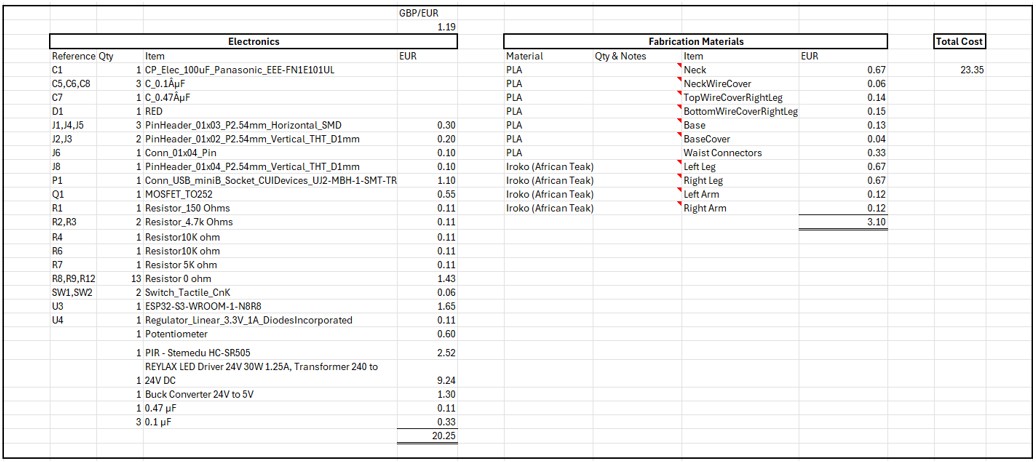
Sourcing and Costs
The Iroko wood was bought from a factory called Maymi Germans in Riera D'Argentona, 7 in Cabrera de Mar on the permitter of Barcelona. The mixed transparent and white Resin was courtesy of my classmate Simsi and one of my instructors, Adai.
The 3D printing material - PLA muted white PLA series by polymaker was ordered from Amazon. I bought the LED driver, an On/Off switch, a PIR sensor from Amazon. The gold Wire was sourced from a light shop on Carrer Mutaner.
All electronics were otherwise made by me in the Fab Academy Proto Lab including ESP32, voltage reducer, Mosfet, connectors, buck converter, capacitors, resistors, wires, potentiometer.
Parts and Systems
The physical pieces of the lamp from diffuser base will be modelled by me in Fusion 360, then milled, and 3D or Resin printed. From the electronics side I used an ESP32 S3 W1 which is a very capable processor but I had to build the whole development board around it. So I am using off the shelf items available in either the lab, from digikey, amazon or from a supplier.
Processes Used
For the wood fabrication I have decided to use Fusion 360 for the part design and then Rhino and Rhino cam for the slicing and toolpath generation. The machine I will use is a Raptor X SL 3200. For the 3D printing, the modelling is in Fusion 360 as well and most of my parts are sliced in Bambu and printed on an X1 Carbon printer. Some of them (as few as possible will be printed on the A1. For a key component I am using a Resin printer, the Elegoo Saturn 4 Ultra, and for the Ultraviolet curing I am using the Projet.
Moving on to the electronics production, I used a PCB mill that we have in our lab called the Roland SRM-20. After that we use the RS Pro solder with soldering iron and heat shrink as well as tin/lead wire, flux, tweezers and air filtration devices.
Questions and Challenges
At first, each part felt like its own world — modelling in Fusion, drawing traces in KiCad, learning how to solder without lifting the pads off the board. We made mistakes, of course. But with every error, the pieces became clearer — not just what to do, but why things worked the way they did.
Flashing firmware through Arduino, understanding regulators and ground planes — slowly, it started to feel less like magic and more like logic. And yet, one thing kept feeling distant: how it all comes together. Especially the transition from wall power to a working system. AC to DC, high voltage to low — still occupying my mind.
For my lamp, I now understand that I'll need two power supplies: 5V for the microcontroller, 24V for the LEDs. I haven't wired it up yet, but I can see the path. I'll know it's working when I can connect the transformer, split the current safely through a buck converter, load the code, and everything lights up — without frying the board.
I chose Iroko wood because it felt right — warm, rich, and full of presence. Paired with a muted white PLA, the combination had the quiet strength I wanted. But where the PLA behaved — precise, reliable, obedient to the millimetre — the wood reminded me it has its own logic.
The joins were meant to be seamless: 5mm sockets, 5mm inserts. PLA hits 4.9 to 4.95mm, snug but workable. But Iroko… some cuts are too tight, others too loose. Even though I measured, even though I was careful, the wood shifts. It resists standardisation.
So I've gone back to print more parts, trying to mediate between these two very different materials — one engineered, the other alive. I know it will come together. I'm not worried about the final result. But the perfectionist in me is impatient. There's a part of me that just wants it to click into place already.
And yet, maybe this mismatch is the point — learning to negotiate between control and character. Between exactness and expression.
What I've realised — and what's often left out in early designs — is just how demanding the manufacturing process really is. It's one thing to imagine a form; it's another to make it real, to adapt when the materials push back. That part — the unglamorous, stubborn bit — needs to be considered from the start. Because it changes everything.
Evaluation
At the simplest level, it will be a success if it works — if the light comes on, if the sensor listens, if the pieces hold together. But really, I'll know it's right if my mother, for whom this lamp is a gift, can sit with it, enjoy its company, and feel something warm in return.
Of course, the perfectionist in me wants more — that the joins align just so, that people notice the care in the form, the materials, the quietness of it. I had ambitions of moulds and boxes and extra features I didn't have time to realise. That's okay. What matters is that it stands on its own.
When I began this course, I came from real estate and finance — I had never built anything with my hands. But I always dreamed of making. Of shaping something, not just managing it.
So this lamp is more than a project. It's the beginning of a new story. A move from admiring to doing. If it lights up, if it stands proud, if it carries a little of my intent — then it's already a success. The rest is just refinement.