
Week 01: Project Principles and Practices
Assignment
Plan and sketch a potential final project, see final project section. Sign the student agreement, document my start to Git...how to create SSH Keys, setup the Git Repositry locally and remotely, stage, commit and push files as well as how I went about creating this website
How I built a website
For my Week 01 coursework, I'm documenting my first-ever attempt at building a website. Coding had always felt unapproachable—books and articles just couldn't hold my interest.
Then came LLMs, and everything clicked. Now, I can ask questions, get tailored explanations, and see as many examples as I need. It fits my learning style perfectly. Before, a single gap in understanding could throw me off; now, learning feels intuitive and, without exaggeration, enjoyable.
I should also say that I do still feel very overwhelmed by everything but I am willing to give it not just a go, but many goes and somehow figure it out.
There are plenty of ways to build a website. Some dive straight into raw code, like I'm doing, while others go for drag-and-drop builders like Wix, Squarespace, or WordPress. Those platforms are great for convenience, but for me, they felt like a black box—I wanted to understand what I'm building rather than rely on someone else's templates. Call it stubbornness, but I'd rather craft something from the ground up than just fill in the blanks.
So, to build a website I started looking into HTML and came across W3Schools via the Fabacademy before joining.
I started to understand that to create a basic HTML website, one needs to learn fundamental code buckets:
There is a certain structure to it and key elements /code to learn are how to use
- <html>, <head>, <body>
- Headings: <h1> to <h6>
- Paragraphs: <p>
- Links: <a href="URL">
- Images: <img src="image.jpg">
- Lists: <ul>, <ol>, <li>
- Tables: <table>, <tr>, <td>
Given, information on how to start, it is astonishingly easy to make a mistake. The slightest missed comma, chevron or other wrongly placed syntax just throws everything off. However, I began to understand quickly that in principle HTML coding can be though of as putting together buckets, snippets or containers or code to achieve ones goals.
So, to take an example: HTML provides built-in tags to format content directly. These tags change the appearance of the text without requiring additional styling. You can use the <b> or <strong> tag to make text bold in your html document.

At this point I learnt that there was a more efficient way of dealing with the style elements inside HTML and this was by using CSS (Cascading Style Sheets) and would be achieved in a separate document called styles.css. It is a different file but it is held in the same folder and is read by your main home folder index.html. The purpose is to control the appearance of elements.
Example (Making Text Bold Using CSS)
CSS Bold Example
This is bold text using CSS.
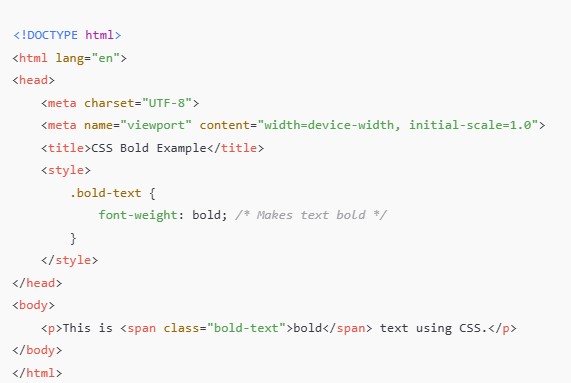

To explain this. The first bit of code is how the HTML now looks. Instead of directly hardcoding in the format into HTML a container called Class is created and then this Class container is referred to in the style file (CSS) with the format setting.
This is a very basic example of how it is done. The reason is to be more efficient. If one wants to change many things it can be done once in CSS rather than having to change each line individually.
In CSS one can modify colors, layouts, and positioning.
Key Concepts
- Selectors: p { color: red; }
- Classes & IDs: .class {}, #id {}
- Box Model: margin, padding, border
- Flexbox (for layouts): display: flex;
- Grid (for layouts): display: grid;
- Media Queries (responsive design): @media (max-width: 600px) {}
(There is another type of file I didn't mention called Javascript files, and those allow for more dynamic effects - I have not started using JS yet).
Once the code is written, it's time to run the website and check if it works as expected. This is where various programs come into play — Brackets, Phoenix, VS Studio, and many more. These tools let you test and refine the code before pushing it to the Git repository once you're satisfied.
Now, here's a key aspect I haven't explicitly mentioned yet. While I generally understood the principles of how the code should be structured, actually writing it is time-consuming and full of potential pitfalls. Since much of the process involves assembling predefined code blocks to achieve different goals, I turned to ChatGPT for help. I described what I wanted the website to do and either asked for improvements to my code or for it to generate code from scratch.
These LLMs are powerful coding assistants, but they're far from perfect. They'll fix one thing and break another. I found myself bouncing between different LLMs—troubleshooting, refining, and even correcting their mistakes (the last one was totally wishful thinking). It's an interesting process, but definitely not a flawless one!
That said, this process has a hidden benefit: you actually learn a lot. As you see how the LLM solves similar or identical problems, you start to recognize patterns—how it formats elements like shadows, underlines, and other design touches. So, while it's not flawless, it's a fascinating way to pick up new skills along the way.
An example of this workflow as follows:
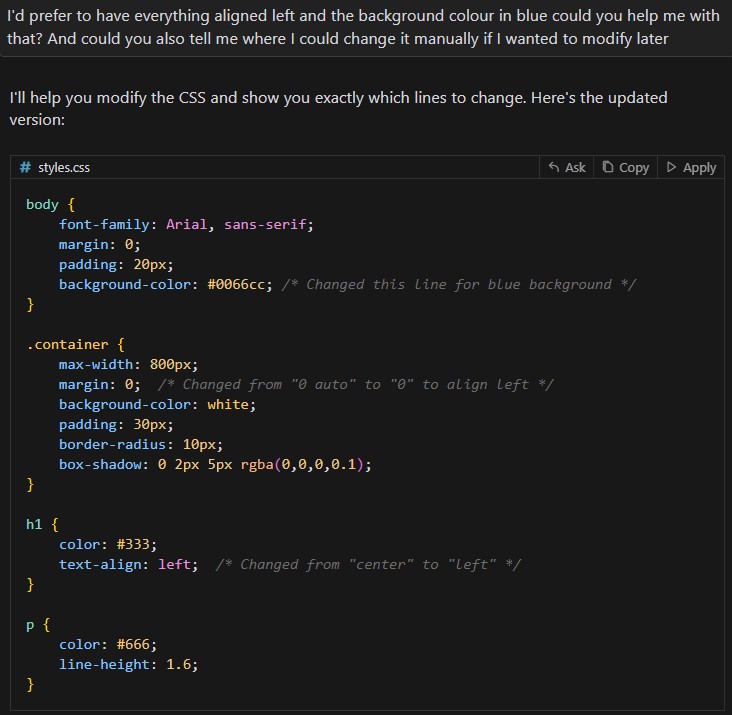
After providing the corrected code it then gives me the explanation I asked for:
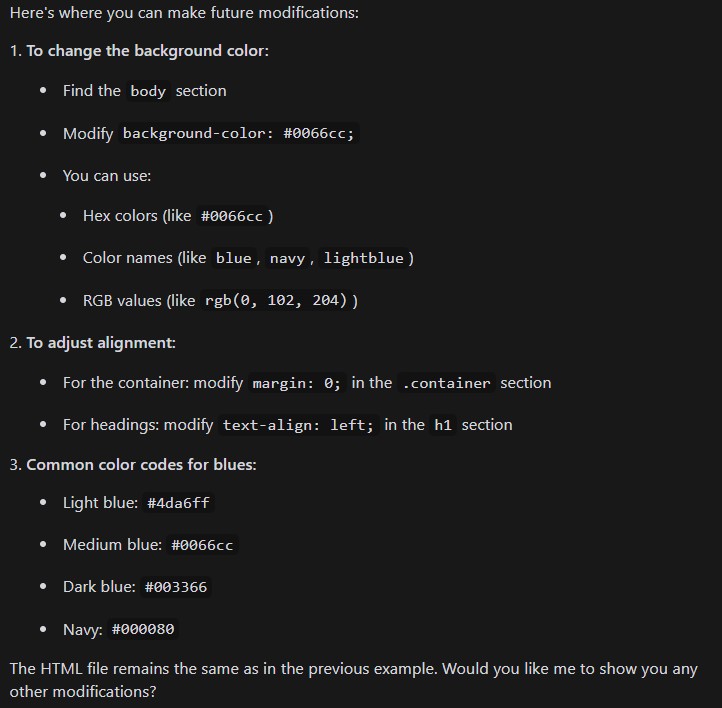
I've used ChatGPT, Bolt, Loveable.dev, Deepseek, and Cursor.ai to help me along the way.
Remember, the goal of this coursework as I've understood it, is to get the task done—not to recreate a Michelangelo masterpiece in your first week. Take a look at the Fab Academy websites; they're pretty simple. If you have the skills to create something spectacular, go for it! But my advice? Complete the task first, then refine and iterate when time allows.
My page started out super simple. When I have a spare moment, I tweak the formatting and polish the style. Each time I push a new week's work to the Git repository, I make small improvements. Who knows? By the end, I might just look like a superstar.
Git Notes
Git is a (DVCS) distributed version control system for tracking changes in source code during software development. It is designed for coordinating work among programmers, but it can be used to track changes in any set of files. Its goals include speed, data integrity, and support for distributed, non-linear workflows.
What is a distributed VCS? With a distributed VCS like Git, every contributor has a local copy or 'clone' of the main repository i.e. everyone maintains a local repository of their own which contains all the files and metadata present in the main repository.
Why Git?
- Free and Open Source
- Speed
- Scalable
- Reliable
- Distributed Development
Git Structure
As a reference, this is a basic structure of the local/remote structure using git.
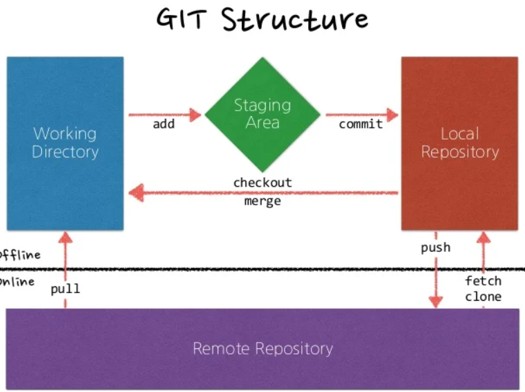
The diagram illustrates how Git manages files locally (on your computer) and remotely (on a server like GitHub). I have used Deepseek in order to help explain how the components interact:
Local Environment (Offline)
- Working Directory:
- This is your project folder where you edit files (e.g., index.html, styles.css).
- Changes here are untracked until you stage them.
- Staging Area:
- Use git add to move changes from the Working Directory to the Staging Area.
- This prepares files for a commit (like a "save point").
- Local Repository:
- Use git commit to permanently save staged changes here.
- This is your project's history stored on your machine.
Remote Repository (Online)
- Remote Repository:
- A cloud-hosted version of your project (e.g., GitHub, GitLab).
- Use git push to send local commits to the remote.
- Use git fetch or git pull to download updates from the remote.
Key Commands & Workflows
- commit:
- Saves changes from the Staging Area to the Local Repository.
- Example: git commit -m "Add login button".
- push:
- Uploads local commits to the Remote Repository.
- Example: git push origin main.
- fetch/pull:
- fetch: Downloads remote changes without merging them.
- pull: Combines fetch + merge to update your local branch.
- clone:
- Copies a Remote Repository to your machine for the first time.
- Example: git clone https://github.com/user/repo.git.
- checkout:
- Switches branches or restores files from the Local Repository to the Working Directory.
- merge:
- Combines changes from different branches (e.g., merging feature-branch into main).
Using Git
First we must announce username and email so that commits are attributed to us
After downloading Git Bash we open the terminal and add Git user name and set email as follows:
git config --global user.name "your_username"
git config --global user.email "your_email@mail.com"
Generate SSH Keys
So that your laptop communicates with your remote repository:
- Check if you have an SSH KEY already (If you see a long string starting with ssh-rsa, you can skip the ssh-keygen step):
cat ~/.ssh/id_rsa.pub - Generate your SSH key:
ssh-keygen -t rsa -C "your_email@mail.com" - Now let's see your keygen:
cat ~/.ssh/id_rsa.pub
Copy your key:
Windows:
clip < ~/.ssh/id_rsa.pub
macOS:
pbcopy < ~/.ssh/id_rsa.pub
Now for the purpose of explaining things I will assume you have web pages to commit. Go to Git bash and type pwd to see which directory I am in.

Now I want to move forward to a directory named Public which is where my website is.
so type: cd public (and if you want to go back to mark-shamash, you would type cd ..)

and as you can see its taken me to that folder.
There are many other useful commands, like ls will give you all the folders available in the current directory and ls -a will show you the hidden ones too.

As you can see it listed my folders in purple colour and then files in white. In this file there were no hidden files.
There are plenty of useful commands to learn as you go. Personally, I prefer interactive discussions (like using ChatGPT) over reading a book, because debate and dialogue sharpen your understanding by raising unexpected points and highlighting what you need to navigate a situation – after that, repetition will be the key.
I will mention a few other bits that I came across. So, let's say I want to open my index.html to edit/update part of my webpage. My editor is Notepad. In the bash you can type notepad index.html and it will open up the page ready for editing. If you find it doesn't work, you will need to check with pwd that you are in the right folder and then using cd public make sure you are there.
Now, after you have edited your file, you need to stage the file. Why. What is staging? Staging is a preparatory area for the file. If a file is not yet tracked by Git, then it will start tracking it and index its current state. If it is already tracked then it will update any changes before the next phases of committing and tracking.
So one can stage by using the git add command. If one wants to stage a particular file one can git add filename.html or if one wants to stage all files that were worked upon then one can use the command: git add . (please note the syntax is intentional).
Now we commit the file by typing git commit -m "write in here what changes you made including the quotation marks and this can be seen later in a log" This commit is also kept in your local files. When you are finally sure you want to push the file(s) you have made to the remote server (in our case the fablab cloud), then we simply use the git push origin -u main command and it is done. This command tells Git to push the file from the origin (your computer) upstream to the remote computer. Once that has been done once it should be fine to just use the command git push
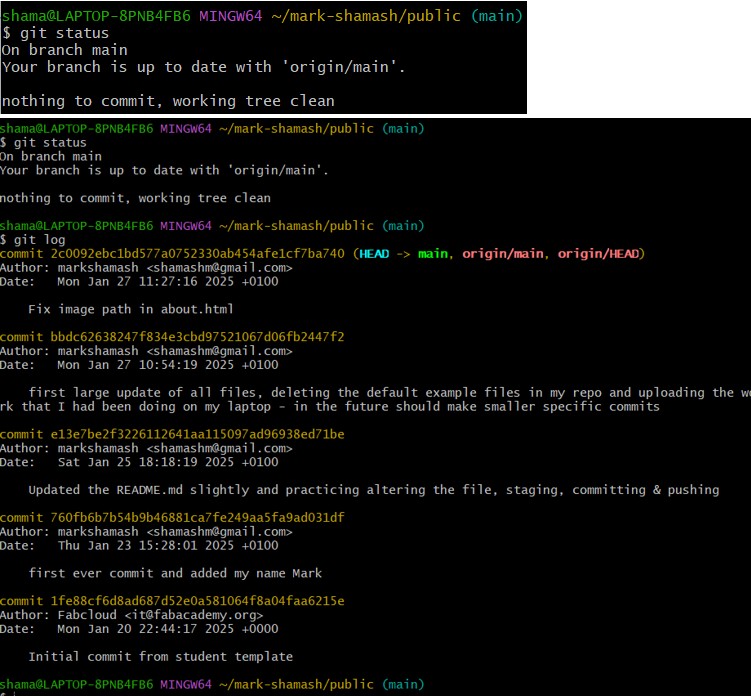
There are a few other commands that I have used such as git status (showing which files have changed, which changes are staged and which files aren't tracked yet. Also it will show whether you are up to date, ahead or behind the remote branch). Git log will show the commit history (Who committed, when, and with what message).
I will continue to update this documentation as the weeks progress and I use more commands. Enjoy the ride!