Week 14 - Group assignment
The goal of this assignment is to compare different tool options to create interfaces, in particular the tools we used for our individual assignments. We didn't have the chance to work together for the group assignment but we had a discussion about web interfaces. I cannot really compare what I used to what my comrade used because she didn't detailed it yet in her documentation and didn't share her results with me, but I understood that she wanted to work with python.
Here are some possibilities to interface a microcontroller to a graphical user interface:
- Processing (see individual assignment)
- Python - with a GUI package such as
tkinter - Arduino
Webserial.hlibrary which relies on a web server stored on an EPS32 board's flash memory - Serial Peripheral Interface Flash File System which allows to neatly store all interface's files (
htmlandcss) in the ESP32 flash memory - P5.js online editor and interface, using for exemple
P5.serialportlibrary andP5.serialcontrolapp (see more below) - Blynk library to use in Arduino or Platformio.org for IoT projects
For this assignment I'll briefly explore the workflow for interfacing sensor data with p5.js. I found this very interesting tutorial on the resource ITP Physical Computing. All code mentioned in this page comes from this resource.
Workflow for serial communication with Processing
As a reminder, for my individual assignment I used serial communication between a microcontroller and my computer to retrieve analog values of flex sensors in real time.
- The analog flex sensor is connected as an input on the microcontroller board
-
A simple (arduino) sketch is uploaded on the microcontroller, which will run forever as long as the board is powered:
- The resistance of the flex sensor is retrieved by the microcontroller with the
analogRead()function, then mapped to angles - The angle values are printed in the serial port thanks to the function
Serial.println()
- The resistance of the flex sensor is retrieved by the microcontroller with the
-
The microcontroller board is connected in USB to the computer, in order to ensure the serial communication.
- We run a processing sketch on the computer, which will retrieve all information from the serial port thanks to the instruction
readStringUntil(see details in individual assignment). - The sketch specifies how the retrieved values are used (visualization, mapped sounds, etc.)
How does it work in a web browser?
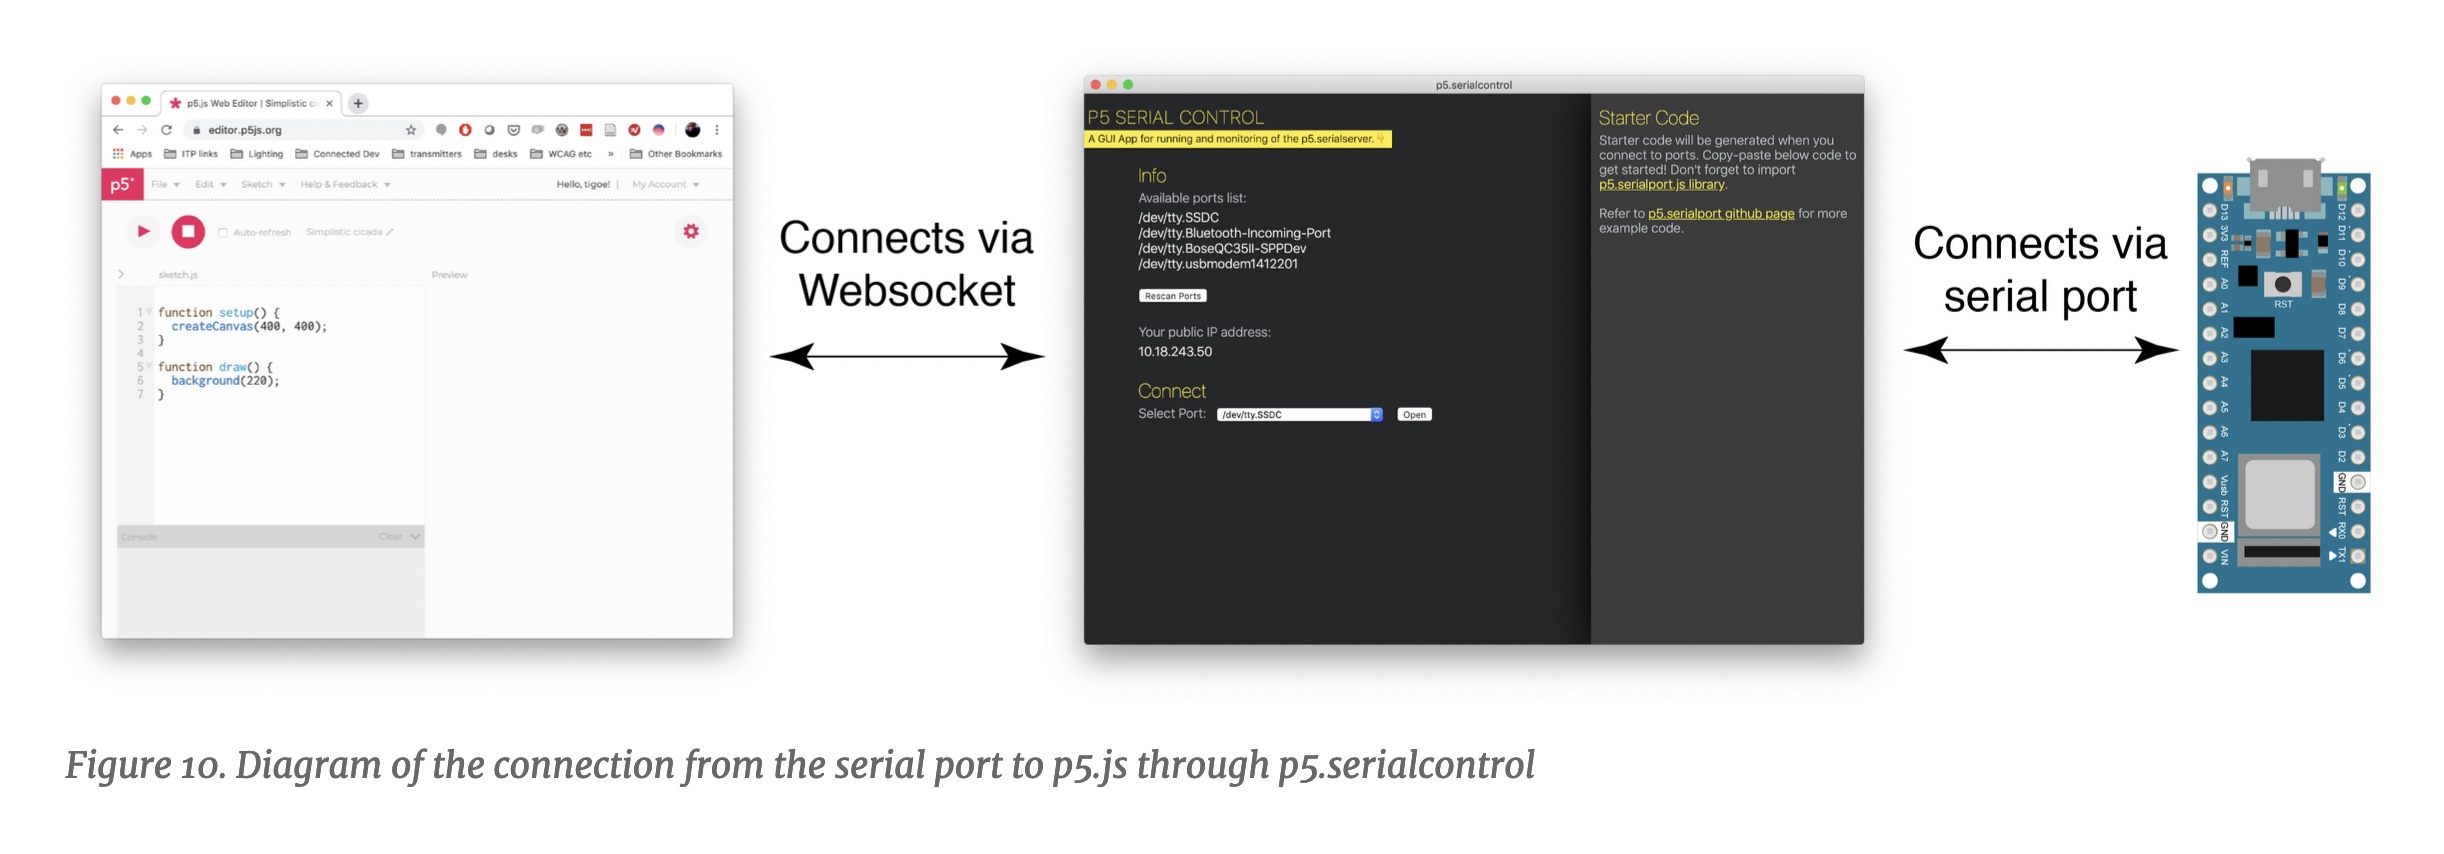
The difficult point that we discussed about with my instructor about using web interfaces for a similar hardware project is that the web browsers don't have access to the computer's serial ports, for security reasons. But according to the tutorial of ITP Physical Computing, we can make it work with P5.js thanks to two dedicated solutions, P5.serialport library and P5.serialcontrol app.
In order to get your browser-based applications to communicate with a microcontroller serially, you need a program that can both serve HTML/JavaScript pages, and communicate with the serial port. When you’re making projects with P5.js, you can achieve this by using the P5.serialport library and the P5.serialcontrol app by Shawn Van Every (updated by Jiwon Shin). When you use the p5.serialport library, it communicates with the p5.serialcontrol app, a WebSocket server that gives you access to serial devices attached to your computer.
The microcontroller can be programmed exactly the same way as in the local project based on Processing, transmitting the mapped analog values in the serial port with Serial.println()
To communicate with your microcontroller serially, you’re going to use the P5.js serialport library and the p5.serialcontrol app. The P5.js serialport library can’t access your serial ports directly when a sketch is running in a browser because the browser doesn’t have direct access to the serial port. But it can communicate with another program on your computer that can exchange data with the serialport. p5.serialcontrol is the app that connects your sketch, running in a browser, with the serial ports on your computer as shown in Figure 10.
The next steps would be:
- Download the p5.serialcontrol app
- Open the web editor editor.p5js.org and write a p5.js sketch to list available ports
let serial; // variable to hold an instance of the serialport library

function setup() {
  serial = new p5.SerialPort(); // make a new instance of the serialport library
  serial.on('list', printList); // set a callback function for the serialport list event

  serial.list(); // list the serial ports
}

// get the list of ports:
function printList(portList) {
  // portList is an array of serial port names
  for (var i = 0; i < portList.length; i++) {
    // Display the list the console:
    console.log(i + portList[i]);
  }
}
Don't forget to include the libraries in the index.html file.
<script language="javascript" type="text/javascript" src="https://cdn.jsdelivr.net/npm/p5.serialserver@0.0.28/lib/p5.serialport.js"></script>
Run your p5.js script: you’ll get a list of the available serial ports in the console, find the name of your port in the list. Later, you’ll assign that name to a global variable called portName.
Now you’re ready to listen for some incoming serial data.
- Detect events and wirte callback functions to be called when such event happens (remember that P5.js relies on Javascript language)
let serial;          // variable to hold an instance of the serialport library
let portName = '/dev/cu.usbmodem1421';  // fill in your serial port name here

function setup() {
  serial = new p5.SerialPort();       // make a new instance of the serialport library
  serial.on('list', printList);  // set a callback function for the serialport list event
  serial.on('connected', serverConnected); // callback for connecting to the server
  serial.on('open', portOpen);        // callback for the port opening
  serial.on('data', serialEvent);     // callback for when new data arrives
  serial.on('error', serialError);    // callback for errors
  serial.on('close', portClose);      // callback for the port closing

  serial.list();                      // list the serial ports
  serial.open(portName);              // open a serial port
}
Note: In p5.js, 9600 bits per second is the default serial communication rate.
- Declare new functions that will respond to the callback functions;
function serverConnected() {
  console.log('connected to server.');
}

function portOpen() {
  console.log('the serial port opened.')
}

function serialEvent() {

}

function serialError(err) {
  console.log('Something went wrong with the serial port. ' + err);
}

function portClose() {
  console.log('The serial port closed.');
}
serialEvent()is the most important function, as it is the one that responds to new data. Start by storing these data in a new variable:
let serial;          // variable to hold an instance of the serialport library
let portName = '/dev/cu.usbmodem1421';  // fill in your serial port name here
let inData;                             // for incoming serial data
Then modify the serialEvent() function. Instructions may differ depending on if you're reading numbers or strings from the serial port. Here I am reading strings like in my Processing sketch (the arduino sketch sends data thanks to the Serial.println() function):
function serialEvent() {
  // read a string from the serial port:
  var inString = serial.readLine();
  // check to see that there's actually a string there:
  if (inString.length > 0 ) {
  // convert it to a number:
  inData = Number(inString);
  }
}
note: readLine() is the same as readStringUntil(‘\r\n’)
- Customize it to use incoming serial data to make fun stuff, like drawing, sound visualization etc.
I haven't tested it yet but it sounds really interesting.