Final project development
Description
My ambition with this project is to create a tool to experiment light art. I thus developped Radiant, a set of tools to explore the beauty of light diffusion.
You might be used to practicing art through a variety of media, thanks to some tools or instruments. Maybe you have experience performing graphic arts such as painting with watercolor, or drawing with pens. You might also have skills producing and arranging sounds with the help of a musical instrument or a computer.This project aims at providing a small set of tools to explore light in an esthetic way.
One of my goal was to give access to the large possibilities offered by programmable LEDs, but without modifying the code manually each time, nor using a web interface or something similar. I wanted to explore the gesture a person would use to play with the device, and define controls according to what may feel more natural, intuitive and fun. I also wanted to erase the sense of the code and numbers that underlies the device, in particular regarding the color coding.
Regarding the objects design, I wanted to make something minimalistic in order to really focus on the light diffusion effects, and more importantly to attenuate the technological aspect of this project, by hiding as much as possible of the underlying technicity. For example, I hid the NFC tag in pads made of felt, a material that feels and looks nice but which is also not commonly associated with electronic projects. Plaster casted objects also illustrates that will to offer a raw and "traditional" texture.
Elements of the set of tools
- Color palette
- Light sticks
- Primary color pads
- Obstacles
- Wood pannels
User scenario
Users interact with the tools thanks to the following gesture:
- Setting a RGB color in the palette pod, thanks to primary colors pads.
- Attribute this color to a light sticks by placing it on the palette pod. The longer the led element is in contact with the palette pod, the more the led element gets lit up.
- the led element can be filled with different colors if it's placed on another pod or if the user changes the color of the pod
- Place led elements on the scene
- Place ribbed obstacles on the scene
- Enjoy the light diffusion effects, experiment various configurations
General technical principle
The two main element types are the color palette and the light sticks.
Each of them contain their own PCB and are powered independently.
The color palette provides a RFID reader, which reads the UID of the NFC passive tags when they are bring close to the reader. UID have been read beforehand to assign an action (a color) to each tag of the set. When the reader identifies the NFC tag whose UID has been assigned to the blue color, an integer variable b is incremented. This value is immediately used to update the color of the pod's leds: all pixels are set to the color (r,g,b).
At first a light stick displays no color, the leds are off. When the contact pads of a light stick touch the pogo pins of the palette pod, it allows I2C communication to happen between the palette board and the light stick. I2C is a wired communication using two lines SDA and SCL. The pads/pins thus connect SDA of both sides together, same goes for SCL, the ground and 3.3V. The palette board acts as a primary board, sending the values of the r, gand b variables in real time to the secondary boards at a certain adress (defined in the code). The light stick board acts as a secondary board and listens to the (r,g,b) values sended by the primary board to light up the first pixel of the strip to that (r,g,b) color. As long as the light stick is in contact with the pogo pins of the palette, the I2C communication continues, and the pixels lights up one after another, according to a delay specified in the code. When the contact is interrupted, the ligh stick stays in the same state, partially (or totally) lit up.
When there is no contact, the r,g,b values of the palette can be modified again independetly from the light stick. A NFC tag allows to reset them to 0,0,0, turning off the palette leds. When a new contact is enabled between a partially filled light stick and the pod, the pixels keep lighting up to the new r,g,b color, starting from the one after the last pixel lit up during the previous "filling" step. When a stick is fully lit up, it starts again to the first pixel of the strip.
Project management and tasks tracking
As a reminder, here is the gantt diagram starting from May 22th to planify all remaining tasks:
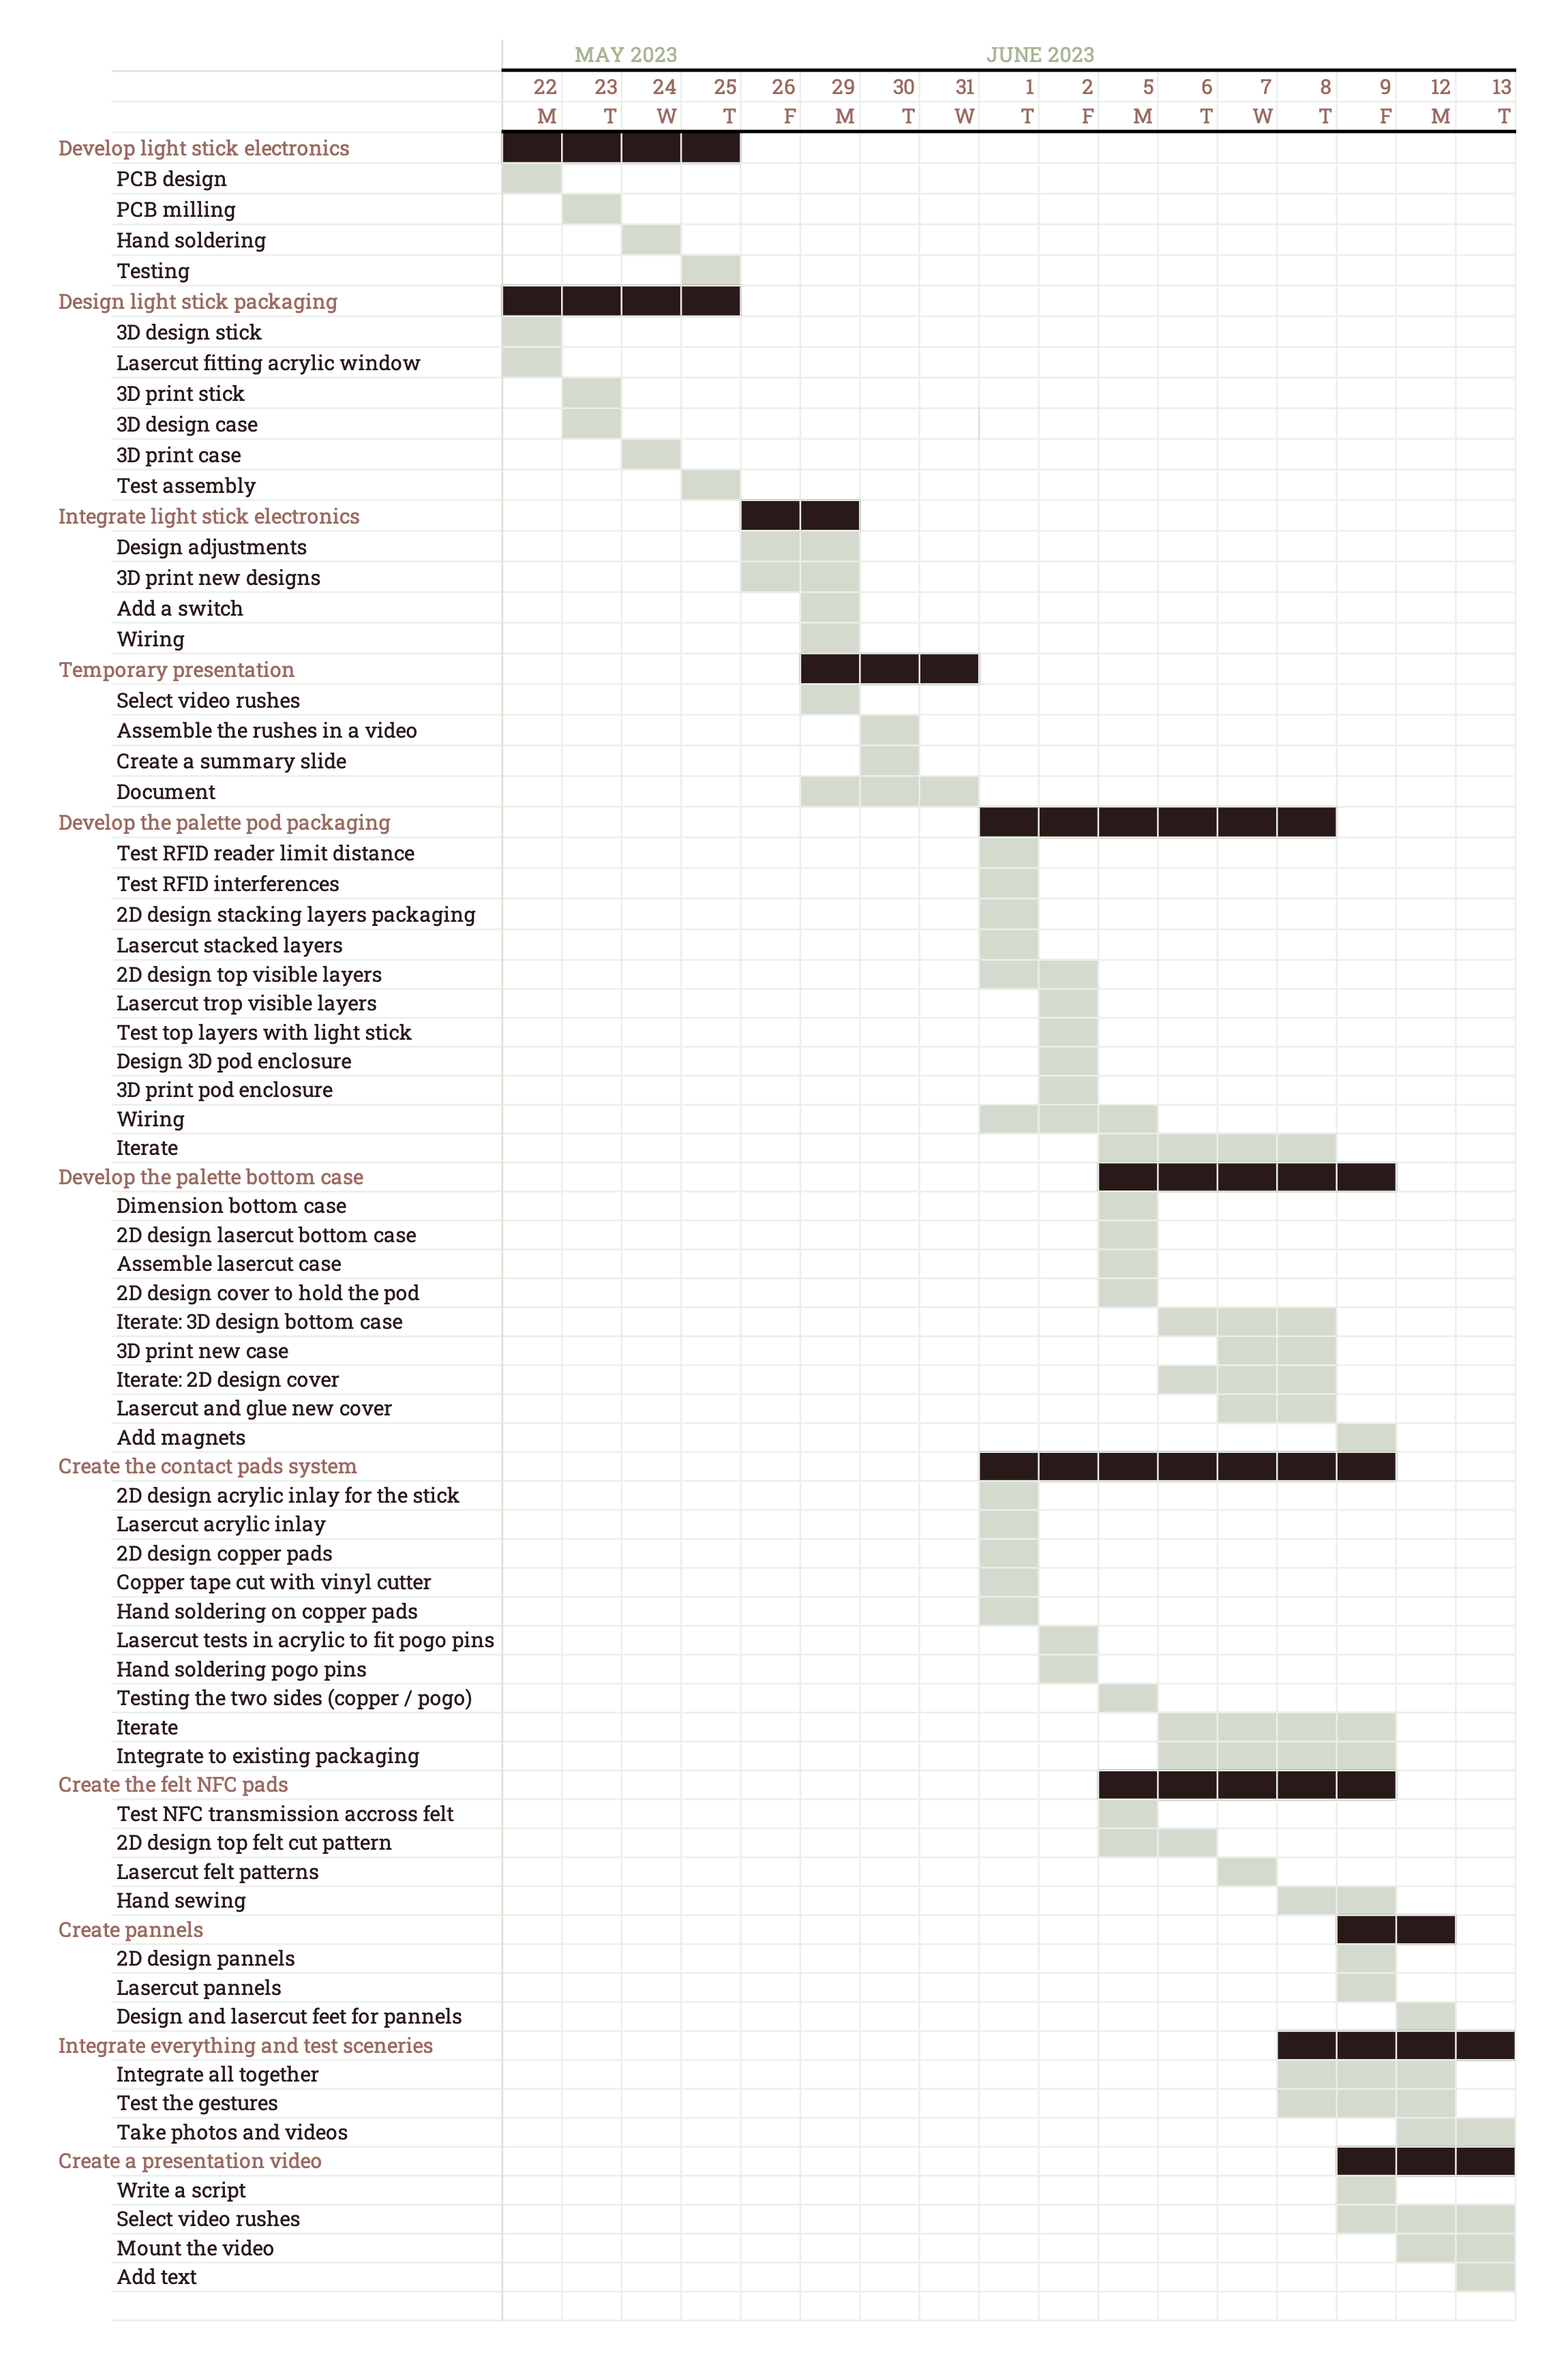
During this week (May 31st to 6th june) I had a lot of important development steps to achieve, in particular the contact pads and the palette pod casing. I decided to develop only one pod to have a more minimalistic object.
Here's questions to be answered to track my progress:
What tasks have been completed, and what tasks remain?
Completed tasks
- First implementation of the I2C contact system
- Design, cut contact pads and their acrylic inlay support
- Solder jumper wires to the contact pads
- Design, lasercut the pogo pin acrylic support
- Solder jumper wires to the pogo pins
- I2C test
- Several iterations of the palette pod packaging
- Solder header pins to RFID
- Solder jumpers to neopixel ring
- Test RFID maximum reading distance and interferences with the neopixel ring
- Design and lasercut in MDF the stacking inner casing
- Assemble, wire, test
- Design and lasercut in POM and acrylic of the top visible layers, test with the light stick dimensions
- 3D design and external plastic case
- 3D print it, assemble
- ITERATE
- First version of the palette bottom casing
- Dimension
- 2D design of the palette case
- Lasercut the palette case
- Assemble
- Adapt to make it in PLA: 3D design and 3D print
- Minor modifications of the lightstick case
- Modify 3D design of the case's upper part to have a smaller height
- 3D print
Remaining tasks
- Finish the palette pod casing
- Integrate it with an appropriate bottom case cover
- Integrate the contact pads system, test and if necesseary improve
- Design and lasercut felt pads patterns
- Sew NFC felt pads
- Embellish, improve the finishing
- Print definitive parts in matt PLA
- Design and lasercut wood pannels
- Test sceneries
- If there is some time remaining:
- Make other obstacles
- Write a new code to integrate the accelerometer
What's working? what's not?
The casing is overall satisfying and I love the direction it's visually taking, minimalistic and simple. I think it will have a nice esthetic coherence with all the different whites and the light wooden details.
The copper tape pad / pogo pins contact system seems to work but I'm not sure it's very sustainable, as the pogo pins may damage the copper tape after some time. So I redesigned another version with copper tape on both sides.
Otherwise, everything worked fine until at one point my RC-522 reader just stopped working °[]° I spent some time trying to understand why; some online forums encountered similar problems of readers that worked fine until a certain amount of time, not the same time for each component, when they stopped working and needed to be reset. That seemed to be due to the buffer management or somethink like that. I tried resetting it software / hardware but wasn't getting anywhere. Maybe I had just damage the hardware in some way? I just decided to carry on with other RC-522. I bought one, and two colleagues lend theirs. I was ready for more tests.
I read that the RC-522 readers can be of various quality depending on the supplyer. I also experienced that they could have different reading range!! This is very annoying, because it's the case with the new one I am using (shorter reading range), so I will have to redesign my pod's inner casing.
What questions need to be resolved?
How to reorganize my inner stacking to be able to stay in the reading range and still see the leds? Am I sure that I want to connect the 3.3V points of the main and secondary board? Also, will the contact system be efficient in real conditions?
What will happen when?
I'm sure that next week I have to present my work, after creating a time consuming video. So I really need to have this pod working before the end of the week.
What have you learned?
That RC-522 readers are not very reliable :(
Also that a lasercut wooden box is not always the best way to go for a prototype, it may be more time consuming than what you expect, as it was for me! (the plywood was crisp and tended to break easily)
I first printed my prototype (for example candle casing) in regular white PLA before using my matt PLA spool (we only have one). But I learned that this matt PLA doesn't react as the regular PLA we print usually, it tends to retract less! So all my snap fitting design might need to be slightly redesigned. I guess that this is a more general lesson on filament fine differences even when they are in the same plastic family. Hard to find the balance between prototyping and resource management 8-)