Final project presentation
Introduction
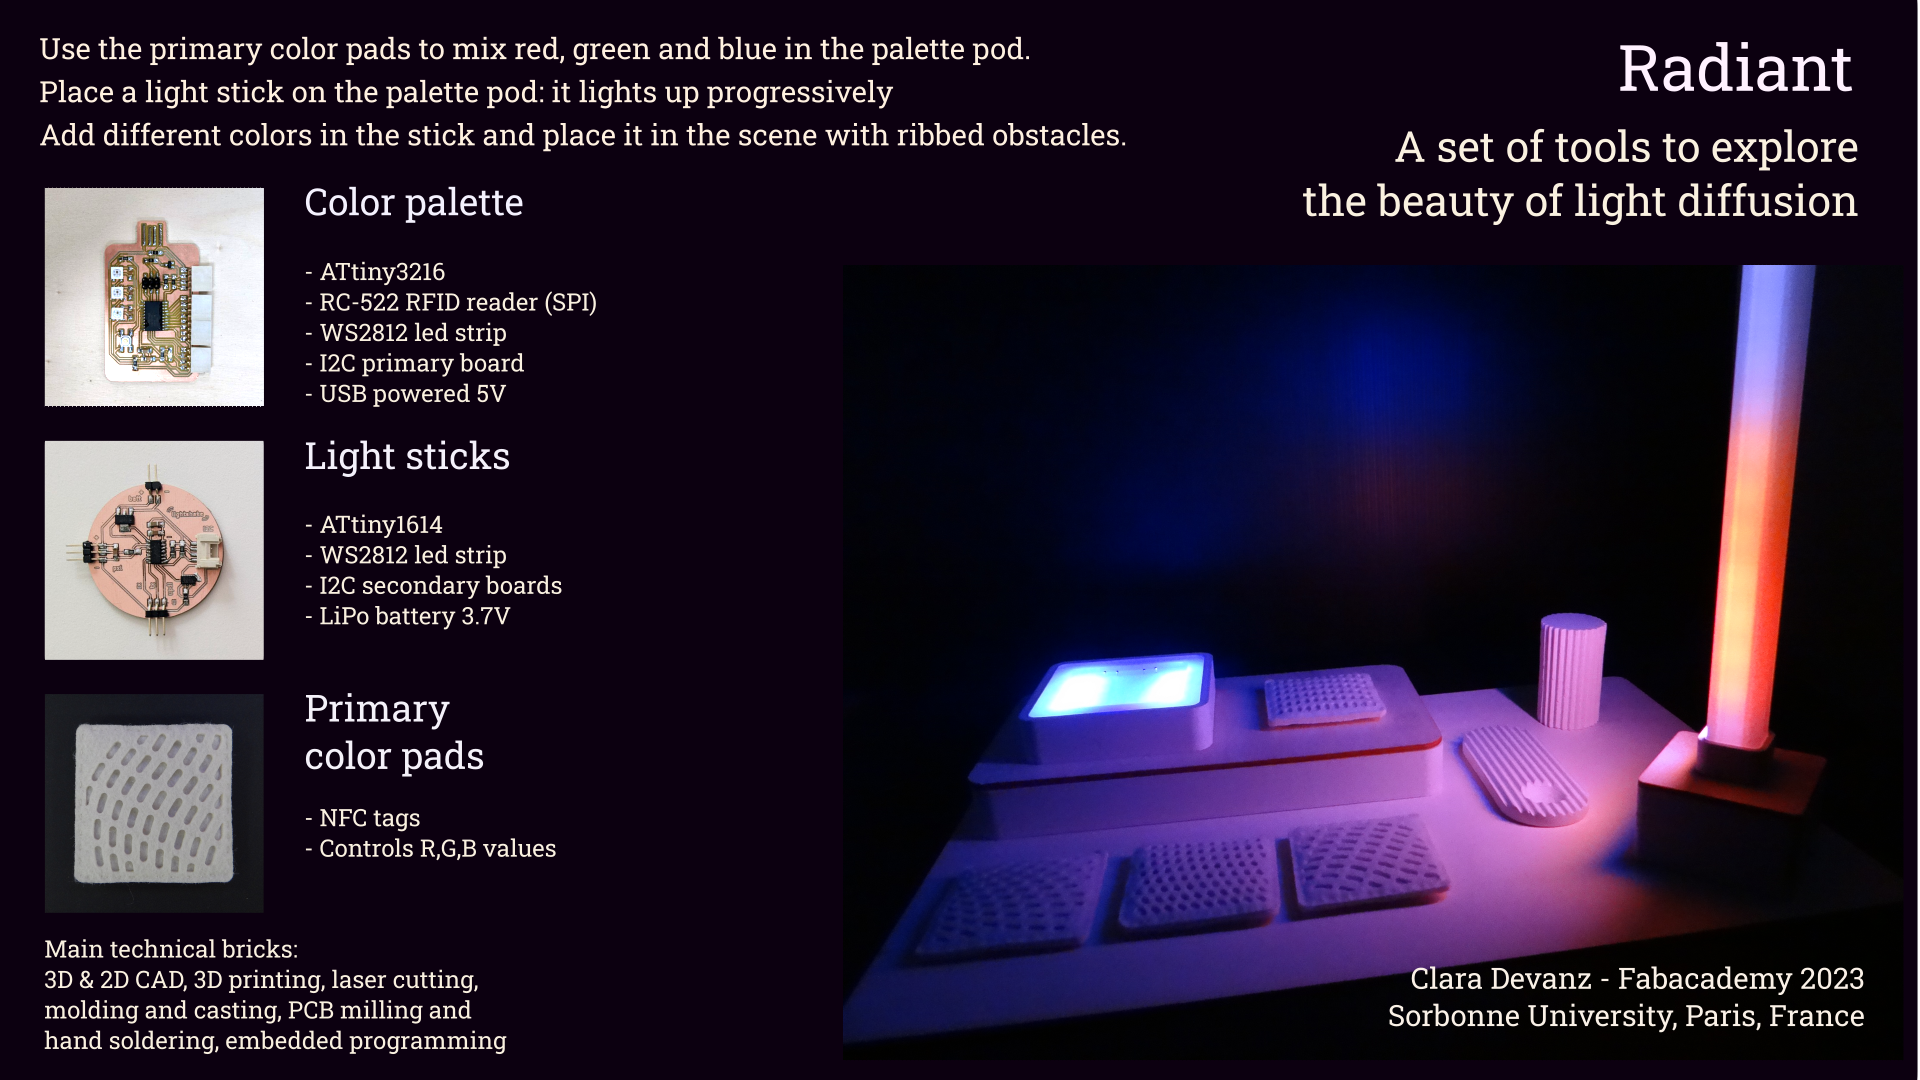
My ambition with this project was to create a tool to experiment light art. I thus developped Radiant, a set of tools to explore the beauty of light diffusion.
You might be used to practicing art through a variety of media, thanks to some tools or instruments. Maybe you have experience performing graphic arts such as painting with watercolor, or drawing with pens. You might also have skills producing and arranging sounds with the help of a musical instrument or a computer.This project aims at providing a small set of tools to explore light in an esthetic way.
One of my goal was to give access to the large possibilities offered by programmable LEDs, but without modifying the code manually each time, nor using a web interface or something similar. I wanted to explore the gesture a person would use to play with the device, and define controls according to what may feel more natural, intuitive and fun. I also wanted to erase the sense of the code and numbers that underlies the device, in particular regarding the color coding.
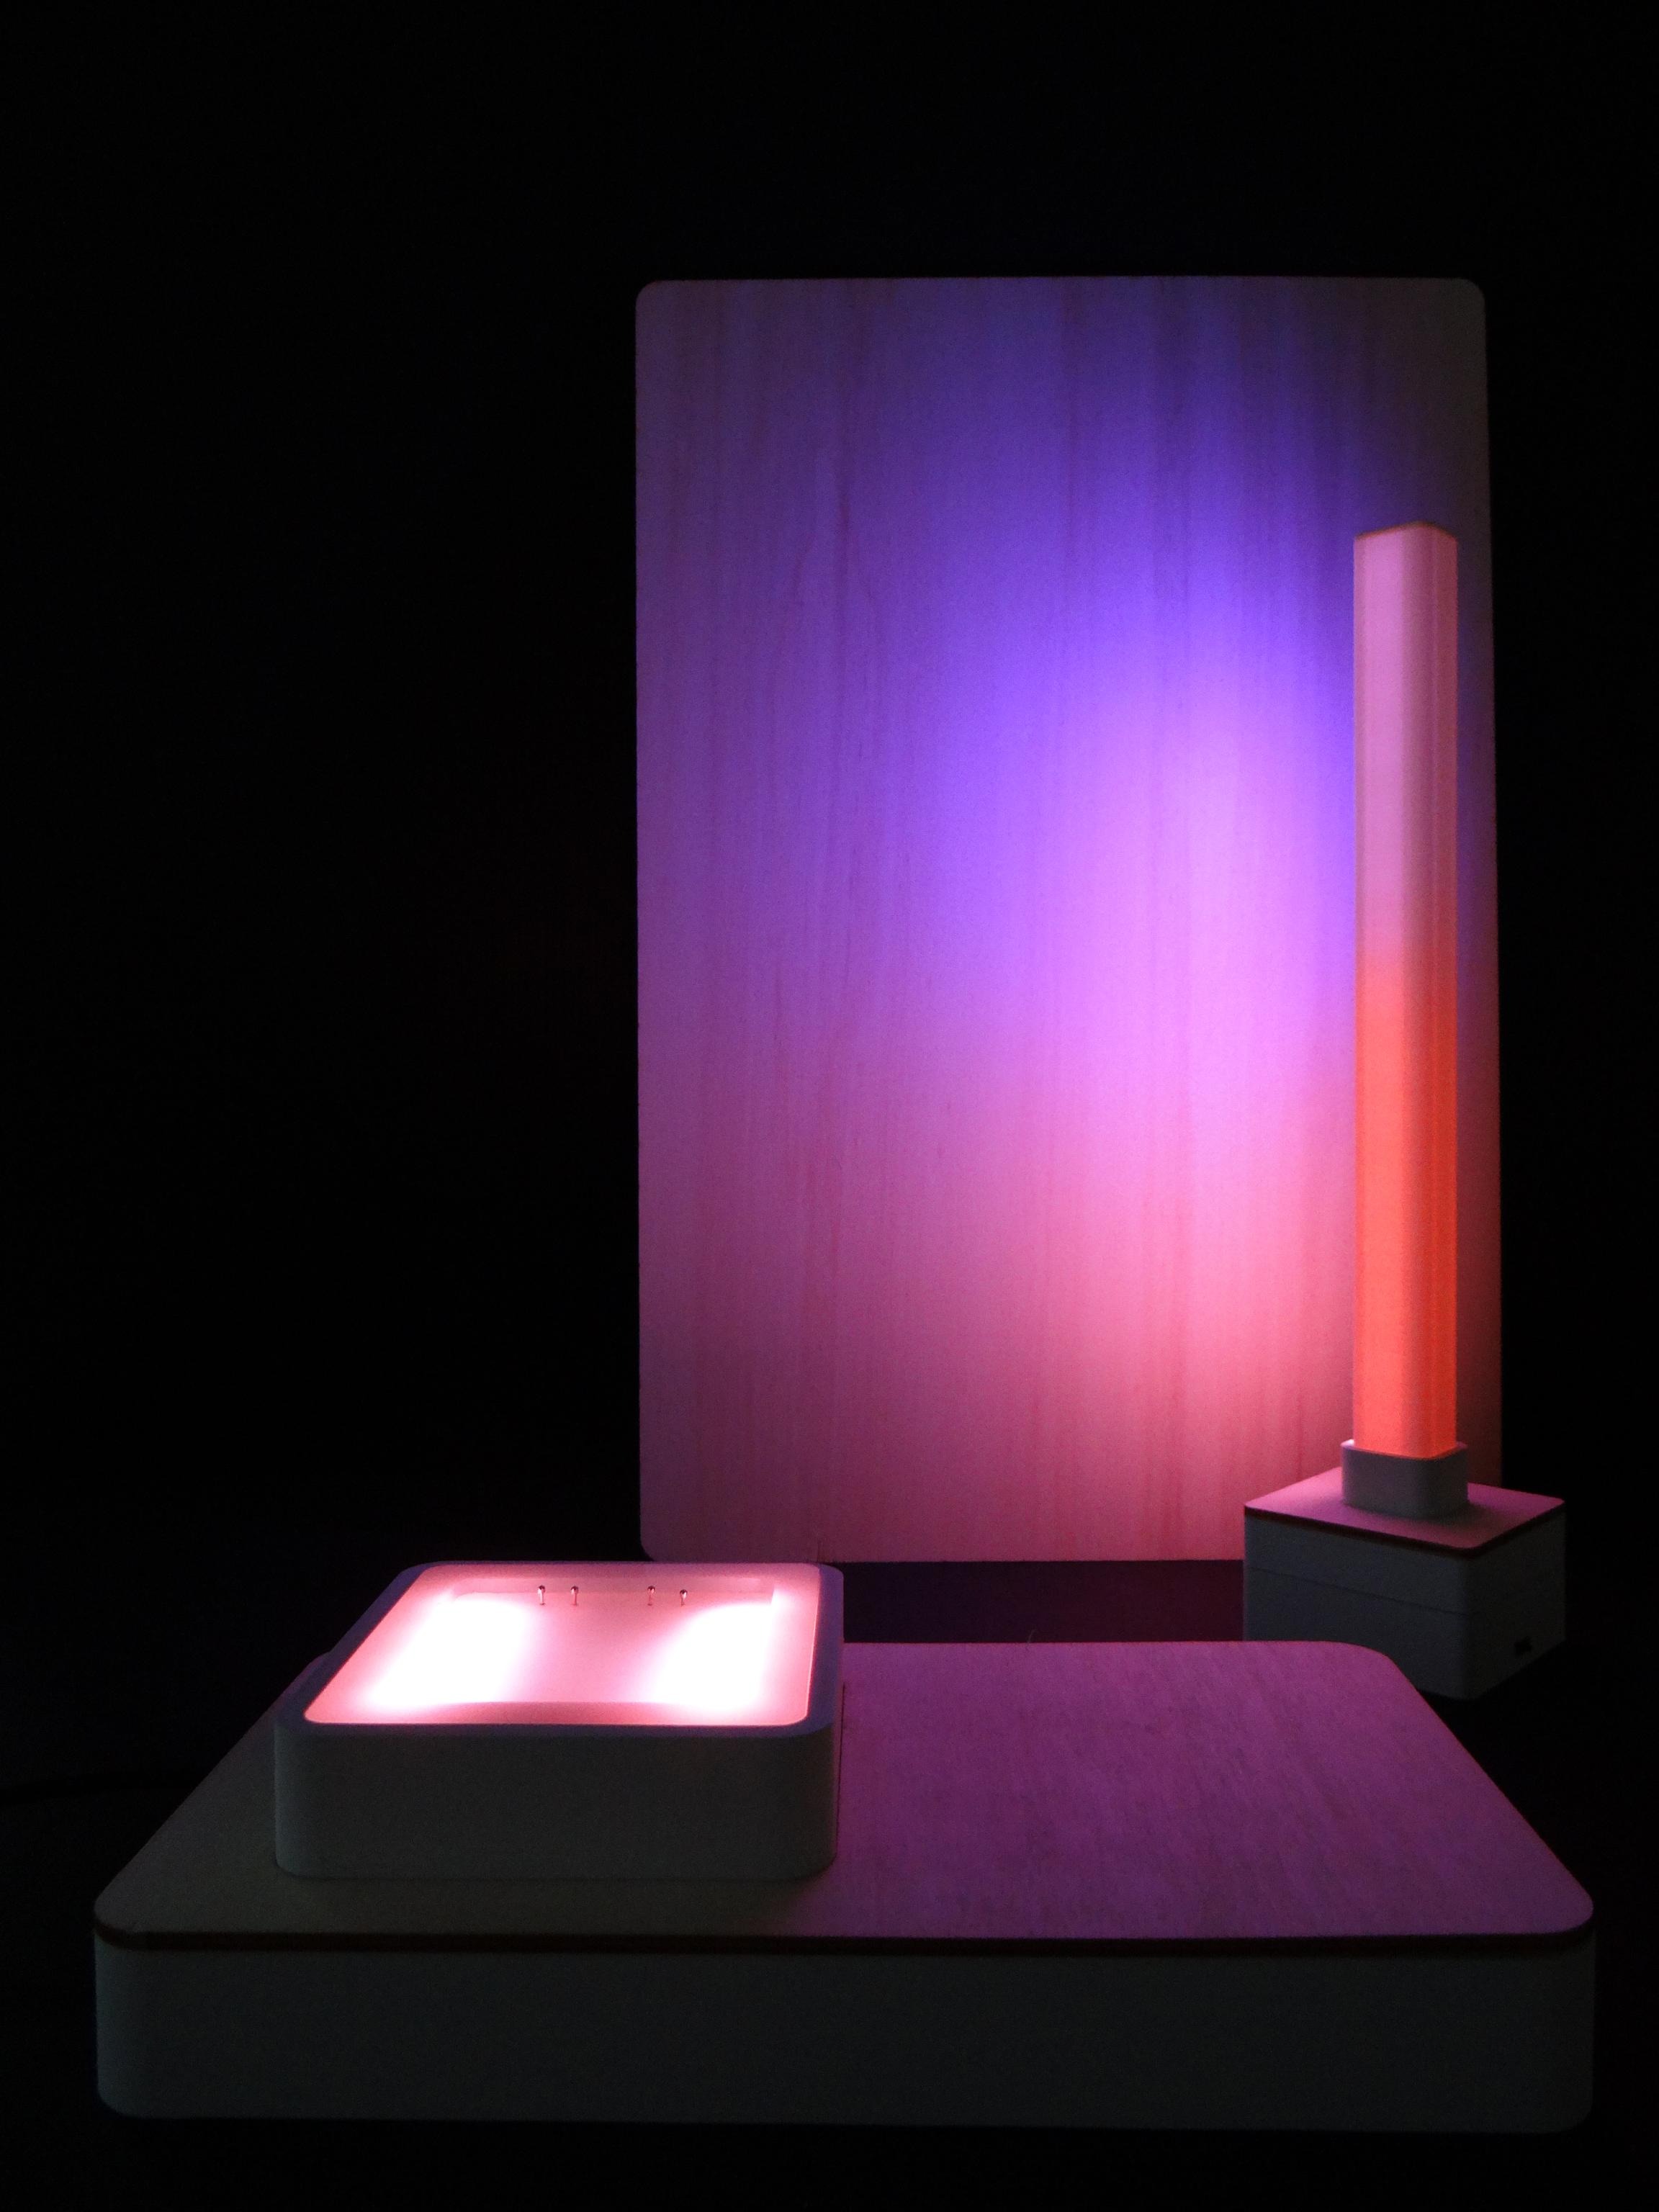
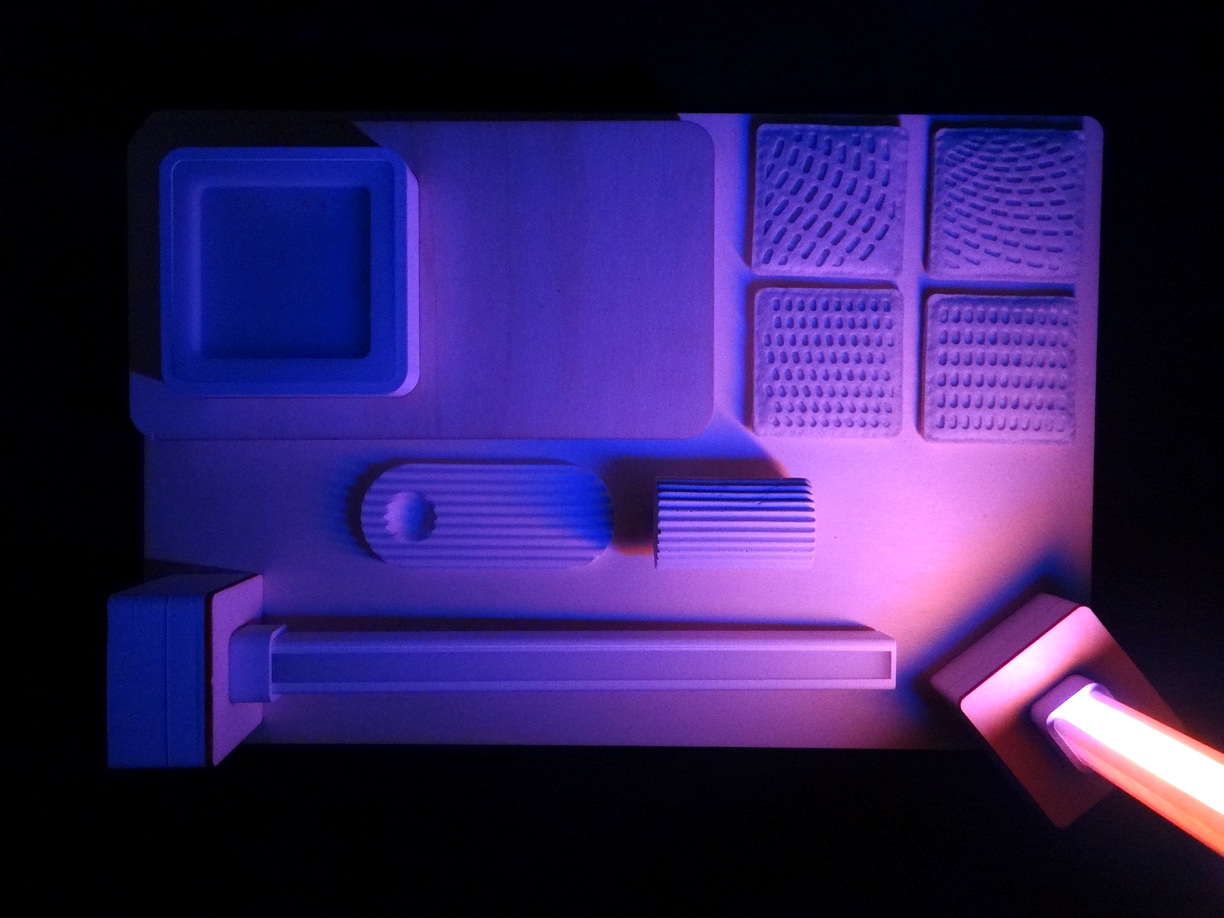
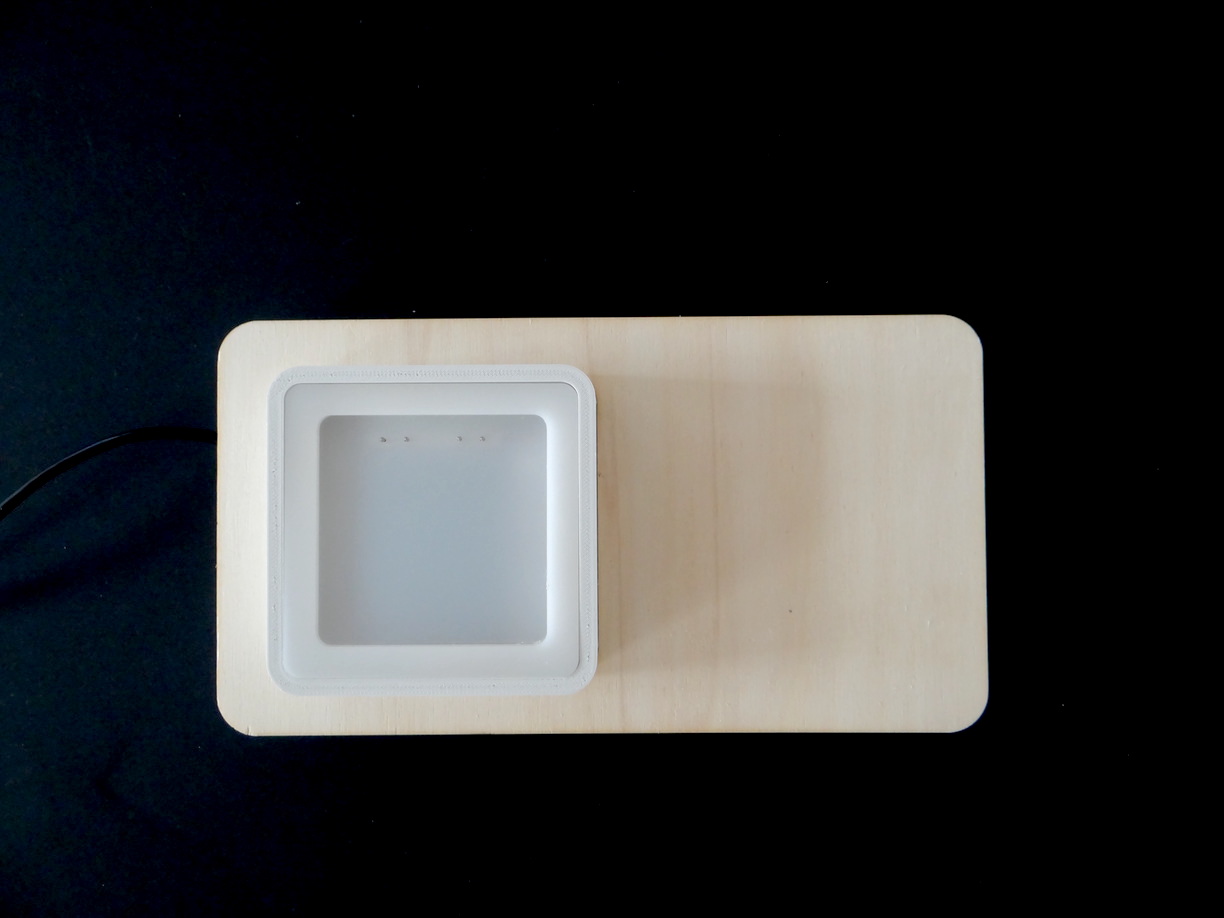
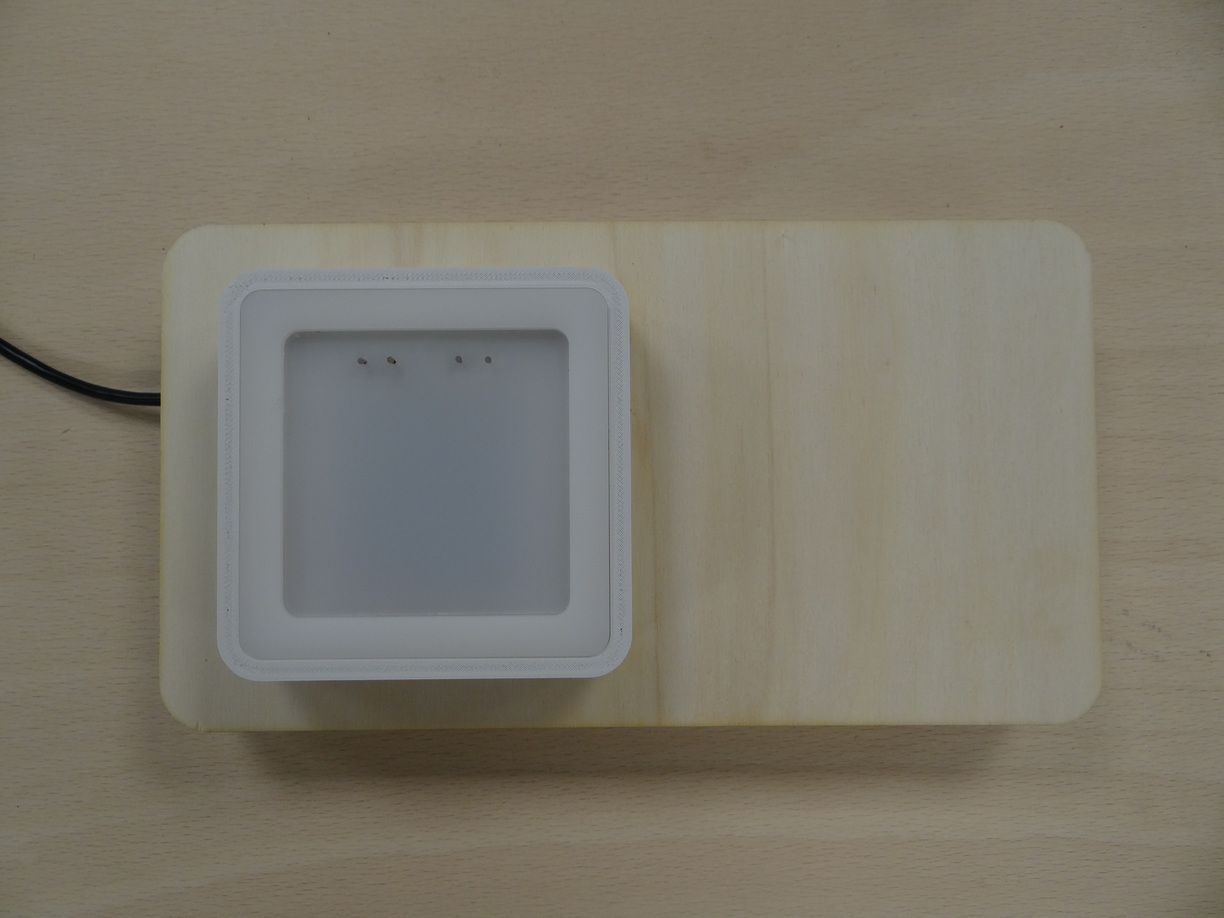
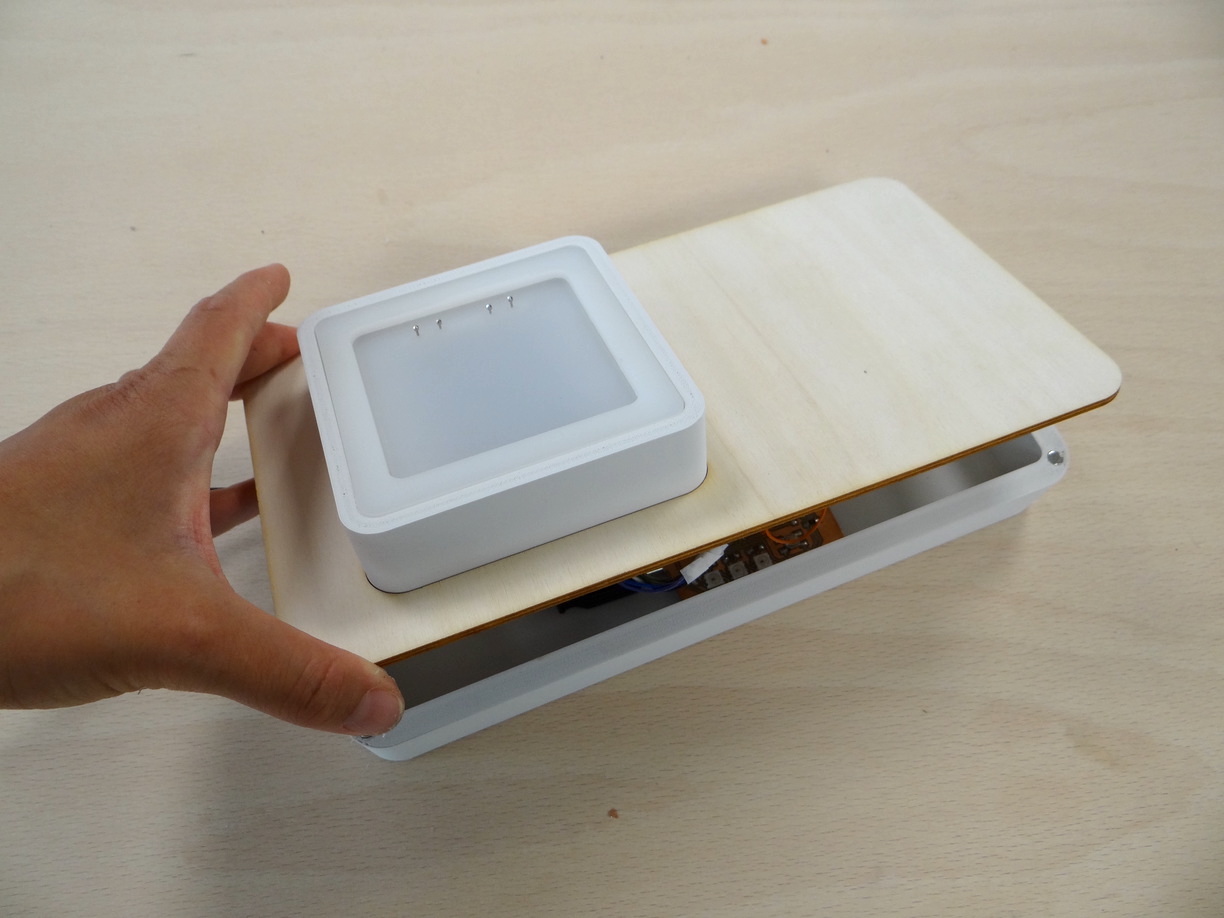
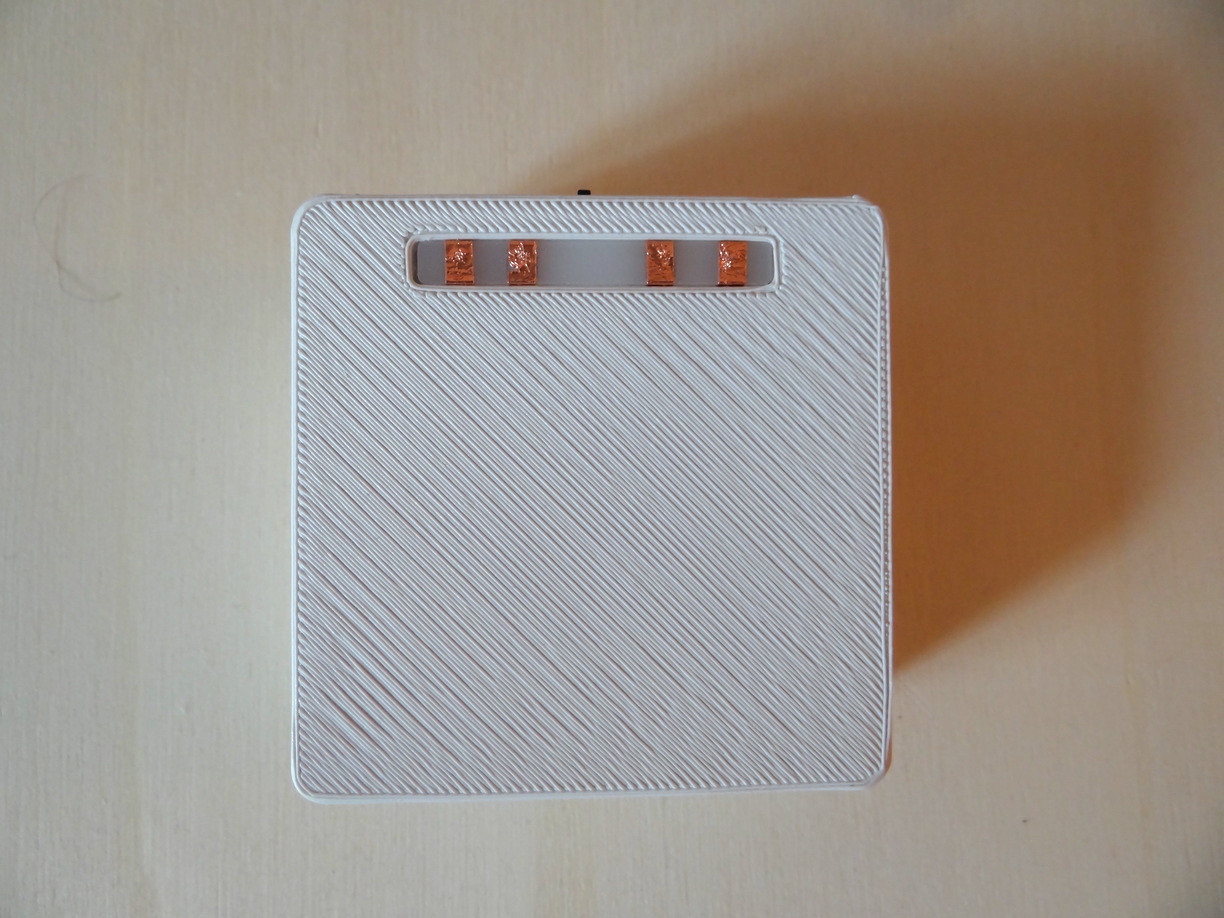
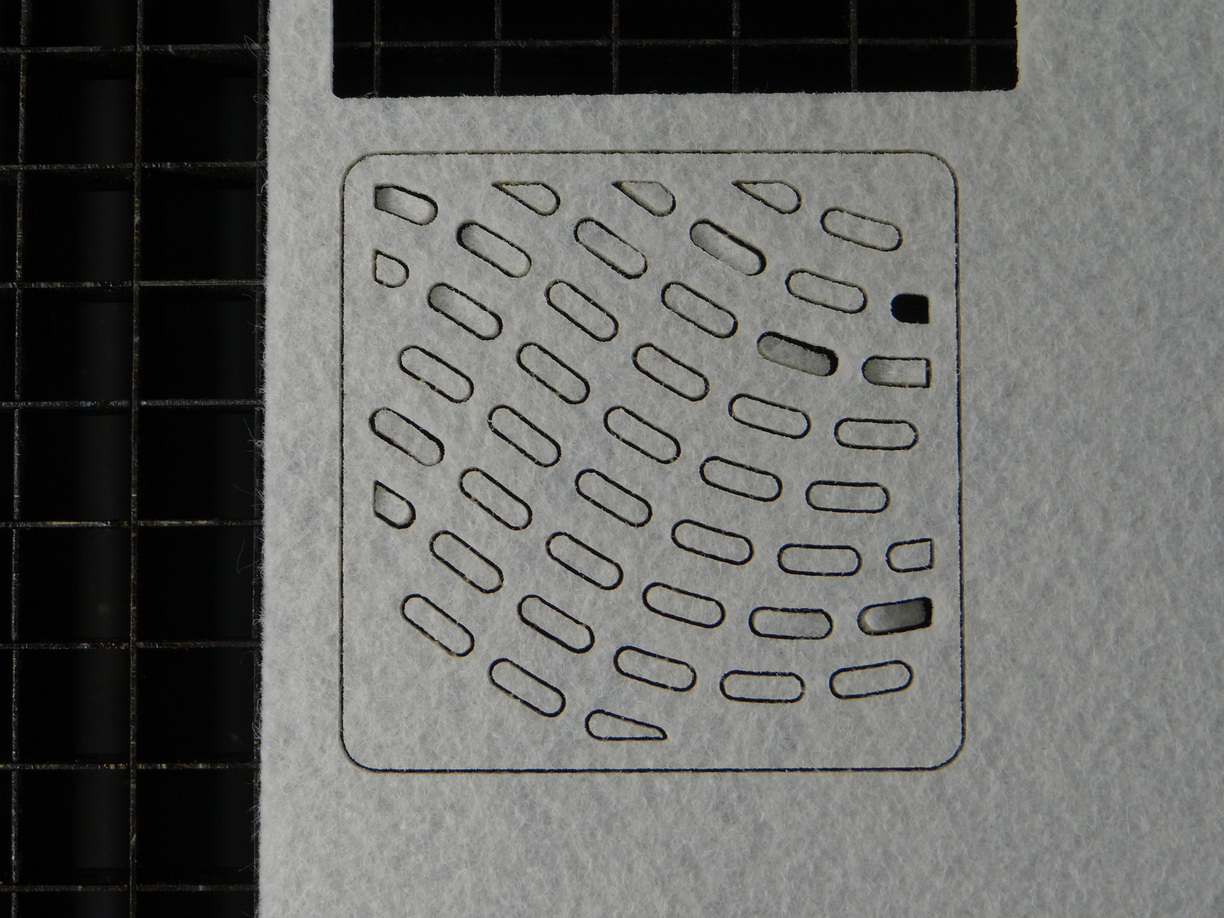
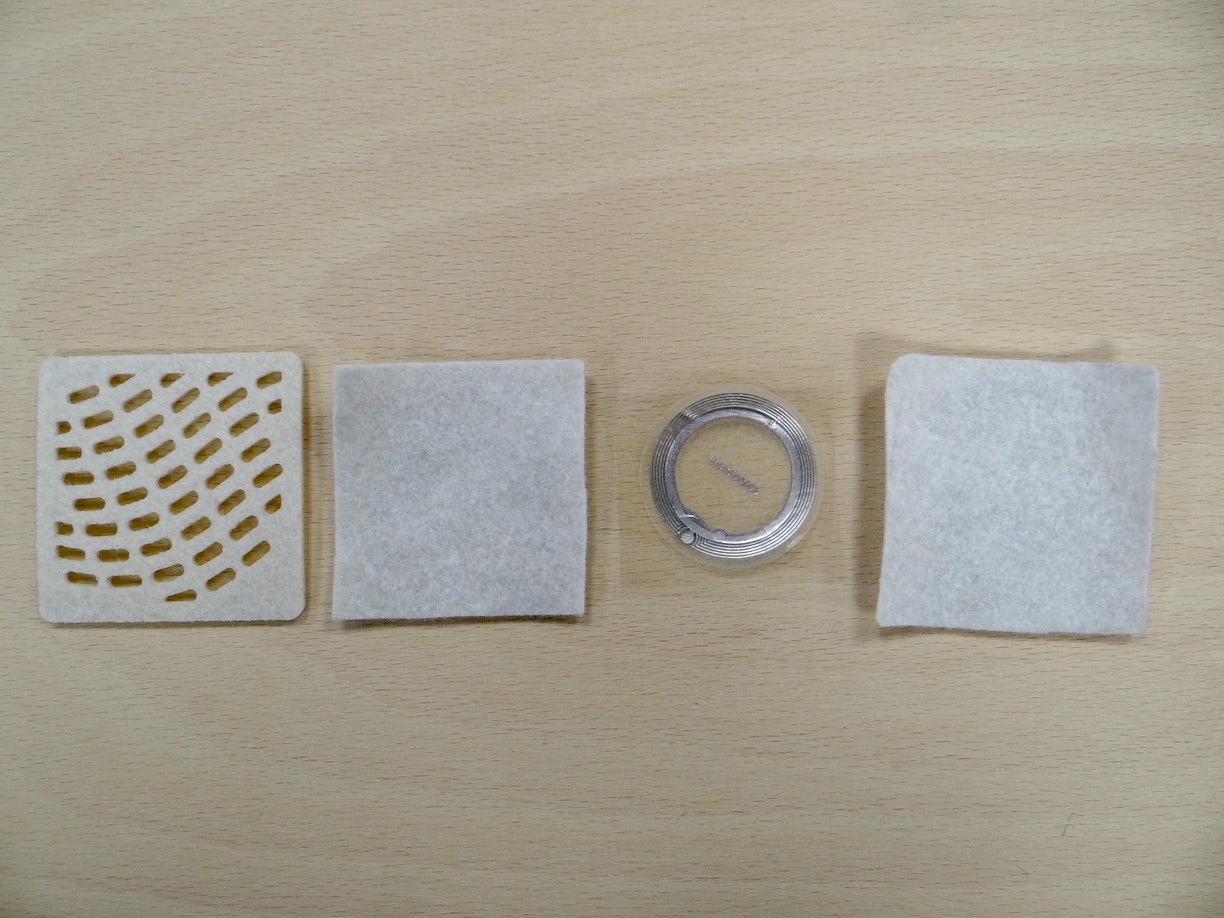
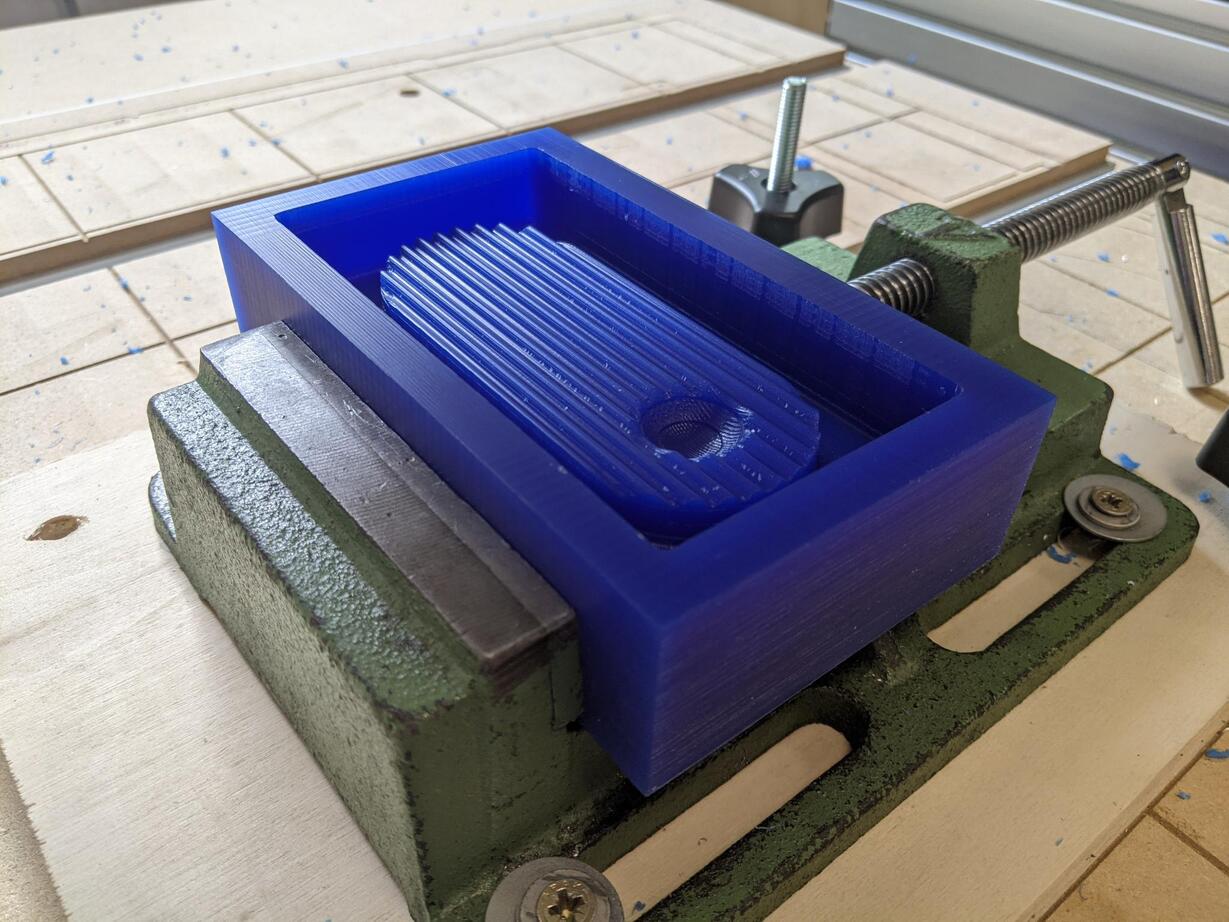
Regarding the objects design, I wanted to make something minimalistic in order to really focus on the light diffusion effects, and more importantly to attenuate the technological aspect of this project, by hiding as much as possible of the underlying technicity. For example, I hid the NFC tag in pads made of felt, a material that feels and looks nice but which is also not commonly associated with electronic projects. Plaster casted objects also illustrates that will to offer a raw and "traditional" texture.
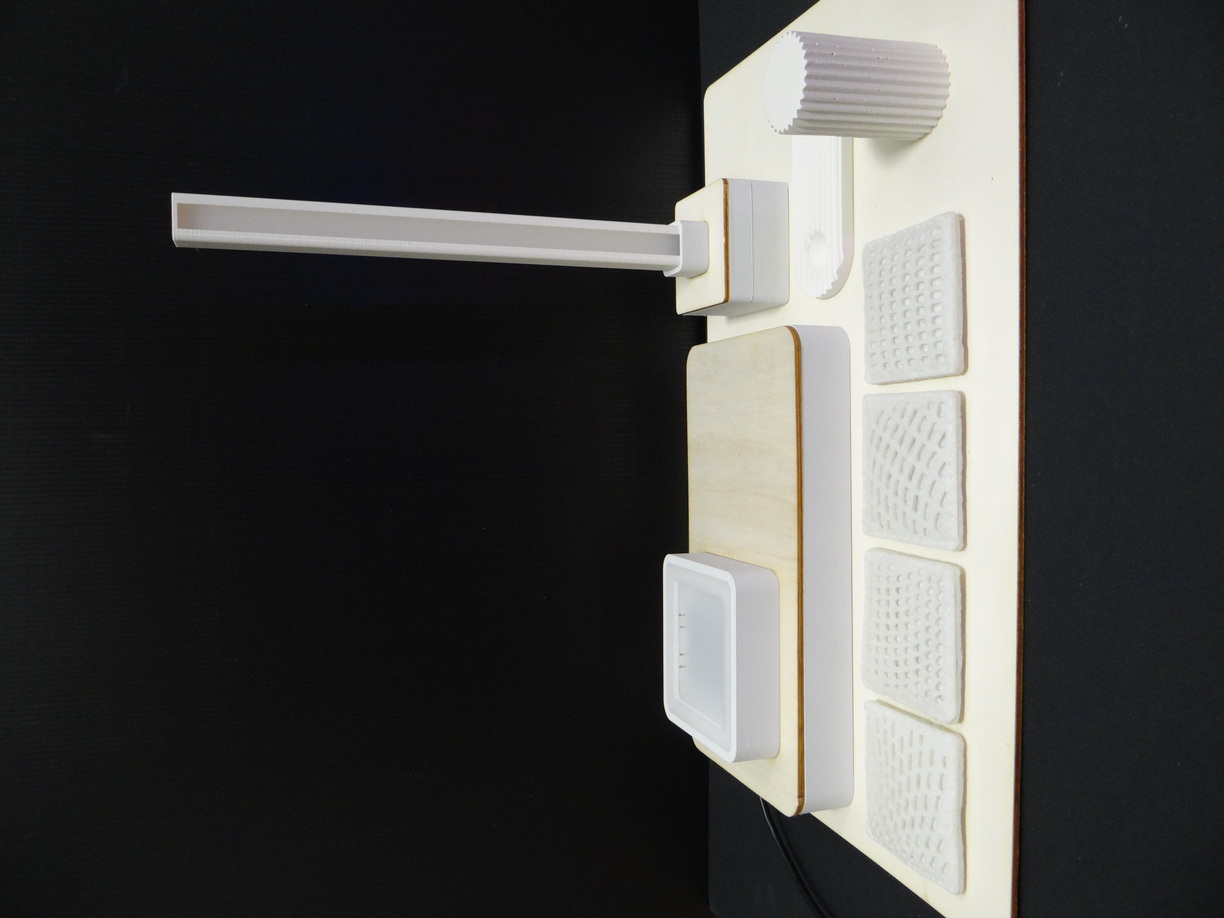
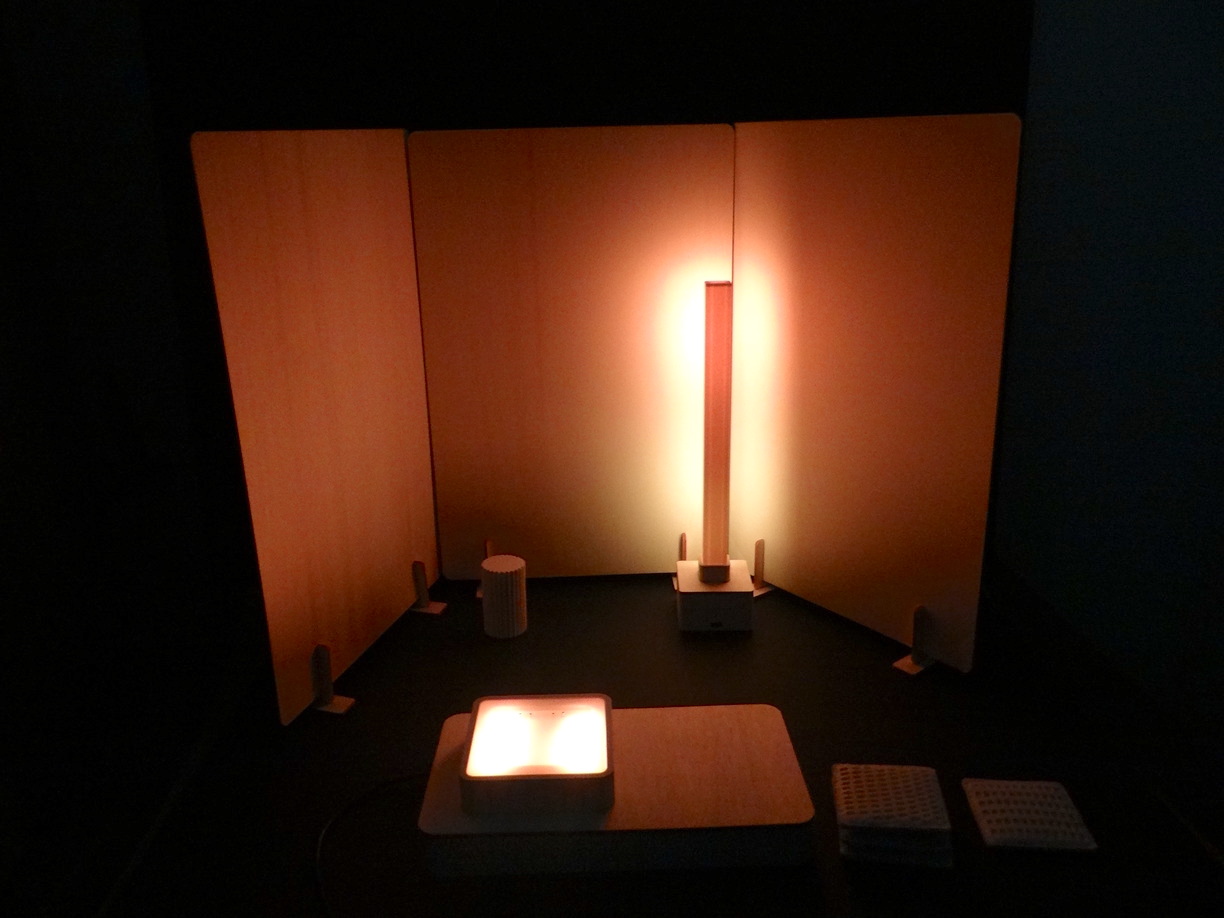
Elements of the set of tools
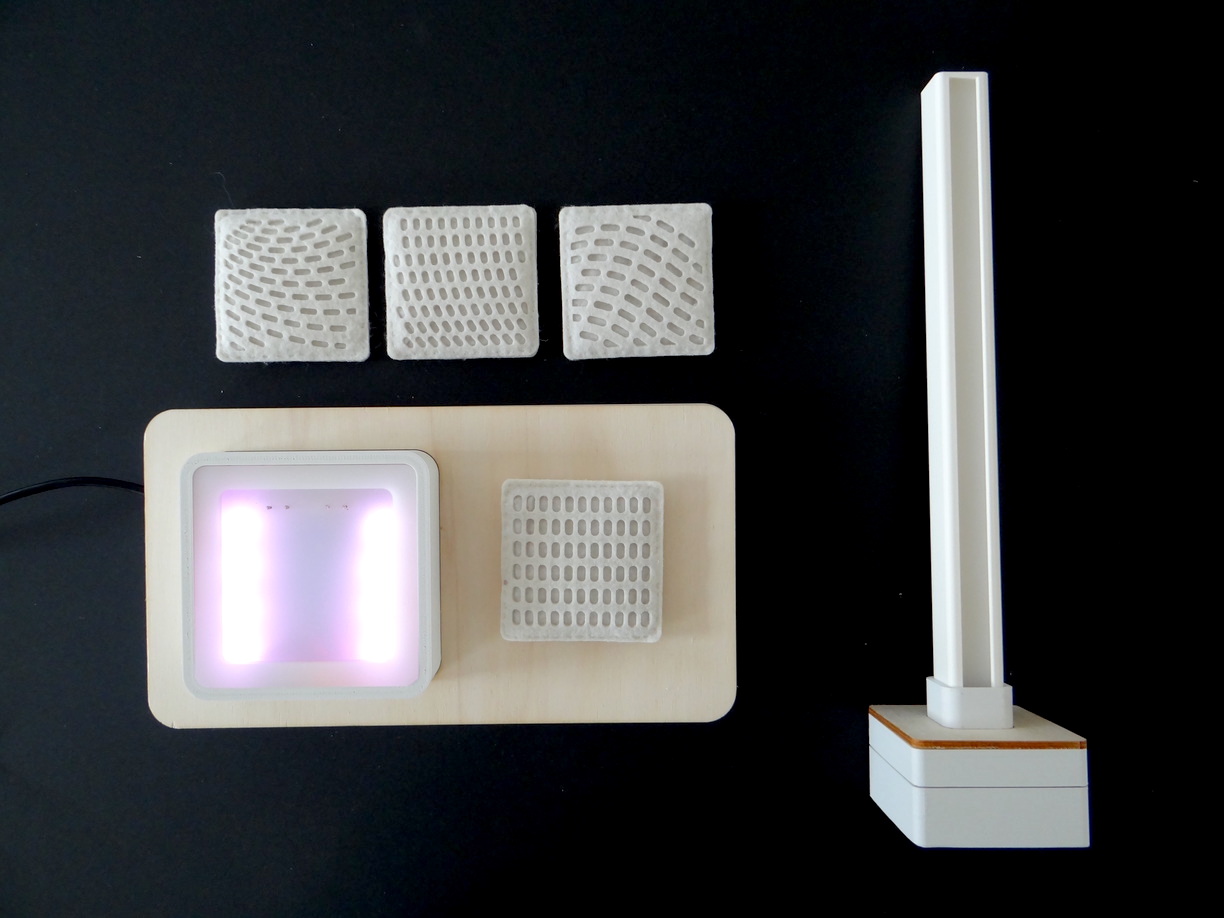
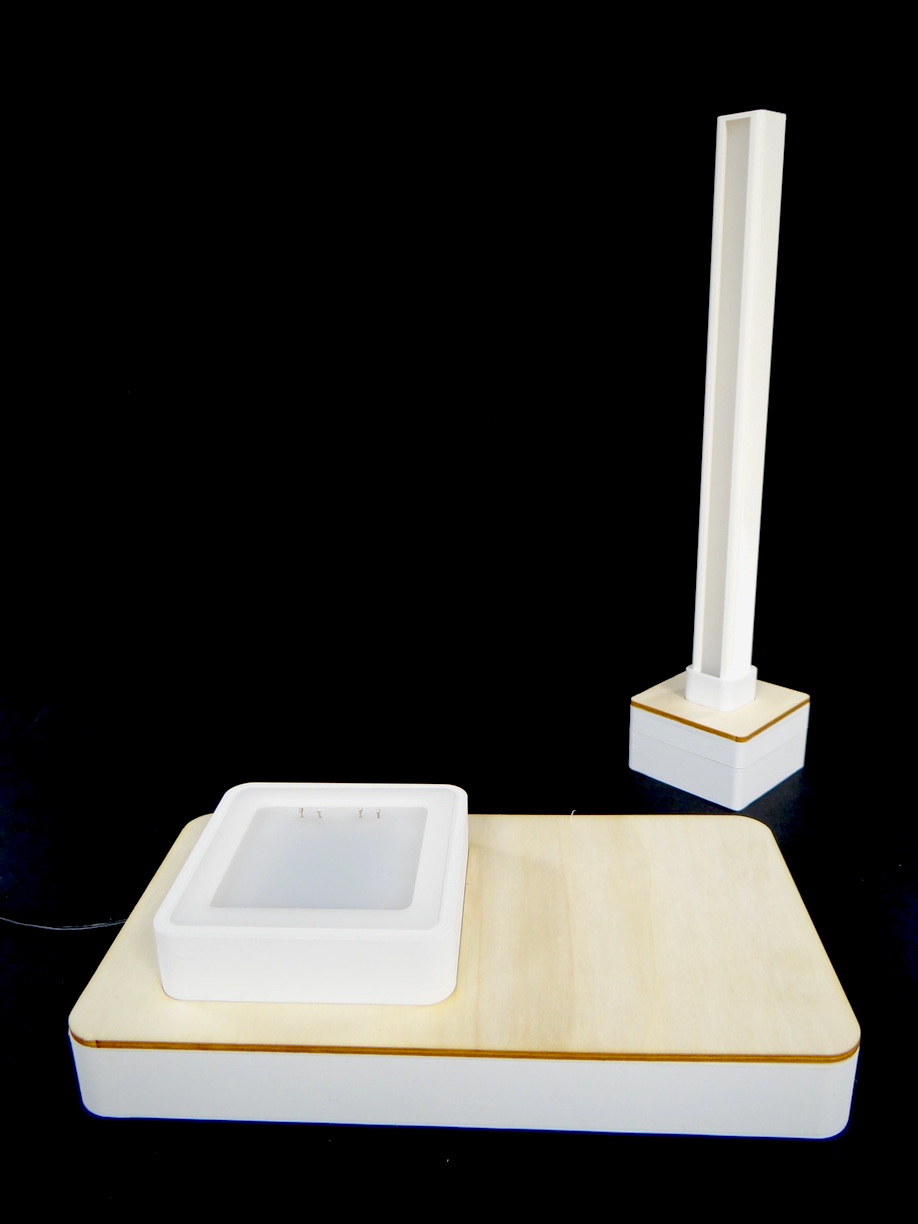
- Color palette
- Light sticks
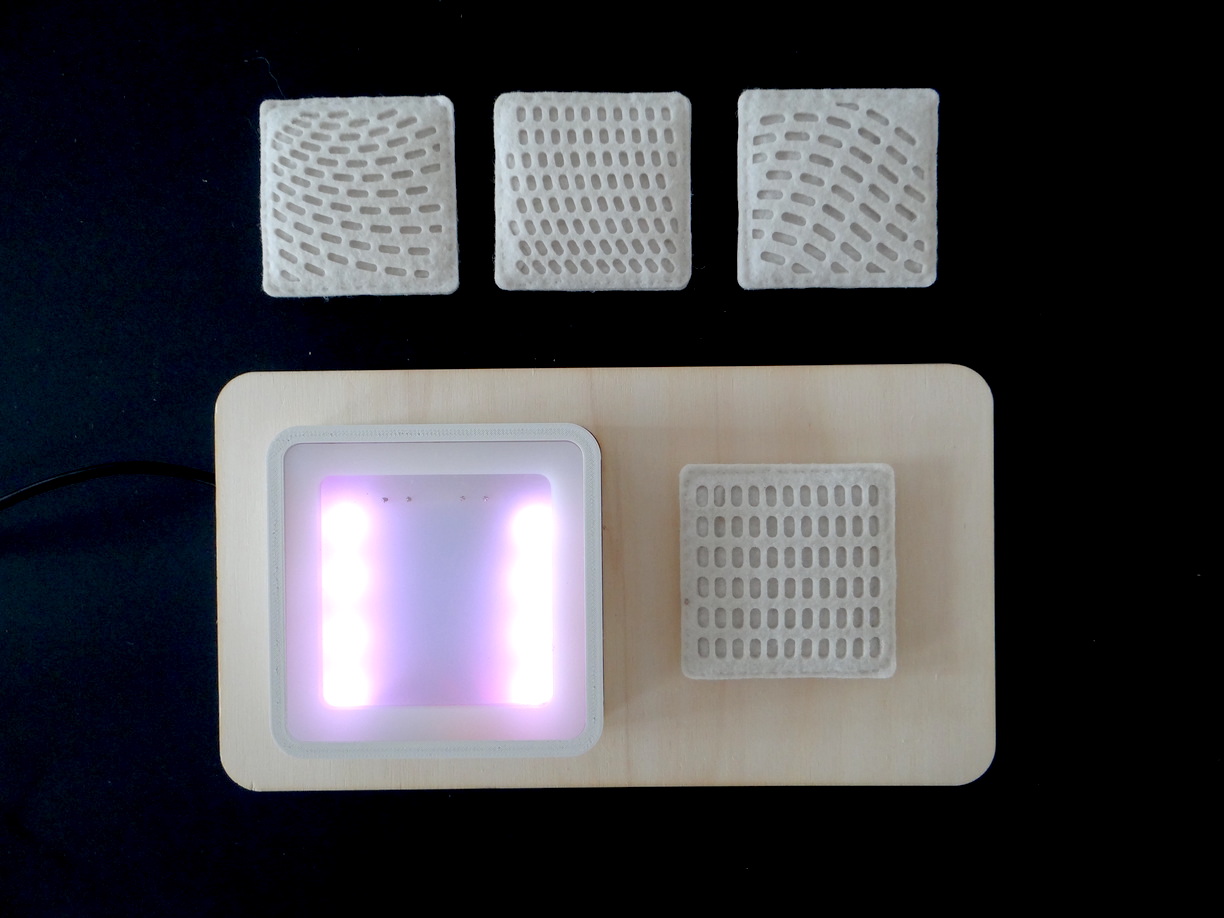
- Primary color pads
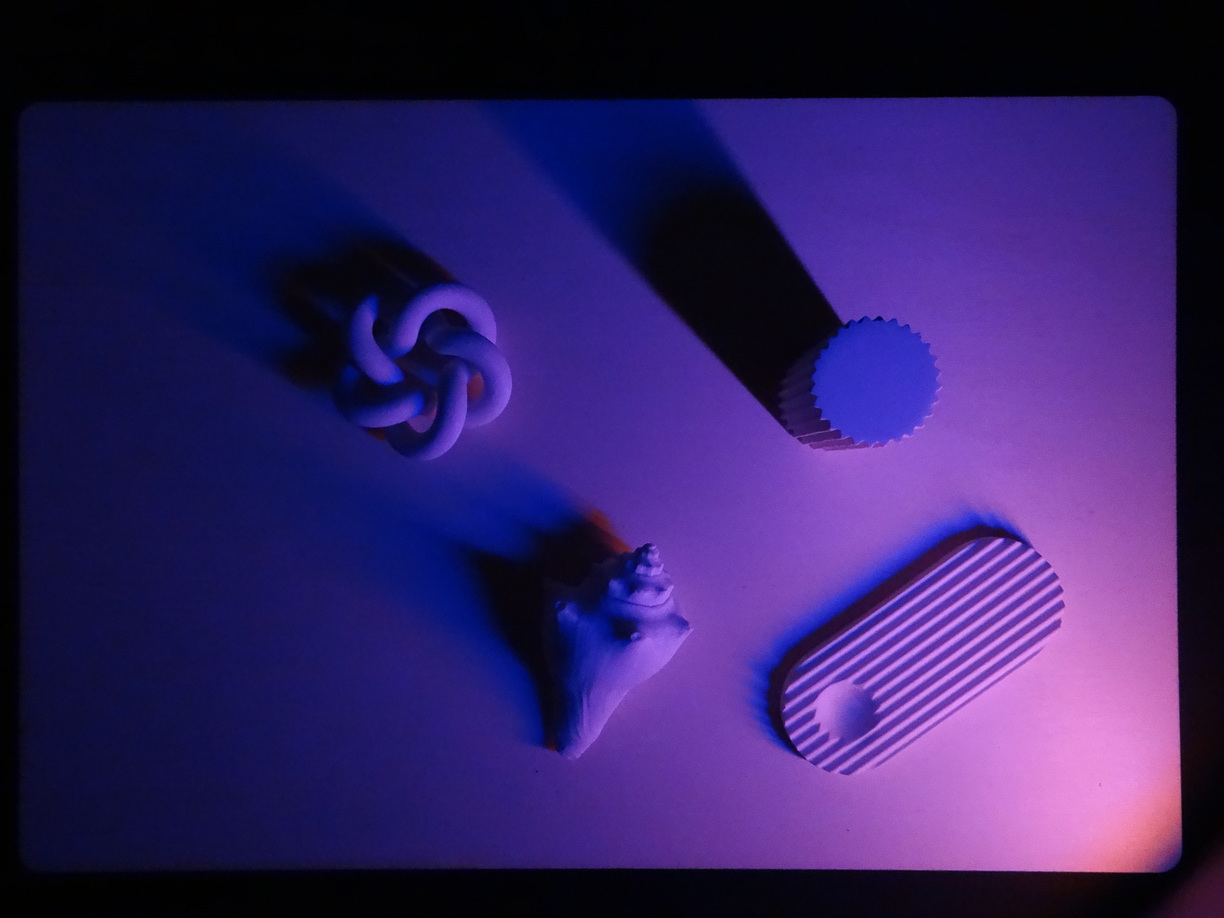
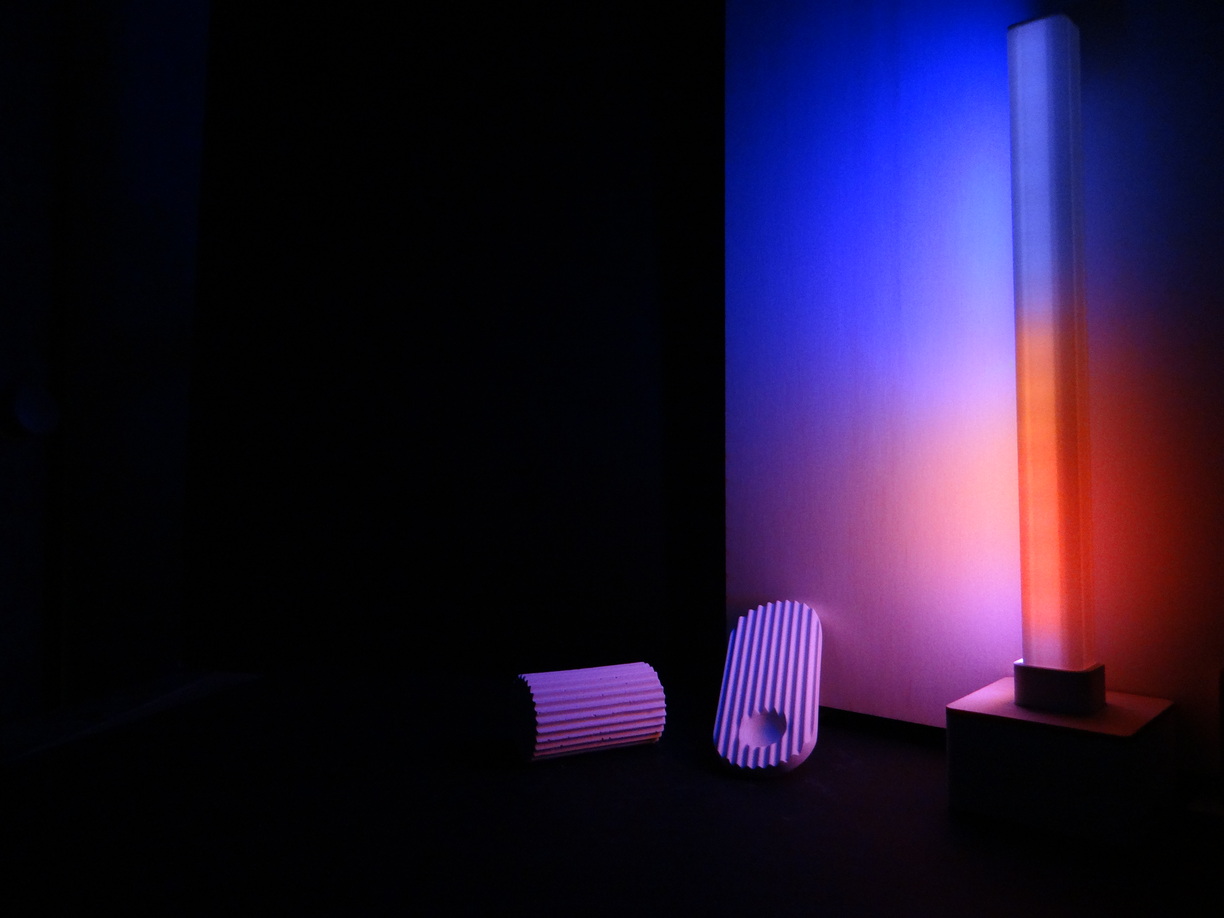
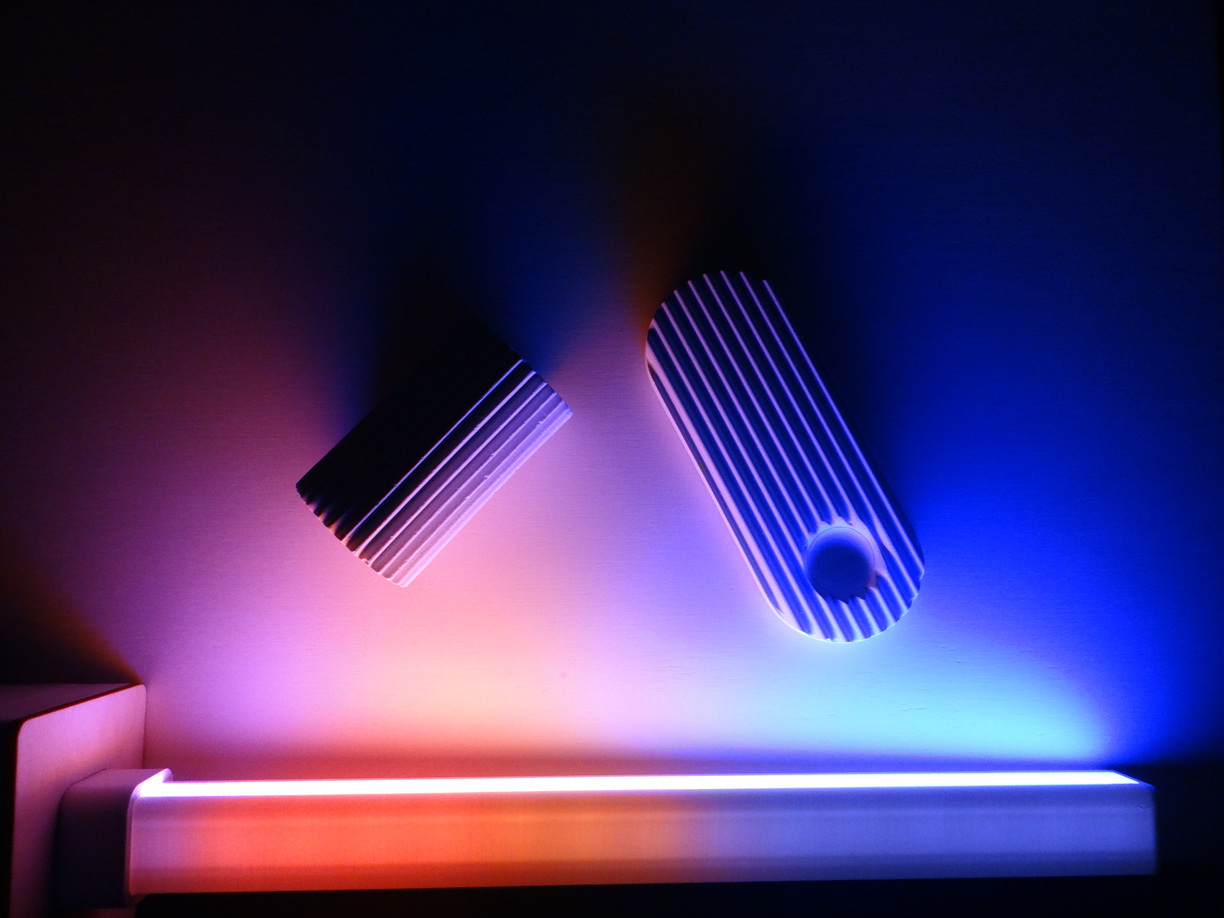
- Obstacles
- Wood screens
Key questions
What does it do?
User scenario
Users interact with the tools thanks to the following gesture:
- Setting a RGB color in the palette pod, thanks to primary colors pads.
- Attribute this color to a light sticks by placing it on the palette pod. The longer the led element is in contact with the palette pod, the more the led element gets lit up.
- the led element can be filled with different colors if it's placed on another pod or if the user changes the color of the pod
- Place led elements on the scene
- Place ribbed obstacles on the scene
- Enjoy the light diffusion effects, experiment various configurations
General technical principle
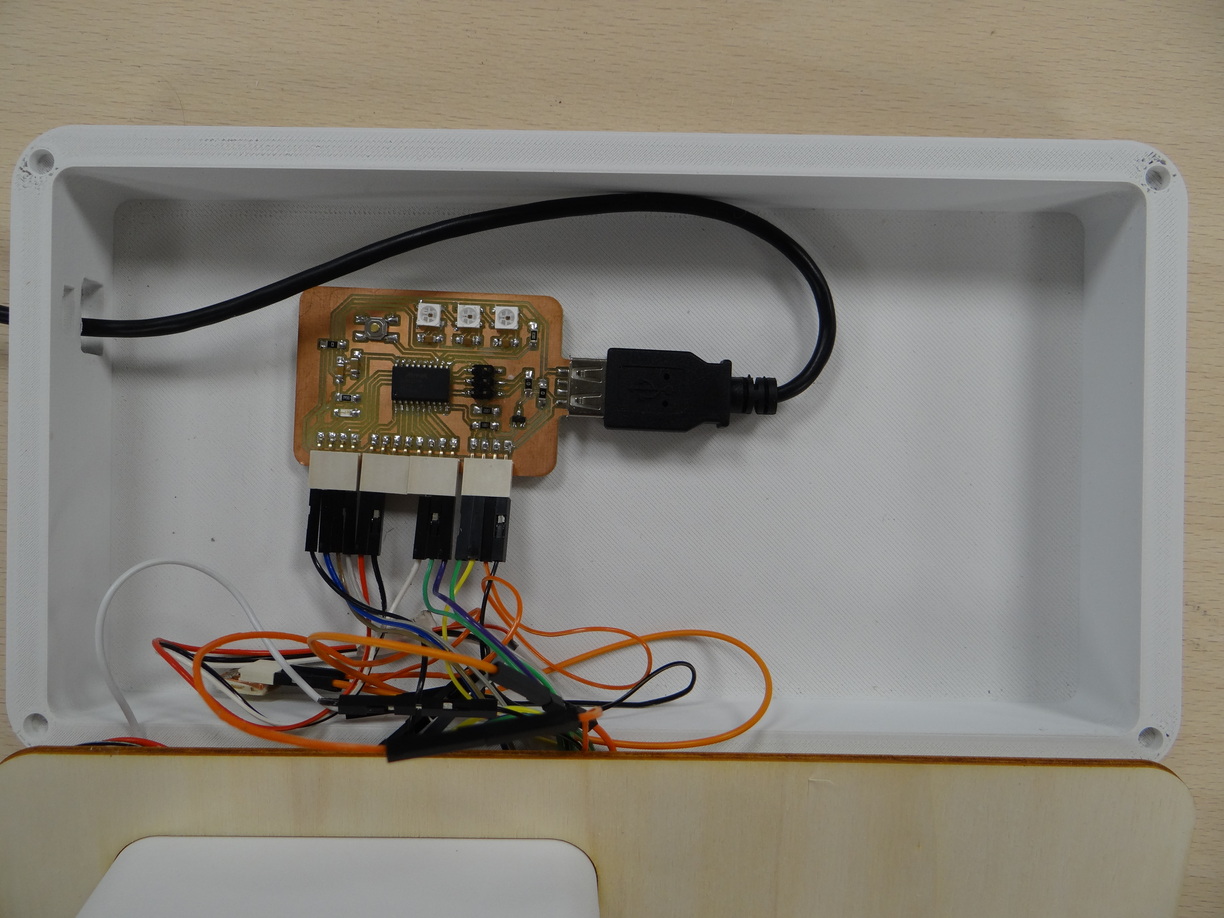
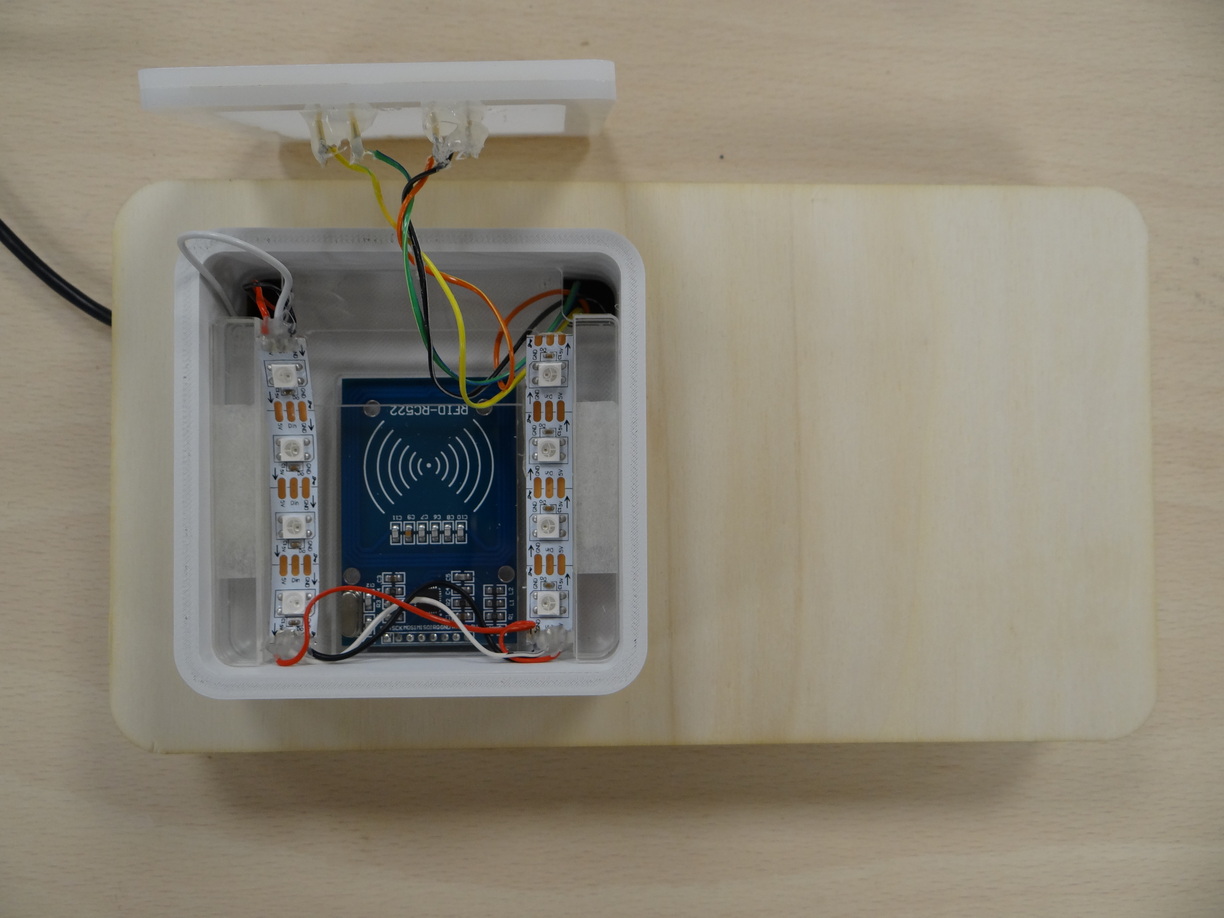
The two main element types are the color palette and the light sticks.
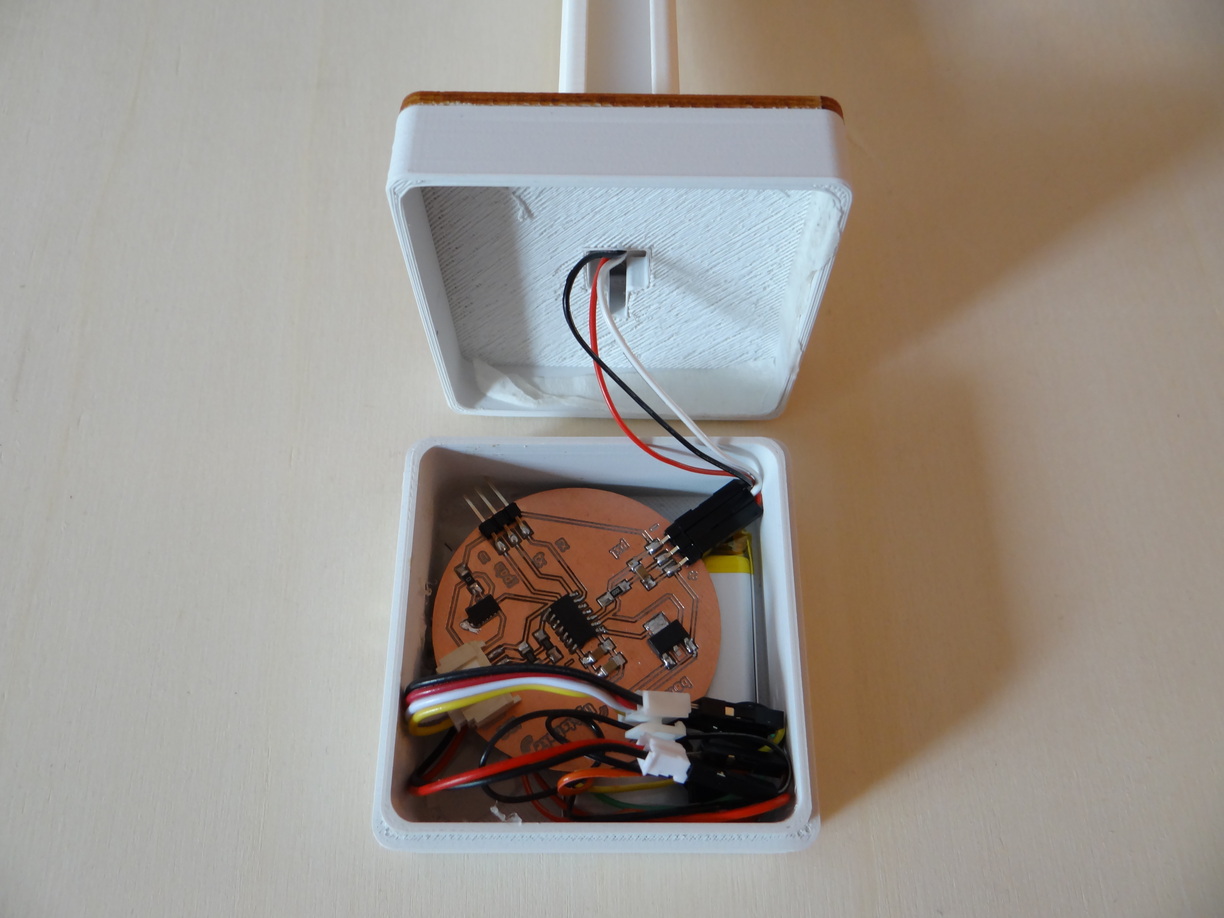
Each of them contain their own PCB and are powered independently.
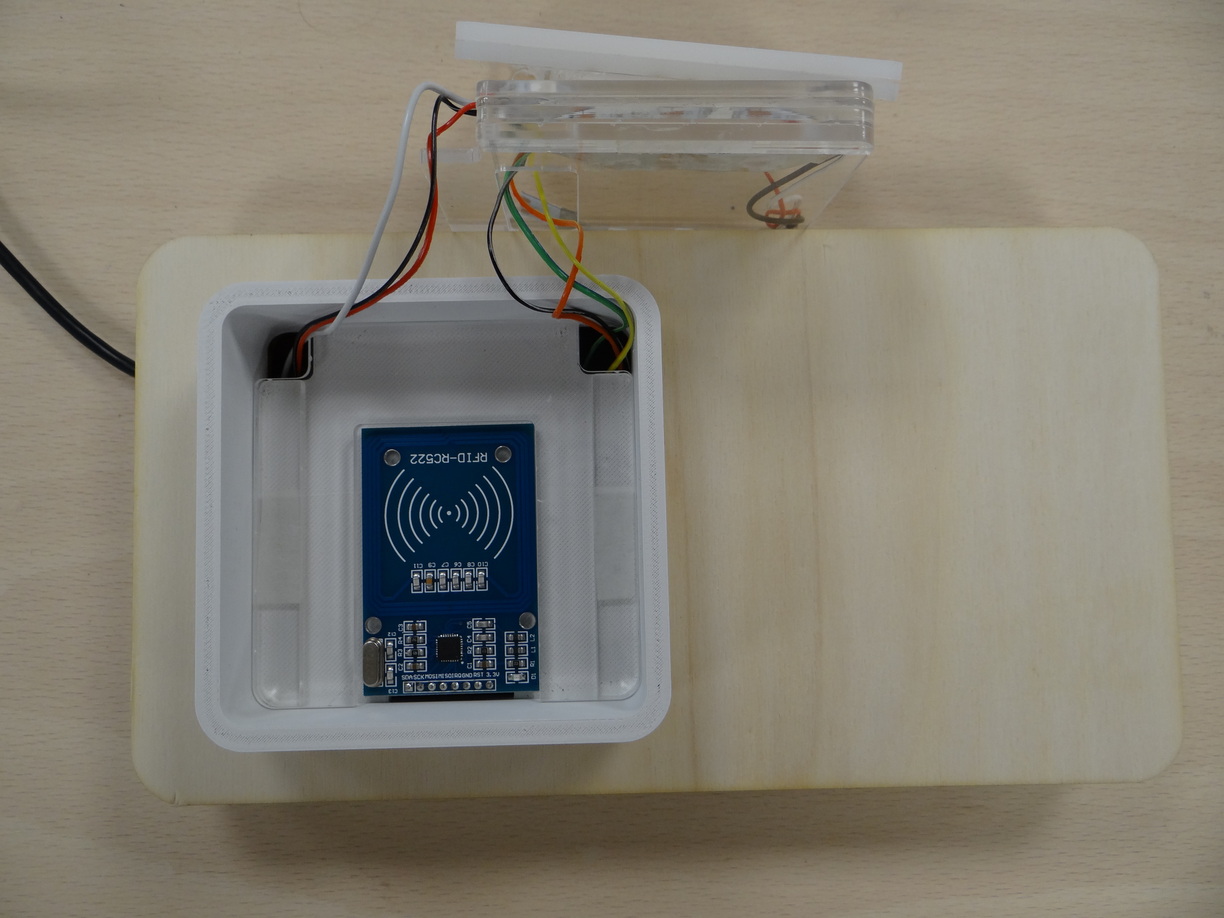
The color palette provides a RFID reader, which reads the UID of the NFC passive tags when they are bring close to the reader. UID have been read beforehand to assign an action (a color) to each tag of the set. When the reader identifies the NFC tag whose UID has been assigned to the blue color, an integer variable b is incremented. This value is immediately used to update the color of the pod's leds: all pixels are set to the color (r,g,b).
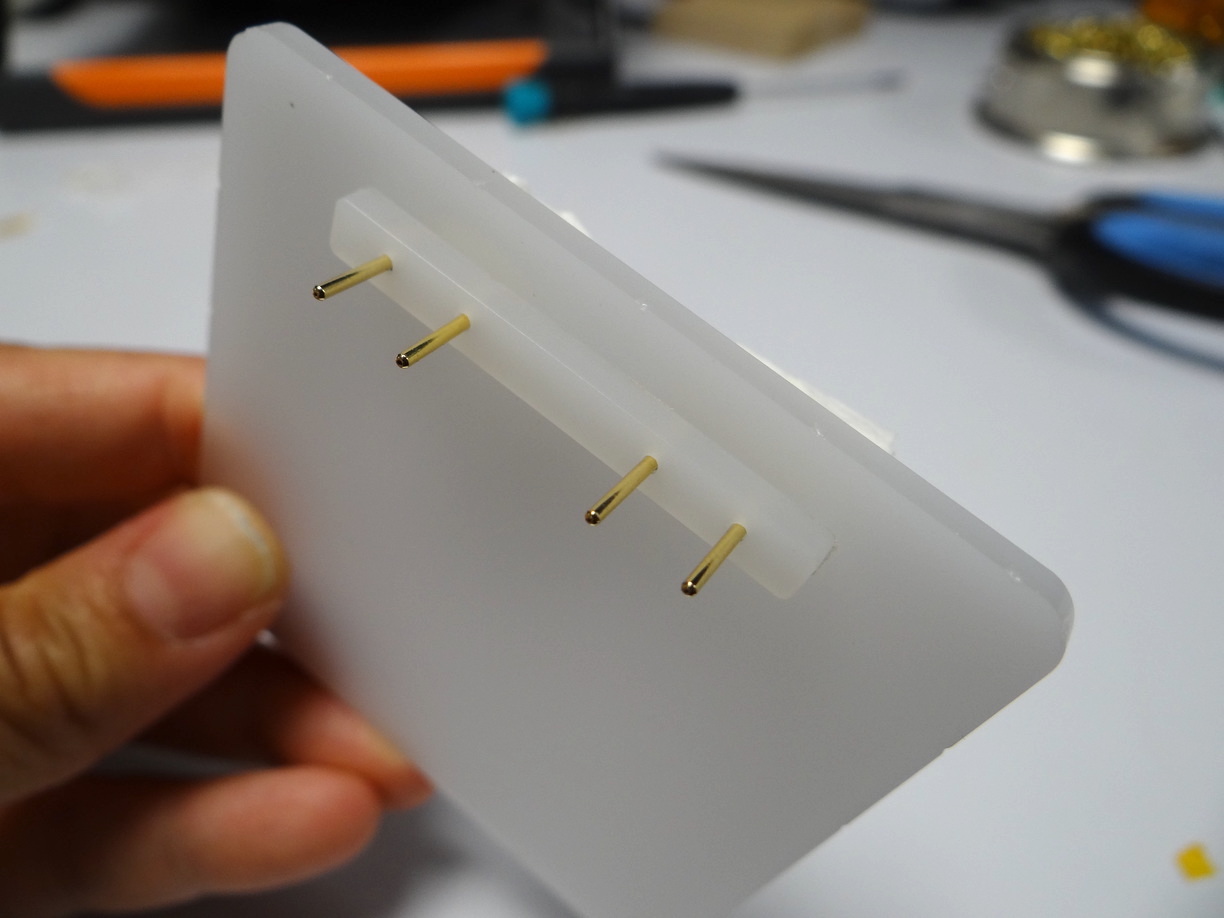
At first a light stick displays no color, the leds are off. When the contact pads of a light stick touch the pogo pins of the palette pod, it allows I2C communication to happen between the palette board and the light stick. I2C is a wired communication using two lines SDA and SCL. The pads/pins thus connect SDA of both sides together, same goes for SCL, the ground and 3.3V. The palette board acts as a primary board, sending the values of the r, gand b variables in real time to the secondary boards at a certain adress (defined in the code). The light stick board acts as a secondary board and listens to the (r,g,b) values sended by the primary board to light up the first pixel of the strip to that (r,g,b) color. As long as the light stick is in contact with the pogo pins of the palette, the I2C communication continues, and the pixels lights up one after another, according to a delay specified in the code. When the contact is interrupted, the ligh stick stays in the same state, partially (or totally) lit up.
When there is no contact, the (r,g,b) values of the palette can be modified again independetly from the light stick. A NFC tag allows to reset them to 0,0,0, turning off the palette leds. When a new contact is enabled between a partially filled light stick and the pod, the pixels keep lighting up to the new (r,g,b) color, starting from the one after the last pixel lit up during the previous "filling" step. When a stick is fully lit up, it starts again to the first pixel of the strip.
Who's done what beforehand?
Light art has been explored in many ways by artists and crafters. Among the more famous is the minimalist artist Dan Flavin who worked with neon tubes.
The led elements that the kit provides resemble to light tubes used in photography or filming. Similar coloured lights can also be found in interior design.
I created all important elements myself.
I used WS2812 led strips that were already soldered together instead of building the led strips myself. I also used a premade RC-522 RFID reader including its antenna. I used premade NFC tag stickers with a defined UID (red thanks to the reader and the DumpInfo sketch). I used jumper wires that I adapted and soldered when necessary, and pogo pins. I have not created the primary material myself (birch plywood, PLA, acrylic, POM, copper plate fr4, wax, copper tape). I used silicone commercially sold and found my own proporitons for the plaster + water mix. I used the UPDI programmer board of my colleague and instructor Stéphane. I used a generic USB power supply with a USB extension cable. I used the enclosure model of my colleague Simon to make the column silicone mold.
What did you design?
I designed all the following elements:
Color palette
- Electronics design (KiCad)
- 3D design of the bottom casing (Inkscape)
- 2D design of all the pod's stacked layers (internal packaging + top visible layers) (Inkscape)
- 3D design of the external pod case (Fusion 360)
- 2D design of the wood cover (Inkscape)
Light sticks
- Electronics design (KiCad)
- 3D design of the tube casing (Fusion 360)
- 2D design of the diffusing tube window (Inkscape)
- 3D design of the two parts of the bottom enclosure (Fusion 360)
- 2D design of a wood decoration (Fusion 360 x Inkscape)
Felt pads
- 2D design of the felt pattern (Inkscape)
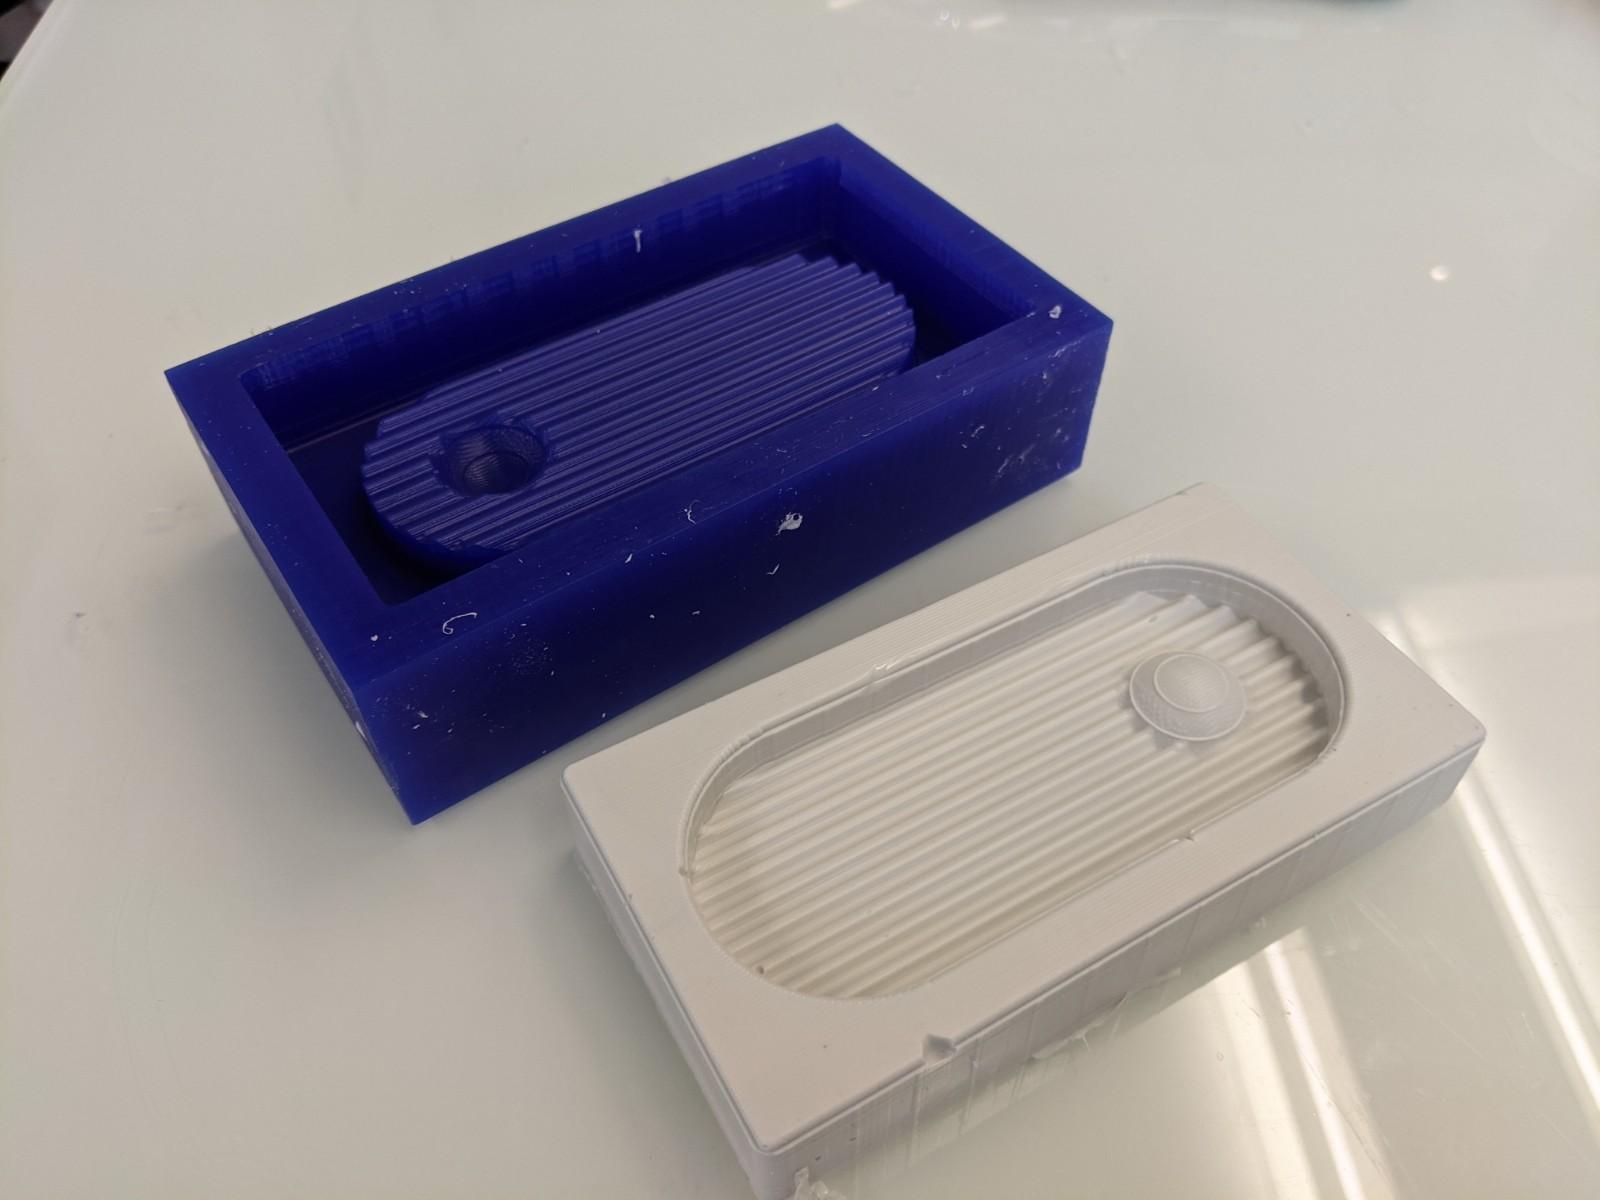
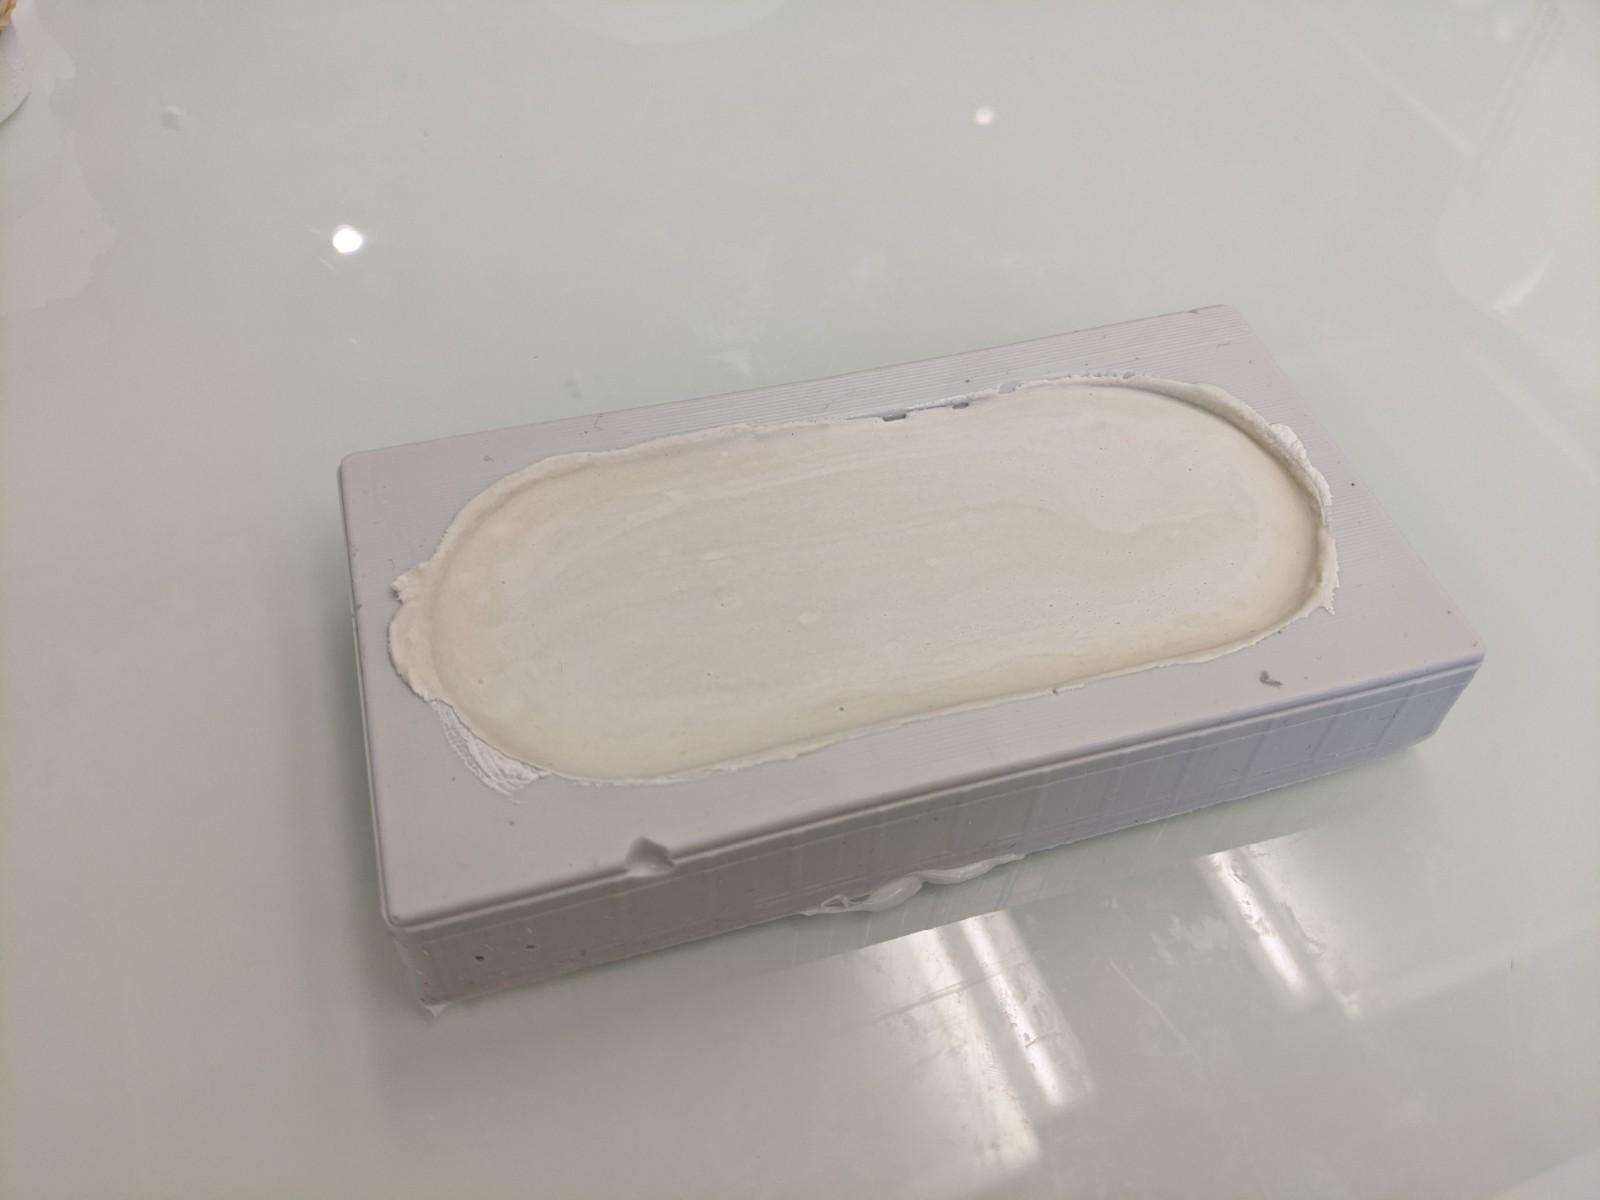
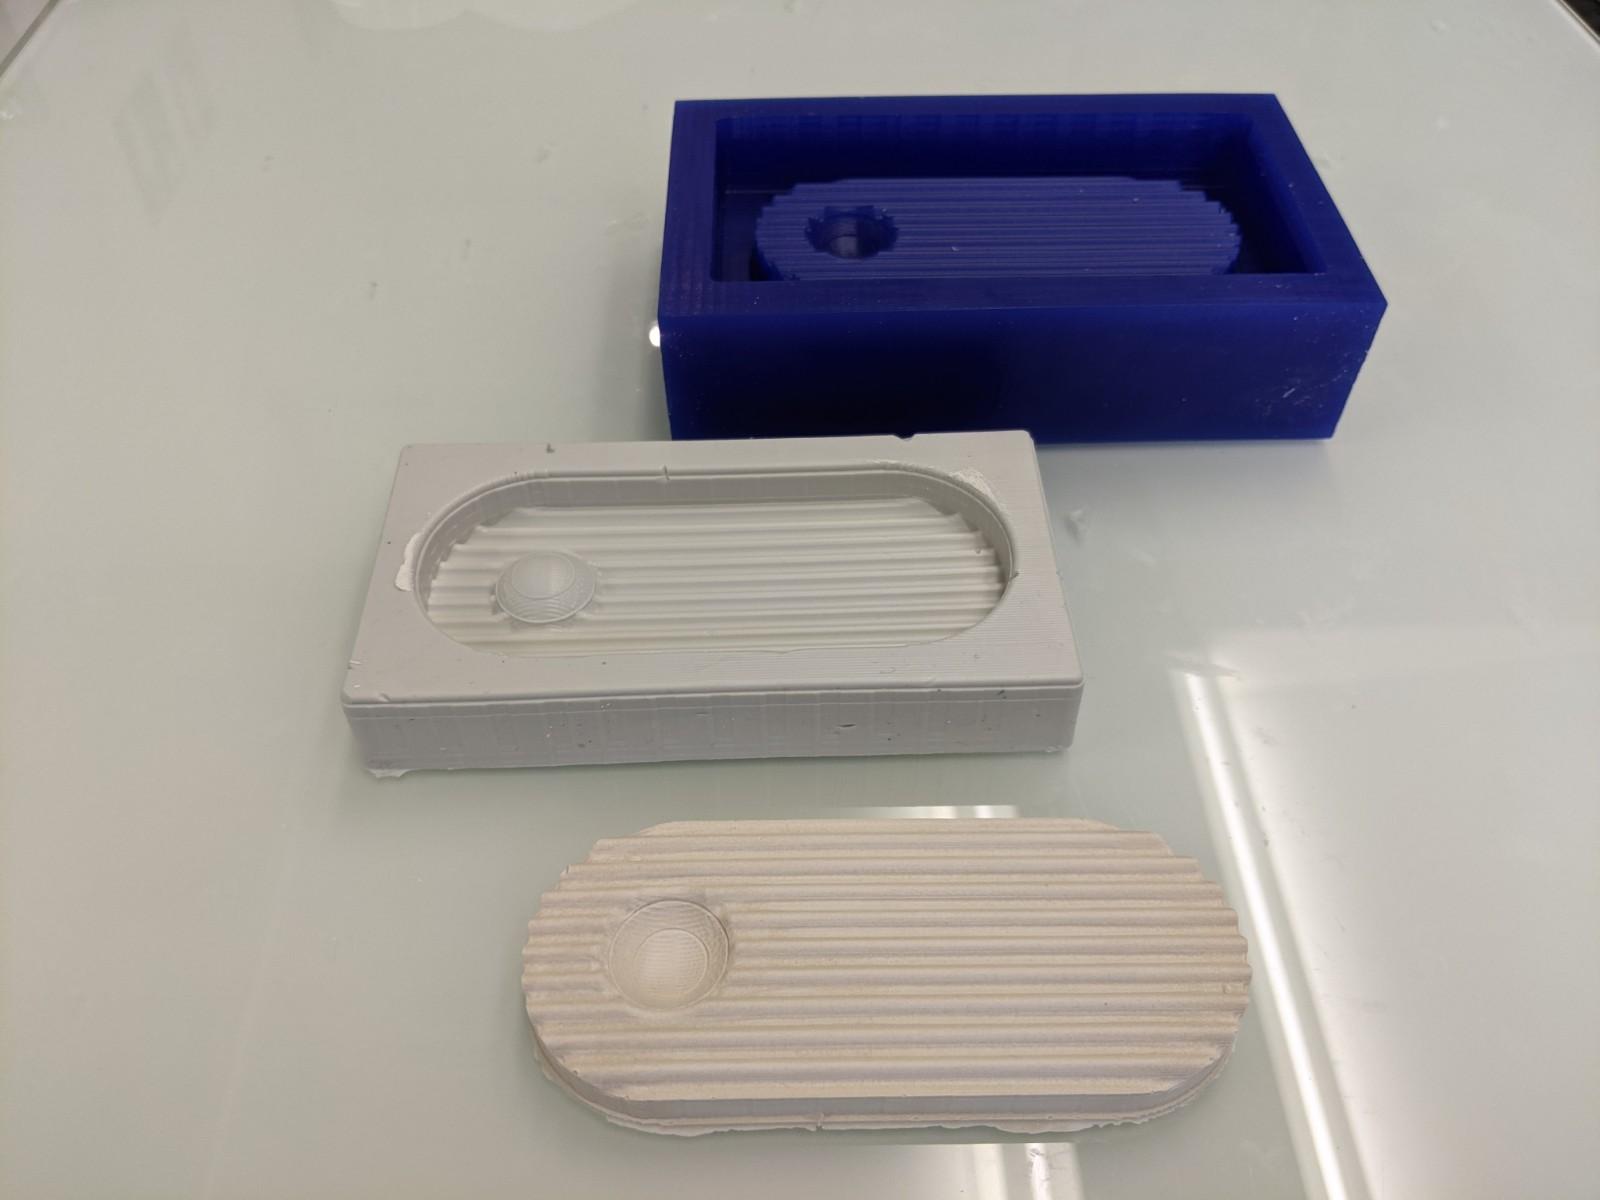
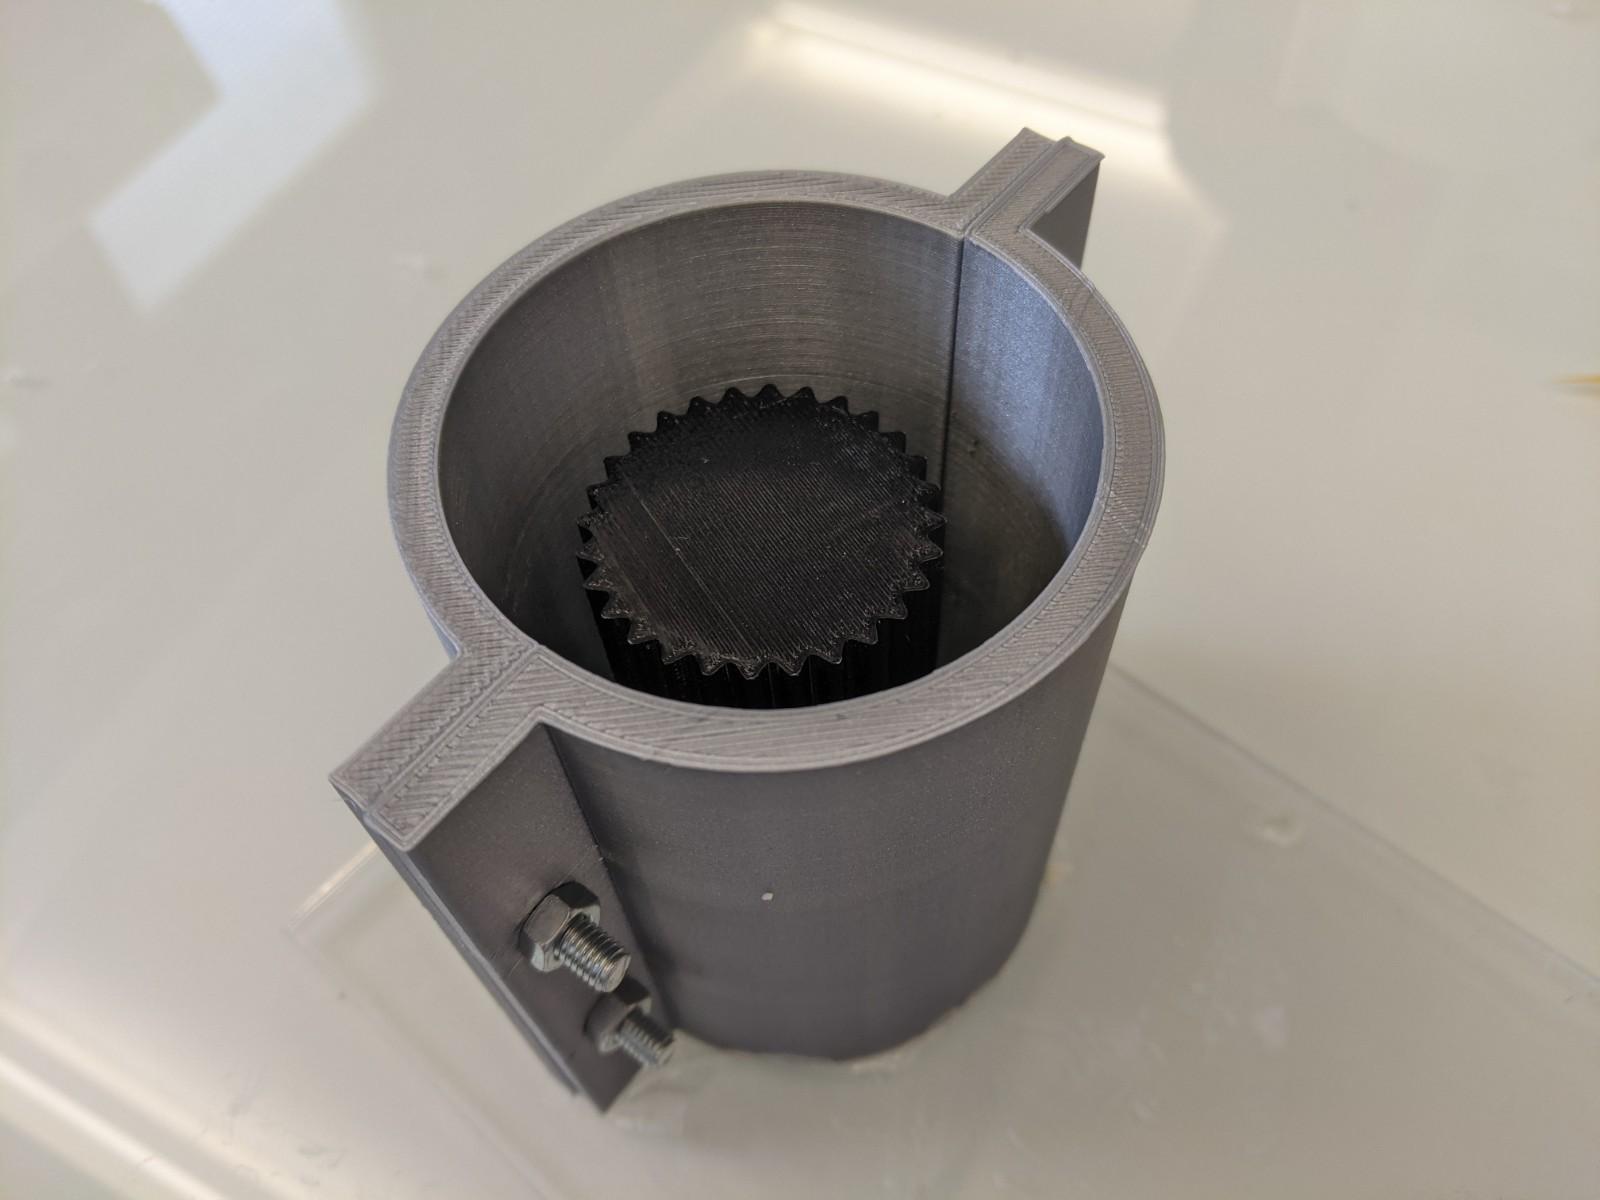
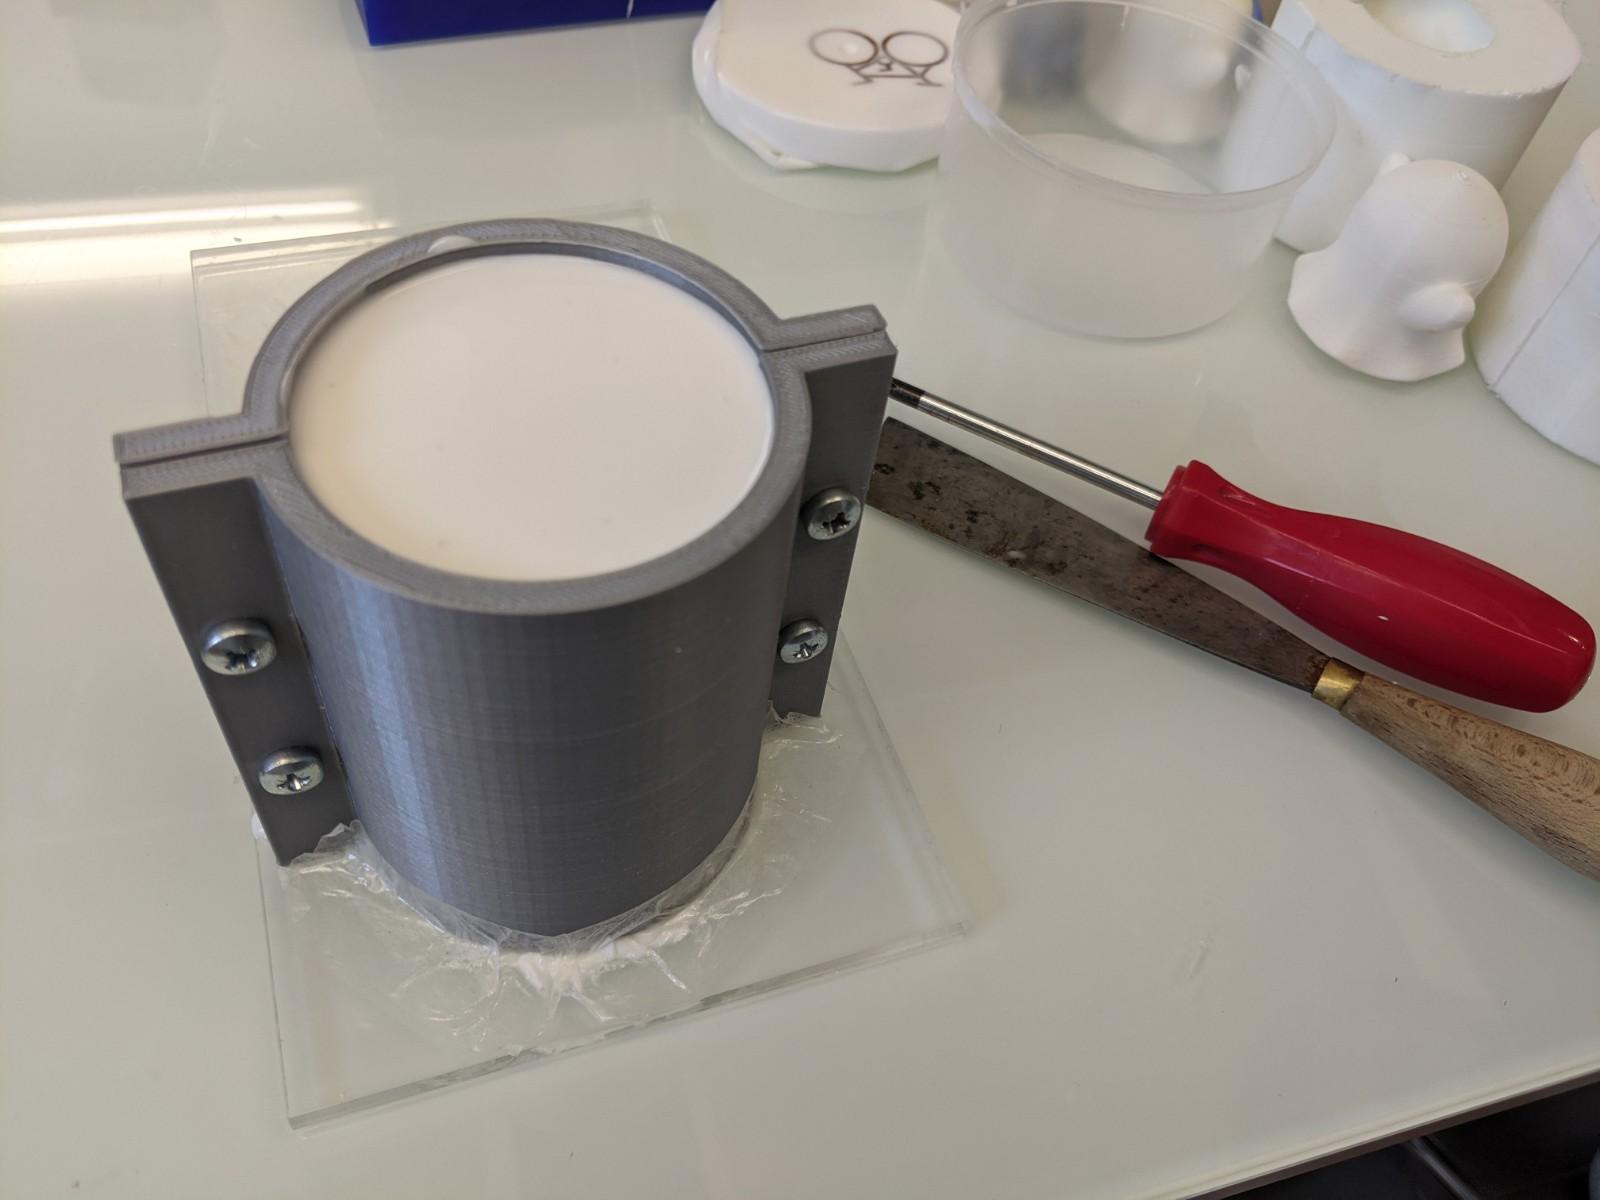
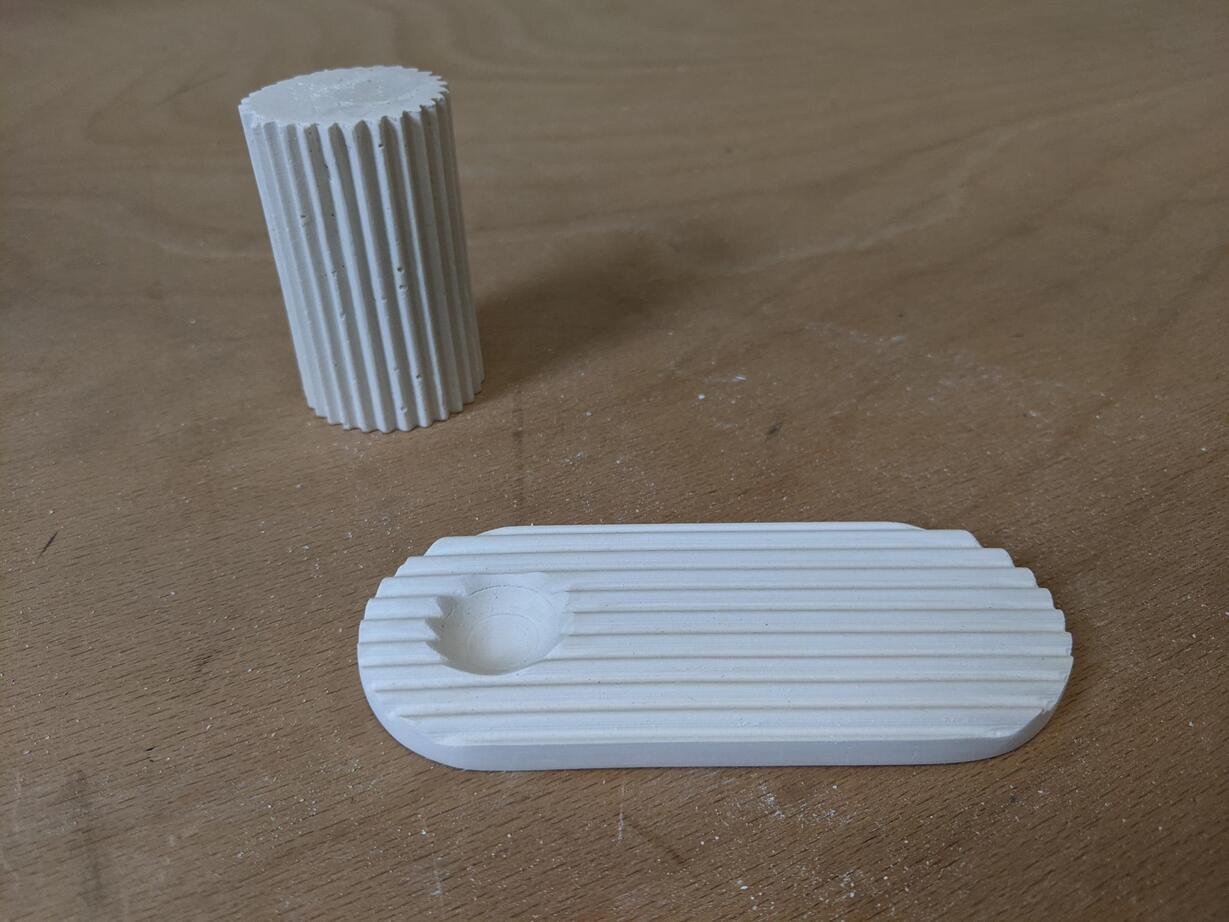
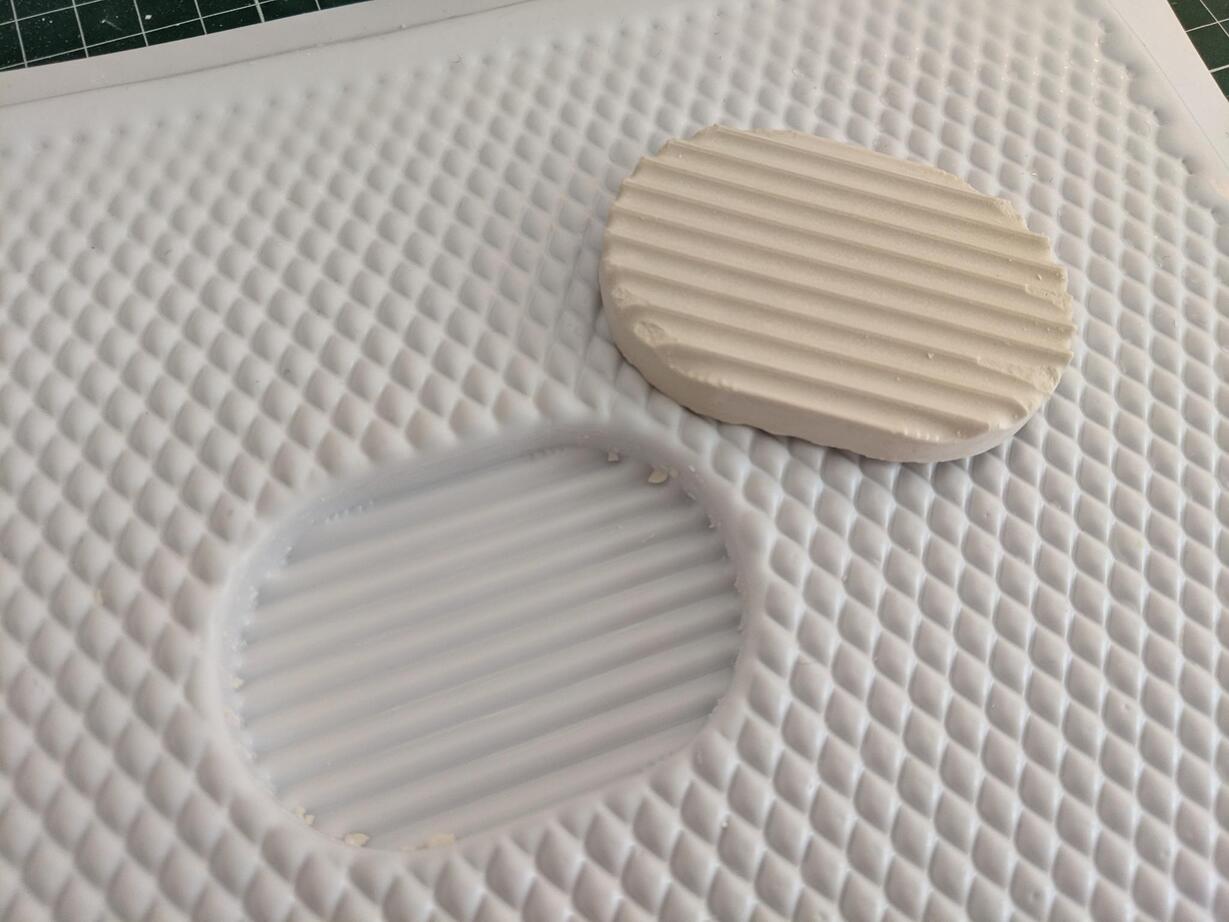
Ribbed obstacles
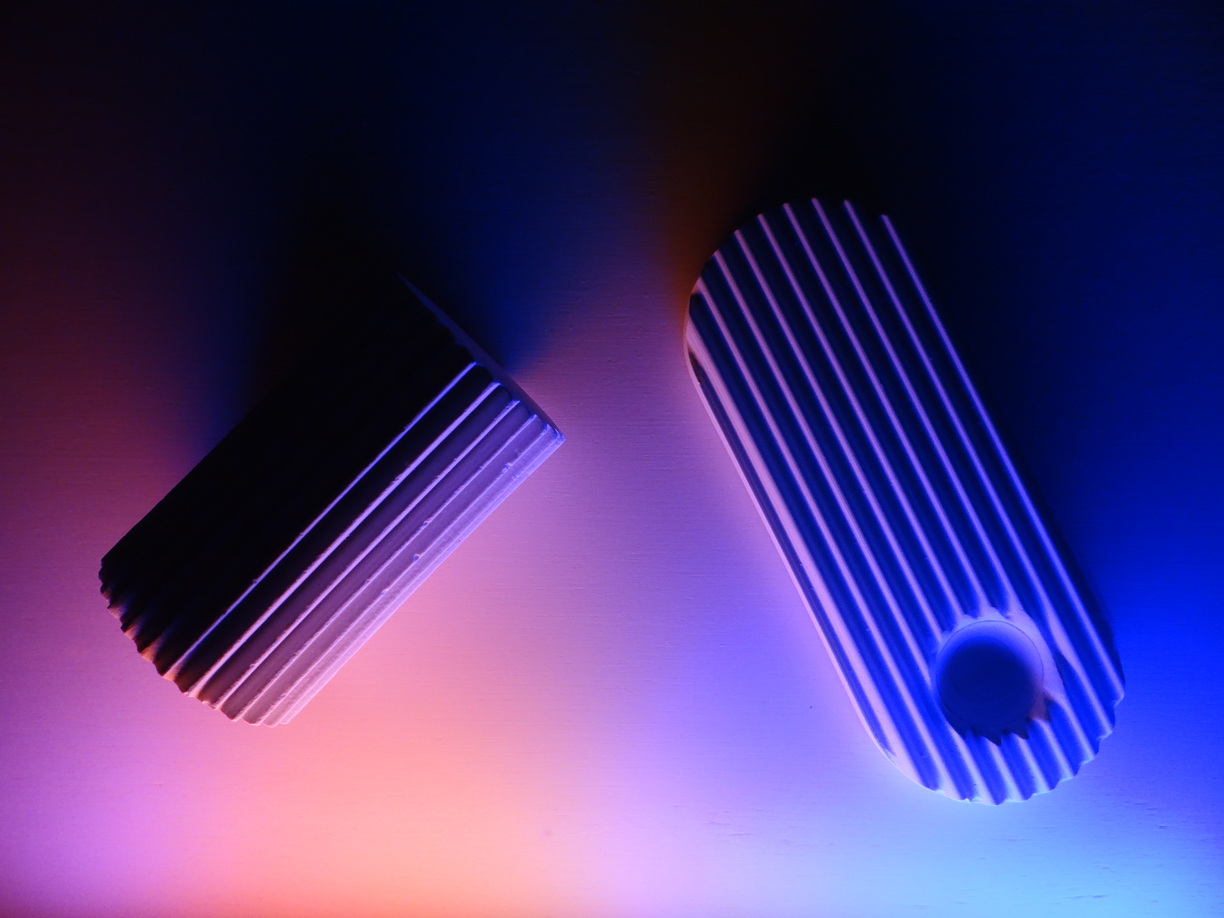
- 3D design of a wax mold for the tray (Fusion 360)
- 3D design of a ribbed model for the column (FreeCad... it was a long time ago!)
- 3D design of a candle holder (Fusion 360) (not casted yet)
- 3D design of a small tray for vacuum forming (Fusion 360)
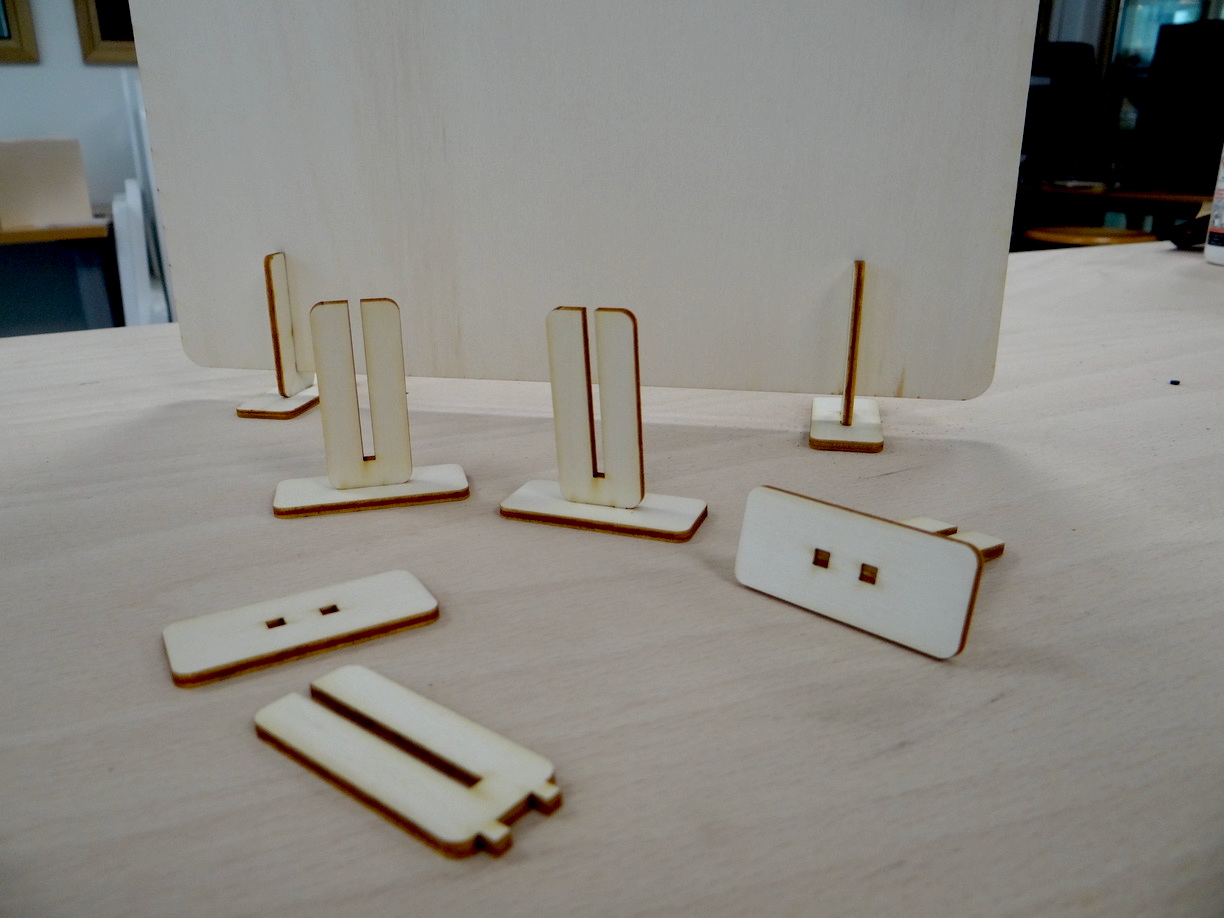
Wood pannels
- 2D design of the pannels and the feet (Inkscape)
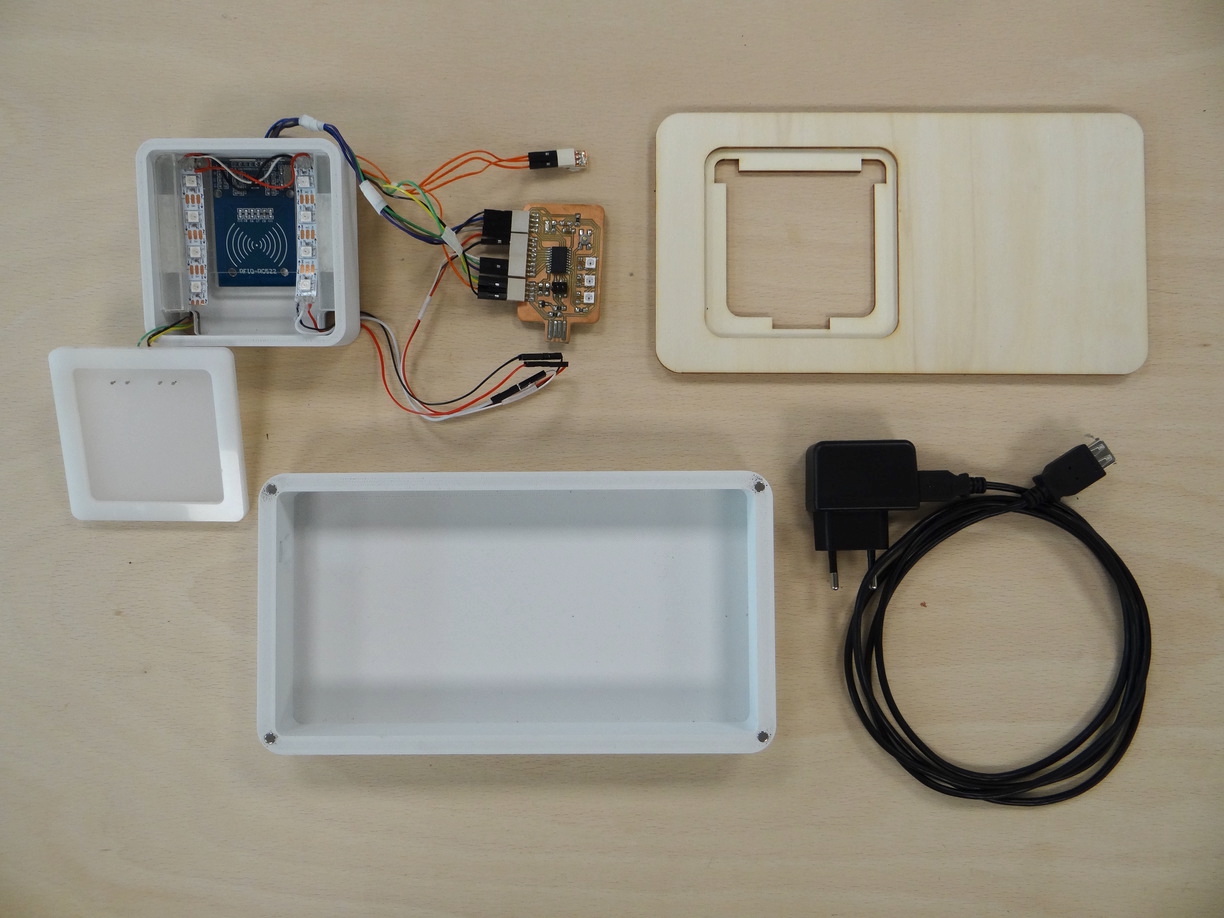
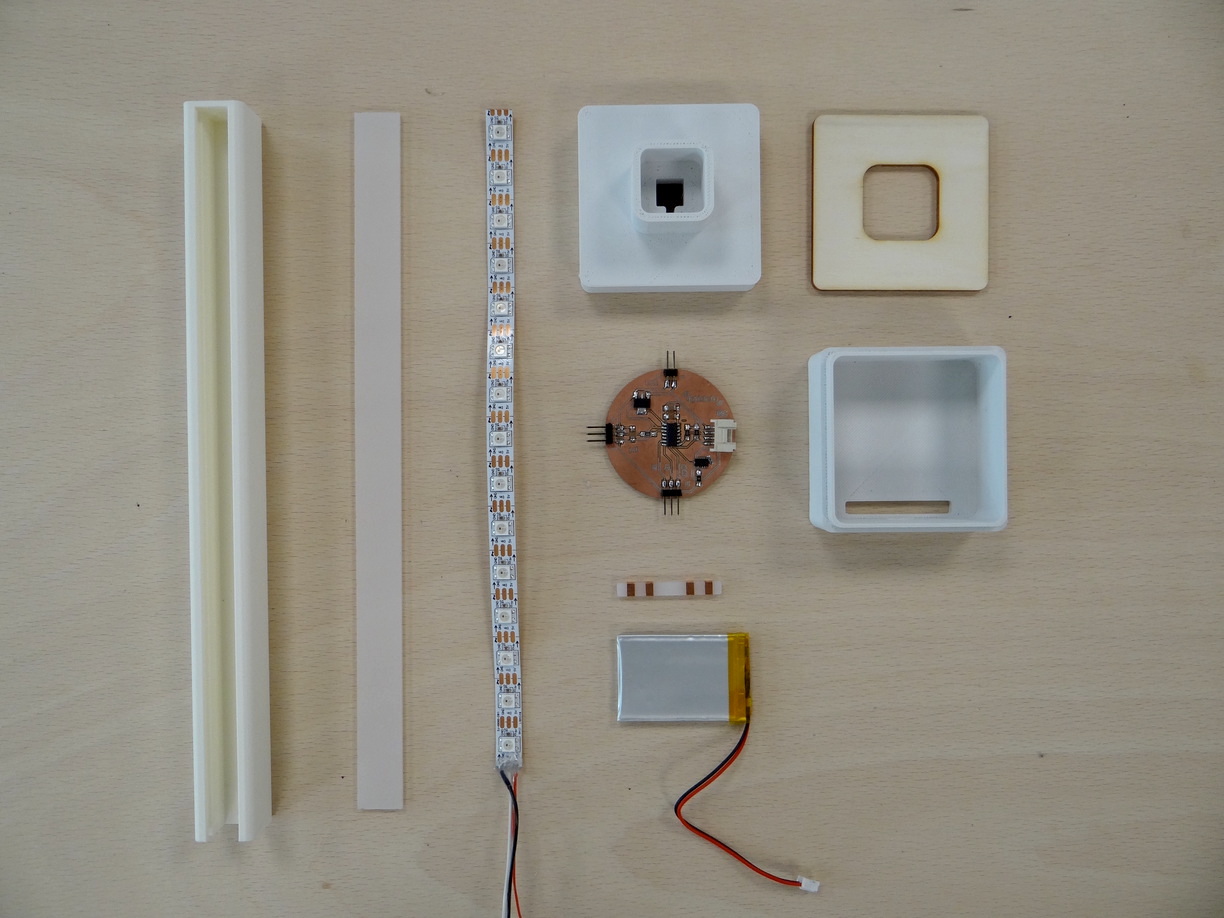
What materials and components were used?
Color palette
Here's the material needed to make the palette
- ATtiny3216
- RC-522 RFID reader
- WS2812 led strip. I used 8 pixels.
- USB sector power supply / optionally USB power bank
- Small electronic components: capacitors (to filter signals), resistors (to protect the neopixel ring + I2C pullup resistors), switch (to turn the device on/off), headers (for testing and for UPDI/FTDI)
- Wires, tin
- 4 pogo pins
- PCB copper plate
- Matt PLA for the casing and the pod compartment
- Plywood to embellish the casing and hold the pod compartment
- Diffusing acrylic
- POM for the pod compartment finish
- a UPDI/FTDI programmer board
Light sticks
Here's the material needed to make one light stick
- WS2812 RGB led strips with sufficient density (60 pixels per meter). I used 15 pixels for each light stick.
- ATtiny1614
- Li-Po battery 3.7V
- Small electronic components: capacitors (to filter signals), resistor (to protect the strip), switch (to turn the device on/off), headers (for UPDI/FTDI)
- Wires, tin
- PCB copper plate
- Copper tape for the contact pads
- matt PLA/ABS for the foot
- Diffusing acrylic (not coloured)
- White PLA/ABS
- a UPDI/FTDI programmer board
- a USB Li-Po battery charger
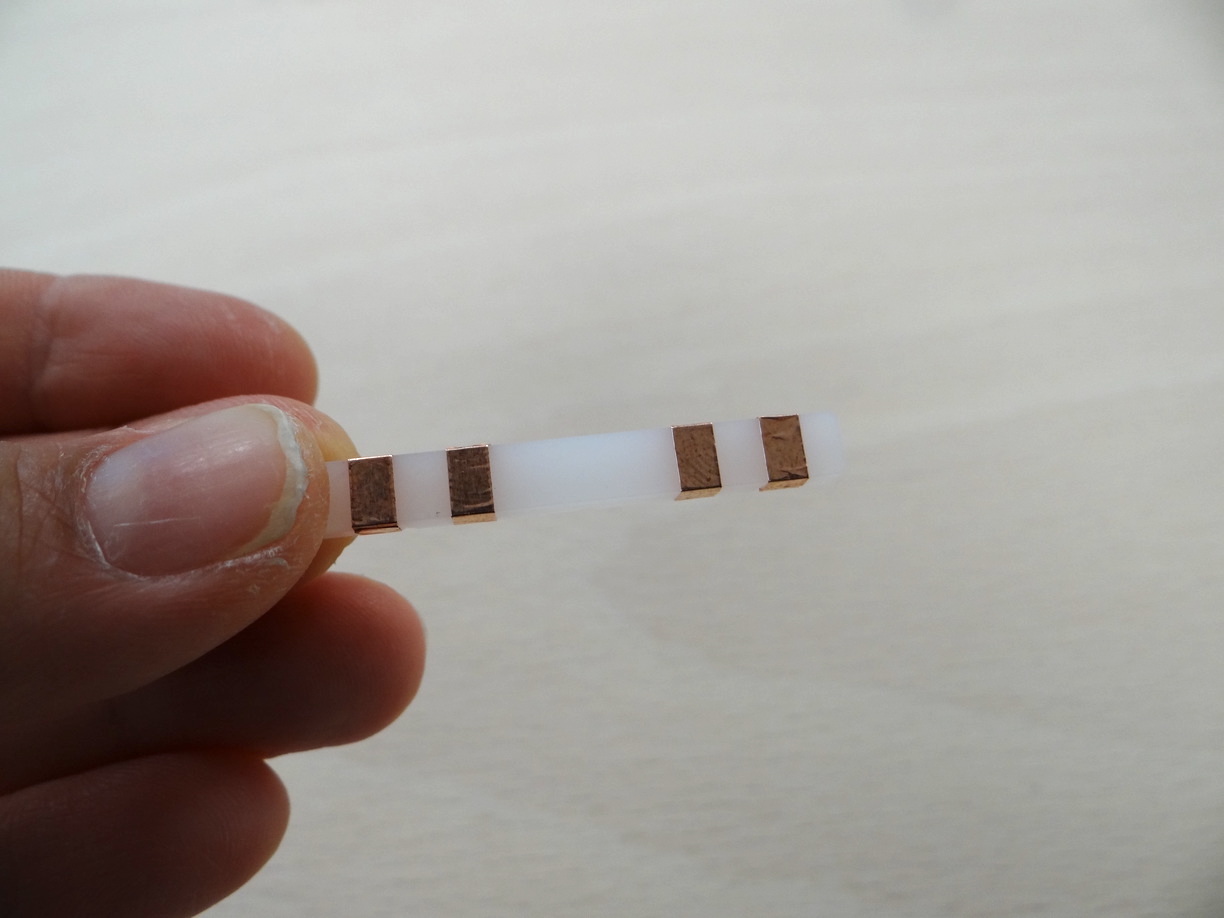
Primary colors pads
Here's the material needed for one puck (5 pucks would be provided, minimum 3 pucks for R, G and B)
- NFC passive tag sticker
- Rigid white felt
- Soft white felt
- White sewing thread
Ribbed obstacles
Here's the material used for the featured ribbed obstacles:
To create the molds:
- Machinable wax
- PLA filament
- ABS filament
- Silicone for molds making
- ABS / HIPS sheet for vacuum forming
For the casting:
- Plaster
- Water
Wood pannels
Here's the material needed to create one plywood pannel (I made three of them):
- 300*500mm, 3mm thick birch plywood
Where did they come from?
- Birch plywood, LED acrylic, clear acrylic, MDF: Trotec
- Rigid felt: Rougié & Plé
- Soft felt: Rougié & Plé
- NFC tags: NFCTagify
- RFID RC522 readers: AZDelivery (at the end they stopped working and I borrowed the ones of my colleagues so I recommand another supplyer)
- WS2812 strip: Adafruit via Mouser
- SMD components: Mouser, Farnell
- Matt PLA: Formfutura
- Silicone: Esprit Composite
- Plaster: Construction plaster found on the campus
- Wax: Cookson-CLAL
How much did they cost?
Bill of materials
This is the price of the components for the final object, for the prototyping part I must add a spool of regular PLA filament, two boards of MDF (300x600mm, 3mm thick) and three boards of birch plywood (300x600mm, 3mm thick).
| Component / Material | Price per unit (€) | Quantity | Information |
|---|---|---|---|
| 1M/60leds WS2812 Digital RGB LED Flexi Strip | 16,80 | 1 | |
| RC522 RFID readers | 4 | 1 | |
| NFC tag stickers | 1 | 4 | |
| ATtiny3216 | 1,3 | 1 | |
| ATtiny1614 | 1 | 3 | |
| LiPo 3.7V battery | 10 | 3 | |
| Plywood board 300*600 3mm thick | 4,58 | 4 | |
| Clear acrylic board 300*600 3mm thick | 4,58 | 1 | |
| Acrylic Troglass LED white 300*600mm, 3mm thick | 13,21 | 1 | |
| Troglass ClearCast 300*600mm, 3mm thick | 14,56 | 1 | |
| POM 300*600mm, 3mm thick | 16 | 1 | |
| Matt PLA FormFutura 750g spool | 34,99 | 1 | |
| White PLA 750g spool | 30 | 1 | |
| Silicone RTV Esprit composite 1kg | 43,65 | 1 | |
| Felt rigid | 2,5 | 1 | |
| Felt soft | 6,5 | 1 | |
| Wax | 58,4 | 1 |
What parts and systems were made?
All the parts I intended to develop were made:
- 1 Color palette
- 3 light sticks
- 4 felt pads
- 3 plywood pannels + feet
- 3 plaster ribbed obstacles
What processes were used?
- 2D design: Inkscape
- 3D design: Fusion360
- Embedded programming, inputs, outputs, networking: Arduino IDE (C++)
- Electronics design: KiCad
- PCB path generation: FlatCAM
- large CNC path generation: VCarve
- PCB milling: Roland SRM-20
- Laser cutting: Trotec Speedy 360
- 3D FDM printing: Raise 3D Pro2
- Vinyl cutter: Graphtec pro FC9000
- Molding and casting
- CNC machining: Shopbot buddy
- Vacuum forming: Formech compac mini
- Casting silicone and plaster
- Other: hand soldering, wiring, sewing, scissors cutting, gluing, assembling, iterating, documenting
What questions were answered?
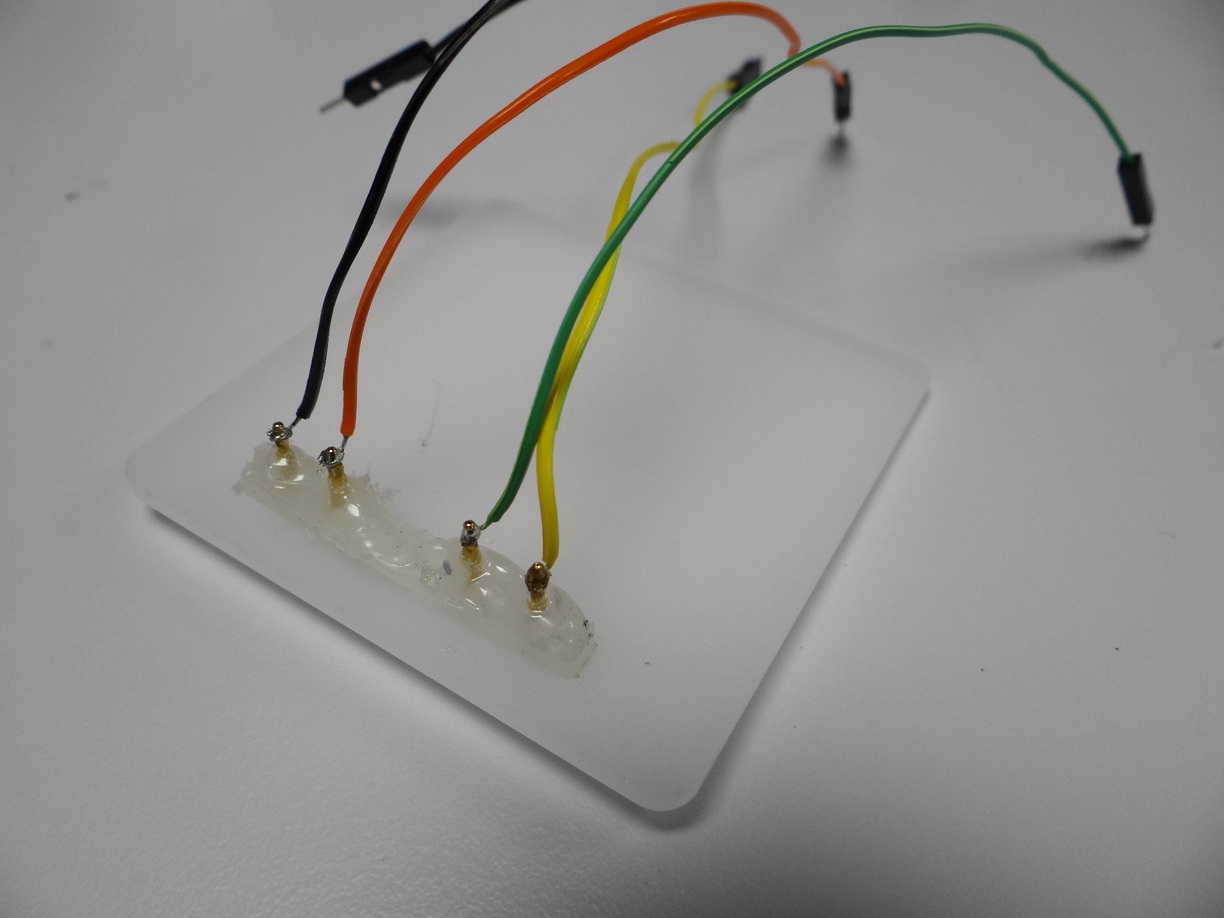
- How to provide a nice finishing for the contact pads parts? --> The I2C contact system were made with copper tape below the light stick, and with pogo pins on the palette pod. Pogo pins blends in a very discreet way in the pod's design. The copper tape pads are discreet too and well integrated, but not the more sustainable, moreover due to the contact with the pointy pogo pins
- How to charge easily the batteries? --> With a USB LiPo charger. It still requires to open the light stick case though.
- How is the scene integrated in its environment? --> No rigid frame were made, the environment relies in three simple wood pannels standing on small feet, that can be oriented freely.
What worked? What didn’t?
I couldn't find the time to integrate the code for the accelerometer to the working RFID-led-I2C code.
Otherwise the electronics worked:
- The NFC felt pads trigger fluidly the color changes
- The light stick filling, e.g. the I2C communication works fluidly too... when the copper pads are not torn / damaged! If they are, you just have to add an extra layer of copper tape. Another spiral would integrate solid copper pads. I started working on it, made a Kicad design, milled it... but unfortunately the machine didn't seem to like the drilling gcode, I don't know why.
- The lighting effects are just gorgeous, mixing colors in the stick is so esthetically interesting. The ribbed obstacles work very well with the light diffusion in enhancing the light reflections and the shadows.
How was it evaluated?
- Do the gestures to change the light colors feel intuitive?
I tested the project with some people who didn't know beforehand about it, they really enjoyed mixing the colors. It seems that tapping the felt several times to add more color doesn't feel natural to everyone, a continuous filling could work better (as with the light stick)
The filling gesture seems to really provoke some excitement!
- Does the set of tools allow interesting expressivity?
I believe it's a good start, quite modular, even if I'd like to create more passive elements (textures to clip to the pannels, other obstacles, reflective elements or filters, etc.)
- Does it feel inviting for more experiments?
For me definitely, but it really depends on who interacts with it. I believe you must have some light or color interest to fully enjoy it.
- How was it percieved by Neil and by peers during the presentation?
I had a lot of positive feedbacks by my peers during the presentation (via the message chat). Comments such as beautiful, very cool / great project, this is awesome / take my money.
Neil really seemed to appreciate the project, especially the fact that the technology is hidden.
It's beautiful the way you just call up color
I've never seen programmable light colors that let you mix them in this intuitive way. I suspect many people would like to have that, and I like the metaphor of sort of filling it up and pouring it out.
See the live presentation at 1:56:00
What are the implications?
Apart from making more sustainable contact pads, I don't intend to develop this project more in the following months. But I'd be glad if someone feel like carrying on with its development as long as it stays an open and non commercial project!
As for the object itself, I may also integrate it in my apartment's decoration (on special occasion for example) or use it to make interesting pictures.