14. Interface and Application Programming
This week I worked we learned making interfaces to our microcontroller projects. During group work we tested many different interfaces that could be used to control the microcontroller board and receive information from it. I programmed a web server interface to be served by ESP32C3 microcontroller.
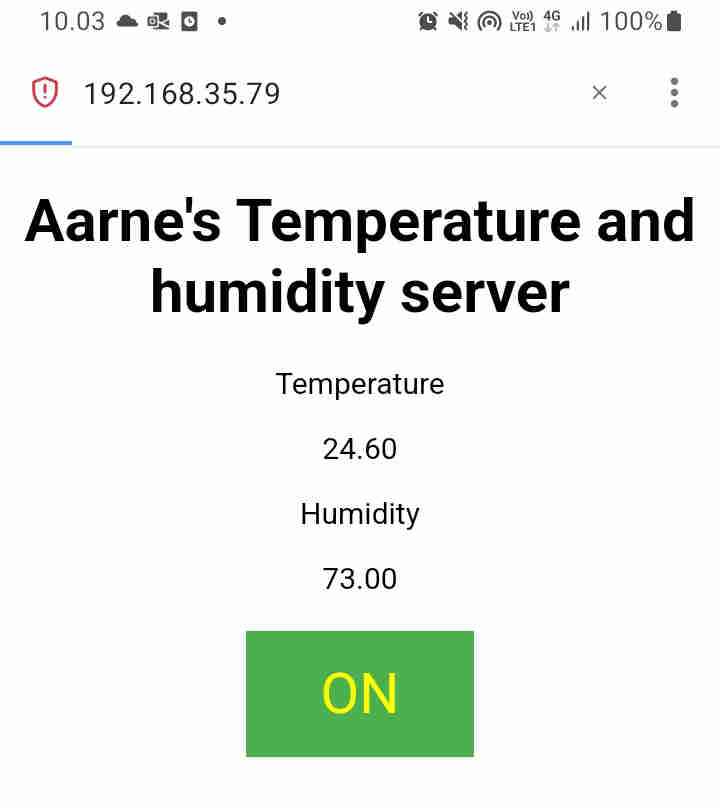
Web server interface to ESP32C with DHT22 temperature humidity sensor and a led controlled by html button
During the previous week I had tested wireless communication with ESP32C microcontoller according to random nerd tutorial. This week I developed the project a bit further and introduced DHT22 temperature humidity sensor to the board, which I milled during electronics production week. I modified the html code produced by the board to output temperature and humidity data. The board had a led connected to arduino digital pin D6, which I set to be controlled by the web server by programming the html code. In the html page served by the ESP32C, there is a button to control the led (on/off) and the web page displays current temperature and humidity data.
The web server on the ESP32C3 MCU utilizes the WiFi library, which is available for this microcontroller. The library is taken in to use by including the following lines in the Arduino IDE code:
// Load Wi-Fi library
#include <WiFi.h>
After this, the code that is used to define the access to the local wifi hotspot:
// Replace with your network credentials
const char* ssid = "here is the wifi hot spot name";
const char* password = "here is the password of the hotspot";

// Set web server port number to 80
WiFiServer server(80);

// Variable to store the HTTP request
String header;
In the setup loop, the ESP32C3 is set to connect to the wifi. The main command to achieve this is the WiFi.begin(ssid,password):
// Connect to Wi-Fi network with SSID and password
  Serial.print("Connecting to ");
  Serial.println(ssid);
  WiFi.begin(ssid, password);
  while (WiFi.status() != WL_CONNECTED) {
    delay(500);
    Serial.print(".");
  }
  // Print local IP address and start web server
  Serial.println("");
  Serial.println("WiFi connected.");
  Serial.println("IP address: ");
  Serial.println(WiFi.localIP());
  server.begin();
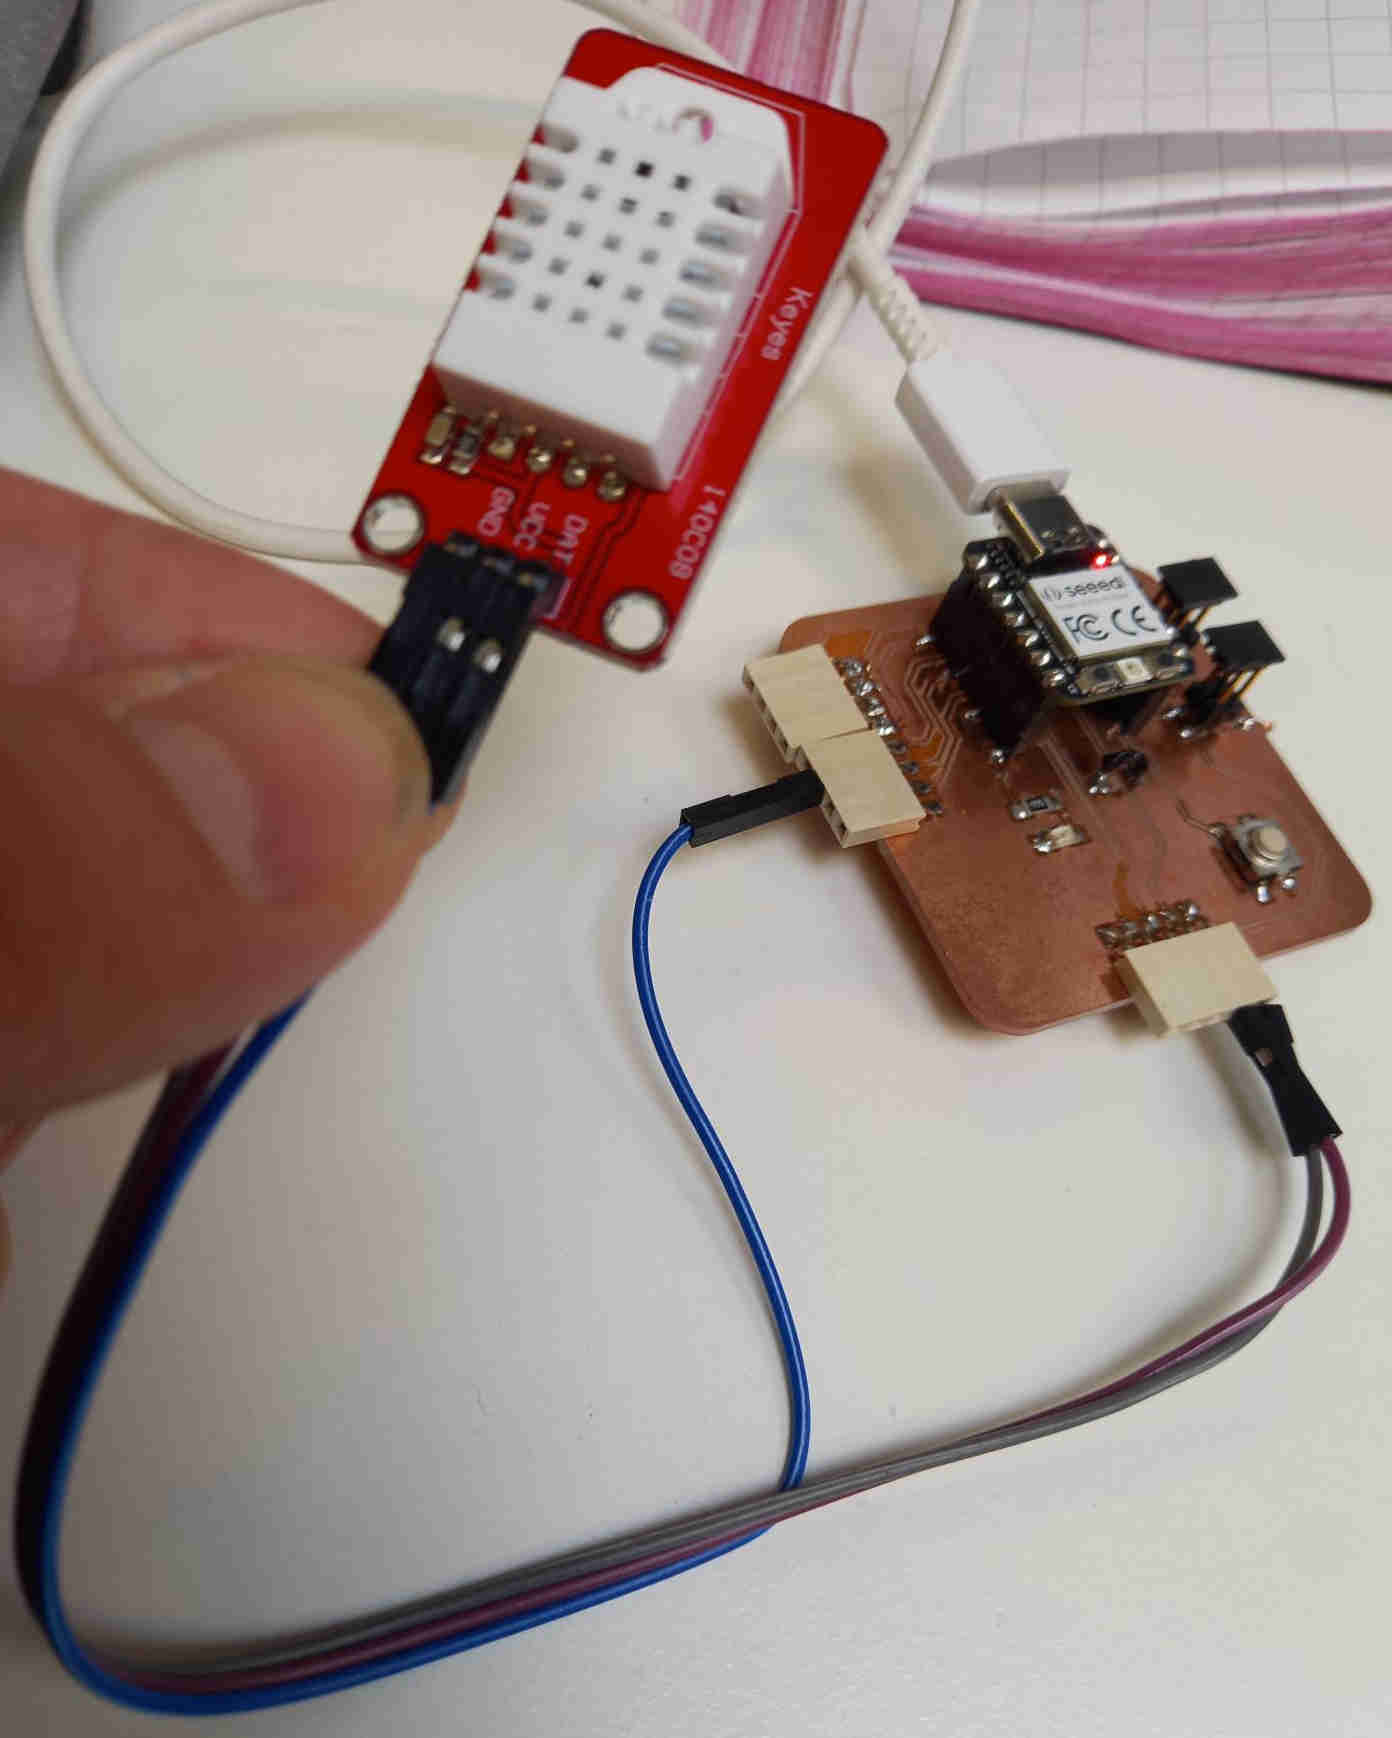
Gleb gave me DHT22 sensor and instructed to use Adafruit DHT library, which I installed. I used the DHT22 example code provided by the library. During our local lecture Gleb instructed us how to avoid delays by using timer. I adopted this approach by modifying the code so that the DHT22 sensor is polled every 2 seconds in the main loop using timer instead of delays (delays were used in the Adafruit DHT22 example code). I modified the Adafruit DHT22 example code to use timers as follows:
deltaaika=millis()-aika;
  mytimer=mytimer+deltaaika;
  aika=millis();
  if (mytimer>2000){
  // Reading temperature or humidity takes about 250 milliseconds!
  // Sensor readings may also be up to 2 seconds 'old' (its a very slow sensor)
  h = dht.readHumidity();
  // Read temperature as Celsius (the default)
  t = dht.readTemperature();
  // Read temperature as Fahrenheit (isFahrenheit = true)
  f = dht.readTemperature(true);
  ...
  mytimer=0;
  }
I combined the modified DHT22 code with the ESP32C web server code that I used last week, and I also set the led on the board that I had milled to be controlled by the html page button. The full code which I had modified is here.
The communication between the client (the mobile phone browser), the MCU (ESP32C3) and the sensor (DHT22) is managed as follows. The mobile phone is used as a WiFi hotspot. The ESP32C3 connects to it when it is powered. The ESP32C3 polls the sensor continuously in two second intervals. The ESP32C3 updates the webpage according to the temperature and humidity readings obtained from the sensor. I added the line to make the browser update every three seconds, so the recent temperature and humidity data are displayed on the updated page of the browser:
client.print("<meta http-equiv=\"refresh\" content=\"3; URL=http://");
Additionally, I applied the button on the web page to turn on the led on my board. I modified the original Random Nerd Tutorial code to use pin D6 (the led pin of my board) by modifying the line in the beginning of the code to:
// Assign output variables to GPIO pins
const int output26 = D6;
The turning on/off of the led is handled in the code with the lines:
// turns the GPIOs on and off
if (header.indexOf("GET /26/on") >= 0) {
  Serial.println("GPIO 26 on");
  output26State = "on";
  digitalWrite(output26, HIGH);
  } else if (header.indexOf("GET /26/off") >= 0) {
    Serial.println("GPIO 26 off");
    output26State = "off";
    digitalWrite(output26, LOW);
I tested interfacing with the DHT22 temperature humidity sensor and the led. In the following video, I am breathing to the DHT22 sensor, and the humidity rises. Then I push the button on the web interface, and the led lights up on the board.