1. Principles and practices, project management
This week I worked on defining my final project idea and started to getting used to the documentation process.
Updating Fab academy pages: SSH, Keygen and GIT
Git is a free and open source version control system. Gitlab is a platform for hosting git projects and working on them collaboratively.
I will concisely describe the steps that I took to take git and gitlab in to use. I am using Mac, which has the usual unix terminal, that I used to type in the commmands. We had local lecture where we learned using git and html editing.
I set up connection to Fab Academy gitlab site. I used keygen to generate the SSH keys necessary for connecting to the Fabacademy gitlab site. SSH key is an access credential in the SSH protocol. SSH keys enable to connect to an account on a remote server, without the need for password authentication.
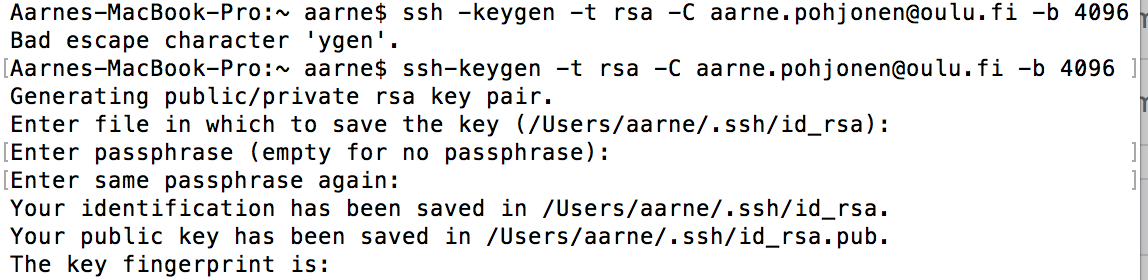
I had GIT already installed on my older Mac, but I configured the username setting.

The ssh key was created at the (hidden) folder /Users/aarne/.ssh/ it was located in file id_rsa.pub. I opened the file, and copy-pasted the key to gitlab website, so that the authentication will work and I can connect to my account. In the git webpages I opened user settings, and there SSH keys.
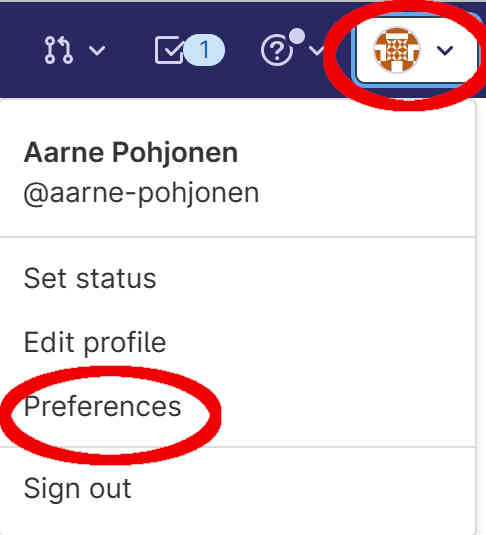
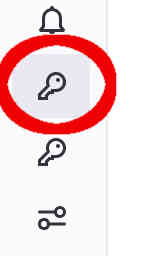
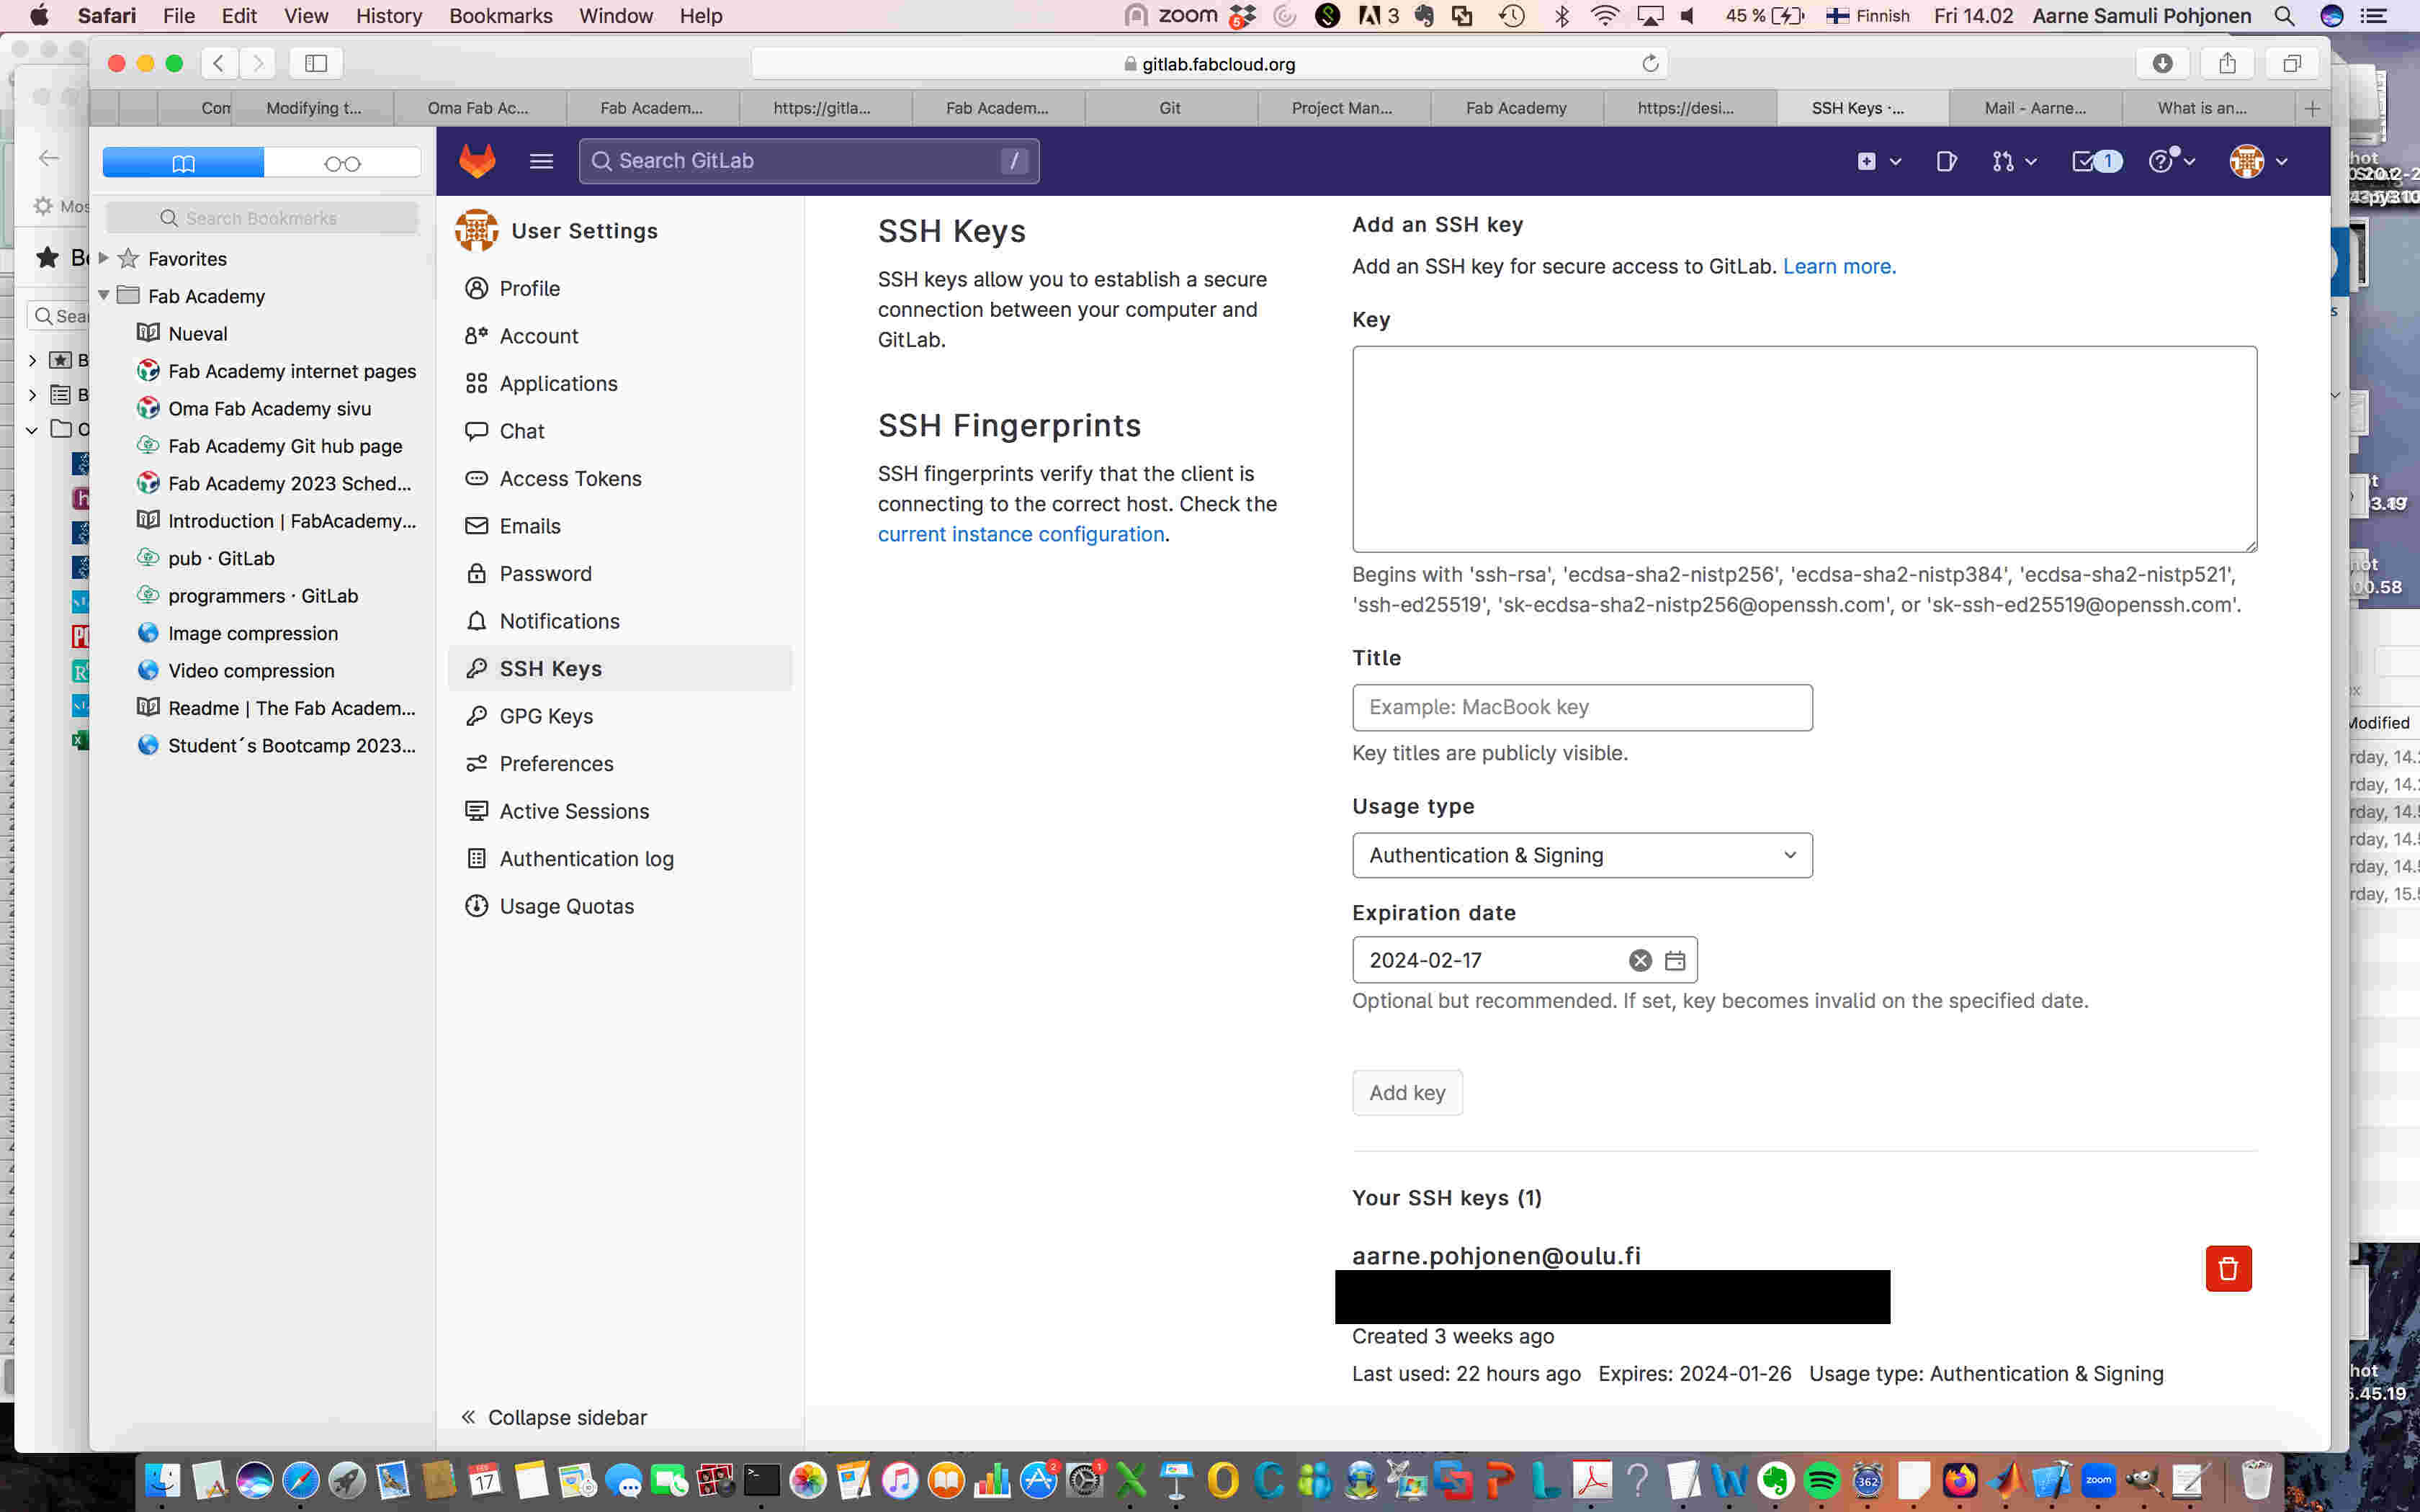
I pasted the key to the box under title “key” and clicked Add key.
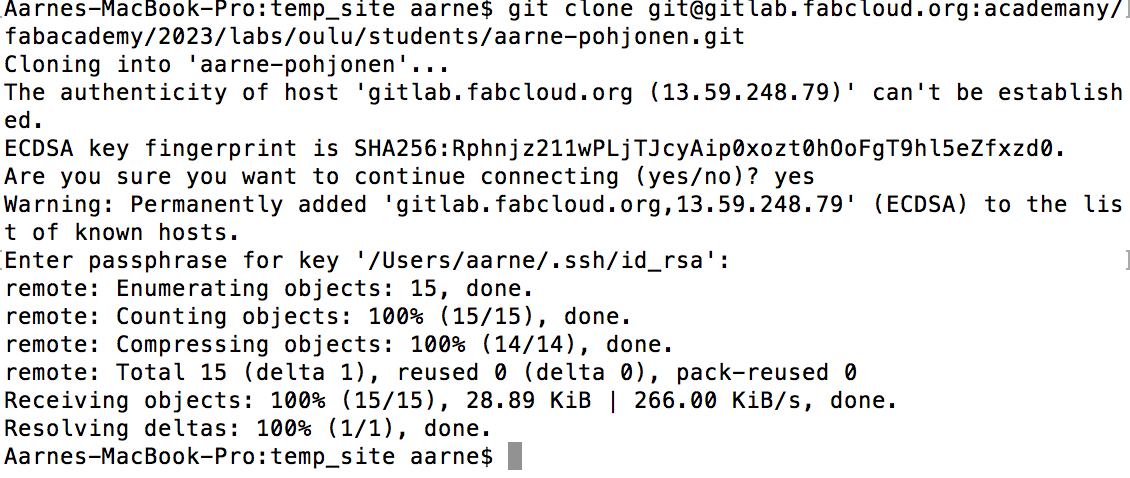
On my own computer, I cloned my page on Fab Academy gitlab site to local site. Cloning means that I initate the git folder on my machine and download the current version from the server.
After making changes to my site, I uploaded it to the Fab Academy gitlab site. I used mac terminal to type in the git commands. The commands that I used for git are:
git status
git pull
git add --all
git commit -m "Tried to use figure definers in html and caption"
git push origin main
Git status shows the status of each file. If a file is modified it is shown with red color with status command until it is added. When it is added the status command will show the file with green color. Git pull will download those latest files to my computer that are different on my computer. Using the add command makes the file staged ready for commit. Git add –all will add those files, that have been modified since last commit, to the committing stage area. The commit command will create a new snapshot of the project, that will include all the files in the stage area the -m will add the message to the commit. The push command will upload the commit to the repository. The origin keyword defines the remote repository where the commit is pushed. The branch comes after origin. When I want to push the commit to the main branch, I will write “push origin main”.
Other important command is git init, which will generate an empty git directory, i.e. it will contain the necessary hidden folder .git and files for the git system, but otherwise the folder is empty.
If I want to pull some other branch than the main, I need to use checkout command: git checkout, followed by the name of the branch.
Mkdocs
First (unsuccesful) trial to use mkdocs
I also tried to use mkdocs: I copied the files that I thought are necessary for the mkdocs from the Oulu Fab Academy gitlab pages, and wrote an index.md file, which I though would automatically be translated to .html file through mkdocs when it is uploaded. However, this was not the case, and I decided to edit the .html file directly for the beginning of the Fab Academy (weeks 1 to 7). Later it was proposed by by our instructor Ivan that it would be good to get to know the mkdocs since it is important for the fab academy project, so I started experimenting with it
Second (succesful) trial to use mkdocs
Ivan helped me with setting up the mkdocs and testing it on my computer. It seems that I had earlier confused the place where I should download the mkdocs files: I had downloaded he Oulu Fab Academy site files, and thought that it would be good idea to start using them on my own site. I now downloaded the files which I found through the Oulu site wiki, and replaced the mkdocs setup files in my folder with those. The most important files and folders that are needed for the mkdocs to operate are:
- .gitlab-ci.yml
- mkdocs.yml
- requirements.txt
- public/
- docs/index.md
- docs/assignments/week01.md
- docs/assignments/week01/
- docs/assignments/week02.md
- docs/assignments/week02/
- ...
- docs/about/
- docs/about/index.md
- docs/projects/
- docs/projects/final-project.md
The .gitlab-ci.yml appears to be script which builds the site on the server site, and moves it to public/ folder. The file mkdocs.yml contains the settings for the site. The folder docs contains the files needed to build the site. Index.md is the landing or homepage markdown file of my Fab Academy page. The assignments folder contains the markdown files for weekly assignments: week01.md, week02.md… and the folders docs/assignments/week01/ contain the files for the weekly assignment files. The folder docs/about/ contains the file index.md, where I wrote information about myself and the folder docs/projects/ contains the file final-project.md, which is about the final project.
I also installed mkdocs and mkdocs-material to my computer using pip (I already had python and pip installed) (pip install mkdocs, pip install mkdocs-material). Then I could test the site operation on my own computer (command mkdocs serve) before uploading it to the Fab Academy Gitlab site.
I converted the html files for weeks 1 to 7 to mkdocs files and replaced the html site by the mkdocs version during week 8.
Basic mkdocs usage
To make first level heading:
# Heading
To make second level heading:
## 2nd level Heading
and 3 rd level heading using three of these signs, and so on.
To make a link:
[text that is displayed](http://linktowebpage.org)
To include code in mkdocs, I can use three backtics, as shown by the next image:

Figures can be quickly included in to the mkdocs file as follows:

Videos from Vimeo or Youtube can be included as follows:
## Video

### From Vimeo

<iframe src="https://player.vimeo.com/video/10048961" width="640" height="480" frameborder="0" webkitallowfullscreen mozallowfullscreen allowfullscreen></iframe>
<p><a href="https://vimeo.com/10048961">Sound Waves</a> from <a href="https://vimeo.com/radarboy">George Gally (Radarboy)</a> on <a href="https://vimeo.com">Vimeo</a>.</p>

### From Youtube

<iframe width="560" height="315" src="https://www.youtube.com/embed/jjNgJFemlC4" frameborder="0" allow="autoplay; encrypted-media" allowfullscreen></iframe>
these examples were included in the example pages in the fab academy template.
The great thing about mkdocs is that it can be mixed with usual html. Since the standard html has good tools for displaying and sizing of figures, I usuallly use html formatting for figures and locally hosted videos on my site.
Trying to use latex generated html file
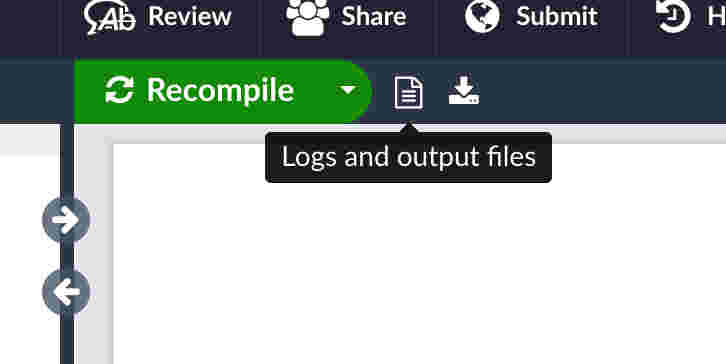
Probably the best way to use Latex within and with html, would be latex2html project. However, I have been using overleaf, which is web based collaborative environment for writing articles. I noticed that there exists a hack called make4ht to generate html from latex using overleaf, and decided to try it out. The usage was quite straightforward, one just needs to upload the template to the overleaf and compile the document. The only difficulty is that you need to copy the files by first selecting logs and output files, as shown in the figures below.

Here is an example html generated with this procedure.
Html usage
Since I initially had trouble with usign mkdocs, I decided to first stick with directly copying and editing html files, since it was quite straightforward, and I needed to move on with the exercises. Also, I learned the basic html this way. Note that around weeks 7 to 8 I managed to get the mkdocs working with some help from Ivan, and changed my whole site to mkdocs format.
I used different computers and editors to write html during the Fab Academy. My favorite editor is Kate (with mac), and I have recently tested Visual studio code on Windows, which is nice. I used to use Emacs earlier, and I definitely don’t know how to use Vi.
Few useful basic commands that I used to present my assignments:
- adding hyperlink:

- adding figure:

Videos can be inluded inside the figure environment, so that they will include caption:
<figure>
   <video width="320" height="240" controls loop>
   <source src="./hammasrattaat2.ogg" type="video/ogg">
   Your browser does not support the video tag.
   </video>
   <figcaption>Video: Testing the operation of the different sized gears.</figcaption>
   </figure>
I define the headings using h1 identifier and subheadings with h2 identifier in the hmtl code:
<h1> Heading </h1>
<h2> Subheading </h2>
When I am want to create a new page on my site, I will create a new .html file and link to it. I keep the other files in a separate folders for each week, and link to them from the html file.
In essence, the directory structure of the public folder of my html version of the site was (Note that I replaced the html site with mkdocs version during week8):
public/
  index.html
  style.css
  about.html
  final-project.html
  images/
      All the images needed by the public folder
  assignments/
      week01.html
      week02.html
      ...
      week01files/
        All the images etc. needed by week01.html
      week02files/
        All the images etc. needed by week02.html
      ...
The index.html is the landing (or start) page of my site, which contains links to the other pages on my site. The style.css is the cascading stylesheet file, which contains information on how the webpages are formatted. I may make changes to this file later to personalize my webpage, if I have extra time. The changes then affect all the pages. The about.html page contains some information on me, which I want to share in the Fab Academy site. The final-project.html page contains information on the final project that I have planned to do in Fab Academy. The works done in the weekly assignments are contained in the assignments folder, in the respective files: week01.html, week02.html etc. The files needed by the weekly pages are contained in the respective folders.
Sketches for the final project
Initially, I had several different ideas for the final project. I think they were not very good, but I tried to brainstorm to get something ready, and they might have been ok for trying to fulfill the requirements. Finally at around 7th or 8th week, I had a project idea that I thought would be a very good. At this point I changed my final project to recycling storage box. Until then, I was aiming to make the projects 4 and 5, as described here.
Sketch for the final project No 1.
I made a sketch for the final project. Here is me with the sketch
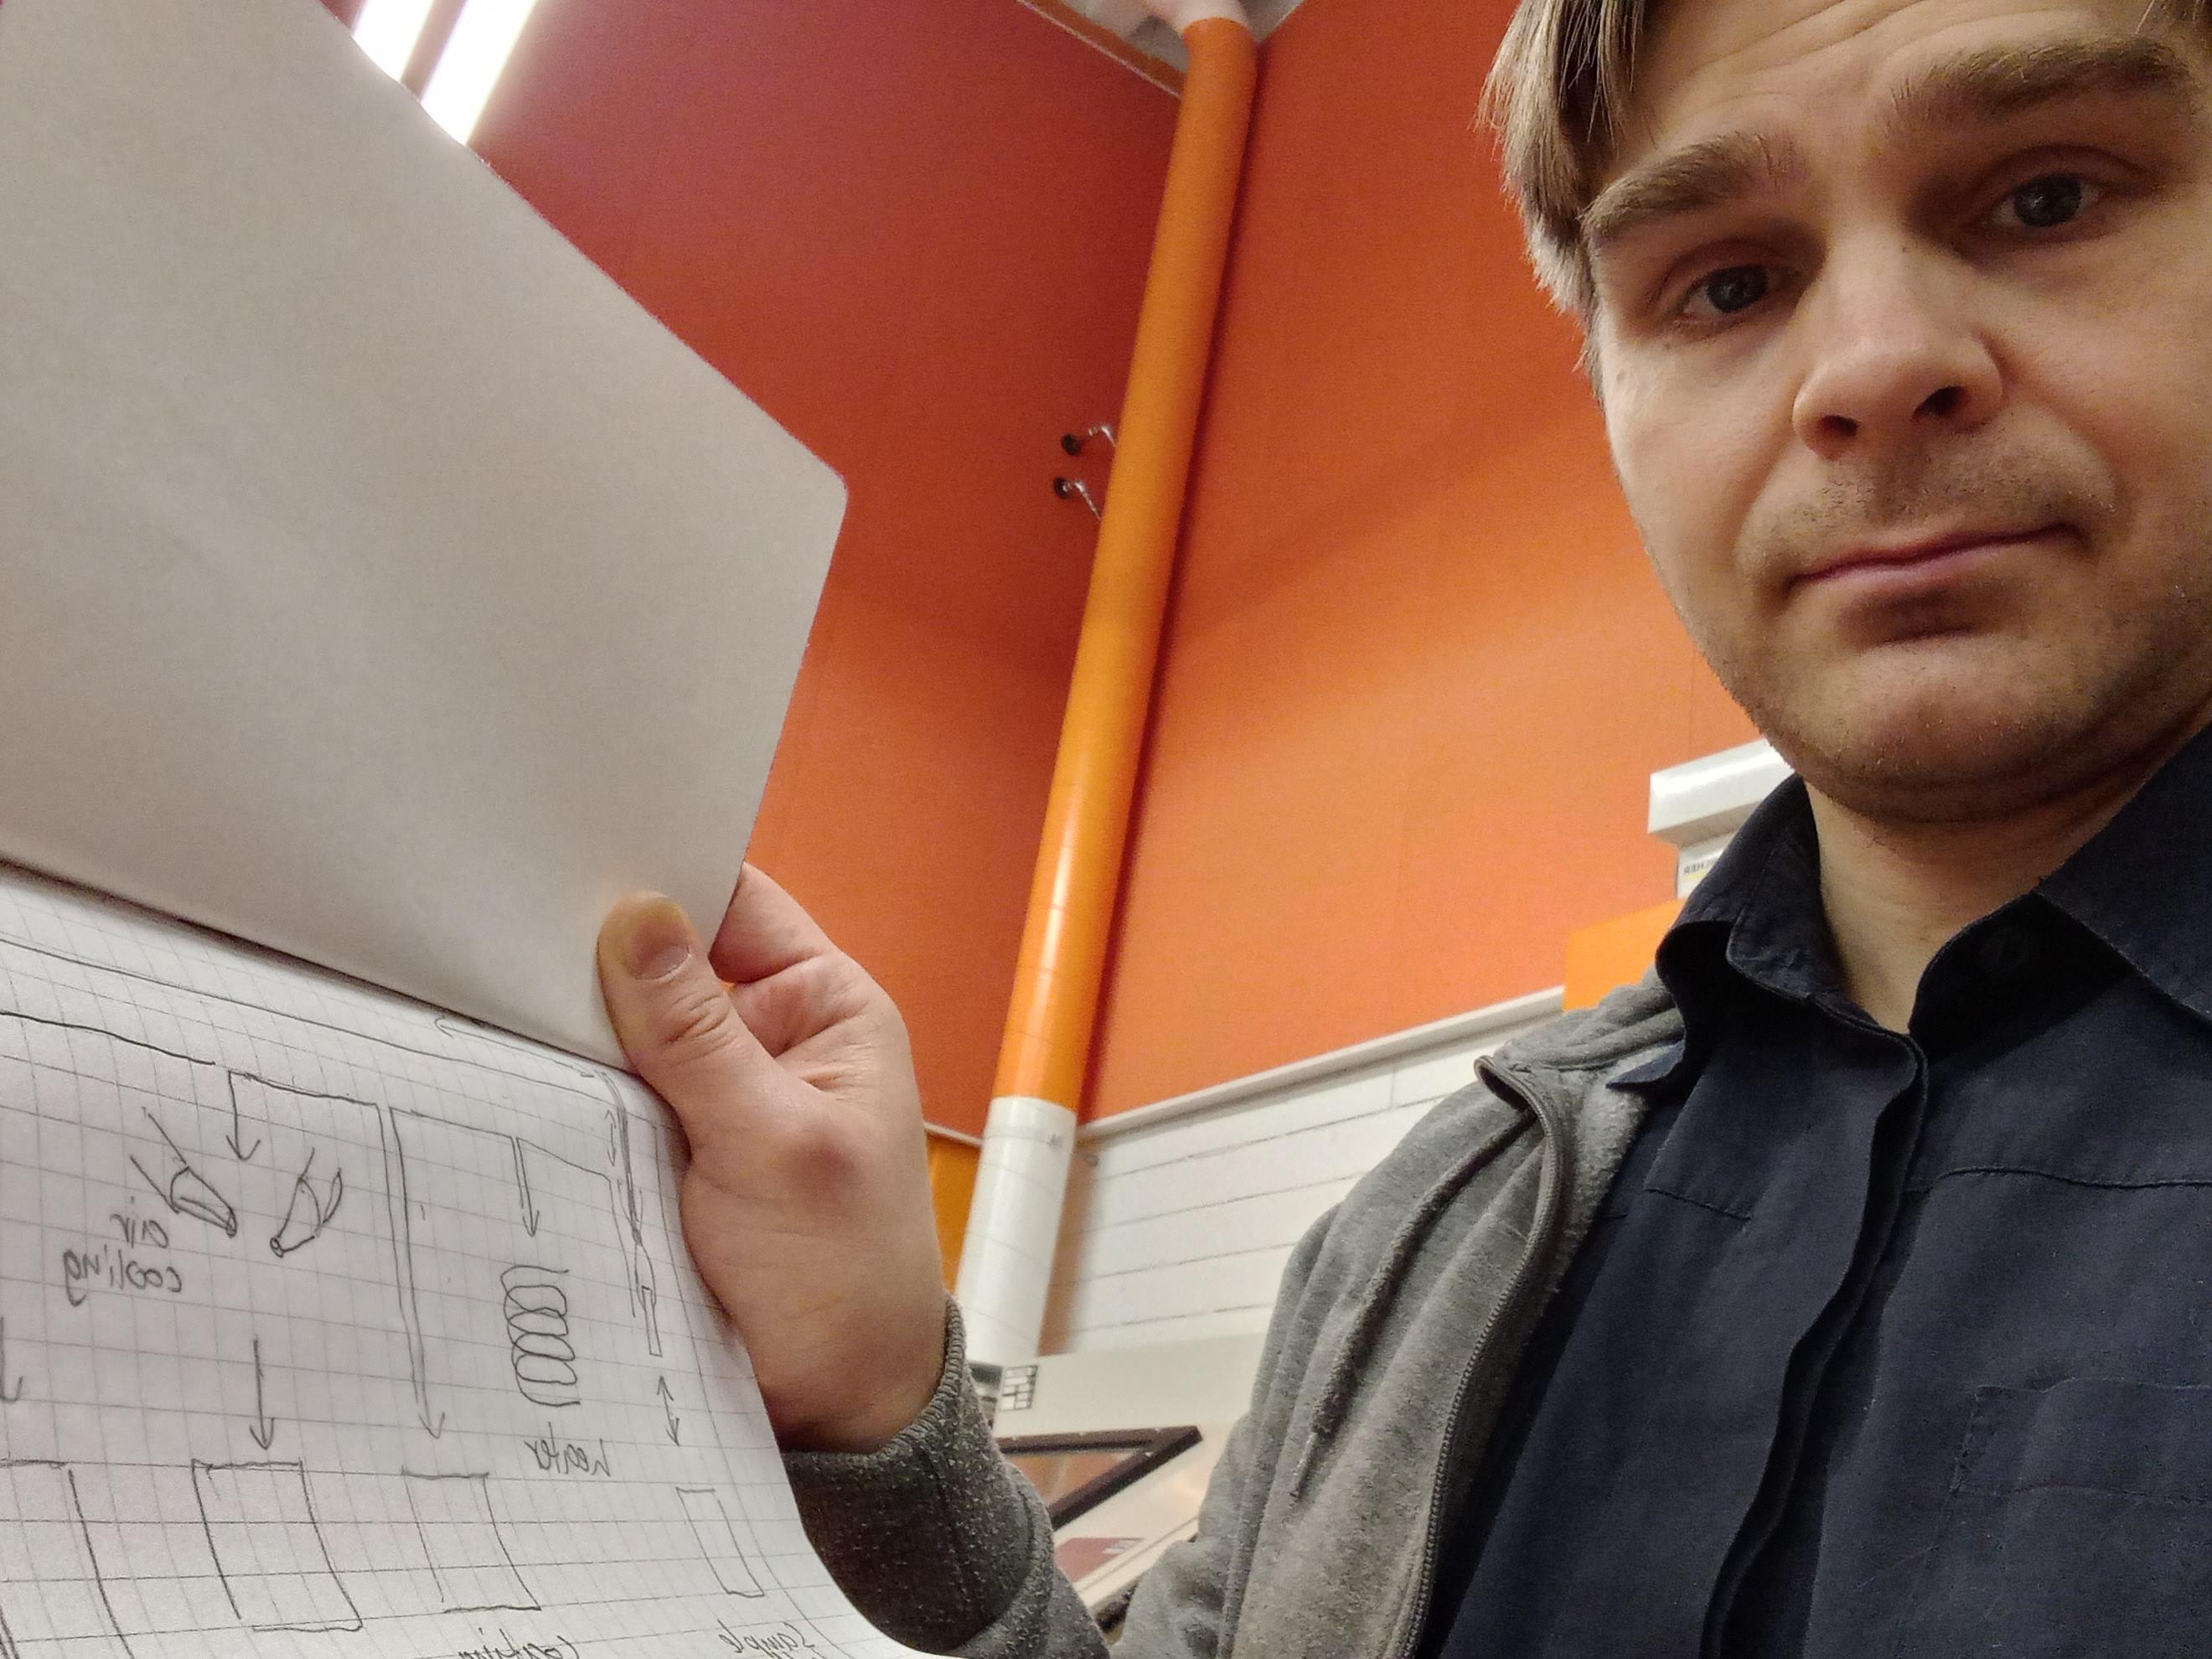
The schematic is shown here
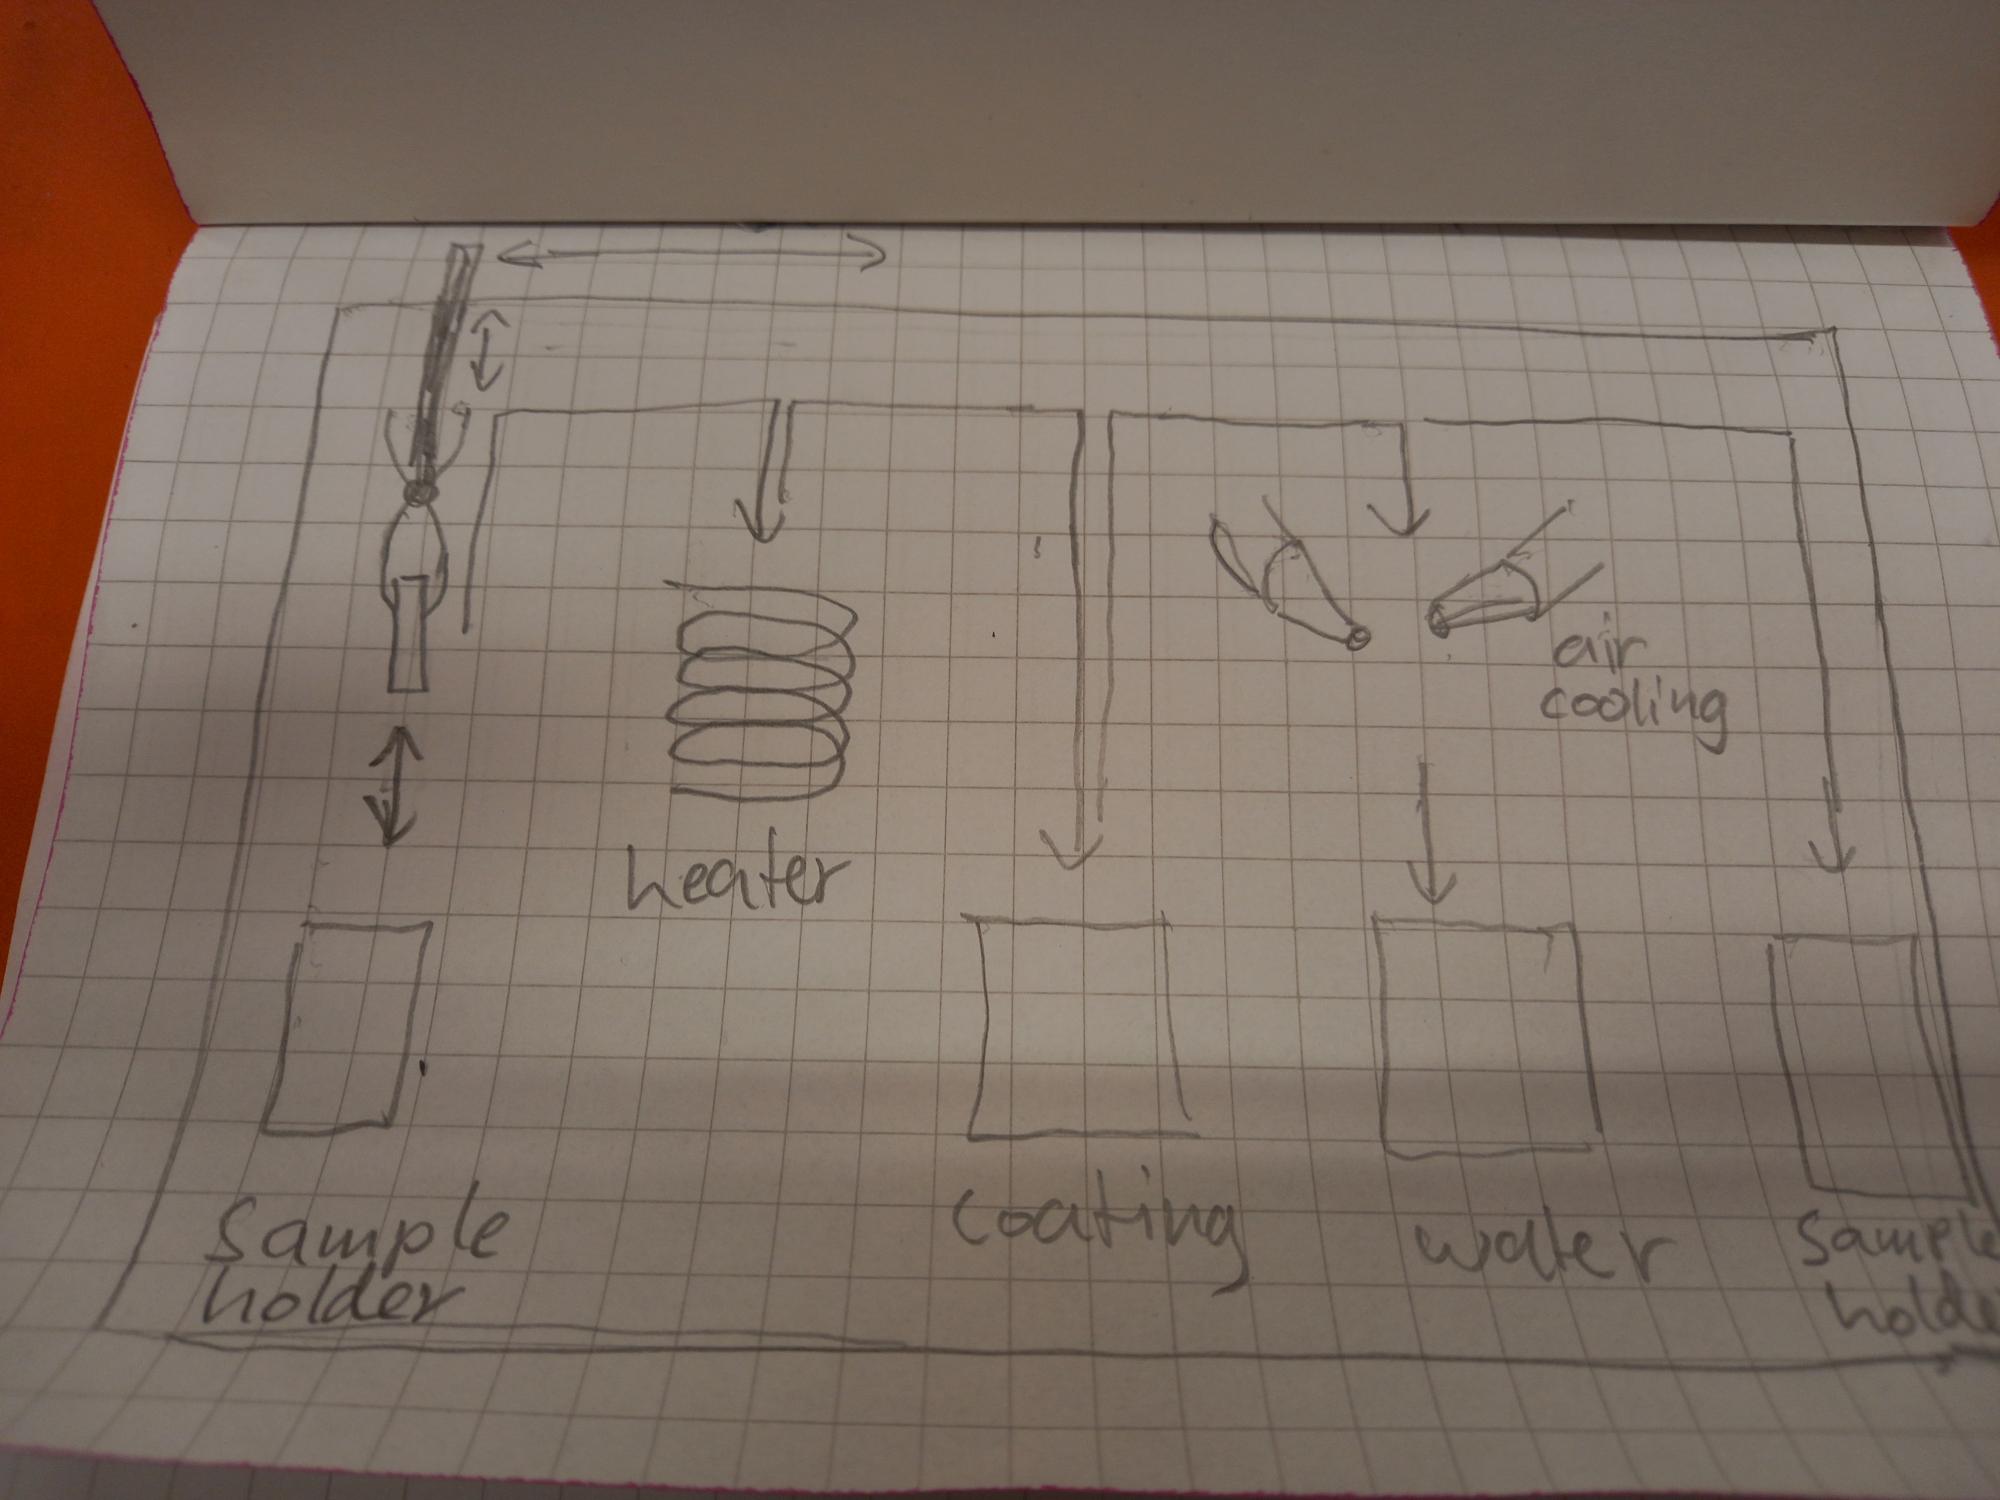
The name of the project idea is “Pick and move”. The idea is to build a mobile “hand” that 1. will pick a sample from a sample holder, 2. move it to a heater, 3. hold it for a time given by a user, 4. move it to air cooling, 5. hold it for given time, 6. move it to water cooling bucket (rapid cooling) and finally 7. move it to sample holder.
Who would use it? If everything works well, then the device could be used by a researcher to automate the test process.
Sketch for the final project No 2.
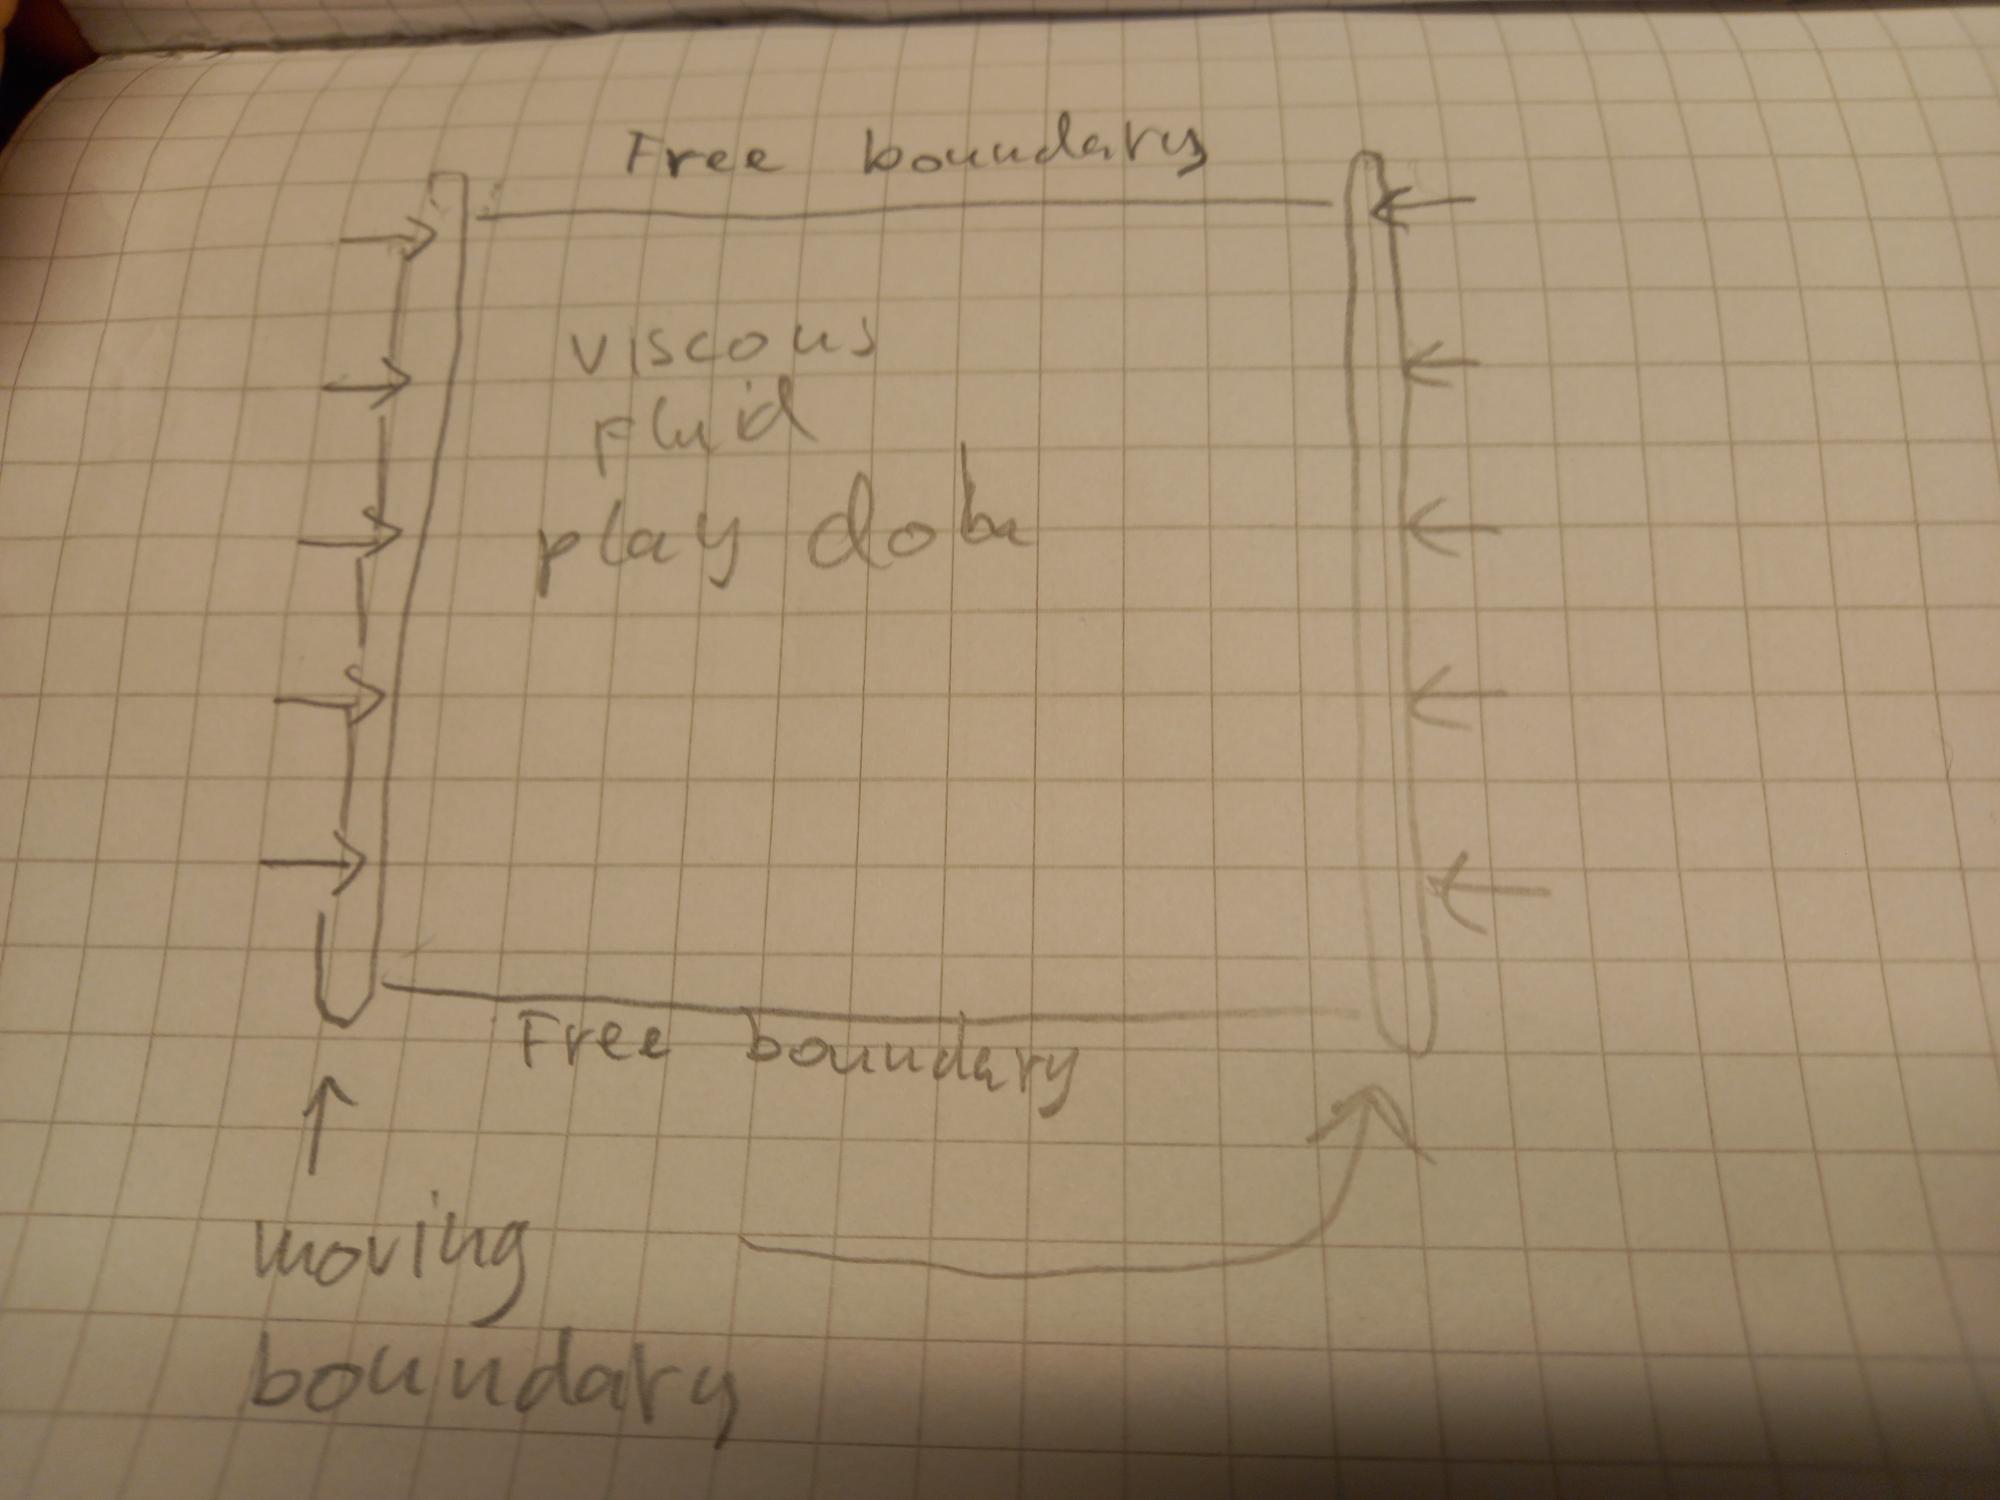
I made another sketch for the final project. The idea of this project would be to make a machine that deforms viscous material (play doh). This would produce experimental images of the strains, and I could make a computational model to simulate the flow. It would be interesting to compare the numerical model to the experimental data obtained with this machine.
Sketch for the final project No 3.
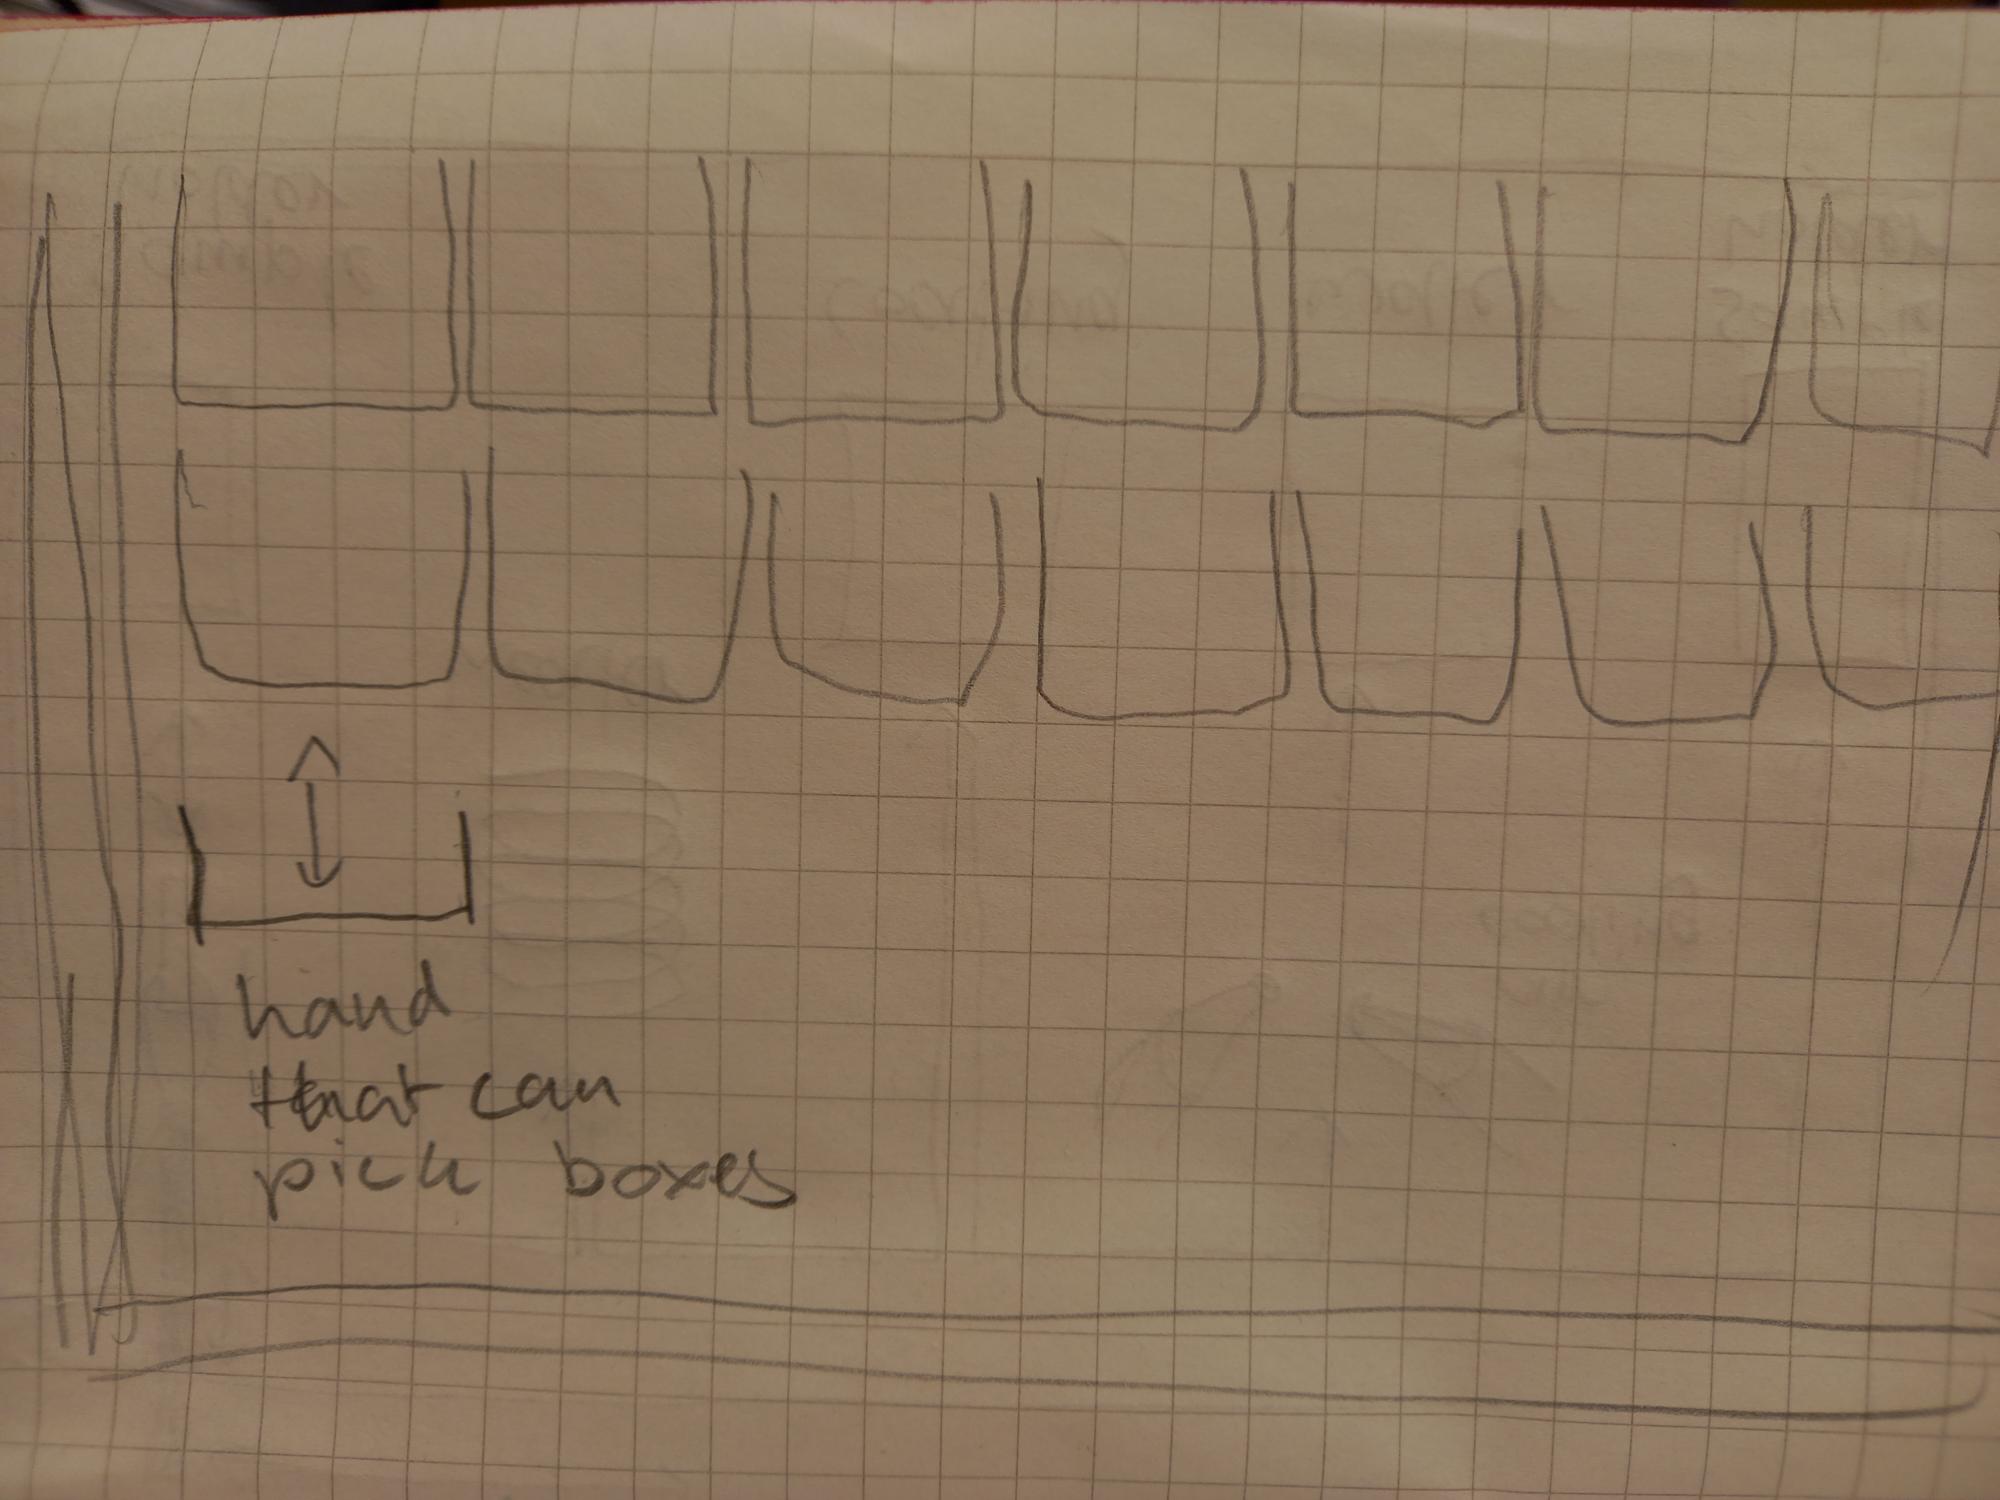
I made third sketch for the final project. The idea of this project would be to make a storage robot, that can move boxes to and from the shelf. The robot will keep up an inventory what is in each box.
Sketch for the final project No 4.
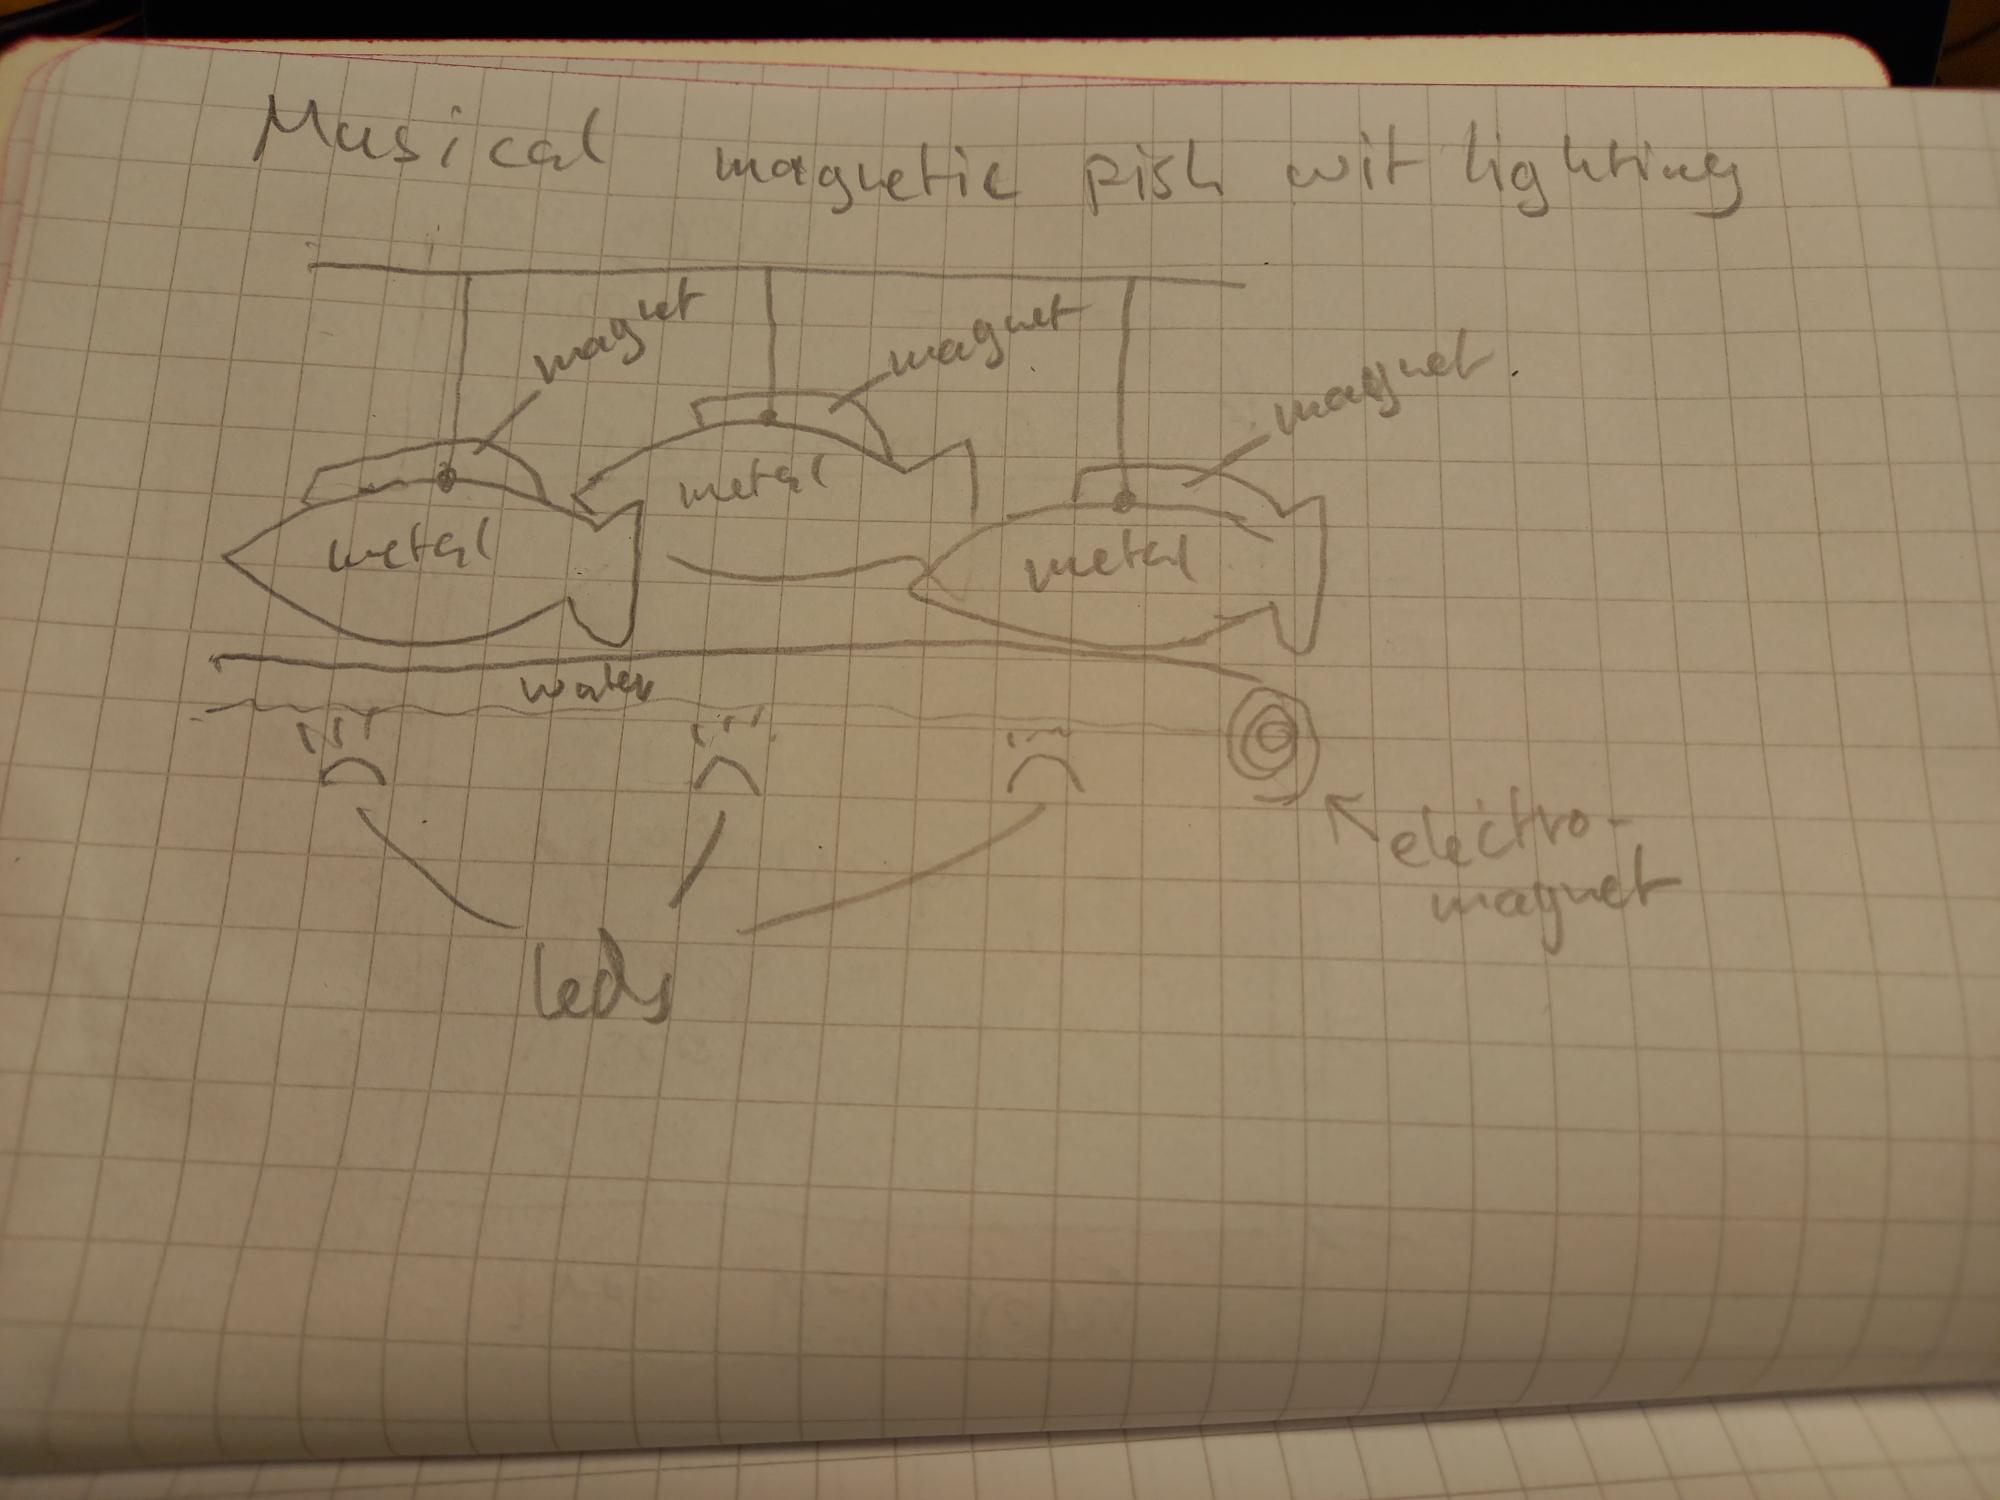
I made fourth sketch for the final project. The idea of this project is to make a decorative visual object, where the shadow of the fish figures is projected to wall. The orientation of the figures can be changed by making small change in the magnetic field, which is controlled by an electromagnet. The fish can touch each other producing a pleasant sound. The leds provide lighting to create shadows.
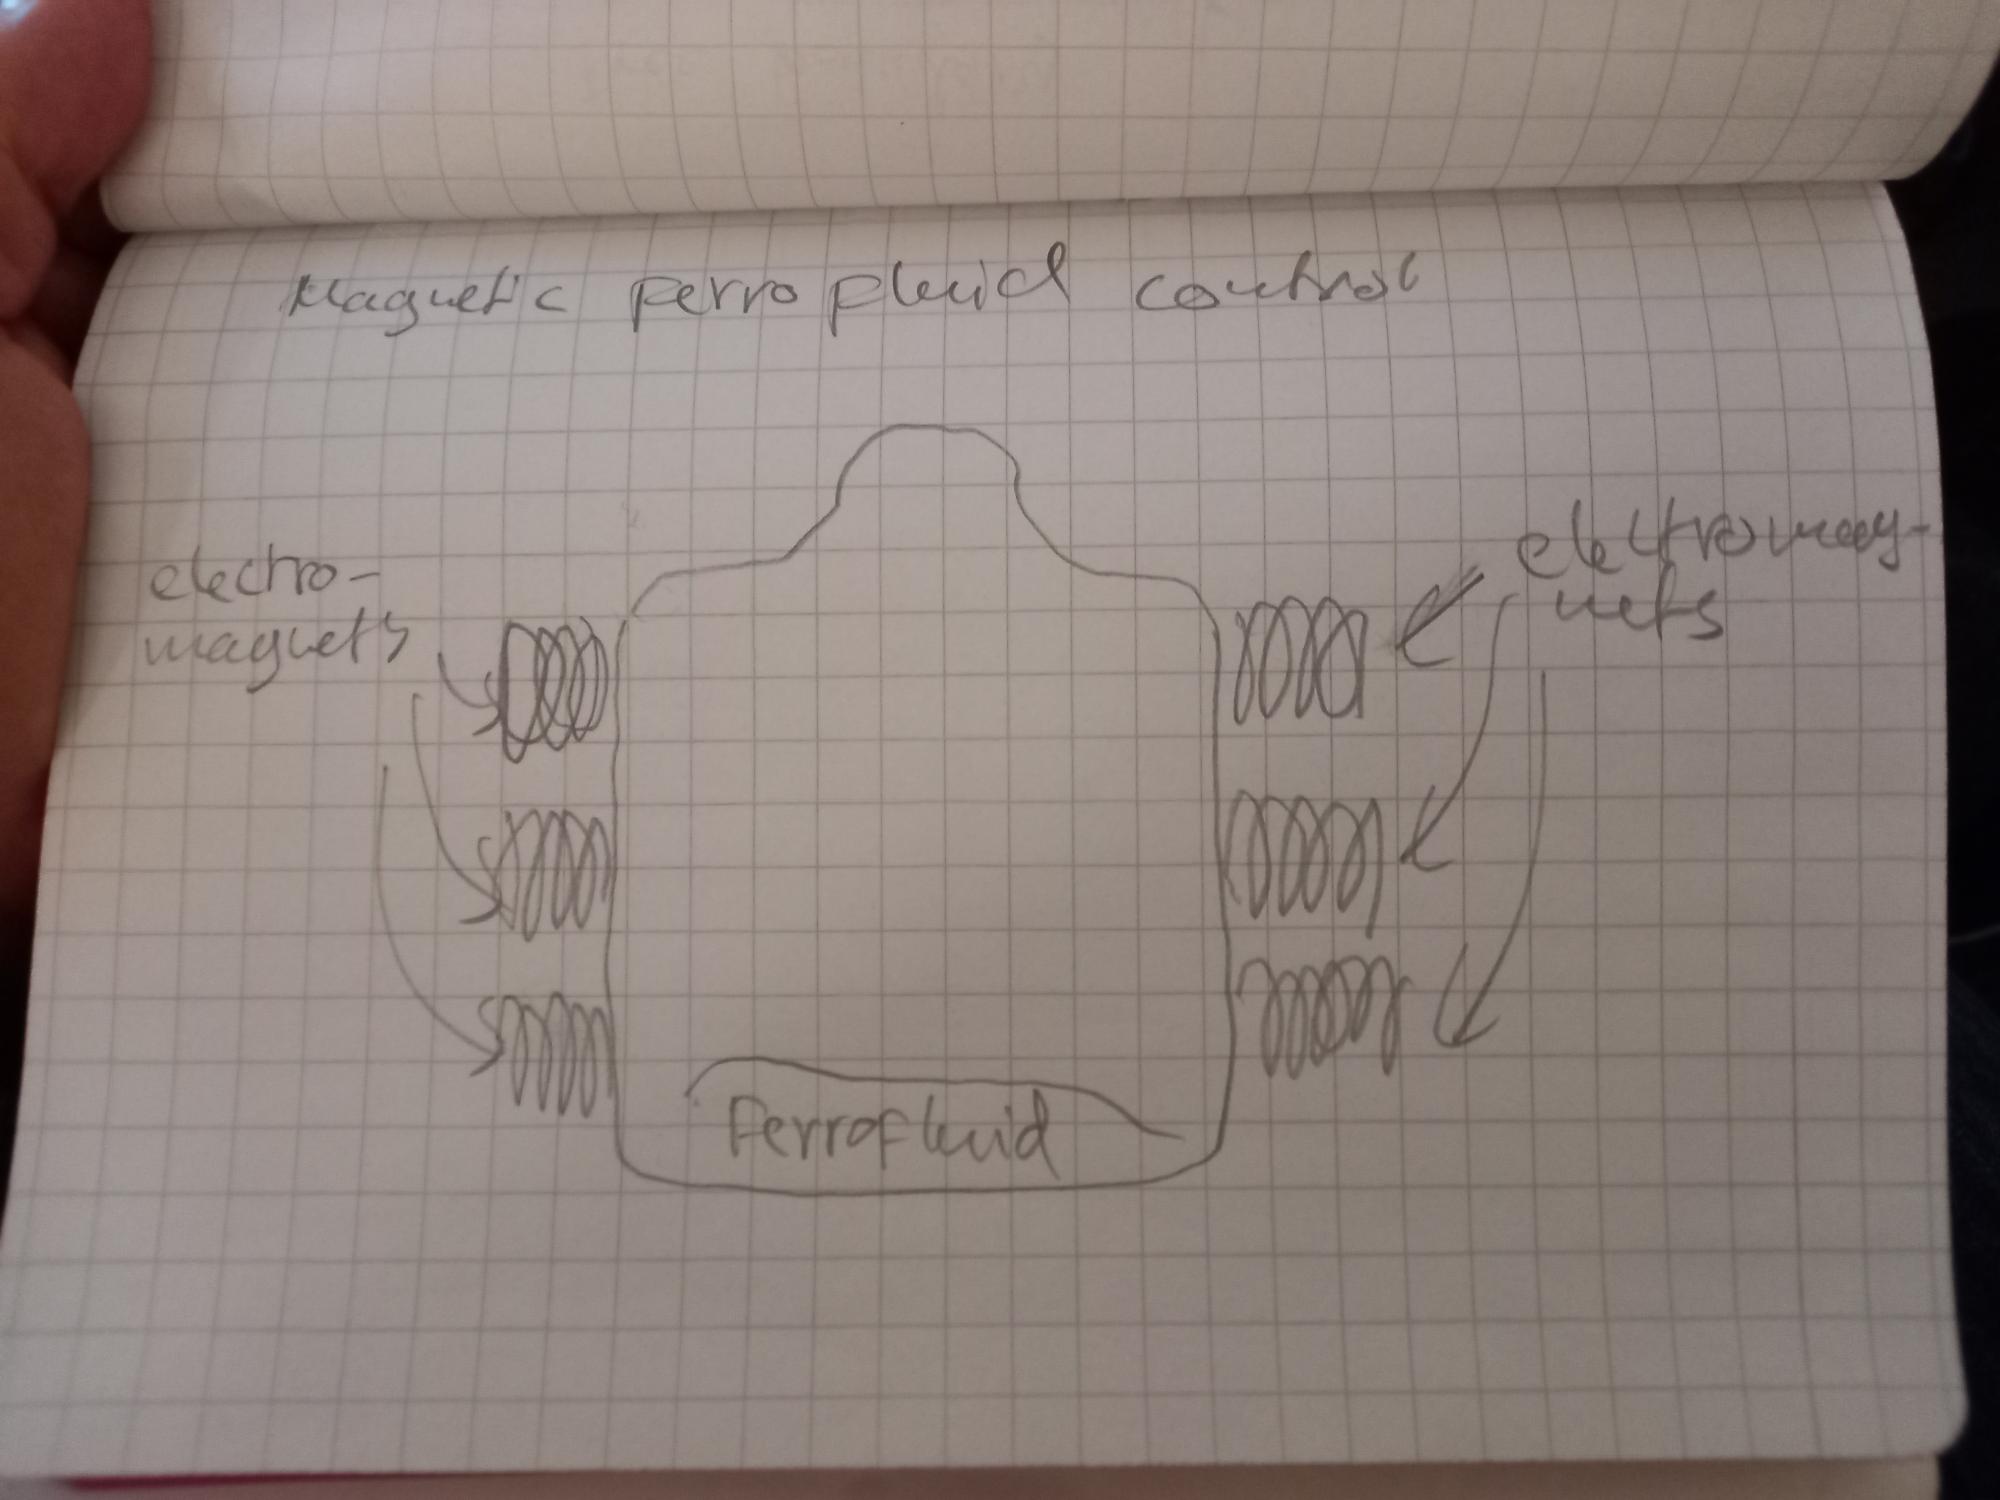
Sketch for the final project No 5.
I made fifth sketch for the final project. The idea of this project is to make a decorative visual object by controlling movement of ferrofluid with electrical magnets. I could also add some led lights to cause shadows to be cast to walls, when the device is’ operated in darkness.