Week 13 Embedded Networking and Communications
Group assignment:
Send a message between two projects
Thoughts and feelings
- I managed to control my board via internet for the individual assignment. And for group assignment, I experienced direct communication between boards.
- This made me a lot to think about what to make, I want to make something with controlling from far away.
- Net working needs a lot of rules, so I need to learn more but it seems clearly fun.
Individual assignment:
Design, build, and connect wired or wireless node(s) with network or bus addresses
Result
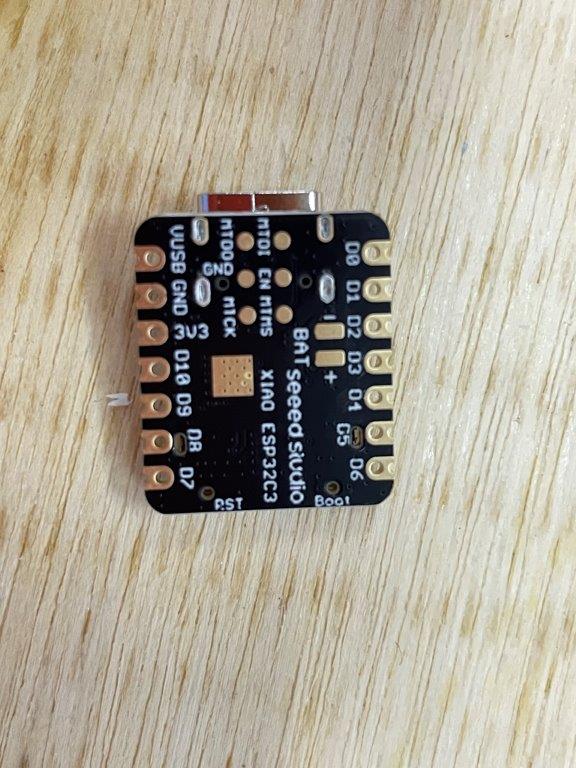
I made a board with XIAO esp32c, and blinked the LED on the board from my mobile phone via wifi.
Process to the result
- Board making
- I made a board with XIAO esp32c for wireless communication. The same design for XIAO 2040 of week8.
- PCB design and milling same as week8
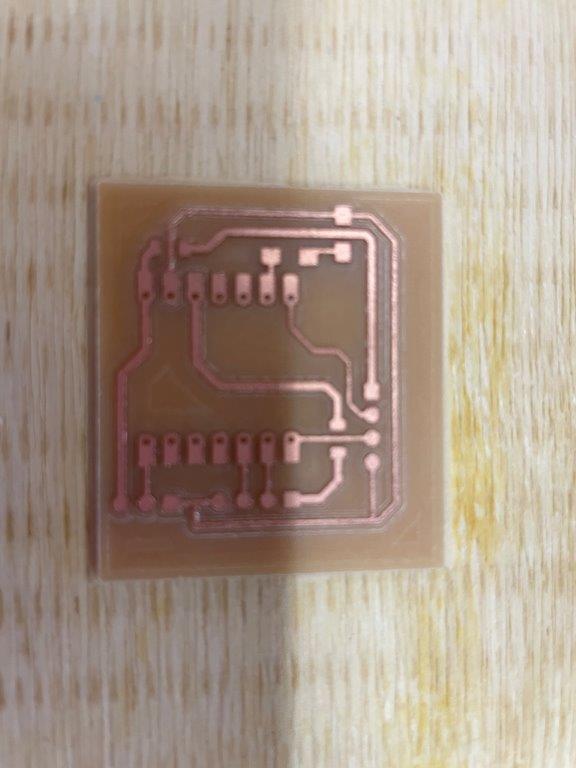
- Put masking tape at the bottom of the controller to avoid short circuit because XIAO esp32c has terminals at bottom side, and my board has a pattern which runs below the controller.

- Soldered

- Program for network connection
- I referred this site how to do it.
- The program is at end of this document.("ssid" and "password" should be changed for the environment)
- Connect the board to wifi
- Once the program is uploaded, the board starts to connect wifi shown in the code.
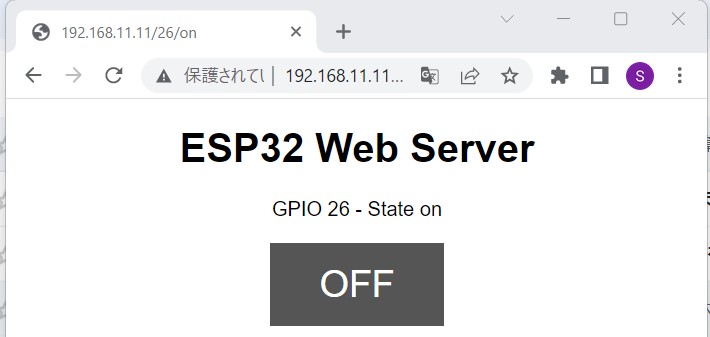
- I can see a IP address when the board successfully connected.
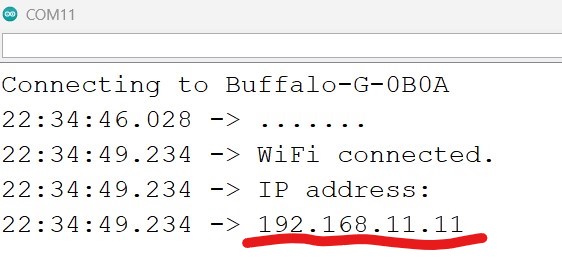
-
The IP address is used in internet protocol stack and defines an unique address of the machine (server) that we want to communicate with.
-
I can see the control interface by inputting the IP address in a browser.
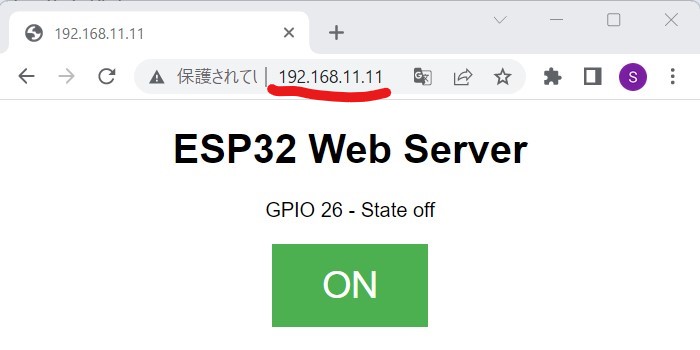
-
Then I can turn on/off the LED on the board via my mobile phone.
- This interface page is made from code below after "Display the HTML web page", HTML(HyperText Transfer Protocol) is the foundation of the World Wide Web, and is used to load webpages using hypertext links. For more information I referred this site
-
Code for the week
// Load Wi-Fi library
#include <WiFi.h>
// Replace with your network credentials
const char* ssid = "ssid";
const char* password = "password";

// Set web server port number to 80
WiFiServer server(80);

// Variable to store the HTTP request
String header;

// Auxiliar variables to store the current output state
String output26State = "off";
String output27State = "off";

// Assign output variables to GPIO pins
const int output26 = 8;
const int output27 = 2;

// Current time
unsigned long currentTime = millis();
// Previous time
unsigned long previousTime = 0;
// Define timeout time in milliseconds (example: 2000ms = 2s)
const long timeoutTime = 2000;

void setup() {
  Serial.begin(115200);
  // Initialize the output variables as outputs
  pinMode(output26, OUTPUT);
  pinMode(output27, OUTPUT);
  // Set outputs to LOW
  digitalWrite(output26, LOW);
  digitalWrite(output27, LOW);

  // Connect to Wi-Fi network with SSID and password
  Serial.print("Connecting to ");
  Serial.println(ssid);
  WiFi.begin(ssid, password);
  while (WiFi.status() != WL_CONNECTED) {
    delay(500);
    Serial.print(".");
  }
  // Print local IP address and start web server
  Serial.println("");
  Serial.println("WiFi connected.");
  Serial.println("IP address: ");
  Serial.println(WiFi.localIP());
  server.begin();
}

void loop(){
  WiFiClient client = server.available();   // Listen for incoming clients

  if (client) {                             // If a new client connects,
    currentTime = millis();
    previousTime = currentTime;
    Serial.println("New Client.");          // print a message out in the serial port
    String currentLine = "";                // make a String to hold incoming data from the client
    while (client.connected() && currentTime - previousTime <= timeoutTime) {  // loop while the client's connected
      currentTime = millis();
      if (client.available()) {             // if there's bytes to read from the client,
        char c = client.read();             // read a byte, then
        Serial.write(c);                    // print it out the serial monitor
        header += c;
        if (c == '\n') {                    // if the byte is a newline character
          // if the current line is blank, you got two newline characters in a row.
          // that's the end of the client HTTP request, so send a response:
          if (currentLine.length() == 0) {
            // HTTP headers always start with a response code (e.g. HTTP/1.1 200 OK)
            // and a content-type so the client knows what's coming, then a blank line:
            client.println("HTTP/1.1 200 OK");
            client.println("Content-type:text/html");
            client.println("Connection: close");
            client.println();

            // turns the GPIOs on and off
            if (header.indexOf("GET /26/on") >= 0) {
              Serial.println("GPIO 26 on");
              output26State = "on";
              digitalWrite(output26, HIGH);
            } else if (header.indexOf("GET /26/off") >= 0) {
              Serial.println("GPIO 26 off");
              output26State = "off";
              digitalWrite(output26, LOW);
            } else if (header.indexOf("GET /27/on") >= 0) {
              Serial.println("GPIO 27 on");
              output27State = "on";
              digitalWrite(output27, HIGH);
            } else if (header.indexOf("GET /27/off") >= 0) {
              Serial.println("GPIO 27 off");
              output27State = "off";
              digitalWrite(output27, LOW);
            }

            // Display the HTML web page
            client.println("<!DOCTYPE html><html>");
            client.println("<head><meta name=\"viewport\" content=\"width=device-width, initial-scale=1\">");
            client.println("<link rel=\"icon\" href=\"data:,\">");
            // CSS to style the on/off buttons
            // Feel free to change the background-color and font-size attributes to fit your preferences
            client.println("<style>html { font-family: Helvetica; display: inline-block; margin: 0px auto; text-align: center;}");
            client.println(".button { background-color: #4CAF50; border: none; color: white; padding: 16px 40px;");
            client.println("text-decoration: none; font-size: 30px; margin: 2px; cursor: pointer;}");
            client.println(".button2 {background-color: #555555;}</style></head>");

            // Web Page Heading
            client.println("<body><h1>ESP32 Web Server</h1>");

            // Display current state, and ON/OFF buttons for GPIO 26
            client.println("<p>GPIO 26 - State " + output26State + "</p>");
            // If the output26State is off, it displays the ON button
            if (output26State=="off") {
              client.println("<p><a href=\"/26/on\"><button class=\"button\">ON</button></a></p>");
            } else {
              client.println("<p><a href=\"/26/off\"><button class=\"button button2\">OFF</button></a></p>");
            }

            // Display current state, and ON/OFF buttons for GPIO 27
            client.println("<p>GPIO 27 - State " + output27State + "</p>");
            // If the output27State is off, it displays the ON button
            if (output27State=="off") {
              client.println("<p><a href=\"/27/on\"><button class=\"button\">ON</button></a></p>");
            } else {
              client.println("<p><a href=\"/27/off\"><button class=\"button button2\">OFF</button></a></p>");
            }
            client.println("</body></html>");

            // The HTTP response ends with another blank line
            client.println();
            // Break out of the while loop
            break;
          } else { // if you got a newline, then clear currentLine
            currentLine = "";
          }
        } else if (c != '\r') {  // if you got anything else but a carriage return character,
          currentLine += c;      // add it to the end of the currentLine
        }
      }
    }
    // Clear the header variable
    header = "";
    // Close the connection
    client.stop();
    Serial.println("Client disconnected.");
    Serial.println("");
  }
}
Re-try
- The code above is just borrowed one from a web site. Now I prepared new code for my final project using ESP-NOW protocol.
- ESP-NOW is a wireless communication protocol defined by Espressif, which enables the direct, quick and low-power control of smart devices, without the need of a router. ESP-NOW can work with Wi-Fi and Bluetooth LE, and supports the ESP8266, ESP32, ESP32-S and ESP32-C series of SoCs. It’s widely used in smart-home appliances, remote controlling, sensors, etc(extracted from above site)
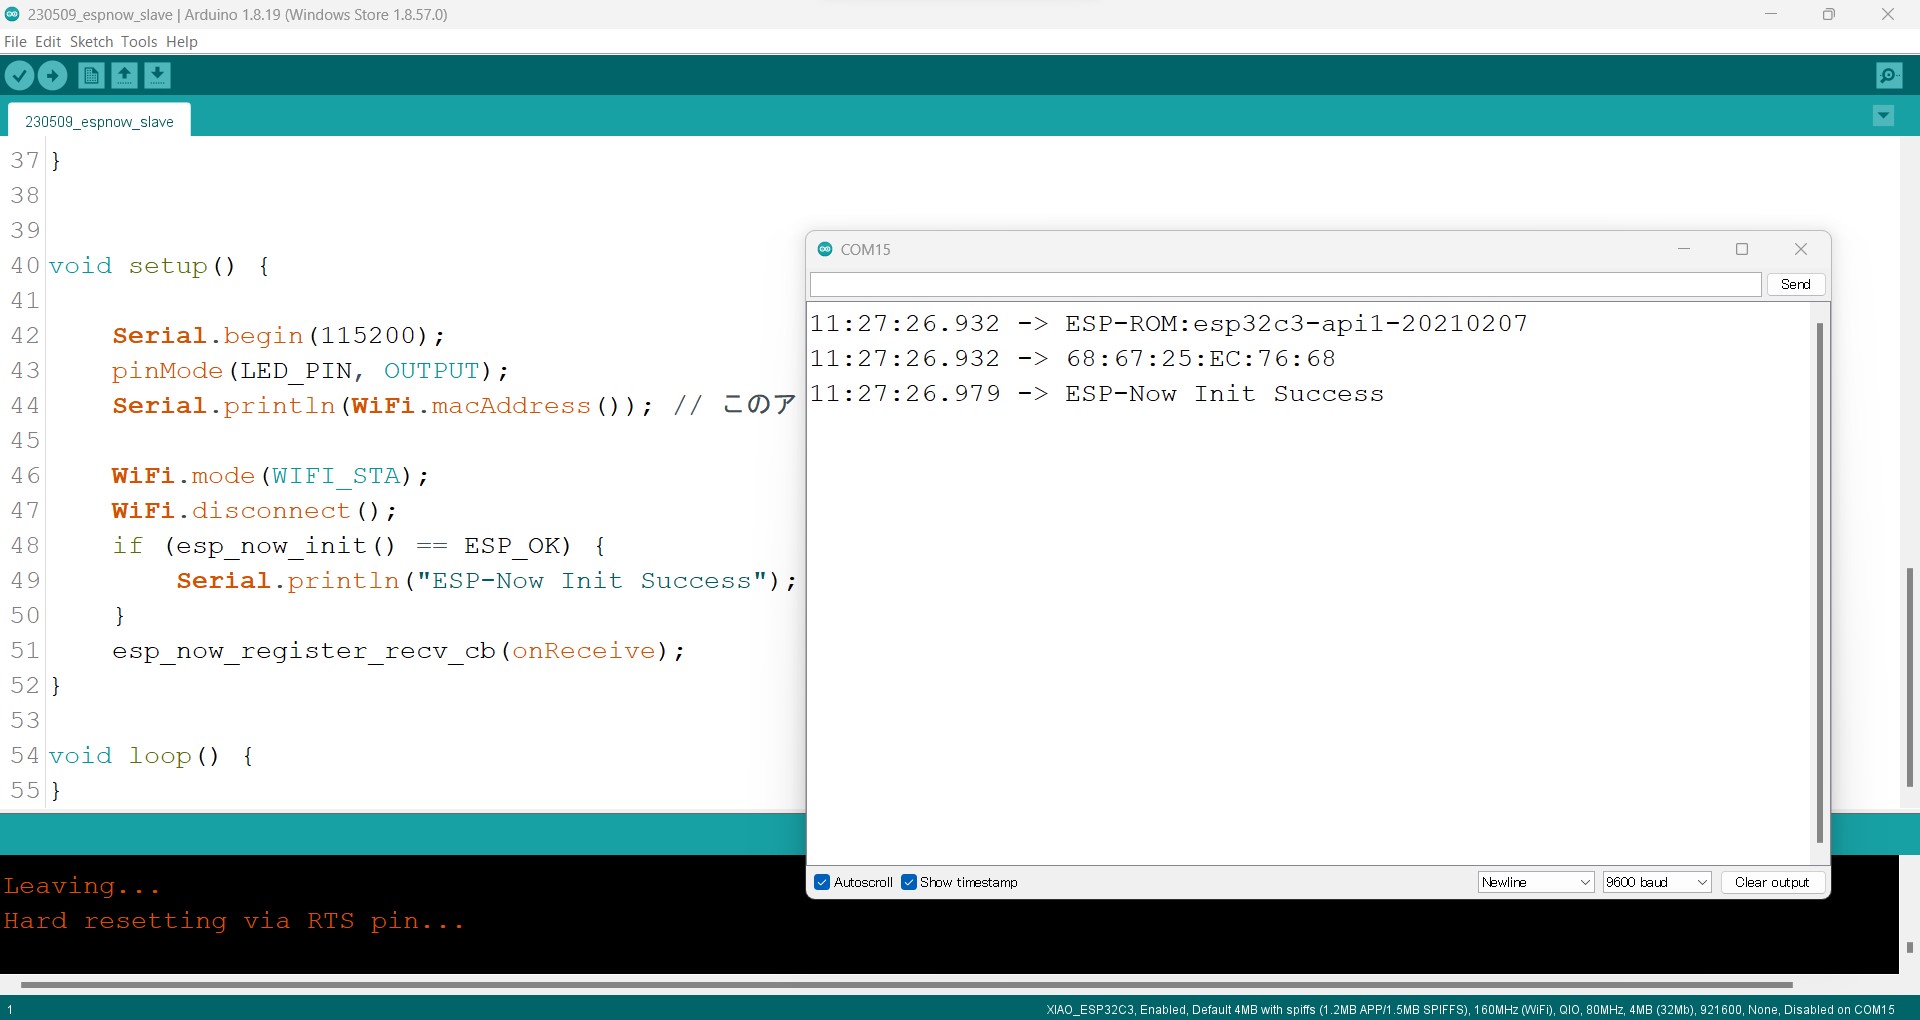
- To use ESP-NOW, I checked MAC address of one device.
-
MAC address (media access control address) is a 12-digit hexadecimal number assigned to each device connected to the network.
-
As chat GPT is allowed to make code I asked to generate codes with below prompt;
//
please make codes with ESPNOW protocol under condition below, please make 2 codes one for sending device and the other is for receiving device;
Hardware
Sending device
- xiaoesp32c3
- PIR sensor connected to 21 pin
Receiving device
- xiaoesp32c3
- MAC address == 0x12, 0x23, 0x34, 0x45, 0x56, 0x67
- LED connected to 7
Action
- Sensor on Sending device turned high;
- Signal sent with EspNOW protocol to Receiving device
- x pin on Receiving device turned high once the signal received
//
As a result I got below code
- For sending device
#include <esp_now.h> // Include the ESP-NOW library #include <WiFi.h> // Include the WiFi library #define PIR_PIN 21 // Define the pin connected to the PIR sensor // MAC address of the receiver uint8_t broadcastAddress[] = {0x12, 0x23, 0x34, 0x45, 0x56, 0x67}; void setup() { pinMode(PIR_PIN, INPUT); // Set PIR_PIN as input WiFi.mode(WIFI_STA); // Set the device in Station mode to be able to send data esp_now_init(); // Initialize ESP-NOW // Create a peer information structure esp_now_peer_info_t peerInfo; memcpy(peerInfo.peer_addr, broadcastAddress, 6); // Set the peer MAC address peerInfo.channel = 0; // WiFi channel. If 0, use the current channel which station is on peerInfo.encrypt = false; // Disable encryption // Add the peer. If the peer does not exist, the function fails esp_now_add_peer(&peerInfo); } void loop() { bool pirState = digitalRead(PIR_PIN); // Read the state of the PIR sensor // Send data to the peer esp_now_send(broadcastAddress, (uint8_t *) &pirState, sizeof(pirState)); delay(2000); // Wait for 2 seconds before next loop } - For receiving device
#include <esp_now.h> // Include the ESP-NOW library
#include <WiFi.h> // Include the WiFi library

#define LED_PIN 8 // Define the pin connected to the LED

void setup() {
  pinMode(LED_PIN, OUTPUT); // Set LED_PIN as output

  WiFi.mode(WIFI_STA); // Set the device in Station mode to be able to receive data

  esp_now_init(); // Initialize ESP-NOW
  esp_now_register_recv_cb(OnDataRecv); // Register for a callback function that will be called when data is received
}

void loop() {
  delay(1000); // Wait for 1 second before next loop
}

// The callback function that will be called when data is received
void OnDataRecv(const uint8_t *mac_addr, const uint8_t *data, int len) {
  bool *pirState = (bool*) data; // Cast the received data to boolean
  digitalWrite(LED_PIN, *pirState ? HIGH : LOW); // If PIR state is true, turn on the LED, else turn it off
}
As a result, 2 devices connected each other. Sender (left side) detects the hand then LED on Receiver (right side) blinks.