Week 09 Output Devices
Group assignment
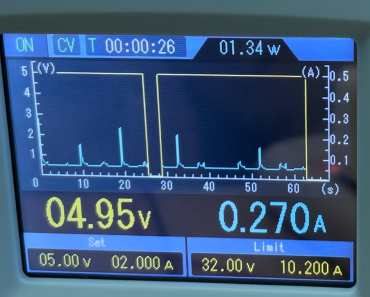
Measure the power consumption of an output device
Result
I checked the power consumption of DFPlayer
The result was 1.34W
This device has an amplifier and be able to make sound via speakers. This is why rather high power consumption.
Thoughts and feelings
Individual assignment
Add an output device to a microcontroller board you've designed, and program it to do something
Result
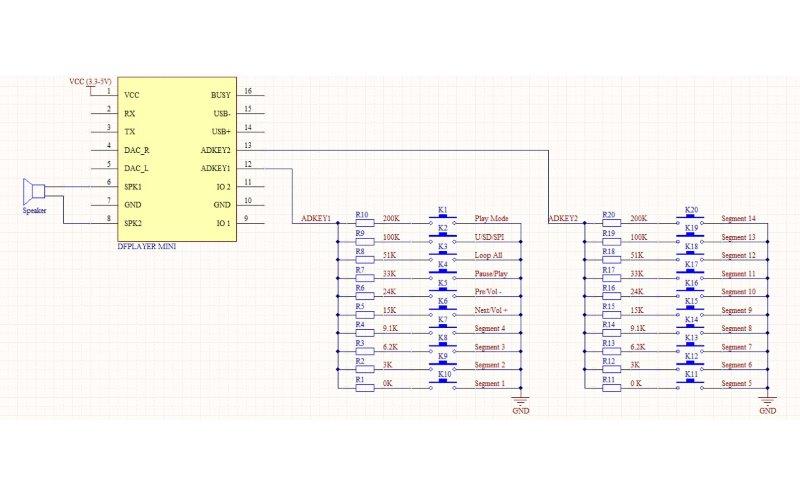
I added DFPlayer to play mp3 audio files.
Process to the result
I learnt from this site and did below;
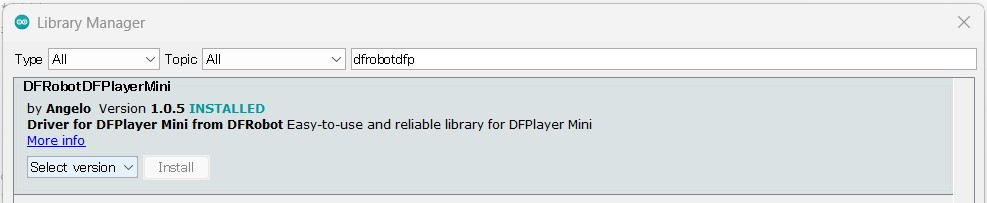
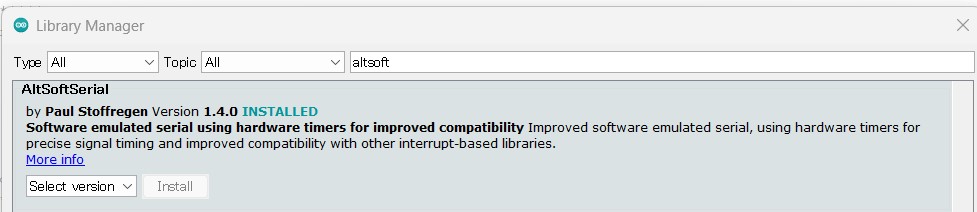
Library
- I installed necessary library "DFrobotDFPlayerMini" into my Arduino IDE
- I also installed "AltSoftSerial" for Software Serial Library.
Program
- For the first time use test, I just copied the sketch from example files of the library installed.
- I picked up below sketch:
/***************************************************
DFPlayer - A Mini MP3 Player For Arduino
 <https://www.dfrobot.com/product-1121.html>

 ***************************************************
 This example shows the basic function of library for DFPlayer.

 Created 2016-12-07
 By [Angelo qiao](Angelo.qiao@dfrobot.com)

 GNU Lesser General Public License.
 See <http://www.gnu.org/licenses/> for details.
 All above must be included in any redistribution
 ****************************************************/

/***********Notice and Trouble shooting***************
 1.Connection and Diagram can be found here
 <https://www.dfrobot.com/wiki/index.php/DFPlayer_Mini_SKU:DFR0299#Connection_Diagram>
 2.This code is tested on Arduino Uno, Leonardo, Mega boards.
 ****************************************************/

#include "Arduino.h"
#include "DFRobotDFPlayerMini.h"

DFRobotDFPlayerMini myDFPlayer;
void printDetail(uint8_t type, int value);

void setup()
{
  Serial1.begin(9600);
  Serial.begin(115200);

  Serial.println();
  Serial.println(F("DFRobot DFPlayer Mini Demo"));
  Serial.println(F("Initializing DFPlayer ... (May take 3~5 seconds)"));

  if (!myDFPlayer.begin(Serial1)) {  //Use softwareSerial to communicate with mp3.
    Serial.println(F("Unable to begin:"));
    Serial.println(F("1.Please recheck the connection!"));
    Serial.println(F("2.Please insert the SD card!"));
    while(true){
      delay(0); // Code to compatible with ESP8266 watch dog.
    }
  }
  Serial.println(F("DFPlayer Mini online."));

  myDFPlayer.volume(10);  //Set volume value. From 0 to 30
  myDFPlayer.play(1);  //Play the first mp3
}

void loop()
{
  static unsigned long timer = millis();

  if (millis() - timer > 3000) {
    timer = millis();
    myDFPlayer.next();  //Play next mp3 every 3 second.
  }

  if (myDFPlayer.available()) {
    printDetail(myDFPlayer.readType(), myDFPlayer.read()); //Print the detail message from DFPlayer to handle different errors and states.
  }
}

void printDetail(uint8_t type, int value){
  switch (type) {
    case TimeOut:
      Serial.println(F("Time Out!"));
      break;
    case WrongStack:
      Serial.println(F("Stack Wrong!"));
      break;
    case DFPlayerCardInserted:
      Serial.println(F("Card Inserted!"));
      break;
    case DFPlayerCardRemoved:
      Serial.println(F("Card Removed!"));
      break;
    case DFPlayerCardOnline:
      Serial.println(F("Card Online!"));
      break;
    case DFPlayerUSBInserted:
      Serial.println("USB Inserted!");
      break;
    case DFPlayerUSBRemoved:
      Serial.println("USB Removed!");
      break;
    case DFPlayerPlayFinished:
      Serial.print(F("Number:"));
      Serial.print(value);
      Serial.println(F(" Play Finished!"));
      break;
    case DFPlayerError:
      Serial.print(F("DFPlayerError:"));
      switch (value) {
        case Busy:
          Serial.println(F("Card not found"));
          break;
        case Sleeping:
          Serial.println(F("Sleeping"));
          break;
        case SerialWrongStack:
          Serial.println(F("Get Wrong Stack"));
          break;
        case CheckSumNotMatch:
          Serial.println(F("Check Sum Not Match"));
          break;
        case FileIndexOut:
          Serial.println(F("File Index Out of Bound"));
          break;
        case FileMismatch:
          Serial.println(F("Cannot Find File"));
          break;
        case Advertise:
          Serial.println(F("In Advertise"));
          break;
        default:
          break;
      }
      break;
    default:
      break;
  }

}
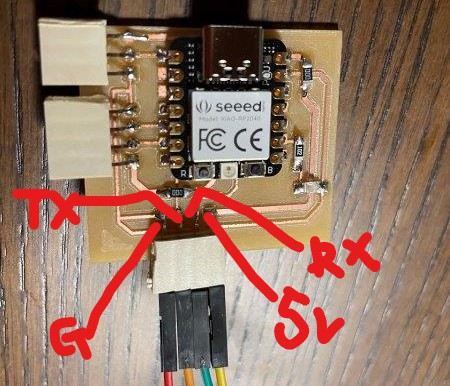
Connect to device
I connected a speaker and DFPlayer to my xiao 2040 board.
- According to supplier's site, it is said this device is "MP3 module player with a simplified output directly to the speaker." Then I connected it without amplifier, it worked.
- For the connection to the speaker, I just connected speaker's cable and jumper cables. Then put the of the jumper cables in bread board.
- I also added a "damping resister" on the siginal line from DFplayer's RX pin which is a resistor used to prevent unwanted oscillations or reflections and to ensure the integrity of the signal.

I also prepared mp3 audio in micro SD card and inserted.
Test failed
The program was compiled and indicated "Done uploading", but it made no sound. Nothing shown on the serial monitor.
Debugging day1
-
Continuity
- I checked all continuity with my tester.
- I checked all cables as well.
- It seemed nothing wrong.
-
VCC and Ground
- I checked VCC and Ground with my LED board.
- The LED was on, so no wrong with VCC and Ground.
-
Signal
- Next I tried to check signal output for each io.
- To confirm the signal I made below program which gives signal all io and blink LED.
void setup() { pinMode( 2, OUTPUT ); pinMode( 0, OUTPUT ); pinMode( 1, OUTPUT ); } void loop() { digitalWrite( 2, HIGH ); delay(100); digitalWrite( 2, LOW ); delay(300); digitalWrite( 0, HIGH ); delay(100); digitalWrite( 0, LOW ); delay(300); digitalWrite( 1, HIGH ); delay(100); digitalWrite( 1, LOW ); delay(300); } - As a result, both pin 0(TX) and pin 1(RX) blinked the light so out put signal was generated.
- Device (DFPlayer module)
- Then I doubted the device was out of order. Actually the LED on DFPlayer never blinked so far.
- I learnt how to use DFPlayer without controller. With below information, I can play mp3 without controller.
- It says I can choose action by changing resistor to pin 12 and 13.
- My idea is to put line from 12 pin directly into GND, it means 0 ohm resistor for 12 pin. Then it plays "segment1".
- It worked, played mp3 and the LED on the device lighting.
My micro SD has 3 mp3 files; bird, elephant, chime, it was supposed to play only bird. But it played all and bird again. This point I cannot understand, but it proved the device was not out of order.
Debugging day2
- I did the same as previous day to make sound, but this day it did not work.
- Picked up the output wave by oscilloscope and found no signal to the speaker. Besides LED lighting is very weak compare to previous day.
- Luckily my co-learner in the same lab has the same device, and tested the same. Then found sound wave shape is shown in oscilloscope and lighting is clear.
- Then I know my device is broken between day1 and day2, not sure the cause, maybe physical shock or short circuit by wrongly connecting.
- I borrowed co-learner's device and measured power consumption.
- Still RXTX is not possible. I must buy new device and continue debugging.
Thought and feelings
- From this week I started to use more complicated output device. DFPlayer requires RXTX connection. But it did not work for the first trial.
- Debugging needs knowledge of how it is working. And I have learned and actually made the board, so I know how it works.
- My debugging is not completed yet, and the process teaches me a lot.
Second trial
- I bought a new DFPlayer mini and tried the work again. And it made sound.
-
I should have made board and soldered this but didn't, because I want to use this device other purpose. (I did not use this for my final project)
-
Our instructor explained that if you bought cheap device I better check it works or not on arrival, because defective ratio is high. I just heard of it but this time I actually experienced.
- Cheap device has cost merit but quality risk. So I need to order extra parts if I use cheap one for important function.
Another trial
- In above trials, I did not put the DFPlayer on my board, now I try other way with my board.
- I made a board with XIAO RP2040 and a LED on its 8 pin in week 8. I connected a PIR sensor as input and turned on LED as output.
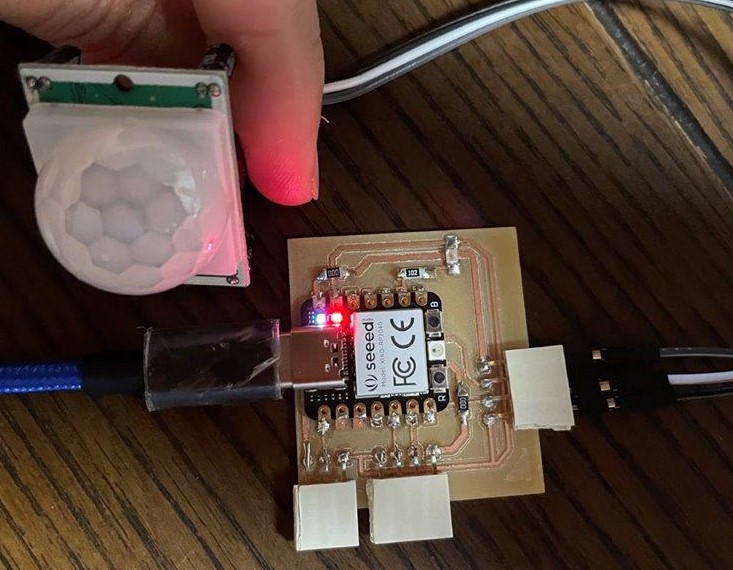
- I refer this site and borrowed the code and made it simpler as below;
#define SENSOR 0 // Sensor pin number
#define LED 2  // LED pin number

void setup()
{
  pinMode(SENSOR, INPUT);// Define Sensor pin as input
  pinMode(LED, OUTPUT);   // Define LED pin as output
}

void loop()
{
  if (digitalRead(SENSOR)) // sensor detect something
  {
    digitalWrite(LED, HIGH); // turn on LED
    delay(1000);
    digitalWrite(LED,LOW); // turn off in a second
  }
  else
  {
    digitalWrite(LED, LOW);
  }
  delay(100);
}
(end of document)