Week 04 Embedded Programming
a) Description of the week
- Prof. Neil explained microcontrollers, IDEs and languages.
- This year the sequence of learning is different from last year.
b) Assignment of the week
1 Group assignment
- Compare the performance and development workflows for other architectures
2 individual assignment:
- Browse through the data sheet for your microcontroller.
- Program a microcontroller development board to interact (with local input &/or output) and communicate (remotely)
- Extra credit: use different languages &/or development environments
1 Group assignment
c1) Result
d1) Thoughts and feelings
- It was great to see each board worked as expected.
- Depends on IDE and program language, UI and necessary libraries are different, but basic procedure is similar.
- Decide IDE and programming language
- Edit the code
- Search and install necessary libraries, it depends on the language and the device.
- Search and install the board setting. If necessary, select serial port on the IDE.
- Sometimes it does not go well as expected. Knowledge for debugging is quite important.
- Check the code error
- Check the necessary library and board setting is installed
- Check the port selected correctly
- Check the serial cable is working, some cables are for only power supply.
- Check your PC setting to use the IDE and serial programming.
- This time I did not have the case, but sometimes the board itself is broken.
2 Individual assignment
c2) Result
- Data sheet browsing
- I browsed data sheets of;
RP2040
ESP32-PICO-D4 - I also browsed overview explanation sites as follows;
XIAO RP2040
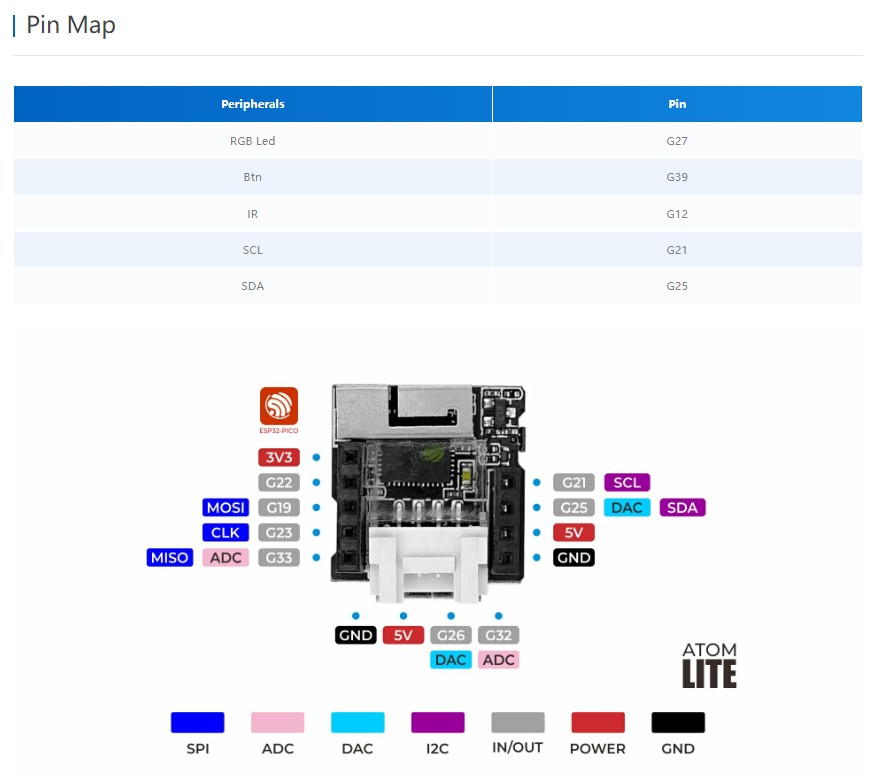
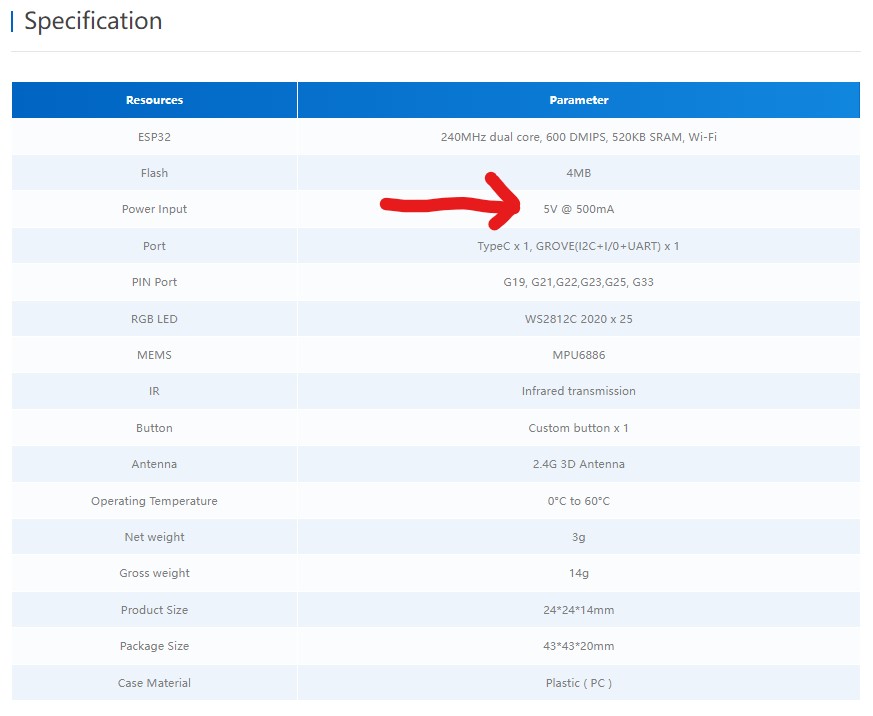
M5 stack ATOM Matrix - I learned not all contents necessary, but pin map and power information is important.
- XIAO RP2040


- M5 stack ATOM Matrix
- XIAO RP2040
- Regarding "pin map", the numbering should be correctly reflected in the program. And pin has character, like below 2 kinds;
- GPIO (general purpose input/output) : Digital I/O pins
- UART (Universal Asynchronous Receiver Transmitter): Pins for special communication protocol this is a set of RX pin and TX pin.
- Program and try different development environments
-
Development environments
-I used "Arduino IDE" and "Platform IO IDE on VS code" as shown in group assignment- Programmed "XIAO RP2040" and "M5 stack ATOM Matrix" as shown in group assignment
-
Program
For XIAO RP2040, I uploaded below code and make neopixel LED red blink.The original code for above is in this site and changed LED color simpler. (Only red)#include <Adafruit_NeoPixel.h> #define NUMPIXELS 1 #define NEO_PWR 11 //GPIO11 #define NEOPIX 12 //GPIO12 Adafruit_NeoPixel pixels(NUMPIXELS, NEOPIX, NEO_GRB + NEO_KHZ800); void setup() { pixels.begin(); pinMode(NEO_PWR,OUTPUT); digitalWrite(NEO_PWR, HIGH); delay(200); } void loop() { pixels.setPixelColor(0, pixels.Color(255, 0, 0)); pixels.show(); delay (200); //LED color adjusted Red only pixels.clear(); pixels.show(); delay(200); } -
Program M5 Atom
I also uploaded below code and show text on serial monitor by pressing the button on M5Atom.To make this code, I referred this site and modified below code for M5Atom and change the text shown in the serial monitor#include <M5Atom.h> void setup() { M5.begin(); } void loop() { M5.update(); if(M5.Btn.isPressed()){//If the button pressed, Serial.println("Fab lab Kitakagaya!"); // show letters "Fab lab Kitakagaya!" on serial monitor. } delay(200); }#include <M5Core2.h> void setup() { M5.begin(); M5.Lcd.println("Please pressed Button A."); } void loop() { M5.update(); if (M5.BtnA.wasPressed()) { //If the key is pressed. M5.Lcd.println("Button is pressed."); } delay(20); }
f2) Thoughts and feelings
- "Data sheet" has a lot of detailed information, but for me quite difficult. On the other hand, "Overview" site by each supplier is edited briefly and covers important points. As a beginner of microcontrollers, it is better to begin with overview information.
- Pin allocation seems quite important for actual work.
- In the beginning, I could not understand the difference between RP2040 and XIAO RP 2040. But by browsing suppliers documents many times finally got that RP2040 is a name of microcontroller, and XIAO RP2040 is the name of a board with RP2040. I must identify "tip" and "board".
- This is the first time for me to use microcontrollers and program into it. It was super fun when my program worked.
- I tried 2 development environment "Arduino IDE" and "VScode + Platform IO". The basic idea and process seems the same. But the appearance and performance are not the same. I prefer Arduino IDE in appearance, but the compile time takes longer than other one.
- As for Platform IO, serial writing did not work. I managed to write it with alternative way.
g) References
Data sheet of RP2040
Data sheet of ESP32-PICO-D4
Overview of XIAO RP2040
Overview of M5stack ATOM Matrix
XIAO RP2040 program sample
(end of document)