Embedded Programming | Week 09

What is Data Sheet?

  • Technical data sheets are one of the most important papers for presenting your product's features to users. This document contains information on the product's important characteristics, such as technical specifications, application or use techniques, and so on.


  • Lets Review on bases of Maket:


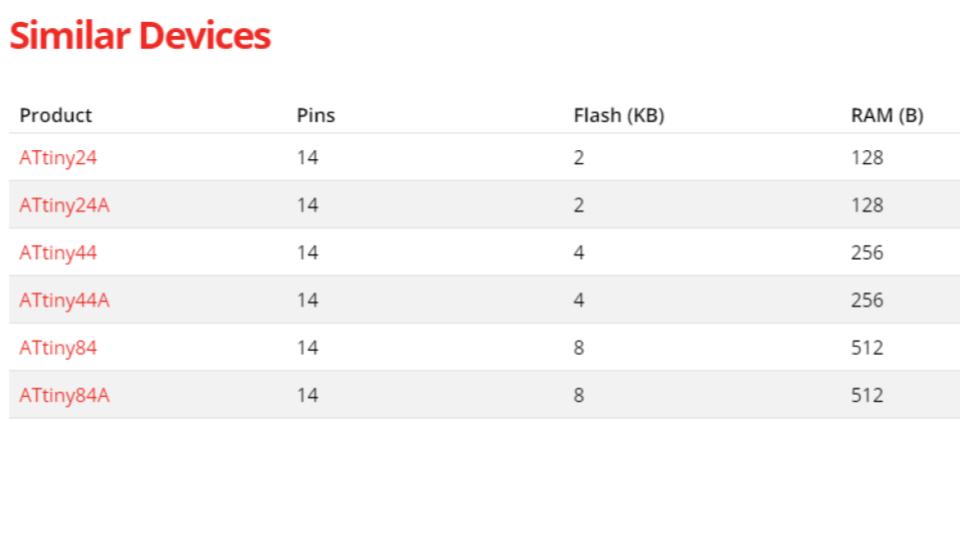
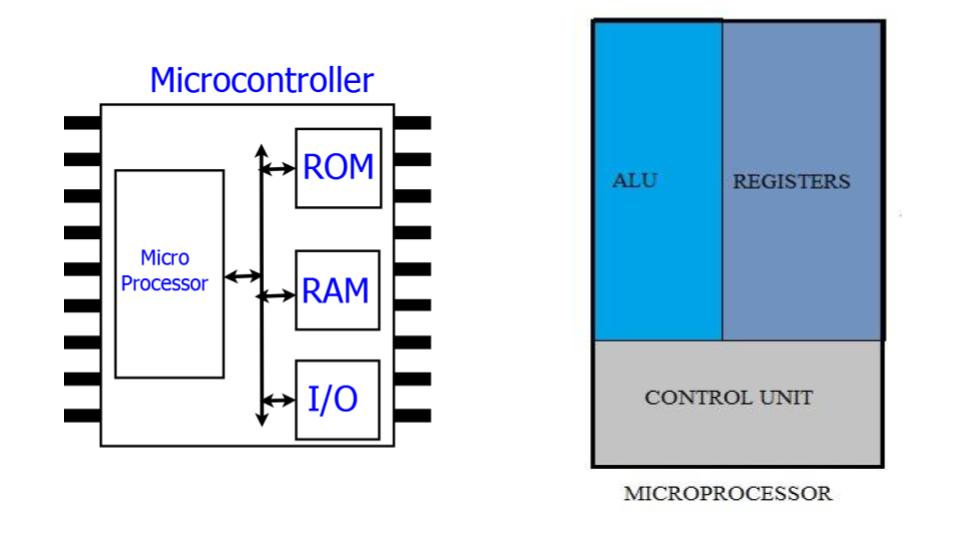
  • Mircocontroller & Microprocessor

  • In essence, a microcontroller is a computer on a chip. A microcontroller differs from a regular desktop or laptop computers in that it is an application-specific computer that typically runs a single program to perform the dedicated task(s), whereas the latter two are general-purpose computers that can run a variety of programmes depending on the needs of the user. A microcontroller is a semiconductor that contains a CPU, an input/output interface, memory, a clock, a timer, and a variety of other peripherals.


  • A microprocessor, on the other hand, is simply a CPU to which external memory, clock, input/output interfaces, timer, and other peripherals must be added. This explains why microprocessors have so many pins.


  • Photo Reference LinkS.

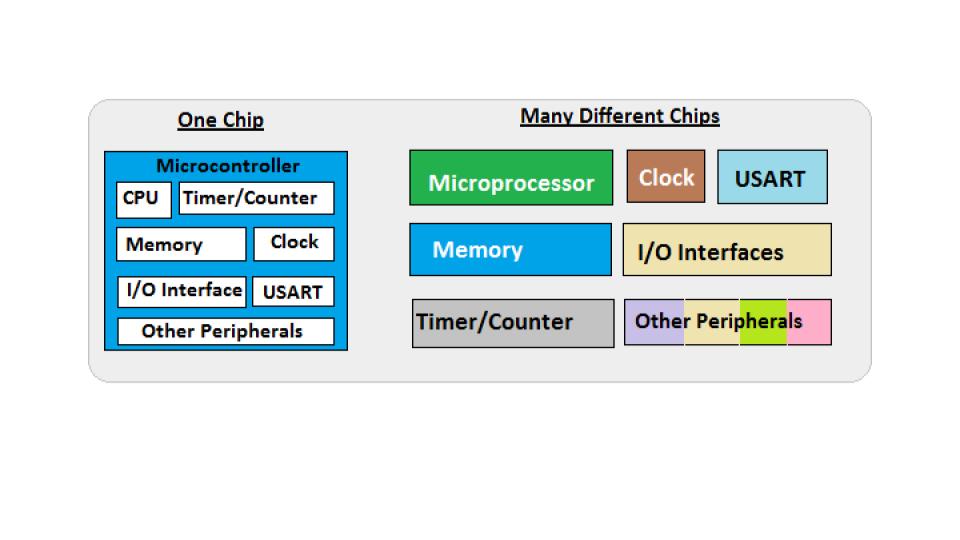
  • Advantages of a similar microcontroller vs microprocessor product


  • Microcontroller products are more compact because they have several components on one chip. A microprocessor product requires the addition of multiple extra chips, making it large.

  • Cheaper - Because a microcontroller has all of the components on a single chip, it is much less expensive than a microprocessor system, which requires the production of many chips.

  • What is IC?


  • IC is nothing more than packaging. It could be a single IC gate, numerous gates, a microcontroller (which is essentially a computer), a CPU, memory, or simply an analog circuit. In addition to transistors, ICs may contain passive components like resistors and capacitors.

  • Logic components such as NOR, NAND, and others are essential computer building blocks, so any processor or memory is made up of logic gates.


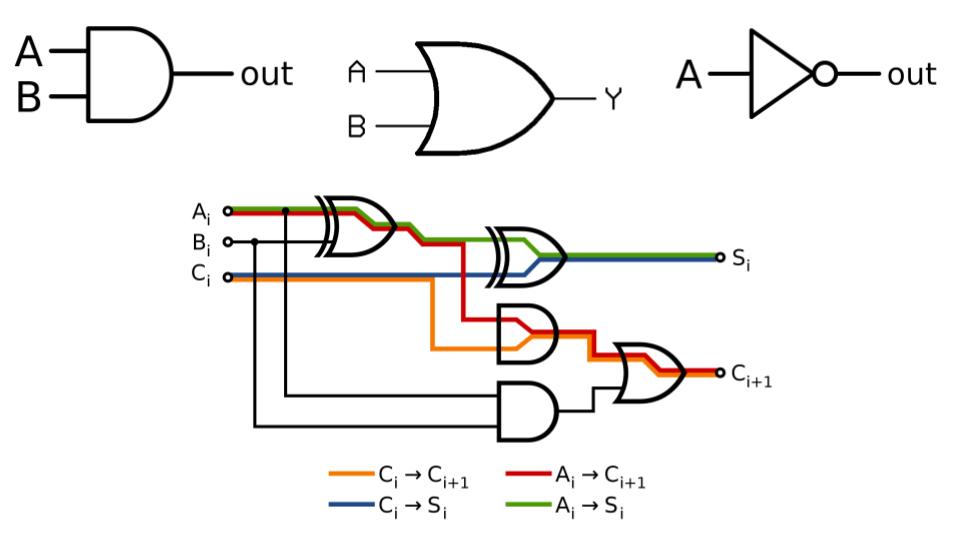
  • What is Embedded Programming?


  • Embedded programming is a sort of programming that enables the creation of consumer- or business-facing devices that do not run typical operating systems like full-size laptop computers and mobile devices. The concept of embedded programming is at the heart of today's IT market's expansion of digital appliances and equipment.

  • Embedded programming, also known as embedded software development or embedded systems programming, is a type of programming that takes place on a computer. For More Detail.

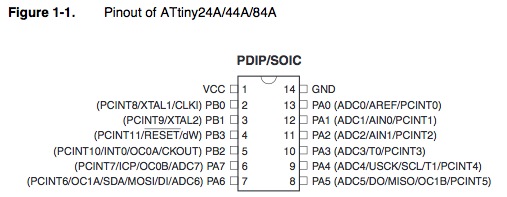
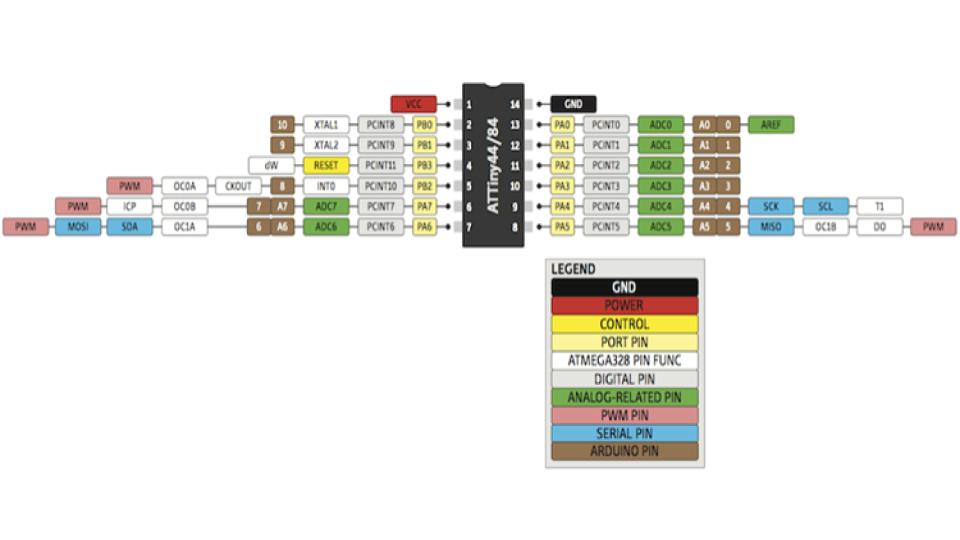
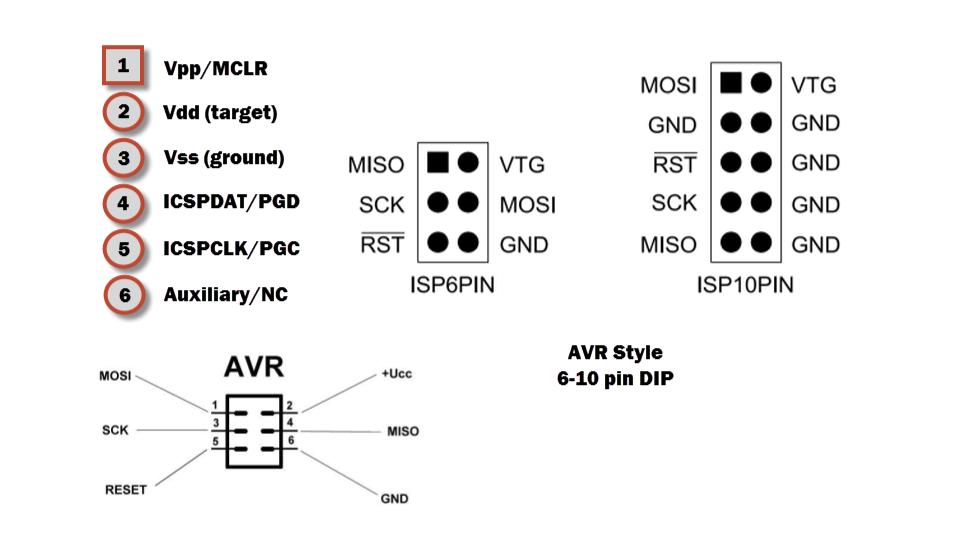
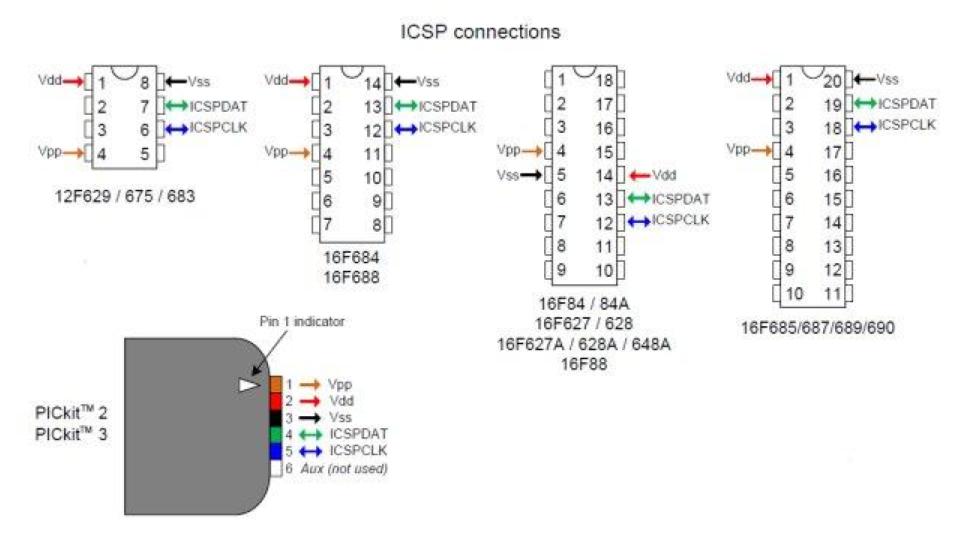
  • For programming any board we need to include these pins in our board. Some notes to understand the ISP


    MOSI :Master out Slave in

  • This pin is used to transfer data from computer to the microprocessor

  • MISO :Master in Slave out

  • This pin is used to read data from the microprocessor

  • RST :reset pin

  • This pin is used to reset the microprocessor

  • SCK :clock

  • Clock signal is supplied with help of this pin

  • VCC :Voltage supply

    GND :Ground


  • Reference Maharshi Solanki

    Group Assignment #6: Embedded Programming


  • This assignment is about documenting what we learned in Embedded programming week that includes understanding the data sheets of microcontrollers, compare the performance and development workflows for other architectures. We used ESP32 board, which is from Xtensa family of microcontrollers. We used micropython to program the ESP32 through Thonny IDE to blink an inbuilt as well as external LED attached to this board.

  • Objectives of the Group Assignment:


  • Understanding the data sheets of microcontrollers
  • Compare the performance and development workflows for other architectures


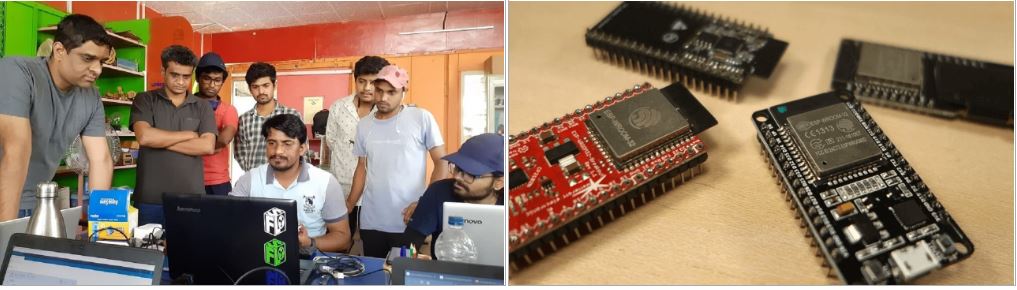
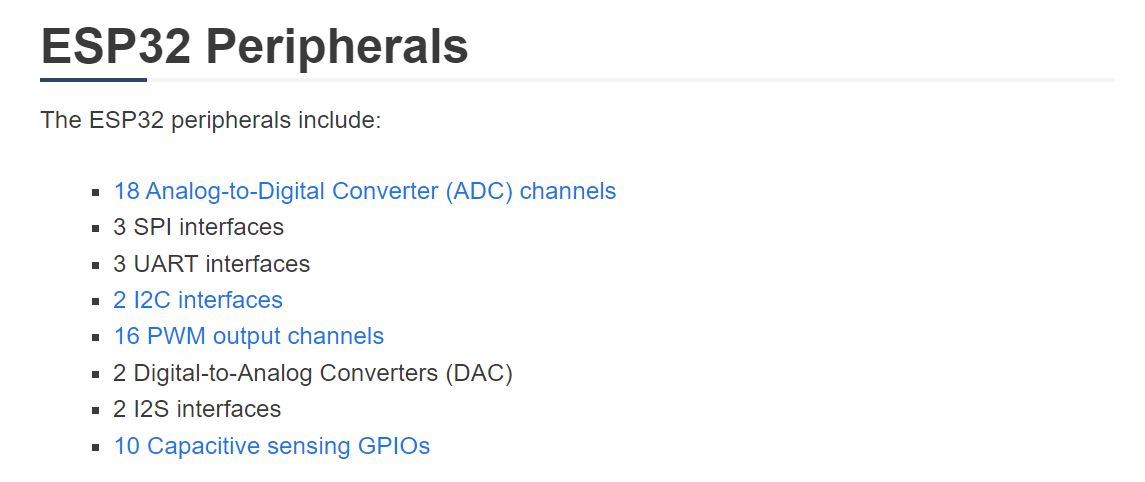
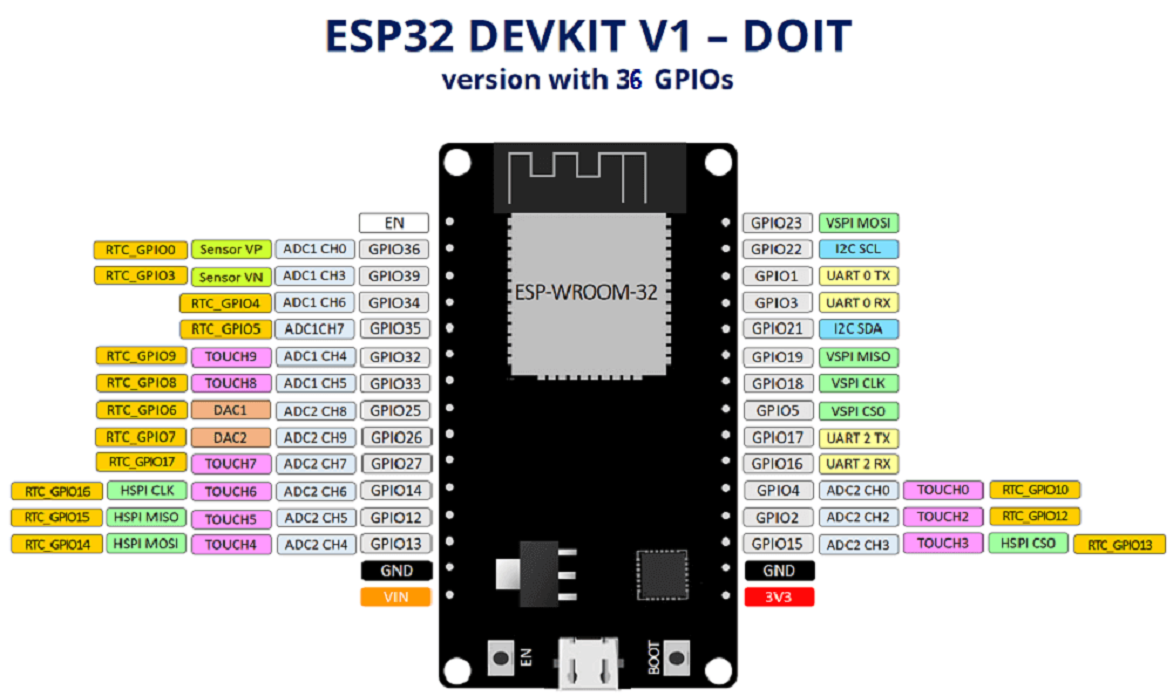
  • ESP32 Development Board
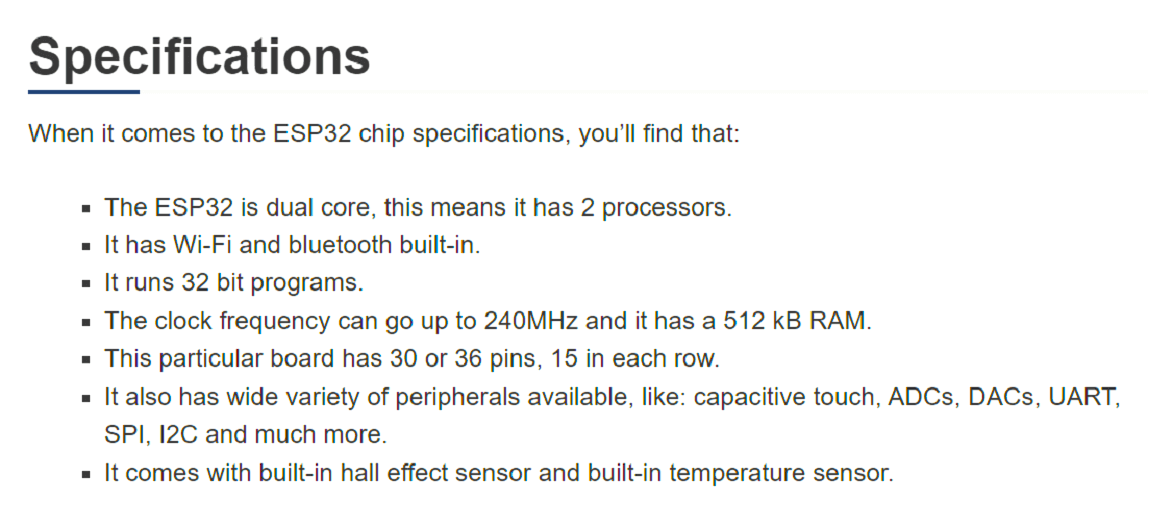
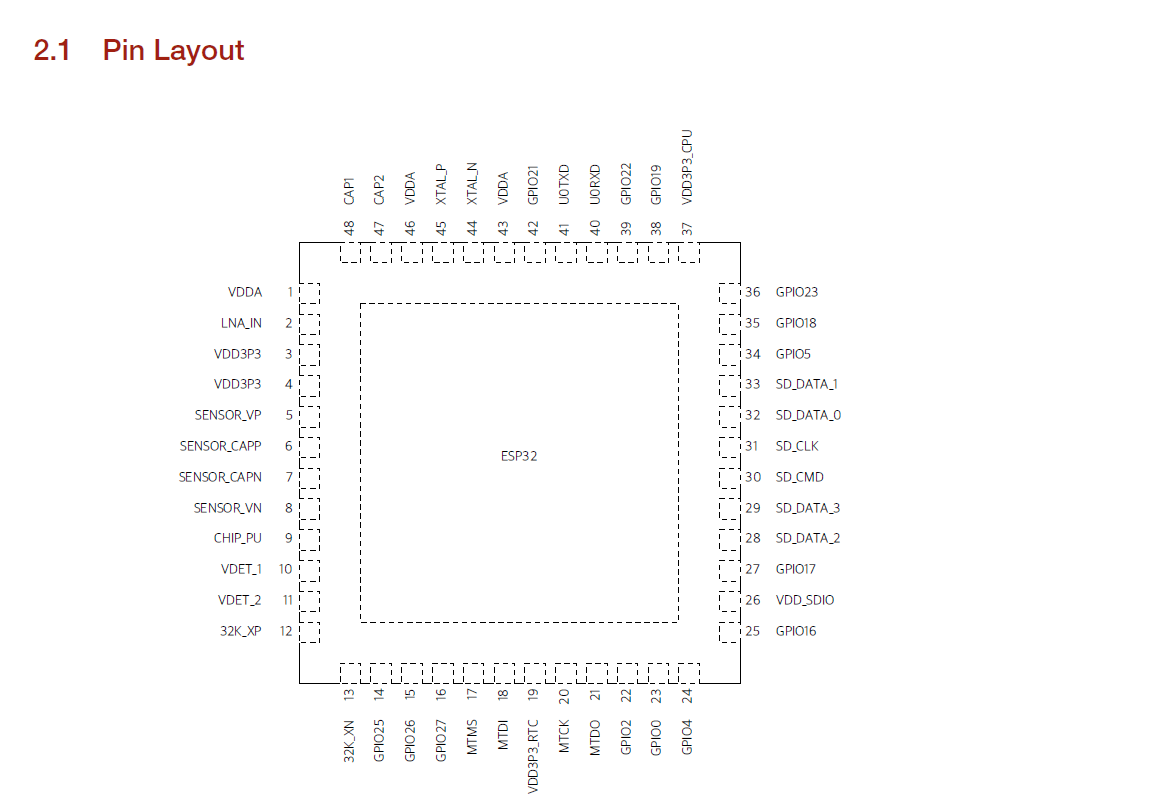
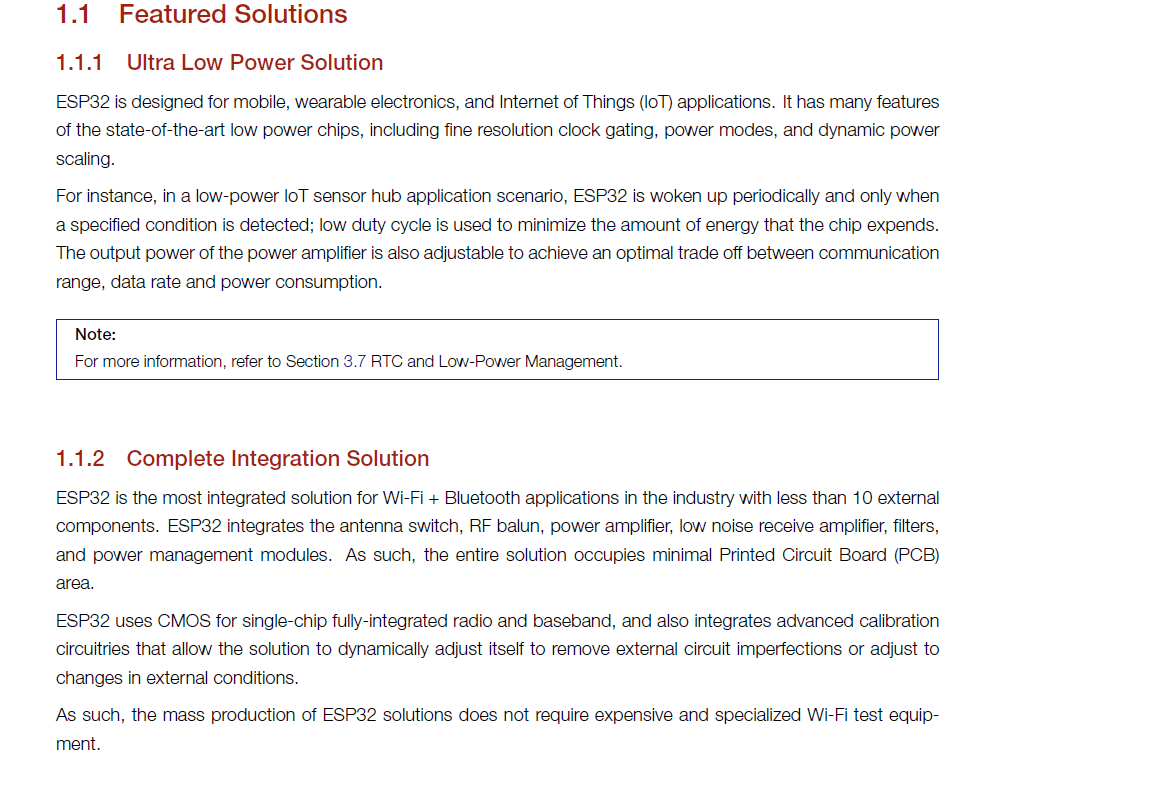
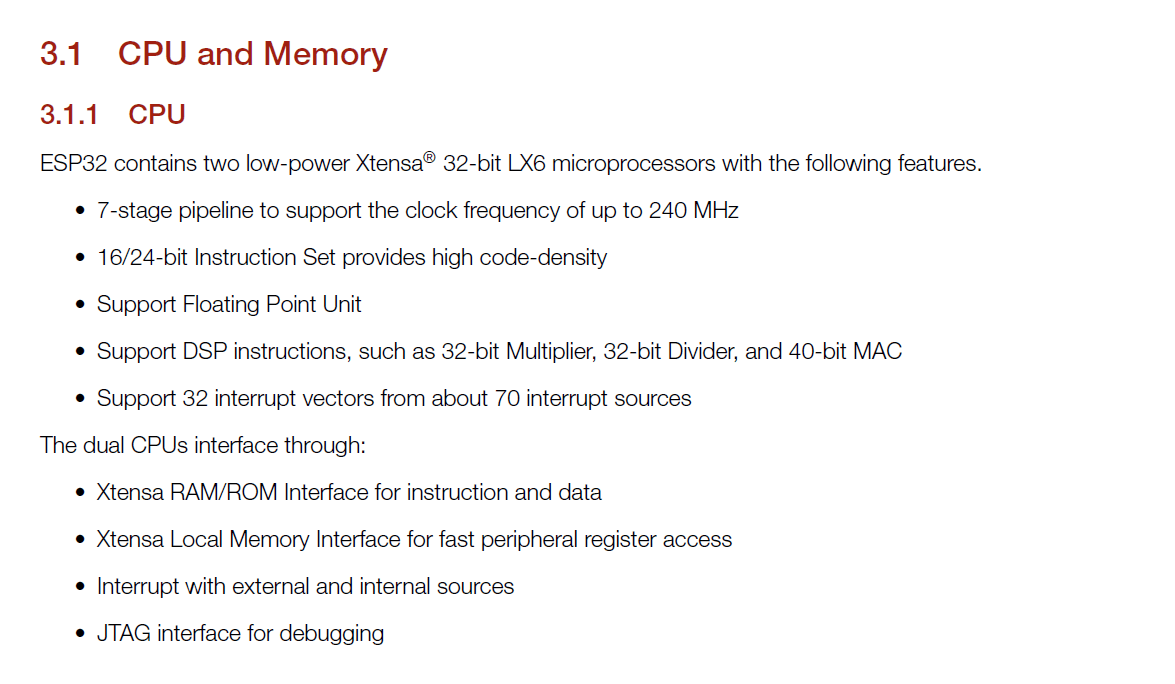
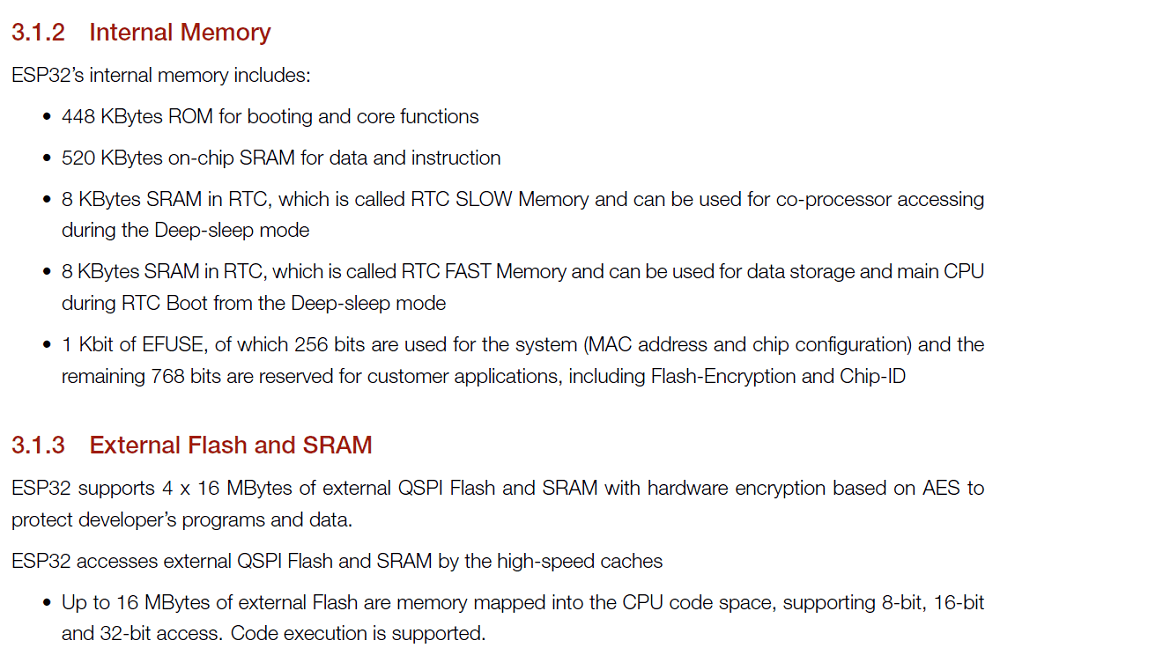
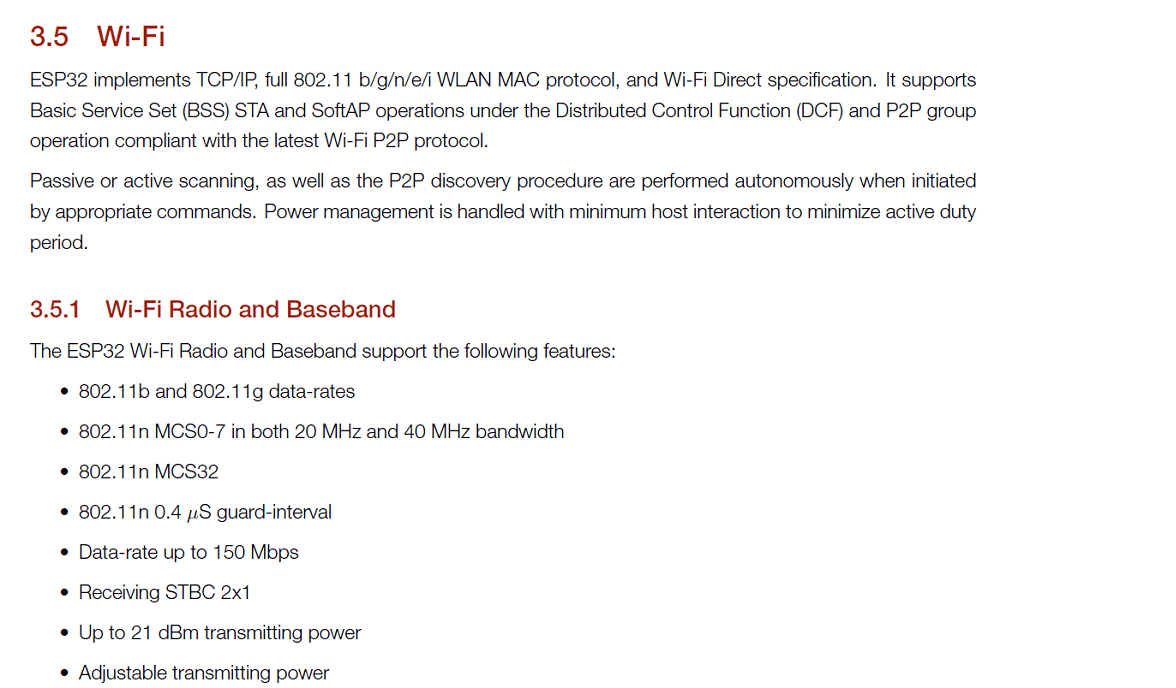
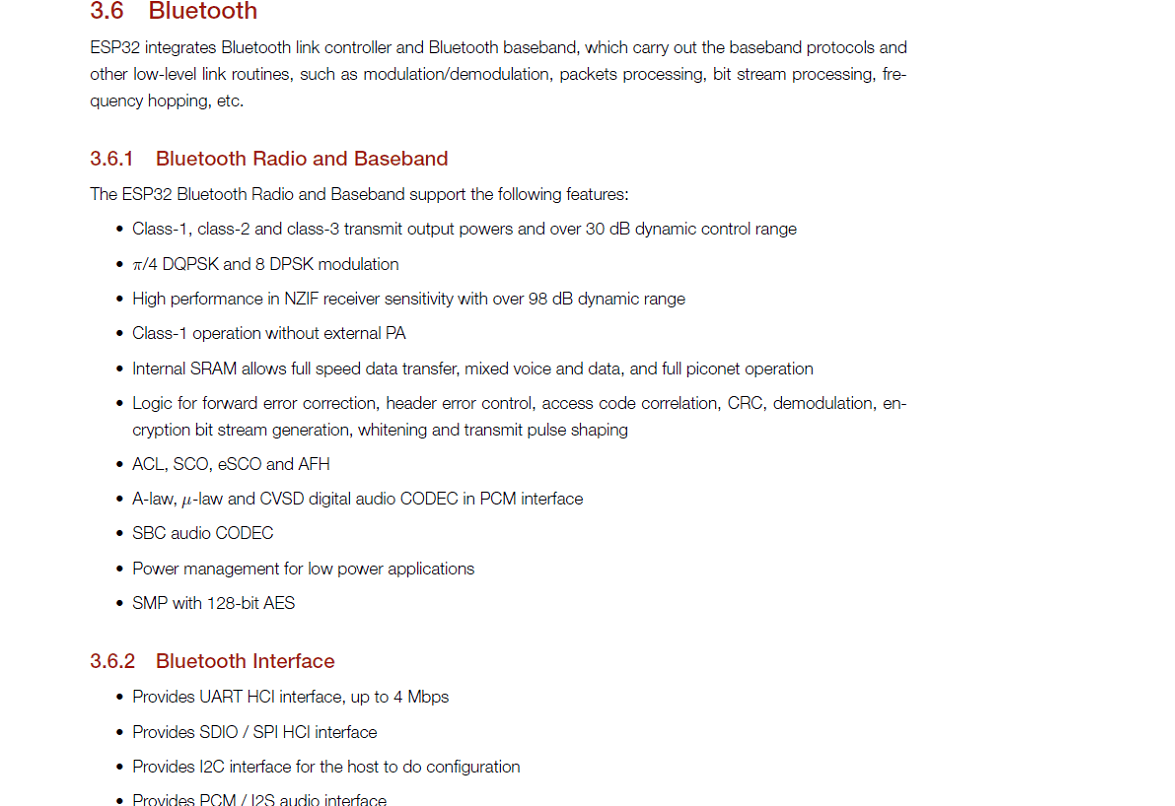
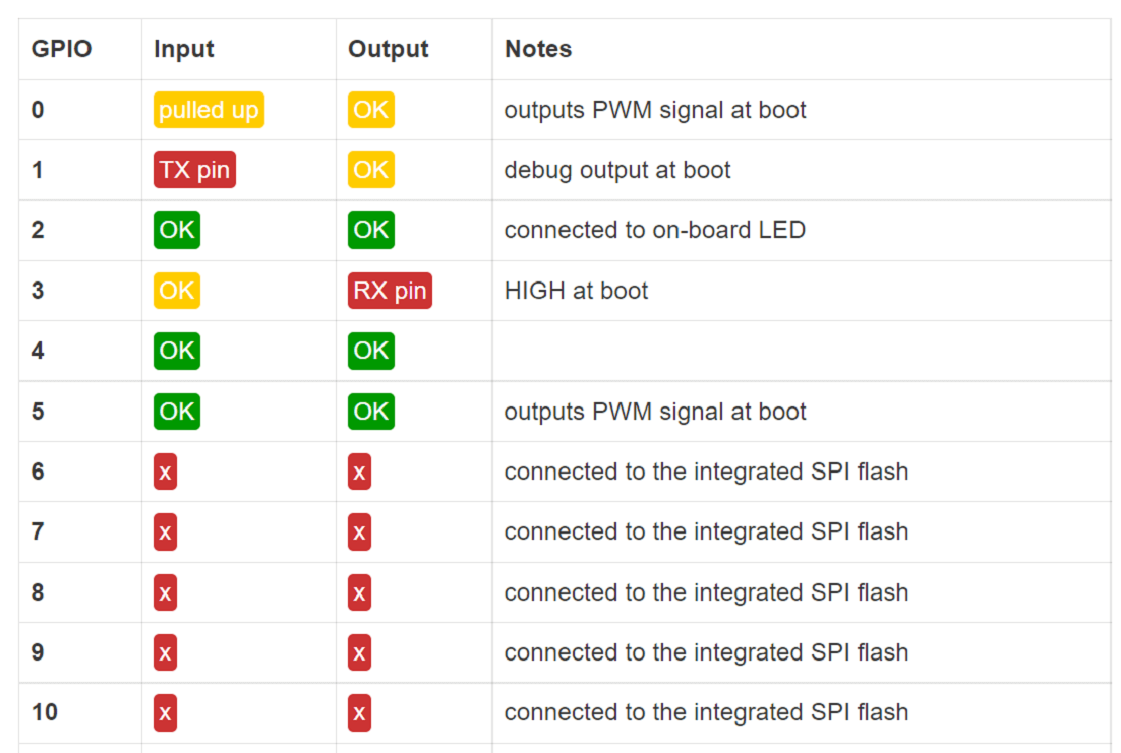
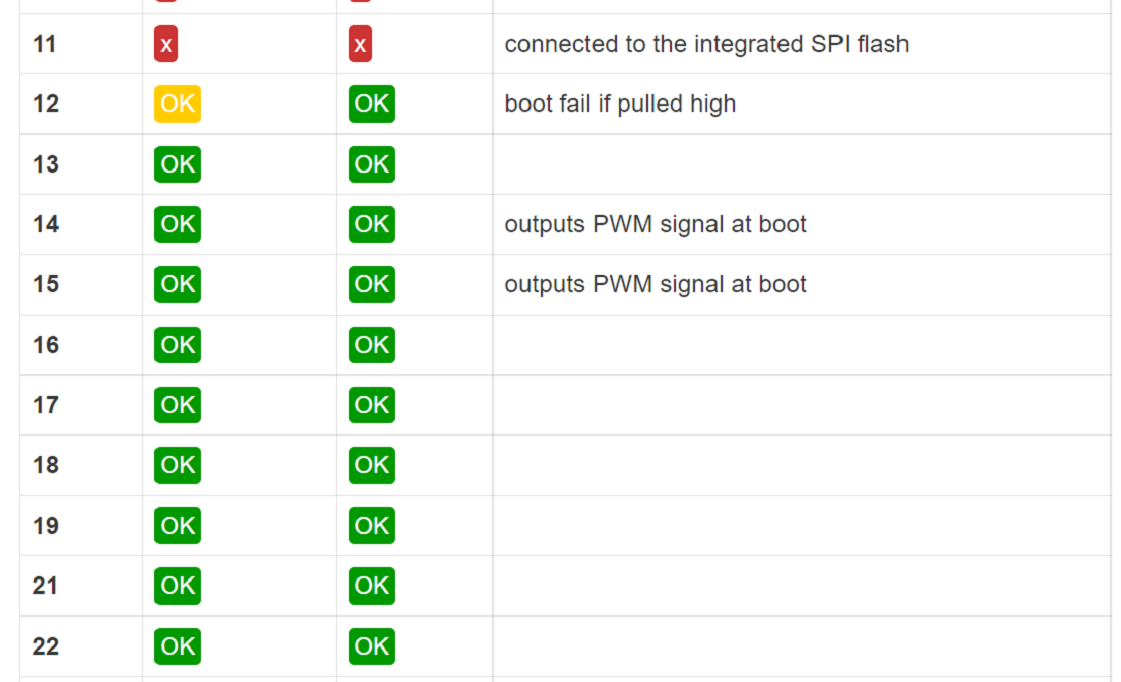
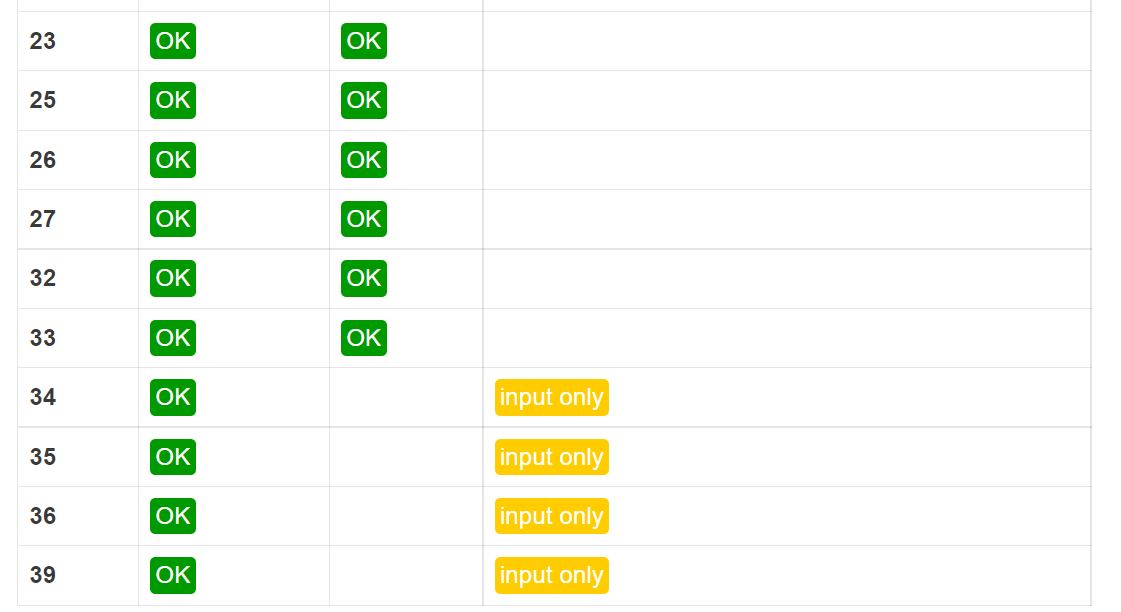

  • For this group assignment, we worked on understanding ESP32 development board, it's datasheet and then we did embedded programming on this board. If you are familiar with the ESP8266, the ESP32 is its successor. The ESP32 is loaded with lots of new features. The most relevant: it combines WiFi and Bluetooth wireless capabilities and it's dual core. Following are the specifications of ESP32 chip and ESP32 Development board


  • ESP32 Datasheet


  • A data sheet, data-sheet, or spec sheet is a document that summarizes the performance and other characteristics of a product, machine, component (e.g., an electronic component), material, subsystem (e.g., a power supply), or software in sufficient detail that allows a buyer to understand what the product is and a design engineer to understand the role of the component in the overall system. Typically, a data sheet is created by the manufacturer and begins with an introductory page describing the rest of the document, followed by listings of specific characteristics, with further information on the connectivity of the devices. In cases where there is relevant source code to include, it is usually attached near the end of the document or separated into another file. Data sheets are created, stored, and distributed via product information management or product data management systems.


  • The ADC (analog to digital converter) and DAC (digital to analog converter) features are assigned to specific static pins. However, with the ESP32 you can decide which pins are UART, I2C, or SPI - you just need to set that on the code. This is possible due to the ESP32 chip's multiplexing feature that allows to assign multiple functions to the same pin. If you don't set them on the code, the pins will be used as default - as shown in the figure below (the pin location can change depending on the manufacturer).


  • Additionally, there are pins with specific features that make them suitable or not for a particular project. The following table shows what pins are best to use as inputs, outputs and which ones you need to be cautious.

  • The pins highlighted in green are OK to use. The ones highlighted in yellow are OK to use, but you need to pay attention because they may have an unexpected behavior mainly at boot. The pins highlighted in red are not recommended to use as inputs or outputs.


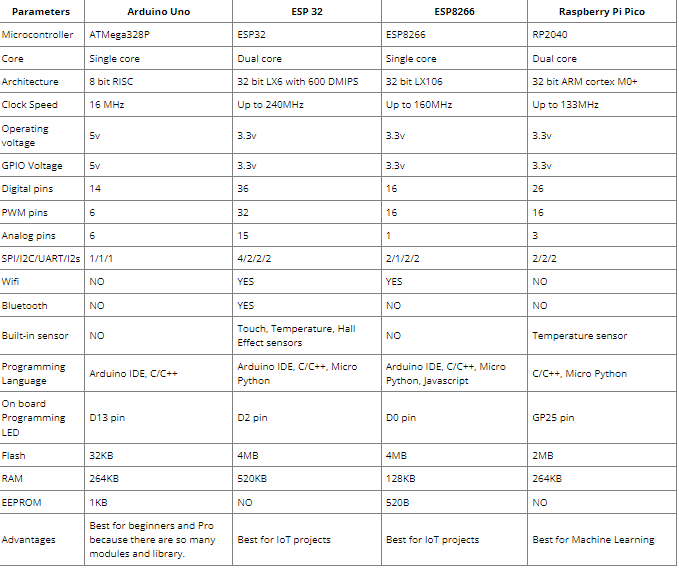
  • Comparison of Microcontrollers


    ESP32 vs ESP8266 - Pros and Cons

  • What's the difference between ESP32 and ESP8266? Should you use the ESP32 or the ESP8266 in your projects? The ESP32 and ESP8266 are cheap Wi-Fi modules perfectly suited for DIY projects in the Internet of Things (IoT) and Home Automation fields. Both chips have a 32-bit processor. The ESP32 is a dual-core 160MHz to 240MHz CPU, whereas the ESP8266 is a single-core processor that runs at 80MHz

  • These modules come with GPIOs that support various protocols like SPI, I2C, UART, ADC, DAC, and PWM. The best part is that these boards come with wireless networking included, which makes them apart from other microcontrollers like the Arduino. This means that you can easily control and monitor devices remotely via Wi-Fi or Bluetooth (in the case of ESP32) for a very low price.

  • Alternatively, if you don't need to use its wireless capabilities, you can use the ESP32/ESP8266 to control inputs and outputs as you would do with an Arduino. However, you should take into account that the Arduino works with 5V logic, the ESP32 and ESP8266 work at 3.3V.

  • The ESP32 is the ESP8266 successor. It adds an extra CPU core, faster Wi-Fi, more GPIOs, and supports Bluetooth 4.2 and Bluetooth low energy. Additionally, the ESP32 comes with touch-sensitive pins that can be used to wake up the ESP32 from deep sleep, a built-in hall effect sensor, and a built-in temperature sensor (recent versions of the ESP32 don't come with a built-in temperature sensor anymore).

  • The ESP8266 is cheaper than the ESP32. Although it doesn't have as many functionalities, it works just fine for most simple DIY IoT projects. However, it has some limitations in the GPIO mapping, and it might not have enough pins for what you intend to do. If that's the case, you should get an ESP32

  • The ESP32 is much more powerful than the ESP8266, comes with more GPIOs with multiple functions, faster Wi-Fi, and supports Bluetooth. However, many people think that the ESP32 is more difficult to deal with than the ESP8266 because it is more complex. On the contrary, it is as easy to program the ESP32 as the ESP8266, especially if you intend to program it using the "Arduino language" or MicroPython.

  • Programming ESP32 using Micro-python
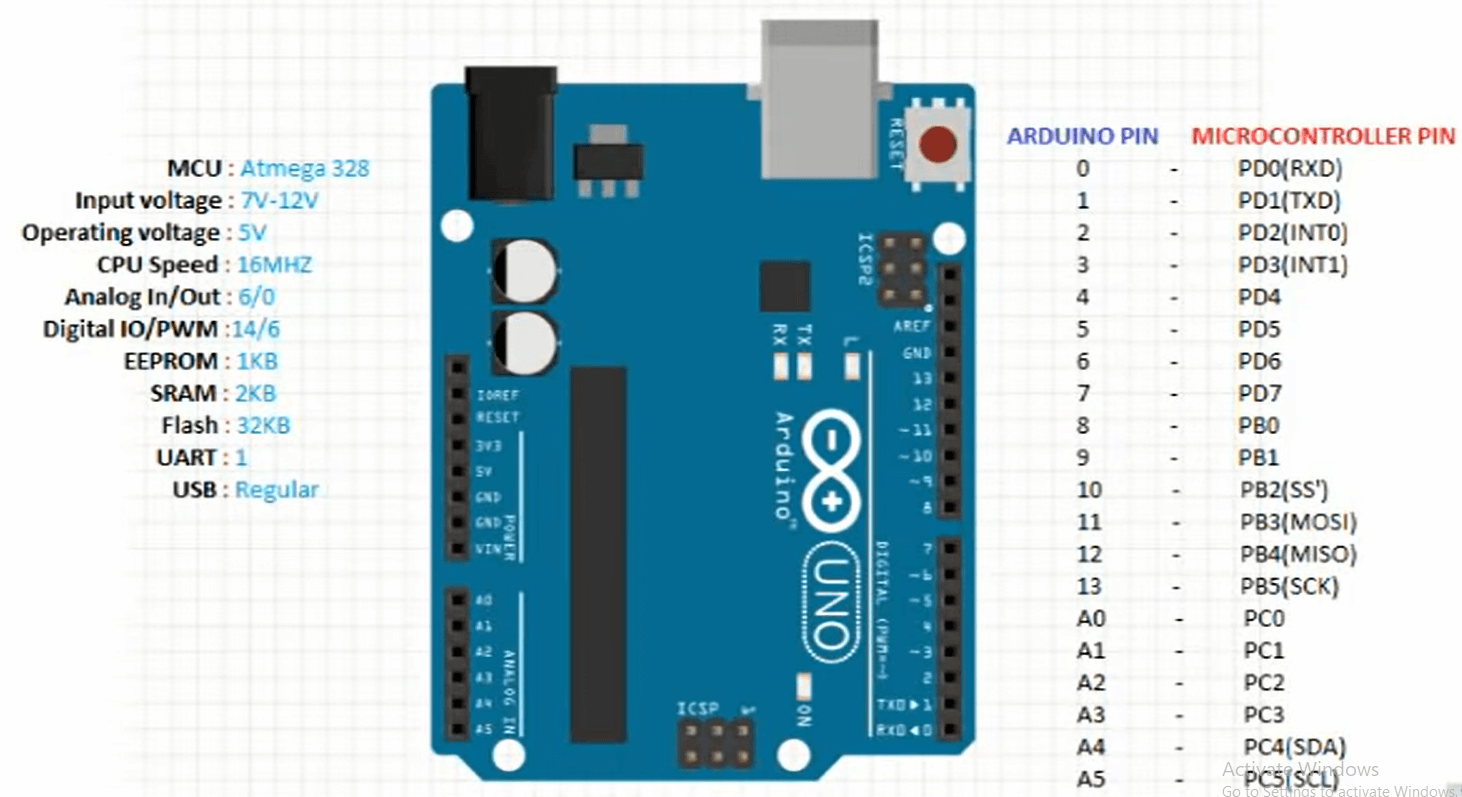

  • If we want to program your ESP32 and ESP8266 with MicroPython firmware, it's very handy to use an IDE. We programmed the ESP32 boards using MicroPython, and Thonny seemed a good choice. It is compatible with Windows, Mac OS X, and Linux. It even comes installed by default on the Raspberry Pi OS. Additionally, it's easy to install.

  • Group Assignment Link
  • Arduino

    What is the Arduino ?


  • The Arduino/Genuino Uno microcontroller board is based on the ATmega328P microcontroller (datasheet). There are 14 digital input/output pins (six of which can be used as PWM outputs), six analogue inputs, a 16 MHz quartz crystal, a USB connection, a power jack, an ICSP header, and a reset button on the board.

  • Arduino Reference Datasheets link Link.


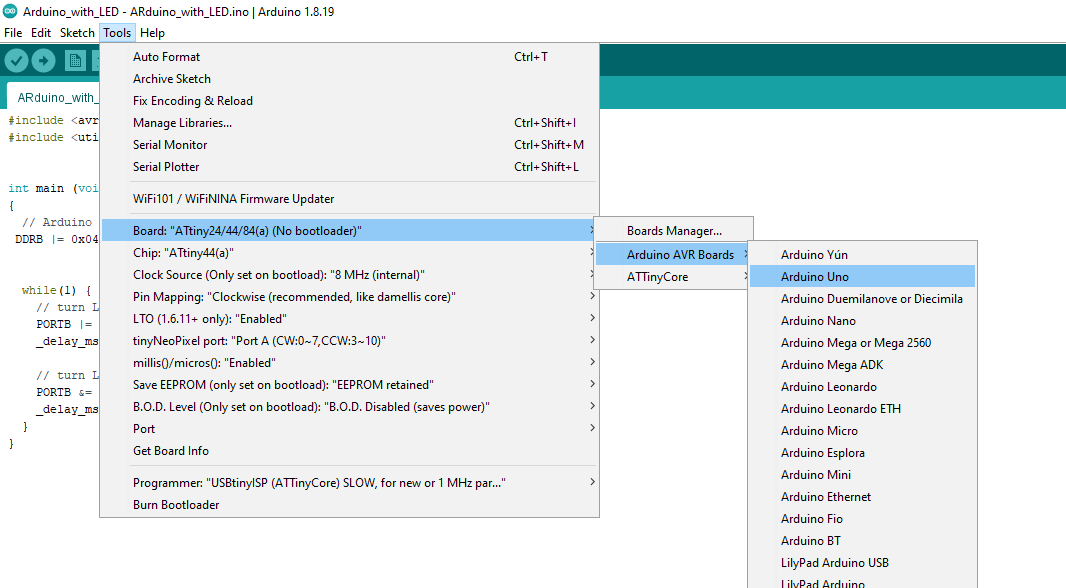
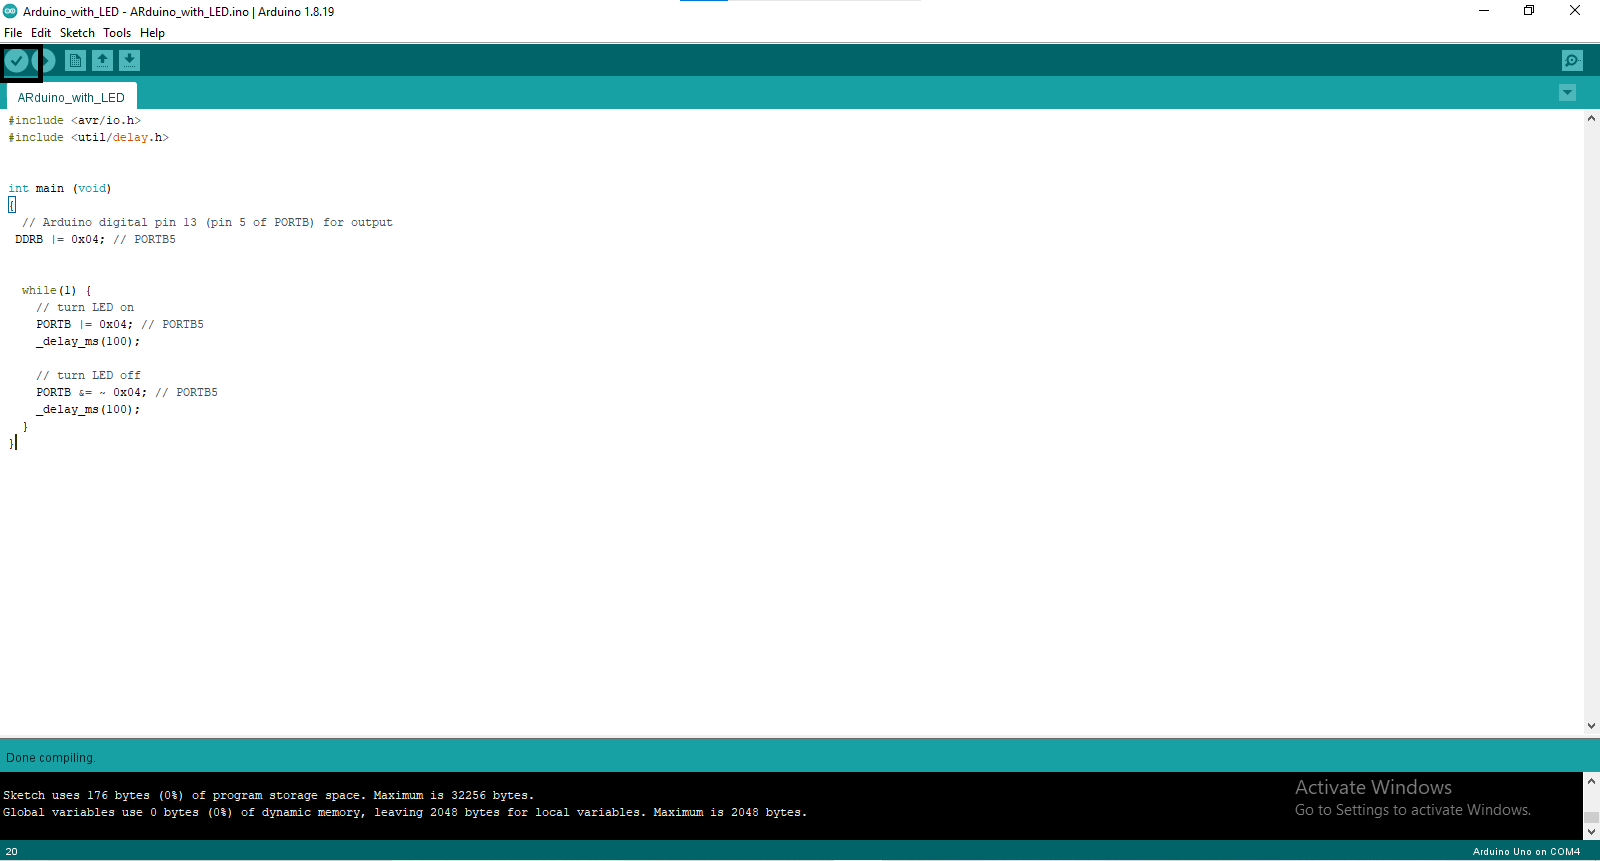
  • Arduino With LED Programming


  • Step1: Download Arduino IDE software Link.

  • Step2: Click Windows.


  • Step3: ANd Then Click Just Download.


  • Step4: Run Arduino IDE.
  • Step5: Arduino IDE Home Page.


  • Step6: Make a Code in Arduino IDE.


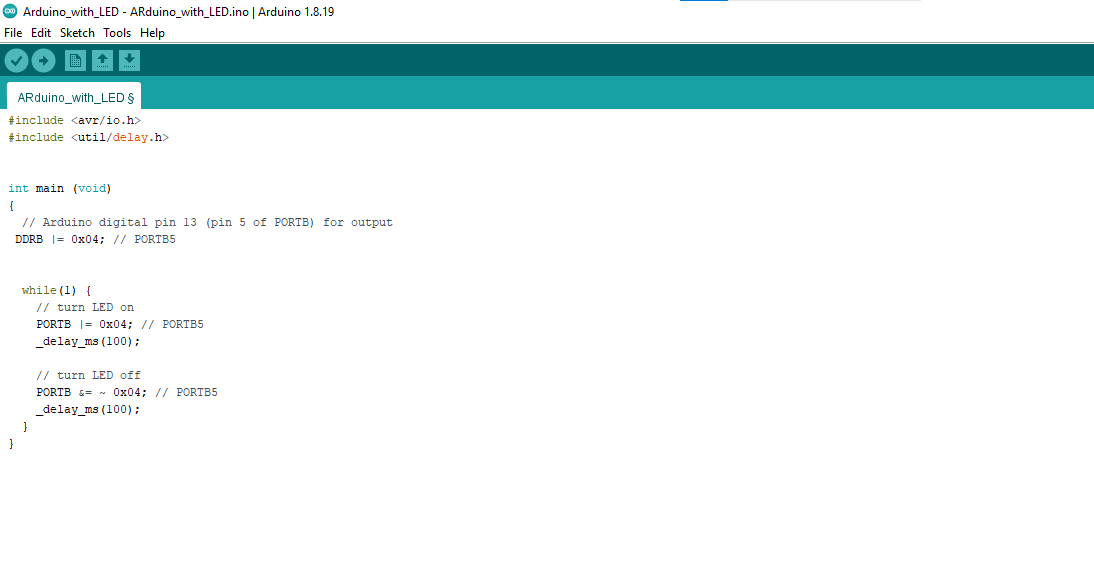
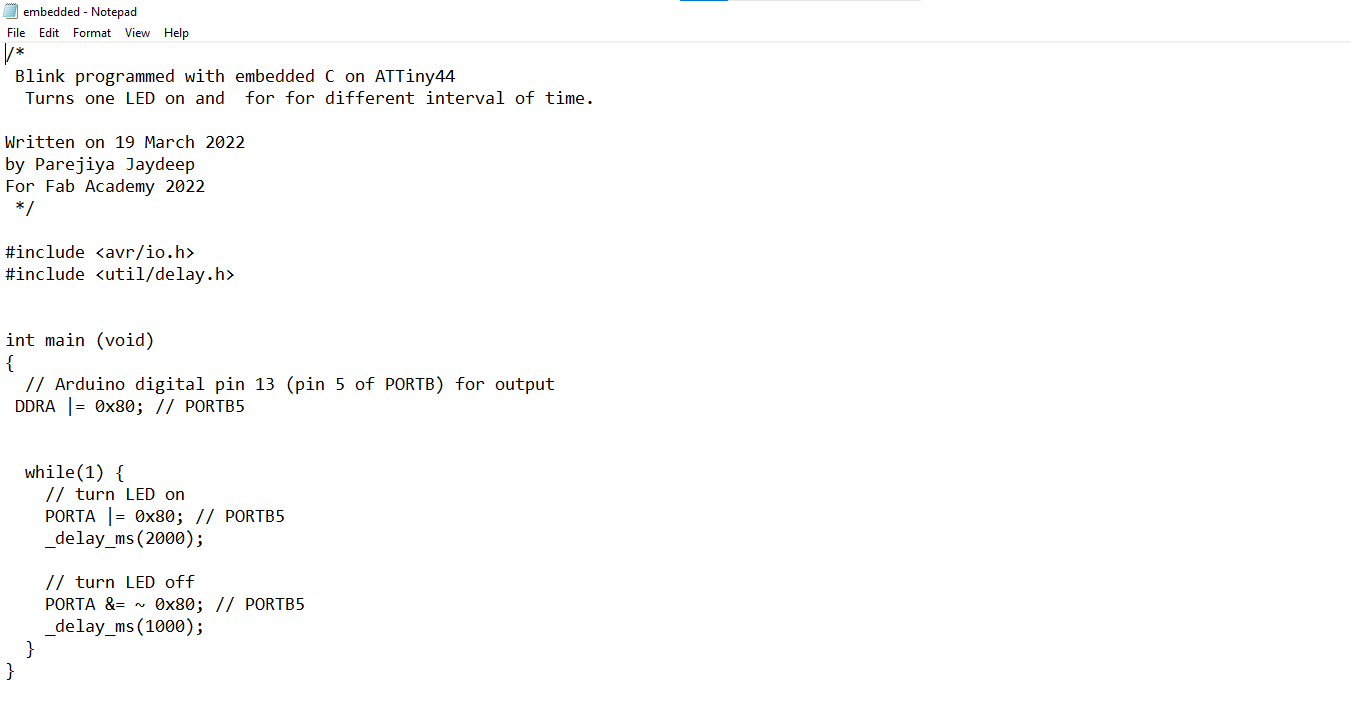
  • Step7: Arduino With LED Code.


  • Step8: Connect A to B cable with Arduino Board


  • Step9: Connect LED in Arduino.

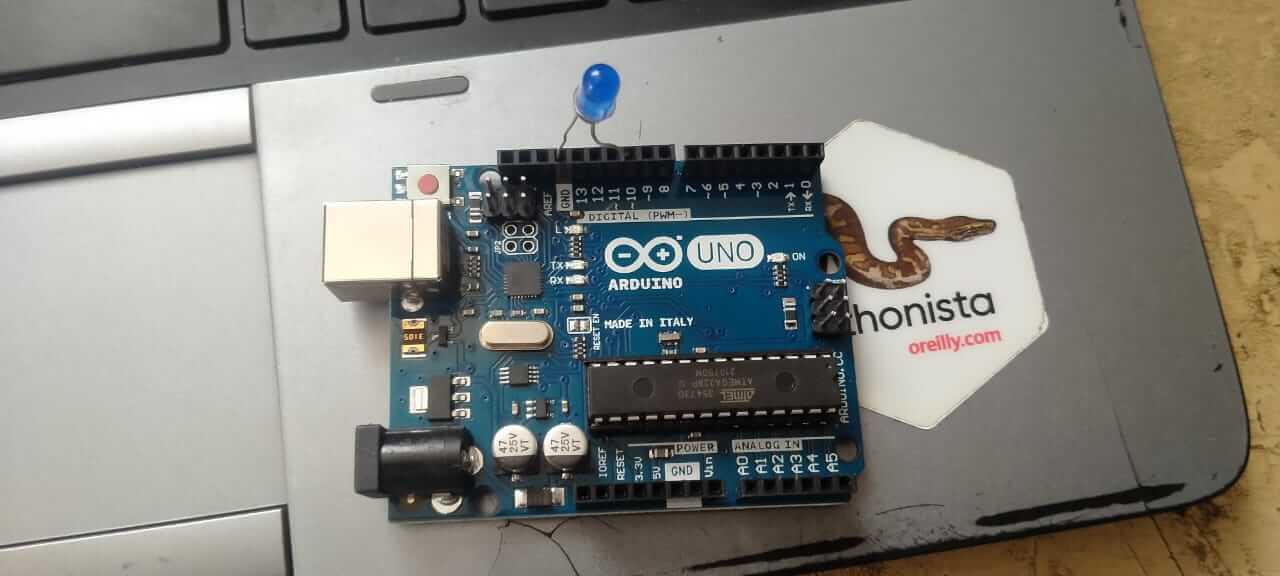
  • Step10: LED pin Number:

    1)LED sort Leg Connect GND.

    2)LED Long Leg Connect 10 Number Pin.


  • Step11: Select Arduino uno Board.


  • Step12: Select Arduino uno Board Port.


  • Step13: Click Compilling.


  • Step14: And Upload The Code.
  • Upload Code Sort Cut Key ctrl+u.


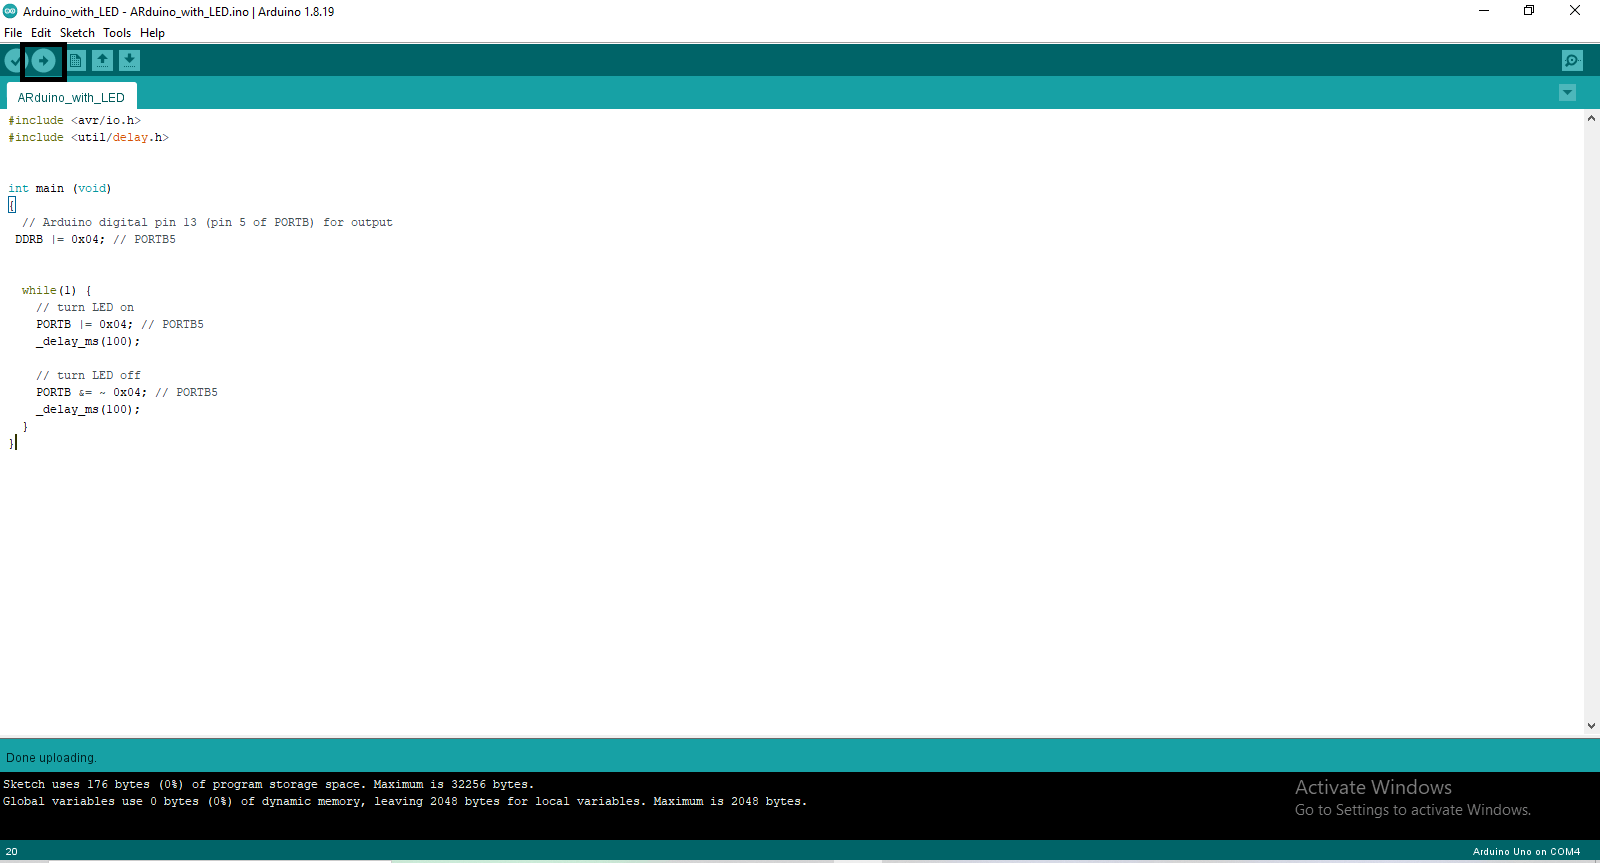
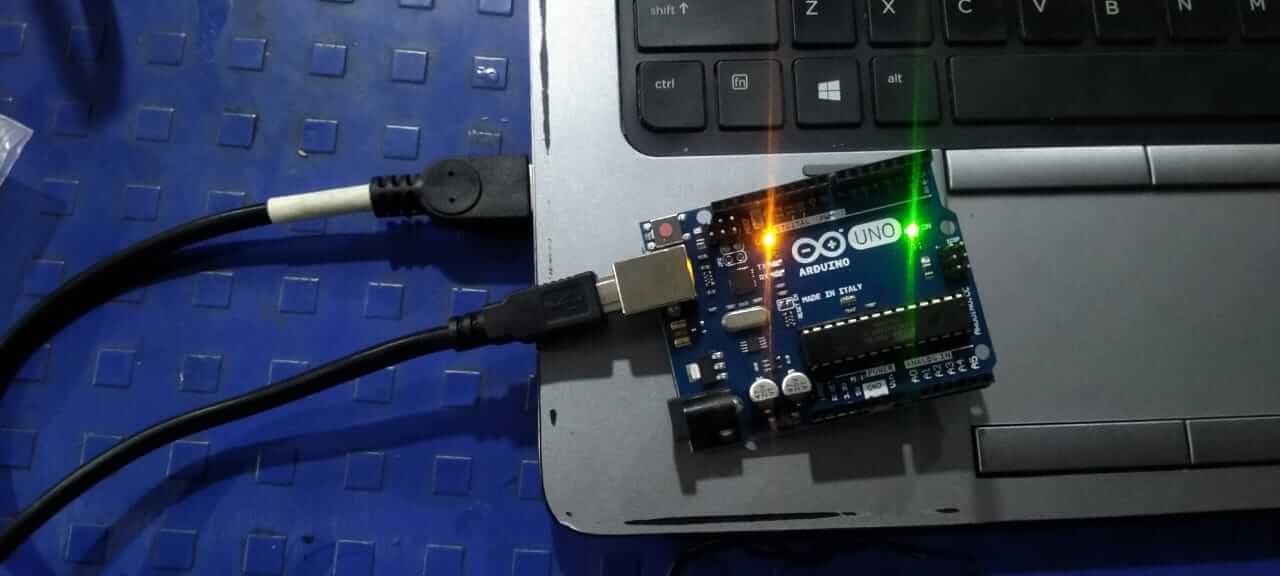
  • Arduino with LED Output Video


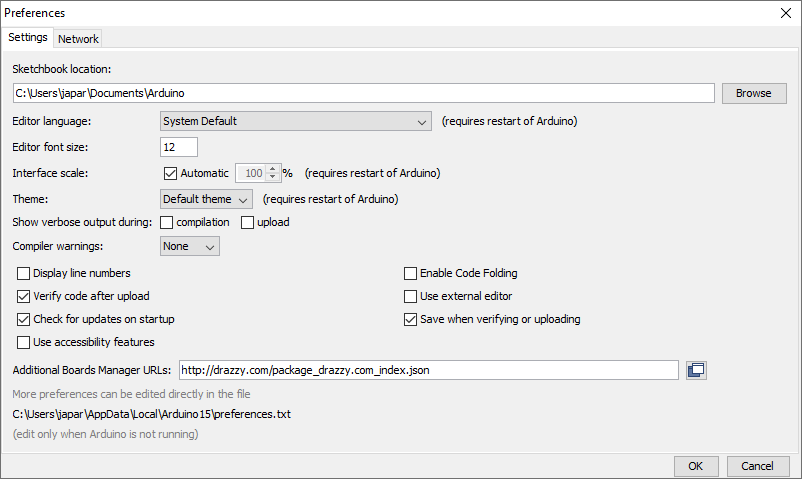
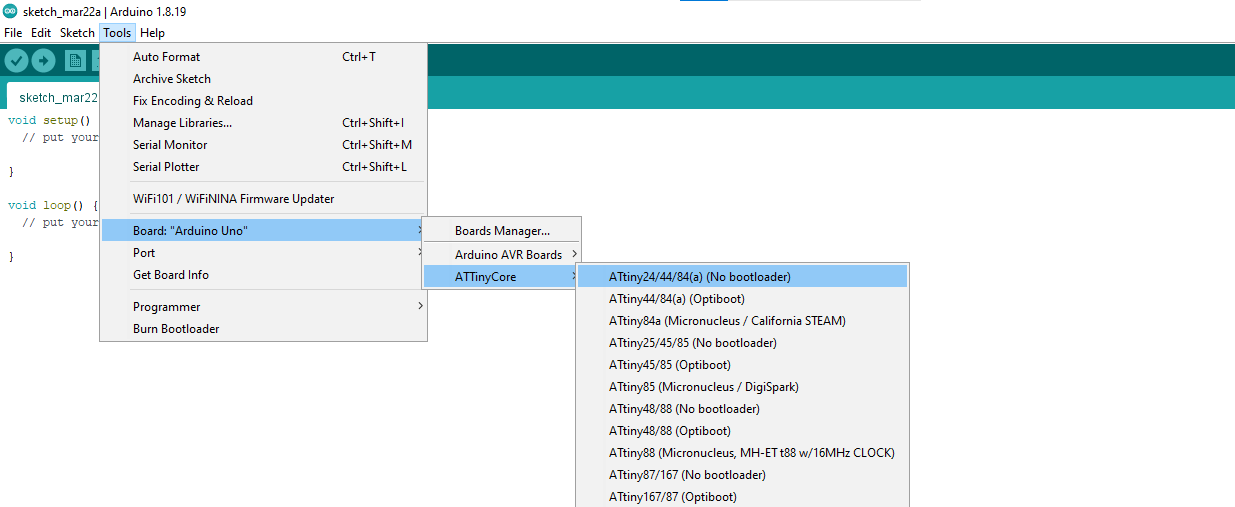
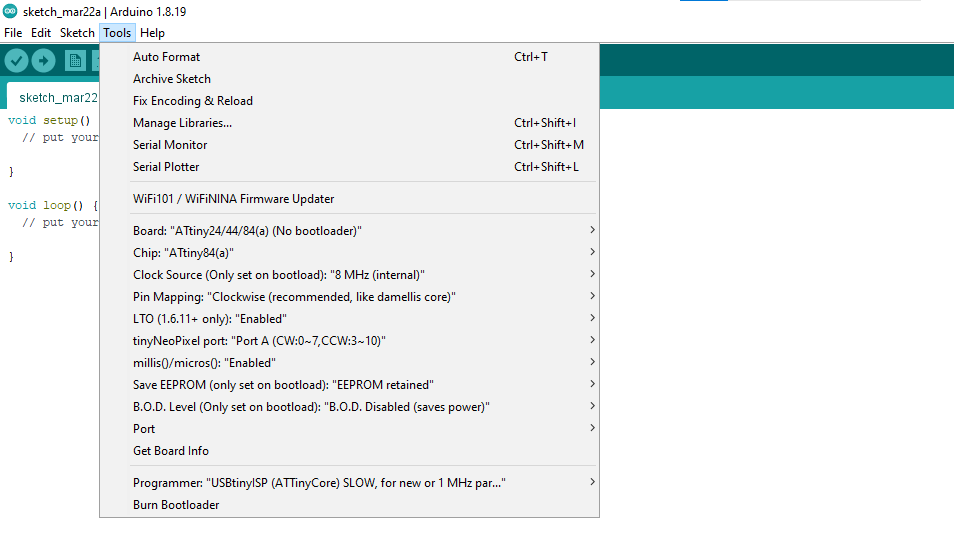
    Programmed my “Hello World Board” using FabISP in Arduino:
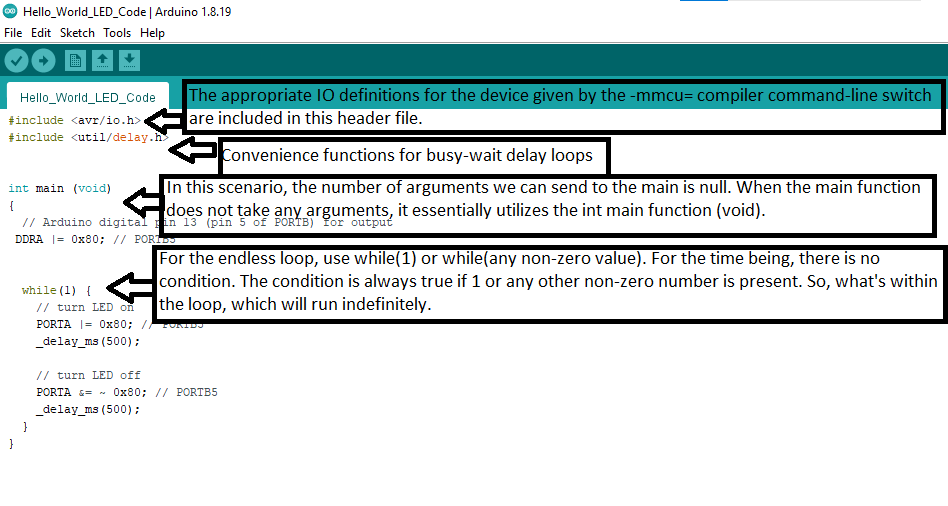
  • Step1: Open Arduino IDE.
  • Step2: Upload Link In Preferences.


  • Step3: Select Attiny44 Board.


  • Step4:


  • Step5: Then Make a Code In Arduino IDE.


  • Step6: Code:


  • So it's not dissimilar to the arduino language example, where you already have ready-to-use setup and loop functions. All C code programmes begin with the int main() function, as you can see.

  • We must include avr/io.h, which defines the terms PORTB and DDRB in the code.

  • util/delay.h is used to implement the delay function.

  • while (1) loop act same like loop() function of arduino language

  • Step7: Connect FabISP and Hello World Board.

  • Upload Code In FabISP.


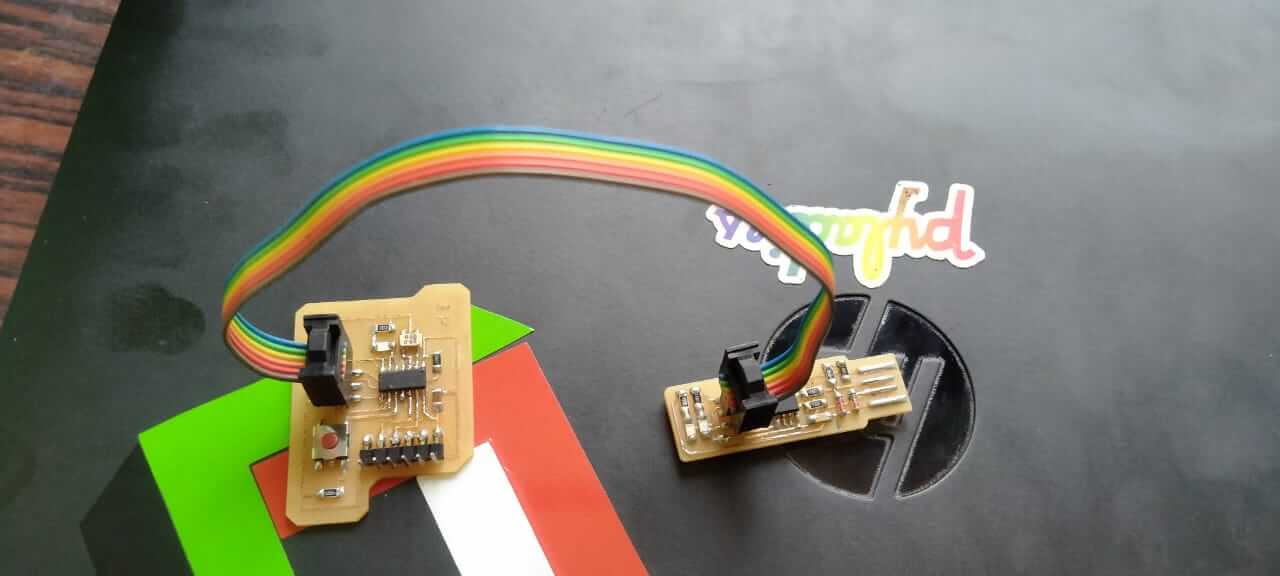
  • FabISP with Hello World Board Output Video


    AVR Dude:

  • Step1: Make New Folder
  • Step2: Open Notepad.
  • Step3: Make Your Code.
  • Step4: And Then Save and File Name is embedded.


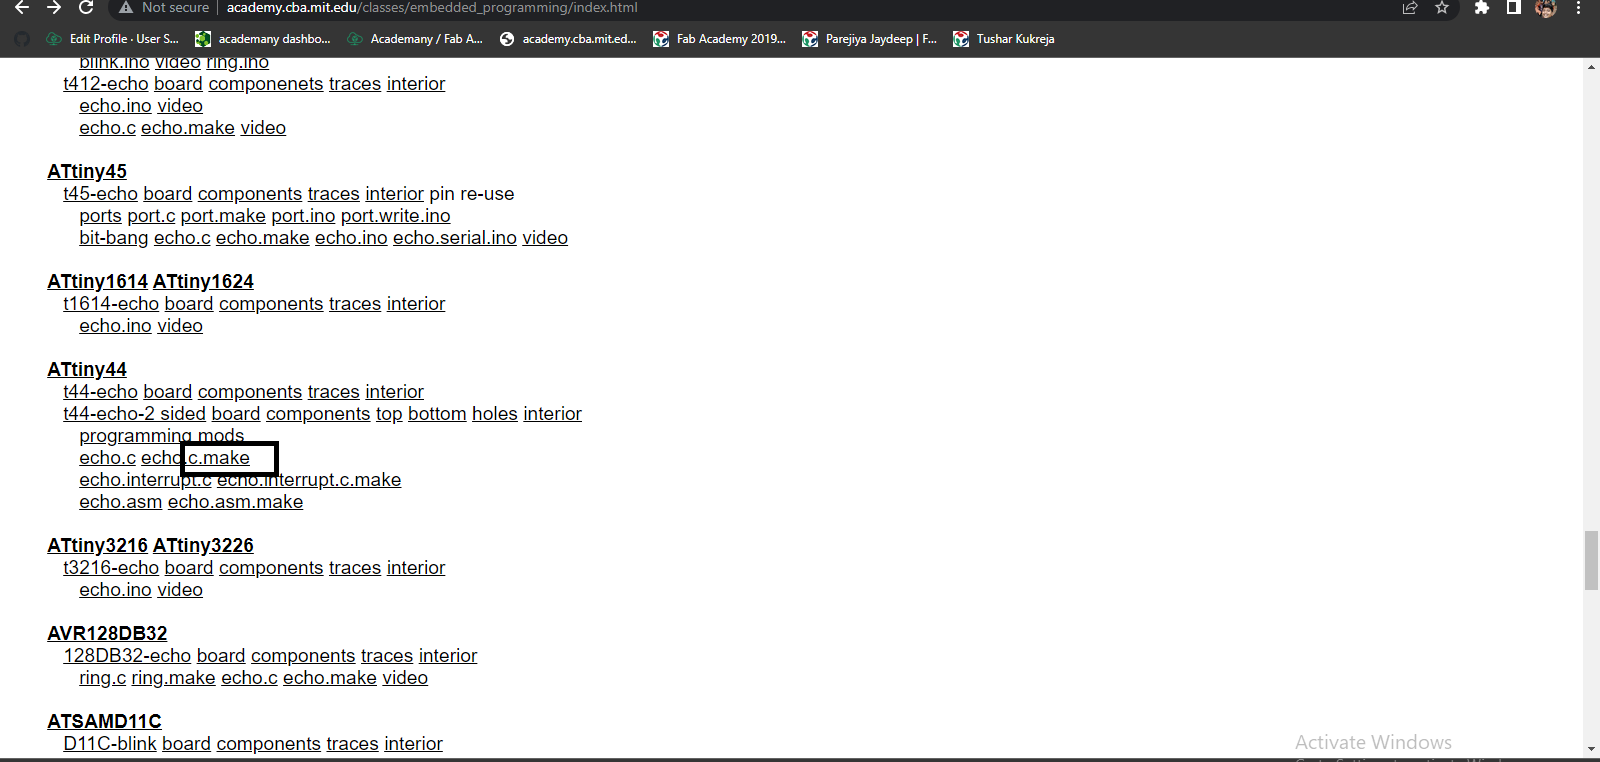
  • What is The Make File?


  • Makefile is a set of commands (similar to terminal commands) with variable names and targets to create object file and to remove them. In a single make file we can create multiple targets to compile and to remove object, binary files. You can compile your project (program) any number of times by using Makefile. Link.

  • Step5: Click echo.c.make and Copy And Past in Notepad. Link.

  • Step6: Then Make File File Name Save is embedded.c


  • change a project name.


  • Step7: embedded And embedded.c file is Done.


  • Step8: Open Git Bash


  • Git Bash Home Page.


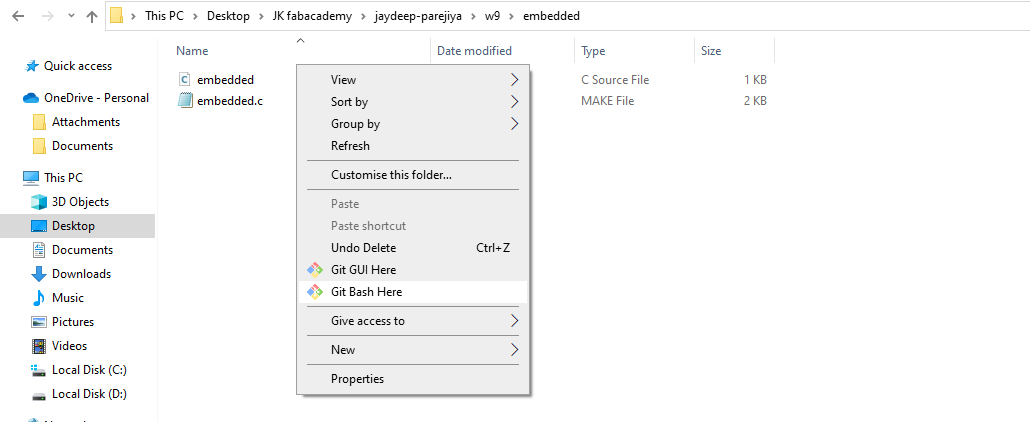
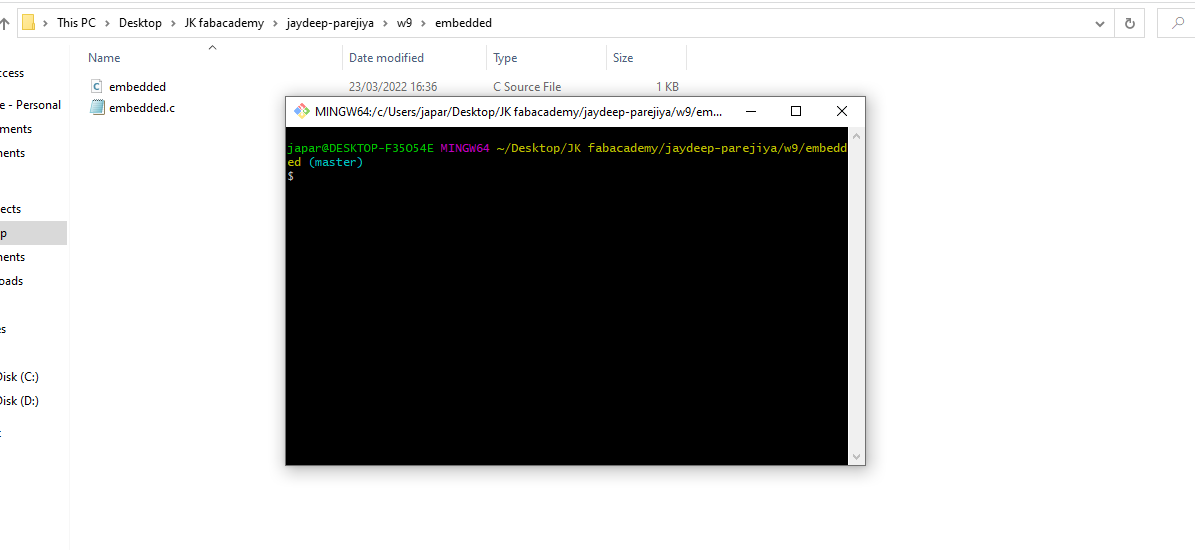
  • Step9: Code in Git Bash

  • Reference Link.

  • $ make -f embedded.c.make

    $ make -f embedded.c.make program-usbtiny-fuses


    $ make -f embedded.c.make program-usbtiny


    AVR Dute Output Video
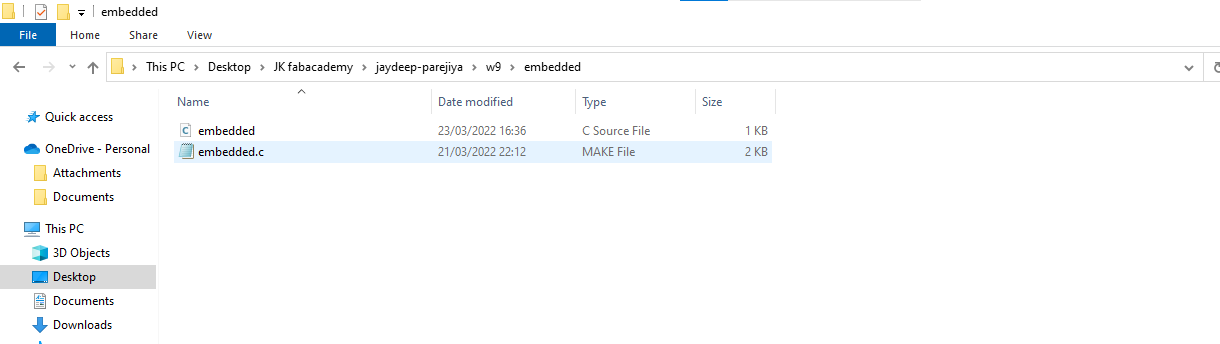


    Original File All

  • Arduino With LED
  • FabISP WIth Hello World Board
  • AVR Embedded File


  • Safety Switch by Parejiya Jaydeep is licensed under CC BY-ND 4.0