9. Embedded programming
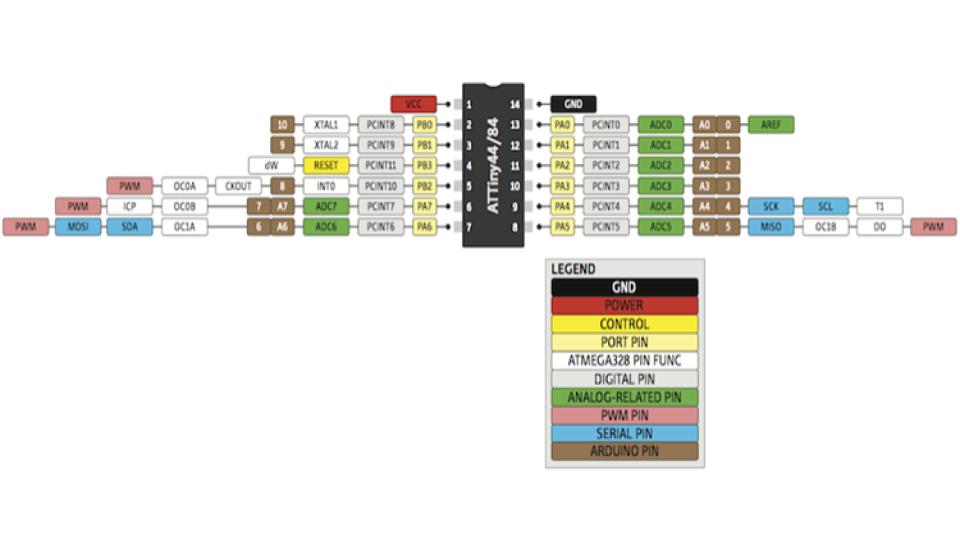
Read a microcontroller data sheet program your board to do something, with as many different programming languages and programming environments as possible.
Visit Group website for more imformations. Click here.
What is Data Sheet?
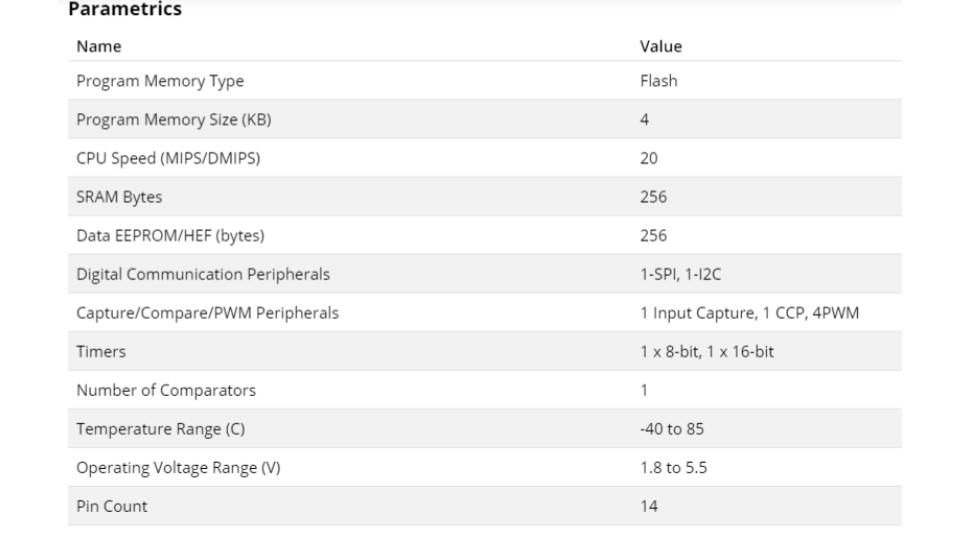
Technical data sheets are one of the key documents of the products and present your product properties to users. This documents includes information on key properties of the product like technical specifications, application or using methods, etc.
Lets Review on bases of Maket:
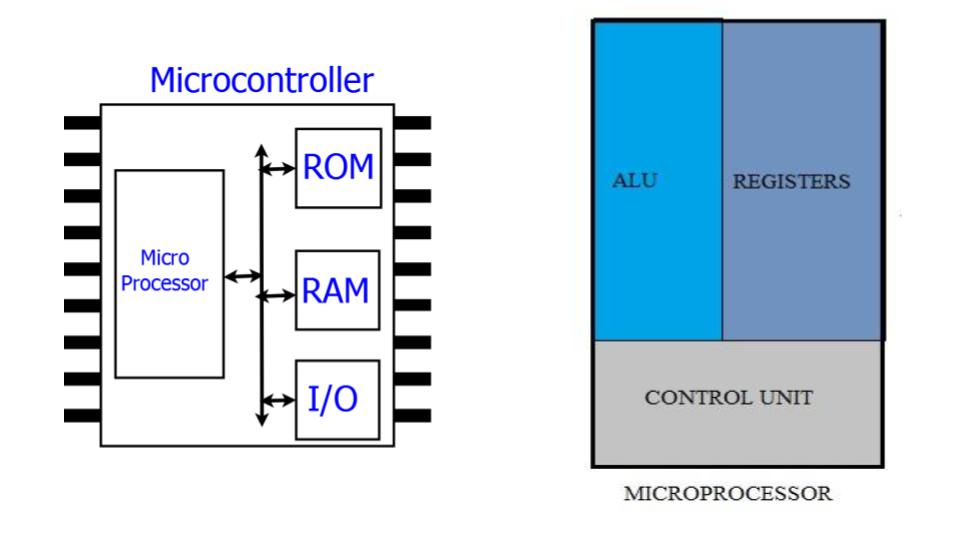
Mircocontroller & Microprocessor
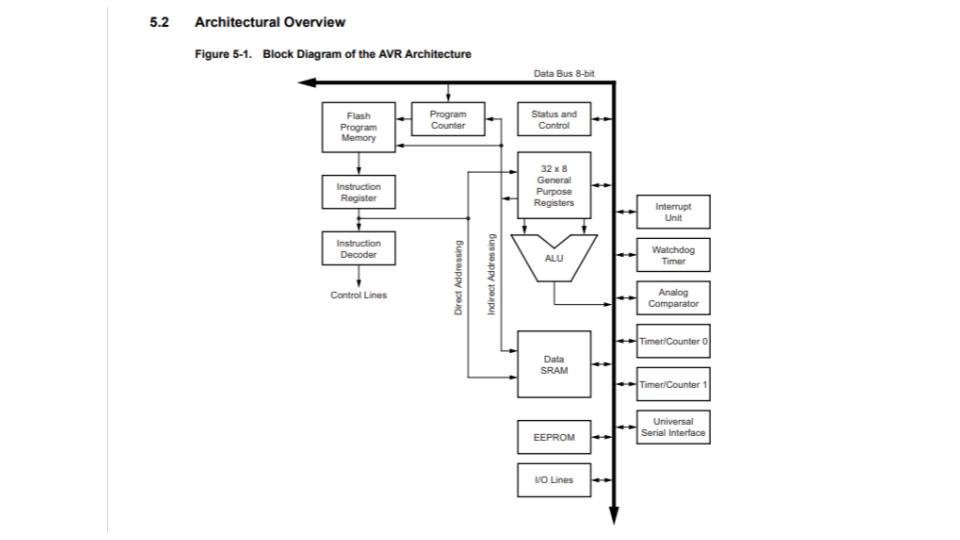
A Microcontroller is basically a computer on a chip. It differs form normal desktop or laptop computers in that a microcontroller is an application specific computer that usually runs a single program performing dedicated task(s) while the the later two are general purpose computers that can run numerous programs depending on a users needs. A microcontroller contains on chip CPU, input/output interface, memory, clock, timer, and an assortment of of other peripherals.
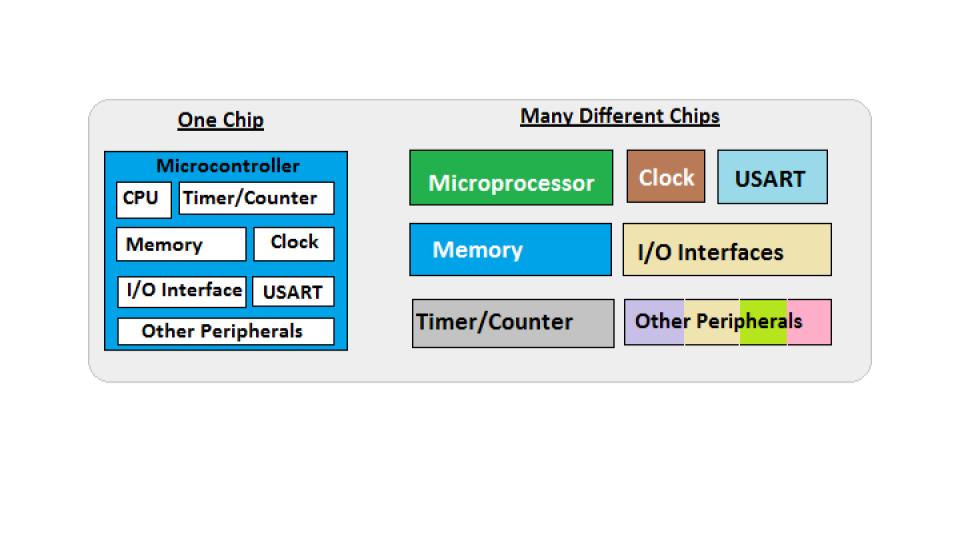
A Microprocessor on the other hand is just a CPU one has to add externally memory, clock, input/output interfaces, timer and all other needed peripheral. This is the reason a microprocessor has so many pins.
Advantages of a similar microcontroller vs microprocessor product
Product smaller - A microcontroller product has many components on one chip and so is more compact. With a microprocessor product one have to add several other chips and so its bulky.
Cheaper - All the components on a microcontroller is manufacturer on a single chip and so is mush cheaper than having to manufacture several chips as is the case for a microprocessor system.
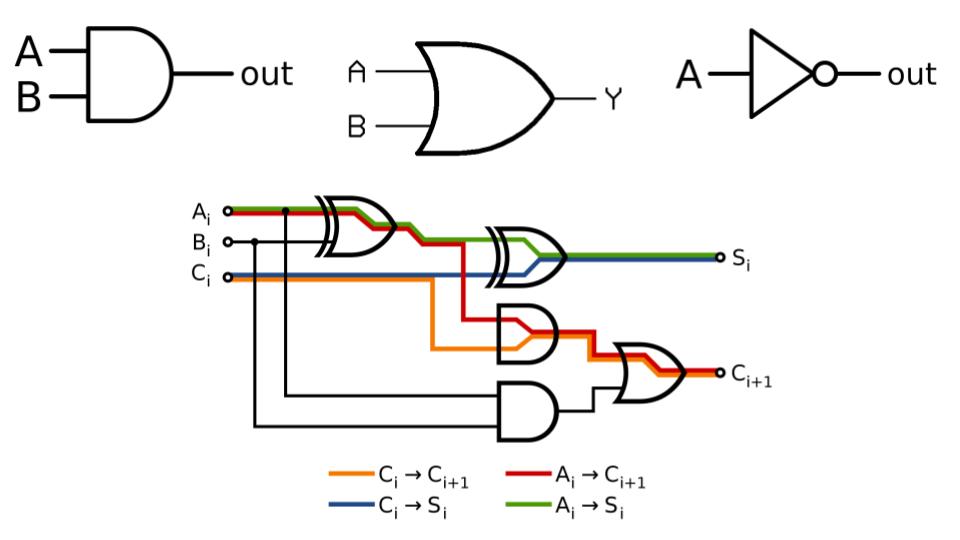
What is IC?
IC is just a package . It could be a single gate in IC, several gates, a microcontroller (which is effectively a complete computer), a processor, memory or just some analog circuit. There might be not only transistors in IC, but passive compenents like resistors and capacitors too.
Logic components like NOR, NAND, etc are basic building blocks for computer, so yes, any processor or memory is built of logic gates
What is Embedded Programming?
Embedded programming is a specific type of programming that supports the creation of consumer facing or business facing devices that don’t operate on traditional operating systems the way that full-scale laptop computers and mobile devices do. The idea of embedded programming is part of what drives the evolution of the digital appliances and equipment in today’s IT markets.
Embedded programming is also known as embedded software development or embedded systems programming. For More Detail

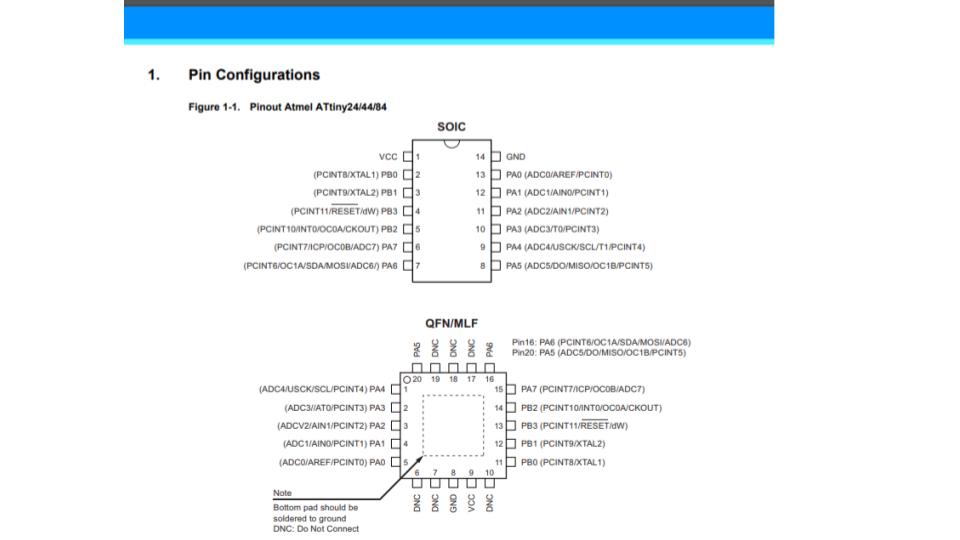
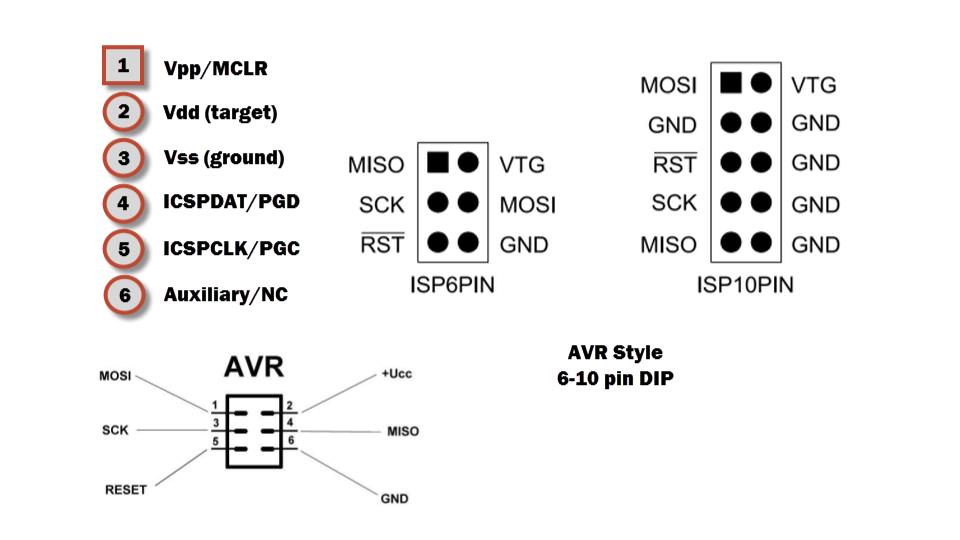
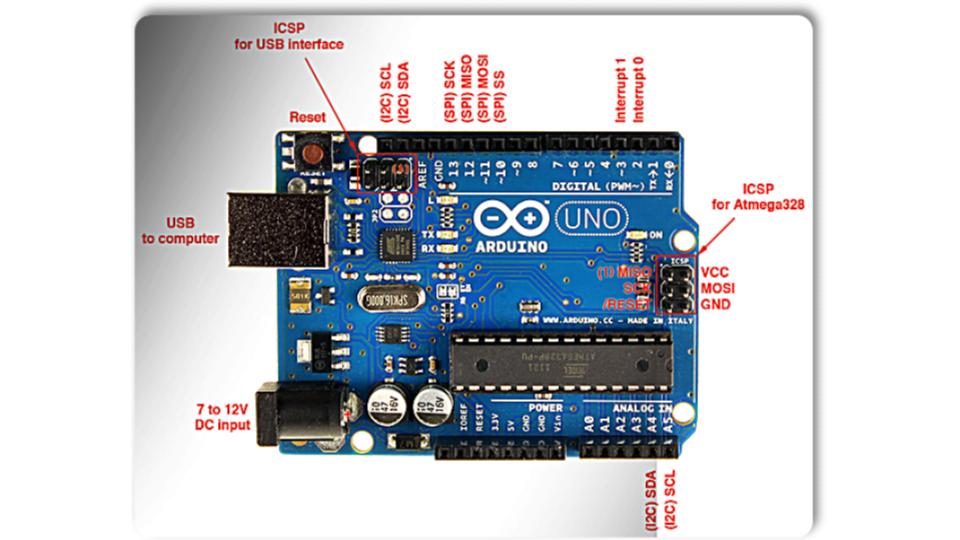
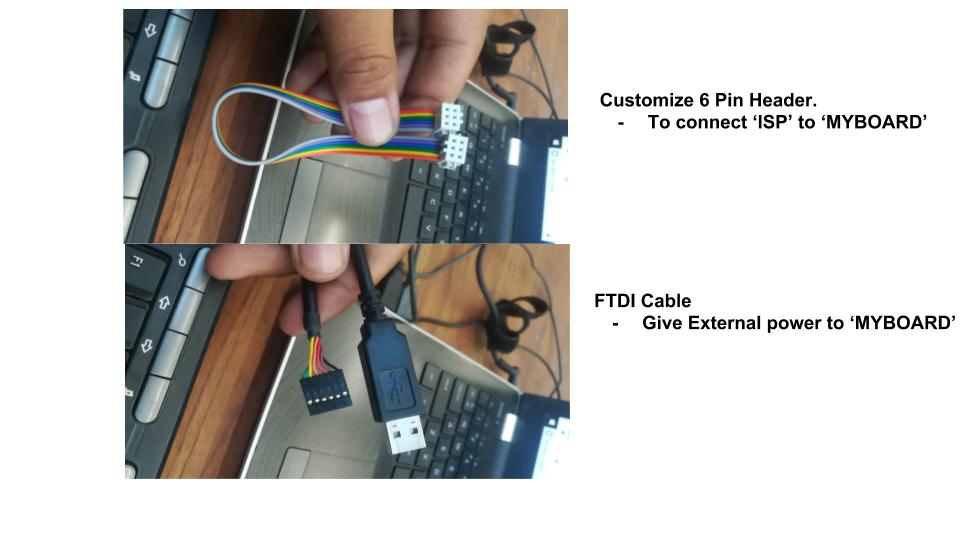
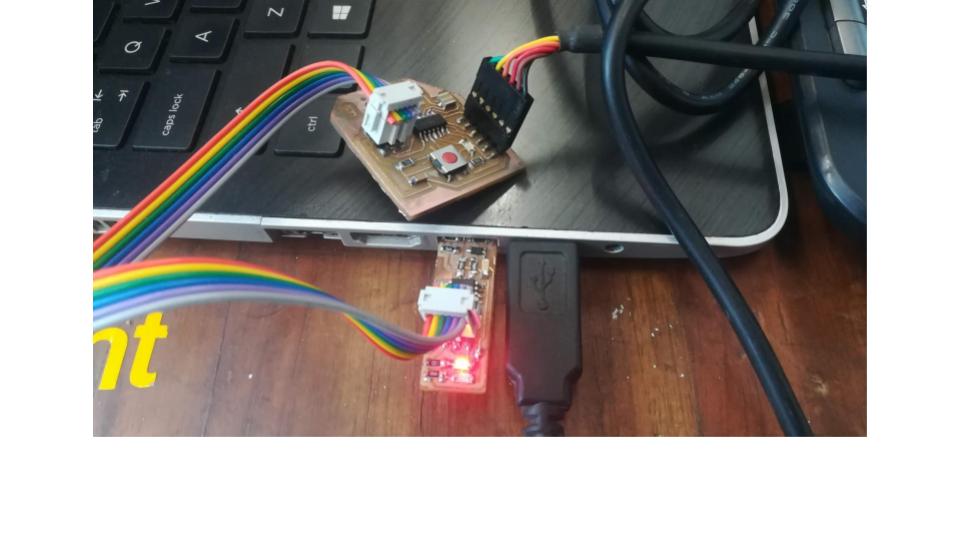
For programming any board we need to include these pins in our board. Some notes to understand the ISP
- MOSI : Master out Slave in - This pin is used to transfer data from computer to the microprocessor
- MISO : Master in Slave out - This pin is used to read data from the microprocessor
- RST : reset pin - This pin is used to reset the microprocessor
- SCK : clock - Clock signal is supplied with help of this pin
- VCC : Voltage supply
- GND : Ground
Arduino ISP
- The Arduino ISP is an In-System-Programmer that is used to program AVR microcontrollers. You can use the Arduino ISP to upload sketches directly on the AVR-based Arduino boards without the need of the bootloader. Otherwise you can use it to restore the bootloader.
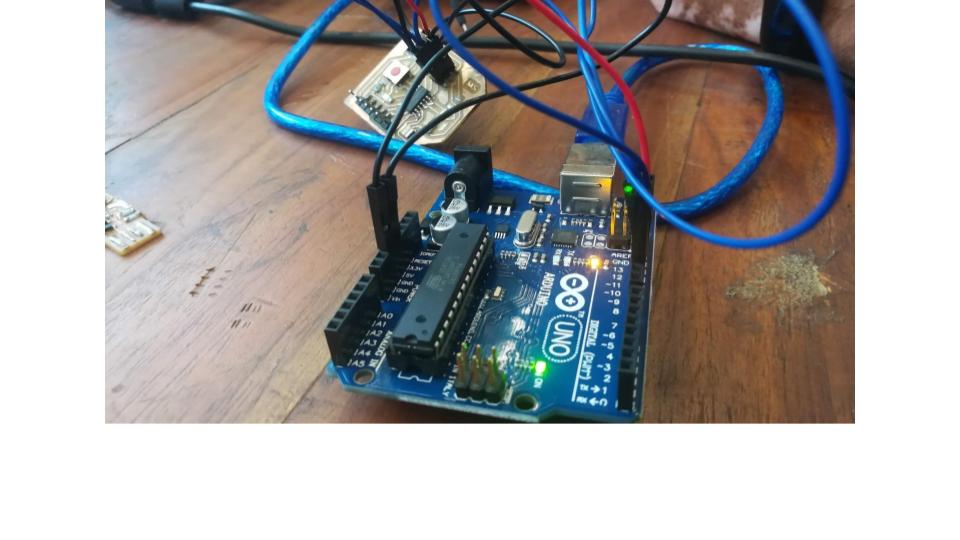
Steps to work with ArduinoISP
After Connection:
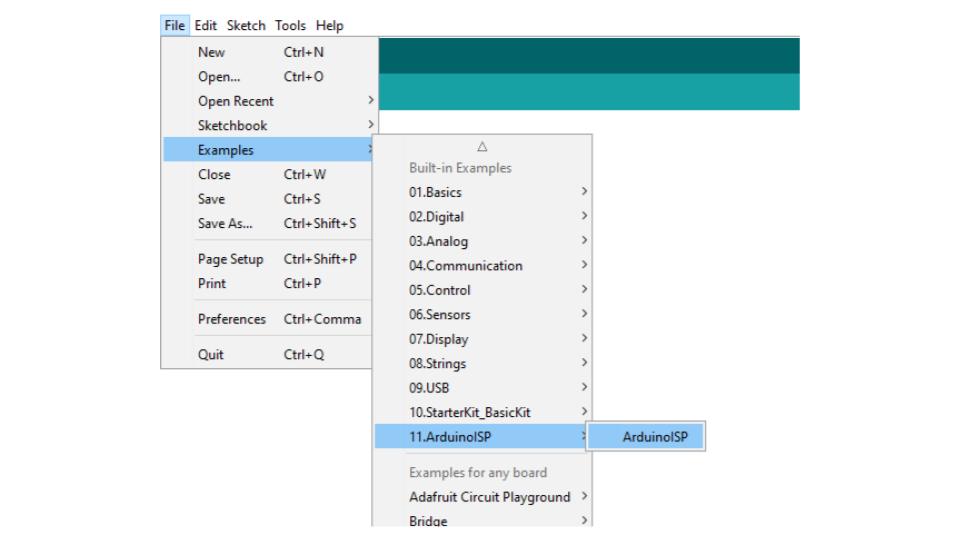
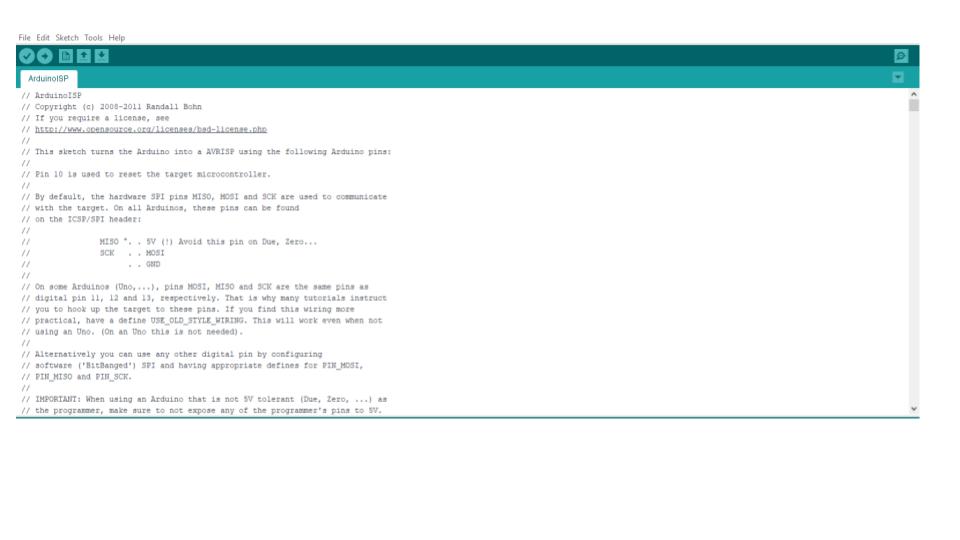
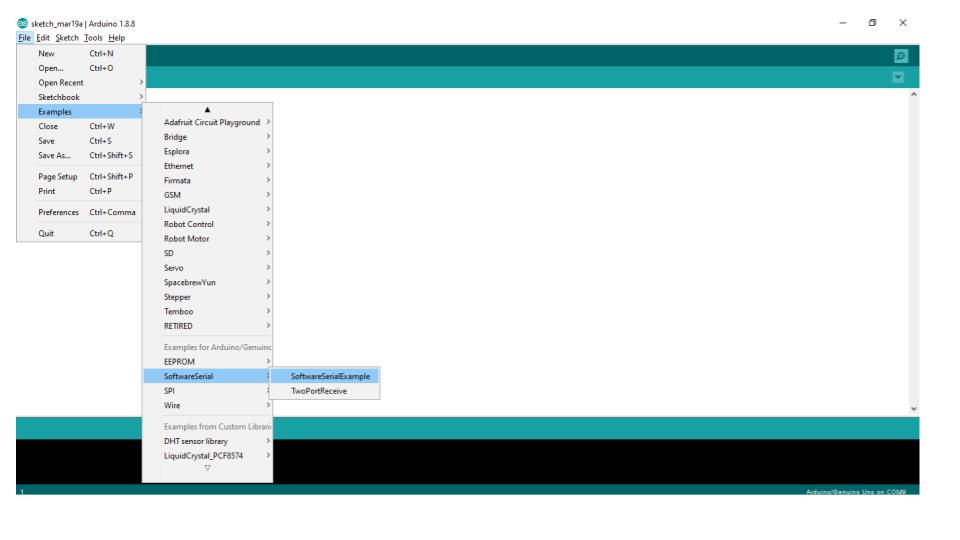
- Open “Arduino IDE”
-
File ==> Example
11. ArduinoISP
–>”ArduinoISP”
-
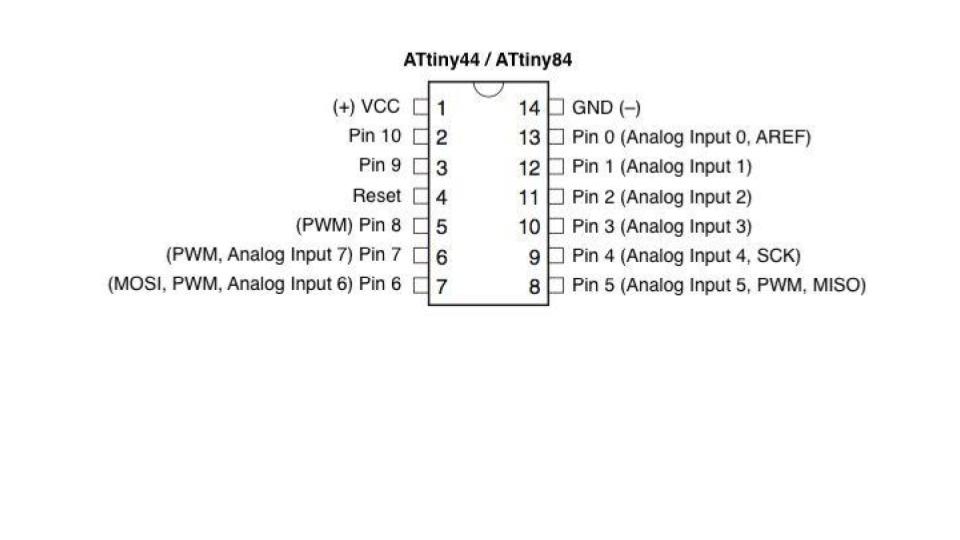
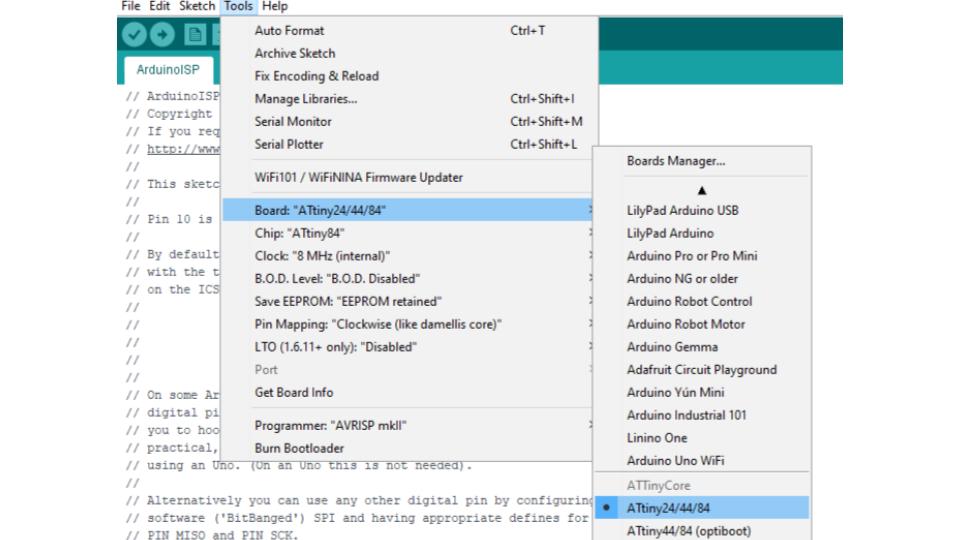
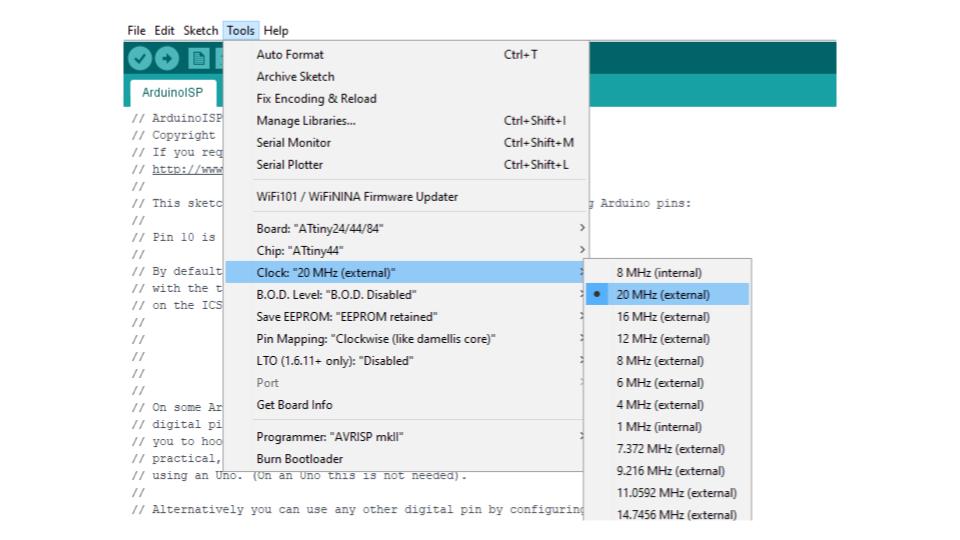
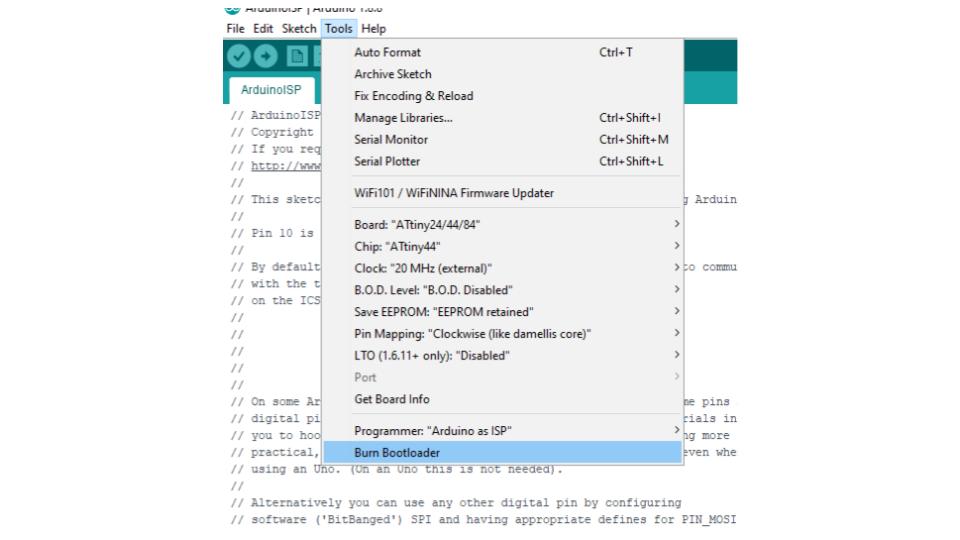
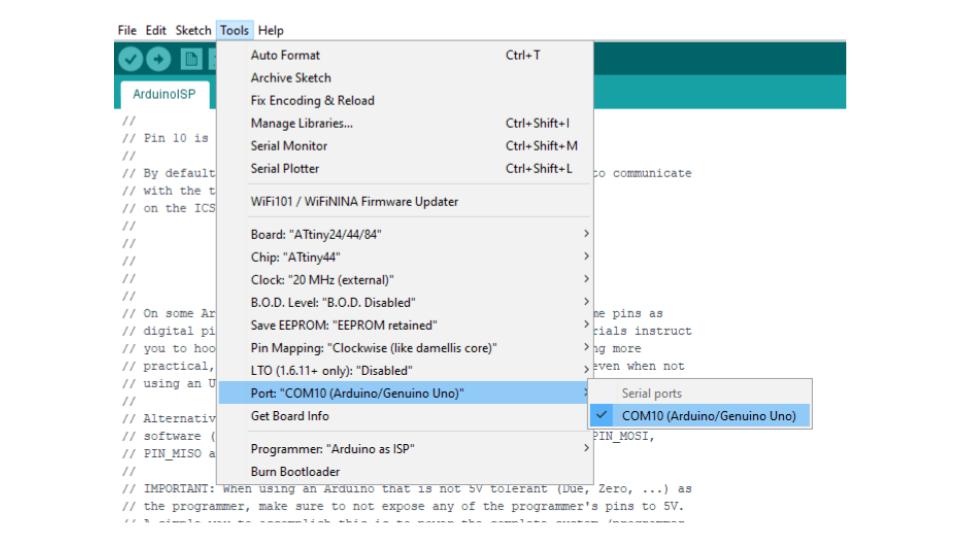
Tools ==> Board “ATtiny24/44/84”
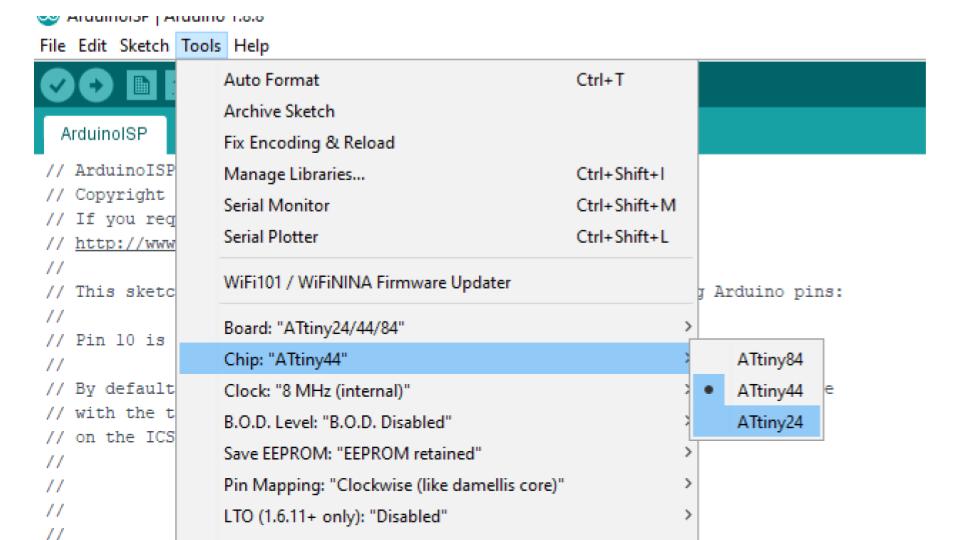
- Chip “ATtiny44”
-
Clock “20MHz(external)”
-
Port : “COM10(Arduino/D\Genuino UNO)
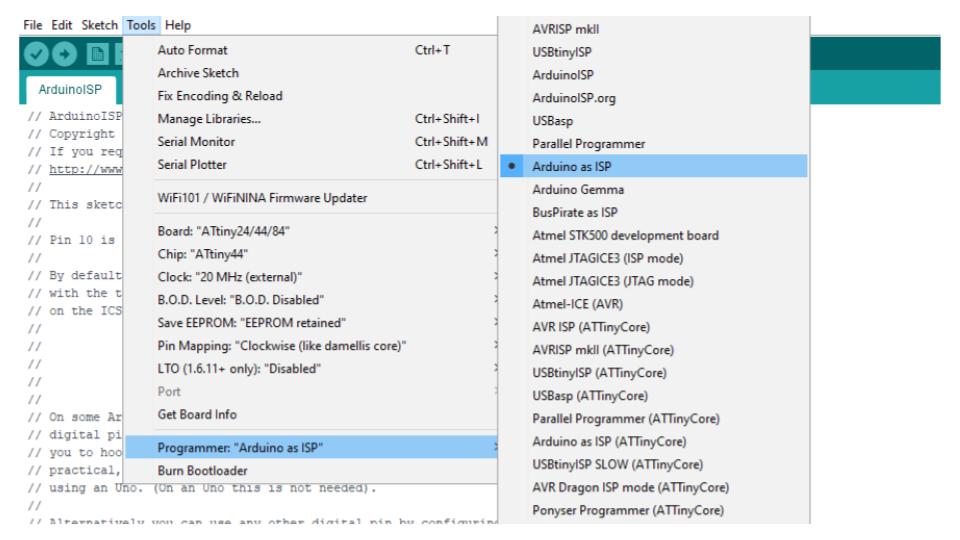
- Programmer : “ArduinoISP”
- Ctrl+U ==> Upload
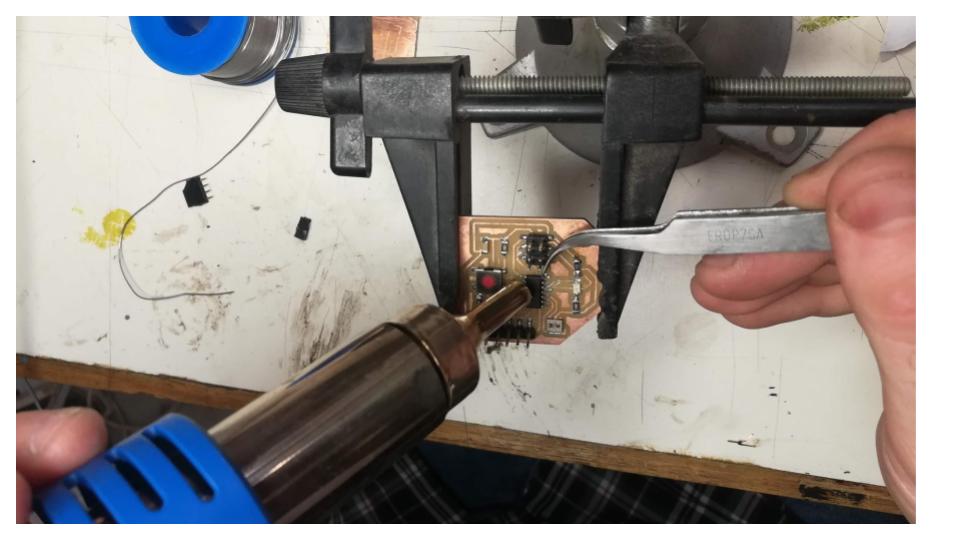
Programming Section
Step 1:
 Step 2:
 Step 3:
 Step 4:
 Step 5:
 Step 6:
 Step 7:
 Step 8:
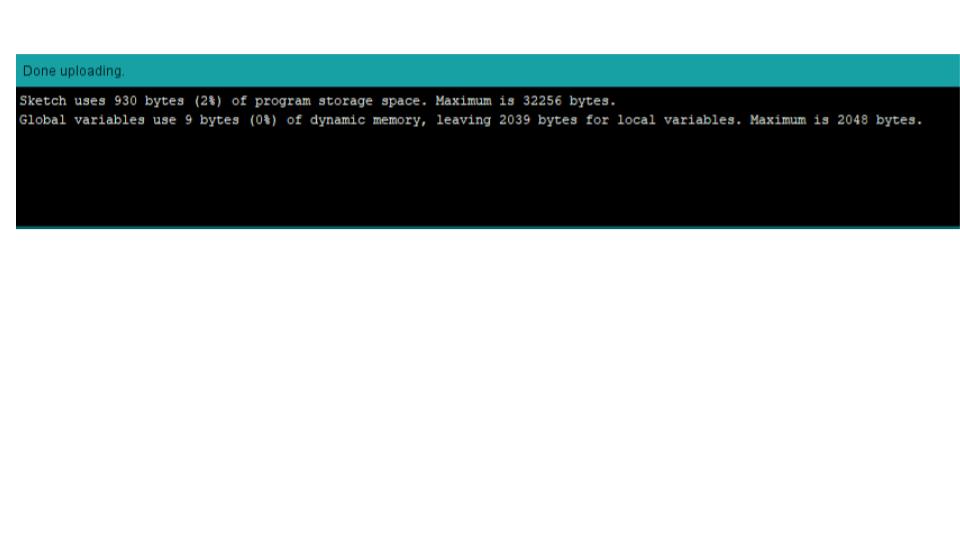
command line output
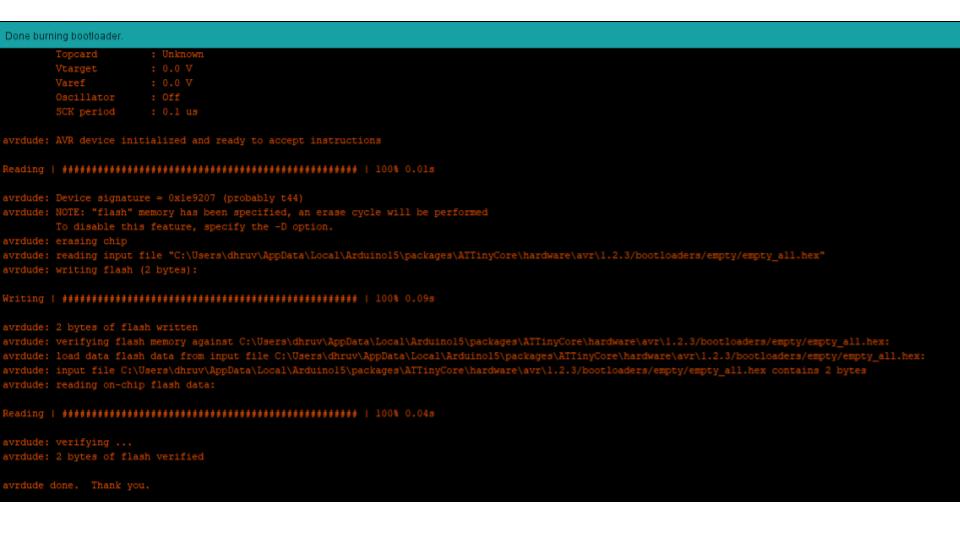
avrdude: Version 6.3, compiled on Feb 19 2019 at 19:25:53
         Copyright (c) 2000-2005 Brian Dean, http://www.bdmicro.com/


         System wide configuration file is "D:\Program Files\arduino-1.8.7-windows\arduino-1.8.7\hardware\tools\avr/etc/avrdude.conf"

         Using Port                    : usb
         Using Programmer              : usbtiny
avrdude: usbdev_open(): Found USBtinyISP, bus:device: bus-0:\\.\libusb0-0001--0x1781-0x0c9f
         AVR Part                      : ATtiny44
         Chip Erase delay              : 4500 us
         PAGEL                         : P00
         BS2                           : P00
         RESET disposition             : possible i/o
         RETRY pulse                   : SCK
         serial program mode           : yes
         parallel program mode         : yes
         Timeout                       : 200
         StabDelay                     : 100
         CmdexeDelay                   : 25
         SyncLoops                     : 32
         ByteDelay                     : 0
         PollIndex                     : 3
         PollValue                     : 0x53
         Memory Detail                 :

                                  Block Poll               Page                       Polled
           Memory Type Mode Delay Size  Indx Paged  Size   Size #Pages MinW  MaxW   ReadBack
           ----------- ---- ----- ----- ---- ------ ------ ---- ------ ----- ----- ---------
           eeprom        65     6     4    0 no        256    4      0  4000  4500 0xff 0xff
           flash         65     6    32    0 yes      4096   64     64  4500  4500 0xff 0xff
           signature      0     0     0    0 no          3    0      0     0     0 0x00 0x00
           lock           0     0     0    0 no          1    0      0  9000  9000 0x00 0x00
           lfuse          0     0     0    0 no          1    0      0  9000  9000 0x00 0x00
           hfuse          0     0     0    0 no          1    0      0  9000  9000 0x00 0x00
           efuse          0     0     0    0 no          1    0      0  9000  9000 0x00 0x00
           calibration    0     0     0    0 no          1    0      0     0     0 0x00 0x00

         Programmer Type : USBtiny
         Description     : USBtiny simple USB programmer, http://www.ladyada.net/make/usbtinyisp/
avrdude: programmer operation not supported

avrdude: Using SCK period of 10 usec
avrdude: AVR device initialized and ready to accept instructions

Reading | ################################################## | 100% 0.00s

avrdude: Device signature = 0x1e9207 (probably t44)
avrdude: NOTE: "flash" memory has been specified, an erase cycle will be performed
         To disable this feature, specify the -D option.
avrdude: erasing chip
avrdude: Using SCK period of 10 usec
avrdude: reading input file "C:\Users\maharshi\AppData\Local\Temp\arduino_build_40627/at44_test.ino.hex"
avrdude: writing flash (930 bytes):

Writing | ################################################## | 100% 1.48s

avrdude: 930 bytes of flash written
avrdude: verifying flash memory against C:\Users\maharshi\AppData\Local\Temp\arduino_build_40627/at44_test.ino.hex:
avrdude: load data flash data from input file C:\Users\maharshi\AppData\Local\Temp\arduino_build_40627/at44_test.ino.hex:
avrdude: input file C:\Users\maharshi\AppData\Local\Temp\arduino_build_40627/at44_test.ino.hex contains 930 bytes
avrdude: reading on-chip flash data:

Reading | ################################################## | 100% 1.68s

avrdude: verifying ...
avrdude: 930 bytes of flash verified

avrdude done.  Thank you.
Step 9:
 Step 10:
Command line for flashing
avrdude.exe: AVR device initialized and ready to accept instructions

Reading | ################################################## | 100% 0.00s

avrdude.exe: Device signature = 0x1e9207
avrdude.exe: NOTE: "flash" memory has been specified, an erase cycle will be performed
             To disable this feature, specify the -D option.
avrdude.exe: erasing chip
avrdude.exe: reading input file "c:\users\maharshi\Documents\Atmel Studio\7.0\at44_test\at44_test\Debug\at44_test.hex"
avrdude.exe: writing flash (182 bytes):

Writing | ################################################## | 100% 0.30s

avrdude.exe: 182 bytes of flash written
avrdude.exe: verifying flash memory against c:\users\maharshi\Documents\Atmel Studio\7.0\at44_test\at44_test\Debug\at44_test.hex:
avrdude.exe: load data flash data from input file c:\users\maharshi\Documents\Atmel Studio\7.0\at44_test\at44_test\Debug\at44_test.hex:
avrdude.exe: input file c:\users\maharshi\Documents\Atmel Studio\7.0\at44_test\at44_test\Debug\at44_test.hex contains 182 bytes
avrdude.exe: reading on-chip flash data:

Reading | ################################################## | 100% 0.34s

avrdude.exe: verifying ...
avrdude.exe: 182 bytes of flash verified

avrdude.exe: safemode: Fuses OK (H:FF, E:D7, L:FF)

avrdude.exe done.  Thank you.
Step 11:
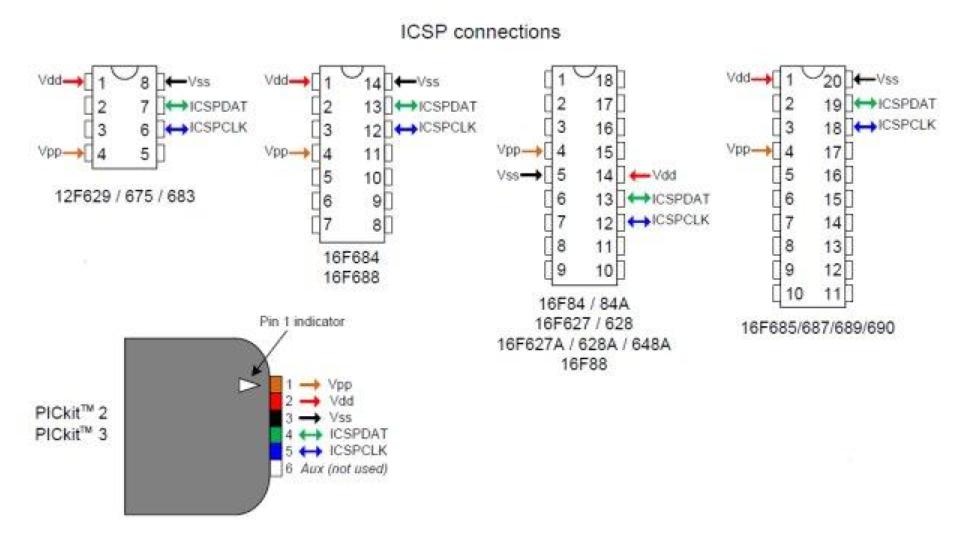
What is FabISP?
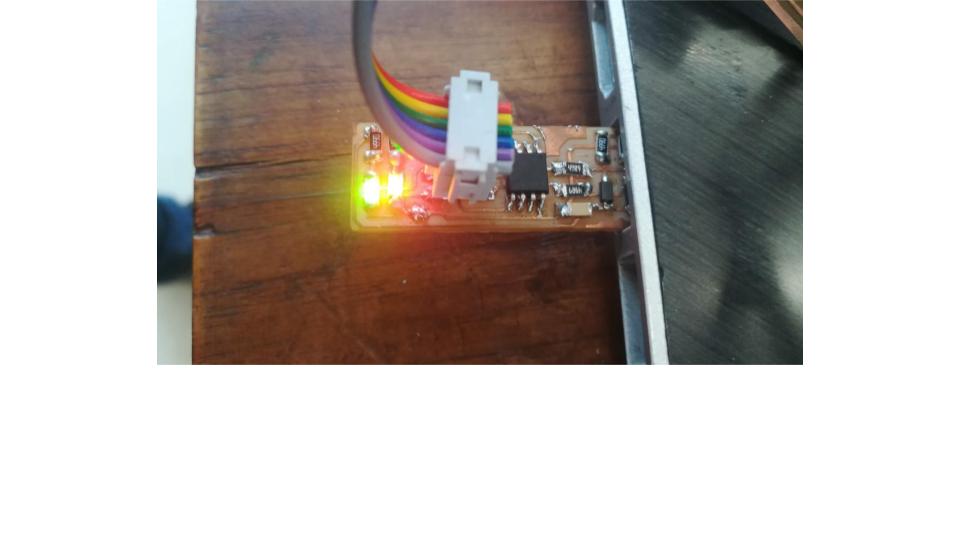
- The FabISP is an in-system programmer for AVR microcontrollers, designed for production within a FabLab. That is, it allows you to program the microcontrollers on other boards you make, using nothing but a USB cable and 6-pin IDC to 6-pin IDC cable. It’s based on the USBtiny and V-USB firmwares, which allow the ATtiny44 to perform USB communication in software. Programming can be done through avrdude.
Steps to work with FABISP
- Open “Arduino IDE”
- Tools ==> Board “ATtiny25/45/85”
- Chip “ATtiny45”
- Programmer : “USBtinyISP”
- Ctrl+U ==> Upload
Codes
Code for digital
/ constants won't change. They're used here to set pin numbers:
const int buttonPin = 2;     // the number of the pushbutton pin
const int ledPin =  3;      // the number of the LED pin

// variables will change:
int buttonState = 0;         // variable for reading the pushbutton status

void setup() {
  // initialize the LED pin as an output:
  pinMode(ledPin, OUTPUT);
  // initialize the pushbutton pin as an input:
  pinMode(buttonPin, INPUT);
}

void loop() {
  // read the state of the pushbutton value:
  buttonState = digitalRead(buttonPin);

  // check if the pushbutton is pressed. If it is, the buttonState is HIGH:
  if (buttonState == HIGH) {
    // turn LED on:
    digitalWrite(ledPin, HIGH);
  } else {
    // turn LED off:
    digitalWrite(ledPin, LOW);
  }
}
(Trying this code from arduino btn)
what were you aiming to achieve with programming
- Coding improves problem solving. When kids code, they take complex problems and break them down into smaller parts. Kids learn what it’s like to approach a problem the way a software engineer does, with logical, computational thinking
Embedded programming baord- All files