12. Output devices
Add an output device to a microcontroller board you’ve designed, program it to do something
Visit Group website for more imformations. Click here.
What is an Output Device?
Output devices in electronic systems transfer energy from the electrical energy that has been processed to another kind of energy, often light, sound or movement (kinetic). Output devices can be digital or analogue.
Devices which perform an “Output” function are generally called Actuators.
Getting reference form past assignment
Reference:
https://github.com/satshas/satshakit
Harvard electronics design’s concept
To get started
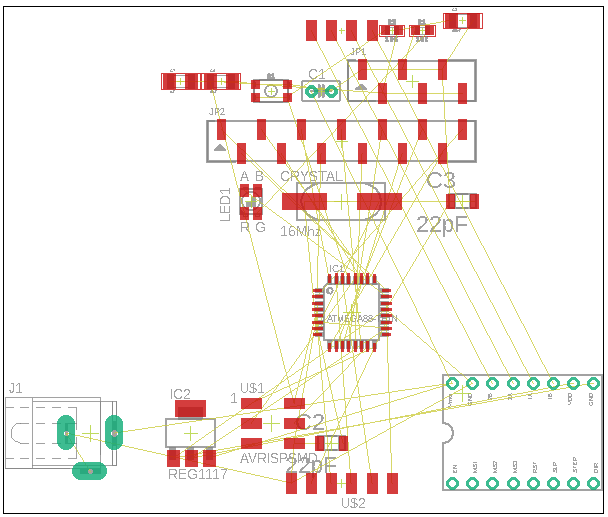
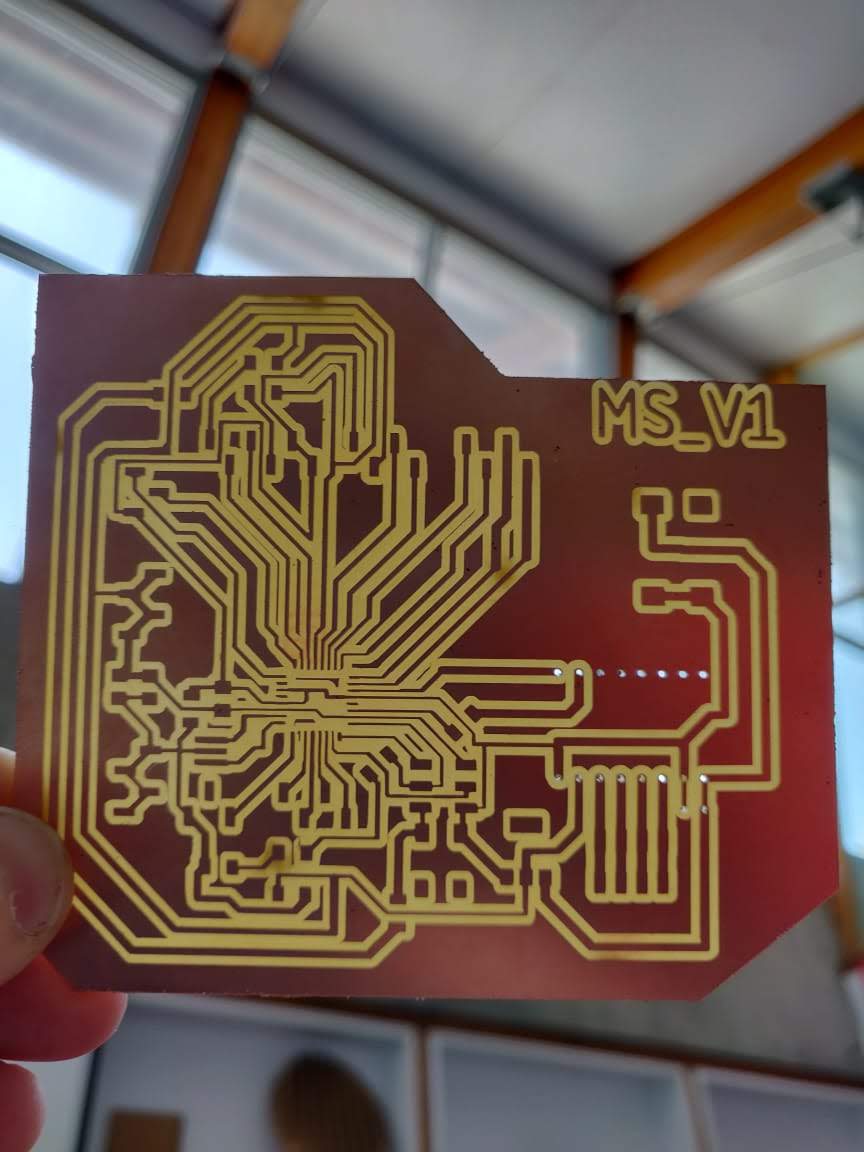
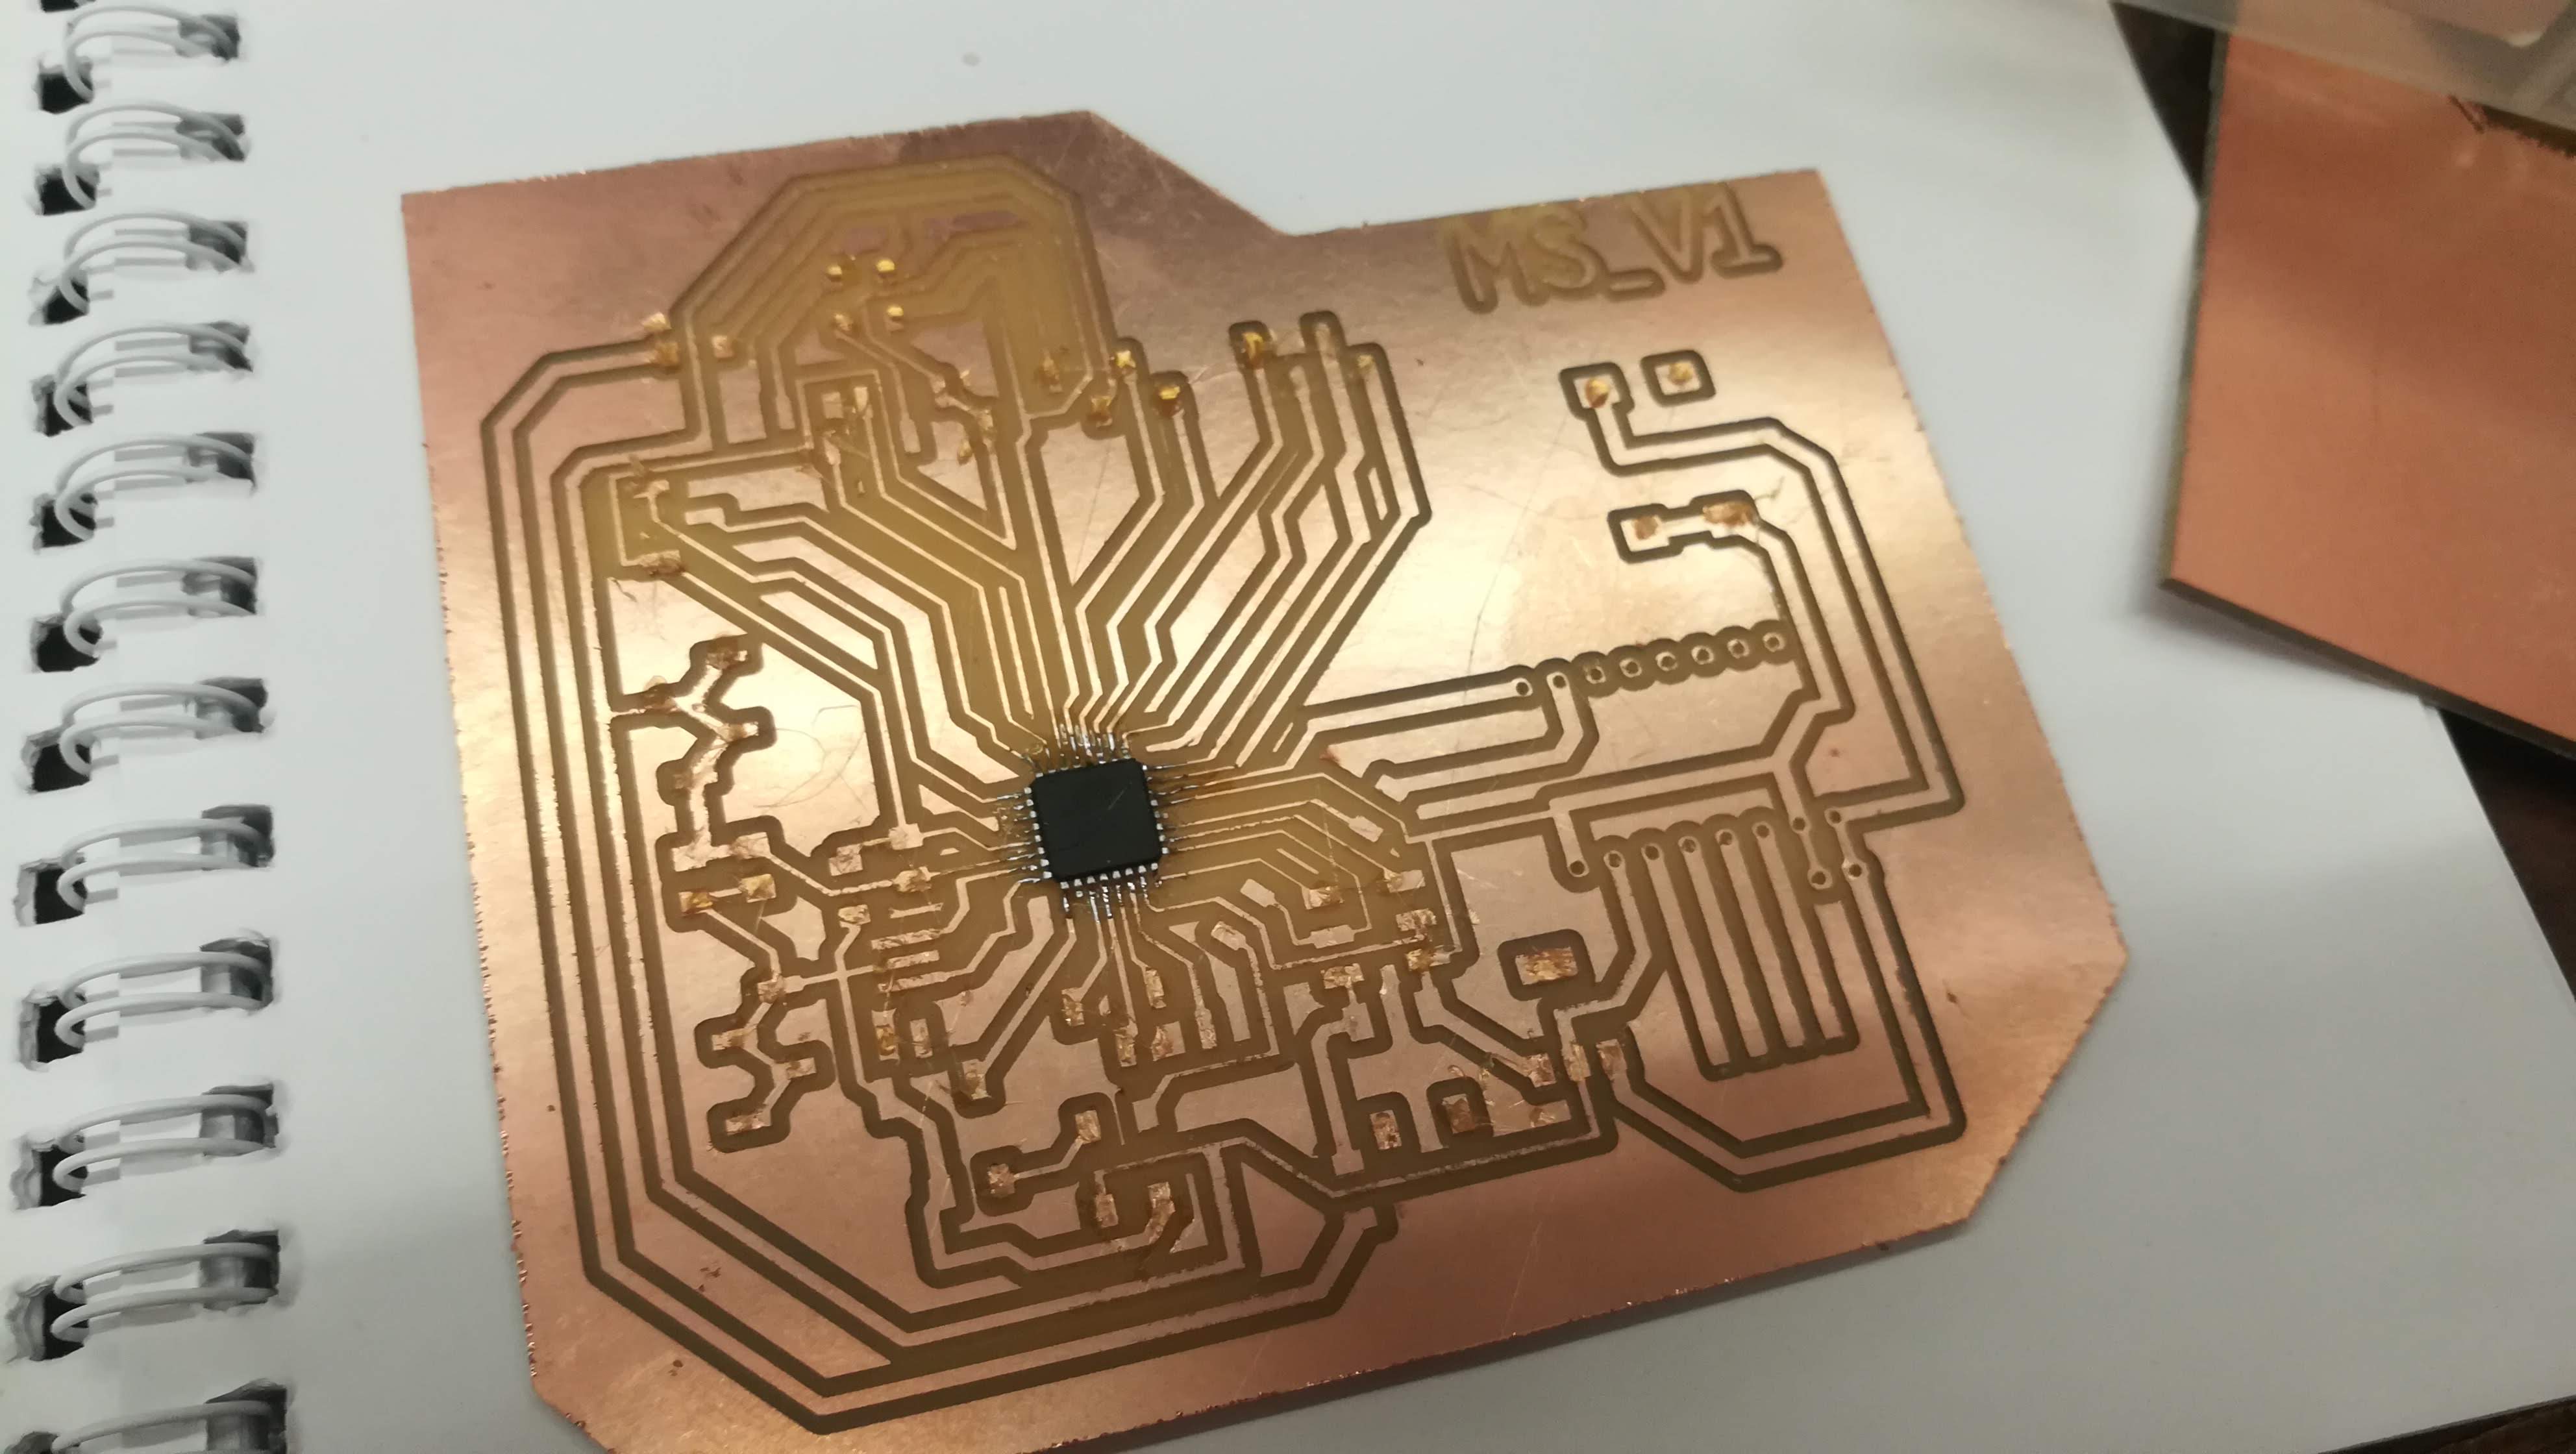
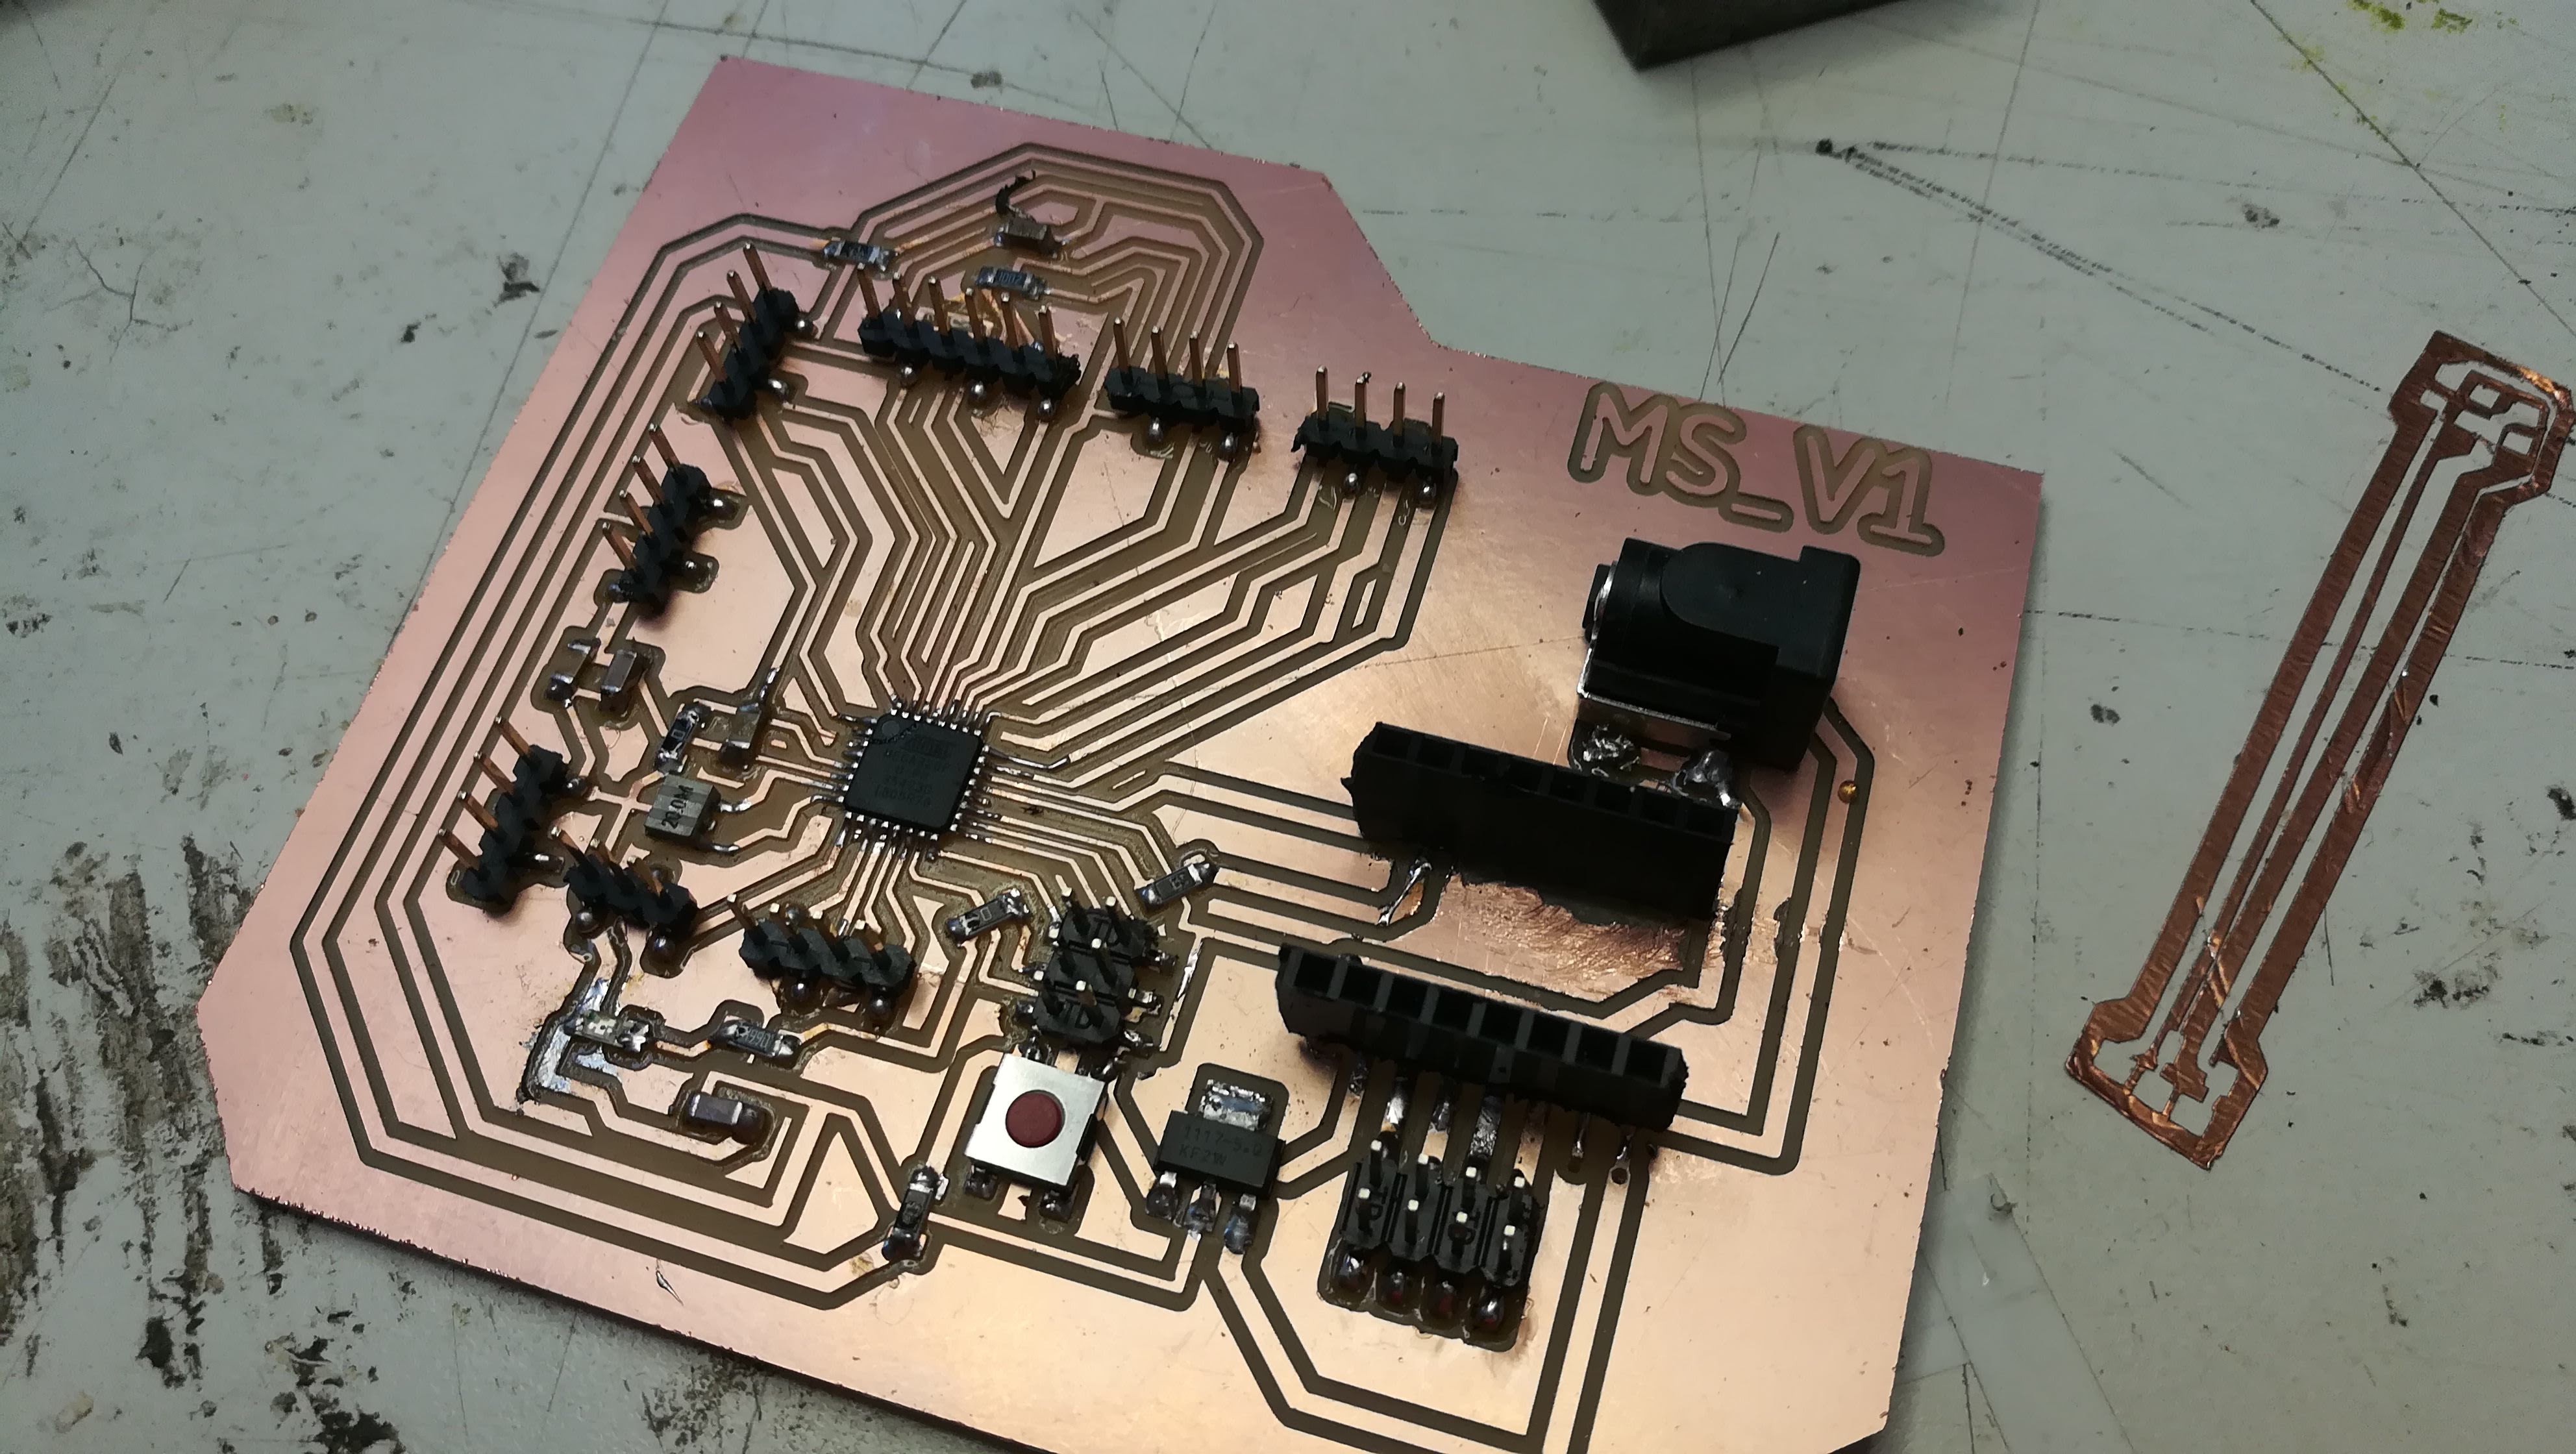
- I made the hello world unipolar stepper board using Neil Gershenfeld’s template available here at MIT Fab Labs. I used these already-existing designs to modeal my board in Eagle and later to stuff it.
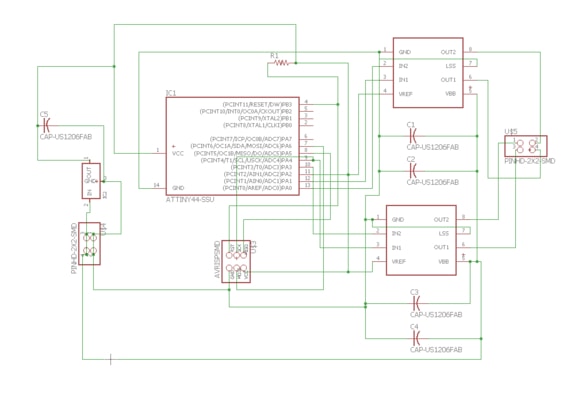
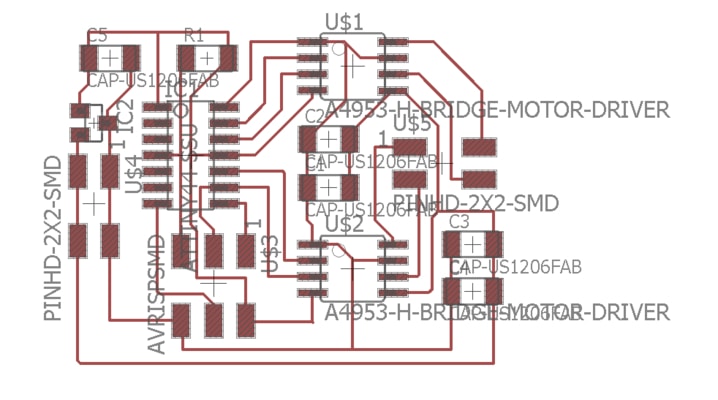
Board Components
- ATtiny 44 (1)
- 10 microFarad Capacitor (1)
- 10 kiloOhm Resistor (1)
- 1.7 Amp Mosfet Transistor (4, one for each output wire of the motor)
- 5V Regulator (1, This looks suspiciously like the transistors)
- 2 x 3 Header (2, One to power the motor and the other to connect to a programmer)
- 2 x 2 Header (1, to power the board)
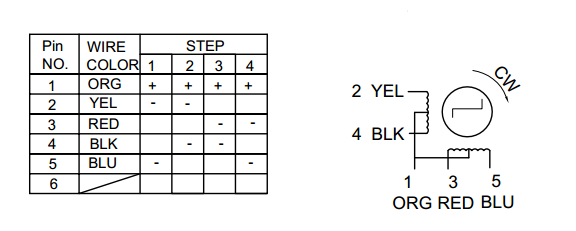
Unipolar Motor Mechanics
This video helped me visualize the inner workings of the unipolar motor. Here are quick images extracted from the video.
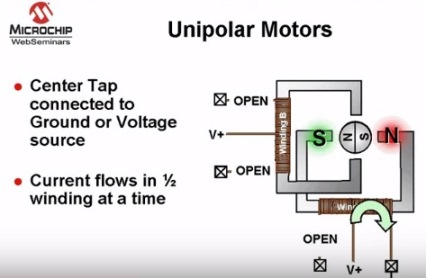
I also used the motor’s datasheet to understand the color coding between wires and coils within the motor, and which cycles to reiterate through for clockwise vs counterclockwise rotation. For this assignment, I used the Jameco ReliaPro Unipolar Stepper Motor Step 7 Volt DC-350 mA 7.5 Step Angle 680 G-CM. Jameco Part no: 2138812
making driver for Stepper
Why not attiny 44? Is it work? or any problem?
-
If we use Attiny 44 we need h-bridge A4953, it is not aailable in place.
-
Yes its work but with this may be size limitation held there.
Mind Diversion
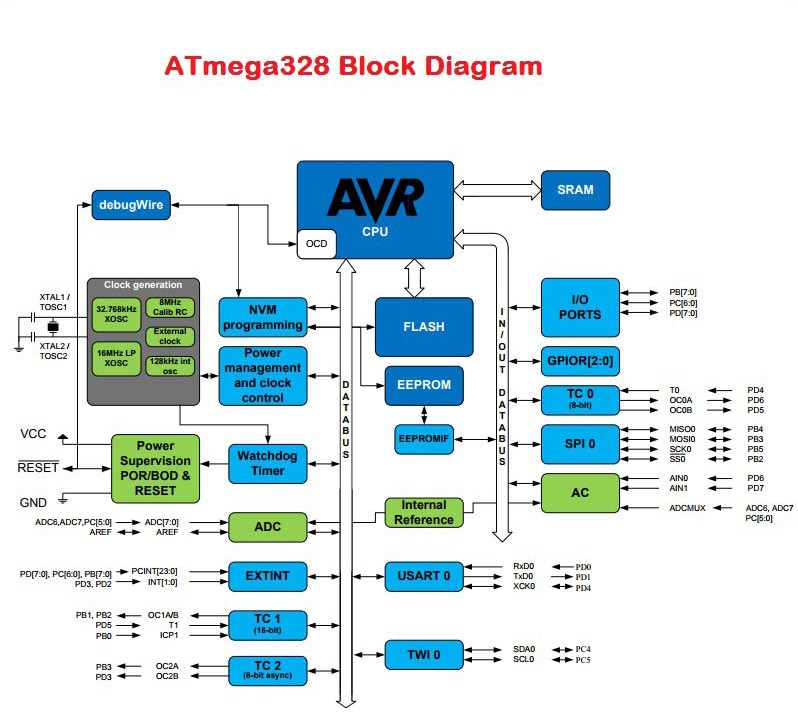
The fab kit uses atmega168, whereas satshakit uses Atmega 328p. My lab had the availability of 328p and is better than 168, so I decided to use 328.
Specifications:
- 28-pin AVR Microcontroller
- Flash Program Memory: 32 kbytes
- EEPROM Data Memory: 1 kbytes
- SRAM Data Memory: 2 kbytes
- I/O Pins: 23
- Timers: Two 8-bit / One 16-bit
- A/D Converter: 10-bit Six Channel
- PWM: Six Channels
- RTC: Yes with Separate Oscillator
- MSSP: SPI and I²C Master and Slave Support
- USART: Yes
- External Oscillator: up to 20MHz
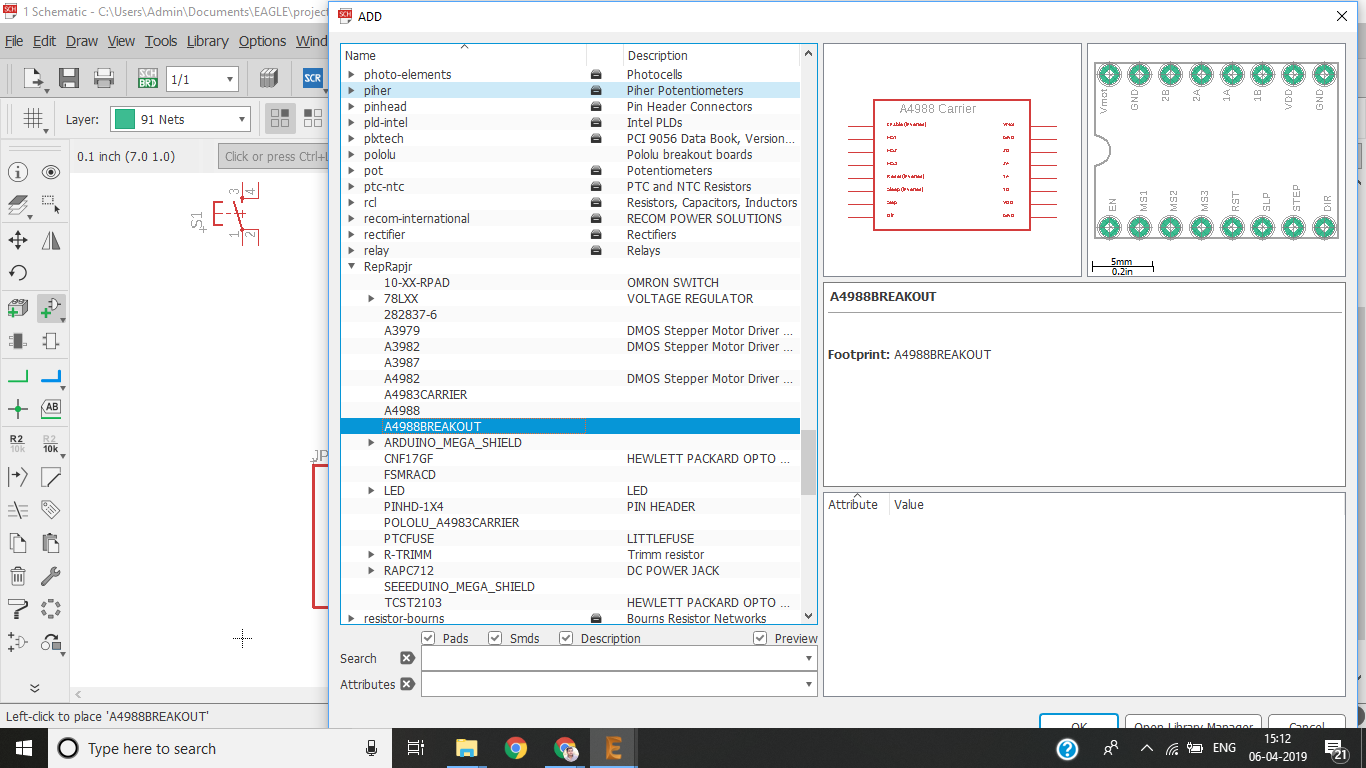
Using A4988 Driver + Amega 328p
- We have to install library for footprint of A4988 A4988 lbr its not available on eagle

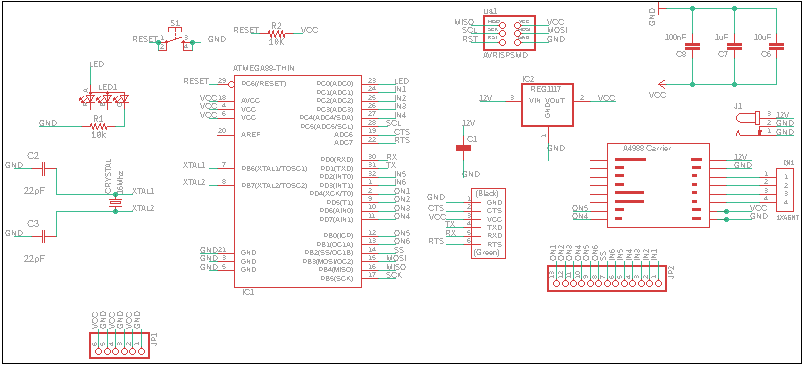
Describe my board which explain my board
- In this week my board has to work for stepper motor and neopixel that should be in my final project so I started with my output week
- for stepper motor I need H Bridge but no availability in India and its shipping will be costly from outside and it takes more time to deliver to our lab so our instructor guide us to use 4988 stepper motor IC
- For neo pixel I need only a pin 6 or 5 that are PWM pins my neo pixel need only 3 pins vcc ground and digitalin 5 or 6 and my board is enough to control both of them I use 328 microcontroller
- 328 p microcontroller work as a arduino give me all things which are available in Arduino UNO or Arduino mini
Output with Neo pixel
library Neo
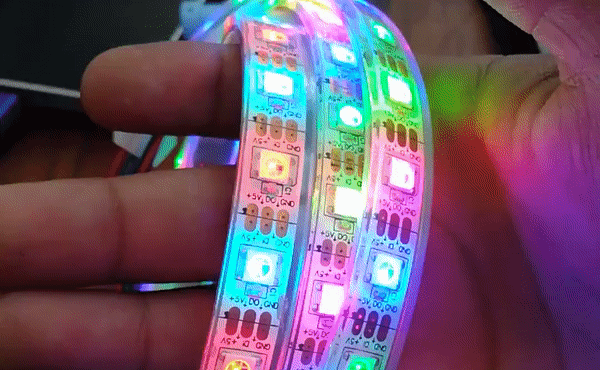

Some Example from Neo Pixel
- Its work from Adafruit Neo pixel library
// NeoPixel Ring simple sketch (c) 2013 Shae Erisson
// Released under the GPLv3 license to match the rest of the
// Adafruit NeoPixel library

#include <Adafruit_NeoPixel.h>
#ifdef __AVR__
 #include <avr/power.h> // Required for 16 MHz Adafruit Trinket
#endif

// Which pin on the Arduino is connected to the NeoPixels?
#define PIN        6 // On Trinket or Gemma, suggest changing this to 1

// How many NeoPixels are attached to the Arduino?
#define NUMPIXELS 16 // Popular NeoPixel ring size

// When setting up the NeoPixel library, we tell it how many pixels,
// and which pin to use to send signals. Note that for older NeoPixel
// strips you might need to change the third parameter -- see the
// strandtest example for more information on possible values.
Adafruit_NeoPixel pixels(NUMPIXELS, PIN, NEO_GRB + NEO_KHZ800);

#define DELAYVAL 500 // Time (in milliseconds) to pause between pixels

void setup() {
  // These lines are specifically to support the Adafruit Trinket 5V 16 MHz.
  // Any other board, you can remove this part (but no harm leaving it):

  clock_prescale_set(clock_div_1);
#endif
  // END of Trinket-specific code.

  pixels.begin(); // INITIALIZE NeoPixel strip object (REQUIRED)
}

void loop() {
  pixels.clear(); // Set all pixel colors to 'off'

  // The first NeoPixel in a strand is #0, second is 1, all the way up
  // to the count of pixels minus one.
  for(int i=0; i<NUMPIXELS; i++) { // For each pixel...

    // pixels.Color() takes RGB values, from 0,0,0 up to 255,255,255
    // Here we're using a moderately bright green color:
    pixels.setPixelColor(i, pixels.Color(0, 150, 0));

    pixels.show();   // Send the updated pixel colors to the hardware.

    delay(DELAYVAL); // Pause before next pass through loop
  }
}
// Simple demonstration on using an input device to trigger changes on your
// NeoPixels. Wire a momentary push button to connect from ground to a
// digital IO pin. When the button is pressed it will change to a new pixel
// animation. Initial state has all pixels off -- press the button once to
// start the first animation. As written, the button does not interrupt an
// animation in-progress, it works only when idle.

#include <Adafruit_NeoPixel.h>
#ifdef __AVR__
 #include <avr/power.h> // Required for 16 MHz Adafruit Trinket
#endif

// Digital IO pin connected to the button. This will be driven with a
// pull-up resistor so the switch pulls the pin to ground momentarily.
// On a high -> low transition the button press logic will execute.
#define BUTTON_PIN   2

#define PIXEL_PIN    6  // Digital IO pin connected to the NeoPixels.

#define PIXEL_COUNT 16  // Number of NeoPixels

// Declare our NeoPixel strip object:
Adafruit_NeoPixel strip(PIXEL_COUNT, PIXEL_PIN, NEO_GRB + NEO_KHZ800);
// Argument 1 = Number of pixels in NeoPixel strip
// Argument 2 = Arduino pin number (most are valid)
// Argument 3 = Pixel type flags, add together as needed:
//   NEO_KHZ800  800 KHz bitstream (most NeoPixel products w/WS2812 LEDs)
//   NEO_KHZ400  400 KHz (classic 'v1' (not v2) FLORA pixels, WS2811 drivers)
//   NEO_GRB     Pixels are wired for GRB bitstream (most NeoPixel products)
//   NEO_RGB     Pixels are wired for RGB bitstream (v1 FLORA pixels, not v2)
//   NEO_RGBW    Pixels are wired for RGBW bitstream (NeoPixel RGBW products)

boolean oldState = HIGH;
int     mode     = 0;    // Currently-active animation mode, 0-9

void setup() {
  pinMode(BUTTON_PIN, INPUT_PULLUP);
  strip.begin(); // Initialize NeoPixel strip object (REQUIRED)
  strip.show();  // Initialize all pixels to 'off'
}

void loop() {
  // Get current button state.
  boolean newState = digitalRead(BUTTON_PIN);

  // Check if state changed from high to low (button press).
  if((newState == LOW) && (oldState == HIGH)) {
    // Short delay to debounce button.
    delay(20);
    // Check if button is still low after debounce.
    newState = digitalRead(BUTTON_PIN);
    if(newState == LOW) {      // Yes, still low
      if(++mode > 8) mode = 0; // Advance to next mode, wrap around after #8
      switch(mode) {           // Start the new animation...
        case 0:
          colorWipe(strip.Color(  0,   0,   0), 50);    // Black/off
          break;
        case 1:
          colorWipe(strip.Color(255,   0,   0), 50);    // Red
          break;
        case 2:
          colorWipe(strip.Color(  0, 255,   0), 50);    // Green
          break;
        case 3:
          colorWipe(strip.Color(  0,   0, 255), 50);    // Blue
          break;
        case 4:
          theaterChase(strip.Color(127, 127, 127), 50); // White
          break;
        case 5:
          theaterChase(strip.Color(127,   0,   0), 50); // Red
          break;
        case 6:
          theaterChase(strip.Color(  0,   0, 127), 50); // Blue
          break;
        case 7:
          rainbow(10);
          break;
        case 8:
          theaterChaseRainbow(50);
          break;
      }
    }
  }

  // Set the last-read button state to the old state.
  oldState = newState;
}

// Fill strip pixels one after another with a color. Strip is NOT cleared
// first; anything there will be covered pixel by pixel. Pass in color
// (as a single 'packed' 32-bit value, which you can get by calling
// strip.Color(red, green, blue) as shown in the loop() function above),
// and a delay time (in milliseconds) between pixels.
void colorWipe(uint32_t color, int wait) {
  for(int i=0; i<strip.numPixels(); i++) { // For each pixel in strip...
    strip.setPixelColor(i, color);         //  Set pixel's color (in RAM)
    strip.show();                          //  Update strip to match
    delay(wait);                           //  Pause for a moment
  }
}

// Theater-marquee-style chasing lights. Pass in a color (32-bit value,
// a la strip.Color(r,g,b) as mentioned above), and a delay time (in ms)
// between frames.
void theaterChase(uint32_t color, int wait) {
  for(int a=0; a<10; a++) {  // Repeat 10 times...
    for(int b=0; b<3; b++) { //  'b' counts from 0 to 2...
      strip.clear();         //   Set all pixels in RAM to 0 (off)
      // 'c' counts up from 'b' to end of strip in steps of 3...
      for(int c=b; c<strip.numPixels(); c += 3) {
        strip.setPixelColor(c, color); // Set pixel 'c' to value 'color'
      }
      strip.show(); // Update strip with new contents
      delay(wait);  // Pause for a moment
    }
  }
}

// Rainbow cycle along whole strip. Pass delay time (in ms) between frames.
void rainbow(int wait) {
  // Hue of first pixel runs 3 complete loops through the color wheel.
  // Color wheel has a range of 65536 but it's OK if we roll over, so
  // just count from 0 to 3*65536. Adding 256 to firstPixelHue each time
  // means we'll make 3*65536/256 = 768 passes through this outer loop:
  for(long firstPixelHue = 0; firstPixelHue < 3*65536; firstPixelHue += 256) {
    for(int i=0; i<strip.numPixels(); i++) { // For each pixel in strip...
      // Offset pixel hue by an amount to make one full revolution of the
      // color wheel (range of 65536) along the length of the strip
      // (strip.numPixels() steps):
      int pixelHue = firstPixelHue + (i * 65536L / strip.numPixels());
      // strip.ColorHSV() can take 1 or 3 arguments: a hue (0 to 65535) or
      // optionally add saturation and value (brightness) (each 0 to 255).
      // Here we're using just the single-argument hue variant. The result
      // is passed through strip.gamma32() to provide 'truer' colors
      // before assigning to each pixel:
      strip.setPixelColor(i, strip.gamma32(strip.ColorHSV(pixelHue)));
    }
    strip.show(); // Update strip with new contents
    delay(wait);  // Pause for a moment
  }
}

// Rainbow-enhanced theater marquee. Pass delay time (in ms) between frames.
void theaterChaseRainbow(int wait) {
  int firstPixelHue = 0;     // First pixel starts at red (hue 0)
  for(int a=0; a<30; a++) {  // Repeat 30 times...
    for(int b=0; b<3; b++) { //  'b' counts from 0 to 2...
      strip.clear();         //   Set all pixels in RAM to 0 (off)
      // 'c' counts up from 'b' to end of strip in increments of 3...
      for(int c=b; c<strip.numPixels(); c += 3) {
        // hue of pixel 'c' is offset by an amount to make one full
        // revolution of the color wheel (range 65536) along the length
        // of the strip (strip.numPixels() steps):
        int      hue   = firstPixelHue + c * 65536L / strip.numPixels();
        uint32_t color = strip.gamma32(strip.ColorHSV(hue)); // hue -> RGB
        strip.setPixelColor(c, color); // Set pixel 'c' to value 'color'
      }
      strip.show();                // Update strip with new contents
      delay(wait);                 // Pause for a moment
      firstPixelHue += 65536 / 90; // One cycle of color wheel over 90 frames
    }
  }
}
Stepper Motor
- Here i test the stepper code with input of differnt voltage and amp, that give me speed and torqueof NEMA 17 stepper motor.
- Stepper motor ws working on bases of stepper motor. therefore workin of that and counting that step moves how much it should be done here.
- For the coding part its just an testing and review different patterns
// Arduino stepper motor control code

#include <Stepper.h> // Include the header file

// change this to the number of steps on your motor
#define STEPS 32

// create an instance of the stepper class using the steps and pins
Stepper stepper(STEPS, 8, 10, 9, 11);

int val = 0;

void setup() {
  Serial.begin(9600);
  stepper.setSpeed(200);
}

void loop() {

  if (Serial.available()>0)
  {
    val = Serial.parseInt();
    stepper.step(val);
    Serial.println(val); //for debugging
  }


}