20. Project presentations
Document a final project masterpiece that integrates the range of units covered, answering:
- What does it do?
- Who’s done what beforehand?
- What did you design?
- What materials and components were used?
- Where did they come from?
- How much did they cost?
- What parts and systems were made?
- What processes were used?
- What questions were answered?
- What worked? What didn’t?
- How was it evaluated?
- What are the implications?
Prepare a summary slide and a one minute video showing the conception, construction, and operation Your project should incorporate 2D design, additive and subtractive fabrication processes, electronics design and production, embedded microcontroller interfacing and programming, system integration and packaging where possible. You should make rather than buy the parts of your project.
Projects can be separate or joint, but need to show individual mastery of the skills, and be independently operable
Present your final project, weekly and group assignments, and documentation
Presentation of my project
The master slide
We also can see here:

The project video
We also can see in youtube:
Describing my project
For the presentation of my project I will answer some of the questions:
What does it do?
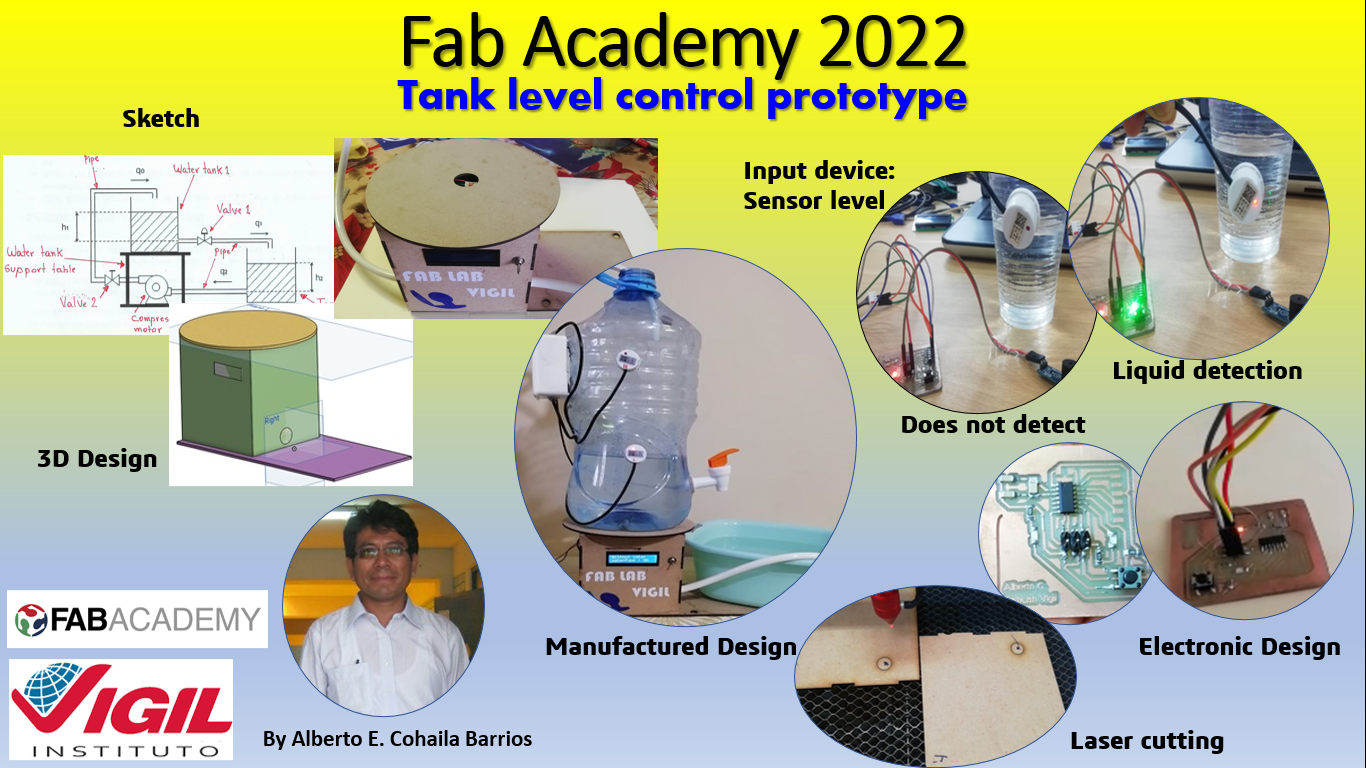
The project is a prototype of a water tank level control for demonstration and educational use.
Who’s done what beforehand?
There are several commercial models (very expensive) and also personally manufactured models, both to demonstrate process control theory and in others as a professional challenge (thesis). My proposal is to integrate digital fabrication with control algorithms all of which are robust and low cost.
What did you design?
Design: The structure that supports the water tank, the electronics housed in the structure and the software based control algorithm with feedback.
What materials and components were used?
Materials:
- 3 mm MDF plate of 60 cm x 80 cm approximately.
- PLA type filament for 3D printing.
- A piece of Vinyl 140 mm x100 mm
- A 5 l water tank (recycled)
- Two meter of 1/4” flexible plastic sleeve
Components:
- One ATTiny44A microcontroller board.
- Two non-contact liquid level sensors - XKC-Y25-NPN.
- One 12 V, 2A, 3.5 l/min water pump.
- One L298B power driver.
- A 16x2” LCD screen
- A variable power supply from 1.2 V to 24 V @ 2A.
Where did they come from?
I had all the components and materials at my disposal. But these were imported in advance from China by Ali Express (sensors, ATTiny44A, LCD and 16x2), the electric pump was bought from the local store, I could not import it because of the weight. The rest of the materials are recycled.
How much did they cost?
The materials and component had a cost of:
| Quantity | Material | $ |
|---|---|---|
| 1 | 3mm MDF plate of 60 cm x 80 cm | 7.5 |
| 1 | PLA type filament for 3D printing | 5 |
| 1 | Vinyl of white color of 14 cm x 10 cm | 3 |
| 1 | A 5 l water tank | 2.5 |
| 2 | Meter of 1/4” flexible plastic hose | 0.5 |
| sub total 1 | 18.5 |
| Quantity | Component | $ |
|---|---|---|
| 1 | ATTiny44A | 5 |
| 2 | non-contact liquid level Sensors - XKC-Y25-NPN | 10 |
| 1 | One 12 V, 2A, 3.5 l/min water pump | 15 |
| 1 | One L298B power driver | 1.8 |
| 1 | 16x2” LCD screen | 2.5 |
| 1 | Variable power Supply from 1.2 V to 24 V @ 2A. | 11 |
| sub total 2 | 45.8 |
| Total | $ |
|---|---|
| 64.3 |
What parts and systems were made?
They were designed:
- The structure of the prototype
- The integrated electronics of the ATTiny44A
- The program
What processes were used?
- Laser cutting was used for the structure.
- 3D printing was used for the brace bracket.
- Tabletop router (Monofab) was used to fabricate the electronic board.
- Use the vinyl cutting machine for labeling.
What questions were answered?
-
The filling and emptying time of the water tank was not known, after 3 tests it was determined that the average filling time is 2 min up to the upper sensor level, and the emptying time up to the discharge valve is 45 sec.
-
Also the consumption of the water pump motor was unknown, a measurement was made and it was verified that it consumed 0.5 A in operation with water.
-
When the water from the tank was poured to the lower tank, it splashed small drops of water to the base which is MDF and moistened it, likewise when filling the water to the tank there are always drops of water that escape and wet the MDF, this was not foreseen. So it is better to make the structure with material that does not affect the water as acrylic but you run the risk of increasing the price.
-
At the beginning there were times when it worked that the LCD screen did not show information. I was able to verify that this happened when the pump was turned on, so I checked the connections and realized that there was no good ground (GND) so I corrected it and such an imperfection did not occur again.
What worked? What didn’t?
-
The water pump control and communication with the LCD and sensors work well. Also the automatic operation of the water tank control system and everything else is working as planned.
-
It was not possible to eliminate the splashing of the water drops, one solution would be to cover the MDF with plastic (but it would take away aesthetics) another solution would be to place a hose to the valve that goes directly to the vacuum tank (also takes away aesthetics).
How was it evaluated?
I made tests of filling (loading) and emptying of the water tank (unloading) tests in all of them, it was verified that no water leaked through the hose connections.
The following sampling times were obtained:
| Test | loading time (min) | download time (s) |
|---|---|---|
| 1 | 2.08 | 47 |
| 2 | 2.04 | 43 |
| 3 | 1.58 | 46 |
What are the implications?
With this project I will be able to teach students the application of process control theory and the integration of sensors and actuators in a realistic scale model to improve the learning curve in both technical and university education.
Likewise, the manufacture of scale prototypes in the FabLab Vigil.

This work is licensed under a Creative Commons Attribution 4.0 International License.