19. Project development
This week I worked on defining my final project idea and started to getting used to the documentation process.
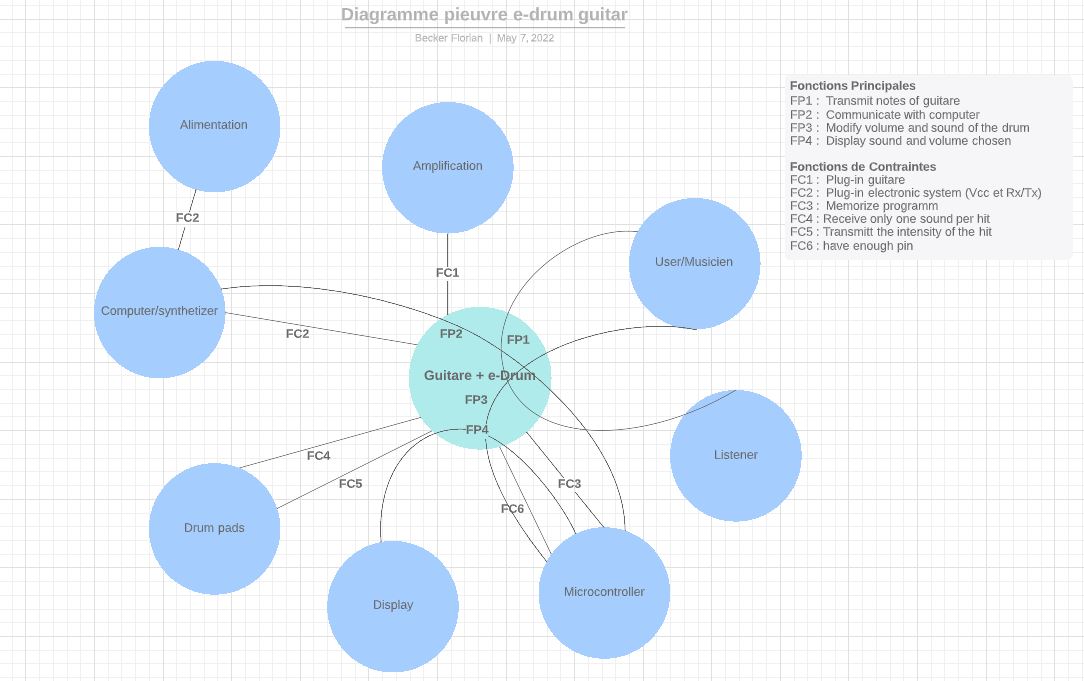
What are the functions of the guitar ?
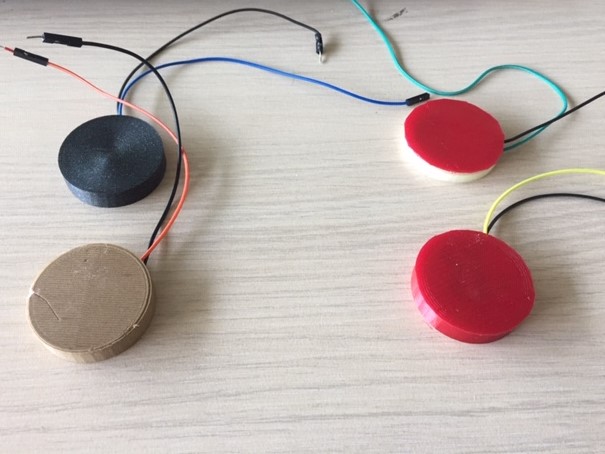
- Drum part : Drum pads on the body of the guitar. They have a piezo electric sensor. Each one would be connected to a synthesizer (which is not going to be build) with a cable jack. Could I reduce the number of jack cable going out of the guitar to one for the whole drum part ? I’ll look into MIDI protocol. Here is my first attempt to do a drum pad :
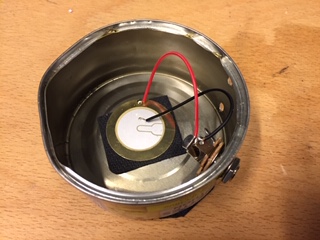
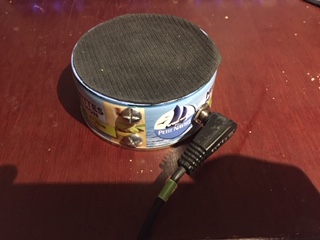
-
Loop part : make a drum looper to play a short section and repeat it while playing the guitar. This seems a really complex project to do from scratch and maybe I’ll have to find another way to do it.
-
Guitar part : Mill the body of a guitar and screw a neck from the industry to it.
-
Display :
Here is a diagram of the project :
Research
-
looper : This Instructables shows an example of a looper. It’s a really long and complex project with a 44 pin microship, an OP amp, a RAM and Digital to Audio Converter. I need to figure out a way to prototype it in an iterative way (spiral development) to not over commit to it if too complicated.
-
Drums : Arduino minimal drum kit
-
MIDI controller : DIY Arduino MIDI controller This seems really feasible even if I want to build it from scratch with an ATMEGA 328p instead of the Arduino.
-
Digital to Analog Converter (DAC) : This youtube video explains how the DAC works. Arduino UNO has a build in Analog to Digital Converter (ADC).
2D and 3D Modeling
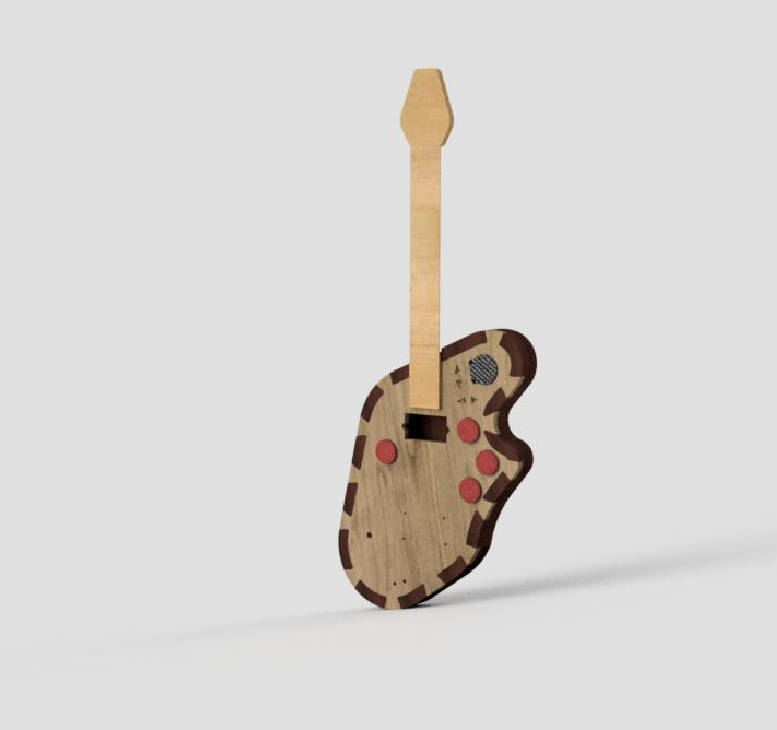
Below is my initial 3D model (made in xDesign):
Rendering made in Fusion 360 :
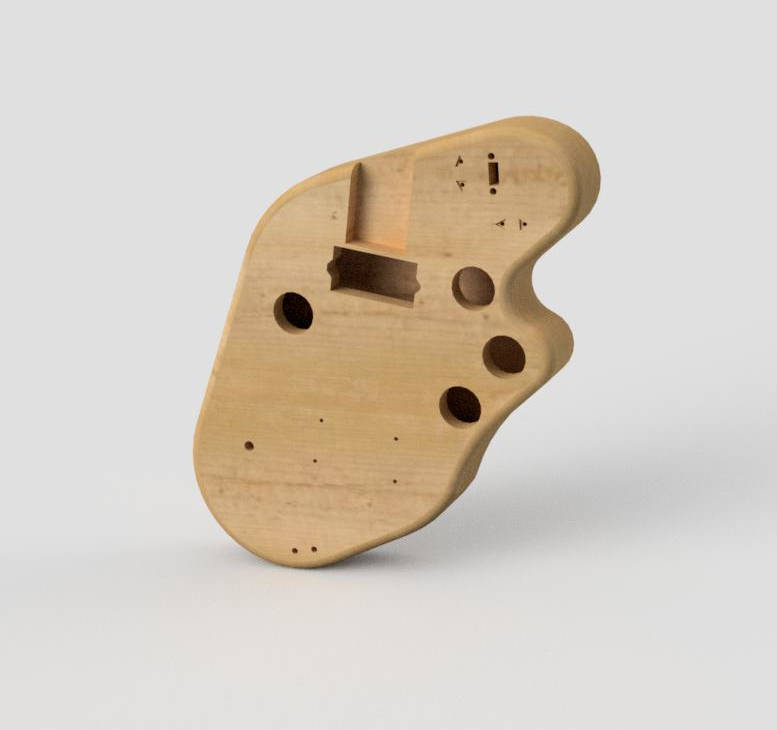
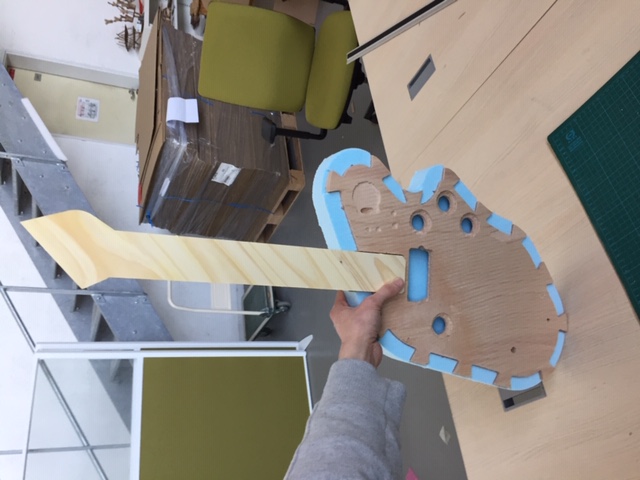
I changed the initial design during the Computer controlled machining week to take into account joinery :
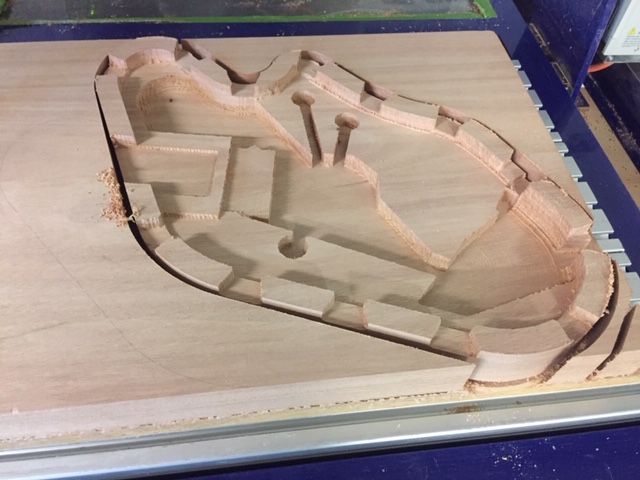
Final result for the body. The interior body is made of styrofoam for prototyping. Once I’ll get a better idea of the space I’ll need for the electronic, I’ll design a new interior to mill in wood :

I made also a guitar neck which I probably won’t use because it’s made of pine wood and it’s too soft. I’ll probably buy a neck from the industry.
Drum part
MIDI code
#include <MIDI.h>

MIDI_CREATE_DEFAULT_INSTANCE();

#define LED 13
#define PAD1 A2
#define PAD2 A3
#define PAD3 A4
#define PAD4 A5

int threshold = 380;                                     // threshold value going from 0 to 1023
byte note1 = 1;
byte note2 = 15;
byte note3 = 30;
byte note4 = 45;
int pad1hit = 0;

void setup() {
  // put your setup code here, to run once:
  Serial.begin(115200);
  MIDI.begin(4);
  pinMode(LED, OUTPUT);
}

void loop() {
  // put your main code here, to run repeatedly:
  if (analogRead(PAD1) >= threshold) {                    // if the value exceed the threshold, we say the pad has been hit
    pad1hit = 1;
    //Serial.print("max = ");
   //Serial.print(analogRead(PAD1));
  }
  /*if (volume1>=threshold && millis()-timer >= DEBOUNCE){
    MIDI.sendNoteOn(30, 127, 1);
    timer=millis();
  }*/
  if (pad1hit == 1 && analogRead(PAD1) <= (threshold - 100)){ // if the pad has been previously hit and the signal is diminishing, we send the note
    int volume1 = analogRead(PAD1);
    digitalWrite(LED, HIGH);
    //Serial.print("Volume1 =");
   //Serial.print(analogRead(PAD1));
    MIDI.sendNoteOn(note1, volume1, 1);
    MIDI.sendNoteOff(note1, 0, 1);
    volume1=0;
    pad1hit = 0;                                            // setting the marker padhit back to 0
  }
  digitalWrite(LED, LOW);
}
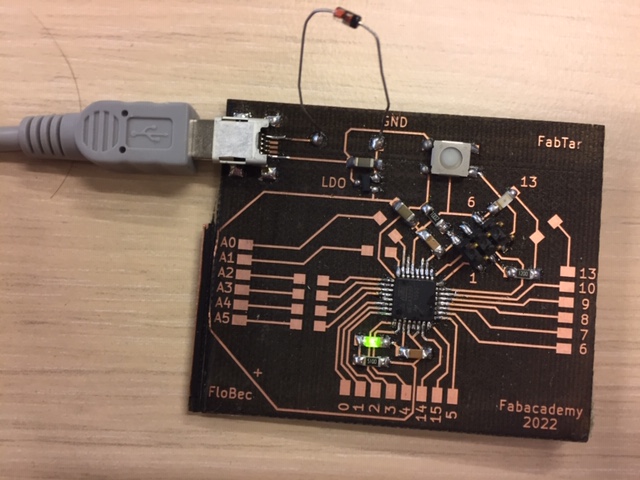
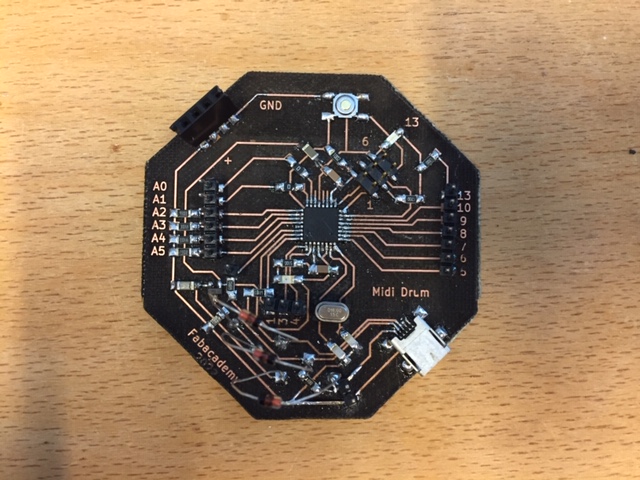
Board made on the Output devices week :
Drumming test :
Different pads tested (black PLA, Bamboo, red TPU, TPU + PVA) :
New board design
I made a new board for the final project. I added a 16Mhz crystal oscillator, 1Mohm resistor between GND and analogic inputs to improve the signal :
We can see the impact of the 1Mohm resistor in the following graphs. The left one has not resistor and the right one has a 1Mohm resistor :
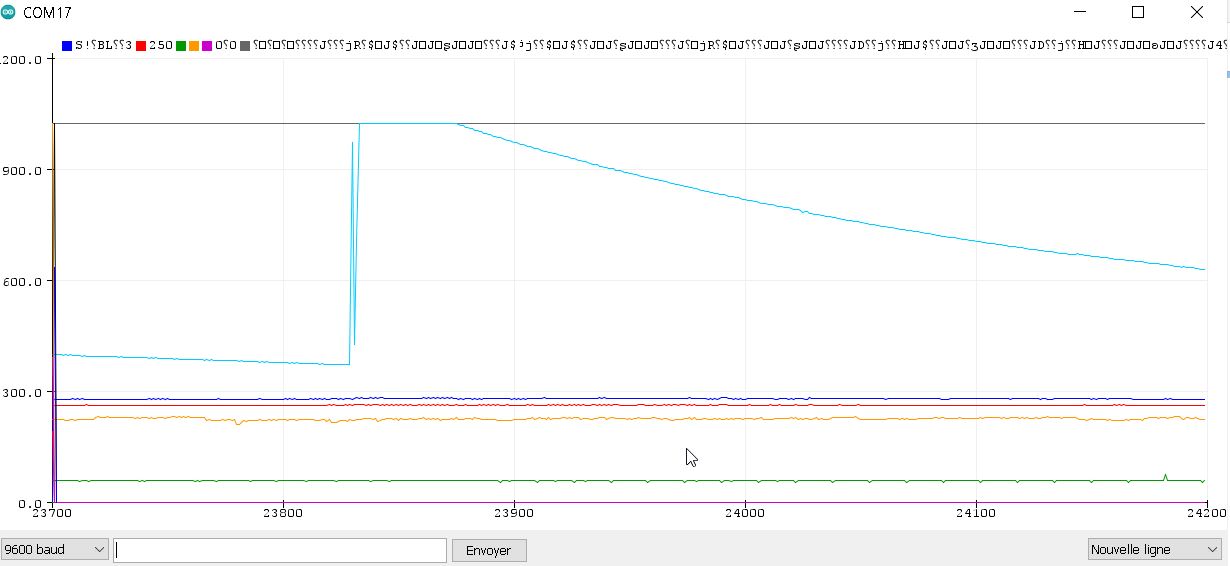
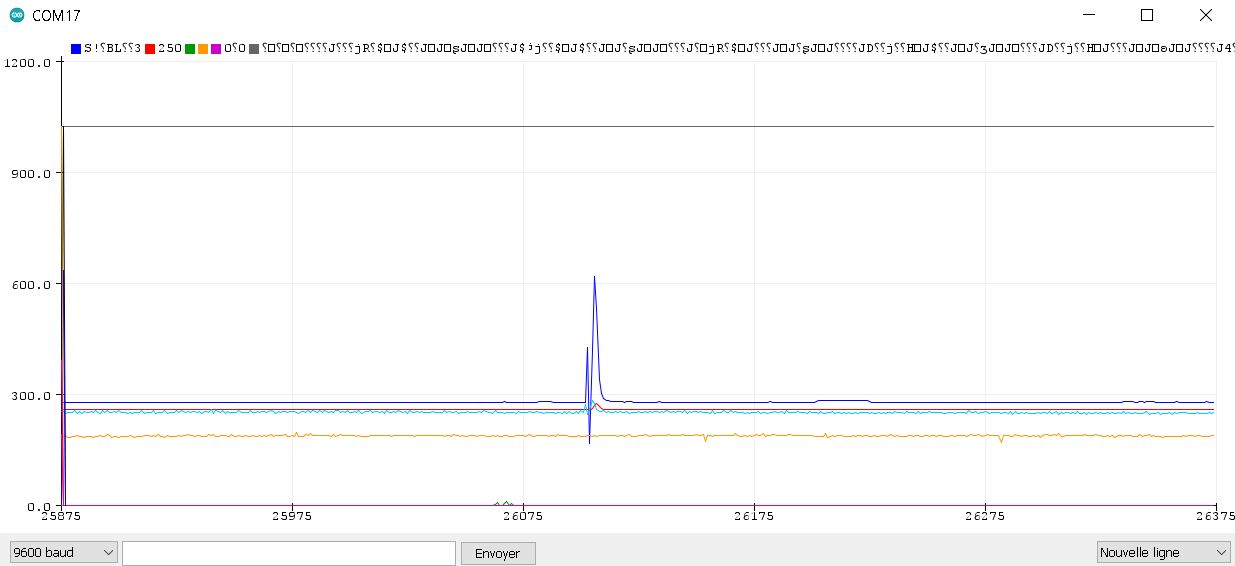
The impact is more precise with the resistor.
In the following video, we can see the drumming in action. I’m using Ableton software as a synthesiser :
Display
I’m adding a display to my project to show the volume of the drum as well as the choice of the user for the drumset. I’m using a TFT LCD display which is close to the one I used during the Output devices week, programming wise :
Display code
// the following code is for displaying volume and drum set.

#include "DFRobot_ST7687S_Latch.h"

#ifdef __AVR__
uint8_t pin_cs = 3, pin_rs = 5, pin_wr = 6, pin_lck = 7;
#else
uint8_t pin_cs = D3, pin_rs = D5, pin_wr = D6, pin_lck = D7;
#endif

DFRobot_ST7687S_Latch tft(pin_cs, pin_rs, pin_wr, pin_lck);

#define buttonDrumSet  0
#define buttonPlus  1
#define buttonMinus  2

int DrumSet = 1;
int x = 0;

void setup(void)
{
  // Initialyse display
  Serial.begin(115200);
  tft.begin();
  tft.fillScreen(DISPLAY_BLACK);
  pinMode(buttonDrumSet, INPUT);
  pinMode(buttonPlus, INPUT);
  pinMode(buttonMinus, INPUT);
  digitalWrite(buttonDrumSet, LOW);
  digitalWrite(buttonPlus, LOW);
  digitalWrite(buttonMinus, LOW);
}

void loop(void)
{

  tft.drawCircle(0, 0, 60, DISPLAY_WHITE);  //draw circle
  tft.drawHLine(-60, 0, 10, DISPLAY_WHITE);
  tft.drawHLine(50, 0, 10, DISPLAY_WHITE);
  tft.drawVLine(0, 50, 10, DISPLAY_WHITE);
  tft.drawVLine(0, -60, 10, DISPLAY_WHITE);
  tft.drawLine(-42, 42, -35, 35, DISPLAY_RED);
  tft.drawLine(-42, -42, -35, -35, DISPLAY_RED);
  tft.drawLine(42, -42, 35, -35, DISPLAY_RED);
  tft.drawLine(42, 42, 35, 35, DISPLAY_RED);
  tft.setCursor(25, 32);
  tft.setTextColor(DISPLAY_WHITE);  //set text color as white
  tft.setTextSize(2);  //2 * text size, default text size: 6 * 8
  tft.print("DrumSet :");
  tft.setCursor(60, 54);
  tft.setTextColor(DISPLAY_RED);  //set text color as white
  tft.setTextSize(2);  //2 * text size, default text size: 6 * 8
  tft.print("1");

  if (digitalRead(buttonDrumSet) == HIGH && DrumSet == 2){
      DrumSet = 1;
    tft.setCursor(25, 32);
    tft.setTextColor(DISPLAY_WHITE);  //set text color as white
    tft.setTextSize(2);  //2 * text size, default text size: 6 * 8
    tft.print("DrumSet :");
    tft.setCursor(60, 54);
    tft.setTextColor(DISPLAY_RED);  //set text color as white
    tft.setTextSize(2);  //2 * text size, default text size: 6 * 8
    tft.print("1");
   }

  if (digitalRead(buttonDrumSet) == HIGH && DrumSet == 1){
      DrumSet = 2;
    tft.setCursor(25, 32);
    tft.setTextColor(DISPLAY_WHITE);  //set text color as white
    tft.setTextSize(2);  //2 * text size, default text size: 6 * 8
    tft.print("DrumSet :");
    tft.setCursor(60, 54);
    tft.setTextColor(DISPLAY_BLUE);  //set text color as white
    tft.setTextSize(2);  //2 * text size, default text size: 6 * 8
    tft.print("2");
  }

  if (digitalRead(buttonMinus) == HIGH && x == 1){ // set 1st quadrant in black
    x = 0;
    tft.drawLine(-5, 60, -4, 50, DISPLAY_BLACK);
    tft.drawLine(-10, 59, -9, 49, DISPLAY_BLACK);
    tft.drawLine(-16, 58, -13, 48, DISPLAY_BLACK);
    tft.drawLine(-21, 56, -17, 47, DISPLAY_BLACK);
    tft.drawLine(-25, 54, -21, 45, DISPLAY_BLACK);
    tft.drawLine(-30, 52, -25, 43, DISPLAY_BLACK);
    tft.drawLine(-34, 49, -29, 41, DISPLAY_BLACK);
    tft.drawLine(-39, 46, -32, 38, DISPLAY_BLACK);
    tft.drawLine(-46, 39, -38, 32, DISPLAY_BLACK);
    tft.drawLine(-49, 34, -41, 29, DISPLAY_BLACK);
    tft.drawLine(-52, 30, -43, 25, DISPLAY_BLACK);
    tft.drawLine(-54, 25, -45, 21, DISPLAY_BLACK);
    tft.drawLine(-56, 21, -47, 17, DISPLAY_BLACK);
    tft.drawLine(-58, 16, -48, 13, DISPLAY_BLACK);
    tft.drawLine(-59, 10, -49, 9, DISPLAY_BLACK);
    tft.drawLine(-60, 5, -50, 4, DISPLAY_BLACK);
    tft.setCursor(32, 85);
    tft.setTextColor(DISPLAY_WHITE);  //set text color as white
    tft.setTextSize(1);  //2 * text size, default text size: 6 * 8
    tft.print("Volume : 0");
    delay(1000);
  }

  if((digitalRead(buttonPlus) == HIGH && x == 0) || (digitalRead(buttonMinus) == HIGH && x == 2)){ // set 1st quadrant in white and 2nd quadrant in black
    x = 1;
    tft.drawLine(-5, 60, -4, 50, DISPLAY_WHITE);
    tft.drawLine(-10, 59, -9, 49, DISPLAY_WHITE);
    tft.drawLine(-16, 58, -13, 48, DISPLAY_WHITE);
    tft.drawLine(-21, 56, -17, 47, DISPLAY_WHITE);
    tft.drawLine(-25, 54, -21, 45, DISPLAY_WHITE);
    tft.drawLine(-30, 52, -25, 43, DISPLAY_WHITE);
    tft.drawLine(-34, 49, -29, 41, DISPLAY_WHITE);
    tft.drawLine(-39, 46, -32, 38, DISPLAY_WHITE);
    tft.drawLine(-46, 39, -38, 32, DISPLAY_BLACK);
    tft.drawLine(-49, 34, -41, 29, DISPLAY_BLACK);
    tft.drawLine(-52, 30, -43, 25, DISPLAY_BLACK);
    tft.drawLine(-54, 25, -45, 21, DISPLAY_BLACK);
    tft.drawLine(-56, 21, -47, 17, DISPLAY_BLACK);
    tft.drawLine(-58, 16, -48, 13, DISPLAY_BLACK);
    tft.drawLine(-59, 10, -49, 9, DISPLAY_BLACK);
    tft.drawLine(-60, 5, -50, 4, DISPLAY_BLACK);

    tft.setCursor(32, 85);
    tft.setTextColor(DISPLAY_WHITE);  //set text color as white
    tft.setTextSize(1);  //2 * text size, default text size: 6 * 8
    tft.print("Volume : 1");
    delay(1000);
  }

  if((digitalRead(buttonPlus) == HIGH && x == 1) || (digitalRead(buttonMinus) == HIGH && x == 3)){ // set 2nd quadrant in white and 3d quadrant in black
    x = 2;
    tft.drawLine(-46, 39, -38, 32, DISPLAY_WHITE);
    tft.drawLine(-49, 34, -41, 29, DISPLAY_WHITE);
    tft.drawLine(-52, 30, -43, 25, DISPLAY_WHITE);
    tft.drawLine(-54, 25, -45, 21, DISPLAY_WHITE);
    tft.drawLine(-56, 21, -47, 17, DISPLAY_WHITE);
    tft.drawLine(-58, 16, -48, 13, DISPLAY_WHITE);
    tft.drawLine(-59, 10, -49, 9, DISPLAY_WHITE);
    tft.drawLine(-60, 5, -50, 4, DISPLAY_WHITE);
    tft.drawLine(-60, 0, -50, 0, DISPLAY_WHITE);
        tft.drawLine(-46, -39, -38, -32, DISPLAY_BLACK);
    tft.drawLine(-49, -34, -41, -29, DISPLAY_BLACK);
    tft.drawLine(-52, -30, -43, -25, DISPLAY_BLACK);
    tft.drawLine(-54, -25, -45, -21, DISPLAY_BLACK);
    tft.drawLine(-56, -21, -47, -17, DISPLAY_BLACK);
    tft.drawLine(-58, -16, -48, -13, DISPLAY_BLACK);
    tft.drawLine(-59, -10, -49, -9, DISPLAY_BLACK);
    tft.drawLine(-60, -5, -50, -4, DISPLAY_BLACK);
    tft.drawLine(-60, 0, -50, 0, DISPLAY_BLACK);
    tft.setCursor(32, 85);
    tft.setTextColor(DISPLAY_WHITE);  //set text color as white
    tft.setTextSize(1);  //2 * text size, default text size: 6 * 8
    tft.print("Volume : 2");
    delay(1000);
  }

   if((digitalRead(buttonPlus) == HIGH && x == 2) || (digitalRead(buttonMinus) == HIGH && x == 4)){  // set 3d quadrant in white and 4th quadrant in black
    x = 3;
    tft.drawLine(-46, -39, -38, -32, DISPLAY_WHITE);
    tft.drawLine(-49, -34, -41, -29, DISPLAY_WHITE);
    tft.drawLine(-52, -30, -43, -25, DISPLAY_WHITE);
    tft.drawLine(-54, -25, -45, -21, DISPLAY_WHITE);
    tft.drawLine(-56, -21, -47, -17, DISPLAY_WHITE);
    tft.drawLine(-58, -16, -48, -13, DISPLAY_WHITE);
    tft.drawLine(-59, -10, -49, -9, DISPLAY_WHITE);
    tft.drawLine(-60, -5, -50, -4, DISPLAY_WHITE);
    tft.drawLine(-60, 0, -50, 0, DISPLAY_WHITE);
        tft.drawLine(-5, -60, -4, -50, DISPLAY_BLACK);
    tft.drawLine(-10, -59, -9, -49, DISPLAY_BLACK);
    tft.drawLine(-16, -58, -13, -48, DISPLAY_BLACK);
    tft.drawLine(-21, -56, -17, -47, DISPLAY_BLACK);
    tft.drawLine(-25, -54, -21, -45, DISPLAY_BLACK);
    tft.drawLine(-30, -52, -25, -43, DISPLAY_BLACK);
    tft.drawLine(-34, -49, -29, -41, DISPLAY_BLACK);
    tft.drawLine(-39, -46, -32, -38, DISPLAY_BLACK);
    tft.setCursor(32, 85);
    tft.setTextColor(DISPLAY_WHITE);  //set text color as white
    tft.setTextSize(1);  //2 * text size, default text size: 6 * 8
    tft.print("Volume : 3");
    delay(1000);
  }

   if((digitalRead(buttonPlus) == HIGH && x == 3) || (digitalRead(buttonMinus) == HIGH && x == 5)){
    x = 4;
    tft.drawLine(-5, -60, -4, -50, DISPLAY_WHITE);
    tft.drawLine(-10, -59, -9, -49, DISPLAY_WHITE);
    tft.drawLine(-16, -58, -13, -48, DISPLAY_WHITE);
    tft.drawLine(-21, -56, -17, -47, DISPLAY_WHITE);
    tft.drawLine(-25, -54, -21, -45, DISPLAY_WHITE);
    tft.drawLine(-30, -52, -25, -43, DISPLAY_WHITE);
    tft.drawLine(-34, -49, -29, -41, DISPLAY_WHITE);
    tft.drawLine(-39, -46, -32, -38, DISPLAY_WHITE);
        tft.drawLine(5, -60, 4, -50, DISPLAY_BLACK);
    tft.drawLine(10, -59, 9, -49, DISPLAY_BLACK);
    tft.drawLine(16, -58, 13, -48, DISPLAY_BLACK);
    tft.drawLine(21, -56, 17, -47, DISPLAY_BLACK);
    tft.drawLine(25, -54, 21, -45, DISPLAY_BLACK);
    tft.drawLine(30, -52, 25, -43, DISPLAY_BLACK);
    tft.drawLine(34, -49, 29, -41, DISPLAY_BLACK);
    tft.drawLine(39, -46, 32, -38, DISPLAY_BLACK);
    tft.setCursor(32, 85);
    tft.setTextColor(DISPLAY_WHITE);  //set text color as white
    tft.setTextSize(1);  //2 * text size, default text size: 6 * 8
    tft.print("Volume : 4");
    delay(1000);
  }

   if((digitalRead(buttonPlus) == HIGH && x == 4) || (digitalRead(buttonMinus) == HIGH && x == 6)){
    x = 5;
    tft.drawLine(5, -60, 4, -50, DISPLAY_WHITE);
    tft.drawLine(10, -59, 9, -49, DISPLAY_WHITE);
    tft.drawLine(16, -58, 13, -48, DISPLAY_WHITE);
    tft.drawLine(21, -56, 17, -47, DISPLAY_WHITE);
    tft.drawLine(25, -54, 21, -45, DISPLAY_WHITE);
    tft.drawLine(30, -52, 25, -43, DISPLAY_WHITE);
    tft.drawLine(34, -49, 29, -41, DISPLAY_WHITE);
    tft.drawLine(39, -46, 32, -38, DISPLAY_WHITE);
        tft.drawLine(46, -39, 38, -32, DISPLAY_BLACK);
    tft.drawLine(49, -34, 41, -29, DISPLAY_BLACK);
    tft.drawLine(52, -30, 43, -25, DISPLAY_BLACK);
    tft.drawLine(54, -25, 45, -21, DISPLAY_BLACK);
    tft.drawLine(56, -21, 47, -17, DISPLAY_BLACK);
    tft.drawLine(58, -16, 48, -13, DISPLAY_BLACK);
    tft.drawLine(59, -10, 49, -9, DISPLAY_BLACK);
    tft.drawLine(60, -5, 50, -4, DISPLAY_BLACK);
    tft.drawLine(60, 0, 50, 0, DISPLAY_BLACK);
    tft.setCursor(32, 85);
    tft.setTextColor(DISPLAY_WHITE);  //set text color as white
    tft.setTextSize(1);  //2 * text size, default text size: 6 * 8
    tft.print("Volume : 5");
    delay(1000);
  }

   if((digitalRead(buttonPlus) == HIGH && x == 5) || (digitalRead(buttonMinus) == HIGH && x == 7)){
    x = 6;
    tft.drawLine(46, -39, 38, -32, DISPLAY_WHITE);
    tft.drawLine(49, -34, 41, -29, DISPLAY_WHITE);
    tft.drawLine(52, -30, 43, -25, DISPLAY_WHITE);
    tft.drawLine(54, -25, 45, -21, DISPLAY_WHITE);
    tft.drawLine(56, -21, 47, -17, DISPLAY_WHITE);
    tft.drawLine(58, -16, 48, -13, DISPLAY_WHITE);
    tft.drawLine(59, -10, 49, -9, DISPLAY_WHITE);
    tft.drawLine(60, -5, 50, -4, DISPLAY_WHITE);
    tft.drawLine(60, 0, 50, 0, DISPLAY_WHITE);
        tft.drawLine(46, 39, 38, 32, DISPLAY_BLACK);
    tft.drawLine(49, 34, 41, 29, DISPLAY_BLACK);
    tft.drawLine(52, 30, 43, 25, DISPLAY_BLACK);
    tft.drawLine(54, 25, 45, 21, DISPLAY_BLACK);
    tft.drawLine(56, 21, 47, 17, DISPLAY_BLACK);
    tft.drawLine(58, 16, 48, 13, DISPLAY_BLACK);
    tft.drawLine(59, 10, 49, 9, DISPLAY_BLACK);
    tft.drawLine(60, 5, 50, 4, DISPLAY_BLACK);
    tft.drawLine(60, 0, 50, 0, DISPLAY_BLACK);
    tft.setCursor(32, 85);
    tft.setTextColor(DISPLAY_WHITE);  //set text color as white
    tft.setTextSize(1);  //2 * text size, default text size: 6 * 8
    tft.print("Volume : 6");
    delay(1000);
  }

   if((digitalRead(buttonPlus) == HIGH && x == 6) || (digitalRead(buttonMinus) == HIGH && x == 8)){
    x = 7;
    tft.drawLine(46, 39, 38, 32, DISPLAY_WHITE);
    tft.drawLine(49, 34, 41, 29, DISPLAY_WHITE);
    tft.drawLine(52, 30, 43, 25, DISPLAY_WHITE);
    tft.drawLine(54, 25, 45, 21, DISPLAY_WHITE);
    tft.drawLine(56, 21, 47, 17, DISPLAY_WHITE);
    tft.drawLine(58, 16, 48, 13, DISPLAY_WHITE);
    tft.drawLine(59, 10, 49, 9, DISPLAY_WHITE);
    tft.drawLine(60, 5, 50, 4, DISPLAY_WHITE);
    tft.drawLine(60, 0, 50, 0, DISPLAY_WHITE);
    tft.drawLine(5, 60, 4, 50, DISPLAY_BLACK);
    tft.drawLine(10, 59, 9, 49, DISPLAY_BLACK);
    tft.drawLine(16, 58, 13, 48, DISPLAY_BLACK);
    tft.drawLine(21, 56, 17, 47, DISPLAY_BLACK);
    tft.drawLine(25, 54, 21, 45, DISPLAY_BLACK);
    tft.drawLine(30, 52, 25, 43, DISPLAY_BLACK);
    tft.drawLine(34, 49, 29, 41, DISPLAY_BLACK);
    tft.drawLine(39, 46, 32, 38, DISPLAY_BLACK);
    tft.setCursor(32, 85);
    tft.setTextColor(DISPLAY_WHITE);  //set text color as white
    tft.setTextSize(1);  //2 * text size, default text size: 6 * 8
    tft.print("Volume : 7");
    delay(1000);
  }

   if((digitalRead(buttonPlus) == HIGH && x == 7)){
    x = 8;
    tft.drawLine(5, 60, 4, 50, DISPLAY_WHITE);
    tft.drawLine(10, 59, 9, 49, DISPLAY_WHITE);
    tft.drawLine(16, 58, 13, 48, DISPLAY_WHITE);
    tft.drawLine(21, 56, 17, 47, DISPLAY_WHITE);
    tft.drawLine(25, 54, 21, 45, DISPLAY_WHITE);
    tft.drawLine(30, 52, 25, 43, DISPLAY_WHITE);
    tft.drawLine(34, 49, 29, 41, DISPLAY_WHITE);
    tft.drawLine(39, 46, 32, 38, DISPLAY_WHITE);
    tft.setCursor(32, 85);
    tft.setTextColor(DISPLAY_WHITE);  //set text color as white
    tft.setTextSize(1);  //2 * text size, default text size: 6 * 8
    tft.print("Volume : 8");
    delay(1000);
  }

}
update - final project
I changed the code for the display to be reacting faster. I removed the graphic lines and only put text instead. I also added the code to change the display with buttons. The code can be downloaded in the final project page
Keyboard
I changed my initial idea to control volume and the looper with keyboard inputs using the V-USB library and I went instead for MIDI controls which will be easier to implement :
I’m adding 2 buttons to control the looper (the atmega328 has internal pull-up resistors so there is no need to wire a resistor to each button)
//initialise buttons with the internal pull up resistor
pinMode(buttonDrum, INPUT_PULLUP);
The following code sends a MIDI message when turning a potentiometer only if the analogic value from the pot is more than a defined INT to prevent noise. This code was inspired by Michael Balzer’s Basic MIDI Controller :
tempAnalogPot = analogRead(analogPotMap) / 8; // dividing by 8 to go from the 10 bits ADC to the 7 bit MIDI value

analogDiff = abs(tempAnalogPot - analogPot);

if (analogDiff >= NOISE)
{
  // Record the new analogue value
  analogPot = tempAnalogPot;

  MIDI.sendControlChange(MIDI_Volume, analogPot, 1);
}
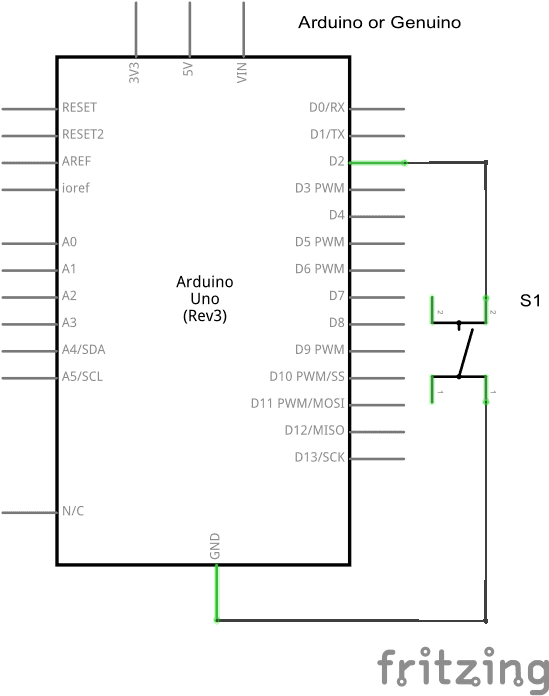
Controlling 2 boards with one button
One board is not enough for the MIDI controller as well as the display (There is enough space memory but the program is too slow - which could probably be optimized). I’ll use one board for each.
To control 2 boards with one button, I’m using the following schematic. The button is linked to the GND of both boards :

I chose to not go for I2C communication because the two boards don’t have the same clock (one is 16Mhz and the other is 8Mhz) which could complicate the coding.
I uploaded the following test code to both boards. The potentiometer controls the LED (led on when the analogic value > 10) of both boards. The button has 4 states (Stop, Recording, PlayLoop and PlayUponLoop) which is done by incrementing a counter each time we press the button. We then compare the counter modulo 4 to the values 0, 1, 2 and 3 :
Test code to control both board with one button and one potentiometer
// constants won’t change. They’re used here to set pin numbers: const int analogPotMap = A1; const int buttonPin = 8; // the number of the pushbutton pin const int ledPin = 13; // the number of the LED pin
// variables will change:
int analogPot;
int tempAnalogPot;
int analogDiff;
int buttonPushCounter = 0; // counter for the number of button presses
int buttonState = 1; // current state of the button
int lastButtonState = 1; // previous state of the button
void setup() { Serial.begin(9600); // initialize the LED pin as an output: pinMode(ledPin, OUTPUT); // initialize the pushbutton pin as an input: pinMode(analogPotMap, INPUT); analogPot = analogRead(analogPotMap) / 8; // initialize the button pin as a input: pinMode(buttonPin, INPUT_PULLUP); }
void loop() {
// the following lines turn on and off the led depending on the value of the analog input tempAnalogPot = analogRead(analogPotMap) / 8;
analogDiff = abs(tempAnalogPot - analogPot);
if (analogDiff >= 5) { // Record the new analogue value analogPot = tempAnalogPot;
Serial.print(“AnalogPot:”); Serial.println(analogPot);
if (analogPot < 10){
digitalWrite(ledPin, LOW);
}
else { digitalWrite (ledPin, HIGH); } }
// the following lines print in serial a word depending on the value of a counter changing with a press of one button. 4 different states for a single button pressed
// read the pushbutton input pin: buttonState = digitalRead(buttonPin);
// compare the buttonState to its previous state if (buttonState != lastButtonState) { // if the state has changed, increment the counter if (buttonState == LOW) { // if the current state is HIGH then the button went from off to on: buttonPushCounter++; Serial.print(“number of button pushes: “); Serial.println(buttonPushCounter); } else { // if the current state is LOW then the button went from on to off: } // compare the counter modulo 4 to the values 1,2,3 and 0 switch (buttonPushCounter % 4) { case 0: Serial.println(“Stop”); break; case 1: Serial.println(“Recording”); break; case 2: Serial.println(“PlayLoop”); break; case 3: Serial.println(“PlayUponLoop”); break; } delay(50); } // save the current state as the last state, for next time through the loop lastButtonState = buttonState;
}
Sending MIDI message and display information with the button
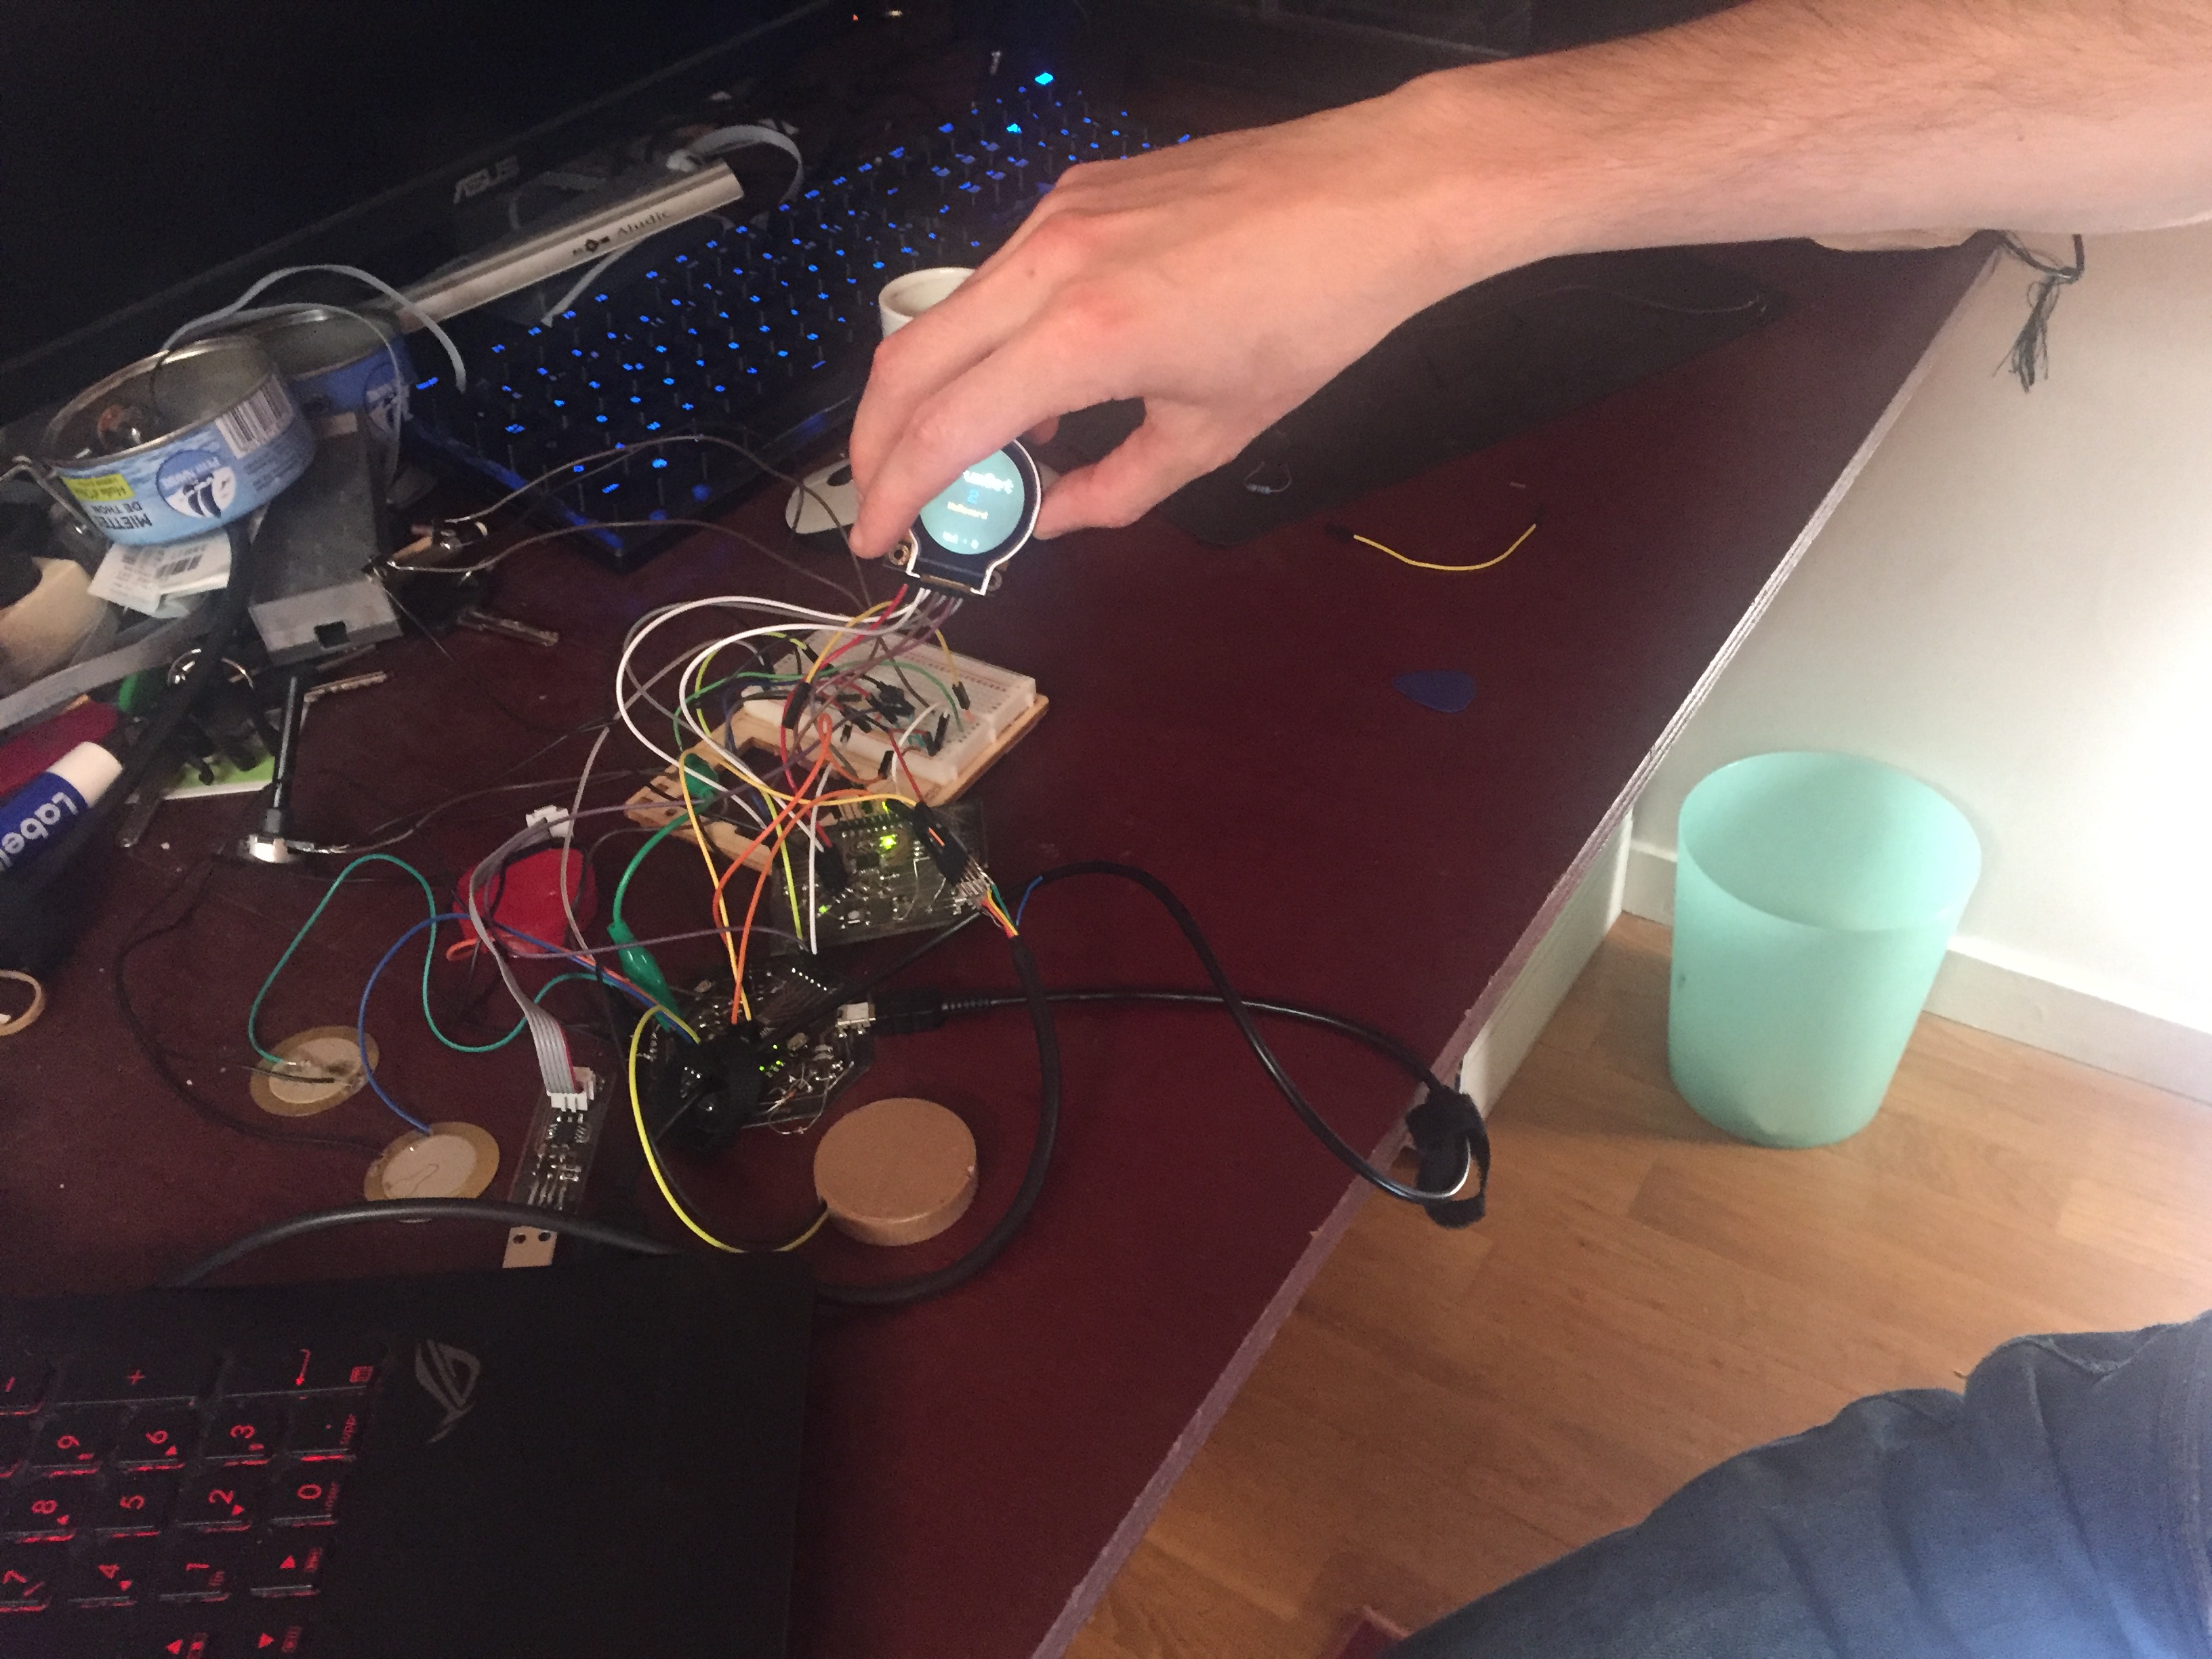
Then I could test the whole electronic circuit for the final project : modify the volume, change the drumset, play the drum with a loop and display those changes
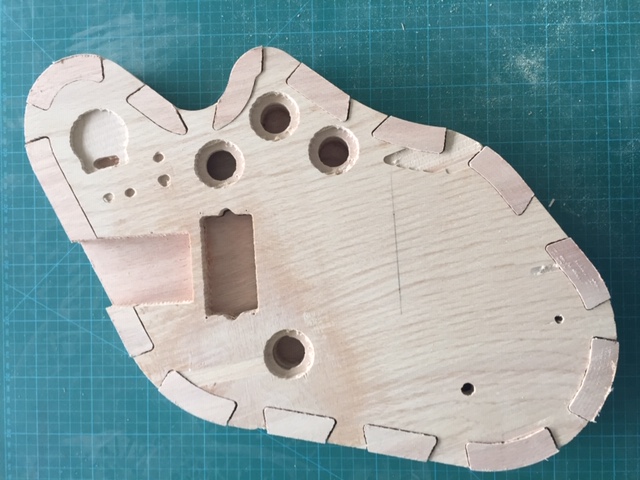
Guitar body milling
1st iteration
Prototype milled during the Computer controlled machining week. I’m using the neck of a guitar I already own as a temporary solution. I may use another neck or mill one after fabacademy :
This first iteration allows me to check the dimensions of my design :
-
Max depth for the pick 18 mm. The top part is 12 mm deep so a maximum depth of 6 mm is needed under the pick ups
-
Height of the PCB :
- with pin headers : 25 mm - without pin headers : 7 mm -> Dimension chosen : 20 mm (I'll need to unsolder pin headers) -
Dimension of the PCB : octagonal PCB of 70 mm width
-
Diameter of the drum pads : 1st iteration : 37 mm, 2nd iteration : 42 mm.
| Potentiometer holes : mill a place for the nut | take into account the diameter of the bit for right-angled corners | modify depth for neck insertion |
|---|---|---|
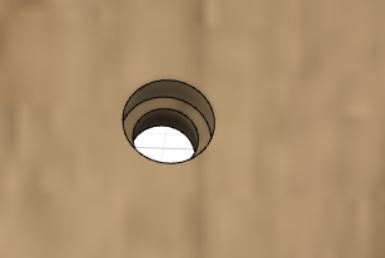 |
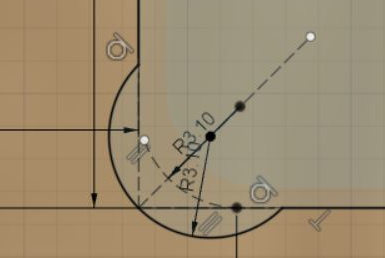 |
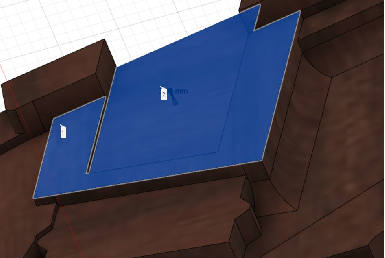 |
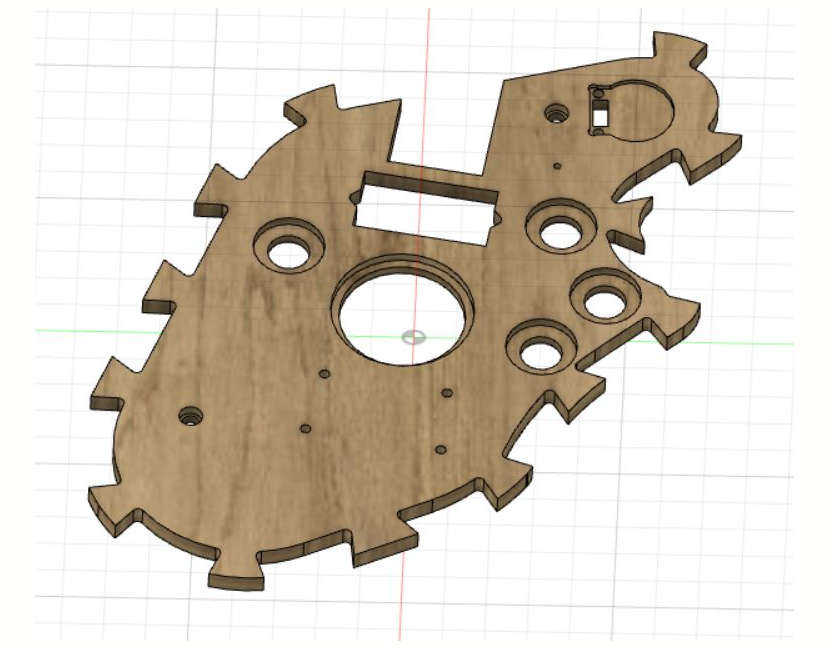
2nd iteration
New design for the bottom and top part :

Milling :
For the milling I used 2 bits :
| 3 flutes end mill for surfacing | 1 flute mill for the outer profile |
|---|---|
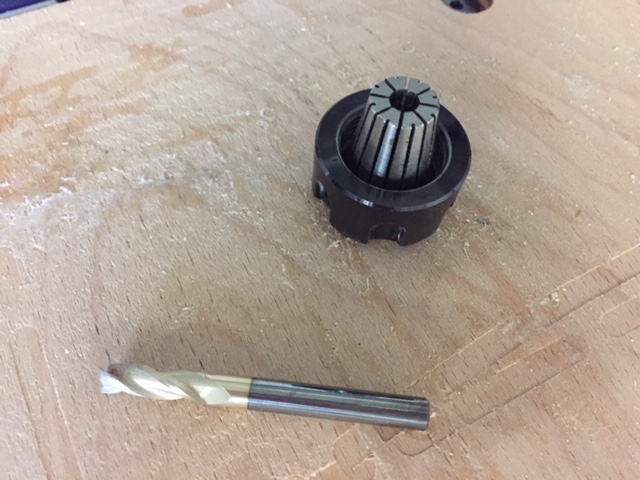 |
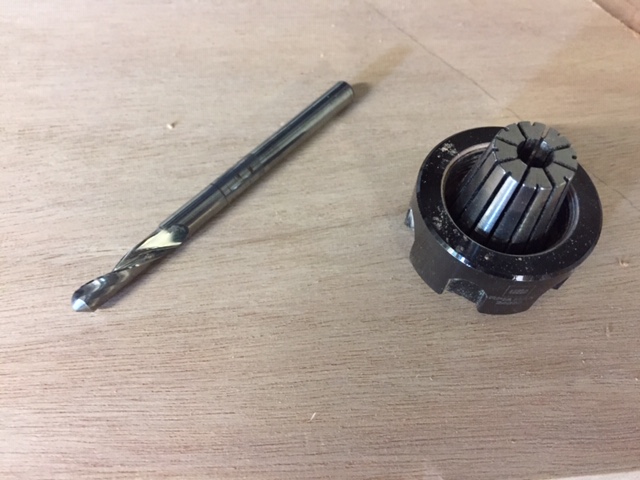 |
Milling time :
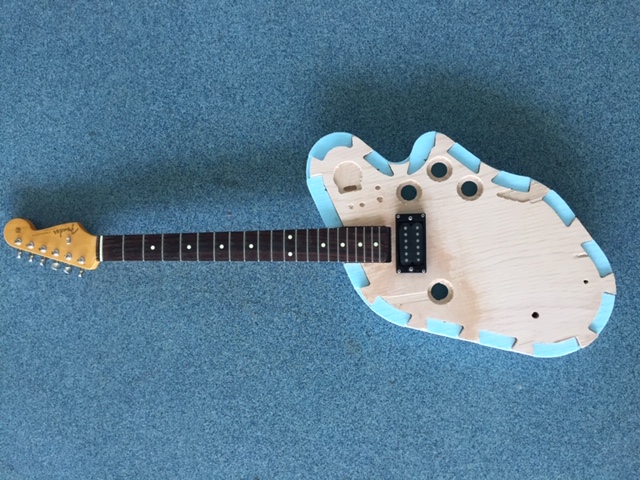
Result of the milling :
Fixturing
The two parts of the body of the guitar are fitting into each other and should not need screws or glue.
I drew a 0.5 mm offset between the 2 parts but maybe the wood expanded a bit after the milling. I had to sand the 2 parts in order to fit them :
2 parts jointed :
For the bridge and neck insertion, I will use screws