15. Interface and application programming
assignment
individual assignment:
write an application that interfaces a user with an input &/or output device that you made
group assignment:
compare as many tool options as possible
Proximity sensor Files
Piezo electric with my board
Folder.zip (.js, .css, .html, .ino files)
Gantt plan of the week
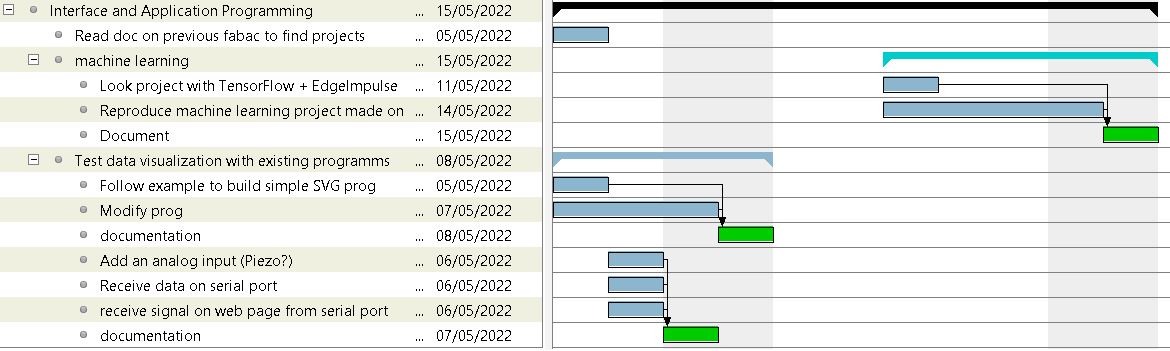
This week I plan to learn something about web graphic interfaces with SVG
Animate with SVG
I started with a SVG Animation tutorial
First thing I learn is to clean the SVG code :
Clean the SVG code
- define the styles within the
<style>tag (and not within the elements themselves) - Save as .svgsimple (svg 1.1)
- clean the code with SVGOMG
- give a class name to each element
Useful sites
-
Also from Waag :Fabuloes Fabacademy site“
1st test : move a circle
<svg viewBox="0 0 800 300">
<circle  class="circle" cx="400" cy="250" r="30"/>
<style>
    .circle {fill:#ff0;stroke:#000;stroke-width:.25;stroke-opacity:1;}

    .circle {
        animation-name: circleMoves;
        animation-duration: 6s;
        animation-iteration-count: infinite;
        animation-timing-function: ease-in;
        animation-timing-function: ease-out;
    }

    @keyframes circleMoves {
        from { transform: translateY(0px); }
        to   { transform: translateY(-150px); }
        }
</style>
</svg>
Then adding the function rotate, changing the origin, scale and changing the opacity :
.circle1 {
  animation-name: circleMoves1;
  animation-duration: 3s;
  animation-iteration-count: infinite;
  animation-timing-function: linear;
  transform-origin: 530px 250px;
}
@keyframes circleMoves1 {
    0% { transform: translateY(0px); }
  20%   { transform: translateY(-150px); }
  90%   { transform: rotate(180deg); }
  100%  { transform: scale(0.5);
      opacity: 0;   }
    }
Adding randomness
To add a random number, I found the following documentation.
The random number has been generated with the following function in JavaScript. We get a random number (here from 15 to 50) and attribute it to the variable r in circle. And a delay of 4000ms has been added :
var circle = document.querySelector("#circle");
setInterval(function() {
  circle.setAttribute("r", getRandomInt(15, 50));
}, 4000);


function getRandomInt(min, max) {
  return Math.floor(Math.random() * (max - min + 1) + min);
}
adding javascript in markdown
In the file mkdocs.yml add the line :
extra_javascript:
   - javascripts/extra.js
And add the js file in the folder docs/javascripts/extra.js
to change style attributes :circle.style.fill=generateRandomColor();
Then I added in the extra.js :
function randColor()  {
    return "#" + Math.floor(Math.random()*16777215).toString(16).padStart(6, '0').toUpperCase();
}
Difference between class="" and id=""
It seems that javascript functions only works with id="example"
To call an ID in CSS, use #example{} instead of .example{}
The difference is that the ID only refers to one single element while class can be used for several elements
Serial communication with p5.js
useful sites
Code Arduino
To test how to communicate via serial on my computer, I used first my Arduino nano 33 ble sense. It’s useful to upload sketch fast and it has a lot of sensors to test different input signals.
I uploaded an example for PDMSerialPlotter sketch which allow to read the audio data from the Arduino and prints the samples in the serial monitor. I changed it to turn on the RGB led depending on the strength of the signal. The library used is the PDM.h (Pulse Density Modulation) which is similar to the PWM (Pulse Width Modulation).
Arduino sketch
/*
This example reads audio data from the on-board PDM microphones, and prints
out the samples to the Serial console. The Serial Plotter built into the
Arduino IDE can be used to plot the audio data (Tools -> Serial Plotter)


This example code is in the public domain.
*/

#include <PDM.h>

// buffer to read samples into, each sample is 16-bits
short sampleBuffer[256];

// number of samples read
volatile int samplesRead;

void setup() {
Serial.begin(9600);
while (!Serial);

// configure the data receive callback
PDM.onReceive(onPDMdata);

// optionally set the gain, defaults to 20
// PDM.setGain(30);

// initialize PDM with:
// - one channel (mono mode)
// - a 16 kHz sample rate
if (!PDM.begin(1, 16000)) {
Serial.println("Failed to start PDM!");
while (1);
}
}

void loop() {
// Wait for samples to be read
if (samplesRead) {

// Print samples to the serial monitor or plotter
for (int i = 0; i < samplesRead; i++) {
 Serial.println(sampleBuffer[i]);
 // check if the sound value is higher than 500
if (sampleBuffer[i]>=500){
  digitalWrite(LEDR,LOW);
  digitalWrite(LEDG,HIGH);
  digitalWrite(LEDB,HIGH);
}
// check if the sound value is higher than 250 and lower than 500
if (sampleBuffer[i]>=250 && sampleBuffer[i] < 500){
  digitalWrite(LEDB,LOW);
  digitalWrite(LEDR,HIGH);
  digitalWrite(LEDG,HIGH);
}
//check if the sound value is higher than 0 and lower than 250
if (sampleBuffer[i]>=0 && sampleBuffer[i] < 250){
  digitalWrite(LEDG,LOW);
  digitalWrite(LEDR,HIGH);
  digitalWrite(LEDB,HIGH);
}
delay(100);
}

// Clear the read count
samplesRead = 0;
}
}

/**
* Callback function to process the data from the PDM microphone.
* NOTE: This callback is executed as part of an ISR.
* Therefore using `Serial` to print messages inside this function isn't supported.
* */
void onPDMdata() {
// Query the number of available bytes
int bytesAvailable = PDM.available();

// Read into the sample buffer
PDM.read(sampleBuffer, bytesAvailable);

// 16-bit, 2 bytes per sample
samplesRead = bytesAvailable / 2;
}
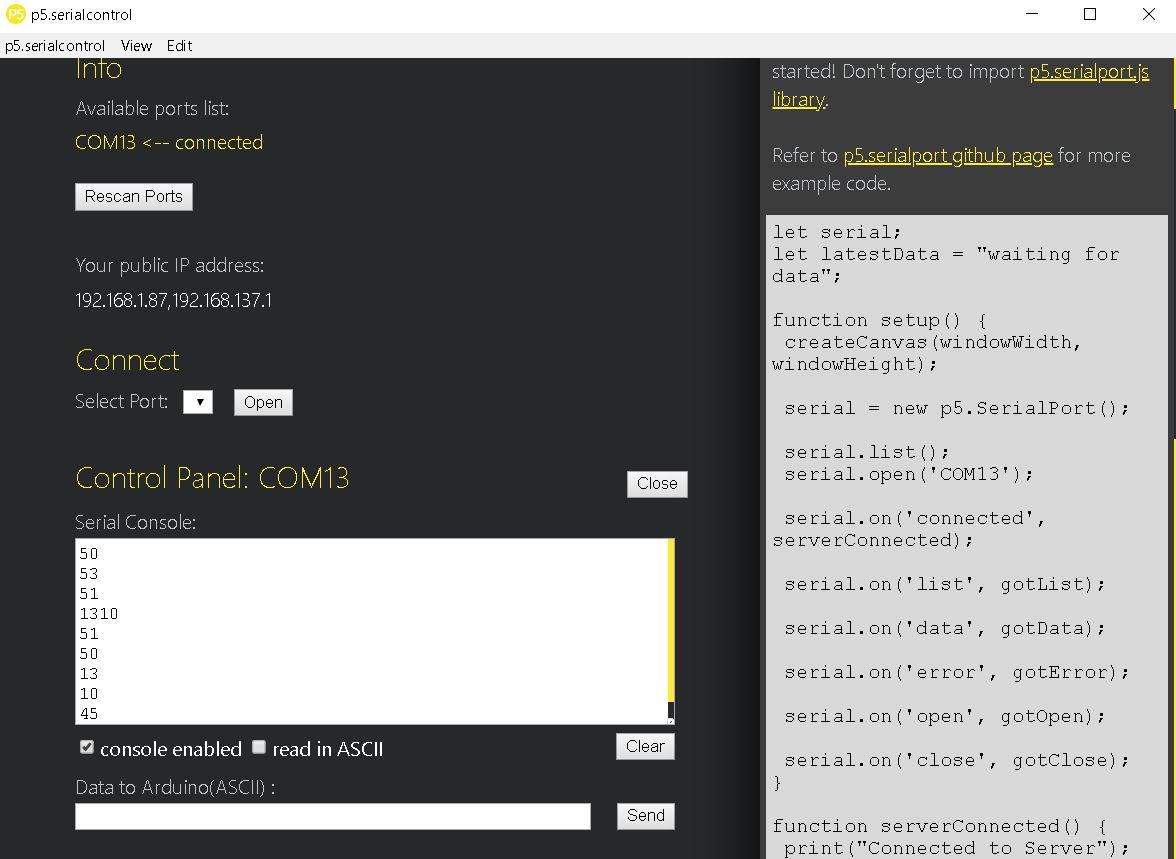
Open p5.serialControl
We have to add the library p5.serialport because JavaScripts in a browser can’t interact directly with a serial port. The app p5.serialcontrol allows to use this library with a simple interface to open a serialport and read it with a .js file. (Another way would be to use Node.js to run it but the app seems the easiest to use).
Next step, I launched the application p5.serialControl and select the good port. When I tried to open the console, the application crashed. After testing several things, I could read the serial console when I put a delay of 100ms between each serial.println in the Arduino code.
Open an example in the browser
I then opened the Read and animate example. I modified first the port name in the sketch.js file.
The result displayed the value on the web page :

In this example the value would change abruptly from a low to a high value in fractions of seconds. So I made another test with the proximity sensor this time to have a more interesting visual experience :
Arduino code
/*
APDS-9960 - Proximity Sensor

This example reads proximity data from the on-board APDS-9960 sensor of the
Nano 33 BLE Sense and prints the proximity value to the Serial Monitor
every 100 ms.

The circuit:
- Arduino Nano 33 BLE Sense

This example code is in the public domain.
*/

#include <Arduino_APDS9960.h>

int ledState = LOW;

unsigned long previousMillis = 0;

const long intervalLong = 1000;
const long intervalMed = 500;
const long intervalShort = 100;

void setup() {
Serial.begin(9600);
while (!Serial);

if (!APDS.begin()) {
Serial.println("Error initializing APDS-9960 sensor!");
}

// set the LEDs pins as outputs
pinMode(LEDR, OUTPUT);
pinMode(LEDG, OUTPUT);
pinMode(LEDB, OUTPUT);

// turn all the LEDs off
digitalWrite(LEDR, HIGH);
digitalWrite(LEDG, HIGH);
digitalWrite(LEDB, HIGH);

}

void loop() {

unsigned long currentMillis = millis();

// check if a proximity reading is available-
if (APDS.proximityAvailable()) {
// read the proximity
// - 0   => close
// - 255 => far
// - -1  => error
int proximity = APDS.readProximity();

if (proximity > 150) {
      if (currentMillis - previousMillis >= intervalLong) {
        previousMillis = currentMillis;

        // if the LED is off turn it on and vice-versa:
        if (ledState == LOW) {
          ledState = HIGH;
        } else {
          ledState = LOW;
        }

        // set the green LED with the ledState of the variable and turn off the rest
        digitalWrite(LEDG, ledState);
        digitalWrite(LEDR, HIGH);
        digitalWrite(LEDB, HIGH);
      }
}
else if(proximity > 50 && proximity <= 150){
  if (currentMillis - previousMillis >= intervalMed) {
    previousMillis = currentMillis;

    // if the LED is off turn it on and vice-versa:
    if (ledState == LOW) {
      ledState = HIGH;
      } else {
        ledState = LOW;
      }

      // set the blue LED with the ledState of the variable and turn off the rest
      digitalWrite(LEDB, ledState);
      digitalWrite(LEDR, HIGH);
      digitalWrite(LEDG, HIGH);
    }
}
else {
  if (currentMillis - previousMillis >= intervalShort) {
    previousMillis = currentMillis;

    // if the LED is off turn it on and vice-versa:
    if (ledState == LOW) {
      ledState = HIGH;
    } else {
      ledState = LOW;
    }

    // set the blue LED with the ledState of the variable and turn off the rest
    digitalWrite(LEDR, ledState);
    digitalWrite(LEDB, HIGH);
    digitalWrite(LEDG, HIGH);
  }
}
  // print value to the Serial Monitor
  Serial.println(proximity);
}
delay(10);
}
Animate SVG with serial data
Looking into the previous example, we need to have the following files :
-
HTML file which contains the header to call the different file. It will also contain the SVG
-
p5.js file which I downloaded from Github
-
sketch.js file which contains the code to read the data coming from the serial port. It will also contain the script I wrote above to change the SVG.
-
p5.serialport.js which I downloaded from Github
-
A css file to apply the style to the SVG
Sketch.js
3 functions are needed to read serial port :
- One for the setup :
function setup() {

  // make an instance of the SerialPort object
  serial = new p5.SerialPort();

  // Get a list the ports available
  // You should have a callback defined to see the results. See gotList, below:
  serial.list();

  // Assuming our Arduino is connected,  open the connection to it
  serial.open(portName);

  // When you get a list of serial ports that are available
  serial.on('list', gotList);

  // When you some data from the serial port
  serial.on('data', gotData);
}
- One to retrieve the serial port :
// Got the list of ports
function gotList(thelist) {
  print("List of Serial Ports:");
  // theList is an array of their names
  for (let i = 0; i < thelist.length; i++) {
    // Display in the console
    print(i + " " + thelist[i]);
  }
}
- And one to get the data from the serial port :
// Called when there is data available from the serial port
function gotData() {
  let currentString = serial.readLine();  // read the incoming data
  trim(currentString);                    // trim off trailing whitespace
  if (!currentString) return;             // if the incoming string is empty, do no more
  console.log(currentString);
  if (!isNaN(currentString)) {  // make sure the string is a number (i.e. NOT Not a Number (NaN))
    SunCXpos = currentString;   // save the currentString to use for the text position in draw()
  }
}
Finally here is a video to show the result :
Final video with my board
I finally made a test with my board made on the Output devices week and the following code. It includes the three functions mentioned above to read serial port, plus two functions to modify the property of the text and the circle :
DrumSVGanimation.js code
let portName = "COM17";
let dataSerial = 100;
let serial;

function setup() {

// make an instance of the SerialPort object
serial = new p5.SerialPort();

// Get a list the ports available
// You should have a callback defined to see the results. See gotList, below:
serial.list();

// Assuming our Arduino is connected,  open the connection to it
serial.open(portName);

// When you get a list of serial ports that are available
serial.on('list', gotList);

// When you some data from the serial port
serial.on('data', gotData);
}

// Got the list of ports
function gotList(thelist) {
print("List of Serial Ports:");
// theList is an array of their names
for (let i = 0; i < thelist.length; i++) {
// Display in the console
print(i + " " + thelist[i]);
}
}

// Called when there is data available from the serial port
function gotData() {
let currentString = serial.readLine();  // read the incoming data
trim(currentString);                    // trim off trailing whitespace
if (!currentString) return;             // if the incoming string is empty, do no more
console.log(currentString);
if (!isNaN(currentString)) {  // make sure the string is a number (i.e. NOT Not a Number (NaN))
dataSerial = currentString;   // save the currentString to use for the text position in draw()
}
}

var text = document.getElementById("value");        // change the text
setInterval(function() {
value.innerHTML=dataSerial;                             // change the text "value" to display dataSerial
value.setAttribute("y", +310 - +dataSerial/3.5);            // change the position y of the text
}, 100);

var circle = document.querySelector("#yellow");
setInterval(function() {
yellow.setAttribute("cy", +305 - +dataSerial/3.5);      // change the position of the circle of id="yellow"
/*yellow.style.fill=testNum(dataSerial);*/              // change the color, calling the function testNum()
}, 10);
The HTML file contains the header which calls the different files needed :
<script language="javascript" type="text/javascript" src="p5.js"></script>
<script language="javascript" type="text/javascript" src="../../lib/p5.serialport.js"></script>
<script language="javascript" type="text/javascript" src="DrumSVGanimation.js"></script>
<link rel="stylesheet" href="DrumSVGanimation.css">
And here is a video with my board. You can download the files needed to do this on top of the page (You’ll need to download the p5.serialcontrol app and add the p5.serialport.js file in your folder):
Bluetooth communication with MIT app builder
Last week I made a test with the MIT app builder :