1. Principles, practices & Project management
This first week has been about learning the Principle and practices in a FabLab
and starting to work on Documenting our work.
To confirm that all students understand and agree with the basic rules of
a Fablab and the Fabcademy, we all had to insert and sign an agreement in our web
page.
Check mine
Documentation
As you might have read in the agreement, the 2nd rule is to keep documenting what we learn and do. To do so, our instructors tought us the magic world of GIT and web creation.
My set-up
I do not have any personal computer and want to do the FabAcademy with my
companion : RaspberryPI
I chose to use the pi headless and use it through my laptop using
VNC Viewer.
How to do the magic ??
From a fresh install of Debian I followed those steps.
- Create a free account at Real VNC
- Connect the wifi or ethernet cable
- Install RealVNC on your computer
- Plug a screen / mouse / keyboard to your Pi
- Menu->Preference->RaspberryPi Configuration->Interface : enable VNC (and SSH it will be useful)
- Click the VNC icon in your task bar and note down the IP address.
- On your computer run RealVNC server and add a machine to connect to using the IP you have noted down before You are all set !
Danger
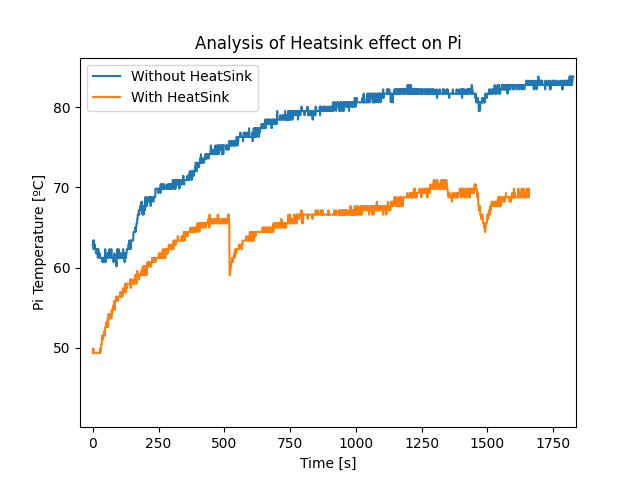
My Pi gets throttled due to temperature increase in the CPU
To assess the issue, our instructor lent me a heatsink and I wanted to evaluate its effect.

So I ran CPU demanding applications with and without heatsink. It is not a state
of the art experimental procedure but … here is the result –> I keep the heatsink 
I use the occasion to try another mkdown feature : the collapsible code block.
Note
#!/usr/bin/env python3

import sys
print(sys.version)
import subprocess
import matplotlib
import matplotlib.pyplot as plt
import matplotlib.animation as animation

# get_throttle interpretation
GET_THROTTLED_CMD = 'vcgencmd get_throttled'
MESSAGES = {
    0: 'Under-voltage!',
    1: 'ARM frequency capped!',
    2: 'Currently throttled!',
    3: 'Soft temperature limit active',
    16: 'Under-voltage has occurred since last reboot.',
    17: 'Throttling has occurred since last reboot.',
    18: 'ARM frequency capped has occurred since last reboot.',
    19: 'Soft temperature limit has occurred'
}

def CPU_temp():
    tFile = open('/sys/class/thermal/thermal_zone0/temp')
    temp = float(tFile.read())
    tempC = temp/1000
    return tempC

def CPU_get_throttle():
    """get cpu temperature using vcgencmd"""
    throttled_output = subprocess.check_output(GET_THROTTLED_CMD, shell=True)
    throttled_output = throttled_output.decode('utf-8')
    throttled_binary = bin(int(throttled_output.split('=')[1], 0))
    return throttled_binary


#Parameter for plotting
x_len_ini = 1000         #Nb of point to displau
y_range = [20,100]  #Temperature range

#Create the figure for plotting
fig = plt.figure()
ax = fig.add_subplot(1,1,1)
xs = list(range(0,x_len_ini))
ys=[0]*x_len_ini
ax.set_ylim(y_range)

#Create a blank line that will be update
line, = ax.plot(xs,ys)

#Definition of list to be saved
my_list=[]

#This will be called at a given frequency
def animate(i,ys,ax):
  #Read the needed data
  y_data = CPU_temp()
  #print("On est dans la fonction")
  #print("%i i",i)
  #print("Y data=",y_data)
  #Add y to the list
  if i<x_len_ini:
    ys[i]=y_data
  else:
    ys.append(y_data)

  #Registering data for file export
  my_list.append(y_data)

  #LImit x and y with the new Y values
  #ys=ys[-x_len:]

  #Update line with the new Y values

  xs = list(range(0,len(ys)))
  #print(xs)
  #print("Len XS : ",len(xs))
  #print("Len YS : ",len(ys))
  #print("ys : ",ys)
  #print("xs : ",xs)

  line.set_ydata(ys)
  line.set_xdata(xs)
  ax.set_xlim([0,len(ys)])

  return line,

#Set up plot to call animate() function periodcally
ani = animation.FuncAnimation(fig, animate, fargs=(ys,ax,), interval=100,blit=True)
plt.show()
print("End of animation")
with open('/home/pi/Documents/00_Projects/01_FabAcademy/repository/adrien88/docs/files/PiTemp/woHS.txt', 'w') as f:
    for item in my_list:
        f.write("%s\n" % item)
Tip
To easily send files to my Pi I use the following command on my Linux for Windows console. This way I do not use pendrive.
laveau@FRM1156:/mnt/d/01_LAVEAU$ scp -r /mnt/d/01_LAVEAU/07_FabAcademy/sc_01_Pi_Throttle_NOK.png pi@172.16.21.210:/home/pi/Documents/00_Projects/01_FabAcademy/repository/adrien88/docs/images/week01
Now let’s empower the Pi to do the Assignment
Update & Upgrade
From the fresh Debian first of all update and upgrade your distribution
sudo apt-get update
sudo apt-get upgrade
SSH key
The steps are well described in our FabLab guide.
Git installation
Git is pretty straigth forward to install.
sudo apt-get install git
Geany 
My code editor is Geany. If you want to enjoy all of Geany possibility you
can add its plug-in by running the following command
sudo apt-get install geany-plugins
Mkdocs
If you decide to work with mkdocs as I did, install it.
sudo apt-get install mkdocs
Note
I tried to work with Jekyll when I realized that mkdocs was too strict on the layout. But changed my mind after testing because in the end the mkdocs templates fits quite well the needs of the Fabacademy.
During the first days of the FabAcademy my repo was not available but
still I needed a base to start. So I “stole” the repository of Diego
(Check his web by the way) 
To do so
sudo apt-get install git
cd /Documents/00_Projects/01_FabAcademy/repository/ #Your personal path
git clone "the direction of diego's directory"
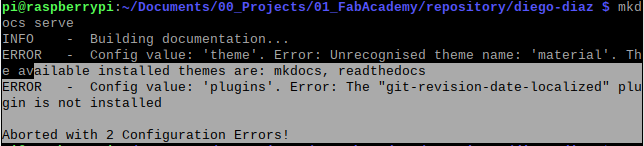
Then I tried to check how it looks to run the repo locally. The following commands will make mkdocs run and convert the md files into html and make it accessible in the web browser.
cd "go to your repo"
mkdocs serve
Failure
Two plug-in are missing in my installation
- material
- git-revision-date-localized
Let’s correct that. mkdocs runs on python so the plugins have to be installed using pip3
pip3 install mkdocs-material
pip3 install mkdocs-git-revision-date-localized-plugin
Pimp your terminal for GIT
Durgin the lecture, the instructors all showed nice terminal images of git
But mine was more like this

So I added the following code to my .bashrc file
parse_git_branch() {
 git branch 2> /dev/null | sed -e '/^[^*]/d' -e 's/* \(.*\)/(\1)/'
}
if [ "$color_prompt" = yes ]; then
 PS1='${debian_chroot:+($debian_chroot)}\[\033[01;32m\]\u@\h\[\033[00m\]:\[\033[01;34m\]\w\[\033[01;31m\] $(parse_git_branch)\[\033[00m\]\$ '
else
 PS1='${debian_chroot:+($debian_chroot)}\u@\h:\w$(parse_git_branch)\$ '
fi
And now it looks like this

Tip
A little extra I discovered to avoid cd to my repo everytime I start a terminal. I added the following command to the same .bashrc file
cd ~/Documents/00_Projects/01_FabAcademy/repository/adrien88
This way it always starts in my git repo. As I use the raspberry for this project only at the moment, it is pretty useful.
Danger
When working with your pi, I STRONGLY recommand to save an image of your SD card on a regular basis (weekly ?) to avoid any bad surprise of corrupted SD card (which happend to me before the FabAcademy).
Web Creation and Edition
As explained in the previous section I work with Mkdocs and Geany. In this section I will explain how I manage and create my website.
Mkdocs is using what is called Markdown to create the web. Markdown is a way of writing a web page with some easy to remember codes that is abstracting the html/CSS part. Mkdocs is fexible and allows a lot of things but also has its limitation, but this is fully covered by the fact that we can easily include html as we would do in a normal html page to combine the easiness of markdown and flexbility of html.
The markdown code is then interpreted by Mkdocs python script when you run the following function at the root of your project :
mkdocs serve
Mkdocs Features
The main features I am using on a daily basis are presented below :
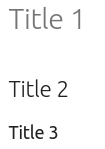
Titles
#Title 1
##Title 2
###Title 3
Pictures
Here I used HTML to allow caption and thumbnails to combine good layout and the user can have access to the full size pictures.
<a href="../../images/week08/BOARD_prog_switch.jpg" target="_blank">
    <figure>
        <img src="../../images/week08/BOARD_prog_switch.jpg" width="400" alt="IDE install">
        <figcaption>Hardware for reprogrammation</figcaption>
    </figure>
</a>
I also use this kind of syntaxe to have side by side pictures.
<div class="row_week06">
  <div class="column_week06">
    <a href="../../images/week07/GA_pressfit_conventional.jpg" target="_blank">
        <figure>
            <img src="../../images/week07/GA_pressfit_conventional.jpg" height="250" alt="conventional cut">
            <figcaption>Conventional cut</figcaption>
        </figure>
    </a>
  </div>
  <div class="column_week06">
    <a href="../../images/week07/GA_pressfit_climb.jpg" target="_blank">
        <figure>
            <img src="../../images/week07/GA_pressfit_climb.jpg" height="250" alt="conventional cut">
            <figcaption>Mounted conventional press-fit</figcaption>
        </figure>
    </a>
  </div>
</div>
Admonition
Basic
This is a function to add block of info to give extra information to the reader.
!!!tip
    This is a tip
Tip
This is a tip
A lot of types are availale, like the warning.
!!!warning
    To raise the attention to something
Warning
To raise the attention to something
Extra features
Admonition can be tuned in a lot of different ways and can be combined with all mkdocs features. For example the code below will create a foldable admonition with a sample of highlighted code written in Python.
??? bug
    Here is my python code
    ~~~ python linenums="1" hl_lines="3"
    import tensorflow

    for (i in range(10):
        do print i

    ~~~
Bug
Here is my python code
1 2 3 4 | |
Links
Base of the web
[Text to show](url)
Tables
One can make tables from really simple to really complicated with pictures.

| Header 1 | Header 2|
|----------|---------|
| Item 1   | Value 1 |
| Item 2   | Value 2 |
The code above gives the table below.
| Header 1 | Header 2 |
|---|---|
| Item 1 | Value 1 |
| Item 2 | Value 2 |
Tabs
Last but not least, the tab feature is really usefull to avoid lengthy pages and give a brief overview to the reader with organized information.
I use it to explain processes or variants of the same procedure or code.
=== "Sketch your part"
    Here I explain how to sketch

=== "Design your part in 2D"
    Here we add constraints

=== "Extrude your part"
    !!! info
        We can even add admonition here

=== "Slice it"
    Some info about Cura

=== "Print it"
    Final result
The code above produces the tabs below. Try to click and switch between them to see how they work.
Here I explain how to sketch
Here we add constraints
Info
We can even add admonition here
Some info about Cura
Final result
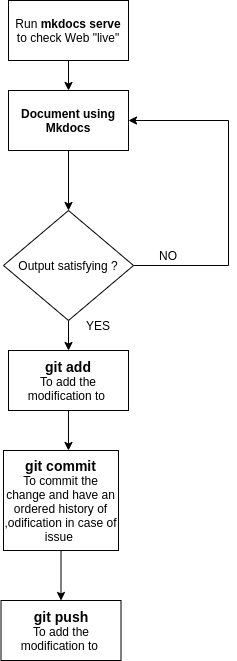
Work, Add, Commit and Push
My worflow to document is the following one. I work in parallel with Geany and mkdocs serve to check the ouput of the script in my browser.
Once I am happy with the result I ‘git add’ the changes to the staging area and ‘git commit’ them.
Commiting regularly and with a purpose is important to be able to come back to a previous version of your work in case of an error.
To save and publish the results on my web page I finally use the ‘git push’ command.
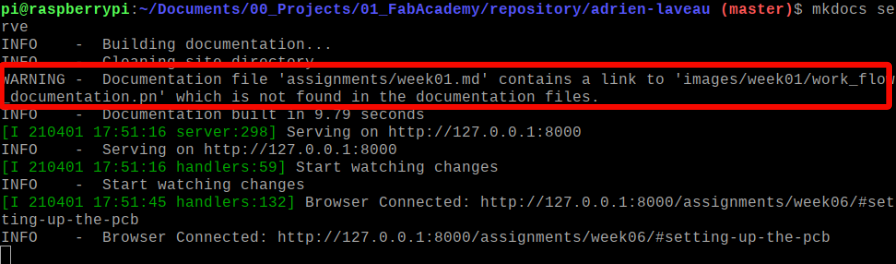
Tip
One cool thing about mkdocs is that running the ‘mkdocs serve’ commands
allows you to see the broken links in the terminal.
As I work with the raspberry, pushing regularly is a way to save my work in case the SD card gets corrupted (it happened …).
Go online
Once the code is written and pushed to Gitlab through GIT. The server will follow orders we are giving him to get a nice and clean web.
For this process (the job) to happen, one has to follow some rules in the repo.
The repo must contains the following files
-
mkdocs.yml This file contains the description of the web and some specific add-in the user wants to have available in his mkdocs scripting. For example I modified the base color of the web using the following lines of code
1
2
3
4
5
6
theme: name: material palette: # try other colors https://squidfunk.github.io/mkdocs-material/getting-started/#primary-colors primary: teal #deep accent: green #indigo -
.gitlab-cy.yml This file contains the orders sent to the server that will be executed everytime a push is done to the repo. The command that can be found in this file are :
-
Installing python requirements (the requirement file can be edited)
time apt update && apt-get install -y git
time pip install -r requirements.txt -
test
This part is about building a first test of the wbe to be sure there is no coding error and if it goes well, the site is built wit hthe next section. -
pages
This is the part where the site is concretly built with the following function> time mkdocs build --site-dir publicIn my case, I modified a little bit this part to be able to run a python script to gather the commit information and provide it on the web as a graph. For the moment it does not work due to access authorization issue.
-
-
README.MD This file is not compulsory but is nice for the person that lands on the repo. In this file you can explain what your project is about and where to find the information or how to duplicate the project.
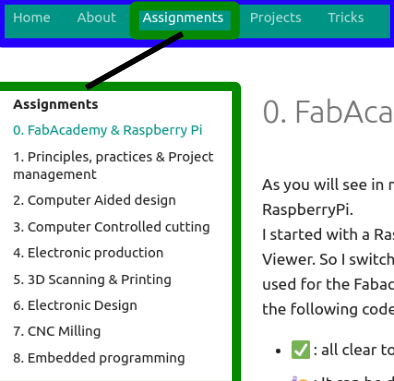
The folder structure and page naming is essential because it will define how the navigation tabs will be displayed and link the pages.
The first line of any pages should start with the following information :
- ”#” : to indicate mkdocs it will be the name of our page
- “1.” : the number of the page to order them properly
- “Title” : the tile of the page
Something like this :
# 1. Principles, practices & Project management
The folder structure presented below will create the structure of the
navigation panel.
Each folder will be presented in the upper part as a main menu. Then
a hierarchy of title will be created for each sub-folder page present in the
main folders.
mkdocs.yml
.gitlab-ci.yml
/docs/ ----
            |/assignment/ ----
                                | week01.md
                                | week02.md
                                | ...
            |/files/----
                        |/week01/----
                                     | file1.txt
                                     | file2.txt
                                     | ...
                        |/week02/----
                                     | file1.png
                                     | file.png
                                     | ...
            |/images/----
                        |/week01/----
                                     | image1.png
                                     | image2.png
                                     | ...
                        |/week02/----
                                     | image1.png
                                     | image2.png
                                     | ...
Special pages in my repo
To learn and share with my teams mates, I have included several extra pages in my web that are described below :
- How is the academy going with Raspberry Pi
- Tricks : a set of pages with info I found during the academy that can help the other student and that I use to remember some cmplicated actions.
Useful links
Project management
I am using GitLab power to manage my project and some of the features offered by the platform allows to organize my work.
Milestone
I am using the milestone function to organize my weeks and see how issues/ task are related
Issues
From now on every wednesday I will set up all the tasks to be done for the week under one milestone not to forget any assignement.
Final project
What it will do and who will use it
My final project is about monitoring energy consumption in a house directly from the fusebox using ampermetric clamps. I want the system to be easy to install by anyone who knows a little bit about how fusebox works. It could also be installed by a professional. Then the system should be as much plug&play as possible. The output for the user is to have insight about his electricity consumption via a display that still has to be chosen.
Biblography
I did a bit of research of pre-existing Final project.
- In Trivandrum, India, Amith Gnair created an energy measurment system linked to his phone. Have a look
- The Green Fablab in Barcelona worked with OpenEnergyMonitor info for their Aquaponics system Have a look
Week Assessment
During this week, have I :
- Read the Fab Charter ? Yes, I learnt the basic philosophiy behind the word “Fablab”
- Sketched my final project idea ? Yes, have a look at the final project page
- Described what it will do and who will use it ? Yes, right above.
- Started documenting my work ? How do you like my web ? Any comment is welcome