1. Principles and Practices & Project management

This week we learned the basics about Fab Academy, being this website our pillar to document the process. That's why we need to learn about Visual Studio Code and GitHub, alongside with HTML, CSS and JavaScript.

Introducing Visual Studio Code (VS Code)

Visual Studio Code is a lightweight and powerful code editor used for web development, programming, and version control. Here we will be writing and editing all our codes.

Introducing Git and GitHub

Git is a version control system that helps us track all changes in our code and collaborate with others. It works locally on your computer. While GitHub is an online platform that hosts Git repositories, like a cloud version. Both will be helping with our website. But how they work together? Well, the typical workflow would be:

  1. You write the code on your computer
  2. Git tracks your changes
  3. You commit your changes
  4. GitHub stores and shares those commits

Let's Start

Step 1: Cloning the Fab Academy repository

  1. First, we created a specific folder on our computer where the Fab Academy repository would be stored. This folder would contain all the files related to our documentation website.
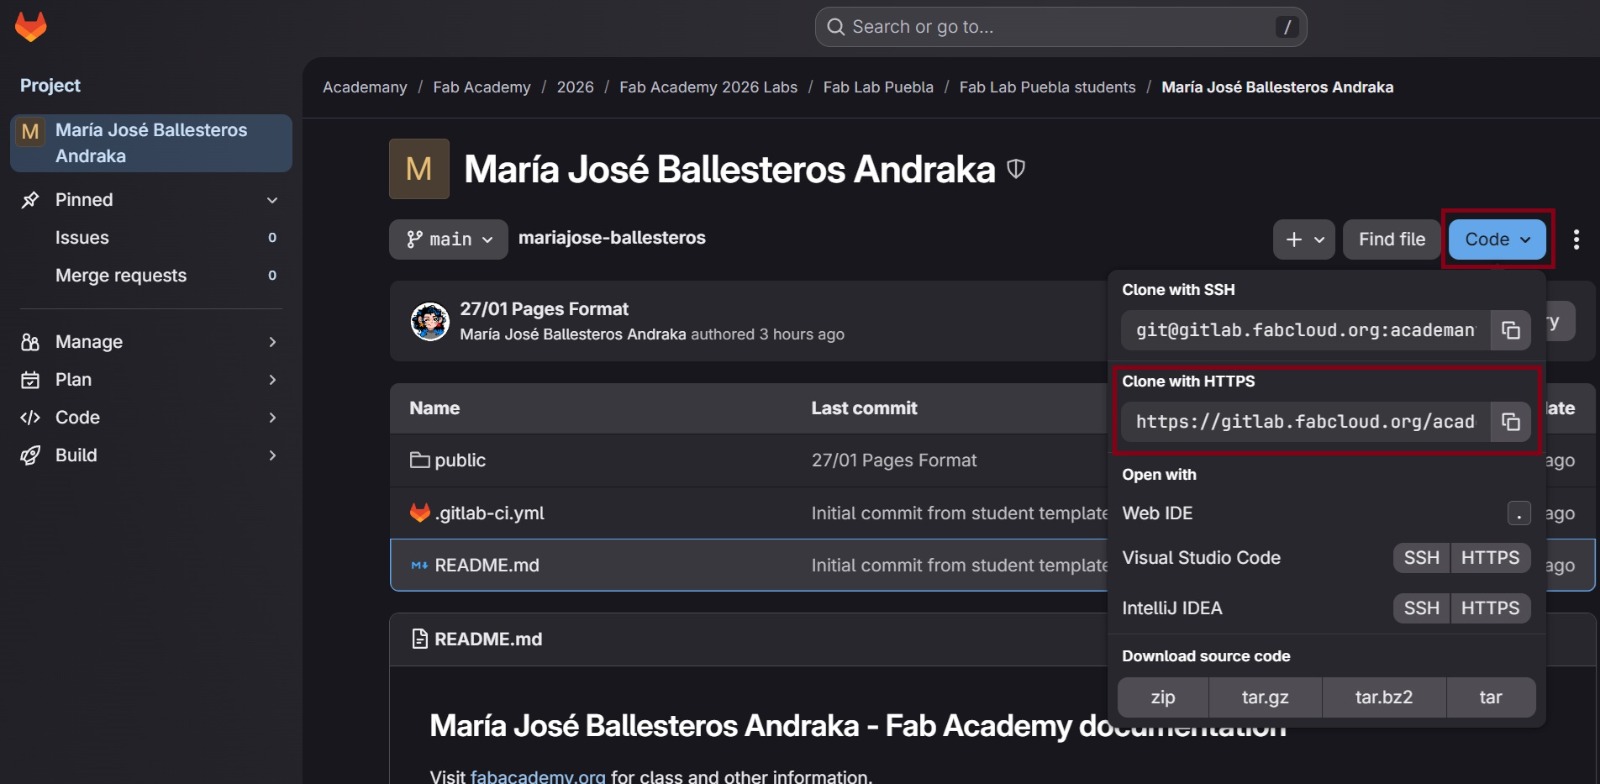
  2. Then, we accessed our Fab Academy GitLab profile and opened our personal repository. By clicking the “Code” button, several options appeared. We selected “Clone with HTTPS” and copied the provided link.
  3. Next, we opened Visual Studio Code and launched the integrated terminal. In the terminal, we typed:
    git clone [repository-link]
          
    and pasted the HTTPS link copied from GitLab.
  4. After pressing Enter, Git prompted us to enter our Fab Academy GitLab credentials (username and password). Once authenticated, the repository was successfully downloaded to our computer.
  5. When the cloning process finished, we navigated to the correct directory by typing:
    cd your-username/public
          
  6. At this point, we were ready to start editing the files and working on our documentation website.

Step 2: First HTML exercise

  1. After cloning the repository, we completed a basic HTML exercise in class to understand the structure of a webpage.
  2. The exercise focused only on HTML, without using any CSS, in order to understand how content is organized.
  3. This is how the page looked in the browser and how the code looks if we inspect it:

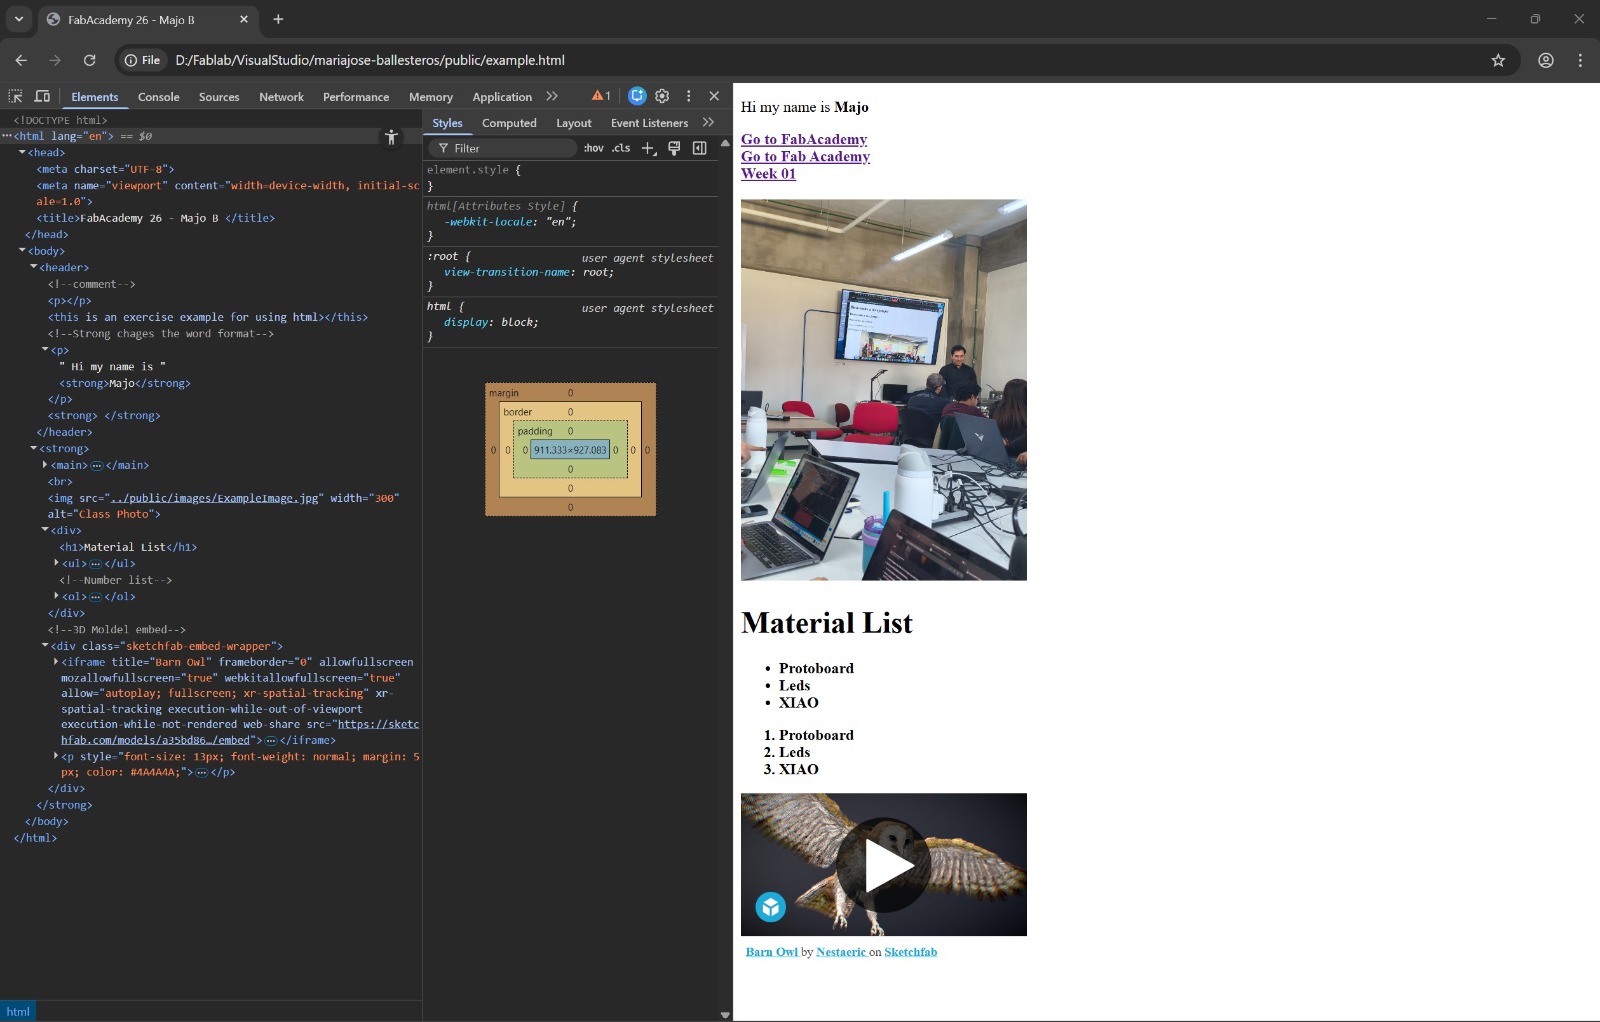
Since no CSS was applied, the webpage displayed only the default browser styles, showing the content without visual customization.

Basic Git Commands

Some of the basic Git commands used during this process are:

Glossary: Git, HTML, CSS & Terminal Basics

Git & GitHub Commands

  • git clone <URL>
    Clones a repository from GitHub to your local computer.
  • git add .
    Adds all modified files to the staging area.
    The dot (.) means “add everything”.
    You can also add a specific folder or file: git add /folder-name
  • File size limit
    The maximum size allowed for a single push is approximately 10 MB.
  • git commit -m "MESSAGE"
    Saves the changes and describes what was modified.
    The message explains what commit or change you are making.
  • git push
    Uploads all committed changes to the online repository.
    This activates the deploy process, which may be pending or completed.
  • git status
    Shows the current state of the repository.
    • Up to date: local and cloud versions match
    • Ahead: local changes not yet pushed
    • Behind: repository has changes not yet pulled
  • git pull
    Brings changes from the repository to your local computer.
  • git reset
    Removes commits, usually used when something heavy or broken prevents pushing.
    • Soft reset: removes commits but keeps files
    • Hard reset: removes commits and files to match the repository
    Example: git reset --soft HEAD~1
    Double dash (--) ensures it is a soft reset, and you can choose how many commits to go back.

Terminal Basics

  • cd
    Navigates through folders.
  • Case sensitivity
    The terminal respects uppercase and lowercase letters.
  • code .
    Opens the current folder in Visual Studio Code.
  • Saving files
    Always save changes using Ctrl + S.
  • Checking file size
    Right click on folders to check their weight before pushing.

HTML Basics

  • HTML is not a programming language; it is a markup language.
  • Most HTML elements have an opening and closing tag: <tag></tag>
  • html:5
    Generates the basic HTML structure.
  • index.html
    Main file of the website.
  • <head>
    Contains metadata and the page title (e.g. Fab Academy 2026).
  • <body>
    Contains all visible content on the page.
  • Common HTML elements:
    • <p> paragraph
    • <a href=""> hyperlink
    • <section> content grouping
    • <span> inline element (often used for buttons or styling)
    • <!-- comment --> HTML comments

CSS & JavaScript

  • CSS (Cascading Style Sheets)
    Controls the visual style of the website.
  • JavaScript
    Programming language that runs in the browser and controls actions and interactivity.

Design and Documentation Process

For the design process of this documentation, I first did a quick sketch to visualize what I wanted on my website, then wrote all the content in a text document. Once the ideas were clear, I pasted the text into the HTML file and started giving it structure and format using headings, paragraphs, and lists.

During this stage, I frequently reviewed this page, were I searched for Html and Css tutorials. If something didn't work I asked both chatgpt and gemini to help me find the error and asked how could I solve it. This helped me fixing syntax errors (which i did a lot) improving the overall structure and readability of the code.

Because I didn't use a predetermined template, building this website was exahusting, I commited a lot of errors (pls don't run a css file, it will send you to a localhost:8080 page). But they helped me to undertand better all the commands and variables, specially in css where I played with color and margin parameters.

For this process I also needed to compress my images to do it I used XnConverted. For my pfp drawing I used Go Paint and vectorized it in Affinity.