APPLICATIONS & IMPLICATIONS, PROJECT DEVELOPMENT
Applications & Implications
Assignment
Plan a final project masterpiece that integrates the range of units covered, answering:
- What will it do?
- Who's done what beforehand?
- What sources will you use?
- What will you design?
- What materials and components will be used?
- Where will it come from?
- How much will they cost?
- What parts and systems will be made?
- What processes will be used?
- What questions need to be answered?
- How will it be evaluated?
Your project should incorporate:
- 2D and 3D design
- Additive and subtractive fabrication processes
- Electronics design and production
- Embedded microcontroller design, interfacing, and programming
- System integration and packaging
Where possible, you should make rather than buy the parts of your project
Project Management
Assignment
- Prepare drafts of your final project summary slide
- (presentation.png, 1920x1080) and video clip
- (presentation.mp4, 1080p HTML5, < ~minute, < ~25 MB)
- Put them in your root directory
- Check that they are linked in the final presentation schedule
What will it do?
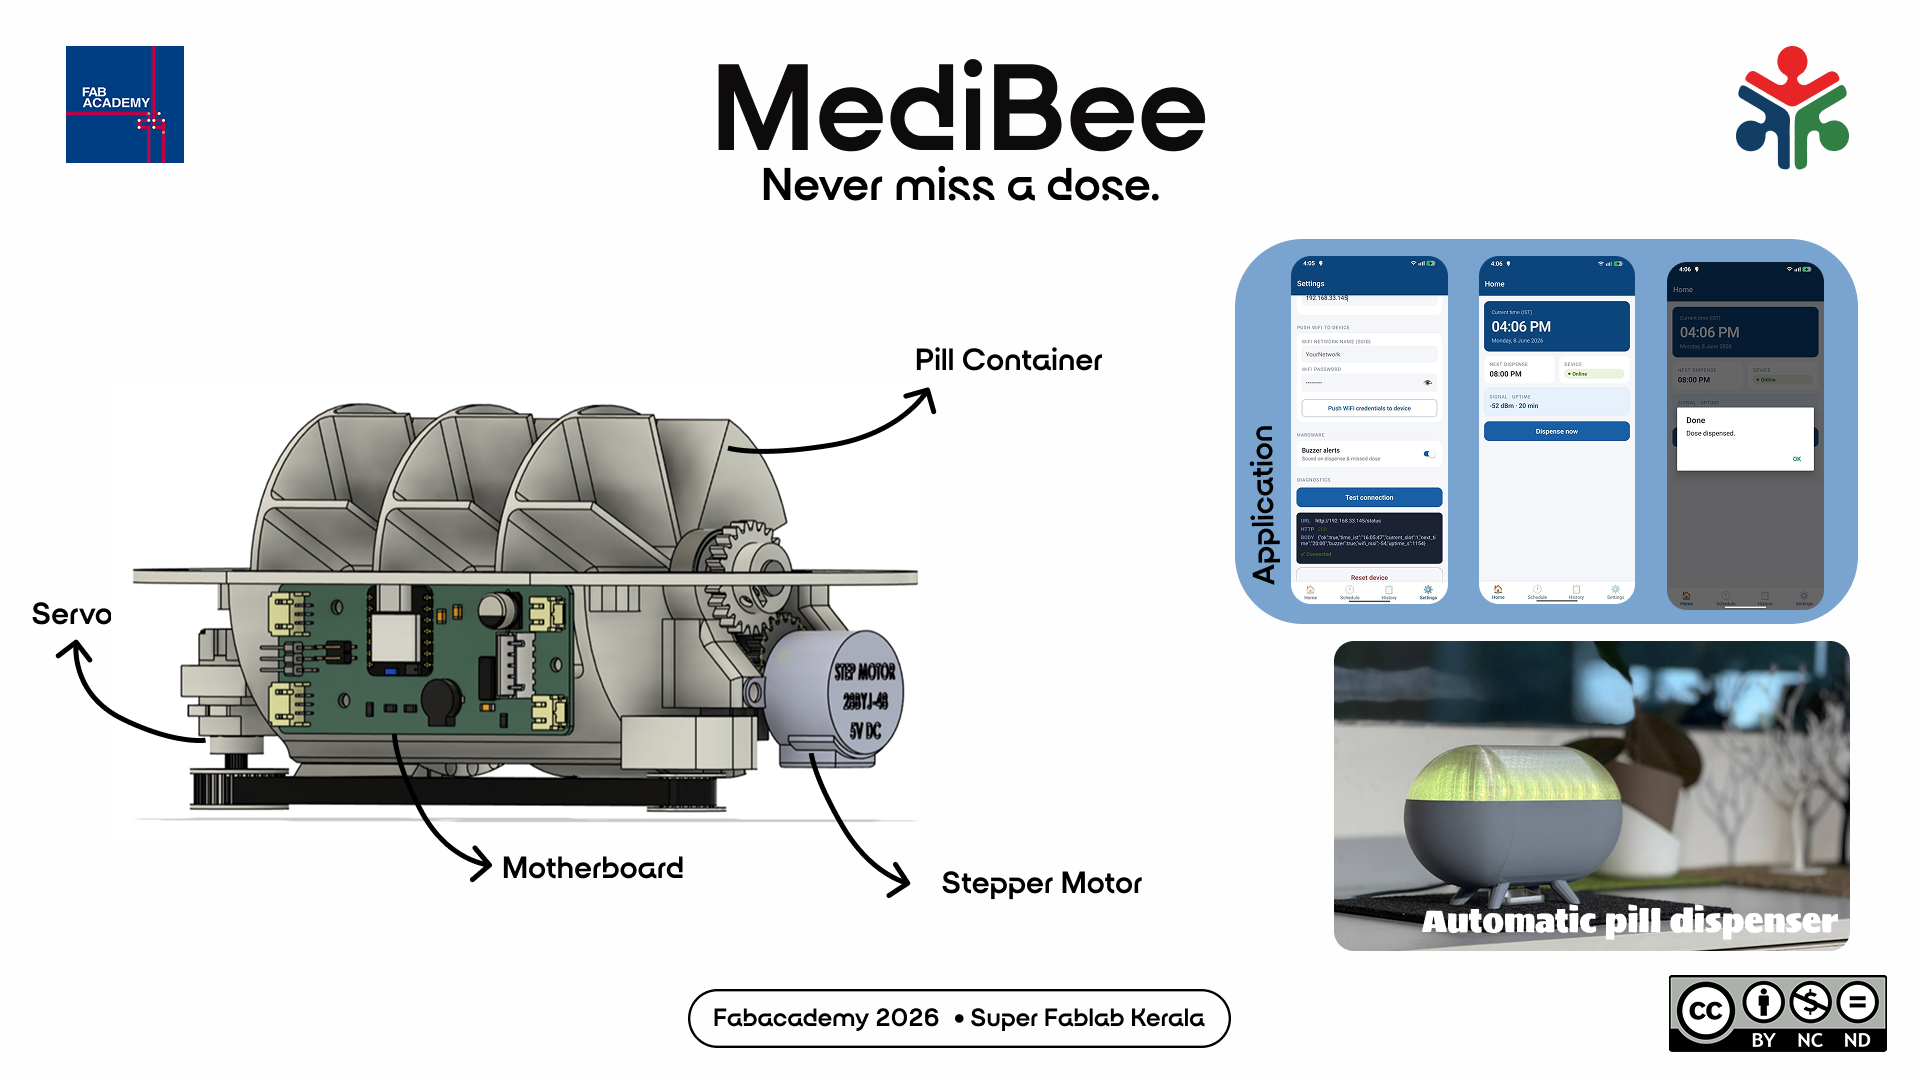
Pilly is a triple-disc automatic pill dispenser that dispenses medication at scheduled times. Three rotating discs, each driven by a stepper motor, hold pills in individual compartments. An ESP32 microcontroller reads and triggers the correct disc to rotate when a dose is due. An OLED display shows the current time, next dose schedule, and confirmation when a pill has been dispensed. The device runs on a LiPo battery and is designed for daily autonomous operation without user intervention.
Who has done what beforehand?
I searched online and I could find a number of products that is similar to the product I had in mind.
What sources will I use?
- Fab Academy archives — past final project pages for dispenser mechanisms and system-integration patterns.
- Datasheets — XIAO ESP32-C6 (Seeed wiki), 28BYJ-48/ULN2003, SG90, A1324, AO3400, SSD1306, WS2812B.
- Espressif documentation — ESP-IDF/Arduino-ESP32 references for LEDC, NVS, WiFi events, mDNS, and SNTP.
- Library documentation — Adafruit NeoPixel, Adafruit SSD1306/GFX, ESPAsyncWebServer, ArduinoJson.
- React Native documentation — networking (fetch), navigation, and Android build tooling.
- My own weekly assignments — electronics design/production, input devices (Hall sensor work on the ATtiny1624 board), output devices, networking, and interface programming weeks all feed directly into this project.
What Will You Design?
- 3D Parts: Three pill disc trays with seven compartments each, enclosure body, lid, motor mounts, and disc retaining rings, designed in Fusion 360 or FreeCAD.
- 2D Parts: Laser-cut acrylic panels for the side walls and dispensing chute.
- PCB: Custom-designed KiCad board featuring an ESP32, DS3231 RTC, ULN2003 motor driver headers, OLED connector, LiPo charging circuit, and power switch.
- Firmware: MicroPython-based scheduling logic with deep sleep between doses, I²C OLED display driver, and stepper motor control sequences.
- Enclosure: A hybrid enclosure combining a 3D-printed shell with laser-cut acrylic panels for a clean, compact, and professional finish.
What materials and components will be used?
Electronics
| Component | Quantity | Purpose |
|---|---|---|
| ESP32C6 | 1 | Main microcontroller |
| 28BYJ-48 stepper motor | 1 | Disc rotation |
| Servo Motor | 1 | Slot door |
| ULN2003 driver board | 1 | Motor driver |
| 0.96" I²C OLED (SSD1306) | 1 | Status display |
| LiPo battery 3.7V 2000mAh | 1 | Power |
| TP4056 charging module | 1 | LiPo charging |
| Tactile push button | 2 | Manual override / menu |
| PCB (custom KiCad) | 1 | All connections |
Fabrication Materials
| Material | Process | Use |
|---|---|---|
| PLA filament (white) | FDM 3D printing | Disc trays, enclosure body |
| Acrylic sheet 3mm (clear) | Laser cutting | Side panels, chute |
| FR4 PCB blank | PCB milling (Roland) | Custom circuit board |
| M3 bolts and nuts | Assembly | Structural fastening |
Where will it come from & How much will they cost?
What Parts and Systems Will Be Made?
- Custom PCB: Milled on the Roland SRM-20 at the Fab Lab.
- Three Pill Disc Trays: Manufactured using FDM 3D printing.
- Enclosure Body and Lid: Manufactured using FDM 3D printing.
- Laser-Cut Components: Side panels and dispensing chute.
- MicroPython Firmware: Written from scratch to control scheduling, dispensing, and power management.
- Wiring Harness: Connects the stepper motors, OLED display, RTC module, and power system.
What processes will be used?
- 2D design: Inkscape / Adobe Illustrator for laser cut panels
- 3D design: Fusion 360 / FreeCAD for discs and enclosure
- Additive fabrication: FDM 3D printing (Bamboo)
- Subtractive fabrication: Laser cutting (acrylic panels), PCB milling (Roland SRM-20)
- Electronics design: KiCad schematic and PCB layout
- Electronics production: PCB milling, soldering, testing
- Embedded programming: C++ on ESP32 via Arduino IDE
- System integration: Mechanical assembly, wiring, firmware calibration
What questions need to be answered?
- Will it always drop exactly one pill? Pills come in different shapes and sizes. I need to test the gate and solenoid together — run it 100 times and count how often it drops zero pills, one pill, or two.
- Will the disc stay lined up? Right now a magnet and Hall sensor tell the disc where it is. But small errors could add up over time. Do I need the disc to "find home" before every dispense, or is once at startup enough?
- Will everything run without crashing? Stepper, servo, solenoid, and LED ring all pull power at once. If they draw too much, the board could reset mid-dispense. I may need to run them one at a time instead of together.
- What if WiFi goes down for days? The clock syncs over the internet. Without it, can the device still keep time well enough to dispense on schedule? Plan: save the last known time and count onward from there.
- Can my grandmother use it? Refilling the disc and understanding the lights and beeps should need zero technical knowledge. Only real users can answer this — I'll watch someone try it without instructions.
- What if power cuts mid-dispense? The device must not give a second dose when it restarts. Fix: write "dispense in progress" to memory before moving, and check that note on boot.
How Will It Be Evaluated?
- Successfully dispenses the correct pill at the scheduled time (3 doses per day for 7 days).
- OLED display correctly shows the current time, next scheduled dose, and dispensing confirmation message.
- Custom PCB functions without errors, with all components properly soldered and operational.
- Enclosure is fully assembled using only the fabricated parts, with no off-the-shelf housing.
- Firmware correctly handles missed doses and edge cases, including booting after deep sleep and low battery conditions.
- Device operates independently for at least 3 days on a single battery charge.
- All design files, including KiCad project, STL files, and firmware, are documented and published on the Fab Academy website.
- Individual mastery is demonstrated through independently designing the PCB, writing the firmware, and assembling the complete device.
How it integrates Fab Academy units
| Unit | Application in Spindo |
|---|---|
| 2D Design | Laser-cut acrylic panels and chute |
| 3D Design & Printing | Disc trays and enclosure body |
| Electronics Design | Custom KiCad PCB |
| Electronics Production | PCB milling and soldering |
| Embedded Programming | C++ firmware on ESP32 |
| Mechanical Design | Disc mechanism, motor mounts |
| System Integration | Full assembly and packaging |
| Input Devices | Buttons for manual override |
| Output Devices | OLED display, stepper motors |
Presentation Slide
For creating the presentation slide, I used the software Figma.
I used this image as background. Our instructor had provided us with the logos of Fabacademy and Fablab Kerala. I put those in the poster.
Then I added some details about the project. The first version looked like this.

I saved the image as presentation.png in the root folder named 'public'.
Loading presets
I added the Fabacademy preset to the Handbrake software.

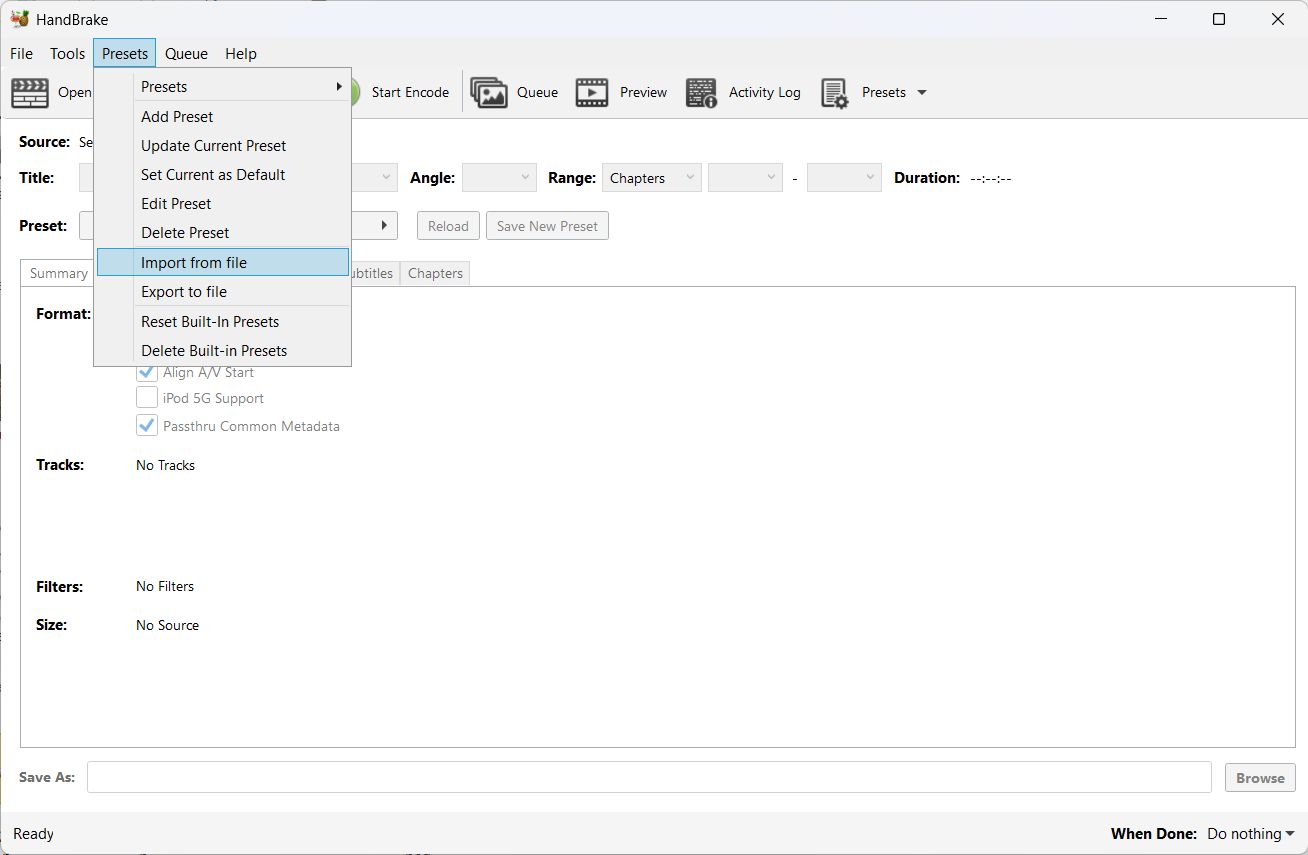
Choose the file and click ok.
You can see the Fabacademy preset under the custom presets tab.
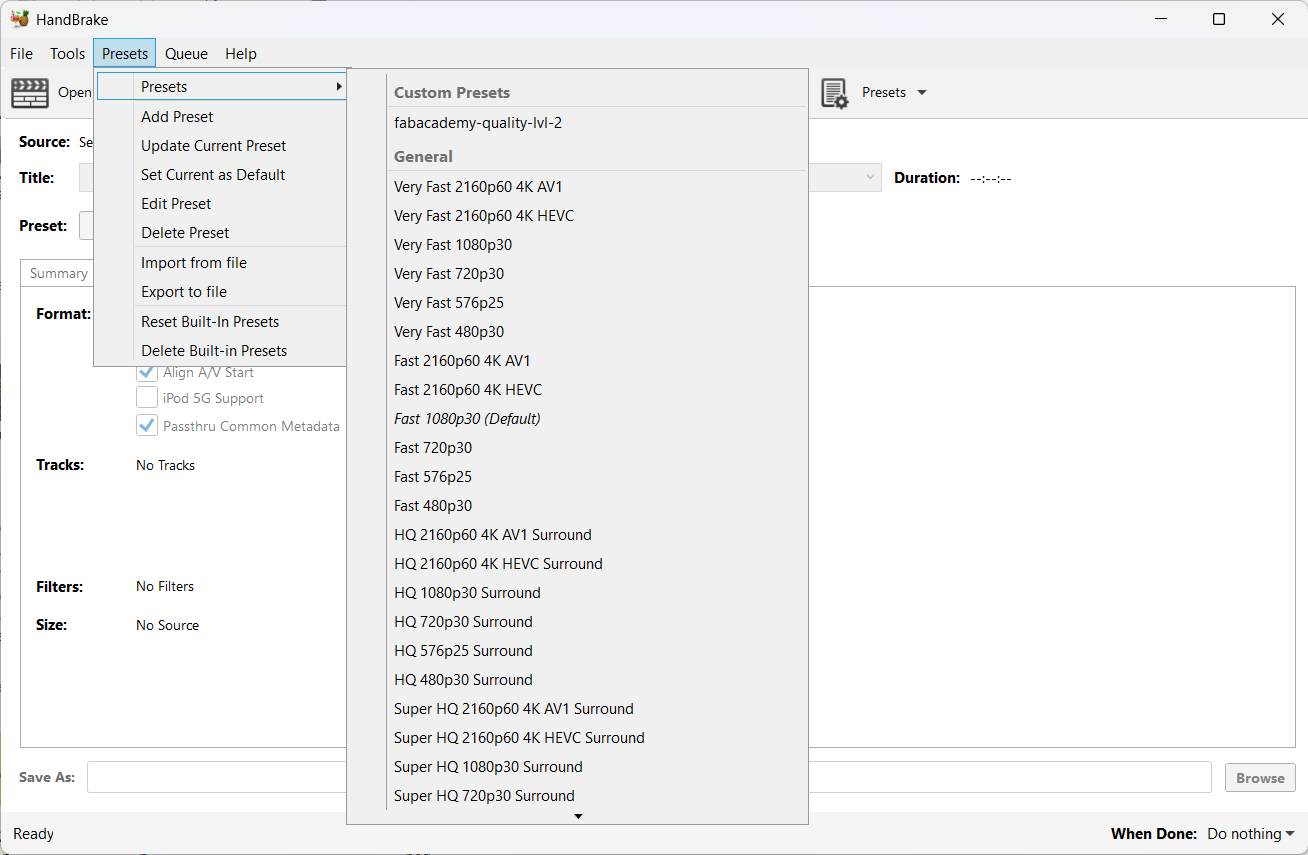
Choose it and click 'ok'.
Presentation Slide