Networking and Communications
Here is the link to our group assignment:
Week 11 Group Assignment — Networking and Communications.
This week covers wired and wireless links between nodes: buses, addresses, and sending messages between projects. Below I reflect on the group exercise and document three individual experiments on the XIAO ESP32-C3 — I2C colour sensing, UART audio playback, and ESP-NOW between two Week 8 boards.
Group Assignment — Send a Message Between Two Projects
The group task was to send a message between two projects and document the setup on the group page. In our lab we paired two microcontroller boards (different students’ Week 8 PCBs) over a wireless link so that an action on one board (button press) triggered a response on the other (LEDs). We compared ESP-NOW (connectionless, low latency, no router) with a simple UART wire between TX/RX pins for a two-node bus.
What I learned from the group work: every node needs a clear identity — Wi-Fi MAC address for ESP-NOW peers, or a fixed UART baud rate and shared ground for serial. Messages should be small structs with a known size so both sides agree on the packet format. ESP-NOW works well for peer-to-peer “remote button → remote LED” demos; wired UART is easier to debug with Serial Monitor but needs a physical link. Full wiring photos and our group test log are on the
group assignment page.
Individual Assignment — Three Communication Nodes
For the individual assignment I designed, built, and connected nodes with network or bus addresses and local input/output devices. All three use the same MCU — SEEED XIAO ESP32-C3 — but different physical layers: I2C (TCS34725), UART (DFPlayer Mini), and ESP-NOW (wireless between two Week 8 boards). These experiments also feed into my final project architecture (colour sensors + audio player on one board).
Part 1 — TCS34725 Colour Sensor (I2C Bus)
I connected a TCS34725 colour light-to-digital converter to the XIAO over the I2C bus. The sensor has a fixed 7-bit address (0x29) and returns raw red, green, blue, and clear-channel values from which lux and colour temperature can be calculated.
Wiring (XIAO ESP32-C3):
- SDA → sensor SDA (D4, default I2C data)
- SCL → sensor SCL (D5, default I2C clock)
- 3.3 V and GND to sensor VCC and GND
- Optional INT pin on the breakout — not used in this basic read loop
I used the Adafruit TCS34725 library (Wire.h + Adafruit_TCS34725.h). In setup() I call Wire.begin() and tcs.begin(); in loop() I read raw channels, then print lux and approximate colour temperature to Serial at 115200 baud every 500 ms. This confirms the bus address and that the sensor responds as an I2C slave.
Source file:
tcs34725_i2c.ino
(install Adafruit TCS34725 from the Arduino Library Manager).
When it's working, I could read the color data from the sensor and print it to the Serial Monitor.
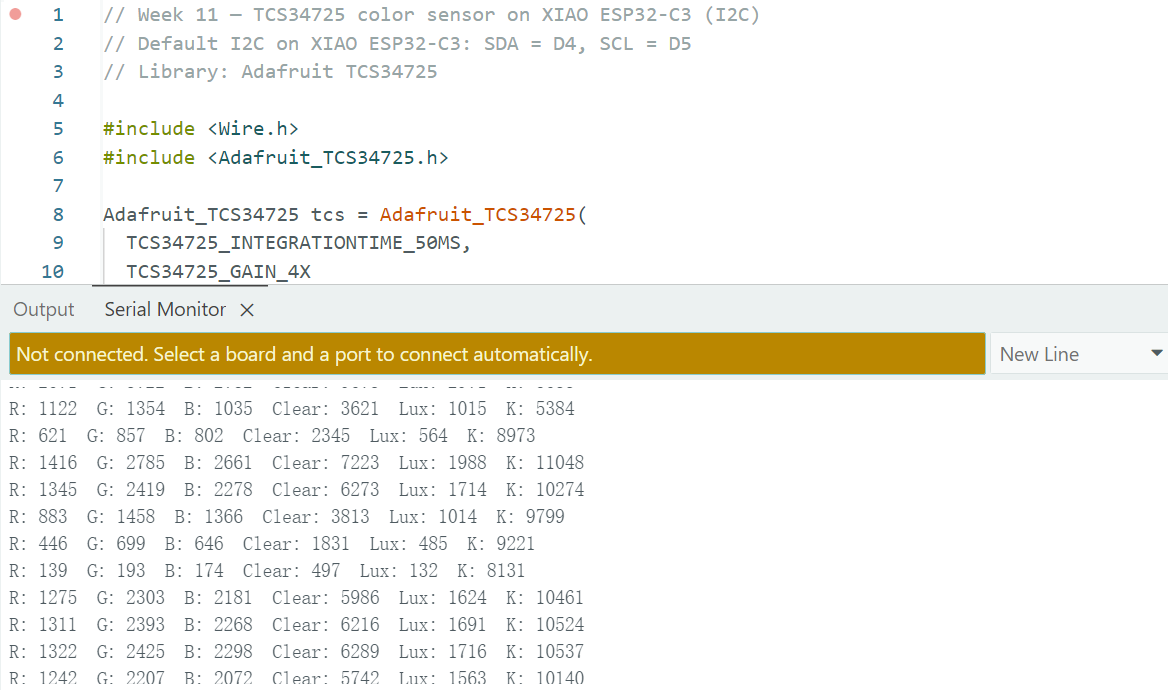
The meaning of the color data is as follows:
- R: Red
- G: Green
- B: Blue
- C: Clear
- Lux: Lux value
- K: Color temperature
Here is the video of the I2C bus:
Part 2 — DFPlayer Mini (UART Serial Bus)
I connected a DFPlayer Mini MP3 module to the XIAO over UART (asynchronous serial). The DFPlayer acts as a second node on the bus: the MCU sends commands at 9600 baud and the module reads MP3 files from a micro-SD card (e.g. 0001.mp3) and drives a small speaker.
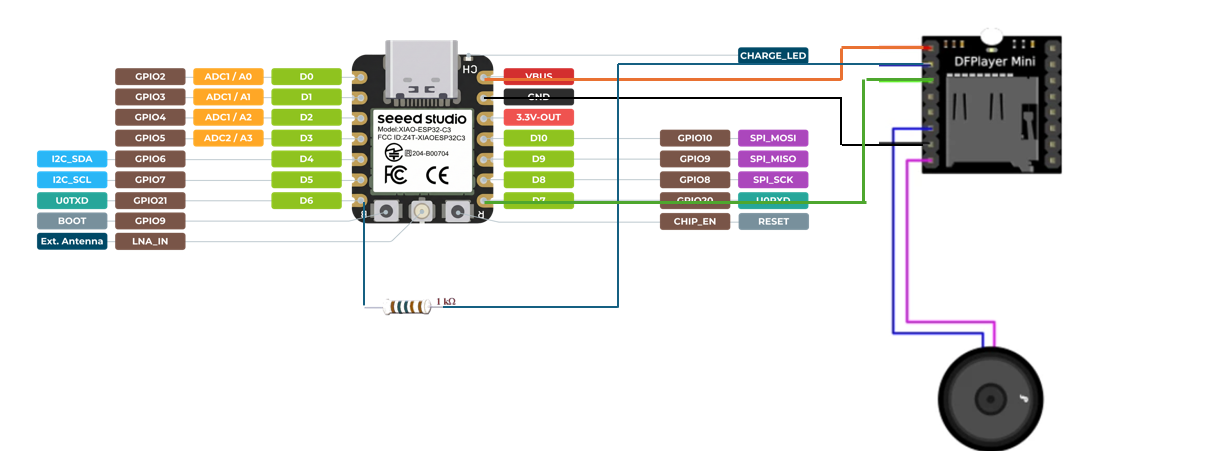
Wiring (XIAO ESP32-C3):
- D6 (TX) → DFPlayer RX (MCU transmits commands)
- D7 (RX) ← DFPlayer TX (MCU receives status; cross-connect TX/RX)
- 5 V and GND to DFPlayer (module and speaker need adequate 5 V current)
- Speaker on SPK_1 / SPK_2; SD card formatted with numbered tracks
Here is the wiring of the DFPlayer Mini:
I used HardwareSerial(1) on pins D7/D6 and the DFRobotDFPlayerMini library. After dfPlayer.begin() I set volume and call play(1). The loop checks for DFPlayerPlayFinished so the track can restart or advance. UART is a simple two-node bus: one master (XIAO), one addressed module (DFPlayer command set).
Source file:
dfplayer_uart.ino
(install DFRobotDFPlayerMini from the Library Manager).
When it's working, I could play the MP3 file and the speaker will play the audio.
The compling in Arduino IDE is a litte bit slow and it took about 20 seconds.
Another thing I noticed is that the DFPlayer Mini is a little bit noisy and the audio is not very clear. I think it's because the speaker is not very powerful.
Between the DFPlayer mini and XIAO ESP32-C3, there should be a 1K resistor between DFPlayer RX and XIAO TX.
Part 3 — ESP-NOW Between Two Week 8 Boards
I milled and assembled a second board identical to my Week 8 PCB (XIAO ESP32-C3, button on D0, LEDs on D1 and D2). Board 1 is the sender: debounced button press increments a counter and sends a small packet over ESP-NOW. Board 2 is the receiver: on each packet it lights the LEDs using the same three-step pattern as Week 8 / Week 9 — press 1 → LED1 for 0.5 s, press 2 → LED2, press 3 → both LEDs, then the cycle repeats.
Setup:
- Flash the receiver sketch on Board 2; open Serial Monitor and copy its MAC address.
- Paste that MAC into
receiverMac[]on Board 1’s sender sketch. - Flash the sender on Board 1. Both boards use
WiFi.mode(WIFI_STA)— no router required. - Press the button on Board 1; Board 2’s LEDs respond wirelessly.
The message is a struct { uint8_t pressCount; } — both sides must use the same layout. ESP-NOW identifies peers by MAC address (6-byte hardware address), which satisfies the assignment’s “network address” requirement for wireless nodes.
Source files:
espnow_sender.ino (Board 1),
espnow_receiver.ino (Board 2).
Here is the video of the ESP-NOW between two Week 8 boards:
At first it always shows "Send status: ❌ FAIL", but then I added the antenna to the sender board, it shows "Send status: ✅ OK". The antenna is important for the ESP-NOW communication, especially for the sender board.
Code
TCS34725 — I2C read loop
// Week 11 — TCS34725 color sensor on XIAO ESP32-C3 (I2C)
            // Default I2C on XIAO ESP32-C3: SDA = D4, SCL = D5
            // Library: Adafruit TCS34725

            #include
            #include

            Adafruit_TCS34725 tcs = Adafruit_TCS34725(
              TCS34725_INTEGRATIONTIME_50MS,
              TCS34725_GAIN_4X
            );

            void setup() {
              Serial.begin(115200);
              Wire.begin();  // SDA/SCL per board default pins

              if (!tcs.begin()) {
                Serial.println(F("TCS34725 not found — check I2C wiring"));
                while (1) delay(1000);
              }
              Serial.println(F("TCS34725 ready"));
            }

            void loop() {
              uint16_t r, g, b, c;
              tcs.getRawData(&r, &g, &b, &c);

              uint16_t lux = tcs.calculateLux(r, g, b);
              uint16_t colorTemp = tcs.calculateColorTemperature(r, g, b);

              Serial.print(F("R: ")); Serial.print(r);
              Serial.print(F("  G: ")); Serial.print(g);
              Serial.print(F("  B: ")); Serial.print(b);
              Serial.print(F("  Clear: ")); Serial.print(c);
              Serial.print(F("  Lux: ")); Serial.print(lux);
              Serial.print(F("  K: ")); Serial.println(colorTemp);

              delay(500);
            }
DFPlayer Mini — UART playback
// Week 11 — DFPlayer Mini on XIAO ESP32-C3 (UART)
            // XIAO TX (D6) → DFPlayer RX
            // XIAO RX (D7) ← DFPlayer TX
            // Library: DFRobotDFPlayerMini

            #include "DFRobotDFPlayerMini.h"
            #include

            HardwareSerial dfSerial(1);

            DFRobotDFPlayerMini dfPlayer;

            void setup() {
              Serial.begin(115200);
              dfSerial.begin(9600, SERIAL_8N1, D7, D6);  // RX, TX

              Serial.println(F("DFPlayer init..."));
              if (!dfPlayer.begin(dfSerial)) {
                Serial.println(F("DFPlayer failed — check UART wiring and SD card"));
                while (1) delay(1000);
              }

              dfPlayer.volume(20);   // 0–30
              dfPlayer.play(1);      // play 0001.mp3 on SD card
              Serial.println(F("Playing track 001"));
            }

            void loop() {
              if (dfPlayer.readType() == DFPlayerPlayFinished) {
                Serial.println(F("Track finished"));
                delay(1000);
                dfPlayer.play(1);
              }
              delay(200);
            }
ESP-NOW — sender (Board 1, button D0)
// Week 11 — ESP-NOW sender (Board 1, XIAO ESP32-C3)
            // Button D0 — debounced press sends message to Board 2

            #include
            #include

            const int buttonPin = D0;
            const unsigned long DEBOUNCE_MS = 50;

            // 接收端MAC地址
            uint8_t receiverMac[] = {0x64, 0xE8, 0x33, 0x85, 0xA7, 0x00};

            typedef struct {
              uint8_t pressCount;
            } Message;

            Message outgoing;
            esp_now_peer_info_t peerInfo;

            int buttonState = LOW;
            int lastReading = LOW;
            unsigned long lastDebounceTime = 0;
            int pressCount = 0;

            void OnDataSent(const uint8_t *mac, esp_now_send_status_t status) {
              Serial.print(F("Send status: "));
              if (status == ESP_NOW_SEND_SUCCESS) {
                Serial.println(F("✅ OK"));
              } else {
                Serial.println(F("❌ FAIL"));
              }
            }

            void setup() {
              Serial.begin(115200);
              pinMode(buttonPin, INPUT);

              Serial.println(F("=== ESP-NOW Sender ==="));
              Serial.print(F("Sender MAC: "));
              Serial.println(WiFi.macAddress());

              // 只设置WiFi模式,不设置信道
              WiFi.mode(WIFI_STA);

              // 延迟一下让WiFi初始化
              delay(100);

              if (esp_now_init() != ESP_OK) {
                Serial.println(F("❌ ESP-NOW init failed"));
                return;
              }

              esp_now_register_send_cb(OnDataSent);

              // 配置peer - 不指定信道
              memcpy(peerInfo.peer_addr, receiverMac, 6);
              peerInfo.channel = 0;  // 0表示自动
              peerInfo.encrypt = false;
              peerInfo.ifidx = WIFI_IF_STA;

              if (esp_now_add_peer(&peerInfo) != ESP_OK) {
                Serial.println(F("❌ Failed to add peer"));
                return;
              }

              Serial.println(F("✅ ESP-NOW sender ready"));
              Serial.print(F("Target MAC: "));
              for (int i = 0; i < 6; i++) {
                Serial.printf("%02X", receiverMac[i]);
                if (i < 5) Serial.print(":");
              }
              Serial.println();
            }

            void loop() {
              int reading = digitalRead(buttonPin);
              if (reading != lastReading) {
                lastDebounceTime = millis();
              }
              if ((millis() - lastDebounceTime) > DEBOUNCE_MS) {
                if (reading != buttonState) {
                  buttonState = reading;
                  if (buttonState == HIGH) {
                    pressCount++;
                    outgoing.pressCount = (uint8_t)pressCount;

                    esp_err_t result = esp_now_send(receiverMac, (uint8_t *)&outgoing, sizeof(outgoing));
                    if (result == ESP_OK) {
                      Serial.print(F("📤 Sent press #"));
                      Serial.println(pressCount);
                    } else {
                      Serial.print(F("❌ Send error code: "));
                      Serial.println(result);
                    }
                  }
                }
              }
              lastReading = reading;
            }
ESP-NOW — receiver (Board 2, LEDs D1 / D2)
// Week 11 — ESP-NOW receiver (Board 2, XIAO ESP32-C3)

            #include
            #include

            const int ledPin  = D1;
            const int ledPin2 = D2;
            const unsigned long LED_ON_MS = 500;

            typedef struct {
              uint8_t pressCount;
            } Message;

            void pulseLeds(bool led1On, bool led2On) {
              digitalWrite(ledPin, led1On ? HIGH : LOW);
              digitalWrite(ledPin2, led2On ? HIGH : LOW);
              delay(LED_ON_MS);
              digitalWrite(ledPin, LOW);
              digitalWrite(ledPin2, LOW);
            }

            void OnDataRecv(const uint8_t *mac, const uint8_t *data, int len) {
              Message incoming;
              memcpy(&incoming, data, sizeof(incoming));
              int phase = incoming.pressCount % 3;

              Serial.print(F("Received press #"));
              Serial.println(incoming.pressCount);

              if (phase == 1) {
                pulseLeds(true, false);
              } else if (phase == 2) {
                pulseLeds(false, true);
              } else {
                pulseLeds(true, true);
              }
            }

            void setup() {
              Serial.begin(115200);
              pinMode(ledPin, OUTPUT);
              pinMode(ledPin2, OUTPUT);
              digitalWrite(ledPin, LOW);
              digitalWrite(ledPin2, LOW);

              Serial.println(F("=== ESP-NOW Receiver ==="));
              Serial.print(F("Receiver MAC: "));
              Serial.println(WiFi.macAddress());

              WiFi.mode(WIFI_STA);
              delay(100);

              if (esp_now_init() != ESP_OK) {
                Serial.println(F("ESP-NOW init failed"));
                return;
              }
              esp_now_register_recv_cb(OnDataRecv);

              Serial.println(F("Ready to receive ESP-NOW messages"));
            }

            void loop() {
              delay(10);
            }
Reflection
This week tied together three “network” styles I will reuse in the final project: I2C for multiple sensors (with a multiplexer later), UART for the DFPlayer audio node, and ESP-NOW for wireless peer messaging without Wi-Fi infrastructure. The hardest part was pairing ESP-NOW peers — the receiver MAC must be exact, and both boards must use matching struct definitions. I2C and UART were straightforward once pin assignments matched the XIAO pinout. The dual-board LED demo proved that my Week 8 PCB is a reusable node: same pin map, different firmware roles (sender vs receiver).