Embedded Programming
MCU board
Here is the link to our Group assignment: Week 4 Group Assignment
For my personal experiences, I really like to use SEEED XIAO ESP32-C3 and ESP32S3.
Here is the official wiki for SEEED XIAO ESP32-C3: XIAO_ESP32-C3
Here is the official wiki for SEEED XIAO ESP32-S3: XIAO_ESP32-S3
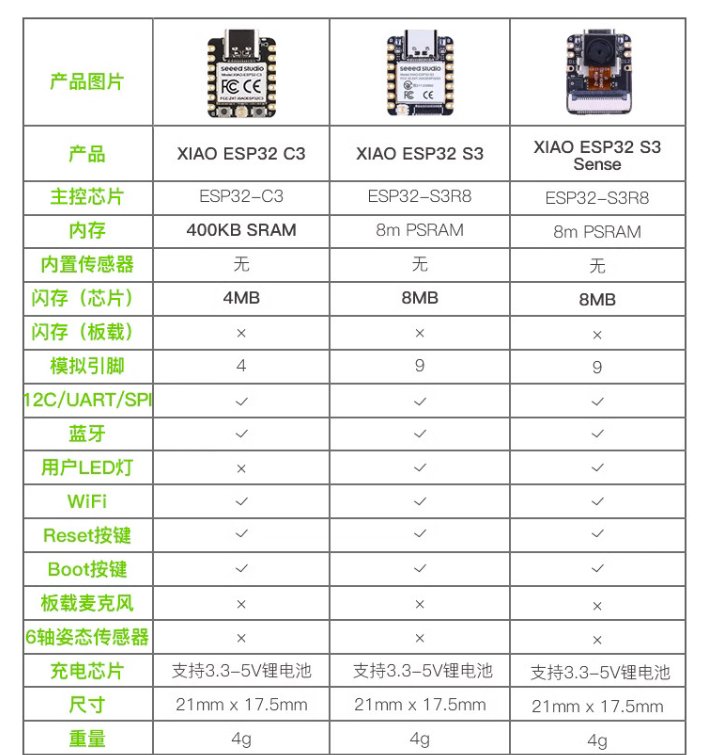
ESP32-C3 is much cheaper than ESP32-S3. Here is a comparison:
Development Software
I will use Arduino IDE.
Here is the official website of Arduino IDE: Arduino IDE
Starting with Arduino
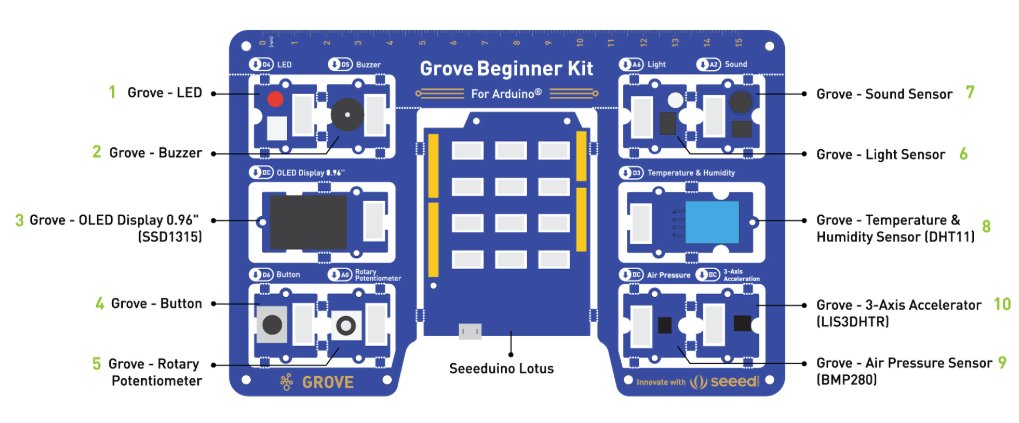
To start with Arduino, there is another simple hardware could be used, Grove Beginner Kit.
Here is the official website of Grove Beginner Kit: Grove Beginner Kit
ESP32-C3
There were different versions of ESP32-C3, I used SEEED XIAO ESP32-C3 in my project.
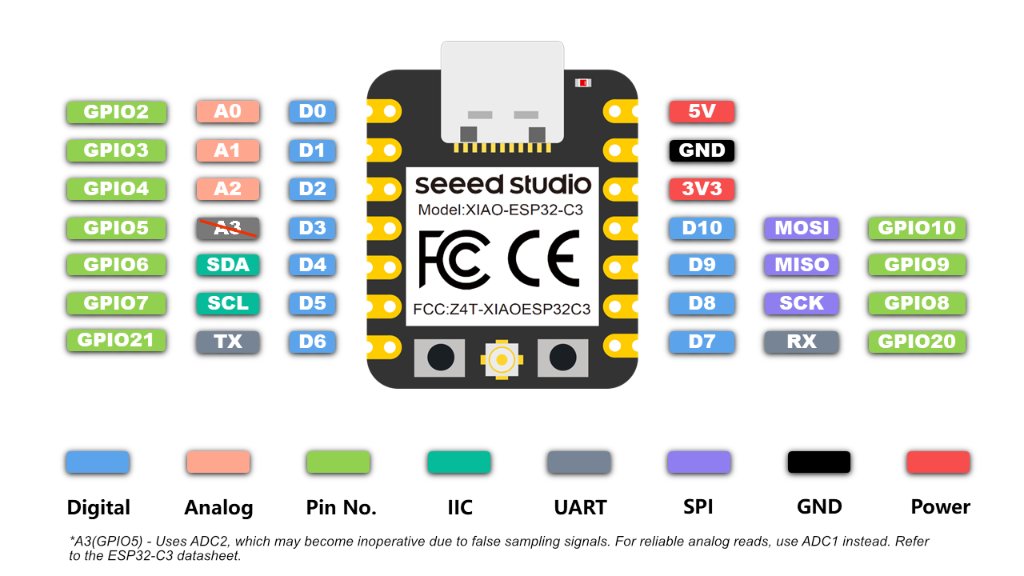
RISC-V single-core 32-bit chip processor with a four-stage pipeline that operates at up to 160 MHz.
On-chip Memory 400KB SRAM & 4MB Flash
1x UART, 1x IIC, 1x SPI, 11x GPIO(PWM), 4x ADC, 1x Reset button, 1x Boot button
Size: 21 x 17.8mm (It's really tiny, I like it)
To start coding for ESP32-C3, I used Arduino IDE.
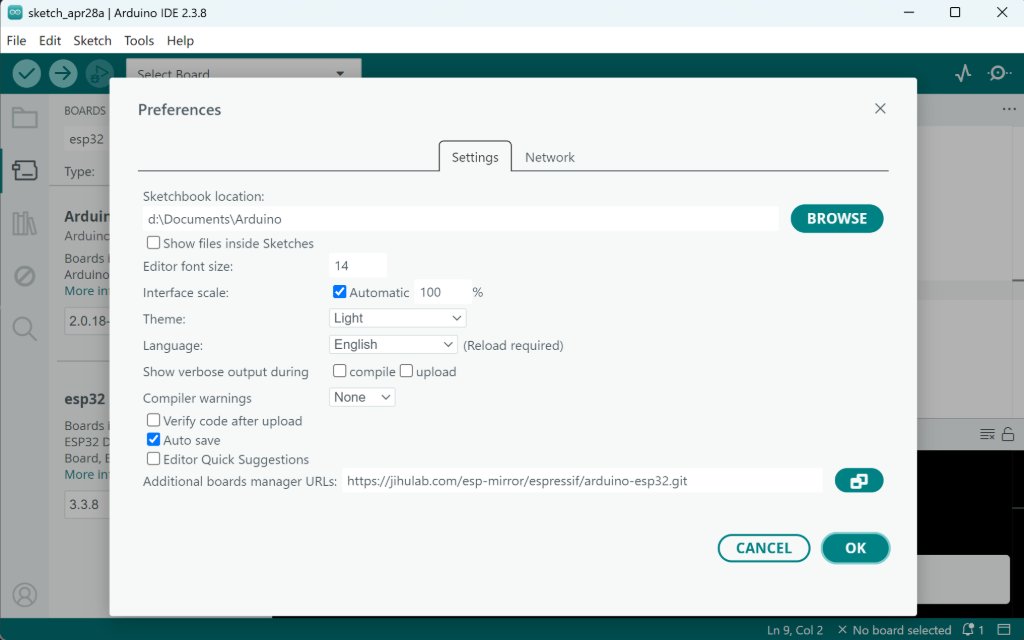
The first time to use IDE, there was no board info of ESP32-C3, so I had to install the board info manually.
Go to File -> Preferences -> Additional Boards Manager URLs
Go to Tools -> Board -> Boards Manager
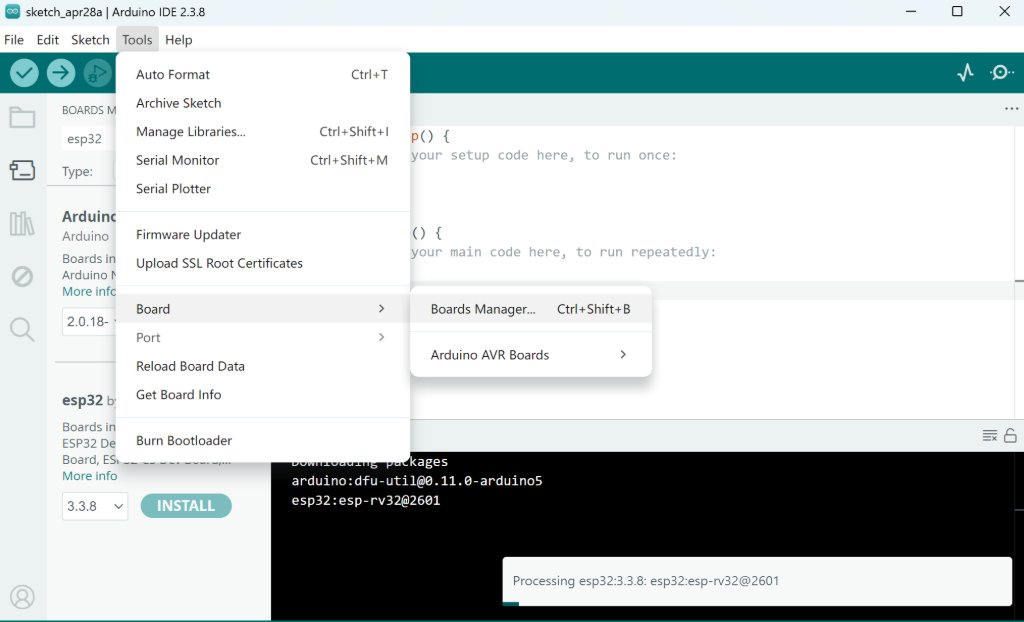
Search for "ESP32" and install "ESP32 by Espressif Systems"
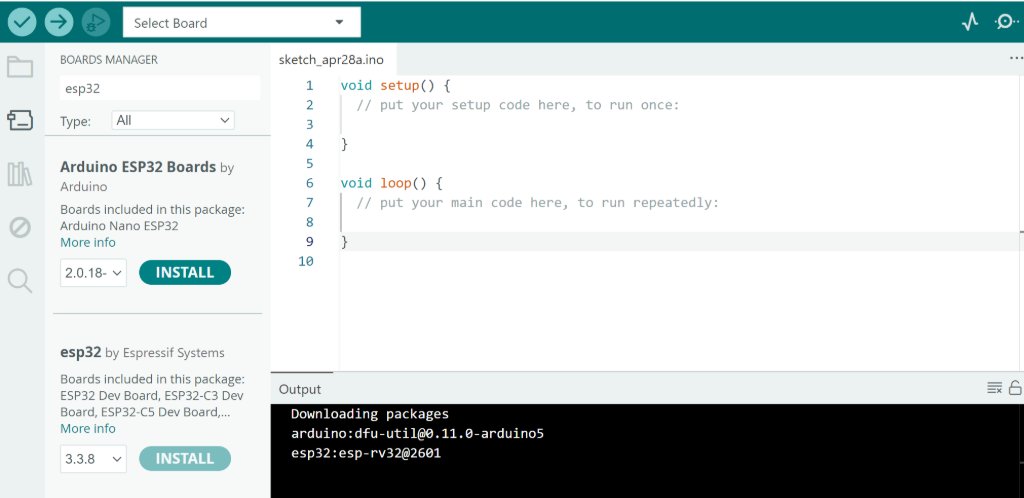
Then we could see ESP32-C3 in the list of boards.

Now you can start coding for ESP32-C3.
Simulation with WOKWI
WOKWI is a online simulator for Arduino and ESP32. It's very useful for testing the code before uploading to the real board.
Here is the basic simulation of XIAO ESP32-C3: WOKWI Sample Project
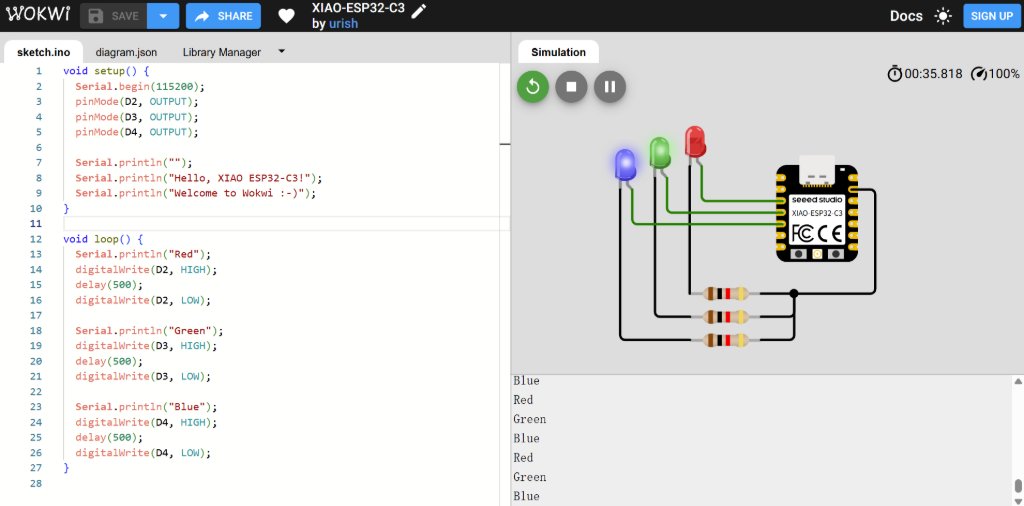
By learning from the example, I added one more LED and Resistor.
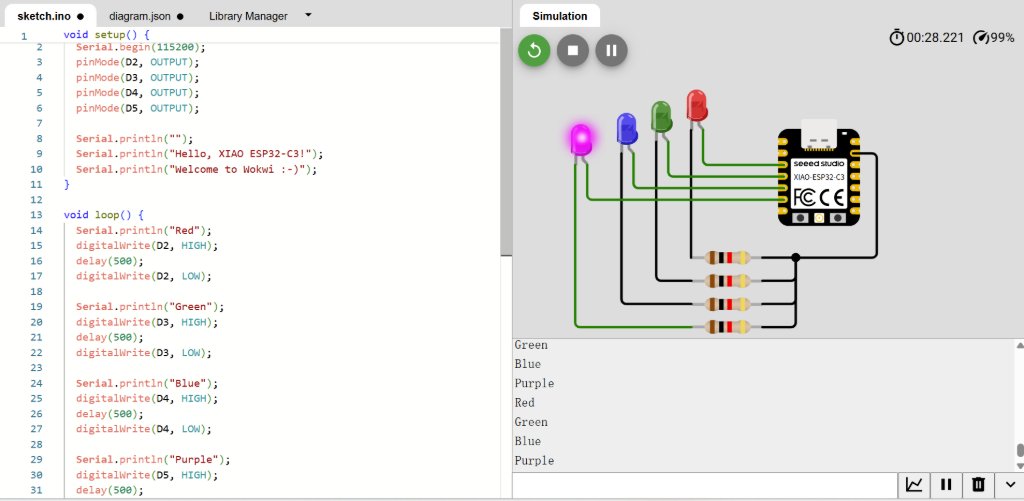
Here is the code for the simulation:
              void setup() {
                Serial.begin(115200);
                pinMode(D2, OUTPUT);
                pinMode(D3, OUTPUT);
                pinMode(D4, OUTPUT);
                pinMode(D5, OUTPUT);

                Serial.println("");
                Serial.println("Hello, XIAO ESP32-C3!");
                Serial.println("Welcome to Wokwi :-)");
              }

              void loop() {
                Serial.println("Red");
                digitalWrite(D2, HIGH);
                delay(500);
                digitalWrite(D2, LOW);

                Serial.println("Green");
                digitalWrite(D3, HIGH);
                delay(500);
                digitalWrite(D3, LOW);

                Serial.println("Blue");
                digitalWrite(D4, HIGH);
                delay(500);
                digitalWrite(D4, LOW);

                Serial.println("Purple");
                digitalWrite(D5, HIGH);
                delay(500);
                digitalWrite(D5, LOW);
              }
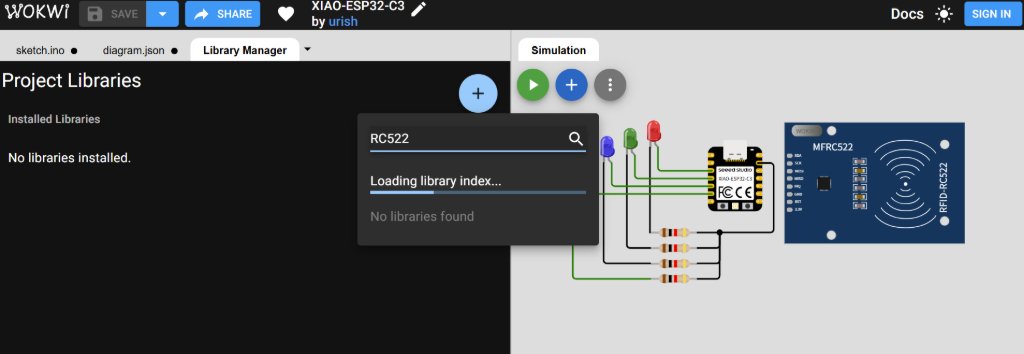
I tried to explore the RFID module in WOKWI, which was RC522, but there was no libaray to support this module.
I tried to search RC522 in the libary manager, but there popped up an error.
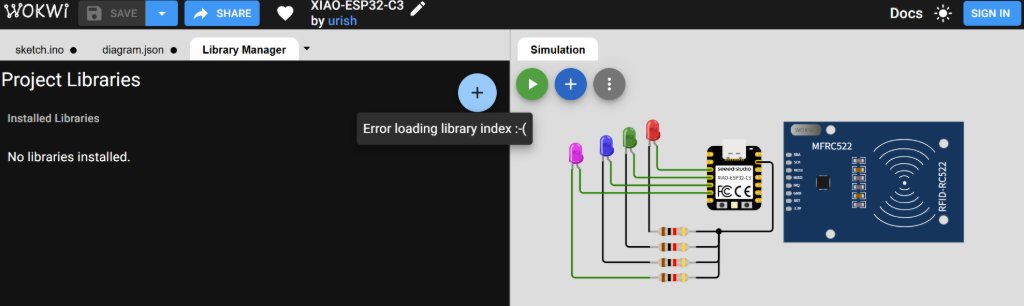
As I still wanted to explore the RFID module which I might use for my final project, I swithed to Arduino IDE to test the RFID module.
RFID Modules
I planned to use RFID modules in my final project, and I found three of them.
RC522, PN532 and RC522 mini.
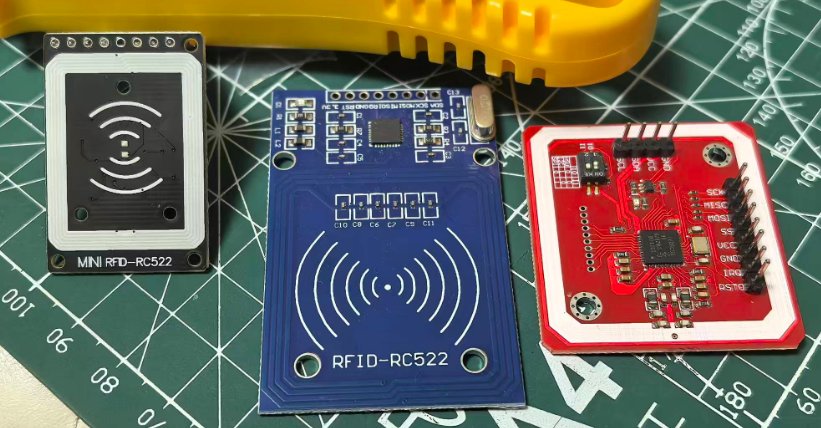
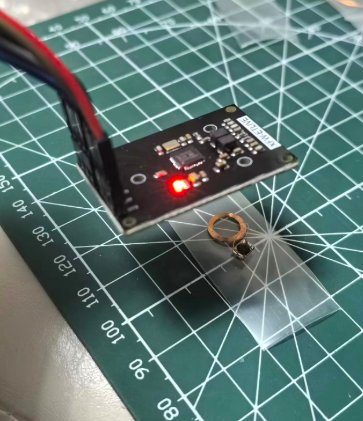
As I always prefer the smaller one, I chose RC522 mini.
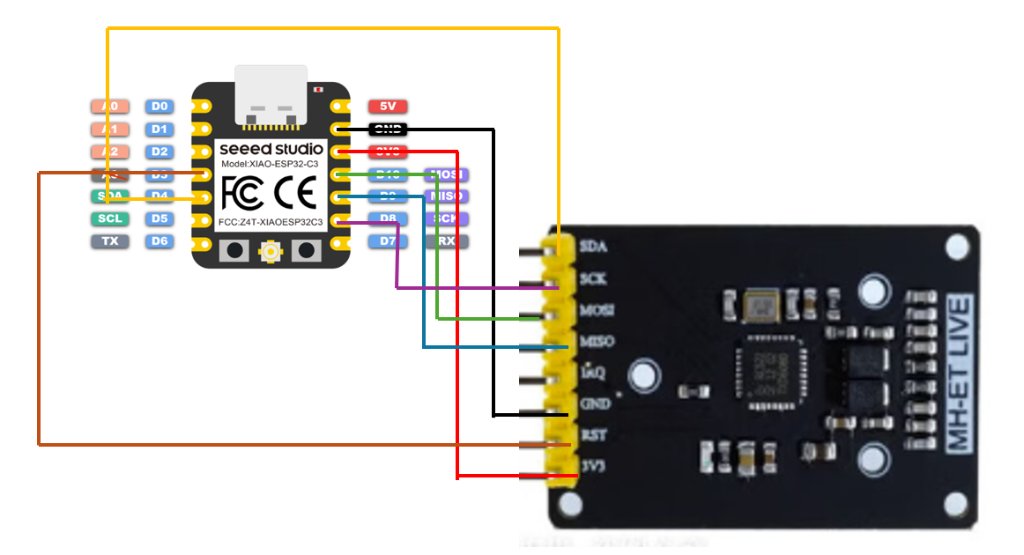
I tried to connect it to the ESP32C3 and connected XIAO to my laptop.

I tried to use RC522 mini to read a RFID card.
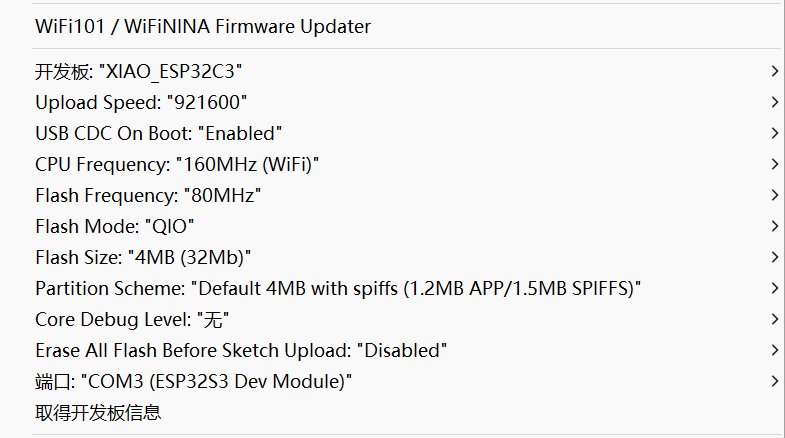
I used an example code. What I need to do is to change the SS_PIN and RST_PIN to the ones I used.
The important thing we need to notice is we need to use the GPIO number for the SS_PIN and RST_PIN.
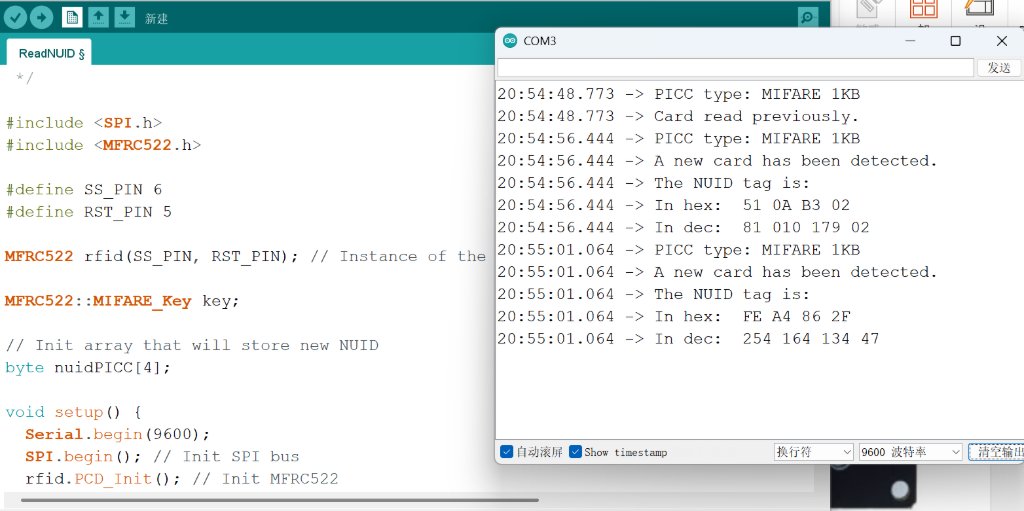
Here is the source code I used for testing the RFID module:
#include <SPI.h>
#include <MFRC522.h>

#define SS_PIN 6
#define RST_PIN 5
MFRC522 rfid(SS_PIN, RST_PIN); // Instance of the class
MFRC522::MIFARE_Key key;

// Init array that will store new NUID
byte nuidPICC[4];
void setup() {
  Serial.begin(9600);
  SPI.begin(); // Init SPI bus
  rfid.PCD_Init(); // Init MFRC522

  for (byte i = 0; i < 6; i++) {
    key.keyByte[i] = 0xFF;
  }

  Serial.println(F("This code scan the MIFARE Classsic NUID."));
  Serial.print(F("Using the following key:"));
  printHex(key.keyByte, MFRC522::MF_KEY_SIZE);
}

void loop() {
  // Reset the loop if no new card present on the sensor/reader. This saves the entire process when idle.
  if ( ! rfid.PICC_IsNewCardPresent())
    return;

  // Verify if the NUID has been readed
  if ( ! rfid.PICC_ReadCardSerial())
    return;

  Serial.print(F("PICC type: "));
  MFRC522::PICC_Type piccType = rfid.PICC_GetType(rfid.uid.sak);
  Serial.println(rfid.PICC_GetTypeName(piccType));

  // Check is the PICC of Classic MIFARE type
  if (piccType != MFRC522::PICC_TYPE_MIFARE_MINI &&
    piccType != MFRC522::PICC_TYPE_MIFARE_1K &&
    piccType != MFRC522::PICC_TYPE_MIFARE_4K) {
    Serial.println(F("Your tag is not of type MIFARE Classic."));
    return;
  }

  if (rfid.uid.uidByte[0] != nuidPICC[0] ||
    rfid.uid.uidByte[1] != nuidPICC[1] ||
    rfid.uid.uidByte[2] != nuidPICC[2] ||
    rfid.uid.uidByte[3] != nuidPICC[3] ) {
    Serial.println(F("A new card has been detected."));

    // Store NUID into nuidPICC array
    for (byte i = 0; i < 4; i++) {
      nuidPICC[i] = rfid.uid.uidByte[i];
    }

    Serial.println(F("The NUID tag is:"));
    Serial.print(F("In hex: "));
    printHex(rfid.uid.uidByte, rfid.uid.size);
    Serial.println();
    Serial.print(F("In dec: "));
    printDec(rfid.uid.uidByte, rfid.uid.size);
    Serial.println();
  }
  else Serial.println(F("Card read previously."));

  // Halt PICC
  rfid.PICC_HaltA();

  // Stop encryption on PCD
  rfid.PCD_StopCrypto1();
}

/**
 * Helper routine to dump a byte array as hex values to Serial.
 */
void printHex(byte *buffer, byte bufferSize) {
  for (byte i = 0; i < bufferSize; i++) {
    Serial.print(buffer[i] < 0x10 ? " 0" : " ");
    Serial.print(buffer[i], HEX);
  }
}

/**
 * Helper routine to dump a byte array as dec values to Serial.
 */
void printDec(byte *buffer, byte bufferSize) {
  for (byte i = 0; i < bufferSize; i++) {
    Serial.print(buffer[i] < 0x10 ? " 0" : " ");
    Serial.print(buffer[i], DEC);
  }
}