Interface and Application Programming
Here is the link to our group assignment:
Week 15 Group Assignment — Interface and Application Programming.
This week is about building a user interface that talks to an embedded board and its input/output devices. Below I reflect on the group tool comparison and document my individual web app for controlling the WS2812B strip from
Week 10 on my
Week 8 board.
Group Assignment — Compare Interface Tool Options
The group task was to compare as many interface tool options as possible for talking to a microcontroller and document the trade-offs on the group page. We looked at how each option sends commands, how hard it is to install, and whether it works on phone or desktop.
Summary of tools we compared:
| Tool | How it connects | Pros | Cons |
|---|---|---|---|
| Arduino Serial Monitor | USB UART | Built-in, zero setup, good for debug | Text only, not a real GUI, cable required |
| Python + pyserial | USB serial | Flexible scripts, plots (matplotlib), cross-platform | Need Python env; user must write protocol parser |
| Processing / p5.js | Serial or network | Fast visual sketches, good for creative UI | Separate app; serial port handling varies by OS |
| MIT App Inventor | Bluetooth (often HC-05) | Drag-and-drop mobile UI, no HTML needed | Extra BT module; block-based logic limits complex apps |
| Blynk / similar IoT apps | Wi-Fi / cloud | Ready-made widgets, quick phone dashboard | Cloud dependency, account, less control over layout |
| Embedded web server (HTML/JS) | Wi-Fi AP or STA | Works in any browser on phone/laptop; no extra app | UI lives in flash; Wi-Fi stack can affect timing-sensitive IO |
| Node.js + Electron / local web | Serial or HTTP to board | Rich desktop UI, npm ecosystem | Heavier stack; overkill for a simple LED demo |
What I learned from the group work: there is no single “best” interface — it depends on whether the user is on a phone, whether you need plots or just buttons, and whether the board already has Wi-Fi. Serial tools are fastest to prototype; mobile BT apps need an extra radio; a web page served by the ESP32 gives a full GUI without installing software, which is why I chose it for my individual assignment. Our full comparison notes and screenshots are on the group assignment page.
Individual Assignment — WS2812B Web Controller
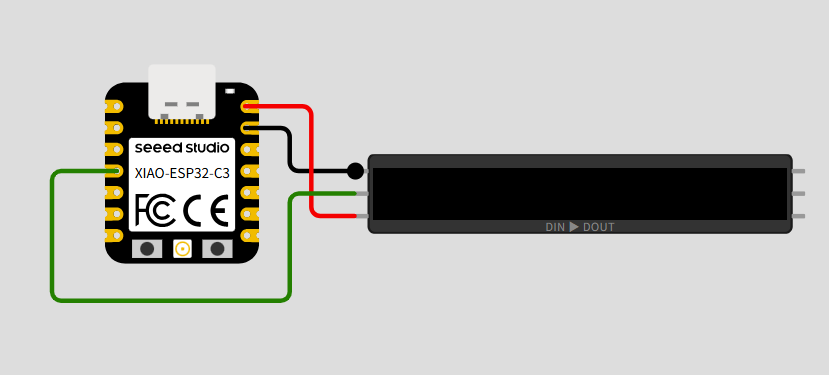
I wrote an application for my Week 8 embedded board (SEEED XIAO ESP32-C3) that interfaces a user with the WS2812B output I built in Week 10. The ESP32 creates a Wi-Fi access point, hosts a small HTTP server, and serves a control page in the browser. The user never installs an app — only connects to the board’s network and opens http://192.168.4.1.
Hardware (unchanged from Week 10):
- MCU: XIAO ESP32-C3 on Week 8 PCB
- Output: WS2812B × 10 pixels, data on D3, 5 V + GND
- Interface: Wi-Fi AP
Guannan-WS2812(passwordfabacademy)
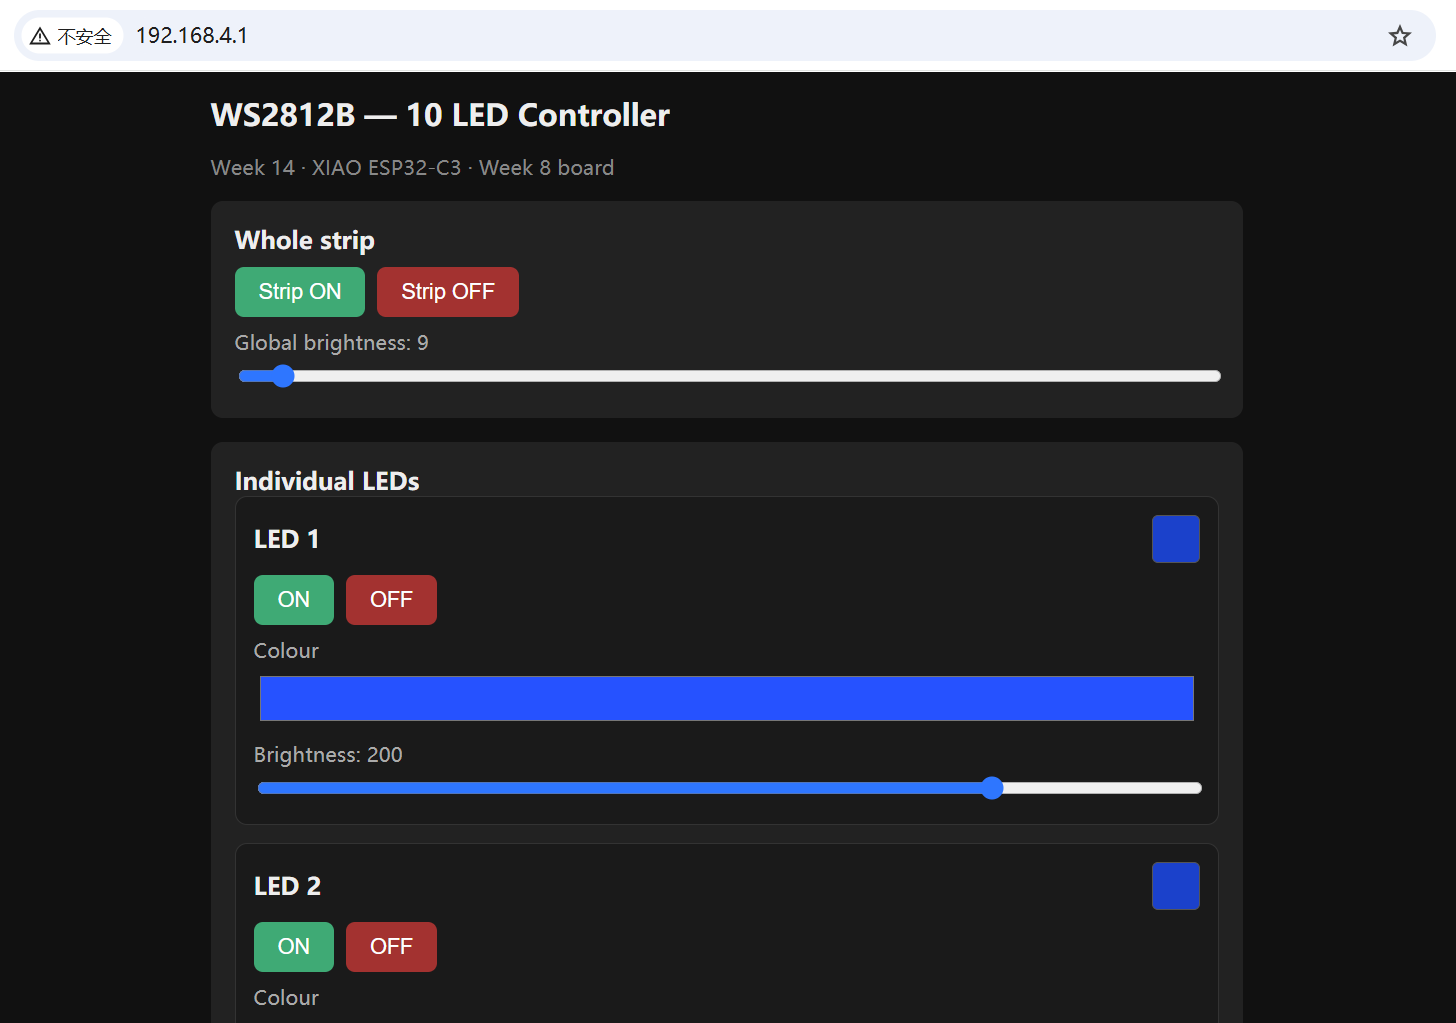
What the web UI can do:
- Whole strip ON/OFF — master switch; when OFF, all pixels stay dark regardless of per-LED settings.
- Global brightness — slider 0–255 maps to
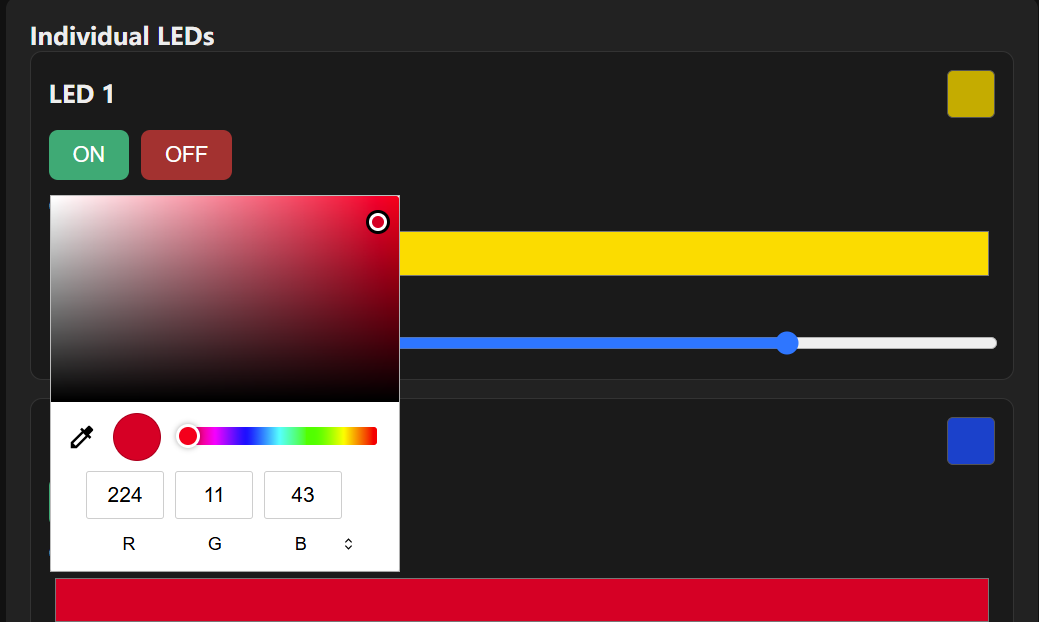
pixels.setBrightness()for the entire chain. - Each LED individually — for LEDs 1–10: ON/OFF toggle, colour picker (RGB), and per-LED brightness slider (scales that pixel’s RGB before sending to the strip).
Software architecture: HTML/CSS/JS is stored in flash (PROGMEM) inside the sketch. The browser calls simple REST-style GET endpoints; the firmware updates an in-memory pixel state array and calls applyPixels() → pixels.show(). Endpoints:
GET /— control pageGET /api/strip?on=0|1— strip master switchGET /api/brightness?val=0–255— global brightnessGET /api/led?id=N&on=0|1&r&g&b&br— one pixelGET /api/state— JSON snapshot (page loads current state on refresh)
How to use: flash ws2812_web.ino, open Serial Monitor for the AP IP, connect the laptop (or phone)to HGN_C3, browse to the URL. Sliders and buttons update the physical LEDs in real time.
Here is the video of how it works:
Source file:
ws2812_web.ino
(install Adafruit NeoPixel; ESP32 board support includes WebServer and WiFi).
Code
Firmware — Wi-Fi AP, HTTP API, NeoPixel output
            // Week 15 — WS2812B web interface on XIAO ESP32-C3
// Libraries: Adafruit NeoPixel, ESP32 WebServer (built-in)

#include
#include
#include

#define PIN_NEO   D3
#define NUMPIXELS 10

const char *AP_SSID = "HGN_C3";
const char *AP_PASS = "fabacademy";

static const char INDEX_HTML[] PROGMEM = R"rawliteral('HTML part')rawliteral";

Adafruit_NeoPixel pixels(NUMPIXELS, PIN_NEO, NEO_GRB + NEO_KHZ800);
WebServer server(80);

bool stripOn = true;
uint8_t globalBrightness = 80;
bool pixelOn[NUMPIXELS];
uint8_t pixelR[NUMPIXELS];
uint8_t pixelG[NUMPIXELS];
uint8_t pixelB[NUMPIXELS];
uint8_t pixelBr[NUMPIXELS];

void applyPixels() {
  pixels.setBrightness(globalBrightness);
  pixels.clear();
  if (stripOn) {
    for (int i = 0; i < NUMPIXELS; i++) {
      if (pixelOn[i]) {
        uint32_t r = (uint32_t)pixelR[i] * pixelBr[i] / 255;
        uint32_t g = (uint32_t)pixelG[i] * pixelBr[i] / 255;
        uint32_t b = (uint32_t)pixelB[i] * pixelBr[i] / 255;
        pixels.setPixelColor(i, pixels.Color(r, g, b));
      }
    }
  }
  pixels.show();
}

void sendJsonOk() {
  server.send(200, "application/json", "{\"ok\":true}");
}

void handleRoot() {
  server.send_P(200, "text/html", INDEX_HTML);
}

void handleStrip() {
  if (server.hasArg("on")) {
    stripOn = server.arg("on").toInt() != 0;
    applyPixels();
  }
  sendJsonOk();
}

void handleGlobalBrightness() {
  if (server.hasArg("val")) {
    globalBrightness = constrain(server.arg("val").toInt(), 0, 255);
    applyPixels();
  }
  sendJsonOk();
}

void handleLed() {
  if (!server.hasArg("id")) {
    server.send(400, "application/json", "{\"ok\":false}");
    return;
  }
  int id = server.arg("id").toInt();
  if (id < 0 || id >= NUMPIXELS) {
    server.send(400, "application/json", "{\"ok\":false}");
    return;
  }
  if (server.hasArg("on")) pixelOn[id] = server.arg("on").toInt() != 0;
  if (server.hasArg("r")) pixelR[id] = constrain(server.arg("r").toInt(), 0, 255);
  if (server.hasArg("g")) pixelG[id] = constrain(server.arg("g").toInt(), 0, 255);
  if (server.hasArg("b")) pixelB[id] = constrain(server.arg("b").toInt(), 0, 255);
  if (server.hasArg("br")) pixelBr[id] = constrain(server.arg("br").toInt(), 0, 255);
  applyPixels();
  sendJsonOk();
}

void handleState() {
  String json = "{\"stripOn\":" + String(stripOn ? "true" : "false");
  json += ",\"globalBrightness\":" + String(globalBrightness);
  json += ",\"leds\":[";
  for (int i = 0; i < NUMPIXELS; i++) {
    if (i) json += ",";
    json += "{\"on\":" + String(pixelOn[i] ? 1 : 0);
    json += ",\"r\":" + String(pixelR[i]);
    json += ",\"g\":" + String(pixelG[i]);
    json += ",\"b\":" + String(pixelB[i]);
    json += ",\"br\":" + String(pixelBr[i]) + "}";
  }
  json += "]}";
  server.send(200, "application/json", json);
}

void setupRoutes() {
  server.on("/", HTTP_GET, handleRoot);
  server.on("/api/strip", HTTP_GET, handleStrip);
  server.on("/api/brightness", HTTP_GET, handleGlobalBrightness);
  server.on("/api/led", HTTP_GET, handleLed);
  server.on("/api/state", HTTP_GET, handleState);
  server.begin();
}

void setup() {
  Serial.begin(115200);
  for (int i = 0; i < NUMPIXELS; i++) {
    pixelOn[i] = false;
    pixelR[i] = 0;
    pixelG[i] = 80;
    pixelB[i] = 255;
    pixelBr[i] = 200;
  }

  pixels.begin();
  pixels.clear();
  pixels.show();

  WiFi.mode(WIFI_AP);
  WiFi.softAP(AP_SSID, AP_PASS);

  Serial.print(F("AP: "));
  Serial.println(AP_SSID);
  Serial.print(F("URL: http://"));
  Serial.println(WiFi.softAPIP());

  setupRoutes();
}

void loop() {
  server.handleClient();
}
The full sketch embeds INDEX_HTML (control page with strip buttons, global brightness slider, and 10 per-LED panels with ON/OFF, colour picker, and brightness slider). See the linked .ino file for the complete HTML and /api/state handler.
Browser — example API calls from the page
// Turn whole strip off
fetch('/api/strip?on=0');

// Set global brightness to 120
fetch('/api/brightness?val=120');

// LED 3 on, orange, 75% pixel brightness
fetch('/api/led?id=2&on=1&r=255&g=128&b=0&br=191');
What I Learned
Interface vs firmware: the assignment is not only about LEDs — it is about separating presentation (HTML in the browser) from control (C++ on the MCU). A small JSON/HTTP API makes the UI easy to extend later (e.g. add presets or animations without rewriting the whole page).
Why web on ESP32: after the group comparison, the embedded web server fit my hardware best — the ESP32-C3 already has Wi-Fi, and a phone browser is enough for colour pickers and sliders. Compared to Python serial scripts, there is no USB cable during demo; compared to Blynk, I own the whole UI and protocol.
Practical limits: WS2812B timing is sensitive; I keep HTTP handlers short and call pixels.show() once per request. Per-LED brightness is implemented by scaling RGB before setPixelColor, on top of the library’s global brightness — two layers that match how users think (“dim this one LED” vs “dim the whole strip”).
Continuity: this app reuses the same Week 8 board and Week 10 wiring; Week 11 Wi-Fi experience helped me understand AP mode and client access. The web controller is a stepping stone toward a richer interface for my
final project.