Week​ 15

Interface and Application Programming

Checklist

Group assignment

Individual assignments 

For this week’s Interface and Application Programming assignment, I used the output board I previously designed.

Output device Week Link

implemented a simple web server using the ESP32-C3. The web interface allowed basic control of the connected output components, such as motors or LEDs. This setup demonstrated how a user can interact with hardware remotely through a browser-based application.

Interface and Application Programming – Introduction

Interface and Application Programming focuses on creating user-friendly ways to interact with embedded systems. It involves designing interfaces—such as web pages, GUIs, or mobile apps—to control or monitor devices. This week emphasizes bridging hardware with software, enabling real-time control and feedback through programming languages, communication protocols, and visual tools.

So, I created a simple web page by integrating HTML code within the Arduino sketch. This web interface allows me to control the hardware remotely. I plan to test this setup further, and if it performs reliably, I will implement the same approach in my final project.

Embedded Web Server Programming

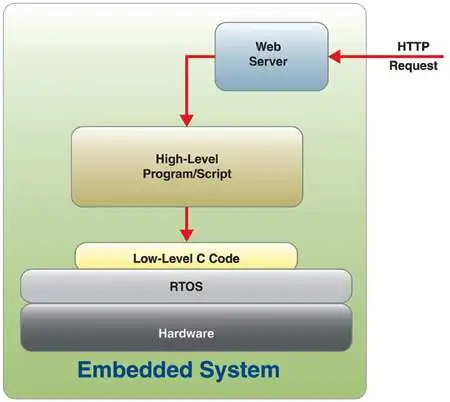
This technique involves embedding HTML code directly into an Arduino sketch, allowing the Arduino (e.g., ESP32) to act as a web server. When connected to Wi-Fi, it serves a web page to any browser on the same network, enabling remote control of hardware through a web interface.

Source link and to know More

Communication Protocol Used: HTTP (HyperText Transfer Protocol)

What Is HTTP?

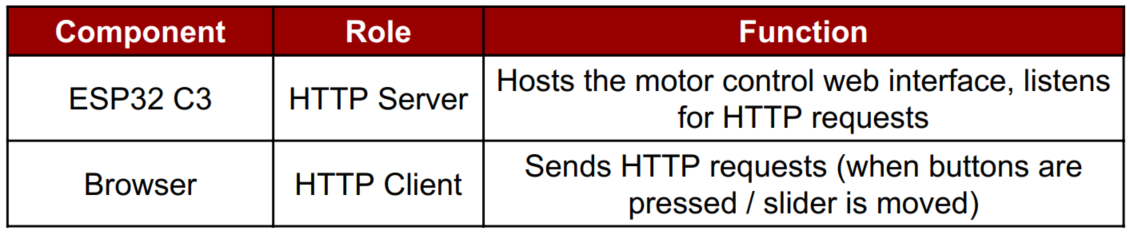
How Does It Work in Your ESP32 Project?

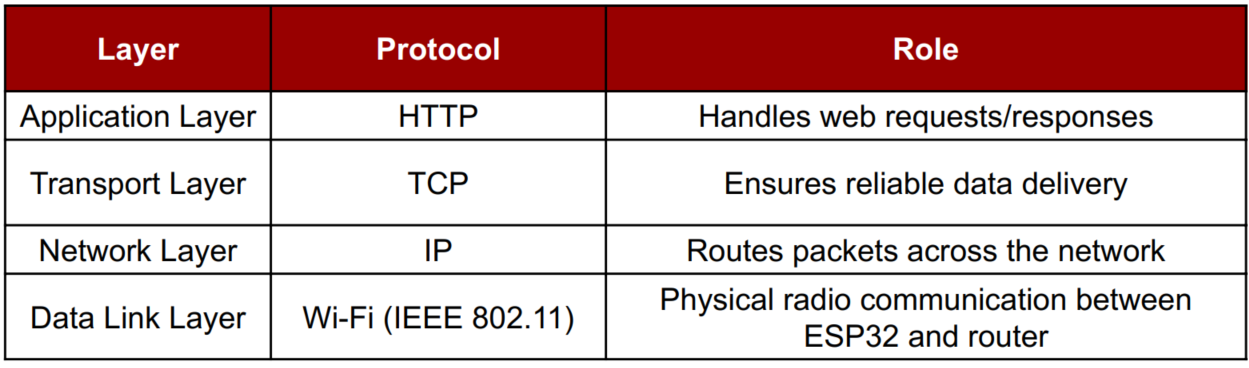
Protocol Stack (Technical Layer View)

Limitations of HTTP

Code Explanations

Library Imports and Wi-Fi Setup

// Include necessary libraries for WiFi and WebServer functionality
#include <wifi.h>
#include <webserver.h>
// Replace with your actual WiFi credentials
const char* ssid = "SABAREESH";
const char* password = "SA2416"; 

These lines include required libraries and set up the WiFi credentials. WiFi.h connects to your router, and WebServer.h lets us serve a web interface.

Define Motor Pins

// Motor A control pins
#define IN1 3   // Direction pin 1
#define IN2 4   // Direction pin 2
#define ENA 5   // PWM (speed) pin
// Motor B control pins
#define IN3 6   // Direction pin 1
#define IN4 7   // Direction pin 2
#define ENB 21  // PWM (speed) pin 

These pins control the two motors using an H-bridge driver. Each motor has two direction pins and one PWM pin for speed control.

Web Server Initialization

// Create web server object on port 80 (HTTP)
WebServer server(80); 

This sets up a web server that listens on the default HTTP port (80).

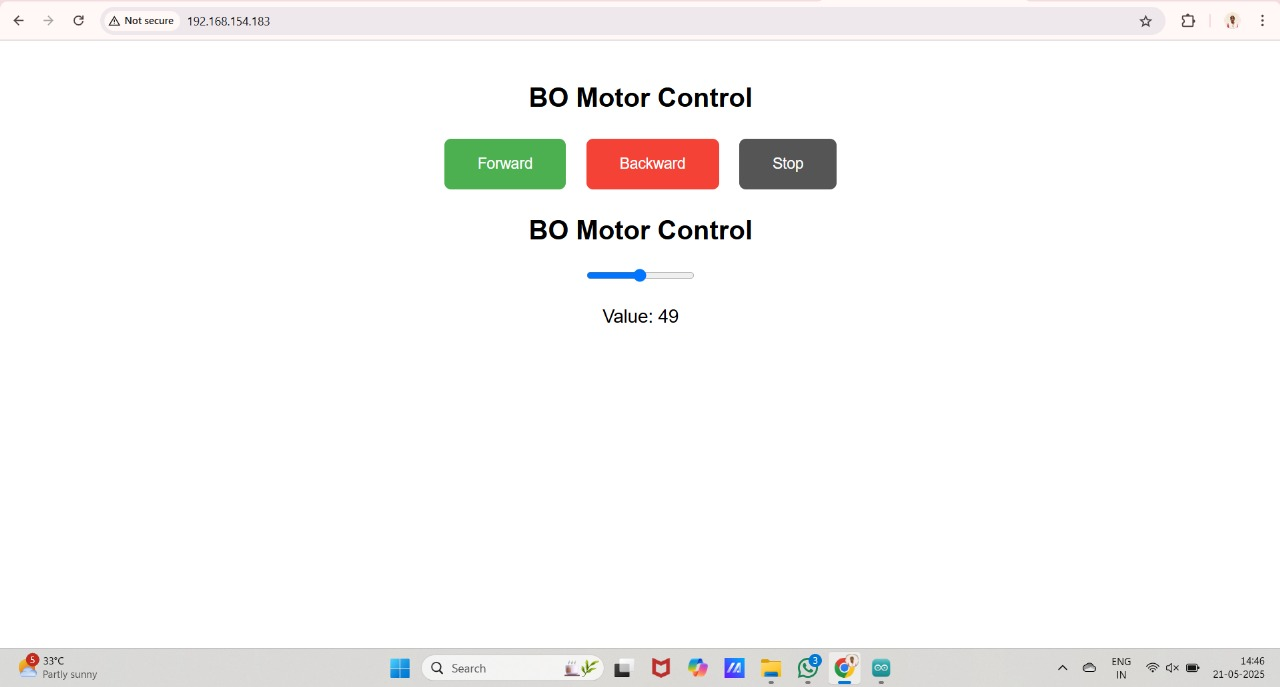
HTML Page for Motor Control Interface

const char webpage[] PROGMEM = R"rawliteral(
  <!DOCTYPE html>
  <title>ESP32 Motor Slider</title>
  <style>
    body { font-family: Arial; text-align: center; margin-top: 50px; }
    button {
      padding: 20px 40px; margin: 10px;
      font-size: 18px; border-radius: 8px;
      border: none; cursor: pointer;
    }
    .forward { background-color: #4CAF50; color: white; }
    .backward { background-color: #f44336; color: white; }
    .stop { background-color: #555; color: white; }
    input[type=range] {
      width: 80%%; height: 25px;
    }
    .value {
      font-size: 22px; margin: 20px;
    }
  </style>
  <h1>BO Motor Control</h1>
  <button class="forward" onclick="sendCmd('forward')">Forward</button>
  <button class="backward" onclick="sendCmd('backward')">Backward</button>
  <button class="stop" onclick="sendCmd('stop')">Stop</button>
  <input type="range" min="-50" max="50" value="0" id="slider" oninput="updateSlider(this.value)">
  <div class="value">Value: 0</span></div>
  <script>
    function sendCmd(cmd) {
      fetch("/" + cmd); // Send command to ESP32
    }
    function updateSlider(val) {
      document.getElementById("val").innerText = val;
      fetch("/slider?value=" + val); // Send slider value
    }
  </script>
</body>
</html>
)rawliteral"; 
          

This is the web page you’ll control motors with. It has buttons for forward, backward, and stop, and a slider for speed control (with direction). The slider sends values between -50 to +50.

Handle Homepage Request

void handleRoot() {
  server.send(200, "text/html", webpage); // Send HTML content
} 

When someone opens the ESP32’s IP in a browser, this function sends the interface.

Handle Slider Input (Speed & Direction)

void handleSlider() {
  if (server.hasArg("value")) {
    int val = server.arg("value").toInt(); // Read slider value
    if (val < 0) {
      // Reverse direction
      digitalWrite(IN1, LOW); digitalWrite(IN2, HIGH);
      analogWrite(ENA, abs(val) * 5.1); // Motor A
      digitalWrite(IN3, LOW); digitalWrite(IN4, HIGH);
      analogWrite(ENB, abs(val) * 5.1); // Motor B
    } else if (val > 0) {
      // Forward direction
      digitalWrite(IN1, HIGH); digitalWrite(IN2, LOW);
      analogWrite(ENA, val * 5.1); // Motor A
      digitalWrite(IN3, HIGH); digitalWrite(IN4, LOW);
      analogWrite(ENB, val * 5.1); // Motor B
    } else {
      // Stop motors
      digitalWrite(IN1, LOW); digitalWrite(IN2, LOW);
      analogWrite(ENA, 0);
      digitalWrite(IN3, LOW); digitalWrite(IN4, LOW);
      analogWrite(ENB, 0);
    }
    server.send(200, "text/plain", "OK");
  }
} 

This function reads the slider value from the web interface and sets motor direction and speed accordingly. Negative = backward, positive = forward, 0 = stop.

Handle Forward Button

void handleForward() {
  digitalWrite(IN1, HIGH); digitalWrite(IN2, LOW);
  analogWrite(ENA, 255); // Full speed forward
  digitalWrite(IN3, HIGH); digitalWrite(IN4, LOW);
  analogWrite(ENB, 255);
  server.send(200, "text/plain", "Motor Forward");
} 

This sets both motors to move forward at full speed.

Handle Backward Button

void handleBackward() {
  digitalWrite(IN1, LOW); digitalWrite(IN2, HIGH);
  analogWrite(ENA, 255); // Full speed backward
  digitalWrite(IN3, LOW); digitalWrite(IN4, HIGH);
  analogWrite(ENB, 255);
  server.send(200, "text/plain", "Motor Backward");
} 

This sets both motors to move backward at full speed.

Handle Stop Button

void handleStop() {
  digitalWrite(IN1, LOW); digitalWrite(IN2, LOW);
  analogWrite(ENA, 0); // Stop motor A
  digitalWrite(IN3, LOW); digitalWrite(IN4, LOW);
  analogWrite(ENB, 0); // Stop motor B
  server.send(200, "text/plain", "Motor Stopped");
} 

Stops both motors by cutting off direction and PWM.

Setup Function

void setup() {
  Serial.begin(115200); // Start Serial Monitor
  // Set motor pins as OUTPUT
  pinMode(IN1, OUTPUT); pinMode(IN2, OUTPUT); pinMode(ENA, OUTPUT);
  pinMode(IN3, OUTPUT); pinMode(IN4, OUTPUT); pinMode(ENB, OUTPUT);
  // Connect to Wi-Fi
  WiFi.begin(ssid, password);
  while (WiFi.status() != WL_CONNECTED) {
    delay(500);
    Serial.print("."); // Show connecting
  }
  Serial.println(""); Serial.println("WiFi connected");
  Serial.println(WiFi.localIP()); // Print ESP32's IP
  // Define endpoints/URLs
  server.on("/", handleRoot);         // Serve web page
  server.on("/forward", handleForward);
  server.on("/backward", handleBackward);
  server.on("/stop", handleStop);
  server.on("/slider", handleSlider);
  // Start the server
  server.begin();
} 

This function connects to Wi-Fi, initializes pins, sets up the routes/URLs, and starts the server.

Loop Function

void loop() {
  server.handleClient(); // Keep handling incoming client requests
} 

This keeps the server running, handling incoming HTTP requests from the browser.

Arduino File Link

Web Interface

In the final version of my web page, I embedded the HTML code directly within the Arduino (.ino) file. This allowed me to create a self-contained web server on the ESP32-C3. Through this interface, I was able to control hardware components like motors and LEDs via a web browser.

Hero Shot

Molding and Casting

Wildcard Week